catalogue
Configuration after installation

K8s is a foundation for learning cloud native. In order to do some experiments, stand-alone deployment is the most convenient. The following will introduce the stand-alone installation of k8s in CentOS NET 6 Program published to k8s.
environment
-
Host: Mac 10.15.7
-
CentOS
-
Version: 7.6
-
Memory: 4gb
-
cpu: 2 cores
-
-
docker: 20.10.12
-
k8s: 1.23.4
prepare
1. Create a CentOS virtual machine with the following configuration:
-
Version: 7.6
-
cpu: 2 cores
-
Memory: 4gb
2. Update the yum source by executing the following command:
yum update
3. Set iptables, check the bridge traffic, and edit / etc / sysctl Conf file, add the following contents to the file:
net.bridge.bridge-nf-call-iptables = 1
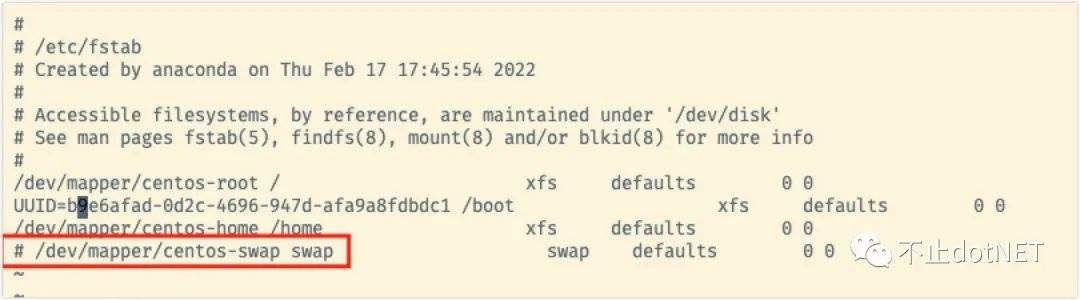
4. Disable swap:
swapoff -a
Modify the / etc/fstab file and annotate the red box in the following figure:
install
1. To install docker:
sudo yum install -y yum-utils device-mapper-persistent-data lvm2

sudo yum-config-manager --add-repo https://download.docker.com/linux/centos/docker-ce.repo

sudo yum-config-manager --add-repo http://mirrors.aliyun.com/docker-ce/linux/centos/docker-ce.repo

sudo yum-config-manager --enable docker-ce-edge

sudo yum install docker-ce

systemctl start docker
chkconfig docker on
2. At / etc / yum.com repos. Create k8s under D Repo and add the following:
[kubernetes]
name=Kubernetes
baseurl=http://mirrors.aliyun.com/kubernetes/yum/repos/kubernetes-el7-x86_64
enabled=1
gpgcheck=0
repo_gpgcheck=0
gpgkey=http://mirrors.aliyun.com/kubernetes/yum/doc/yum-key.gpg
       http://mirrors.aliyun.com/kubernetes/yum/doc/rpm-package-key.gpg
3. To install kubelet, kubedm, and kubectl:
yum install -y kubelet kubeadm kubectl
systemctl enable kubelet  && systemctl start kubelet
4. Create the file k8s-images.exe in the root directory SH, as follows:
for i in `kubeadm config images list`; do
  imageName=${i#k8s.gcr.io/}
  docker pull registry.aliyuncs.com/google_containers/$imageName
  docker tag registry.aliyuncs.com/google_containers/$imageName k8s.gcr.io/$imageName
  docker rmi registry.aliyuncs.com/google_containers/$imageName
done;
5. Execute sh k8s images SH command to pull relevant images, but an error will be reported in the end. The core DNS image pull fails. If it is scientific Internet access, there will be no problem. The error information is as follows:
Error response from daemon: pull access denied for registry.aliyuncs.com/google_containers/k8s.gcr.io/coredns/coredns, repository does not exist or may require 'docker login': denied: requested access to the resource is denied
You can manually pull the image for processing, and execute the following commands in sequence:
docker pull coredns/coredns
docker tag coredns/coredns:latest k8s.gcr.io/coredns/coredns:v1.8.6
docker rmi coredns/coredns:latest
Why is the version 1.8.6 used in the above tag? You can run kubedm config images list to check the version of the image. The image list after I execute here is as follows, and coredns is 1.8.6:
k8s.gcr.io/kube-apiserver:v1.23.4 k8s.gcr.io/kube-controller-manager:v1.23.4 k8s.gcr.io/kube-scheduler:v1.23.4 k8s.gcr.io/kube-proxy:v1.23.4 k8s.gcr.io/pause:3.6 k8s.gcr.io/etcd:3.5.1-0 k8s.gcr.io/coredns/coredns:v1.8.6
6. Set cgroup and add daemon.com in / etc/docker / directory JSON file, as follows:
{
    "exec-opts": ["native.cgroupdriver=systemd"]
}
Execute the following command to make the configuration effective:
systemctl daemon-reload
systemctl restart docker
7. Execute the following command to open the port. If you still encounter the problem that various ports cannot be accessed, the test environment can close the firewall:
#6443 # Kubernetes # API server # all components
firewall-cmd --zone=public --add-port=6443/tcp --permanent && firewall-cmd --reload
#10250 # Kubelet # APT # Kubelet itself, control plane assembly
firewall-cmd --zone=public --add-port=10250/tcp --permanent && firewall-cmd --reload
8. Execute the following command to initialize k8s:
kubeadm init
After successful initialization, the following log will appear:
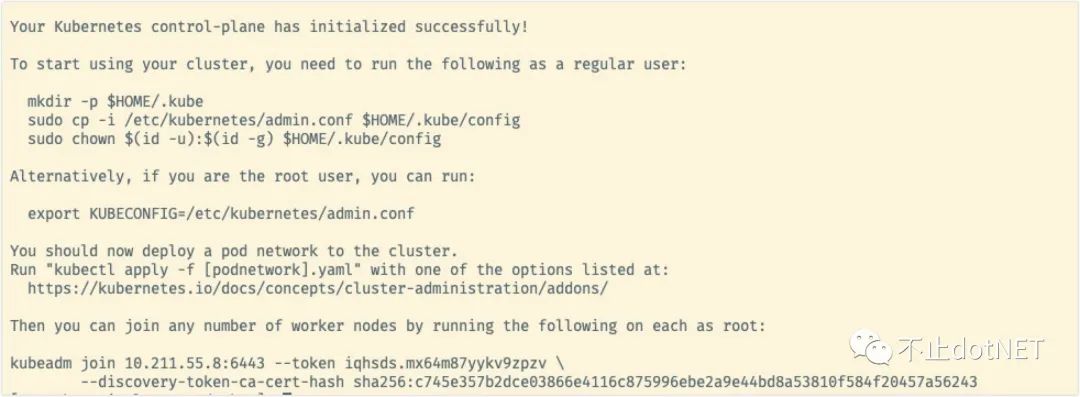
If an error is reported in the middle, after other settings are made, you need to execute kubedm reset before executing kubedm init.
Configuration after installation
1. Configure according to the prompts in the figure above, and execute the following commands in sequence:
mkdir -p $HOME/.kube
sudo cp -i /etc/kubernetes/admin.conf $HOME/.kube/config
sudo chown $(id -u):$(id -g) $HOME/.kube/config
3. Because it is a stand-alone version, the master node needs to be involved in the work:
kubectl taint nodes --all node-role.kubernetes.io/master-
3. To install a network plug-in:
kubectl apply -f "https://cloud.weave.works/k8s/net?k8s-version=$(kubectl version | base64 | tr -d '\n')"
4. Execute kubectl get nodes. If the status is Ready, the installation configuration is completed and the master node is registered in k8s.
NAME STATUS ROLES AGE VERSION k8s-single-temp Ready control-plane,master 5m58s v1.23.4
Deployment NET 6 program
1. Execute the command on the command line to create a project named k8s NETCORE Demo:
dotnet new webApp -o k8s-netcore-demo --no-https
2. Enter the k8s NETCORE demo directory, execute dotnet publish, and copy the published directory to the root directory of CentOS above.
3. Enter the publish directory and create a Dockerfile file with the following contents:
FROM mcr.microsoft.com/dotnet/aspnet:6.0
COPY . /app
WORKDIR /app
EXPOSE 80/tcp
ENTRYPOINT ["dotnet", "k8s-netcore-demo.dll"]
4. Execute the following command in the publish directory to build the program into an image:
docker build -t k8s-netcore-demo .
5. Build a private warehouse:
docker pull registry
docker run -d -p 8888:5000 --restart=always registry
6. Edit / etc / docker / daemon JSON file, add the following:
{
   "exec-opts": ["native.cgroupdriver=systemd"],
   "insecure-registries":["10.211.55.10:8888"] #For the newly added content, IP # is the IP # of the host computer
}
Execute the following command to restart and take effect:
sudo systemctl daemon-reload
sudo systemctl restart docker
7. Push the built image to the private warehouse:
docker tag k8s-netcore-demo 10.211.55.10:8888/k8s-netcore-demo
docker push 10.211.55.10:8888/k8s-netcore-demo
8. Create the file deploy. In the root directory Yaml file, as follows:
apiVersion: apps/v1
kind: Deployment
metadata:
  name: k8s-netcore-demo
  namespace: k8s-netcore
  labels:
    k8s-app: k8s-netcore-demo
spec:
  replicas: 2
  selector:
    matchLabels:
      k8s-app: k8s-netcore-demo
  template:
    metadata:
      labels:
        k8s-app: k8s-netcore-demo
    spec:
      containers:
      - name: k8s-netcore-demo
        image: 10.211.55.10:8888/k8s-netcore-demo
        ports:
        - containerPort: 80
---
# ------------------- Service ------------------- #
kind: Service
apiVersion: v1
metadata:
  labels:
    k8s-app: k8s-netcore-demo
  name: k8s-netcore-demo
  namespace: k8s-netcore
spec:
  type: NodePort
  ports:
    - port: 80
      targetPort: 80
  selector:
    k8s-app: k8s-netcore-demo
-
All the places configured as k8s NETCORE demo are the names of the built images;
-
The value of image is 10.211.55.10:8888 / k8s NETCORE demo, which is the address where the image is published to the private warehouse;
-
The value of the namespace is configured as the name of the created namespace.
9. Create a namespace in k8s:
kubectl create namespace k8s-netcore
10. Execute # deploy Yaml} file:
kubectl create -f deploy.yaml --validate
#With the -- validate} parameter, a prompt will be given when there is an error in the yaml file
11. Use the kubectl get command to view the creation:
kubectl get deploy -n k8s-netcore
#The results are as follows:
NAME               READY   UP-TO-DATE   AVAILABLE   AGE
k8s-netcore-demo   2/2     2            2           8h
12. View access ports:
kubectl get svc -n k8s-netcore
#The results are as follows:
NAME               TYPE       CLUSTER-IP      EXTERNAL-IP   PORT(S)        AGE
k8s-netcore-demo   NodePort   10.106.23.177   <none>        80:32230/TCP   8h
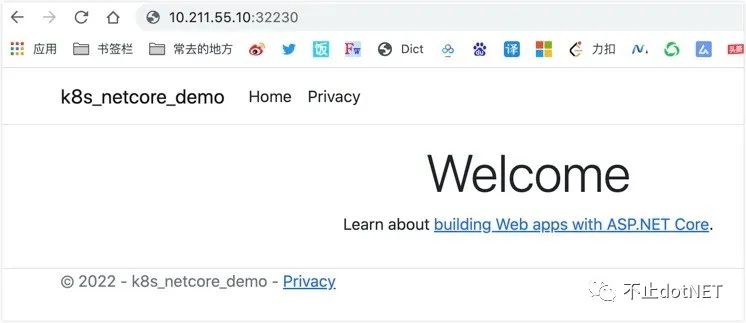
13. Visit http://10.211.55.10:32230 , if the following figure appears normally, the deployment is successful:
summary
I can successfully install it according to the above steps, but there may be problems due to the differences of system, environment, network and version. Don't worry. It can be solved by searching according to the error information.
Problems are not terrible. Only by constantly solving problems can our ability be improved.