1. First understand the difference between compilation and installation and yum installation.
Install centos virtual machine under windows, which was written before. Portal~~
Compile and install:
- It can be installed on demand. It can be installed in whatever directory you want.
- Parameters can be set
- You can install the version you want
yum install:
- Convenient and fast installation
- There is no need to consider package dependencies
- You can directly use commands such as service nginx start.
2. yum installation preparations - switch Alibaba cloud yum source
# 1. Back up the original yum source
mv /etc/yum.repos.d/CentOS-Base.repo /etc/yum.repos.d/CentOS-Base.repo.backup
# 2. Download the new CentOS base Repo to / etc / yum.com repos. d/
wget -O /etc/yum.repos.d/CentOS-Base.repo http://mirrors.aliyun.com/repo/Centos-7.repo
perhaps
curl -o /etc/yum.repos.d/CentOS-Base.repo http://mirrors.aliyun.com/repo/Centos-7.repo
# 3. Clean up cache
yum clean all
# 4. Generate cache
yum makecache
If you want to check whether the current Yum source is successfully switched, you can install something by using yum.
yum install vim
base: mirrors.aliyun.com represents the yum source address
3. Compiling and installing lnmp is not recommended, which is troublesome and easy to report errors.
-
nginx
1.1 check whether nginx has been installed locallyrpm -qa | grep nginx
If it has been installed, execute the following command to uninstall the original nginx
rpm -e nginx-*
1.2 to install nginx, you need to compile the source code downloaded from the official website. The compilation depends on the gcc environment. If there is no gcc environment, you need to install it
yum install gcc-c++
1.3 PCRE(Perl Compatible Regular Expressions) is a perl library, including perl compatible regular expression library. The http module of nginx uses pcre to parse regular expressions, so it is necessary to install pcre library on linux. pcre devel is a secondary development library developed using pcre. Nginx also needs this library. Command:
yum install -y pcre pcre-devel
1.4 zlib library provides many ways of compression and decompression. nginx uses zlib to gzip the contents of http package, so it is necessary to install zlib library on Centos.
yum install -y zlib zlib-devel
1.5 OpenSSL is a powerful secure socket layer cipher library, which includes the main cryptographic algorithms, common key and certificate encapsulation management functions and SSL protocol, and provides rich applications for testing or other purposes.
nginx supports not only http protocol, but also https (i.e. transmitting http over ssl Protocol), so you need to install OpenSSL Library in Centos.yum install -y openssl openssl-devel
1.6 download tar.com from the official website GZ installation package, Address~
Mainline version: mainline version
Stable version: stable version
Legacy versions: old version
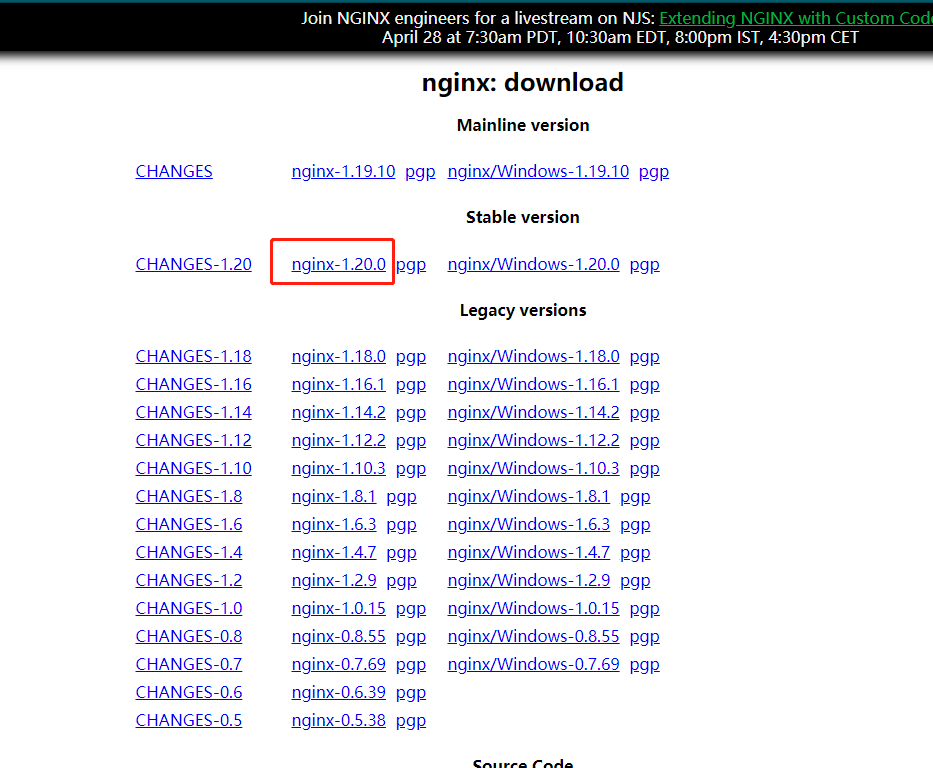
# All our lnmp environments are installed in this directory
cd /usr/local
# download
wget -c https://nginx.org/download/nginx-1.20.0.tar.gz
# decompression
tar -zxvf nginx-1.20.0.tar.gz
cd nginx-1.20.0
# compile
./configure --prefix=/usr/local/nginx
# install
make && make install
# make[1]: leave the directory "/ usr/local/nginx-1.20.0" and finally show that the compilation and installation is successful!
Start and stop nginx
cd /usr/local/nginx/sbin/
./nginx
./nginx -s stop
./nginx -s quit
./nginx -s reload
# View ngin process
ps aux | grep nginx
Configure the service of nginx
first
Stop nginx service firstkillall -9 nginx
Or use CD / usr / local / nginx / SBIN / & &/ nginx -s stopThen edit Service configuration file
vim /etc/init.d/nginx
Write the following configuration in it:
#!/bin/sh
#
# nginx - this script starts and stops the nginx daemon
#
# chkconfig:   - 85 15
# description:  NGINX is an HTTP(S) server, HTTP(S) reverse \
#               proxy and IMAP/POP3 proxy server
# processname: nginx
# config:      /etc/nginx/nginx.conf
# config:      /etc/sysconfig/nginx
# pidfile:     /var/run/nginx.pid

# Source function library.
. /etc/rc.d/init.d/functions

# Source networking configuration.
. /etc/sysconfig/network

# Check that networking is up.
[ "$NETWORKING" = "no" ] && exit 0

# Configure the location of nginx commands
# Modify the path of your nginx executable command, such as: / usr/local/nginx/sbin/nginx
nginx="/usr/local/nginx/sbin/nginx"
prog=$(basename $nginx)

# Point to your configuration file path, such as: / usr / local / nginx / conf / nginx conf
NGINX_CONF_FILE="/usr/local/nginx/conf/nginx.conf"

[ -f /etc/sysconfig/nginx ] && . /etc/sysconfig/nginx

lockfile=/var/lock/subsys/nginx

make_dirs() {
   # make required directories
   user=`$nginx -V 2>&1 | grep "configure arguments:.*--user=" | sed 's/[^*]*--user=\([^ ]*\).*/\1/g' -`
   if [ -n "$user" ]; then
      if [ -z "`grep $user /etc/passwd`" ]; then
         useradd -M -s /bin/nologin $user
      fi
      options=`$nginx -V 2>&1 | grep 'configure arguments:'`
      for opt in $options; do
          if [ `echo $opt | grep '.*-temp-path'` ]; then
              value=`echo $opt | cut -d "=" -f 2`
              if [ ! -d "$value" ]; then
                  # echo "creating" $value
                  mkdir -p $value && chown -R $user $value
              fi
          fi
       done
    fi
}

start() {
    [ -x $nginx ] || exit 5
    [ -f $NGINX_CONF_FILE ] || exit 6
    make_dirs
    echo -n $"Starting $prog: "
    daemon $nginx -c $NGINX_CONF_FILE
    retval=$?
    echo
    [ $retval -eq 0 ] && touch $lockfile
    return $retval
}

stop() {
    echo -n $"Stopping $prog: "
    killproc $prog -QUIT
    retval=$?
    echo
    [ $retval -eq 0 ] && rm -f $lockfile
    return $retval
}

restart() {
    configtest || return $?
    stop
    sleep 1
    start
}

reload() {
    configtest || return $?
    echo -n $"Reloading $prog: "
    killproc $prog -HUP
    retval=$?
    echo
}

force_reload() {
    restart
}

configtest() {
  $nginx -t -c $NGINX_CONF_FILE
}

rh_status() {
    status $prog
}

rh_status_q() {
    rh_status >/dev/null 2>&1
}

case "$1" in
    start)
        rh_status_q && exit 0
        $1
        ;;
    stop)
        rh_status_q || exit 0
        $1
        ;;
    restart|configtest)
        $1
        ;;
    reload)
        rh_status_q || exit 7
        $1
        ;;
    force-reload)
        force_reload
        ;;
    status)
        rh_status
        ;;
    condrestart|try-restart)
        rh_status_q || exit 0
            ;;
    *)
        echo $"Usage: $0 {start|stop|status|restart|condrestart|try-restart|reload|force-reload|configtest}"
        exit 2
esac
Then execute
# Reload the configuration file of a service
systemctl daemon-reload
Then check the nginx status
service nginx status
I made a mistake here!! Prompt error message Can't open PID file / var / run / nginx pid (yet?) After start:, because nginx main configuration file nginx The PID path configured by the PID instruction in conf is inconsistent with the PIDFile path configured in the nginx systemd service file.
terms of settlement:- I didn't solve it with this method! Set / etc / init Remove the pidfile comment of D / nginx (corresponding to your nginx service configuration file), and modify the content to logs / nginx pid
Or put your nginx main configuration file nginx Remove the pid comment of conf and modify the content to the pidfile of your nginx service configuration file
In short, the two pid paths can be solved all the time. - This method solves the problem of specifying nginx with the parameter nginx -c The location of the conf file. Execute the following command.
1. /usr/local/nginx/sbin/nginx -c /usr/local/nginx/conf/nginx.conf
2. systemctl daemon-reload
3. service nginx status is correct
If you want to access nginx outside the virtual machine, remember to turn off the firewall. centos has a variety of firewalls.
systemctl status firewalld.service - view firewall status
systemctl stop firewalld.service - turn off the firewall
systemctl disable firewalld.service - set boot disable firewall
iptables firewall shutdown!!!
servcie iptables stop -- temporarily turn off the firewall
chkconfig iptables off -- Permanently turn off the firewall
service iptables status -- View firewall statusLast step: add nginx to the environment variable
vim /etc/profile
Write the following code at the end
PATH=$PATH:/usr/local/nginx/sbin
export PATH
Finally, execute source /etc/profileAt this point, the compilation and installation of nginx is completed!
- I didn't solve it with this method! Set / etc / init Remove the pidfile comment of D / nginx (corresponding to your nginx service configuration file), and modify the content to logs / nginx pid
-
mysql
1.1 first uninstall the built-in MySQLrpm -qa | grep mariadb View installed mariadb rpm -e mariadb-*** Uninstall the corresponding mariadb yum -y remove mari* uninstall yum Installation of mariadb rpm -qa |grep mysql View installed mysql rpm -e mysql-*** Uninstall installed mysql yum remove mysql** uninstall yum Installation of mysql find / -name mysql rm -rf Corresponding documents
1.2 download installation package
First, check whether your linux is 32-bit or 64 bit?uname -a # If it is a 64 bit machine, it will output x86_ sixty-four
Download installation package mysql download address. To download the version with boost, the Linux generic version is directly downloaded, decompressed, and can be used after a little configuration. The installation and configuration of this version of mysql needs to be studied.
https://cdn.mysql.com/archives/mysql-5.7/mysql-boost-5.7.33.tar.gz
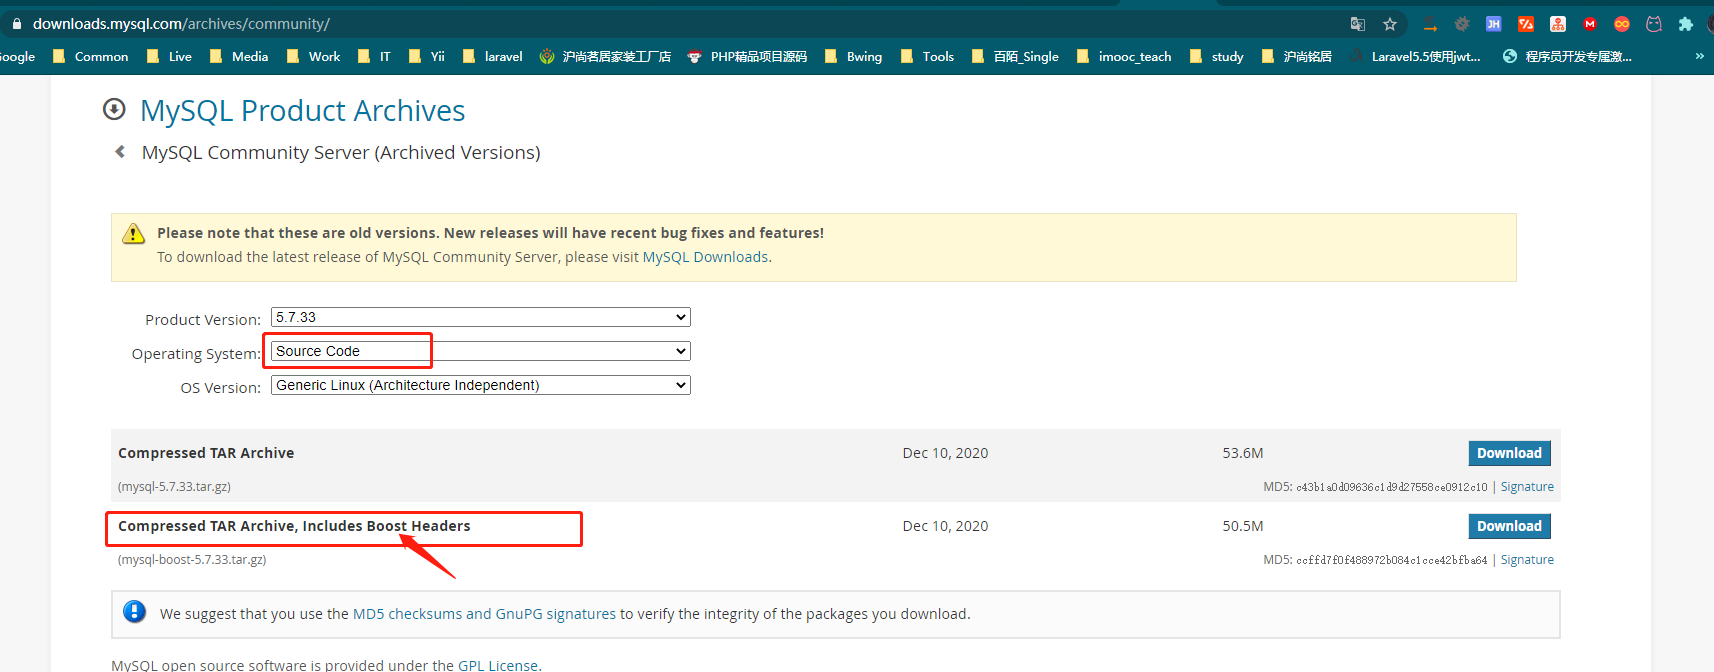
Then unzip it. Here are the configuration instructions of cmake. MySQL CMake parameter manualtar -zxvf mysql-boost-5.7.33.tar.gz cd ./mysql-5.7.33 cmake -DCMAKE_INSTALL_PREFIX=/usr/local/mysql -DMYSQL_DATADIR=/usr/local/mysql/data -DSYSCONFDIR=/etc -DMYSQL_TCP_PORT=3306 -DWITH_BOOST=/usr/local/mysql-5.7.33/boost make && make install
1.3 after installation, execute the command
cd /usr/local/mysql
1.4 edit / etc / my CNF (create if not)
[client]
port        = 3306
socket      = /tmp/mysql.sock

[mysqld]
port        = 3306
socket      = /tmp/mysql.sock
user = mysql

base dir = /usr/local/mysql
datadir = /data/mysql/data
pid-file = /data/mysql/mysql.pid

log_error = /data/mysql/mysql-error.log
slow_query_log = 1
long_query_time = 1
slow_query_log_file = /data/mysql/mysql-slow.log

skip-external-locking
key_buffer_size = 32M
max_allowed_packet = 1024M
table_open_cache = 128
sort_buffer_size = 768K
net_buffer_length = 8K
read_buffer_size = 768K
read_rnd_buffer_size = 512K
myisam_sort_buffer_size = 8M
thread_cache_size = 16
query_cache_size = 16M
tmp_table_size = 32M
performance_schema_max_table_instances = 1000

explicit_defaults_for_timestamp = true
#skip-networking
max_connections = 500
max_connect_errors = 100
open_files_limit = 65535

log_bin=mysql-bin
binlog_format=mixed
server_id   = 232
expire_logs_days = 10
early-plugin-load = ""

default_storage_engine = InnoDB
innodb_file_per_table = 1
innodb_buffer_pool_size = 128M
innodb_log_file_size = 32M
innodb_log_buffer_size = 8M
innodb_flush_log_at_trx_commit = 1
innodb_lock_wait_timeout = 50

[mysqldump]
quick
max_allowed_packet = 16M

[mysql]
no-auto-rehash

[myisamchk]
key_buffer_size = 32M
sort_buffer_size = 768K
read_buffer = 2M
write_buffer = 2M
Change the current user and group to mysql
cd /usr/local
chown -R mysql:mysql mysql
Initialize mysql
./mysqld --initialize-insecure --user=mysql --basedir=/usr/local/mysql --datadir=/data/mysql/data
If the data directory is not created, remember to create it and perform initialization again.
mkdir /data/mysql/data
#Grant authority
chmod -R 777 /data/mysql
Copy executable configuration file
cd /usr/local/mysql/support-files
cp mysql.server /etc/init.d/mysqld
So far, the installation is basically successful. mysql start
service mysqld start
Test connection
cd /usr/local/mysql/bin
./mysql -hlocalhost -uroot -p
You can connect successfully without a password
1.5 modifying environment variablesvim /etc/profile # newly added PATH=/usr/local/mysql/bin:$PATH # Execute after saving and exiting source /etc/profile
Set startup and self startup
systemctl enable mysqld
Check whether the machine starts automatically
chkconfig --list
A few simple commands
service mysqld start
service mysqld restart
service mysqld stop
service mysqld status
Connect mysql in the virtual machine with Navicate.
#First, check the ip address of the virtual machine
ifconfig
#An error will be reported when connecting directly -- > host is not allowed to connect to this MySQL server
#At this point, you need to enter mysql and execute the following command to connect.
mysql -u root -p
use mysql;
update user set host = '%' where user = 'root';
FLUSH PRIVILEGES;
Modify MySQL password
mysql -u root -p #After entering MySQL, execute directly. set password for root@localhost = password('root'); ##This will report an error #Execute the following command to find use mysql; select Host,User from user; #Host is no longer localhost. Because the host has been changed to% just now in order to connect with Navicat, the following command should be executed at this time set password for root@'%' = password('root'); flush privileges; #At this time, the password of mysql is changed to root. -
Install php7 four
3.1 first download the php installation package,https://www.php.net/downloads.php
3.2 decompression, compilation and installation. I downloaded php-7.4.16 tar. gz.
#First move the compressed package to the / usr/local directory
mv php-7.4.16.tar.gz /usr/local
cd /usr/local
tar -zxvf php-7.4.16.tar.gz
cd php-7.4.16
Start compiling and installing. (there's a problem here! As long as I start – with zip when compiling, and then report an error, and this error has not been solved, I directly go to – with zip when compiling. Solve it by Baidu)
./configure  --prefix=/usr/local/php74 --with-config-file-path=/etc/php74 \
--with-fpm-user=nginx \
--with-fpm-group=nginx \
--enable-fpm \
--enable-opcache \
--enable-inline-optimization \
--disable-debug \
--disable-rpath \
--enable-shared \
-enable-mysqlnd \
--with-mysqli=mysqlnd \
--with-pdo-mysql=mysqlnd \
--enable-mysqlnd-compression-support \
--with-iconv-dir \
--with-zlib \
--enable-xml \
--disable-rpath \
--enable-bcmath \
--enable-shmop \
--enable-sysvsem \
--enable-inline-optimization \
--with-curl \
--enable-mbregex \
--enable-mbstring \
--enable-intl \
--enable-ftp \
--enable-gd \
--enable-gd-jis-conv \
--with-jpeg   \
--with-freetype  \
--with-openssl \
--with-mhash \
--enable-pcntl \
--enable-sockets \
--with-xmlrpc \
--with-zip \
--enable-soap \
--with-gettext \
--disable-fileinfo \
--with-pear \
--enable-maintainer-zts \
--with-ldap=shared \
--without-gdbm
Then execute
make && make install
Add environment variable
vim /etc/profile
PATH=$PATH:/usr/local/php74/bin    #My catalogue here is php74. Please don't make mistakes
source /etc/profile
# Execute at this time
php -v   #You can see the php information
Modify the PHP configuration file and find PHP in the previously compiled source package Ini production, copy it to / usr/local/php74 and rename it PHP ini
cp /usr/local/php-7.4.16/php.ini-production /usr/local/php74/php.ini
Modify PHP Ini to set the error message level
vim /usr/local/php74/php.ini
display_errors = On   //It was off
Modify PHP FPM configuration file
cd /usr/local/php74/etc
cp php-fpm.conf.default php-fpm.conf
vim php.fpm.conf
 Remove pid=run/php-fpm.pid Semicolon in front
cp www.conf.default www.conf
Start php
/usr/local/php74/sbin/php-fpm
# View process
ps -aux | grep php
Add PHP FPM to the service
#Enter the compilation directory
cd /usr/local/php-7.4.16/sapi/fpm
cp init.d.php-fpm /etc/init.d/php-fpm
#Give script executable commands and add startup and self startup
chmod +x /etc/init.d/php-fpm
chkconfig --add php-fpm
chkconfig php-fpm on
#Related commands
service php-fpm start
service php-fpm stop
service php-fpm restart
chkconfig --list   --View startup and startup items
4. Execute yum update to install lnmp using yum
- nginx
# Install nginx library first
rpm -Uvh http://nginx.org/packages/centos/7/noarch/RPMS/nginx-release-centos-7-0.el7.ngx.noarch.rpm
#Install nginx using yum or up2date
yum -y install nginx
#start nginx
service nginx start  perhaps   systemctl start nginx
service nginx stop
service nginx status
#After the firewall is closed, the host can directly access the virtual machine nginx through the virtual machine ip
systemctl status firewalld.service		--- View firewall status
systemctl stop firewalld.service    		--- Turn off the firewall
systemctl disable firewalld.service		--- Set boot disable firewall
#Set startup and self startup
systemctl enable nginx   #Cancel use disable since startup
#View startup items
systemctl list-unit-files
systemctl list-unit-files | grep enable
- mysql
First, uninstall MySQL from centos
Download the repo source of mysql repo source of mysql#Uninstall mariadb rpm -qa | grep mariadb yum -y remove mari* rm -rf /var/lib/mysql/ * rpm -qa | grep mariadb # Uninstall mysql database yum remove mysql-community-serve rpm -qa |grep mysql yum remove mysql-* find / -name mysql rm -rf /var/lib/mysql
After a long installation#I downloaded version 5.7 here cd /usr/local wget http://repo.mysql.com/mysql57-community-release-el7-8.noarch.rpm rpm -ivh mysql57-community-release-el7-8.noarch.rpm yum -y install mysql-server
If you want to connect with Navicat, you need to enter the database again to modify the configuration#Start mysql first service mysqld start #Then check the MySQL password grep "password" /var/log/mysqld.log #Then enter mysql mysql -u root -p #Want to change the mysql password to a simpler one #First, change a complex password, otherwise you can't modify the MySQL password policy ALTER USER 'root'@'localhost' IDENTIFIED BY 'lol_LOL123'; #View current MySQL policy SHOW VARIABLES LIKE 'validate_password%'; #Modify strategy set global validate_password_policy=0; set global validate_password_length=1; #View again SHOW VARIABLES LIKE 'validate_password%'; #Now you can change it to a simple password ALTER USER 'root'@'localhost' IDENTIFIED BY 'root';
A few simple commands#After executing the following code, the navicate outside can be connected use mysql; update user set host = '%' where user = 'root'; FLUSH PRIVILEGES;
service mysqld start
service mysqld stop
service mysqld restart
service mysqld status
#Set mysql startup self startup
systemctl enable mysqld   #Cancel use disable since startup
#View startup items
systemctl list-unit-files
systemctl list-unit-files | grep enable
- php7.4
Installation source
Install YUM management toolyum install epel-release yum install http://rpms.remirepo.net/enterprise/remi-release-7.rpm
Install phpyum install yum-utils
Some commandsyum install php74-php-gd php74-php-pdo php74-php-mbstring php74-php-cli php74-php-fpm php74-php-mysqlnd
Finally, attach the nginx configuration file in the / etc/nginx/conf.d directory#Start fpm, stop fpm, restart and view status service php74-php-fpm start service php74-php-fpm stop service php74-php-fpm restart service php74-php-fpm status #Set startup and self startup systemctl enable php74-php-fpm #Cancel use disable since startup #View startup items systemctl list-unit-files systemctl list-unit-files | grep enable
server {
    listen       80 default_server;

    server_name  localhost;
    root         /usr/share/nginx/html;

    # Load configuration files for the default server block.

    location / {
        # The name of the index file defining the home page has been changed here
        index index.php index.html index.htm;
    }

    error_page 404 /404.html;
        location = /40x.html {
    }

    error_page 500 502 503 504 /50x.html;
        location = /50x.html {
    }

    # It's new here
    # All PHP script requests are forwarded to FastCGI for processing Use the default configuration of FastCGI protocol
    # Fastcgi server and program (PHP,Python) communication protocol
    location ~ \.php$ {
        # Set listening port
        fastcgi_pass   127.0.0.1:9000;
        # Set the default homepage file of nginx (it has been set above and can be deleted)
        fastcgi_index  index.php;
        # Set the path of the script file request
        fastcgi_param  SCRIPT_FILENAME  $document_root$fastcgi_script_name;
        # Introducing the configuration file of fastcgi
        include        fastcgi_params;
    }
}
5. lnmp one click installation Reference website I don't like this way, so I haven't tested it. You can read this article
Install php7 in Centos8 (Linux) 4 and three ways to delete it
6. Some errors reported
- Starting nginx (via systemctl): Can't open PID file / var / run / nginx pid (yet?) after start
- Handling method of nginx exception "/ usr/local/nginx/logs/nginx.pid" failed (2: No such file or directory)
7. Notes
8. Reference articles
- Difference between source code installation and yum installation
- Install php7 in Centos8 (Linux) 4 and three ways to delete it
- Linuxyum source switch alicloud software source
- CentOS7 installation Nginx This article is relatively old and can be used for reference.
- Set nginx to system service = =, and the nginx start command is available
- Centos 7 systemctl and firewall firewalld commands
- Stopping and permanent closing of iptables firewall in centos
- Differences between firewalld and iptables
- Uninstall mysql from CentOS 7_ mysql (1) - centos7 how to completely uninstall the built-in mysql
- MySQL CMake parameter manual
- CentOS 7 source code compilation and installation mysql5 seven
- Add PHP FPM to the service
- Linux setup program starts automatically after startup (comparison of usage differences between systemctl and chkconfig commands)
- Uninstall mysql from CentOS 7_ mysql (1) - centos7 how to completely uninstall the built-in mysql
- Install MySQL 5.0 using yum or up2date seven
- rpm -ivh what does this ivh do
- Install MySQL 5.0 using yum under CentOS 7 7.20 the simplest graphic explanation
- Install php7 in Centos8 (Linux) 4 and three ways to delete it