Prepare the centos7 environment in advance. Choose one of the following two installation methods
1. Installation mode 1
Execute in the following order
to configure yum source
vim /etc/yum.repos.d/gitlab-ce.repo

The input content is:
[gitlab-ce]
name=Gitlab CE Repository
baseurl=https://mirrors.tuna.tsinghua.edu.cn/gitlab-ce/yum/el$releasever/
gpgcheck=0
enabled=1

Update local yum cache
yum makecache

install GitLab Community Edition
yum install gitlab-ce #Automatically install the latest version
 Note: if the specified version needs to be installed, add the version number, i.e yum install gitlab-ce-x.x.x
If an error is reported halfway through the download, continue to execute the yum install gitlab CE command to download again or continue the download.
2. Installation mode 2
1, Install and configure the necessary dependencies
Install the required dependencies on the CentOS system: SSH, firewall, postfix (for email notification), wget. The following commands will also open the HTTP and SSH ports in the system firewall for access.
Note: the user is not an administrator. The following warning appears
If the user is not in the sudoers file, this will be reported
You can use su root to switch root permissions
1. Install ssh
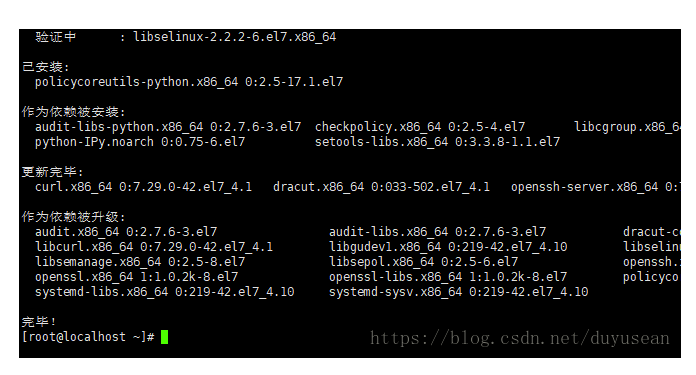
sudo yum install -y curl policycoreutils-python openssh-server
If the message of the following picture appears, it indicates success
2. Set the SSH service to start automatically. The installation command is sudo systemctl enable sshd
3. Start the SSH service. The installation command is sudo systemctl start sshd
4. Add http service to firewalld. Pemmanent means it will take effect permanently. If – permanent is not added, the system will become invalid after the next startup.
sudo firewall-cmd --permanent --add-service=http

5. Restart the firewall and install the command: sudo systemctl reload firewalld
6. Next, install Postfix to send notification email. The installation command is sudo yum install postfix
7. Set the postfix service to start automatically. The installation command is sudo systemctl enable postfix
8. Start postfix. The installation command is sudo systemctl start postfix
During the installation of Postfix, the configuration screen may appear. Select Internet Site and press enter. Use the external DNS of your server to "mail name" and press enter. If an additional screen appears, continue to press enter to accept the default value.
9.wget is used to download plug-ins from the Internet
Check whether wget has been installed in the system. Use the command. If the relevant version description of wget in the figure below appears, it indicates that wget has been installed in the system. If the system fails to find the command, it indicates that wget has not been installed
If wget is not installed, install it. Installation command: yum -y install wget
2, Add gitlab image source and install gitlab server
1. Add gitlab image
wget https://mirrors.tuna.tsinghua.edu.cn/gitlab-ce/yum/el7/gitlab-ce-10.0.0-ce.0.el7.x86_64.rpm
2. Install gitlab installation command: RPM - I gitlab-ce-10.0.0-ce 0.el7. x86_ 64.rpm
The gitlab icon indicates that the installation is complete
3. Installation completed, introduction to common commands
Choose one of the two installation methods to install successfully
If 502 error occurs, the port number may conflict
gitlab-ctl start # Start all gitlab components;

gitlab-ctl stop # Stop all gitlab components;

gitlab-ctl restart # Restart all gitlab components;

gitlab-ctl status # View the service status;

 # Start the service; (reload the configuration file. It can be used after the initial installation of GitLab, but it cannot be used arbitrarily in the business environment. reconfigure will replace some old config files
 # Restore, resulting in the deletion of the modified port and domain name.)
gitlab-ctl reconfigure

vim /etc/gitlab/gitlab.rb # Modify the default configuration file;

gitlab-rake gitlab:check SANITIZE=true --trace # Check gitlab;

sudo gitlab-ctl tail # View log;
4. Profile modification
After installation, you need to modify the configuration file, otherwise you may not be able to access it
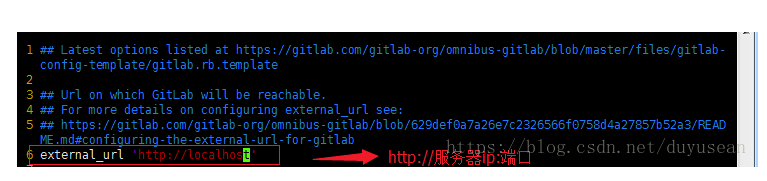
1. Modify the gitlab configuration file to specify the server ip and custom port:
vi /etc/gitlab/gitlab.rb
You can also make changes in the following ways
vi /opt/gitlab/embedded/service/gitlab-rails/config/gitlab.yml
  ## GitLab settings

  gitlab:

    ## Web server settings (note: host is the FQDN, do not include http://)

    host: centos7 of ip address

    port: Custom port

    https: false
Execute the following commands after modification in the above two ways
gitlab-ctl reconfigure
gitlab-ctl restart
After a minute, enter the ip and port number on the browser to access
5. Visit gitlab
The first visit will require a password reset
After setting, skip to the login page
The default account is root, and the password is the password you reset
So far, gitlab installation is completed
6. Backup and recovery of GitLab
GitLab create backup
gitlab-rake gitlab:backup:create

Using the above command will create a file with a name similar to 1520580592 in the / var/opt/gitlab/backups directory by default_ 2018_ 03_ 09_ 10.5.3_ Gitlab_ backup. Tar's compressed package, which is a complete part of Gitlab, with 1520580592 at the beginning_ 2018_ 03_ 09_ 10.5.3 is the date when the backup was created.

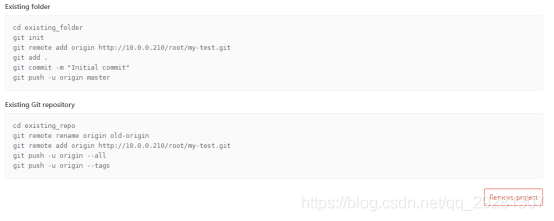
Delete project
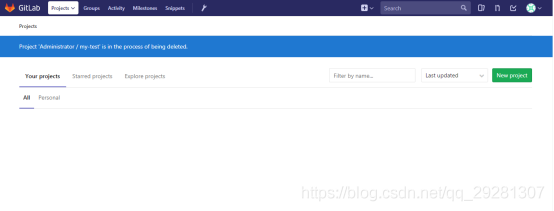
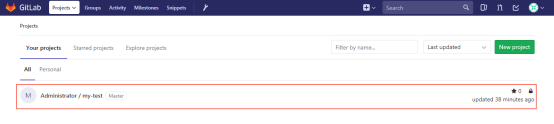
Click the "Remove project" button at the bottom of the created project page to delete the project.
There is no project at this time
GitLab recovery
Stop relevant data connection services
gitlab-ctl stop unicorn

gitlab-ctl stop sidekiq

From 1520580592_ 2018_ 03_ 09_ 10.5.3 number recovery in backup
gitlab-rake gitlab:backup:restore BACKUP=1520580592_2018_03_09_10.5.3
Start Gitlab
gitlab-ctl start
Check whether to restore project in GitLab page.
7. Modify the default path of the warehouse
vi /etc/gitlab/gitlab.rb
# git_data_dirs({
#   "default" => {
#     "path" => "/mnt/nfs-01/git-data"
#    }
# })
git_data_dir "/data/gitlab"   >>Add a custom warehouse Path here. The directory needs to be created in advance
Stop the current gitlab and reload the configuration
gitlab-ctl stop

gitlab-ctl reconfigure
After reloading, you will find an additional repository directory under / data/gitlab directory

Finally, start gitlab
gitlab-ctl start
8. References
To configure ssh:
https://blog.csdn.net/xyzchenxiaolin/article/details/51852333
1. Modify the port without conflict
Sometimes it's not just external that needs to be modified_ The port of the URL, and also modify unicorn
https://blog.csdn.net/fengchao2016/article/details/77851234
2. Modify git file storage path
https://www.cnblogs.com/dieyaxianju/p/7586203.html
3. Set the function of sending mail
Reference link: http://www.fayfox.com/post/39.html
Official document of mailbox configuration: https://docs.gitlab.com/omnibus/settings/smtp.html#mandrill
Test after installation: https://blog.csdn.net/yelllowcong/article/details/79939589
If the test fails, please refer to this article: https://ruby-china.org/topics/20450 (keep the authentication account consistent with the sender.)