In the process of online MySQL installation, since centos7 was used for the first time, it took a long time to record the successful configuration method.
Modify yum source
Enter the local machine to modify the yum configuration file
Enter yum.com repos. D directory
cd /etc/yum.repos.d/
Add the existing Yum source: / etc / yum repos. d/CentOS-Base. Repo backup
mv CentOS-Base.repo CentOS-Base.repo.backup
I use centos7 and Alibaba cloud's yum source. The download address is
http://mirrors.aliyun.com/repo/Centos-7.repo
centos 6 is:
http://mirrors.aliyun.com/repo/Centos-6.repo
Create a new file on this computer
touch CentOS-Base.repo
Copy and paste the contents of the downloaded file into CentOS base In repo
CentOS 7 version is as follows
# CentOS-Base.repo
#
# The mirror system uses the connecting IP address of the client and the
# update status of each mirror to pick mirrors that are updated to and
# geographically close to the client.  You should use this for CentOS updates
# unless you are manually picking other mirrors.
#
# If the mirrorlist= does not work for you, as a fall back you can try the
# remarked out baseurl= line instead.
#
#

[base]
name=CentOS-$releasever - Base - mirrors.aliyun.com
failovermethod=priority
baseurl=http://mirrors.aliyun.com/centos/$releasever/os/$basearch/
        http://mirrors.aliyuncs.com/centos/$releasever/os/$basearch/
        http://mirrors.cloud.aliyuncs.com/centos/$releasever/os/$basearch/
gpgcheck=1
gpgkey=http://mirrors.aliyun.com/centos/RPM-GPG-KEY-CentOS-7

#released updates
[updates]
name=CentOS-$releasever - Updates - mirrors.aliyun.com
failovermethod=priority
baseurl=http://mirrors.aliyun.com/centos/$releasever/updates/$basearch/
        http://mirrors.aliyuncs.com/centos/$releasever/updates/$basearch/
        http://mirrors.cloud.aliyuncs.com/centos/$releasever/updates/$basearch/
gpgcheck=1
gpgkey=http://mirrors.aliyun.com/centos/RPM-GPG-KEY-CentOS-7

#additional packages that may be useful
[extras]
name=CentOS-$releasever - Extras - mirrors.aliyun.com
failovermethod=priority
baseurl=http://mirrors.aliyun.com/centos/$releasever/extras/$basearch/
Rebuild yum
implement
yum clean all
yum makecache
MySQL online installation
Networking, modifying ip
Before, static IP was not used for networking. Now it is necessary to modify the IP for networking
Modify virtual machine configuration
First, check our configuration parameters
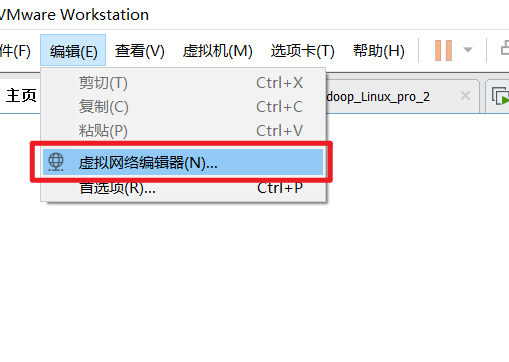
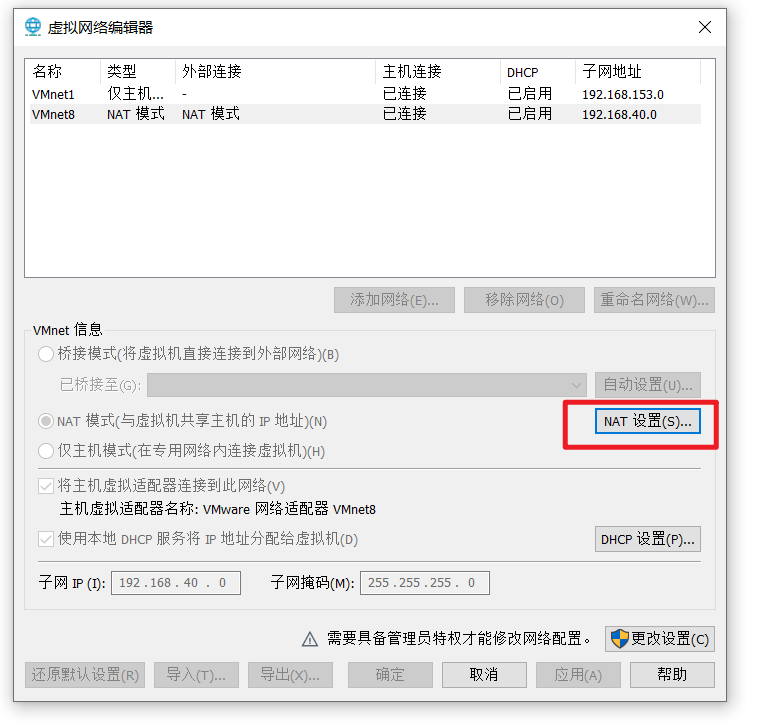
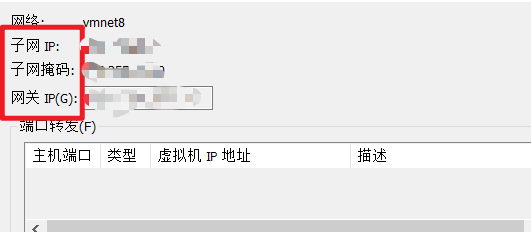
View our subnet, subnet mask, gateway
Enter the virtual machine to modify the configuration
Enter directory
cd /etc/sysconfig/network-scripts/
Check the file and see ifcfg ensxx. Everyone's machine may be different. The prefix should be the same ifcfg. Mine is ifcfg-ens32

Edit this file
vim ifcfg-ens32
TYPE=Ethernet
PROXY_METHOD=none
BROWSER_ONLY=no
#I failed to switch dynamically, so I need to change the static setting to static
BOOTPROTO=static
DEFROUTE=yes
IPV4_FAILURE_FATAL=no
IPV6INIT=yes
IPV6_AUTOCONF=yes
IPV6_DEFROUTE=yes
IPV6_FAILURE_FATAL=no
IPV6_ADDR_GEN_MODE=stable-privacy
NAME=ens32
UUID=e8cbdc50-4c67-4abe-82e6-3dc0b6a9b79e
DEVICE=ens32
ONBOOT=yes
#####Add or modify subnet IP, subnet mask and gateway
IPADDR=#Subnet IP just viewed
NETMASK=#Subnet mask just viewed
GATEWAY=#Gateway just viewed
#To prevent the domain name from being found when ping ing the website
DNS1=8.8.8.8
DNS2=8.8.4.4
service network restart
service network restart
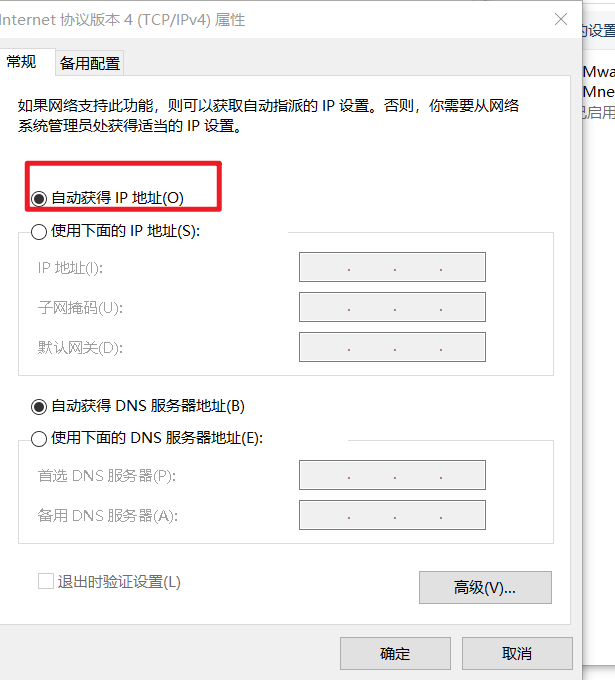
Modify control panel network card configuration
When viewing the parameters above, we can see that the network used is vmnet8

Find this network in the control panel network connections

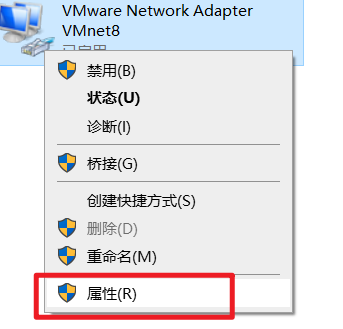
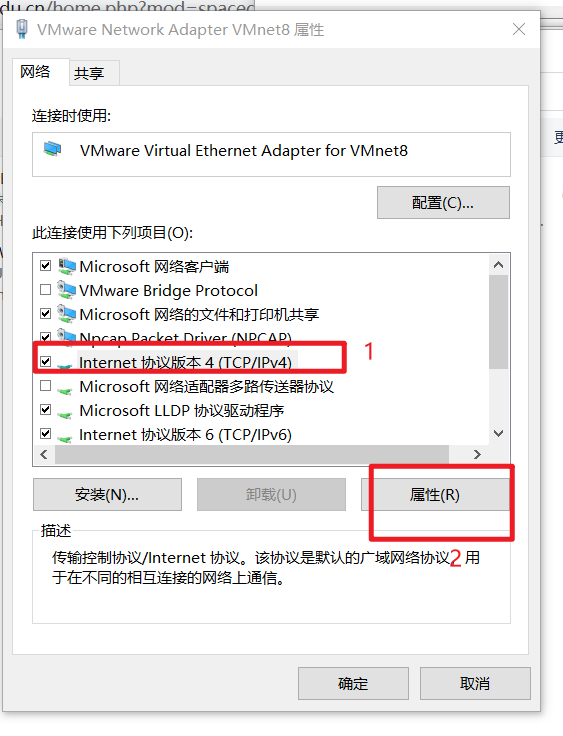
Select get IP address automatically
ping www.baidu.com test
In virtual machine
ping www.baidu.com
Check whether the configuration is successful
Install mysql5 online 7 (based on Alibaba cloud)
Uninstall MariaDB
Check if MariaDB is installed
yum list installed | grep mariadb
Uninstall all if present
yum -y remove mariadb*
Download MySQL installation package
Download MySQL installation package
wget -P /opt/softwares(Installation directory can be set by yourself) http://dev.mysql.com/get/mysql57-community-release-el7-11.noarch.rpm
Enter the download directory and execute the installation command
cd /opt/softwares
Execute MySQL installation package
rpm -ivh mysql57-community-release-el7-11.noarch.rpm
Check whether the yum source of MySQL is successfully installed
View available MySQL yum sources
yum repolist enabled | grep mysql

Install MySQL
yum install mysql-server
Wait for the installation to complete
Verify MySQL
View MySQL installation address
which mysql
View MySQL status
service mysqld status
Service startup and testing
Start MySQL
Start MySQL
service mysqld start
View MySQL status
service mysqld status

The password has not been configured yet. Check the temporary password and log in to MySQL
grep 'temporary password' /var/log/mysqld.log
Log in to MySQL
mysql -u root -p
Modify MySQL password
ALTER USER 'root'@'localhost' IDENTIFIED BY 'Enter the information you want to configure root Account password';
If it is too simple, 123456 is not allowed to prompt
ERROR 1819 (HY000): Your password does not satisfy the current policy requirements
to configure
mysql> set global validate_password_policy=0;
set global validate_password_length=1;
Configuration details refer to: https://www.cnblogs.com/ivictor/p/5142809.html
Configure the password again, eg:
ALTER USER 'root'@'localhost' IDENTIFIED BY '123456';
Configure other machines to log in
Authorize other machines to log in with passwords
GRANT ALL PRIVILEGES ON *.* TO 'root'@'%' IDENTIFIED BY 'Password to configure' WITH GRANT OPTION;
Effective immediately
FLUSH PRIVILEGES;
If the 1819 error occurs again
You can configure it again.