This article is transferred from: Climb high and Fu
SAML, fully known as Security Assertion Markup Language, is a markup preload for security assertion. The latest version is 2.0. Original address
Related articles in this series:
OAuth2.0 protocol Getting Started Guide
OpenID Connect protocol Getting Started Guide
OpenSAML sample
SAML is very useful in single sign on: in SAML protocol, once the user's identity is authenticated by the main website (Identity Provider, IDP), the user can log in directly without entering the identity and password when accessing other applications (Service Providers, Service Providers, SP) registered in the main website.
SAML itself is a very complex protocol. Only the most important part is selected here to explain to you. For more details, please see Official documents , subsequent articles will also further analyze.
The core of SAML protocol is that IDP and SP exchange data through the redirected access of the user's browser.
SP sends SAML identity authentication request message to IDP to request IDP to authenticate user identity; IDP asks for the user name and password from the user and verifies whether they are correct. If the verification is correct, it returns the SAML authentication response to sp, indicating that the user has successfully logged in. In addition, the response also includes some additional information to ensure that the response is tampered with and forged.
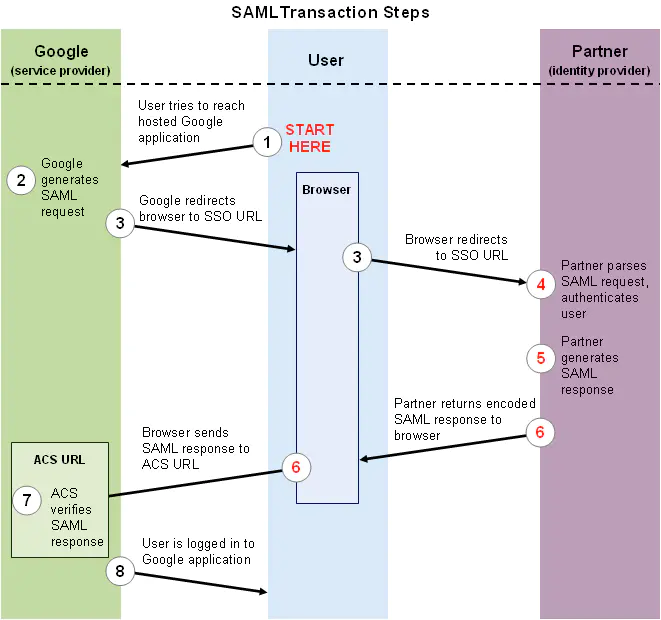
Let's take the user logging in to SP and SP sending a request to IDP to confirm the user's identity as an example to see the workflow of SAML. For example, SP is Google Apps, IDP is the identity server of a university, and Alice is a student of the University.

Now Alice wants to check her email through the browser. Alice usually visits a web page through the browser, such as https://mail.google.com/a/my-university.nl (step1). Because this is a federated identity domain, Google will not ask users for user names and passwords, but will direct them from to IDP to authenticate their identity (step 3). The URL to which the user is redirected is similar to this:
https://idp.uni.nl/sso?
SAMLRequest=fVLLTuswEN0j8Q...c%3D
The SAMLRequest embedded in the HTTP request is the SAML authentication request message. Because SAML is based on XML (usually long), the complete authentication request message can only be transmitted after compression (saving space for URLs) and encoding (preventing special characters). Before compression and encoding, SAML messages have the following format:
<AuthnRequest  ID="kfcn...lfki"
  Version="2.0"
  IssueInstant="2013-02-05T08:28:50Z"
  ProtocolBinding="urn:oasis:names:tc:SAML: 2.0:bindings:HTTP-POST"
  ProviderName="google.com"
  AssertionConsumerServiceURL="https://www.google.com/a/uni.nl/acs">
  <Issuer>google.com</Issuer>
  <NameIDPolicy  AllowCreate="true"
    Format="urn:oasis:names:tc:SAML:1.1:nameid-format:unspecified"/>;
</AuthnRequest>;
The above content is explained in the most straightforward way: this request from Google, please verify the identity of the current user and return the result.
After IDP receives the message and confirms to accept the authentication request, it will ask Alice to enter the user name and password to verify her identity (if Alice has logged in, this step will be skipped); After the verification is passed, Alice's browser will jump back to Google's specific page (assertion consumer service, ACS, step6 for short). Similarly, the content of SAML authentication response is also transmitted in the form of parameters after compression and encoding. Before compression and coding, its structure class is as follows:
<Response Version="2.0"
  IssueInstant="2013-02-05T08:29:00Z"
  Destination="https://www.google.com/a/my.uni.nl/acs" InResponseTo="kfcn...lfki">
  <Issuer>https://idp.uni.nl/</Issuer>
  <Status>
    <StatusCode
      Value="urn:oasis:names:tc:SAML:2.0:status:Success"/>
  </Status>
  <Assertion Version="2.0"
    IssueInstant="2013-02-05T08:29:00Z">
    <Issuer>https://idp.uni.nl/</Issuer>
    <Subject>
      <NameID>alice</NameID>
      <SubjectConfirmation ...>
        <SubjectConfirmationData
          NotOnOrAfter="2013-02-05T08:34:00Z"
          Recipient="https://www.google.com/a/my.uni.nl/acs" InResponseTo="kfcn...lfki"/>
        </SubjectConfirmation>
    </Subject>
    <Conditions NotBefore="2013-02-05T08:28:30Z" NotOnOrAfter="2013-02-05T08:34:00Z">
    </Conditions>
    <AuthnStatement
      AuthnInstant="2013-02-05T08:29:00Z"
      SessionNotOnOrAfter="2013-02-05T16:29:00Z>
    </AuthnStatement>
  </Assertion>
 </Response>
Although there are many contents, it mainly expresses that the message comes from IDP uni. NL, the identity of the user named Alice has been verified by me, and the validity of this message is 2 minutes. In addition, the redirected URL should also have the signature of the message to ensure that it is not tampered with. The public key and algorithm for verifying the signature are negotiated in advance by IDP and SP.
When Google receives the SAML authentication response, it will first verify whether the signature of the message is correct (step 7) and whether it expires due to timeout. Then extract the user identity (NameID, i.e. Alice) that Google can recognize from the authentication message. If the above steps are successful, the user will successfully log in to Google (step 8).
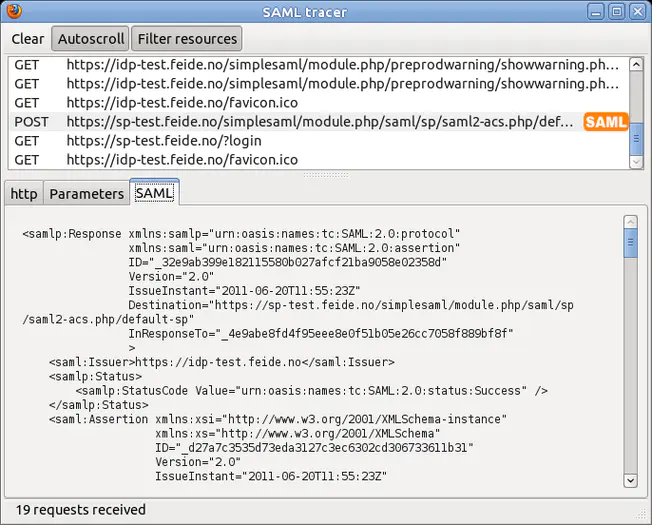
For ease of explanation, the information in the above examples remains readable. If you want to see the real SAML information, it is recommended to use the plug-in tool of Firefox browser SAML tracer . The plug-in will add a window in the browser to display SAML messages. The following is a screenshot:

SAML tracer
I hope the above content can help you understand SAML protocol. The content of SAML protocol is very complex, but the content related to single sign on is based on the above content.
For more information about the implementation of SAML protocol, please refer to a series of tutorial articles I wrote to introduce how to use OpenSAML. Welcome to read and correct: