This tutorial will teach readers how to draw spatial data such as points, markers, labels, lines, models, shapes, and objects using cesium's Entity API. Cesium's prior knowledge is not required, but if the reader has no experience in this field at all, the reader may want to learn from it "Beginner's Chinese tutorial (original)" Start learning.
What is the Entity API?
Cesium has rich APIs for spatial data, which can be divided into two categories: low-level APIs for graphic developers (usually called primitive APIs) and high-level APIs for data-driven visualization (called entity APIs).
The primary goal of the original API is to expose the minimum amount of abstraction required to perform the task at hand. It wants us to think like graphic programmers and use graphic terms. Its structure is to provide the most performance and flexible implementation for a given visualization type, not for API consistency. Loading a model is different from creating a Billboard, both of which are completely different from creating polygons. Each type of visualization has its own unique characteristics. In addition, they each have different performance characteristics and need to follow different best practices. Although it is powerful and flexible, most applications have a higher level of abstraction than the Primitive API. The main goal of the original API is to open up the minimum amount of abstraction required for the current R & D work at hand. It wants us to think like graphic programmers and use graphic terms. Its structure is to provide the most performance and flexible implementation for a given visualization type, not for API consistency. Loading a model is different from creating a Billboard, both of which are completely different from creating polygons. Each type of visualization has its own unique characteristics. In addition, they each have different performance characteristics and need to follow different best practices. Although it is powerful and flexible, most applications provide service interfaces at a higher level of abstraction than the Primitive API.
The purpose of entity API is to expose a set of high-level objects with consistent design. These objects aggregate relevant visualization and information into a unified data structure, which is called entity. It allows us to focus on presenting our data rather than worrying about the potential mechanisms of visualization. It also provides a structure that is easy to build complex and time dynamic visualization, which is naturally suitable for static data. Although the entity API actually uses the original API behind it, this is an implementation detail that we (almost) never need to pay attention to. By applying various heuristics to the data we provide, the entity API can provide flexible and high-performance visualization, and expose a consistent, easy-to-learn and easy-to-use interface.
Our first entity
One of the basic ways to learn about entity API s is by looking at some code. To simplify things, we'll be in cesium sandcastle's Hello World Built in the example. If readers develop Cesium locally, they are free to use their own applications.
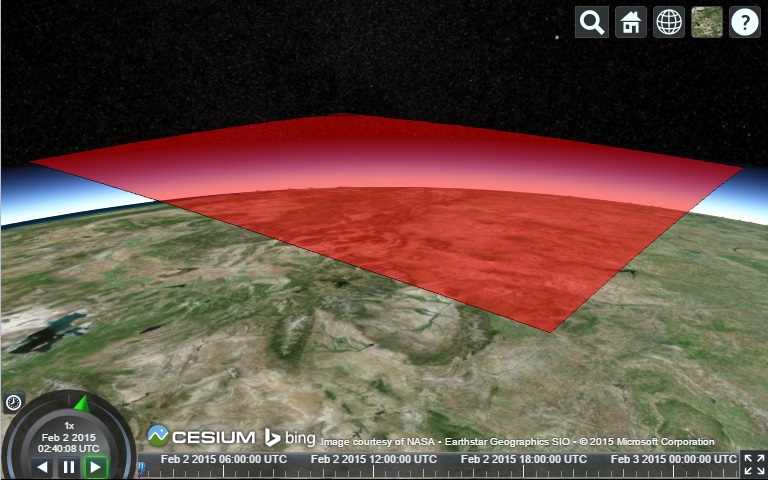
Suppose we want to add a polygon in Wyoming, USA, from the list of longitude and latitude. (Wyoming was selected because it is a simple polygon) we can copy and paste the following code into Sandcastle:
var viewer = new Cesium.Viewer('cesiumContainer');

var wyoming = viewer.entities.add({
  name : 'Wyoming',
  polygon : {
    hierarchy : Cesium.Cartesian3.fromDegreesArray([
                              -109.080842,45.002073,
                              -105.91517,45.002073,
                              -104.058488,44.996596,
                              -104.053011,43.002989,
                              -104.053011,41.003906,
                              -105.728954,40.998429,
                              -107.919731,41.003906,
                              -109.04798,40.998429,
                              -111.047063,40.998429,
                              -111.047063,42.000709,
                              -111.047063,44.476286,
                              -111.05254,45.002073]),
    height : 0,
    material : Cesium.Color.RED.withAlpha(0.5),
    outline : true,
    outlineColor : Cesium.Color.BLACK
  }
});

viewer.zoomTo(wyoming);
Click the run button (or F8) to see the following image:
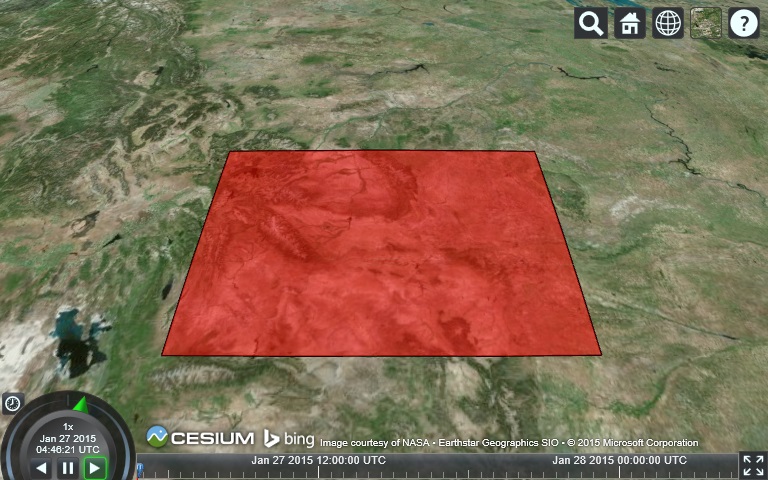
Because one of our goals is to make Cesium's code easy to understand, I hope this is self-evident. We created Viewer widget , it serves as the foundation for almost all Cesium applications, and then viewer.entities.add . add a new Entity . What we need to deliver add The object of is just an option parameter that provides an initial value. The return value is the actual entity instance. Finally, we call viewer.zoomTo To ensure that the entity is in the view. There are many entity options available, but now we specify polygon The interior is translucent red and the boundary is black. We also give the entity a display name of "Wyoming Wyoming".
Shapes and objects
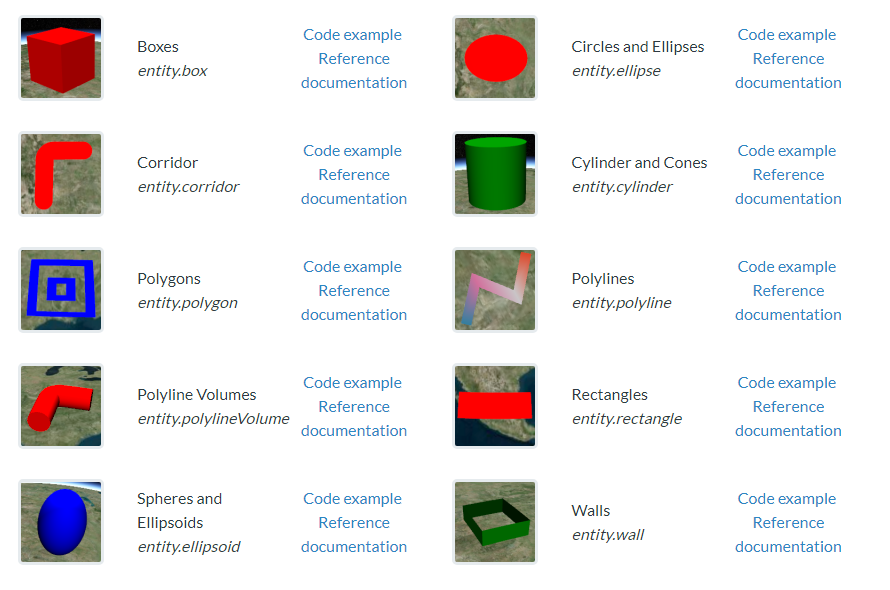
With the basics of creating polygons, and due to the homogeneity of the entity API, we can now simply use Sandcastle The examples in are used as a reference to create various drawings. Below is a complete list of supported shapes and objects.
Materials and profiles
Regardless of their geometric definition, all shapes and objects have a common set of attributes to control their appearance. The fill attribute is a Boolean value that specifies whether the interior of the surface is filled, while the outline attribute controls whether the edge of the shape is contoured. When fill is set to true, the material attribute determines what the filler is. In the following example, let's create a translucent blue ellipse. By default, fill is true and outline is false, so we only need to specify material.
var entity = viewer.entities.add({
  position: Cesium.Cartesian3.fromDegrees(-103.0, 40.0),
  ellipse : {
    semiMinorAxis : 250000.0,
    semiMajorAxis : 400000.0,
    material : Cesium.Color.BLUE.withAlpha(0.5)
  }
});
viewer.zoomTo(viewer.entities);

var ellipse = entity.ellipse; // For upcoming examples
Image
We can also assign a material as a picture link:
ellipse.material = '//cesiumjs.org/tutorials/images/cats.jpg';

In the above two cases, one is automatically created for us at the time of assignment ColorMaterialProperty Attribute or ImageMaterialProperty Properties. For more complex materials, we need to create a material attribute instance ourselves. At present, solid shapes and objects support colors, images, checkerboards, stripes and grid materials.
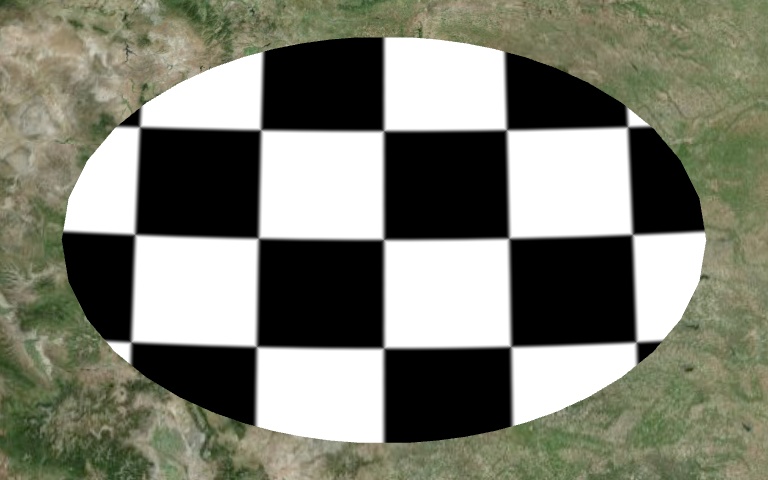
checkerboard
ellipse.material = new Cesium.CheckerboardMaterialProperty({
  evenColor : Cesium.Color.WHITE,
  oddColor : Cesium.Color.BLACK,
  repeat : new Cesium.Cartesian2(4, 4)
});
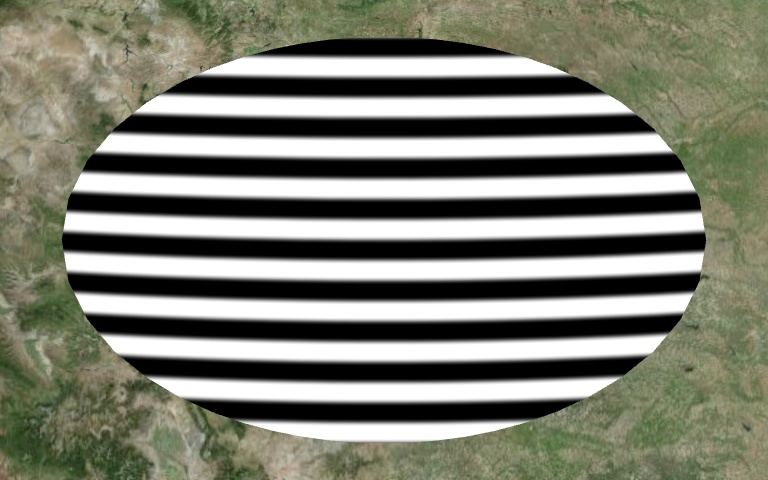
stripe
ellipse.material = new Cesium.StripeMaterialProperty({
  evenColor : Cesium.Color.WHITE,
  oddColor : Cesium.Color.BLACK,
  repeat : 32
});
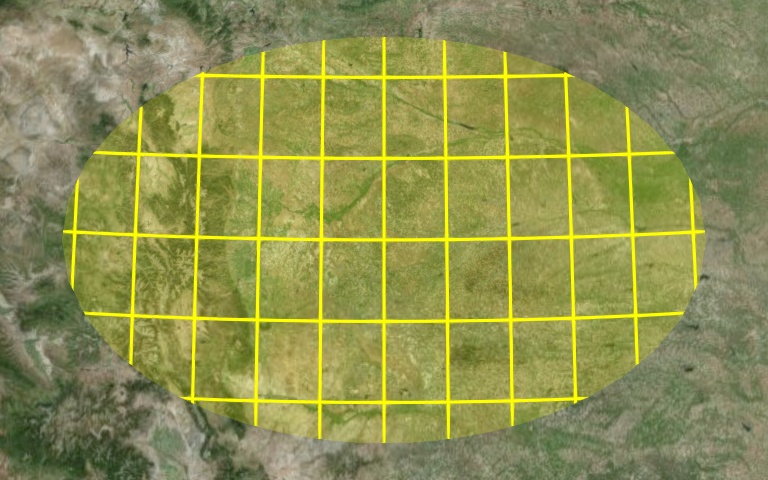
grid
ellipse.material = new Cesium.GridMaterialProperty({
  color : Cesium.Color.YELLOW,
  cellAlpha : 0.2,
  lineCount : new Cesium.Cartesian2(8, 8),
  lineThickness : new Cesium.Cartesian2(2.0, 2.0)
});
outline
Unlike the fill attribute, the outline does not have a corresponding material, but depends on two independent outlineColor and outlineWidth attributes. outlineWidth is only applicable to non Windows systems, such as Android, iOS, Linux and OS X. This is limited by how WebGL is implemented in all three major browser engines on windows.
ellipse.fill = false;
ellipse.outline = true;
ellipse.outlineColor = Cesium.Color.YELLOW;
ellipse.outlineWidth = 2.0;

broken line
Polylines are a special case because they have no fill or contour properties. Instead, they rely on special materials to replace color. Due to these special materials, polylines of different widths and contour widths will work on all systems.
var entity = viewer.entities.add({
    polyline : {
        positions : Cesium.Cartesian3.fromDegreesArray([-77, 35,
                                                        -77.1, 35]),
    width : 5,
    material : Cesium.Color.RED
}});
viewer.zoomTo(viewer.entities);

var polyline = entity.polyline // For upcoming examples

Polyline contour
polyline.material = new Cesium.PolylineOutlineMaterialProperty({
    color : Cesium.Color.ORANGE,
    outlineWidth : 3,
    outlineColor : Cesium.Color.BLACK
});

Discounted halo
polyline.material = new Cesium.PolylineGlowMaterialProperty({
    glowPower : 0.2,
    color : Cesium.Color.BLUE
});

Height and extrusion
All shapes covering the earth are currently circles, ellipses, polygons and rectangles, which can also be placed at an altitude or extruded into an object. In both cases, the shape or object still conforms to the curvature of the earth below it.
For height, all we need to do is set the height attribute on the corresponding graphic object, which is the same for all the shapes listed above. This may be a good time to mention that Cesium always uses meters, radians and seconds as units, unless the function explicitly indicates other situations, such as Cartesian3.fromDegrees . The following code line will lift the polygon 250000 meters above the earth.
wyoming.polygon.height = 250000;
It's just as easy to extrude a shape into an object. We just need to set the extrudedHeight attribute. The object will be generated between height and extended height. If height is undefined, the object starts from 0. In order to create an object from 200000 meters to 250000 meters, we can use the following code. This of course means that the object itself is 50000 meters high.
wyoming.polygon.height = 200000;
wyoming.polygon.extrudedHeight = 250000;

This paper consists of admin Creation, adoption Knowledge sharing signature 3 Chinese Mainland License Agreement License. It can be reproduced and quoted freely, but the author must be signed and the source of the article must be indicated.
Cesium Chinese network QQ group: 838036184