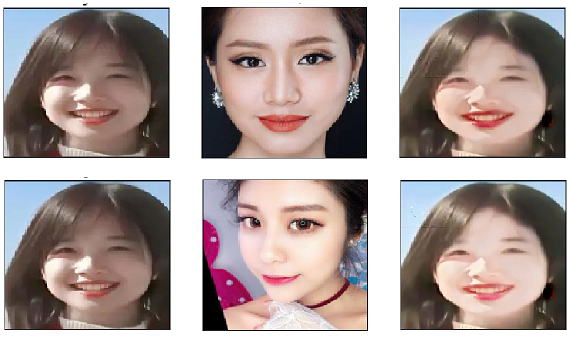
Project link: Changeable ice! Makeup migration based on paddegan
1 project background
Recently, I read an article about using ai to make up for ice. The article uses SCGAN architecture, but the effect of directly using SCGN to extract makeup is not very good. The solution of the article is to cut the picture out of the face, then segment the facial features, and finally use SCGN network to make up. The final effect is also very good. So I came up with an idea - use paddegan's PSGAN model to realize the makeup migration of Bingbing. As for the advantages of PSGAN, let's take a look at the principle analysis of PSGAN.
2 PSGAN principle
The task of PSGAN model is makeup migration, that is, the makeup on any reference image is migrated to the source image without makeup. Many portrait beautification applications need this technology. Recently, some makeup migration methods are mostly based on generating confrontation networks (GAN). They usually use the framework of CycleGAN and train on two data sets, i.e. no makeup image and makeup image. However, the existing methods have one limitation: they only perform well on the front face image, and there is no special module designed to deal with the pose and expression differences between the source image and the reference image. PSGAN is a new pose robust and scalable method The generation of perceptual space confronts the network. PSGAN is mainly divided into three parts: makeup refining network (MDNet), attention makeup deformation (AMM) module and makeup removal re makeup network (DRNet).

3 use paddegan for training
Paddegan, the development kit for the generation countermeasure network of the propeller, provides developers with classic and cutting-edge high-performance implementation of the generation countermeasure network, and supports developers to quickly build, train and deploy the generation countermeasure network for academic, entertainment and industrial applications.
3.1 installing paddegan
# To install paddegan to the root directory, you need to switch directories first
%cd /home/aistudio/
# Use git to clone the addleGAN repository to the current directory
!git clone https://gitee.com/paddlepaddle/PaddleGAN.git
# After downloading, switch to the directory of paddegan
%cd /home/aistudio/PaddleGAN
/home/aistudio
3.2 installation of third-party library
When downloading third-party libraries, many pip downloads are from foreign sources, so we can change to domestic sources, and the download speed will become faster. Here I provide three sources.
- Tsinghua University: https://pypi.tuna.tsinghua.edu.cn/simple
- Alibaba cloud: http://mirrors.aliyun.com/pypi/simple/
- China University of science and technology https://pypi.mirrors.ustc.edu.cn/simple/
# Switch path
%cd /home/aistudio/PaddleGAN/
# Install the required third-party libraries
!pip install -r requirements.txt
!pip install boost -i https://mirrors.aliyun.com/pypi/simple/
!pip install CMake -i https://mirrors.aliyun.com/pypi/simple/
!pip install dlib -i https://mirrors.aliyun.com/pypi/simple/
# The following prompt indicates that the installation is successful
# Successfully built dlib
# Installing collected packages: dlib
# Successfully installed dlib-19.22.0
3.3 cutting face
Note: in fact, the image has been processed in psgan, but when I train, the face is not in the middle, so I can run the following code to cut the face and change the image size first. (it can also not run)
Here, dlib is directly used to cut out the face area
# Crop face
import cv2
import dlib

# Path before and after clipping
cut_before_img="/home/aistudio/work/ps_source.png"
cut_after_img="/home/aistudio/work/ps_source_face.png"
img = cv2.imread(cut_before_img)
height, width = img.shape[:2]

face_detector = dlib.get_frontal_face_detector()
gray = cv2.cvtColor(img, cv2.COLOR_BGR2GRAY)
faces = face_detector(gray, 1)

def get_boundingbox(face, width, height, scale=1.6, minsize=None):
    """
    Expects a dlib face to generate a quadratic bounding box.
    :param face: dlib face class
    :param width: frame width
    :param height: frame height
    :param scale: bounding box size multiplier to get a bigger face region
    :param minsize: set minimum bounding box size
    :return: x, y, bounding_box_size in opencv form
    """
    x1 = face.left()
    y1 = face.top()
    x2 = face.right()
    y2 = face.bottom()
    size_bb = int(max(x2 - x1, y2 - y1) * scale)
    if minsize:
        if size_bb < minsize:
            size_bb = minsize
    center_x, center_y = (x1 + x2) // 2, (y1 + y2) // 2

    # Check for out of bounds, x-y top left corner
    x1 = max(int(center_x - size_bb // 2), 0)
    y1 = max(int(center_y - size_bb // 2), 0)
    # Check for too big bb size for given x, y
    size_bb = min(width - x1, size_bb)
    size_bb = min(height - y1, size_bb)

    return x1, y1, size_bb


if len(faces):
    face = faces[0]

x,y,size = get_boundingbox(face, width, height)
cropped_face = img[y-50:y+size,x:x+size]
cv2.imwrite(cut_after_img, cropped_face)
True
# change a picture's size
import cv2
im1 = cv2.imread(cut_after_img)
im2 = cv2.resize(im1,(im1.shape[1],im1.shape[1]),)  # Resize the picture
cv2.imwrite(cut_after_img,im2)
True
# Crop contrast display
import cv2
from matplotlib import pyplot as plt
%matplotlib inline
# Path before clipping
before = cv2.imread(cut_before_img)
after = cv2.imread(cut_after_img)

plt.figure(figsize=(10, 10))
plt.subplot(1, 2, 1)
plt.title('cut-before')
plt.imshow(before[:, :, ::-1])

plt.subplot(1, 2, 2)
plt.title('cut-after')
plt.imshow(after[:, :, ::-1])


plt.show()

3.4 makeup migration
Run the following command to complete the makeup migration. After the program runs successfully, the image file after makeup migration will be generated in the current folder. The original pictures and references are provided for display in this project. The specific commands are as follows:
python tools/psgan_infer.py \
  --config-file configs/makeup.yaml \
  --model_path /your/model/path \
  --source_path  docs/imgs/ps_source.png  \
  --reference_dir docs/imgs/ref \
  --evaluate-only
Parameter Description:
-
Config file: psgan network to parameter configuration file in yaml format
-
model_path: the path of the network weight file saved after the training is completed (it can be set or not) Click download Weight)
-
source_path: the full path of the original picture file without makeup, including the name of the picture file
-
reference_dir: the path of the reference picture file of makeup, excluding the name of the picture file
-
The results are automatically saved to / home / aistudio / paddegan / output / transferred_ ref_ ps_ ref.png
# Makeup migration code
%cd /home/aistudio/PaddleGAN
!python tools/psgan_infer.py \
--config-file configs/makeup.yaml \
--source_path  ~/work/ps_source_face.png   \
--reference_dir   ~/work/ref \
--evaluate-only
# The following prompt indicates successful operation
# Transfered image output/transfered_ref_ps_ref.png has been saved!
# done!!!
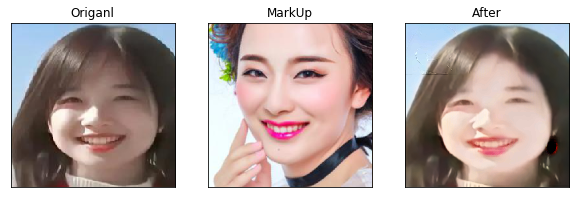
3.5 result display
import cv2
from matplotlib import pyplot as plt
%matplotlib inline
ps_source = cv2.imread('/home/aistudio/work/ps_source_face.png')
ps_ref = cv2.imread('/home/aistudio/work/ref/ps_ref.png') # This is the path of the makeup picture
transfered_ref_ps_ref = cv2.imread('/home/aistudio/PaddleGAN/output/transfered_ref_ps_ref.png')

plt.figure(figsize=(10, 10))
plt.subplot(1, 3, 1)
plt.title('Origanl')
plt.imshow(ps_source[:, :, ::-1])
plt.xticks([])
plt.yticks([])

plt.subplot(1, 3, 2)
plt.title('MarkUp')
plt.imshow(ps_ref[:, :, ::-1])
plt.xticks([])
plt.yticks([])

plt.subplot(1, 3, 3)
plt.title('After')
plt.imshow(transfered_ref_ps_ref[:, :, ::-1])
plt.xticks([])
plt.yticks([])

# preservation
save_path='/home/aistudio/work/output.png'
plt.savefig(save_path)

plt.show()

4 Summary
Looking at the final training effect, I feel pretty good. I've seen it. If you don't try it yourself, you may have unexpected results yo
