Microservice gateway
Basic concepts
Each service of microservice generally has different addresses. A service of an external client may call many interfaces, which will bring the following problems
- The client will request different micro services many times, and the address is complex
- There are cross domain requests and the processing is complex
- Complex certification
- Difficult to reconstruct
- Some micro services may have browser unfriendly communication protocols and complex interactions
The system architecture after joining the microservice gateway is shown in the figure
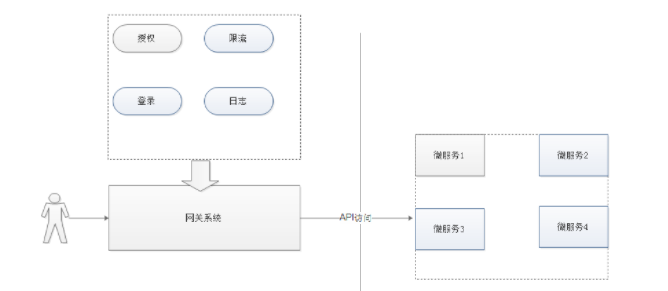
The advantages are as follows:
- Security, only the gateway system is exposed externally, and the micro service can be hidden in the intranet and protected through the firewall.
- Easy to monitor. The monitoring data can be collected at the gateway and pushed to the external system for analysis.
- Easy to certify. You can authenticate on the gateway and then forward the request to the back-end microservices without authenticating in each microservice.
- It reduces the number of interactions between the client and each micro service
- Easy to unify authorization.
Summary: the microservice gateway is a system. By exposing the microservice gateway system, it is convenient for us to carry out relevant functions such as authentication, security control, unified log processing and easy monitoring.
Gateway Technology
Common gateway technologies
- nginx Nginx (tengine x) is a high-performance HTTP and Reverse proxy The web server also provides IMAP/POP3/SMTP services
- Zuul, zuul is a load balancer based on JVM routing and server produced by Netflix.
- Spring cloud gateway is a spring based Gateway project produced by spring. It integrates circuit breaker and path rewriting, and its performance is better than Zuul.
Comparison between Zuul and Gateway
- The Gateway is developed by the spring cloud team, which can be well integrated. Zuul has experienced maintenance for a period of time, and Gateway was developed during this period. Now, although zuul has released 2 There is no planned integration of the spring version of cloud X
- Gateway adopts asynchronous non blocking model AIO, which has great advantages in high concurrency and non blocking response
- The three core functions of Gateway are routing, assertion and filtering
Gateway use
requirement analysis
Because the system we developed includes foreground system and background system, the background system is used by administrators. Then we also need to call various micro services, so we build a gateway system for system management. The analysis is as follows:

Build the background gateway system
Build analysis
It can be seen from the above that since multiple gateways are required, it is convenient for management. We will create a new project, which is packaged in pom, in which we can establish various gateway system modules. As shown in the figure:

(1) Introduce dependency
Modify the Changgou Gateway project, and the packaging method is pom
pom. The XML is as follows:
<?xml version="1.0" encoding="UTF-8"?>
<project xmlns="http://maven.apache.org/POM/4.0.0"
         xmlns:xsi="http://www.w3.org/2001/XMLSchema-instance"
         xsi:schemaLocation="http://maven.apache.org/POM/4.0.0 http://maven.apache.org/xsd/maven-4.0.0.xsd">
    <parent>
        <artifactId>changgou-parent</artifactId>
        <groupId>com.changgou</groupId>
        <version>1.0-SNAPSHOT</version>
    </parent>
    <modelVersion>4.0.0</modelVersion>
    <artifactId>changgou-gateway</artifactId>
    <packaging>pom</packaging>
    <modules>
        <module>changgou-gateway-web</module>
    </modules>

    <!--Gateway dependency-->
    <dependencies>
        <dependency>
            <groupId>org.springframework.cloud</groupId>
            <artifactId>spring-cloud-starter-gateway</artifactId>
        </dependency>

        <dependency>
            <groupId>org.springframework.cloud</groupId>
            <artifactId>spring-cloud-starter-netflix-hystrix</artifactId>
        </dependency>
        <dependency>
            <groupId>org.springframework.cloud</groupId>
            <artifactId>spring-cloud-starter-netflix-eureka-client</artifactId>
        </dependency>
    </dependencies>

</project>
In the Changgou Gateway project, create a Changgou gateway web project. The gateway is mainly used to make a call to the background microservices and connect multiple microservices together.
pom.xml:
<?xml version="1.0" encoding="UTF-8"?>
<project xmlns="http://maven.apache.org/POM/4.0.0"
         xmlns:xsi="http://www.w3.org/2001/XMLSchema-instance"
         xsi:schemaLocation="http://maven.apache.org/POM/4.0.0 http://maven.apache.org/xsd/maven-4.0.0.xsd">
    <parent>
        <artifactId>changgou-gateway</artifactId>
        <groupId>com.changgou</groupId>
        <version>1.0-SNAPSHOT</version>
    </parent>
    <modelVersion>4.0.0</modelVersion>
    <artifactId>changgou-gateway-web</artifactId>
    <description>
        ordinary web Request gateway
    </description>
</project>
(2) Boot class
Create a boot class com. In Changgou gateway web changgou. Gatewaywebapplication, the code is as follows:
@SpringBootApplication
@EnableEurekaClient
public class GatewayWebApplication {

    public static void main(String[] args) {
        SpringApplication.run(GatewayWebApplication.class,args);
    }
}
(3)application.yml configuration
Create the application. Under the resources of Changgou gateway web YML, the code is as follows:
spring:
  application:
    name: gateway-web
server:
  port: 8001
eureka:
  client:
    service-url:
      defaultZone: http://127.0.0.1:7001/eureka
  instance:
    prefer-ip-address: true
management:
  endpoint:
    gateway:
      enabled: true
    web:
      exposure:
        include: true
Cross domain configuration
Sometimes, if we need to process all microservice cross domain requests, we can provide cross domain support in the gateway. Modify application YML, add the following code:
spring:
  cloud:
    gateway:
      globalcors:
        cors-configurations:
          '[/**]': # Match all requests
              allowedOrigins: "*" #Cross domain processing allows all domains
              allowedMethods: # Supported methods
                - GET
                - POST
                - PUT
                - DELETE
Gateway filtering configuration
Routing filters allow you to modify incoming HTTP requests or outgoing HTTP responses in some way. The scope of the path filter is limited to specific paths. Spring Cloud Gateway includes many built-in GatewayFilter factories. As shown in the figure above, route to different micro services according to the request path, which can be realized by using the route filtering function of Gateway.
The filter has more than 20 implementation classes, including header filter, path filter, Hystrix filter and change request URL Filter, as well as other types of filters such as parameters and status codes.
The built-in filter factory has 22 implementation classes, including Header filter, Path filter, Hystrix filter, request URL change filter, and other types of filters such as parameters and Status codes. According to the purpose of the filter factory, it can be divided into the following categories: Header, Parameter, Path, Body, Status, Session, Redirect, Retry, ratelimit and Hystrix.
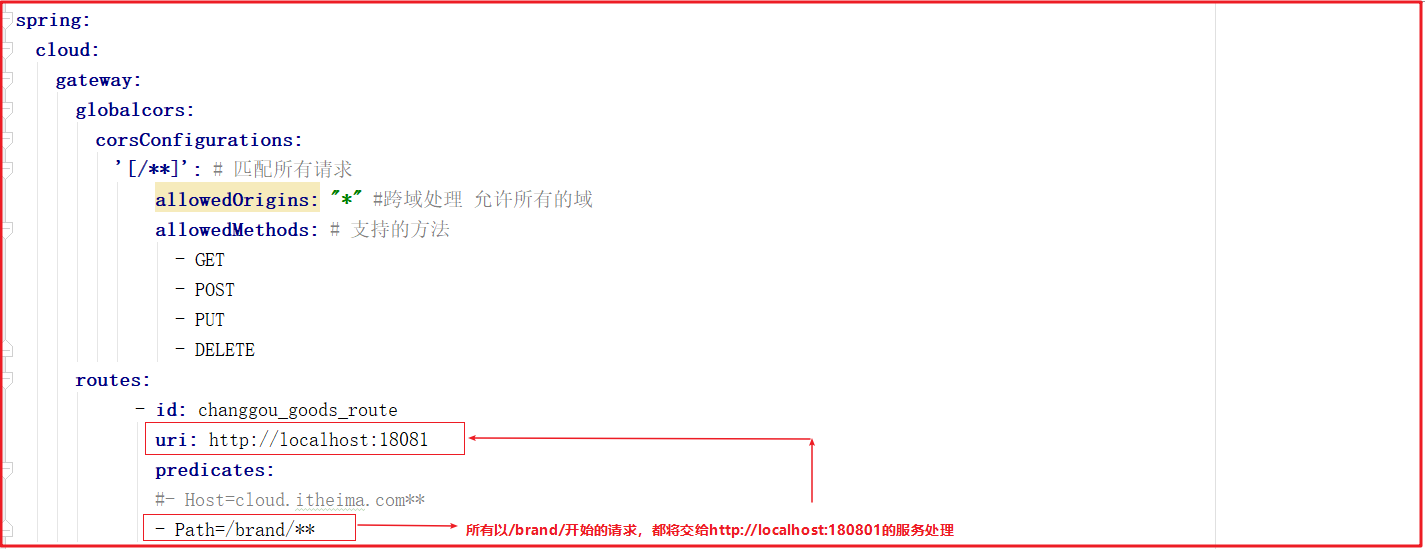
Host routing
For example, the user requests cloud itheima. COM, you can route the request to http://localhost:18081 Service processing, configured as follows:

The above figure is configured as follows:
      routes:
            - id: changgou_goods_route
              uri: http://localhost:18081
              predicates:
              - Host=cloud.itheima.com**
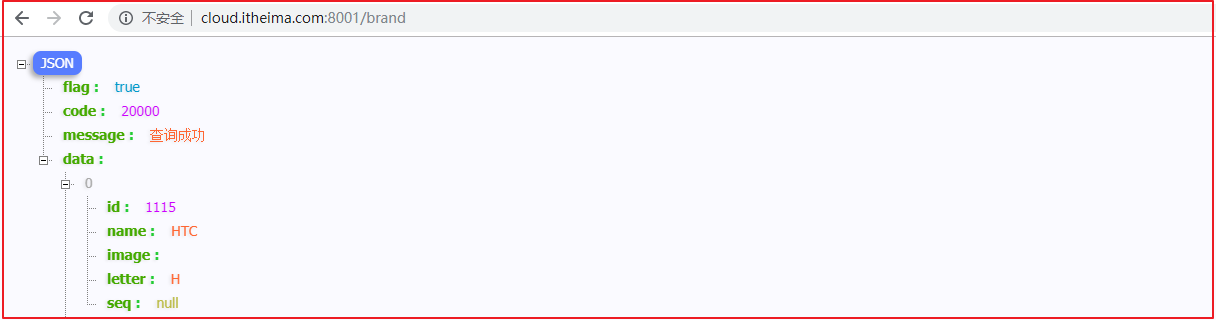
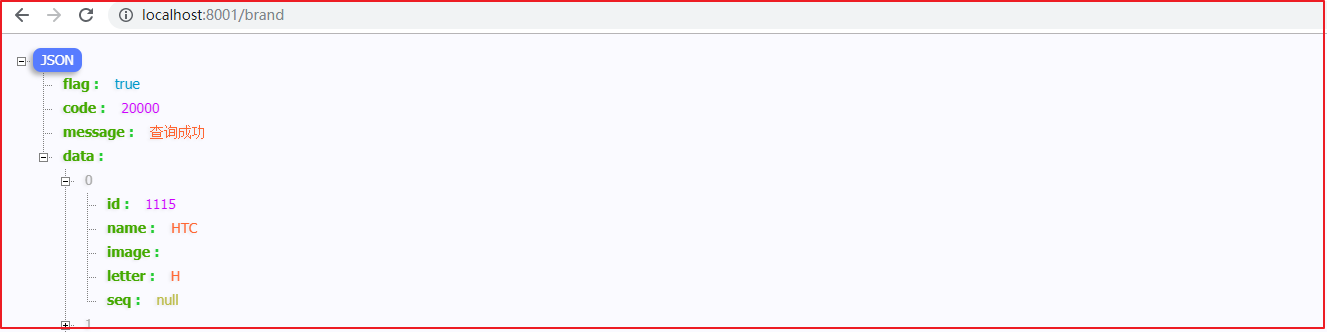
Test request http://cloud.itheima.com:8001/brand , the effect is as follows:
Note: at this time, you want cloud itheima. Com to access the local computer, configure the C:\Windows\System32\drivers\etc\hosts file. The mapping configuration is as follows:
127.0.0.1 cloud.itheima.com
Path matching filter configuration
We can also implement the corresponding route filtering operation according to the request path. For example, the requests starting with / brand / path in the request are directly handed over to the user http://localhost:180801 Service processing, configured as follows:
The above figure is configured as follows:
      routes:
            - id: changgou_goods_route
              uri: http://localhost:18081
              predicates:
              - Path=/brand**
Test request http://localhost:8001/brand , the effect is as follows:
PrefixPath filtering configuration
Every time a user requests a path, we can add a unified prefix to the real request, such as user request http://localhost:8001 We ask it to ask for the real address when we get there http://localhost:8001/brand , as follows:
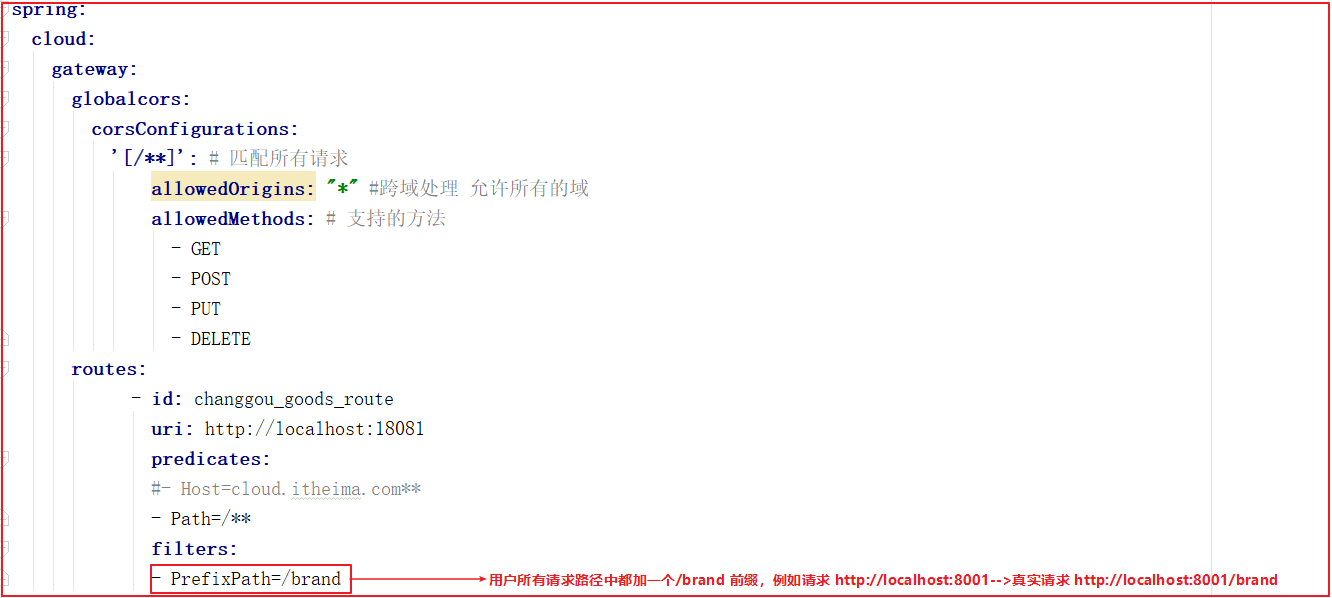
The above figure is configured as follows:
      routes:
            - id: changgou_goods_route
              uri: http://localhost:18081
              predicates:
              #- Host=cloud.itheima.com**
              - Path=/**
              filters:
              - PrefixPath=/brand
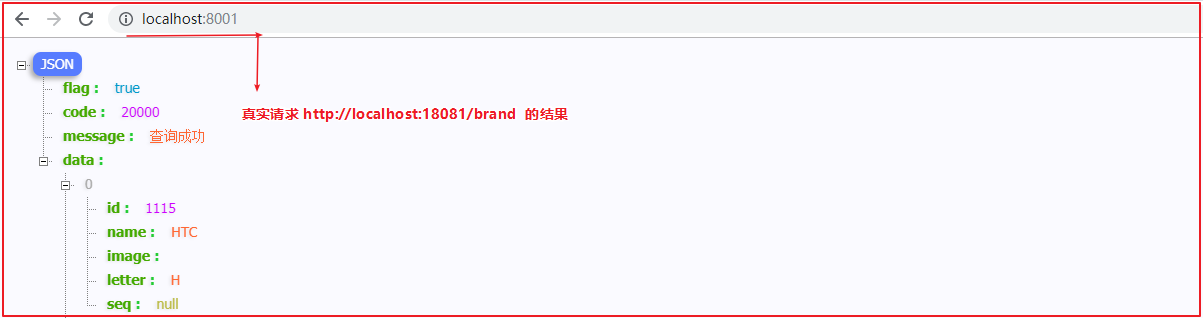
Test request http://localhost:8001/ The effects are as follows:
StripPrefix filter configuration
Many times, there will be such a request. The user's request path is / api/brand and the real path is / brand. At this time, we need to remove / api to be the real path. At this time, we can use SttripPrefix function to filter the path, as shown in the following configuration:
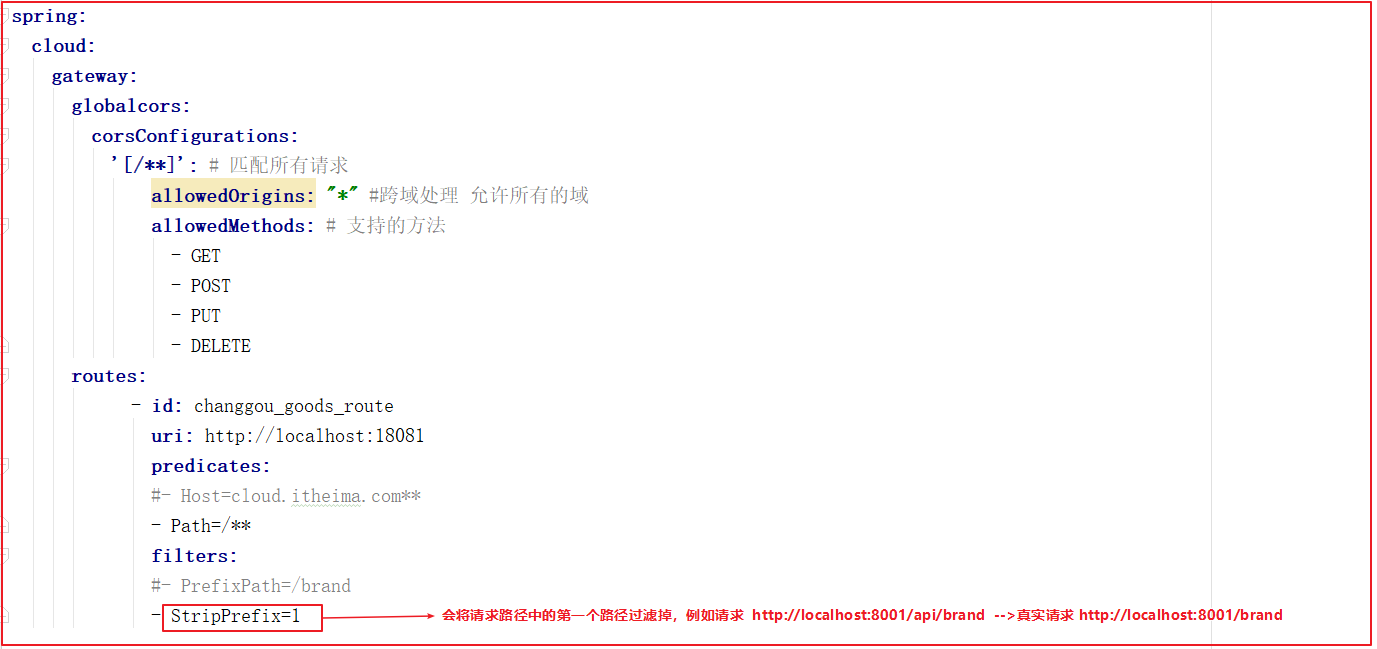
The above figure is configured as follows:
      routes:
            - id: changgou_goods_route
              uri: http://localhost:18081
              predicates:
              #- Host=cloud.itheima.com**
              - Path=/**
              filters:
              #- PrefixPath=/brand
              - StripPrefix=1
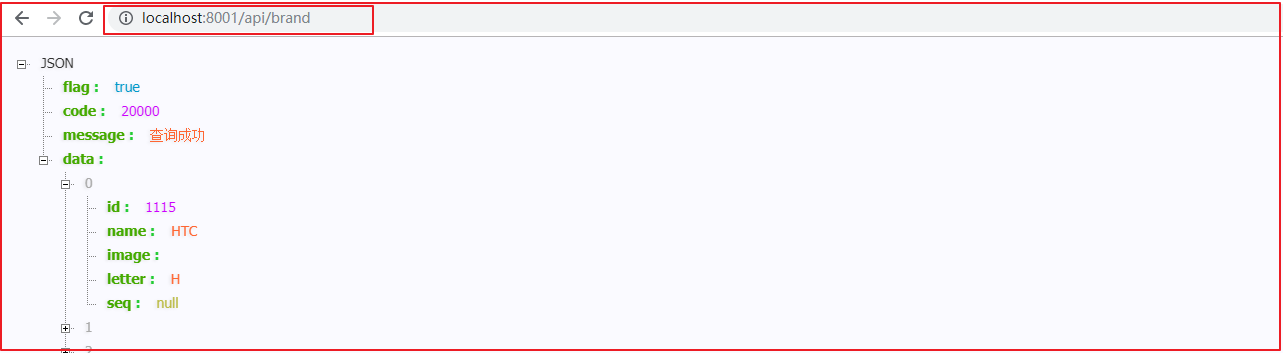
Test request http://localhost:8001/api/brand , the effect is as follows:

LoadBalancerClient routing filter (client load balancing)
The above routing configuration will process the request to the specified URL every time, but if there is a large amount of concurrency in the future production environment, we need to judge the load balancing operation according to the service name. We can use LoadBalancerClientFilter to realize the load balancing call. LoadBalancerClientFilter will act on the route whose URL starts with lb, and then use loadBalancer to obtain the service instance, construct the target requestUrl and set it to GATEWAY_REQUEST_URL_ATTR attribute, used by NettyRoutingFilter.
Modify application YML configuration file, the code is as follows:
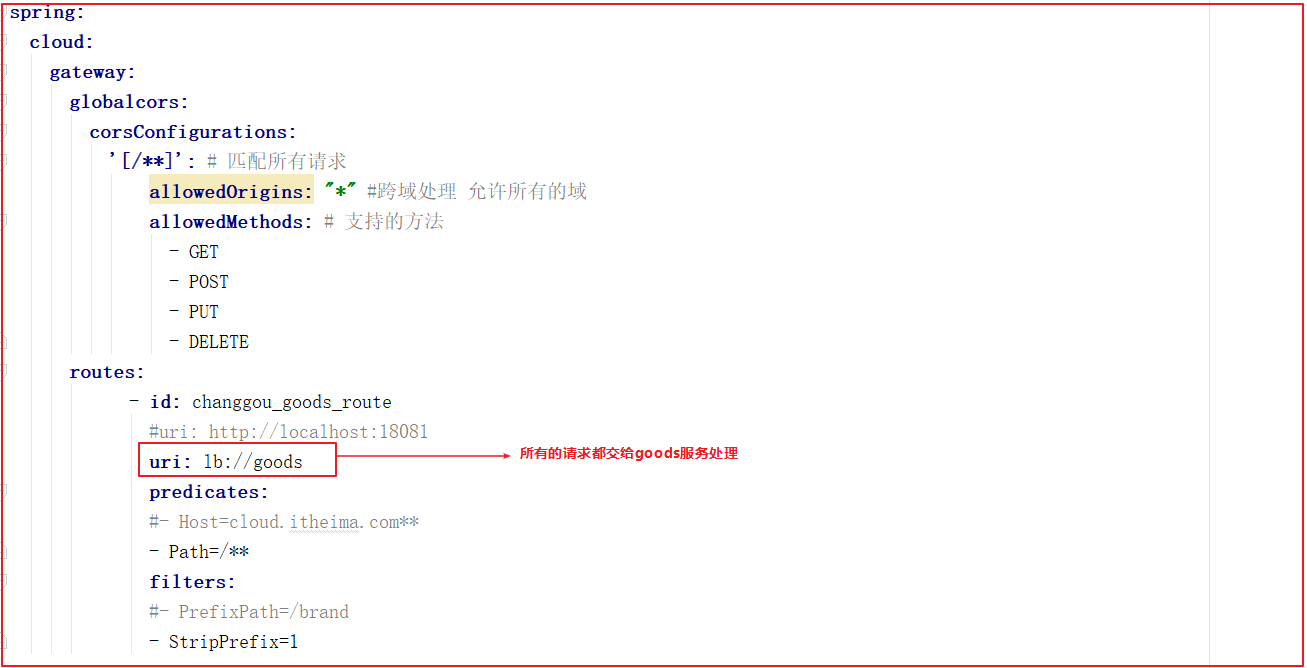
The above figure is configured as follows:
      routes:
            - id: changgou_goods_route
              #uri: http://localhost:18081
              uri: lb://goods
              predicates:
              #- Host=cloud.itheima.com**
              - Path=/**
              filters:
              #- PrefixPath=/brand
              - StripPrefix=1
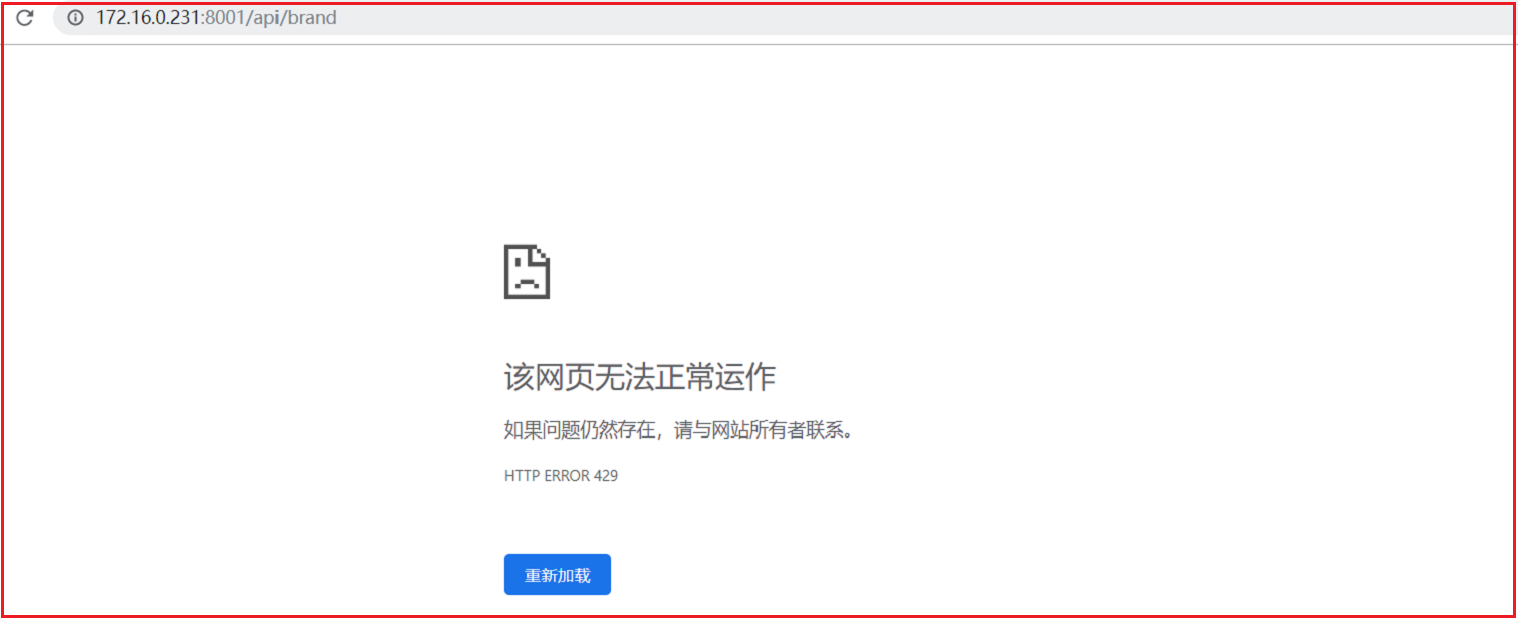
Test request path http://localhost:8001/api/brand
Gateway current limiting
The gateway can do a lot of things, such as limiting the flow. When our system is frequently requested, it may crush the system. Therefore, in order to solve this problem, we need to limit the flow in each micro service. However, if there is a gateway, we can limit the flow in the gateway system, Because all requests need to pass through the gateway system before they can be routed to the micro service.
Train of thought analysis

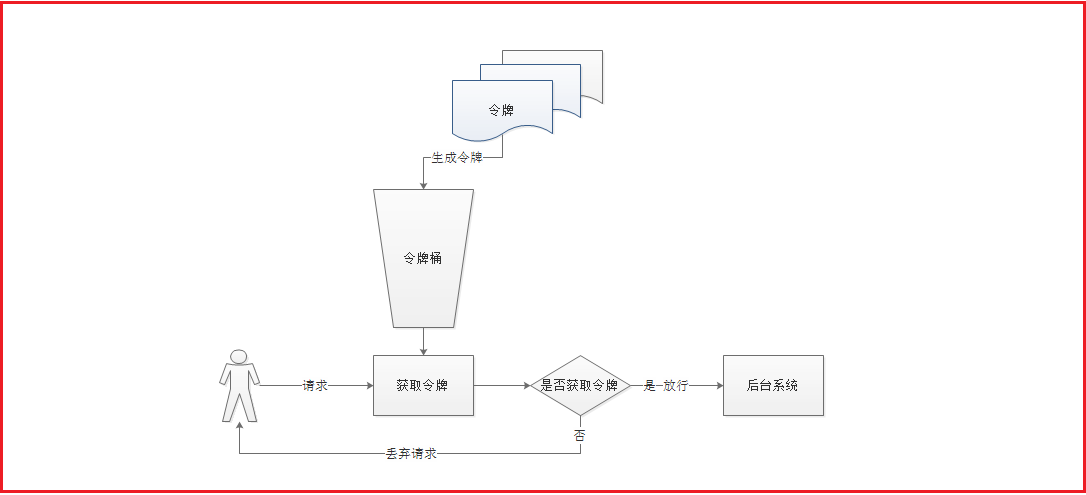
Token Bucket
Token bucket algorithm is one of the more common current limiting algorithms, which is roughly described as follows:
- All requests need to get an available token before being processed;
- According to the current limit, set a certain rate to add tokens to the bucket;
- The bucket sets the maximum limit for placing tokens. When the bucket is full, the newly added tokens are discarded or rejected;
- After the request is reached, first obtain the token in the token bucket, and then carry out other business logic with the token. After processing the business logic, delete the token directly;
- The token bucket has a minimum limit. When the token in the bucket reaches the minimum limit, the token will not be deleted after the request is processed, so as to ensure sufficient current limit
As shown below:
There are many technologies for the implementation of this algorithm. Guaua is one of them, and redis client also has its implementation. Four common current limiting algorithms are mentioned in the part of advertising caching implemented by Lua and canal, the third of Changgou mall
Limit the number of requests using the token bucket
The spring cloud gateway is implemented by using the RateLimter current limiting algorithm of redis by default. Therefore, we need to introduce the dependency of redis before using it
(1) Introducing redis dependency
POM at Changgou gateway Introducing redis dependency into XML
<!--redis-->
<dependency>
    <groupId>org.springframework.boot</groupId>
    <artifactId>spring-boot-starter-data-redis-reactive</artifactId>
    <version>2.1.3.RELEASE</version>
</dependency>
(2) Define KeyResolver
Add the following code to the applicationin boot class. KeyResolver is used to calculate the key of a certain type of current limit, that is, the key of current limit can be specified through KeyResolver.
We can limit the flow according to the IP. For example, each IP can only be requested once per second. Define the key acquisition in the gateway webapplication, obtain the client IP, and use the IP as the key, as shown in the following code:
/***
 * IP Current limiting
 * @return
 */
@Bean(name="ipKeyResolver")
public KeyResolver userKeyResolver() {
    return new KeyResolver() {
        @Override
        public Mono<String> resolve(ServerWebExchange exchange) {
            //Get remote client IP
            String hostName = exchange.getRequest().getRemoteAddress().getAddress().getHostAddress();
            System.out.println("hostName:"+hostName);
            return Mono.just(hostName);
        }
    };
}
(3) Modify application The configuration item in YML specifies the configuration of limiting traffic and the configuration of REDIS, as shown in the figure
The modification is as follows:
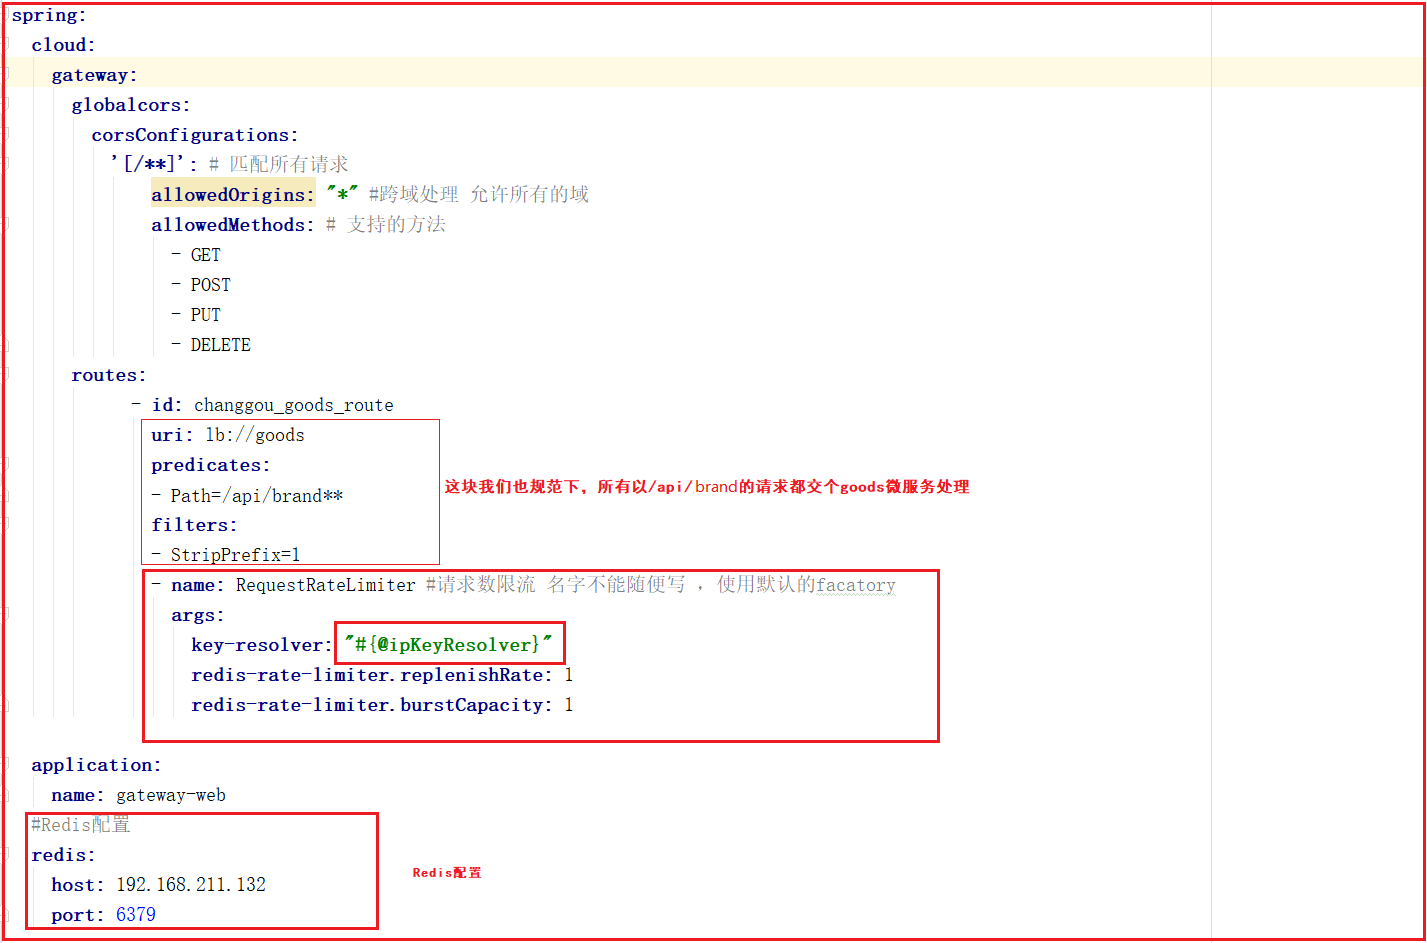
The configuration code is as follows:
spring:
  cloud:
    gateway:
      globalcors:
        corsConfigurations:
          '[/**]': # Match all requests
              allowedOrigins: "*" #Cross domain processing allows all domains
              allowedMethods: # Supported methods
                - GET
                - POST
                - PUT
                - DELETE
      routes:
            - id: changgou_goods_route
              uri: lb://goods
              predicates:
              - Path=/api/brand**
              filters:
              - StripPrefix=1
              - name: RequestRateLimiter #The request stream name cannot be written casually, and the default factor is used
                args:
                  key-resolver: "#{@ipKeyResolver}"
                  redis-rate-limiter.replenishRate: 1
                  redis-rate-limiter.burstCapacity: 1

  application:
    name: gateway-web
  #Redis configuration
  redis:
    host: 192.168.211.132
    port: 6379

server:
  port: 8001
eureka:
  client:
    service-url:
      defaultZone: http://127.0.0.1:7001/eureka
  instance:
    prefer-ip-address: true
management:
  endpoint:
    gateway:
      enabled: true
    web:
      exposure:
        include: true
Explanation:
redis-rate-limiter.replenishRate is how many requests you want to allow users to execute per second without discarding any requests. This is the rate at which the token bucket is filled
redis-rate-limiter.burstCapacity is the capacity of the instruction card bucket and the maximum number of requests allowed to be completed in one second. Setting this value to zero will block all requests.
Key resolver: "#{@ipkeyresolver}" is used to specify which KeyResolver to use through SPEL expression
Configured as above:
Indicates that a request is allowed to pass in one second, and the filling rate of the token bucket is also one token added in one second.
The maximum emergency condition only allows one request per second, which can be adjusted according to the service.
Multiple requests can occur as follows
User login
User information table tb_user
CREATE TABLE `tb_user` (
  `username` varchar(50) NOT NULL COMMENT 'user name',
  `password` varchar(100) NOT NULL COMMENT 'Password, encrypted storage',
  `phone` varchar(20) DEFAULT NULL COMMENT 'Registered mobile number',
  `email` varchar(50) DEFAULT NULL COMMENT 'Mailbox registration',
  `created` datetime NOT NULL COMMENT 'Creation time',
  `updated` datetime NOT NULL COMMENT 'Modification time',
  `source_type` varchar(1) DEFAULT NULL COMMENT 'Member source: 1:PC,2: H5,3: Android,4: IOS',
  `nick_name` varchar(50) DEFAULT NULL COMMENT 'nickname',
  `name` varchar(50) DEFAULT NULL COMMENT 'Real name',
  `status` varchar(1) DEFAULT NULL COMMENT 'Usage status (1 normal 0 abnormal)',
  `head_pic` varchar(150) DEFAULT NULL COMMENT 'Avatar address',
  `qq` varchar(20) DEFAULT NULL COMMENT 'QQ number',
  `is_mobile_check` varchar(1) DEFAULT '0' COMMENT 'Whether the mobile phone is verified (0 No 1 yes)',
  `is_email_check` varchar(1) DEFAULT '0' COMMENT 'Whether the mailbox is detected (0 No 1 yes)',
  `sex` varchar(1) DEFAULT '1' COMMENT 'Gender, 1 male, 0 female',
  `user_level` int(11) DEFAULT NULL COMMENT 'Membership level',
  `points` int(11) DEFAULT NULL COMMENT 'integral',
  `experience_value` int(11) DEFAULT NULL COMMENT 'Experience value',
  `birthday` datetime DEFAULT NULL COMMENT 'Date Of Birth ',
  `last_login_time` datetime DEFAULT NULL COMMENT 'Last login time',
  PRIMARY KEY (`username`),
  UNIQUE KEY `username` (`username`) USING BTREE
) ENGINE=InnoDB DEFAULT CHARSET=utf8 COMMENT='User table';
User micro service
(1) Public API

(2) Rely on
In the POM of Changgou service user XML introduces the following dependencies:
<?xml version="1.0" encoding="UTF-8"?>
<project xmlns="http://maven.apache.org/POM/4.0.0"
         xmlns:xsi="http://www.w3.org/2001/XMLSchema-instance"
         xsi:schemaLocation="http://maven.apache.org/POM/4.0.0 http://maven.apache.org/xsd/maven-4.0.0.xsd">
    <parent>
        <artifactId>changgou-service</artifactId>
        <groupId>com.changgou</groupId>
        <version>1.0-SNAPSHOT</version>
    </parent>
    <modelVersion>4.0.0</modelVersion>
    <artifactId>changgou-service-user</artifactId>

    <!--rely on-->
    <dependencies>
        <dependency>
            <groupId>com.changgou</groupId>
            <artifactId>changgou-service-user-api</artifactId>
            <version>1.0-SNAPSHOT</version>
        </dependency>
    </dependencies>
</project>
(3) Start class creation
Create the startup class com. In the Changgou service user micro service changgou. Userapplication, the code is as follows:
@SpringBootApplication
@EnableEurekaClient
@MapperScan("com.changgou.user.dao")
public class UserApplication {

    public static void main(String[] args) {
        SpringApplication.run(UserApplication.class,args);
    }
}
(4)application.yml configuration
Create an application in the resources of Changgou service user YML configuration, the code is as follows:
server:
  port: 18089
spring:
  application:
    name: user
  datasource:
    driver-class-name: com.mysql.cj.jdbc.Driver
    url: jdbc:mysql://192.168.211.132:3306/changgou_user?useUnicode=true&characterEncoding=UTF-8&serverTimezone=UTC
    username: root
    password: 123456
eureka:
  client:
    service-url:
      defaultZone: http://127.0.0.1:7001/eureka
  instance:
    prefer-ip-address: true
feign:
  hystrix:
    enabled: true
Login business logic
When logging in, password verification is required. BCryptPasswordEncoder is used for encryption. BCrypt in the data needs to be imported into the common project, where BCrypt Checkpw ("plaintext", "ciphertext") is used to compare whether the passwords are consistent.
Modify the com. Of Changgou service user changgou. user. controller. Add login method to usercontroller with the following code:
/***
 * User login
 */
@RequestMapping(value = "/login")
public Result login(String username,String password){
    //Query user information
    User user = userService.findById(username);

    if(user!=null && BCrypt.checkpw(password,user.getPassword())){
        return new Result(true,StatusCode.OK,"Login succeeded!",user);
    }
    return  new Result(false,StatusCode.LOGINERROR,"Wrong account or password!");
}
Note: the password is encrypted here.
Gateway Association
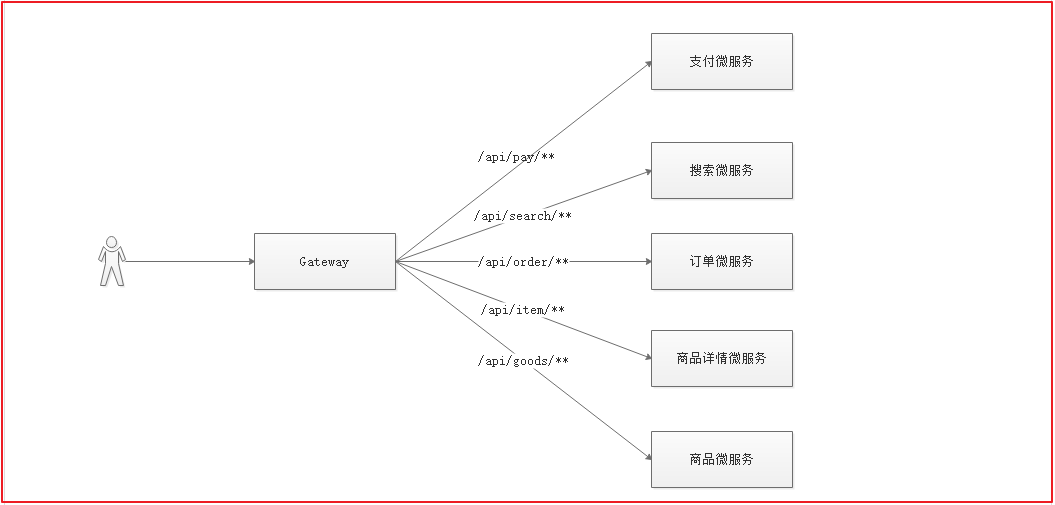
In our daily work, we do not directly expose the microservices. Generally, we use gateway docking to protect the microservices. As shown in the figure above, when the user accesses / api/user /, we call the specified method of the user's microservices according to the user's request. Of course, in addition to / api/user /, / api/address /, / api/areas /, / api/cities /, / api/provinces / all need to be processed by the user micro service to modify the application of the gateway project Changgou gateway web YML configuration file, with the following code:
spring:
  cloud:
    gateway:
      globalcors:
        corsConfigurations:
          '[/**]': # Match all requests
              allowedOrigins: "*" #Cross domain processing allows all domains
              allowedMethods: # Supported methods
                - GET
                - POST
                - PUT
                - DELETE
      routes:
            - id: changgou_goods_route
              uri: lb://goods
              predicates:
              - Path=/api/goods/**
              filters:
              - StripPrefix=1
              - name: RequestRateLimiter #The request stream name cannot be written casually, and the default factor is used
                args:
                  key-resolver: "#{@ipKeyResolver}"
                  redis-rate-limiter.replenishRate: 1
                  redis-rate-limiter.burstCapacity: 1
            #User micro service
            - id: changgou_user_route
              uri: lb://user
              predicates:
              - Path=/api/user/**,/api/address/**,/api/areas/**,/api/cities/**,/api/provinces/**
              filters:
              - StripPrefix=1

  application:
    name: gateway-web
  #Redis configuration
  redis:
    host: 192.168.211.132
    port: 6379

server:
  port: 8001
eureka:
  client:
    service-url:
      defaultZone: http://127.0.0.1:7001/eureka
  instance:
    prefer-ip-address: true
management:
  endpoint:
    gateway:
      enabled: true
    web:
      exposure:
        include: true
Authentication processing based on JWT
JWT token composition
A JWT is actually a string, which consists of three parts: header, payload and signature.
Header
The header is used to describe the most basic information about the JWT, such as its type and the algorithm used for signature. This can also be represented as a JSON object.
{"typ":"JWT","alg":"HS256"}
The header indicates that the signature algorithm is HS256 algorithm. We encode BASE64 http://base64.xpcha.com/ , the encoded string is as follows:
eyJ0eXAiOiJKV1QiLCJhbGciOiJIUzI1NiJ9
Little knowledge: BASE64 is a representation method of binary data based on 64 printable characters. Since the 6th power of 2 is equal to 64, every 6 bits are a unit corresponding to a printable character. Three bytes have 24 bits, corresponding to four BASE64 units, that is, three bytes need to be represented by four printable characters. JDK provides very convenient BASE64Encoder and BASE64Decoder, which can be used to complete BASE64 based encoding and decoding
Load (payload)
Payload is the place where valid information is stored. The name seems to refer specifically to the goods carried on the aircraft. These valid information contains three parts
(1) Declaration registered in the standard (recommended but not mandatory)
iss: jwt Issuer
sub: jwt Target users
aud: receive jwt Party of
exp: jwt The expiration time of must be greater than the issuing time
nbf: Define the time before which the jwt Are not available.
iat: jwt Date of issuance
jti: jwt The unique identification of the, which is mainly used as a one-time identification token,To avoid replay attacks.
(2) Public statement
Any information can be added to the public statement. Generally, the user's relevant information or other necessary information required by the business can be added However, it is not recommended to add sensitive information because this part can be decrypted on the client
(3) Private declaration
Private declaration is a declaration jointly defined by providers and consumers. It is generally not recommended to store sensitive information, because base64 is symmetrically decrypted, which means that this part of information can be classified as plaintext information.
This refers to the custom claim. For example, admin and name in the following face structure examples belong to self-defined claim. The difference between these claims and those specified in the JWT standard lies in: the claims specified in the JWT. After receiving the JWT, the receiver of the JWT knows how to verify the claims of these standards (whether they can be verified or not); private claims will not be verified unless the receiver is explicitly told to verify these claims and rules.
Define a payload:
{"sub":"1234567890","name":"John Doe","admin":true}
Then it is encrypted with base64 to get the second part of Jwt.
eyJzdWIiOiIxMjM0NTY3ODkwIiwibmFtZSI6IkpvaG4gRG9lIiwiYWRtaW4iOnRydWV9
Visa (signature)
The third part of jwt is a visa information, which consists of three parts:
Header (after Base64)
Payload (after Base64)
secret
This part needs base64 encrypted header and base64 encrypted payload The string formed by connection is then encrypted by salt secret combination through the encryption method declared in the header, and then constitutes the third part of jwt.
TJVA95OrM7E2cBab30RMHrHDcEfxjoYZgeFONFh7HgQ
Use these three parts Connected into a complete string to form the final jwt:
eyJhbGciOiJIUzI1NiIsInR5cCI6IkpXVCJ9.eyJzdWIiOiIxMjM0NTY3ODkwIiwibmFtZSI6IkpvaG4gRG9lIiwiYWRtaW4iOnRydWV9.TJVA95OrM7E2cBab30RMHrHDcEfxjoYZgeFONFh7HgQ
The private key is generated by jwt on the server side, so it should be signed and issued by jwt on the server side. Note that the private key is not signed and issued by jwt on the server side. Once the client knows this secret, it means that the client can sign jwt it by itself.
JJWT tool library
JJWT is a Java library that provides end-to-end JWT creation and validation. Always free and open source (Apache License, version 2.0), JJWT is easy to use and understand. It is designed as a smooth interface centered on architecture, hiding most of its complexity.
Official documents:
Create Token
(1) Dependency introduction
POM in the Changgou parent project Add dependency to XML:
<!--authentication -->
<dependency>
    <groupId>io.jsonwebtoken</groupId>
    <artifactId>jjwt</artifactId>
    <version>0.9.0</version>
</dependency>
(2) Create test
Create test classes and set test methods under / test/java in Changgou common
public class JwtTest {

    /****
     * Create Jwt token
     */
    @Test
    public void testCreateJwt(){
        JwtBuilder builder= Jwts.builder()
                .setId("888")             //Set unique number
                .setSubject("Xiaobai")       //The setting theme can be JSON data
                .setIssuedAt(new Date())  //Set issue date
                .signWith(SignatureAlgorithm.HS256,"itcast");//Set the signature to use HS256 algorithm, and set the secret key (string)
        //Build and return a string
        System.out.println( builder.compact() );
    }
}
Run print results:
eyJhbGciOiJIUzI1NiJ9.eyJqdGkiOiI4ODgiLCJzdWIiOiLlsI_nmb0iLCJpYXQiOjE1NjIwNjIyODd9.RBLpZ79USMplQyfJCZFD2muHV_KLks7M1ZsjTu6Aez4
Run again, you will find that the results of each run are different, because our load includes time.
TOKEN parsing
We have just created a token. In a web application, this operation is carried out by the server and sent to the client. The client needs to carry this token when sending a request to the server next time (it's like holding a ticket). The server should parse the information in the token (such as user id) when receiving this token, Query the database according to these information and return the corresponding results.
/***
 * Parsing Jwt token data
 */
@Test
public void testParseJwt(){
    String compactJwt="eyJhbGciOiJIUzI1NiJ9.eyJqdGkiOiI4ODgiLCJzdWIiOiLlsI_nmb0iLCJpYXQiOjE1NjIwNjIyODd9.RBLpZ79USMplQyfJCZFD2muHV_KLks7M1ZsjTu6Aez4";
    Claims claims = Jwts.parser().
            setSigningKey("itcast").
            parseClaimsJws(compactJwt).
            getBody();
    System.out.println(claims);
}
Run print effect:
{jti=888, sub=Xiaobai, iat=1562062287}
If you try to tamper with the token or signature secret key, you will find that an error will be reported at runtime, so parsing the token is to verify the token
At the same time, the Claims class also supports setting the expiration time. If the expiration time is exceeded, the parsing will also report an error
Custom claims
Our example just now only stores id and subject information. If you want to store more information (such as roles), you can define custom claims.
Create a test class and set the test method:
Create token:
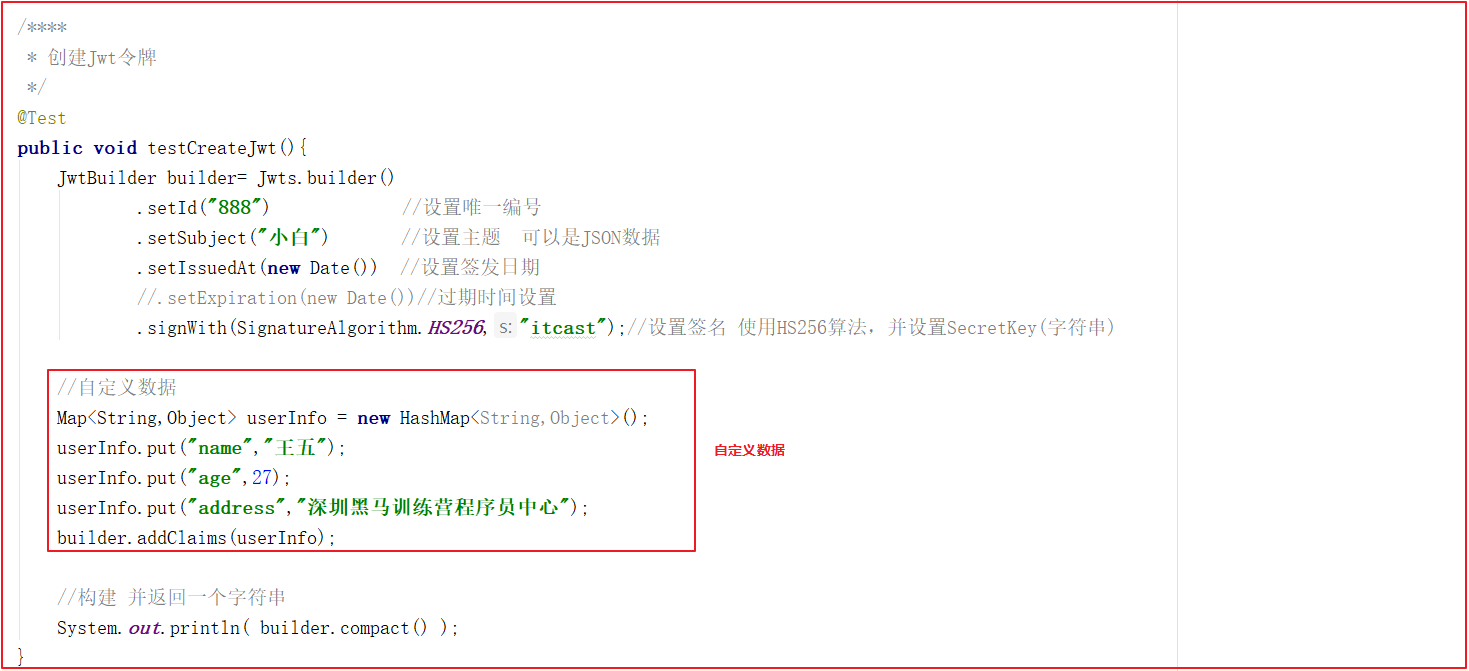
Run print effect:
eyJhbGciOiJIUzI1NiJ9.eyJqdGkiOiI4ODgiLCJzdWIiOiLlsI_nmb0iLCJpYXQiOjE1NjIwNjMyOTIsImFkZHJlc3MiOiLmt7HlnLPpu5Hpqazorq3nu4PokKXnqIvluo_lkZjkuK3lv4MiLCJuYW1lIjoi546L5LqUIiwiYWdlIjoyN30.ZSbHt5qrxz0F1Ma9rVHHAIy4jMCBGIHoNaaPQXxV_dk
Parse TOKEN:
/***
 * Parsing Jwt token data
 */
@Test
public void testParseJwt(){
    String compactJwt="eyJhbGciOiJIUzI1NiJ9.eyJqdGkiOiI4ODgiLCJzdWIiOiLlsI_nmb0iLCJpYXQiOjE1NjIwNjMyOTIsImFkZHJlc3MiOiLmt7HlnLPpu5Hpqazorq3nu4PokKXnqIvluo_lkZjkuK3lv4MiLCJuYW1lIjoi546L5LqUIiwiYWdlIjoyN30.ZSbHt5qrxz0F1Ma9rVHHAIy4jMCBGIHoNaaPQXxV_dk";
    Claims claims = Jwts.parser().
            setSigningKey("itcast").
            parseClaimsJws(compactJwt).
            getBody();
    System.out.println(claims);
}
Operation effect:

Authentication processing
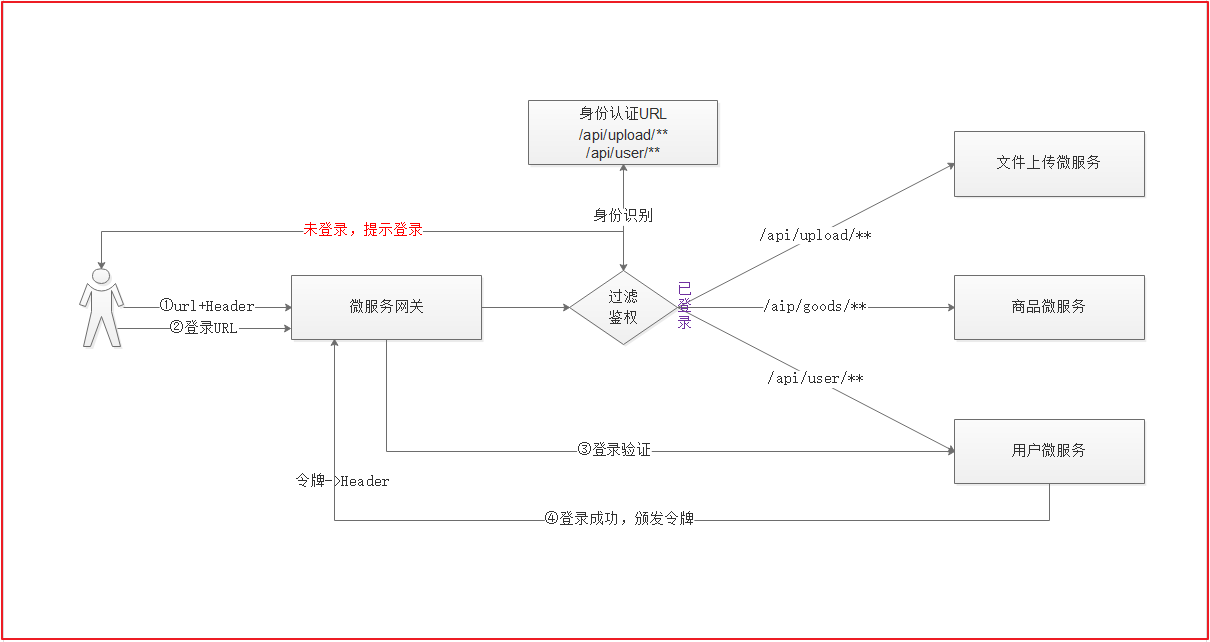
- The user calls the microservice by accessing the microservice gateway and carries the header file information at the same time
- Intercept at the microservice gateway and obtain the path to be accessed by the user after interception
- Identify whether the user's access path requires login. If necessary, identify whether the user's identity can access the path [here, a set of permissions can be designed based on the database]
- If permission access is required and the user has logged in, it will be released
- If permission access is required and the user is not logged in, the user will be prompted to log in
- The user accesses the user's Micro service through the gateway for login authentication
- After the authentication is passed, the user micro service will issue a token to the gateway, and the gateway will encapsulate the user information into the header file and respond to the user
- The next time the user accesses, the user can identify whether to log in by carrying the token information in the header file
User login and sign TOKEN
(1) Generate token tool class
Create the class entity in Changgou common Jwtutil is mainly used to assist in generating Jwt token information. The code is as follows:
public class JwtUtil {

    //Valid for
    public static final Long JWT_TTL = 3600000L;// 60 * 60 * 1000 one hour

    //Jwt token information
    public static final String JWT_KEY = "itcast";

    public static String createJWT(String id, String subject, Long ttlMillis) {
        //Specify algorithm
        SignatureAlgorithm signatureAlgorithm = SignatureAlgorithm.HS256;

        //Current system time
        long nowMillis = System.currentTimeMillis();
        //Token issuing time
        Date now = new Date(nowMillis);

        //If the token validity period is null, the default setting is 1 hour
        if(ttlMillis==null){
            ttlMillis=JwtUtil.JWT_TTL;
        }

        //Token expiration time setting
        long expMillis = nowMillis + ttlMillis;
        Date expDate = new Date(expMillis);

        //Generate secret key
        SecretKey secretKey = generalKey();

        //Encapsulate Jwt token information
        JwtBuilder builder = Jwts.builder()
                .setId(id)                    //Unique ID
                .setSubject(subject)          // Topics can be JSON data
                .setIssuer("admin")          // Issuer
                .setIssuedAt(now)             // Time filed
                .signWith(signatureAlgorithm, secretKey) // Signature algorithm and key
                .setExpiration(expDate);      // Set expiration time
        return builder.compact();
    }

    /**
     * Generate encrypted secretKey
     * @return
     */
    public static SecretKey generalKey() {
        byte[] encodedKey = Base64.getEncoder().encode(JwtUtil.JWT_KEY.getBytes());
        SecretKey key = new SecretKeySpec(encodedKey, 0, encodedKey.length, "AES");
        return key;
    }


    /**
     * Parsing token data
     * @param jwt
     * @return
     * @throws Exception
     */
    public static Claims parseJWT(String jwt) throws Exception {
        SecretKey secretKey = generalKey();
        return Jwts.parser()
                .setSigningKey(secretKey)
                .parseClaimsJws(jwt)
                .getBody();
    }
}
(2) If the user logs in successfully, sign and issue TOKEN, and modify the login method:
/***
 * User login
 */
@RequestMapping(value = "/login")
public Result login(String username,String password){
    //Query user information
    User user = userService.findById(username);

    if(user!=null && BCrypt.checkpw(password,user.getPassword())){
        //Set token information
        Map<String,Object> info = new HashMap<String,Object>();
        info.put("role","USER");
        info.put("success","SUCCESS");
        info.put("username",username);
        //Generate token
        String jwt = JwtUtil.createJWT(UUID.randomUUID().toString(), JSON.toJSONString(info),null);
        return new Result(true,StatusCode.OK,"Login succeeded!",jwt);
    }
    return  new Result(false,StatusCode.LOGINERROR,"Wrong account or password!");
}
Custom global filter
Create a filter class, as shown in the figure:
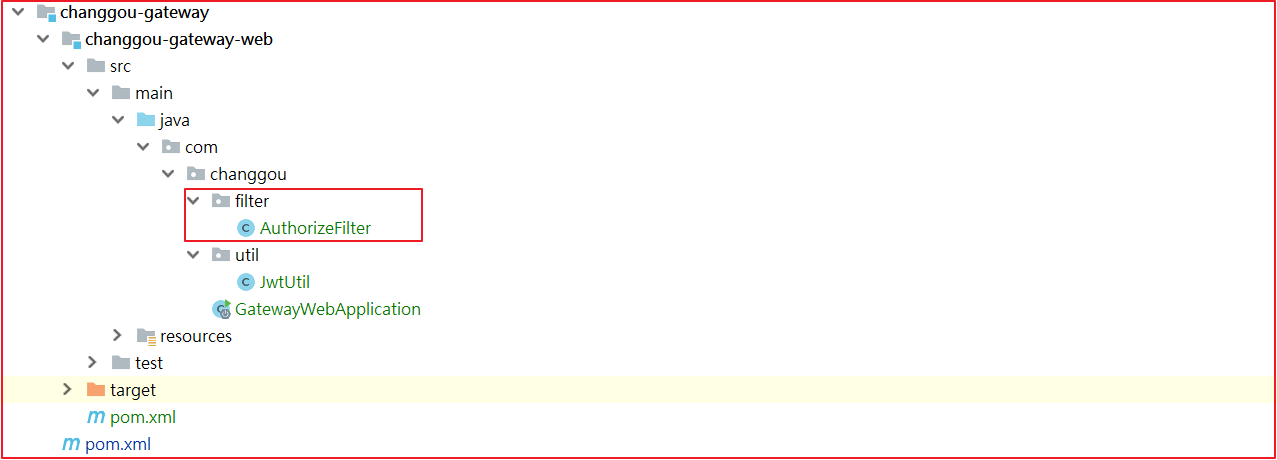
The AuthorizeFilter code is as follows:
@Component
public class AuthorizeFilter implements GlobalFilter, Ordered {

    //Token header name
    private static final String AUTHORIZE_TOKEN = "Authorization";

    /***
     * Global filter
     * @param exchange
     * @param chain
     * @return
     */
    @Override
    public Mono<Void> filter(ServerWebExchange exchange, GatewayFilterChain chain) {
        //Get Request and Response objects
        ServerHttpRequest request = exchange.getRequest();
        ServerHttpResponse response = exchange.getResponse();

        //Gets the URI of the request
        String path = request.getURI().getPath();

        //If it is an open micro service such as login and goods [some of the goods here are open], it will be released directly. There is no complete demonstration here. A set of permission system needs to be designed for the complete demonstration
        if (path.startsWith("/api/user/login") || path.startsWith("/api/brand/search/")) {
            //Release
            Mono<Void> filter = chain.filter(exchange);
            return filter;
        }

        //Get token information in header file
        String tokent = request.getHeaders().getFirst(AUTHORIZE_TOKEN);

        //If not in the header file, it is obtained from the request parameters
        if (StringUtils.isEmpty(tokent)) {
            tokent = request.getQueryParams().getFirst(AUTHORIZE_TOKEN);
        }

        //If it is empty, the error code is output
        if (StringUtils.isEmpty(tokent)) {
            //The setting method is not allowed to be accessed, 405 error code
           response.setStatusCode(HttpStatus.METHOD_NOT_ALLOWED);
           return response.setComplete();
        }

        //Parsing token data
        try {
            Claims claims = JwtUtil.parseJWT(tokent);
        } catch (Exception e) {
            e.printStackTrace();
            //Parsing failed, response error
            response.setStatusCode(HttpStatus.UNAUTHORIZED);
            return response.setComplete();
        }

        //Release
        return chain.filter(exchange);
    }


    /***
     * Filter execution sequence
     * @return
     */
    @Override
    public int getOrder() {
        return 0;
    }
}
Configure filtering rules
Modify the yml file of the gateway system:
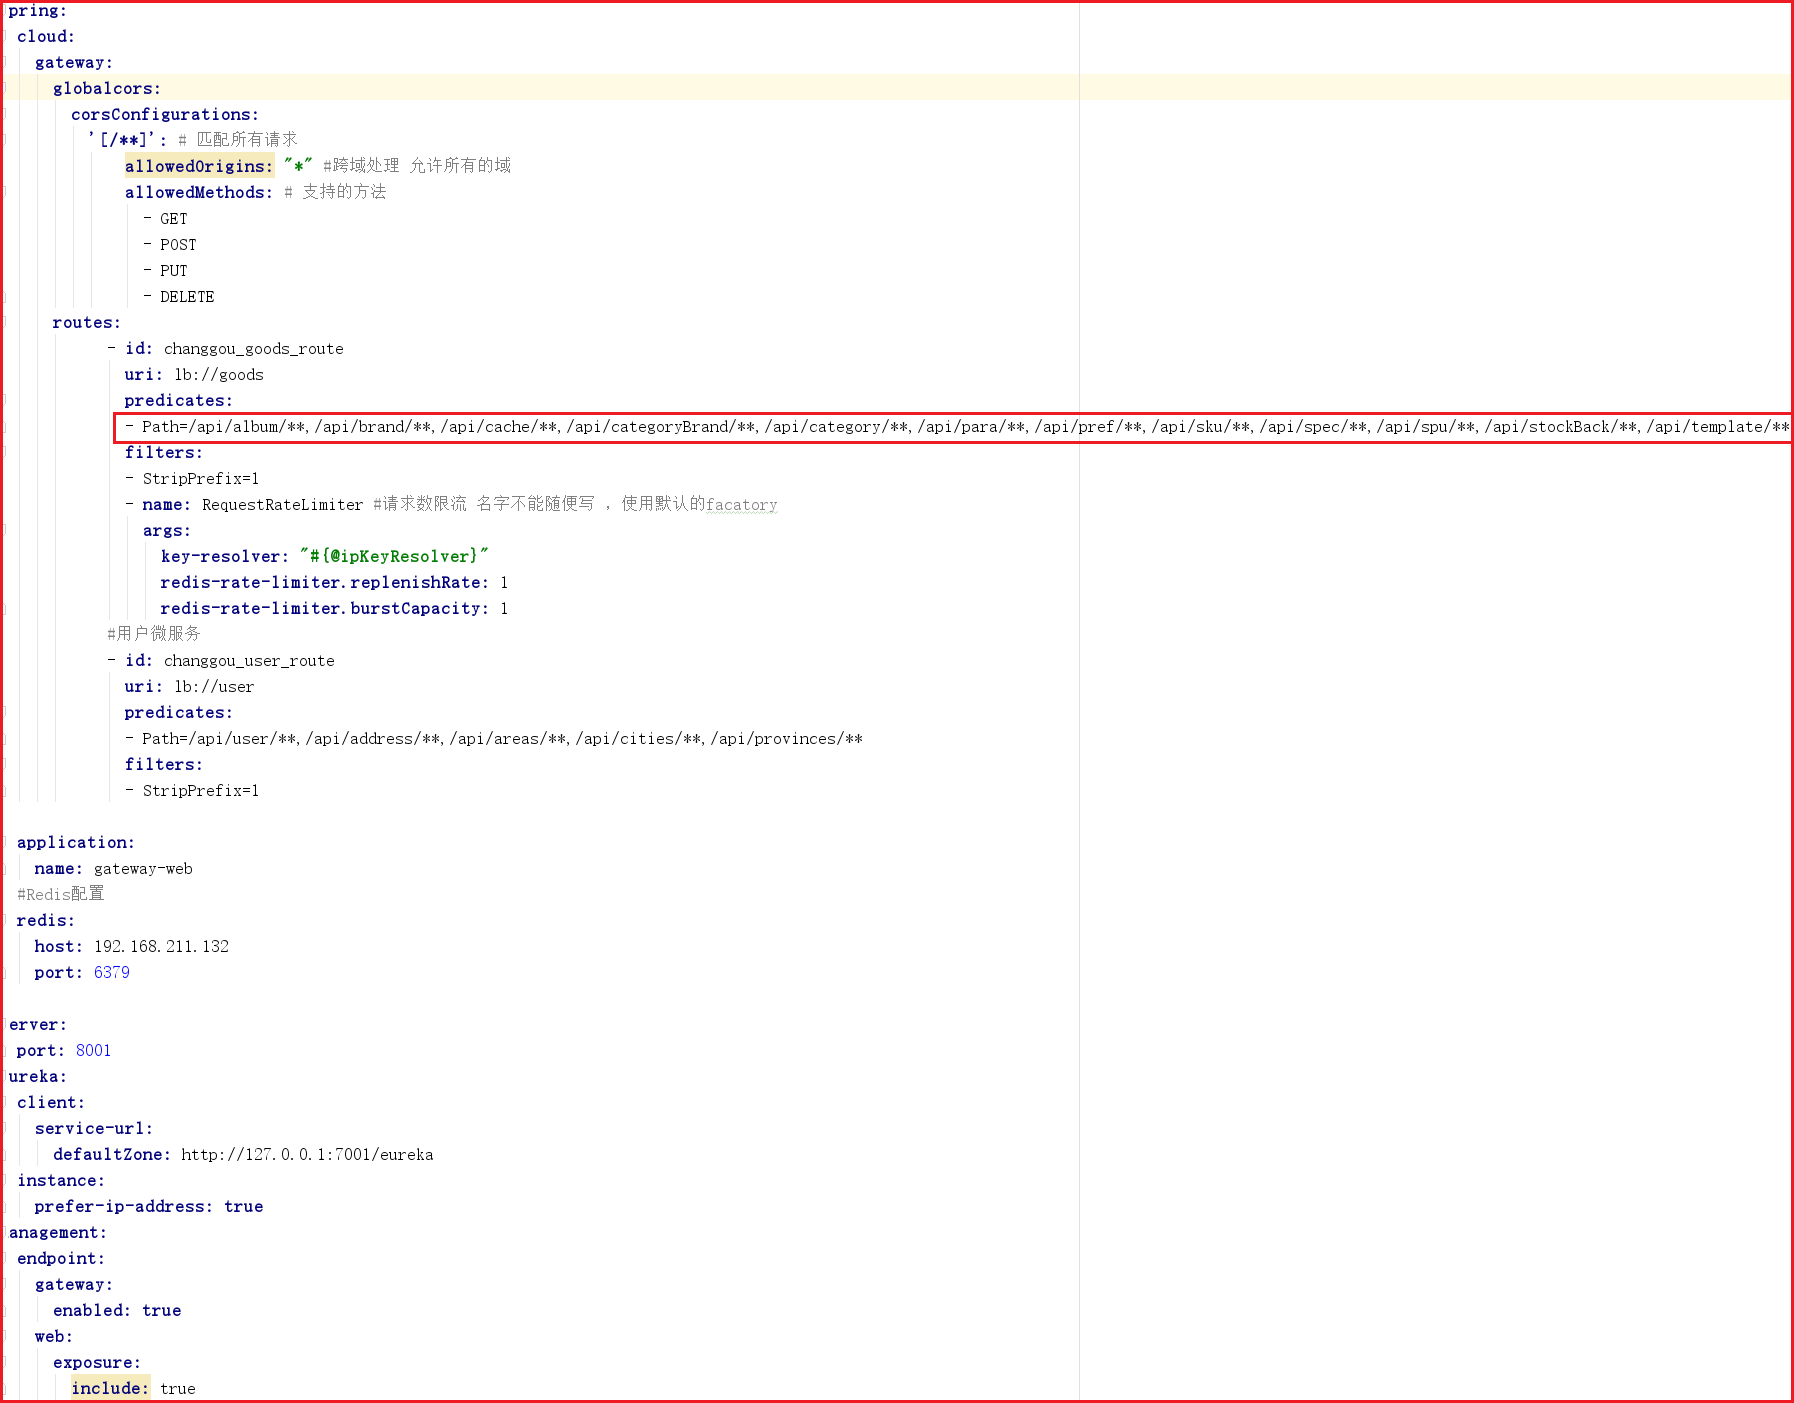
The above codes are as follows:
spring:
  cloud:
    gateway:
      globalcors:
        corsConfigurations:
          '[/**]': # Match all requests
              allowedOrigins: "*" #Cross domain processing allows all domains
              allowedMethods: # Supported methods
                - GET
                - POST
                - PUT
                - DELETE
      routes:
            - id: changgou_goods_route
              uri: lb://goods
              predicates:
              - Path=/api/album/**,/api/brand/**,/api/cache/**,/api/categoryBrand/**,/api/category/**,/api/para/**,/api/pref/**,/api/sku/**,/api/spec/**,/api/spu/**,/api/stockBack/**,/api/template/**
              filters:
              - StripPrefix=1
              - name: RequestRateLimiter #The request stream name cannot be written casually, and the default factor is used
                args:
                  key-resolver: "#{@ipKeyResolver}"
                  redis-rate-limiter.replenishRate: 1
                  redis-rate-limiter.burstCapacity: 1
            #User micro service
            - id: changgou_user_route
              uri: lb://user
              predicates:
              - Path=/api/user/**,/api/address/**,/api/areas/**,/api/cities/**,/api/provinces/**
              filters:
              - StripPrefix=1

  application:
    name: gateway-web
  #Redis configuration
  redis:
    host: 192.168.211.132
    port: 6379

server:
  port: 8001
eureka:
  client:
    service-url:
      defaultZone: http://127.0.0.1:7001/eureka
  instance:
    prefer-ip-address: true
management:
  endpoint:
    gateway:
      enabled: true
    web:
      exposure:
        include: true
Session retention
Every time the user requests, we need to obtain the token data. There are multiple methods. We can submit the data to the header file or store the data in the Cookie every time, verify the data from the Cookie every time, and submit the token data to the gateway in the form of parameters every time. It is easier to implement using Cookie.
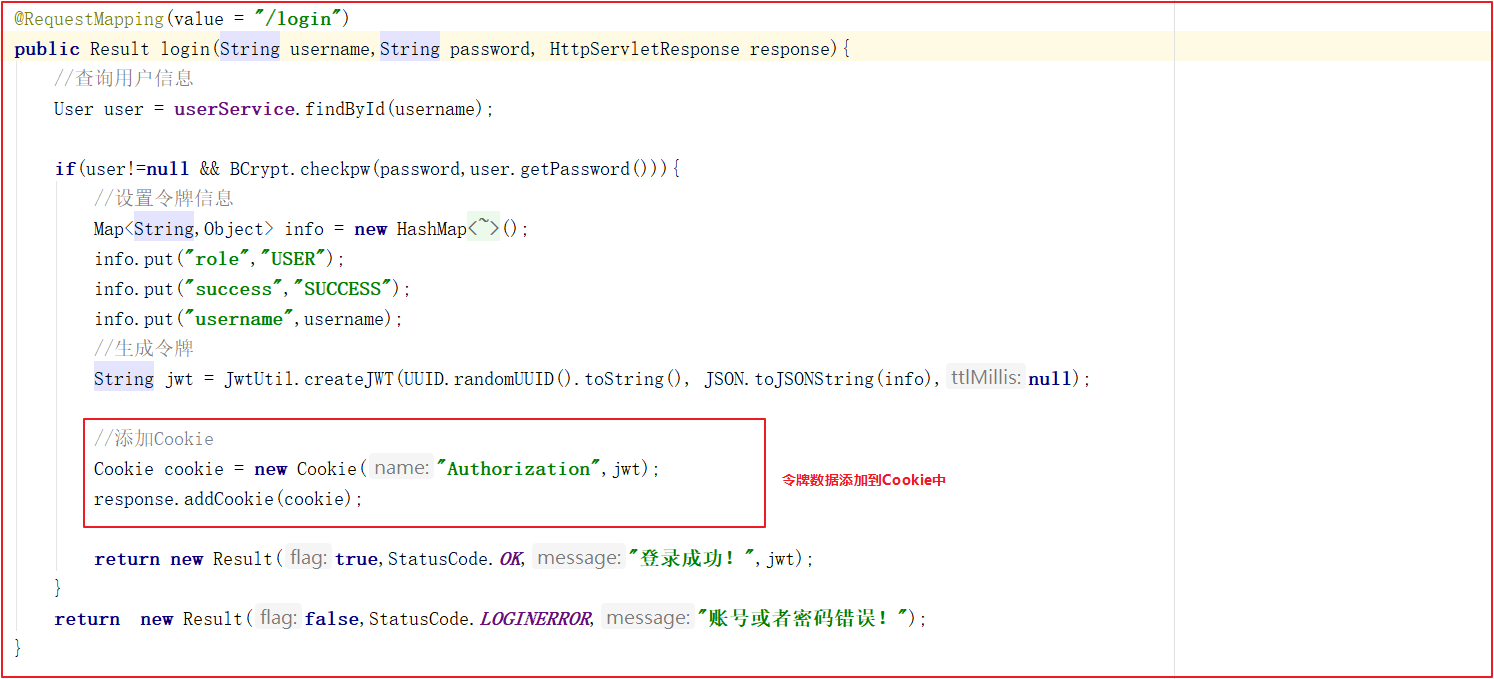
Login encapsulation Cookie
Modify the user micro service, add the token information to the Cookie every time you log in, and modify the com. Of Changgou service user changgou. user. controller. The login method of usercontroller is as follows
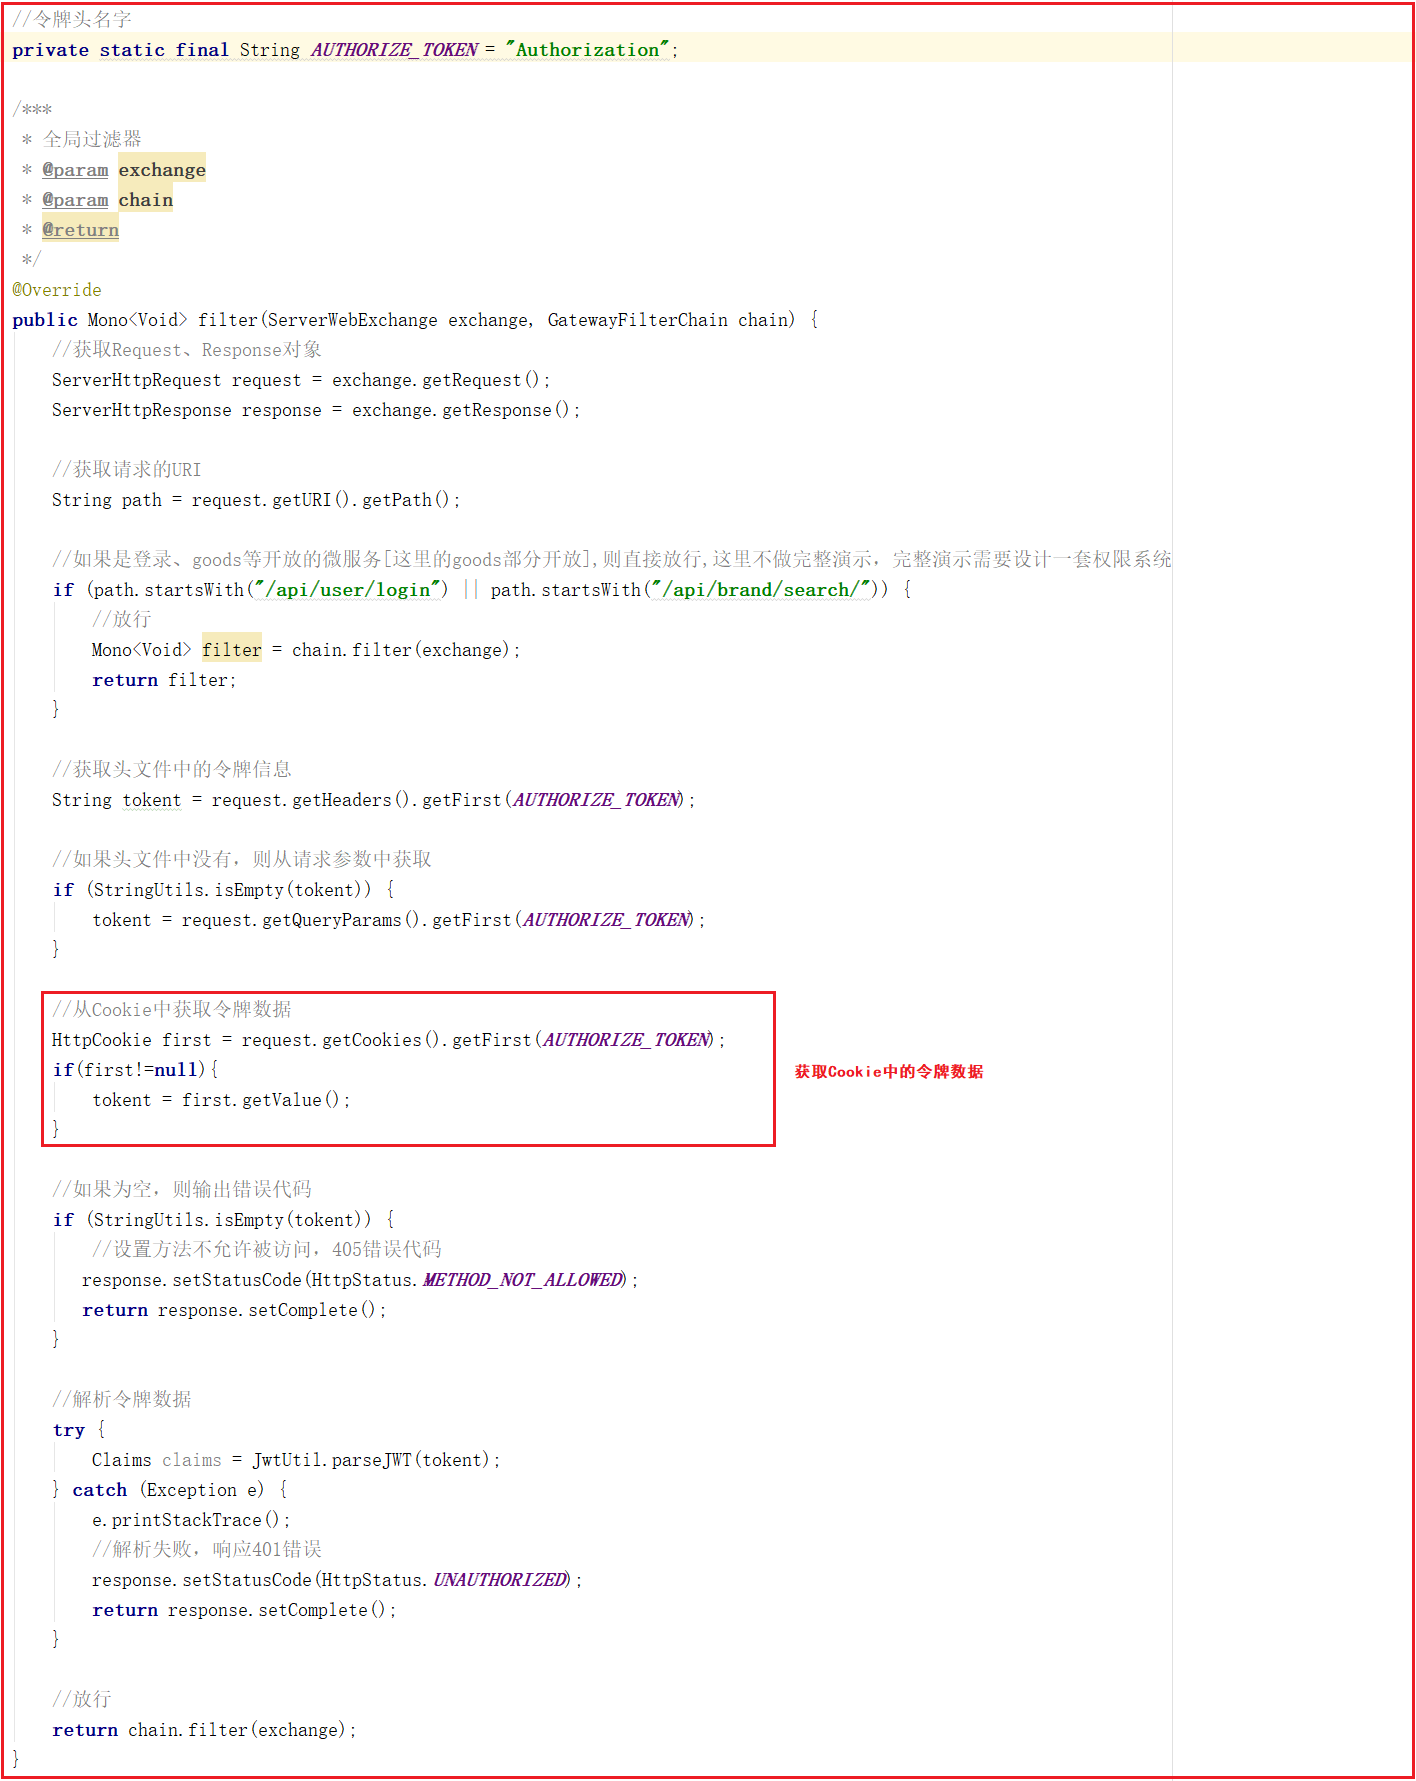
Filter get token data
Each time, obtain the token in the Cookie through the filter in the gateway, analyze the token data, and modify the AuthorizeFilter in the micro service gateway Changgou gateway web. The code is as follows:
Add Header information
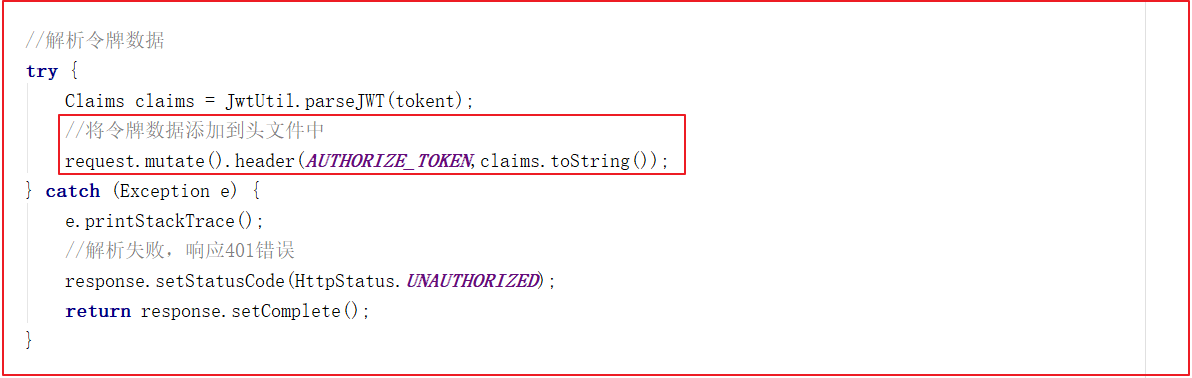
We can also add the request header information in the global filter of Gateway. For example, we can add the token information to the request header and obtain the header information in the micro service, as shown in the following code:
Modify the AuthorizeFilter filter in the microservice gateway and add the token to the request header in the token information verification block, as shown in the following code: