In previous chapters, the author generally used QLabel control to display pictures. But what if you want to use a lot of pictures? Do you want to instantiate many QLabel controls to display them one by one? How to manage it? Of course, we can't do such a thing with QLabel control, otherwise it will be very troublesome and chaotic. The graphical view in PyQt5 allows us to manage and interact with a large number of custom 2D primitives. The framework uses BSP (Binary Space Partitioning - Binary Space Partitioning) tree to quickly find graphic elements. Therefore, even if a view scene contains millions of elements, it can be displayed in real time. If you want to use PyQt5 to make a slightly more complex game, the graphical view must be used.
The graphic view framework mainly includes three classes: QGraphicsItem primitive class, QGraphicsScene scene class and QGraphicsView view view class. In a simple sentence, the relationship between the three is: the elements are placed on the scene, and the scene content is displayed through the view. Let's explain them one by one.
34.1 QGraphicsItem diagram metaclass
Elements can be text, pictures, regular geometry or any custom graphics. This class already provides some standard elements, such as:
- Line entity QGraphicsLineItem
- Rectangular primitive QGraphicsRectItem
- Ellipse primitive QGraphicsEllipseItem
- Picture primitive QGraphicsPixmapItem
- Text primitive QGraphicsTextItem
- Path entity QGraphicsPathItem
You can also know what these elements are used for by name. We will demonstrate how to use them through the following code:
import sys
from PyQt5.QtCore import Qt
from PyQt5.QtGui import QPixmap, QColor, QPainterPath
from PyQt5.QtWidgets import QApplication, QGraphicsItem, QGraphicsLineItem, QGraphicsRectItem, QGraphicsEllipseItem, \
                            QGraphicsPixmapItem, QGraphicsTextItem, QGraphicsPathItem, QGraphicsScene, QGraphicsView


class Demo(QGraphicsView):
    def __init__(self):
        super(Demo, self).__init__()
        # 1
        self.resize(300, 300)

        # 2
        self.scene = QGraphicsScene()
        self.scene.setSceneRect(0, 0, 300, 300)

        # 3
        self.line = QGraphicsLineItem()
        self.line.setLine(100, 10, 200, 10)
        # self.line.setLine(QLineF(100, 10, 200, 10))

        # 4
        self.rect = QGraphicsRectItem()
        self.rect.setRect(100, 30, 100, 30)
        # self.rect.setRect(QRectF(100, 30, 100, 30))

        # 5
        self.ellipse = QGraphicsEllipseItem()
        self.ellipse.setRect(100, 80, 100, 20)
        # self.ellipse.setRect(QRectF(100, 80, 100, 20))

        # 6
        self.pic = QGraphicsPixmapItem()
        self.pic.setPixmap(QPixmap('pic.png').scaled(60, 60))
        self.pic.setFlags(QGraphicsItem.ItemIsSelectable | QGraphicsItem.ItemIsMovable)
        self.pic.setOffset(100, 120)
        # self.pic.setOffset(QPointF(100, 120))

        # 7
        self.text1 = QGraphicsTextItem()
        self.text1.setPlainText('Hello PyQt5')
        self.text1.setDefaultTextColor(QColor(66, 222, 88))
        self.text1.setPos(100, 180)

        self.text2 = QGraphicsTextItem()
        self.text2.setPlainText('Hello World')
        self.text2.setTextInteractionFlags(Qt.TextEditorInteraction)
        self.text2.setPos(100, 200)

        self.text3 = QGraphicsTextItem()
        self.text3.setHtml('<a href="https://baidu. Com "> Baidu < / a > ')
        self.text3.setOpenExternalLinks(True)
        self.text3.setTextInteractionFlags(Qt.TextBrowserInteraction)
        self.text3.setPos(100, 220)

        # 8
        self.path = QGraphicsPathItem()

        self.tri_path = QPainterPath()
        self.tri_path.moveTo(100, 250)
        self.tri_path.lineTo(130, 290)
        self.tri_path.lineTo(100, 290)
        self.tri_path.lineTo(100, 250)
        self.tri_path.closeSubpath()

        self.path.setPath(self.tri_path)

        # 9
        self.scene.addItem(self.line)
        self.scene.addItem(self.rect)
        self.scene.addItem(self.ellipse)
        self.scene.addItem(self.pic)
        self.scene.addItem(self.text1)
        self.scene.addItem(self.text2)
        self.scene.addItem(self.text3)
        self.scene.addItem(self.path)

        # 10
        self.setScene(self.scene)


if __name__ == '__main__':
    app = QApplication(sys.argv)
    demo = Demo()
    demo.show()
    sys.exit(app.exec_())
-
This class directly inherits QGraphicsView, so the window is the view, and the size is 300x300;
-
Instantiate a QGraphicsScene scene and call the setSceneRect(x, y, w, h) method to set the scene coordinate origin and size. From the code, we know that the coordinate origin is (0, 0), and then the elements added to the scene will set the position according to the coordinate (for more information about coordinates, the author will explain it in section 34.4). The size of the scene is 300x300, which is the same as the view size;
-
Instantiate a QGraphicsLineItem line entity, and call the setLine() method to set the coordinates of both ends of the line. This method can pass in either four values directly or a QLineF object. The document is very clear:
[the external link image transfer fails. The source station may have an anti-theft chain mechanism. It is recommended to save the image and upload it directly (img-mh5Ronym-1641378986725)(data:image/svg+xml;utf8, )]
4-5. Similar to straight line primitives, rectangular primitives and elliptical primitives are instantiated respectively, and corresponding methods are called to set the position and size;
-
Instantiate a picture primitive and call setPixmap() method to set the picture. The QPixmap object has a scaled() method to set the size of the picture (of course, we can also use the setScale() method of QGraphicsItem). Then we set the Flag property of the primitive so that it can be selected and moved. This is a common method for all primitives. Finally, the setOffset() method is used to set the offset of the picture relative to the origin of the scene coordinates.
-
Three text primitives are instantiated here to display ordinary green text, editable text and hyperlink text (HTML) respectively. The setDefaultColor() method can be used to set the color of the text, and setPos() is used to set the position of the text primitive relative to the scene coordinate origin (this method is common to all primitives, and we can also use it on other types of primitives of course).
setTextInteractionFlags() is used to set the text attribute, QT The texteditorinteraction parameter is represented as an editable attribute (equivalent to editing text on QTextEdit), and the last QT Textbrowserinteraction indicates that the text is used for browsing (equivalent to the text on the qtext browser). For more properties, you can search Qt::TextInteractionFlags in the document.
Of course, if we want the hyperlink text to be opened, we also need to use the setOpenExternalLinks() method and pass in a True parameter.
-
Path primitives can be used to display graphics of any shape. The setPath() method needs to pass in a QPainterPath object, which we use to draw. The moveTo() method means to move the brush to the corresponding position, the lineTo() method means to draw a straight line, and the closeSubpath() method means that the current painting is over (refer to the document for more methods on QPaintPath object). Here we draw a right triangle;
-
Call the addItem() method of the scene to add all elements;
-
Call the setScene() method to center the scene in the view.
Picture pic Png download address: https://www.easyicon.net/download/png/1214130/128/
The operation screenshot is as follows:
[the external link image transfer fails. The source station may have an anti-theft chain mechanism. It is recommended to save the image and upload it directly (img-G0yxCBo1-1641378986726)(data:image/svg+xml;utf8, )]
Pictures can be selected and moved:
[the external link image transfer fails. The source station may have an anti-theft chain mechanism. It is recommended to save the image and upload it directly (img-7WmiGKWi-1641378986727)(data:image/svg+xml;utf8, )]
Hello World text can be edited:
[the external link image transfer fails. The source station may have an anti-theft chain mechanism. It is recommended to save the image and upload it directly (img-UZmNVKnR-1641378986727)(data:image/svg+xml;utf8, )]
QGraphicsItem also supports the following features:
- Mouse press, move, release, and double-click events, as well as mouse hover events, scroll wheel events, and right-click menu events
- Keyboard input events
- Drag and drop events
- grouping
- collision detection
The implementation of event function is very simple. We won't talk about it in detail here. We will focus on understanding how it is passed in the graphical view framework. See the following code:
import sys
from PyQt5.QtWidgets import QApplication, QGraphicsRectItem, QGraphicsScene, QGraphicsView


class CustomItem(QGraphicsRectItem):
    def __init__(self):
        super(CustomItem, self).__init__()
        self.setRect(100, 30, 100, 30)

    def mousePressEvent(self, event):
        print('event from QGraphicsItem')
        super().mousePressEvent(event)


class CustomScene(QGraphicsScene):
    def __init__(self):
        super(CustomScene, self).__init__()
        self.setSceneRect(0, 0, 300, 300)

    def mousePressEvent(self, event):
        print('event from QGraphicsScene')
        super().mousePressEvent(event)


class CustomView(QGraphicsView):
    def __init__(self):
        super(CustomView, self).__init__()
        self.resize(300, 300)

    def mousePressEvent(self, event):
        print('event from QGraphicsView')
        super().mousePressEvent(event)


if __name__ == '__main__':
    app = QApplication(sys.argv)
    view = CustomView()
    scene = CustomScene()
    item = CustomItem()

    scene.addItem(item)
    view.setScene(scene)

    view.show()
    sys.exit(app.exec_())
Primitives, scenes and views actually have their own event functions. We inherited QGraphicsRectItem, QGraphicsScene and QGraphicsView respectively and re implemented their mousePressEvent() event functions. We all print a sentence to let users know which function was executed.
The operation screenshot is as follows:
[the external link image transfer fails. The source station may have an anti-theft chain mechanism. It is recommended to save the image and upload it directly (IMG jsfpk9xf-1641378986728) (data: image / SVG + XML; utf8, )]
After clicking in the rectangular box, we found that the console entered the following information:
[the external link image transfer fails. The source station may have an anti-theft chain mechanism. It is recommended to save the image and upload it directly (img-uiBgNBe6-1641378986729)(data:image/svg+xml;utf8, )]
It can be seen that the transmission order of events is view - > scene - > element. It should be noted that if we re implement the event function, we must call the corresponding parent event function, otherwise the event cannot be passed smoothly. Suppose I put super () under the event function in the CustomView class If the line mousepressevent (event) is deleted, the console will only output "event from QGraphicsView":
[the external link image transfer fails. The source station may have an anti-theft chain mechanism. It is recommended to save the image and upload it directly (img-ZBVj0O0H-1641378986730)(data:image/svg+xml;utf8, )]
Another element can be added to an element (an element can be the parent of another element). What is the sequence of event transmission between elements? See the following code:
import sys
from PyQt5.QtWidgets import QApplication, QGraphicsRectItem, QGraphicsScene, QGraphicsView


class CustomItem(QGraphicsRectItem):
    def __init__(self, num):
        super(CustomItem, self).__init__()
        self.setRect(100, 30, 100, 30)
        self.num = num

    def mousePressEvent(self, event):
        print('event from QGraphicsItem{}'.format(self.num))
        super().mousePressEvent(event)


if __name__ == '__main__':
    app = QApplication(sys.argv)
    view = QGraphicsView()
    scene = QGraphicsScene()
    item1 = CustomItem(1)
    item2 = CustomItem(2)
    item2.setParentItem(item1)

    scene.addItem(item1)
    view.setScene(scene)

    view.show()
    sys.exit(app.exec_())
Because two rectangular image sources are instantiated, in order to distinguish, we add a num parameter to the initialization function of CustomItem, and then print the number passed in during instantiation in the event function.
Call the setParentItem() method to set item1 as the parent of item2, and then add item1 to the scene (item2 will be added naturally).
The operation screenshot is as follows:
[the external link image transfer fails. The source station may have an anti-theft chain mechanism. It is recommended to save the image and upload it directly (img-EToCXIcd-1641378986730)(data:image/svg+xml;utf8, )]
Click in the rectangular box and the console will print as follows:
[the external link image transfer fails. The source station may have an anti-theft chain mechanism. It is recommended to save the image and upload it directly (img-Aq8dF4Cj-1641378986731)(data:image/svg+xml;utf8, )]
This shows that the event is passed from the child entity to the parent entity. Similarly, if super () is not added Mousepressevent (event), the event will stop transmitting, and finally only "event from QGraphicsItem2" will be displayed:
[the external link image transfer fails. The source station may have an anti-theft chain mechanism. It is recommended to save the image and upload it directly (img-UGOSR6qS-1641378986732)(data:image/svg+xml;utf8, )]
Please be sure to understand the transmission sequence of events, so as to better use the graphical view framework.
The so-called grouping is to classify each element, and the elements divided together will act together (select, move, copy, etc.). Let's demonstrate this with the following code:
import sys
from PyQt5.QtCore import Qt
from PyQt5.QtGui import QPen, QBrush
from PyQt5.QtWidgets import QApplication, QGraphicsItem, QGraphicsRectItem, QGraphicsEllipseItem, QGraphicsScene, \
                            QGraphicsView, QGraphicsItemGroup


class Demo(QGraphicsView):
    def __init__(self):
        super(Demo, self).__init__()
        self.resize(300, 300)

        self.scene = QGraphicsScene()
        self.scene.setSceneRect(0, 0, 300, 300)

        # 1
        self.rect1 = QGraphicsRectItem()
        self.rect2 = QGraphicsRectItem()
        self.ellipse1 = QGraphicsEllipseItem()
        self.ellipse2 = QGraphicsEllipseItem()

        self.rect1.setRect(100, 30, 100, 30)
        self.rect2.setRect(100, 80, 100, 30)
        self.ellipse1.setRect(100, 140, 100, 20)
        self.ellipse2.setRect(100, 180, 100, 50)

        # 2
        pen1 = QPen(Qt.SolidLine)
        pen1.setColor(Qt.blue)
        pen1.setWidth(3)
        pen2 = QPen(Qt.DashLine)
        pen2.setColor(Qt.red)
        pen2.setWidth(2)

        brush1 = QBrush(Qt.SolidPattern)
        brush1.setColor(Qt.blue)
        brush2 = QBrush(Qt.SolidPattern)
        brush2.setColor(Qt.red)

        self.rect1.setPen(pen1)
        self.rect1.setBrush(brush1)
        self.rect2.setPen(pen2)
        self.rect2.setBrush(brush2)
        self.ellipse1.setPen(pen1)
        self.ellipse1.setBrush(brush1)
        self.ellipse2.setPen(pen2)
        self.ellipse2.setBrush(brush2)

        # 3
        self.group1 = QGraphicsItemGroup()
        self.group2 = QGraphicsItemGroup()
        self.group1.addToGroup(self.rect1)
        self.group1.addToGroup(self.ellipse1)
        self.group2.addToGroup(self.rect2)
        self.group2.addToGroup(self.ellipse2)
        self.group1.setFlags(QGraphicsItem.ItemIsSelectable | QGraphicsItem.ItemIsMovable)
        self.group2.setFlags(QGraphicsItem.ItemIsSelectable | QGraphicsItem.ItemIsMovable)
        print(self.group1.boundingRect())
        print(self.group2.boundingRect())

        # 4
        self.scene.addItem(self.group1)
        self.scene.addItem(self.group2)

        self.setScene(self.scene)


if __name__ == '__main__':
    app = QApplication(sys.argv)
    demo = Demo()
    demo.show()
    sys.exit(app.exec_())
-
Instantiate four primitives, two are rectangles and two are ellipses, and call setRect() method to set coordinates and size;
-
Instantiate two kinds of brushes and two kinds of brushes for element style setting;
-
Instantiate two QGraphicsGroup grouping objects and add both rectangles and ellipses. rect1 and ellipse1 are in group1, while rect2 and ellipse2 are in group2. Then call the setFlags() method to set the properties so that the group can be selected and moved. The boundRect() method returns a QRectF value, which can display the boundary position and size of the group;
-
Add a group to the scene.
The operation screenshot is as follows:
[the external link image transfer fails. The source station may have an anti-theft chain mechanism. It is recommended to save the image and upload it directly (img-lz5avygY-1641378986733)(data:image/svg+xml;utf8, )]
Blue rectangles and ellipses are a group, which can be selected and moved at the same time. The same is true for red. The black border is the boundary, and its position and size can be obtained by the boundRect() method. Through the following screenshot, we can find that the position and size of the boundary of QGraphicsItemGroup are determined by the whole entity in it:
[the external link image transfer fails. The source station may have an anti-theft chain mechanism. It is recommended to save the image and upload it directly (img-UQ4oavor-1641378986734)(data:image/svg+xml;utf8, )]
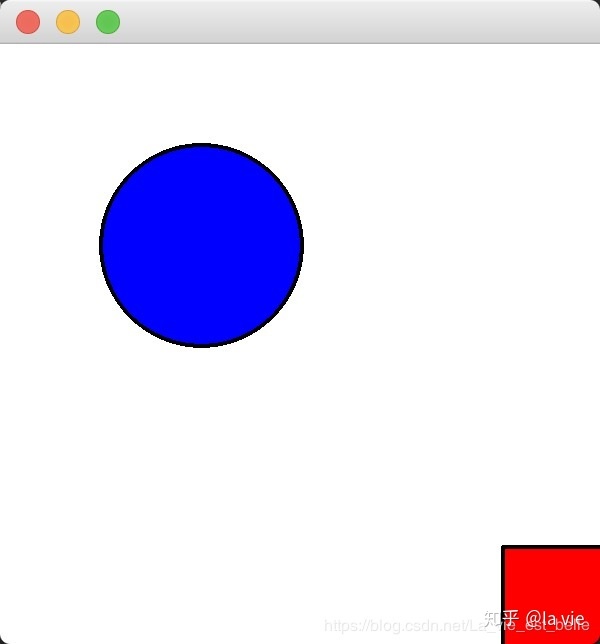
Collision detection is very useful in the game. For example, in the aircraft war game, if the bullets do not have collision detection with the enemy aircraft, the enemy aircraft will not be destroyed, the reward will not be increased, and the game will be meaningless. Let's take you through the following example to learn how to perform collision detection on elements:
[the external link image transfer fails. The source station may have an anti-theft chain mechanism. It is recommended to save the image and upload it directly (img-7c7bbJBr-1641378986736)(data:image/svg+xml;utf8, )]
There is a rectangular primitive and an elliptical primitive on the interface, both of which can be selected and moved. Let's do collision detection for the two. Before that, let's understand the difference between the boundingRect() boundary and the shape(). Look at the elliptical entities below:
[the external link image transfer fails. The source station may have an anti-theft chain mechanism. It is recommended to save the image and upload it directly (img-4UC3dgsB-1641378986736)(data:image/svg+xml;utf8, )]
When this element is selected, the dotted line part shows the boundary of the element, and the shape refers to the element itself, that is, the black solid line part. Collision detection can range from boundary to shape. If we take the boundary as the range in the code, the collision detection will be triggered as soon as the dotted line of the ellipse touches the rectangular primitive; If the shape is the range, the collision detection will be triggered only when the black solid line of the ellipse meets the rectangle.
Here are several specific detection methods:
[the external link image transfer fails. The source station may have an anti-theft chain mechanism. It is recommended to save the image and upload it directly (img-d0yO3p7x-1641378986737)(data:image/svg+xml;utf8, )]
Here is a code example:
import sys
from PyQt5.QtCore import Qt
from PyQt5.QtWidgets import QApplication, QGraphicsItem, QGraphicsRectItem, QGraphicsEllipseItem, QGraphicsScene, \
                            QGraphicsView


class Demo(QGraphicsView):
    def __init__(self):
        super(Demo, self).__init__()
        self.resize(300, 300)

        self.scene = QGraphicsScene()
        self.scene.setSceneRect(0, 0, 300, 300)

        self.rect = QGraphicsRectItem()
        self.ellipse = QGraphicsEllipseItem()
        self.rect.setRect(120, 30, 50, 30)
        self.ellipse.setRect(100, 180, 100, 50)
        self.rect.setFlags(QGraphicsItem.ItemIsMovable | QGraphicsItem.ItemIsSelectable)
        self.ellipse.setFlags(QGraphicsItem.ItemIsMovable | QGraphicsItem.ItemIsSelectable)

        self.scene.addItem(self.rect)
        self.scene.addItem(self.ellipse)

        self.setScene(self.scene)

    def mouseMoveEvent(self, event):
        if self.ellipse.collidesWithItem(self.rect, Qt.IntersectsItemBoundingRect):
            print(self.ellipse.collidingItems(Qt.IntersectsItemShape))
        super().mouseMoveEvent(event)


if __name__ == '__main__':
    app = QApplication(sys.argv)
    demo = Demo()
    demo.show()
    sys.exit(app.exec_())
The code in the initialization function must be understood by everyone. We won't talk about it here. Let's focus on the mouseMoveEvent() event function.
We call the colladeswithitem () method of the elliptical primitive to specify other primitives to be collided with and the detection method. Other primitives refer to rectangular primitives, and we can see that the range here is based on the boundary of ellipse, and detection will be triggered as long as two primitives have intersection. If the collision condition is True, colledeswithitem () will return a True, and the if condition judgment is also True.
After specifying the detection method, the collidingItems() method can return all other elements that meet the collision conditions, and the return value type is list. The detection method here takes the shape as the range, and there is also an intersection.
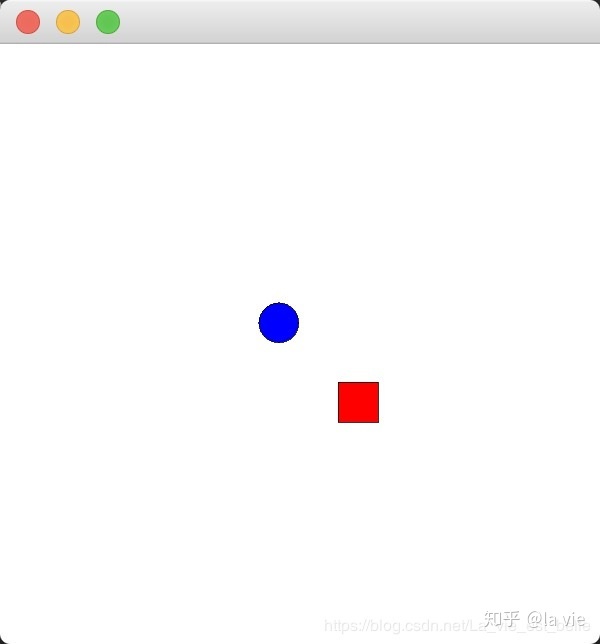
The mouseMoveEvent() event function means that when the boundary of the ellipse contacts the rectangle, the if condition is true, but at this time, the printed list is only empty, because the ellipse itself (black solid line) has not contacted the rectangle. However, when touched, the console will output a list containing rectangular elements.
[the external link image transfer fails. The source station may have an anti-theft chain mechanism. It is recommended to save the image and upload it directly (IMG sbhdqaha-1641378986737) (data: image / SVG + XML; utf8, )]
[the external link image transfer fails. The source station may have an anti-theft chain mechanism. It is recommended to save the image and upload it directly (img-3MvHHLOL-1641378986738)(data:image/svg+xml;utf8, )]
Please call the collidesWithItem() and collidingItems() methods of rectangular elements to try and see the difference. That is, modify the mouseMoveEvent() event function as follows:
def mouseMoveEvent(self, event):
    if self.rect.collidesWithItem(self.ellipse, Qt.IntersectsItemBoundingRect):
        print(self.rect.collidingItems(Qt.IntersectsItemShape))
    super().mouseMoveEvent(event)
For performance reasons, QGraphicsItem does not inherit from QObject, so it cannot use signal and slot mechanism, and we cannot add animation to it. However, we can customize a class and let it inherit from QGraphicsObject. See the following solutions:
import sys
from PyQt5.QtCore import QPropertyAnimation, QPointF, QRectF, pyqtSignal
from PyQt5.QtWidgets import QApplication, QGraphicsScene, QGraphicsView,  QGraphicsObject


class CustomRect(QGraphicsObject):
    # 1
    my_signal = pyqtSignal()

    def __init__(self):
        super(CustomRect, self).__init__()

    # 2
    def boundingRect(self):
        return QRectF(0, 0, 100, 30)

    # 3
    def paint(self, painter, styles, widget=None):
        painter.drawRect(self.boundingRect())


class Demo(QGraphicsView):
    def __init__(self):
        super(Demo, self).__init__()
        self.resize(300, 300)

        # 4
        self.rect = CustomRect()
        self.rect.my_signal.connect(lambda: print('signal and slot'))
        self.rect.my_signal.emit()

        self.scene = QGraphicsScene()
        self.scene.setSceneRect(0, 0, 300, 300)
        self.scene.addItem(self.rect)

        self.setScene(self.scene)

        # 5
        self.animation = QPropertyAnimation(self.rect, b'pos')
        self.animation.setDuration(3000)
        self.animation.setStartValue(QPointF(100, 30))
        self.animation.setEndValue(QPointF(100, 200))
        self.animation.setLoopCount(-1)
        self.animation.start()


if __name__ == '__main__':
    app = QApplication(sys.argv)
    demo = Demo()
    demo.show()
    sys.exit(app.exec_())
- Customize a signal;
2-3. If we inherit QGraphicsObject, we'd better re implement the boundingRect() and paint() methods. In boundingRect(), we return a QRectF type value to determine the default location and size of CustomRect. In paint(), the drawRect() method is called to draw the rectangle to the interface.
-
Connect the customized signal with the slot function, and print the "signal and slot" string in the slot function. Then call the emit() method of the signal to transmit the signal, and the slot function will start;
-
Add QPropertyAnimation attribute animation to move the rectangle from (100, 30) to (100, 200). The time is 3 seconds, and the animation loops indefinitely.
The screenshot of the operation is as follows, and the rectangular element moves slowly from top to bottom:
[the external link image transfer fails. The source station may have an anti-theft chain mechanism. It is recommended to save the image and upload it directly (img-XoO96Rkj-1641378986739)(data:image/svg+xml;utf8, )]
[the external link image transfer fails. The source station may have an anti-theft chain mechanism. It is recommended to save the image and upload it directly (img-BES40G4G-1641378986740)(data:image/svg+xml;utf8, )]
Console print content:
[the external link image transfer fails. The source station may have an anti-theft chain mechanism. It is recommended to save the image and upload it directly (img-t44nmEg9-1641378986740)(data:image/svg+xml;utf8, )]
34.2 QGraphicsScene scene class
In the previous section, if we want to add an element to the scene, we instantiate the element first, and then call the addItem() method of the scene to add it. However, the scene also provides the following methods to quickly add elements:
[the external link image transfer fails. The source station may have an anti-theft chain mechanism. It is recommended to save the image and upload it directly (img-ZNI5eSid-1641378986741)(data:image/svg+xml;utf8, )]
Of course, the scenario also provides many methods for managing primitives. Let's learn from the following code:
import sys
from PyQt5.QtCore import Qt
from PyQt5.QtGui import QPixmap, QTransform
from PyQt5.QtWidgets import QApplication, QGraphicsItem, QGraphicsScene, QGraphicsView


class Demo(QGraphicsView):
    def __init__(self):
        super(Demo, self).__init__()
        self.resize(300, 300)

        self.scene = QGraphicsScene()
        self.scene.setSceneRect(0, 0, 300, 300)

        # 1
        self.rect = self.scene.addRect(100, 30, 100, 30)
        self.ellipse = self.scene.addEllipse(100, 80, 50, 40)
        self.pic = self.scene.addPixmap(QPixmap('pic.png').scaled(60, 60))
        self.pic.setOffset(100, 130)

        self.rect.setFlags(QGraphicsItem.ItemIsSelectable | QGraphicsItem.ItemIsMovable | QGraphicsItem.ItemIsFocusable)
        self.ellipse.setFlags(QGraphicsItem.ItemIsSelectable | QGraphicsItem.ItemIsMovable | QGraphicsItem.ItemIsFocusable)
        self.pic.setFlags(QGraphicsItem.ItemIsSelectable | QGraphicsItem.ItemIsMovable | QGraphicsItem.ItemIsFocusable)

        self.setScene(self.scene)

        # 2
        print(self.scene.items())
        print(self.scene.items(order=Qt.AscendingOrder))
        print(self.scene.itemsBoundingRect())
        print(self.scene.itemAt(110, 40, QTransform()))

        # 3
        self.scene.focusItemChanged.connect(self.my_slot)

    def my_slot(self, new_item, old_item):
        print('new item: {}\nold item: {}'.format(new_item, old_item))

    # 4
    def mouseMoveEvent(self, event):
        print(self.scene.collidingItems(self.ellipse, Qt.IntersectsItemShape))
        super().mouseMoveEvent(event)

    # 5. It needs to be modified
    def mouseDoubleClickEvent(self, event):
        item = self.scene.itemAt(event.pos(), QTransform())
        self.scene.removeItem(item)
        super().mouseDoubleClickEvent(event)


if __name__ == '__main__':
    app = QApplication(sys.argv)
    demo = Demo()
    demo.show()
    sys.exit(app.exec_())
- Directly call the addRect(), addEllipse() and addPixmap() methods of the scene to add elements. Here we need to know a knowledge point: the first added element is below the later added element (Z-axis direction). You can run the code yourself and then move the next element. Then you will find that the picture element in the program is at the top, the ellipse is next, and the rectangle is at the bottom. However, we can change the up and down position by calling the setZValue() method of the element (please refer to the documentation for details, which will not be explained here).
Then set the Flag property of the element. The extra ItemIsFocusable indicates that the element can be focused (it cannot be focused by default). This attribute is related to the foucsItemChanged signal in the third small point below;
- Call the items() method to return all the elements in the scene, and the return value type is list. The returned elements are in descending order by default (QT. Descending order), that is, arranged from top to bottom (QPixmapItem, QEllipseItem, QRectItem). You can modify the value of the order parameter so that the returned elements in the list are arranged in ascending order.
itemsBoundingRect() returns the boundary of the whole composed of all elements.
itemAt() can return the element at the specified position. If there are two overlapping elements at this position, it will return the uppermost element. The incoming QTransform() is related to the Flag attribute itemignorestranformation of the element, Since this attribute is not set here, we can directly pass in QTransform() (not detailed here, otherwise it may be confused. You can simply remember it first and then study it in depth);
-
The scene has a focusChangedItem signal. When we select different elements, the signal will be sent out, provided that the element has the ItemIsFocusable property set. The signal can transmit two values: the first is the newly selected element and the second is the previously selected element;
-
Call collidingItems() of the scene to print out all other elements that collide with the target element under the specified collision trigger conditions;
-
We can call the removeItem() method to delete the element by double clicking it. Note that the event. ID is actually passed directly to itemAt() POS () is inaccurate because of event POS () is actually the coordinates of the mouse on the view, not the coordinates on the scene. You can enlarge the window, and then double-click to try. You will find that the primitive will not disappear because the view size is no longer the same as the scene size, and the coordinates have changed. See section 34.4 for specific solutions.
The operation screenshot is as follows:
[the external link image transfer fails. The source station may have an anti-theft chain mechanism. It is recommended to save the image and upload it directly (img-t4Pgnvhd-1641378986742)(data:image/svg+xml;utf8, )]
Console print content:
[the external link image transfer fails. The source station may have an anti-theft chain mechanism. It is recommended to save the image and upload it directly (img-J8OpZupT-1641378986742)(data:image/svg+xml;utf8, )]
Double click an element to delete it:
[the external link image transfer fails. The source station may have an anti-theft chain mechanism. It is recommended to save the image and upload it directly (img-wbLrfLbt-1641378986743)(data:image/svg+xml;utf8, )]
We can also add simple or complex controls such as qlabel, qlinedit, QPushButton and qtablewidget to the scene, or even directly add a main window. Next, let's take you to know more by completing the following interface (that is, the interface example in Chapter 3 layout management):
[the external link image transfer fails. The source station may have an anti-theft chain mechanism. It is recommended to save the image and upload it directly (img-L3aQ9D9D-1641378986743)(data:image/svg+xml;utf8, )]
The code is as follows:
import sys
from PyQt5.QtCore import Qt
from PyQt5.QtWidgets import QApplication, QGraphicsScene, QGraphicsView, QGraphicsWidget, QGraphicsGridLayout, \
                            QGraphicsLinearLayout, QLabel, QLineEdit, QPushButton


class Demo(QGraphicsView):
    def __init__(self):
        super(Demo, self).__init__()
        self.resize(220, 110)
        # 1
        self.user_label = QLabel('Username:')
        self.pwd_label = QLabel('Password:')
        self.user_line = QLineEdit()
        self.pwd_line = QLineEdit()
        self.login_btn = QPushButton('Log in')
        self.signin_btn = QPushButton('Sign in')

        # 2
        self.scene = QGraphicsScene()
        self.user_label_proxy = self.scene.addWidget(self.user_label)
        self.pwd_label_proxy = self.scene.addWidget(self.pwd_label)
        self.user_line_proxy = self.scene.addWidget(self.user_line)
        self.pwd_line_proxy = self.scene.addWidget(self.pwd_line)
        self.login_btn_proxy = self.scene.addWidget(self.login_btn)
        self.signin_btn_proxy = self.scene.addWidget(self.signin_btn)
        print(type(self.user_label_proxy))

        # 3
        self.g_layout = QGraphicsGridLayout()
        self.l_h_layout = QGraphicsLinearLayout()
        self.l_v_layout = QGraphicsLinearLayout(Qt.Vertical)
        self.g_layout.addItem(self.user_label_proxy, 0, 0, 1, 1)
        self.g_layout.addItem(self.user_line_proxy, 0, 1, 1, 1)
        self.g_layout.addItem(self.pwd_label_proxy, 1, 0, 1, 1)
        self.g_layout.addItem(self.pwd_line_proxy, 1, 1, 1, 1)
        self.l_h_layout.addItem(self.login_btn_proxy)
        self.l_h_layout.addItem(self.signin_btn_proxy)
        self.l_v_layout.addItem(self.g_layout)
        self.l_v_layout.addItem(self.l_h_layout)

        # 4
        self.widget = QGraphicsWidget()
        self.widget.setLayout(self.l_v_layout)

        # 5
        self.scene.addItem(self.widget)
        self.setScene(self.scene)


if __name__ == '__main__':
    app = QApplication(sys.argv)
    demo = Demo()
    demo.show()
    sys.exit(app.exec_())
-
Instantiate the required control. Because the parent class is not QGraphicsView, self is not added;
-
Instantiate a scene object, then call the addWidget() method to add controls. The value returned by the addWidget() method is actually a QGraphicsProxyWidget proxy object, and the control is embedded in the proxy layer provided by the object. user_label_proxy and user_ The status of the label remains the same. If we disable or hide user_label_proxy, then the corresponding user_label will also be disabled or hidden, so we can control the proxy object to operate the control in the scene (but signals and slots should be directly applied to the control, which is not provided by the proxy object).
-
For layout, note that the layout manager in the graphics view frame is used here: QGraphicsGridLayout grid layout and QGraphicsLinearLayout linear layout (combination of horizontal and vertical layout). However, the usage is similar, except that the method called is addItem() instead of addWidget() or addLayout(). The linear layout is horizontal by default. We can pass QT when instantiating Vertical for vertical layout (there is also an anchor layout QGraphicsAnchorLayout in the graphic view, which will not be explained here. I believe you can read the documents clearly);
-
Instantiate a QGraphicsWidget, which is similar to QWidget, but it is used in the graphic view framework, and call the setLayout() method to set the overall layout;
-
Add the QGraphicsWidget object to the scene, and the controls embedded in the QGraphicsProxyWidget will naturally be on the scene. Finally, display the scene in the view.
34.3 QGraphicsView view class
The view is actually a scroll area. If the view is smaller than the scene size, the window will display a scroll bar so that users can observe all the scenes (on Linux and Windows systems, if the view is the same size as the scene, the scroll bar will also be displayed). In the following code, the author makes the scene larger than the view:
import sys
from PyQt5.QtCore import QRectF
from PyQt5.QtWidgets import QApplication, QGraphicsScene, QGraphicsView


class Demo(QGraphicsView):
    def __init__(self):
        super(Demo, self).__init__()
        self.resize(300, 300)

        self.scene = QGraphicsScene()
        self.scene.setSceneRect(0, 0, 500, 500)
        self.scene.addEllipse(QRectF(200, 200, 50, 50))

        self.setScene(self.scene)


if __name__ == '__main__':
    app = QApplication(sys.argv)
    demo = Demo()
    demo.show()
    sys.exit(app.exec_())
The view size is 300x300 and the scene size is 500x500.
The operation screenshot is as follows:
MacOS
[the external link image transfer fails. The source station may have an anti-theft chain mechanism. It is recommended to save the image and upload it directly (IMG ctovjpm6-1641378986744) (data: image / SVG + XML; utf8, )]
Linux(Ubuntu)
[the external link image transfer fails. The source station may have an anti-theft chain mechanism. It is recommended to save the image and upload it directly (img-7MwxUbL9-1641378986745)(data:image/svg+xml;utf8, )]
Windows
[the external link image transfer fails. The source station may have an anti-theft chain mechanism. It is recommended to save the image and upload it directly (img-PI9UMFAC-1641378986745)(data:image/svg+xml;utf8, )]
Now that the primitives have been added and the scene has been set, we can usually call some methods of the view to transform the primitives, such as zoom in, zoom out and rotation. See the code below:
import sys
from PyQt5.QtCore import Qt, QRectF
from PyQt5.QtGui import QColor, QBrush
from PyQt5.QtWidgets import QApplication, QGraphicsItem, QGraphicsScene, QGraphicsView


class Demo(QGraphicsView):
    def __init__(self):
        super(Demo, self).__init__()
        self.resize(300, 300)

        self.scene = QGraphicsScene()
        self.scene.setSceneRect(0, 0, 500, 500)
        self.ellipse = self.scene.addEllipse(QRectF(200, 200, 50, 50), brush=QBrush(QColor(Qt.blue)))
        self.rect = self.scene.addRect(QRectF(300, 300, 50, 50), brush=QBrush(QColor(Qt.red)))
        self.ellipse.setFlags(QGraphicsItem.ItemIsSelectable | QGraphicsItem.ItemIsMovable)
        self.rect.setFlags(QGraphicsItem.ItemIsSelectable | QGraphicsItem.ItemIsMovable)

        self.setScene(self.scene)

        self.press_x = None

    # 1
    def wheelEvent(self, event):
        if event.angleDelta().y() < 0:
            self.scale(0.9, 0.9)
        else:
            self.scale(1.1, 1.1)
        # super().wheelEvent(event)

    # 2
    def mousePressEvent(self, event):
        self.press_x = event.x()
        # super().mousePressEvent(event)

    def mouseMoveEvent(self, event):
        if event.x() > self.press_x:
            self.rotate(10)
        else:
            self.rotate(-10)
        # super().mouseMoveEvent(event)


if __name__ == '__main__':
    app = QApplication(sys.argv)
    demo = Demo()
    demo.show()
    sys.exit(app.exec_())
-
In the mouse wheel event, the scale() method is invoked to enlarge and reduce the view. There is no need to call the event function of the parent class here, because we do not need to pass the event to the scene and primitives;
-
Re implement the mouse press and move event function, first obtain the coordinates when the mouse is pressed, and then judge whether the mouse moves left or right. If to the right, the view rotates 10 degrees clockwise, otherwise it rotates 10 degrees counterclockwise.
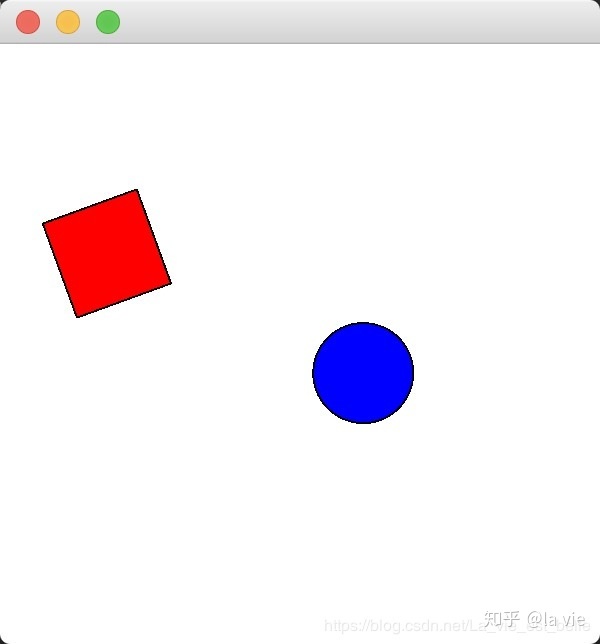
The operation screenshot is as follows:
[the external link image transfer fails. The source station may have an anti-theft chain mechanism. It is recommended to save the image and upload it directly (img-K5JvJzak-1641378986746)(data:image/svg+xml;utf8, )]
Zoom in and out
rotate
Of course, the view also provides many methods. For example, you can also use items() and itemAt() to obtain elements, and you can also set the view background, view cache mode and mouse drag mode. You can check it on demand (there is too much fear of chaos here).
34.4 coordinate system of graphic view
Graphics view is based on Cartesian coordinate system. Views, scenes and primitives have their own coordinates.
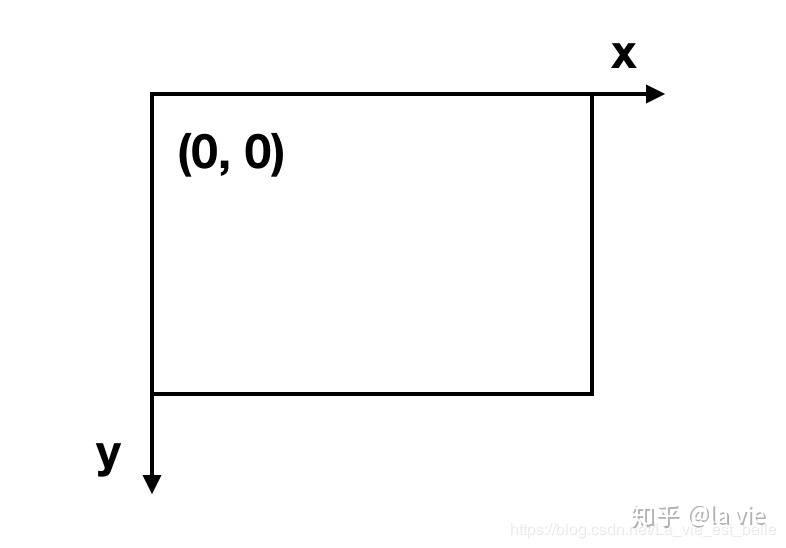
The view coordinates take the upper left corner as the origin, the right as the positive x axis, and the down as the positive y axis (all mouse events start with the view coordinates):
The scene coordinates take the center as the origin, the right as the positive x axis, and the down as the positive y axis (the scene coordinates describe the position of the topmost element):
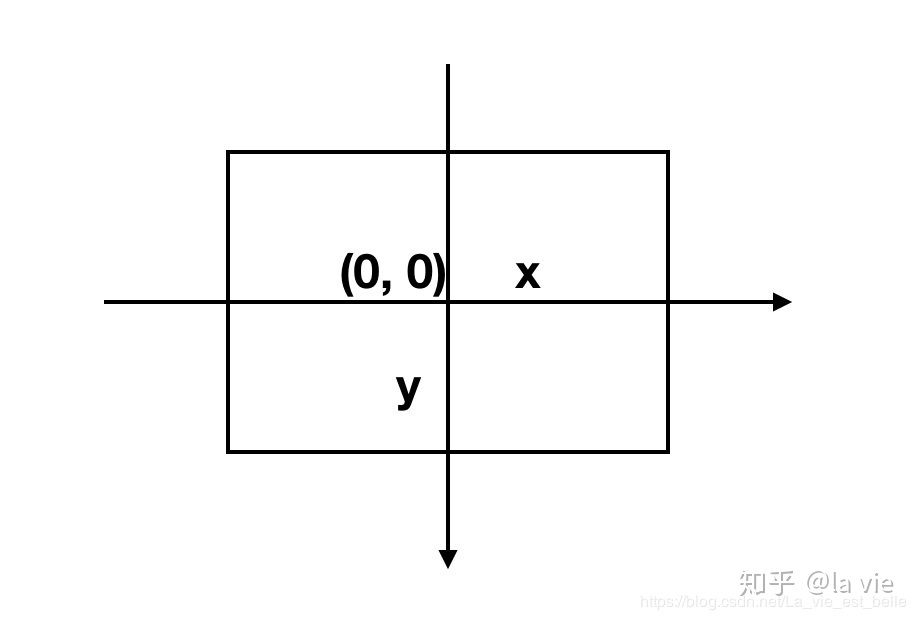
Entity coordinates are the same as scene coordinates (describe the location of sub entities):
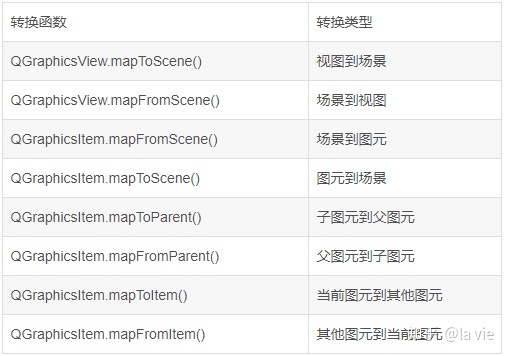
The graphic view provides the function of conversion between three coordinate systems and between elements:
OK, let's explain the problem in section 34.2. The code is as follows:
import sys
from PyQt5.QtGui import QPixmap, QTransform
from PyQt5.QtWidgets import QApplication, QGraphicsItem, QGraphicsScene, QGraphicsView


class Demo(QGraphicsView):
    def __init__(self):
        super(Demo, self).__init__()
        self.resize(600, 600)

        self.scene = QGraphicsScene()
        self.scene.setSceneRect(0, 0, 300, 300)

        self.rect = self.scene.addRect(100, 30, 100, 30)
        self.ellipse = self.scene.addEllipse(100, 80, 50, 40)
        self.pic = self.scene.addPixmap(QPixmap('pic.png').scaled(60, 60))
        self.pic.setOffset(100, 130)

        self.rect.setFlags(QGraphicsItem.ItemIsSelectable | QGraphicsItem.ItemIsMovable)
        self.ellipse.setFlags(QGraphicsItem.ItemIsSelectable | QGraphicsItem.ItemIsMovable)
        self.pic.setFlags(QGraphicsItem.ItemIsSelectable | QGraphicsItem.ItemIsMovable)

        self.setScene(self.scene)

    def mouseDoubleClickEvent(self, event):
        item = self.scene.itemAt(event.pos(), QTransform())
        self.scene.removeItem(item)
        super().mouseDoubleClickEvent(event)


if __name__ == '__main__':
    app = QApplication(sys.argv)
    demo = Demo()
    demo.show()
    sys.exit(app.exec_())
In the above program, the view size is 600x600, while the scene size is only 300x300. Run the program at this time. If we double-click, we can't delete the element because of the event we obtained POS () is the coordinate on the view, but self scene. itemAt() requires scene coordinates. Passing the view coordinates to the itemat () method of the scene can't get any primitives, so we should convert them!
Modify the mouseDoubleClickEvent() event function as follows:
def mouseDoubleClickEvent(self, event):
    point = self.mapToScene(event.pos())
    item = self.scene.itemAt(point, QTransform())
    self.scene.removeItem(item)
    super().mouseDoubleClickEvent(event)
Call the mapToScene() method of the view to convert the view coordinates into scene coordinates, so that the elements can be found and deleted naturally.
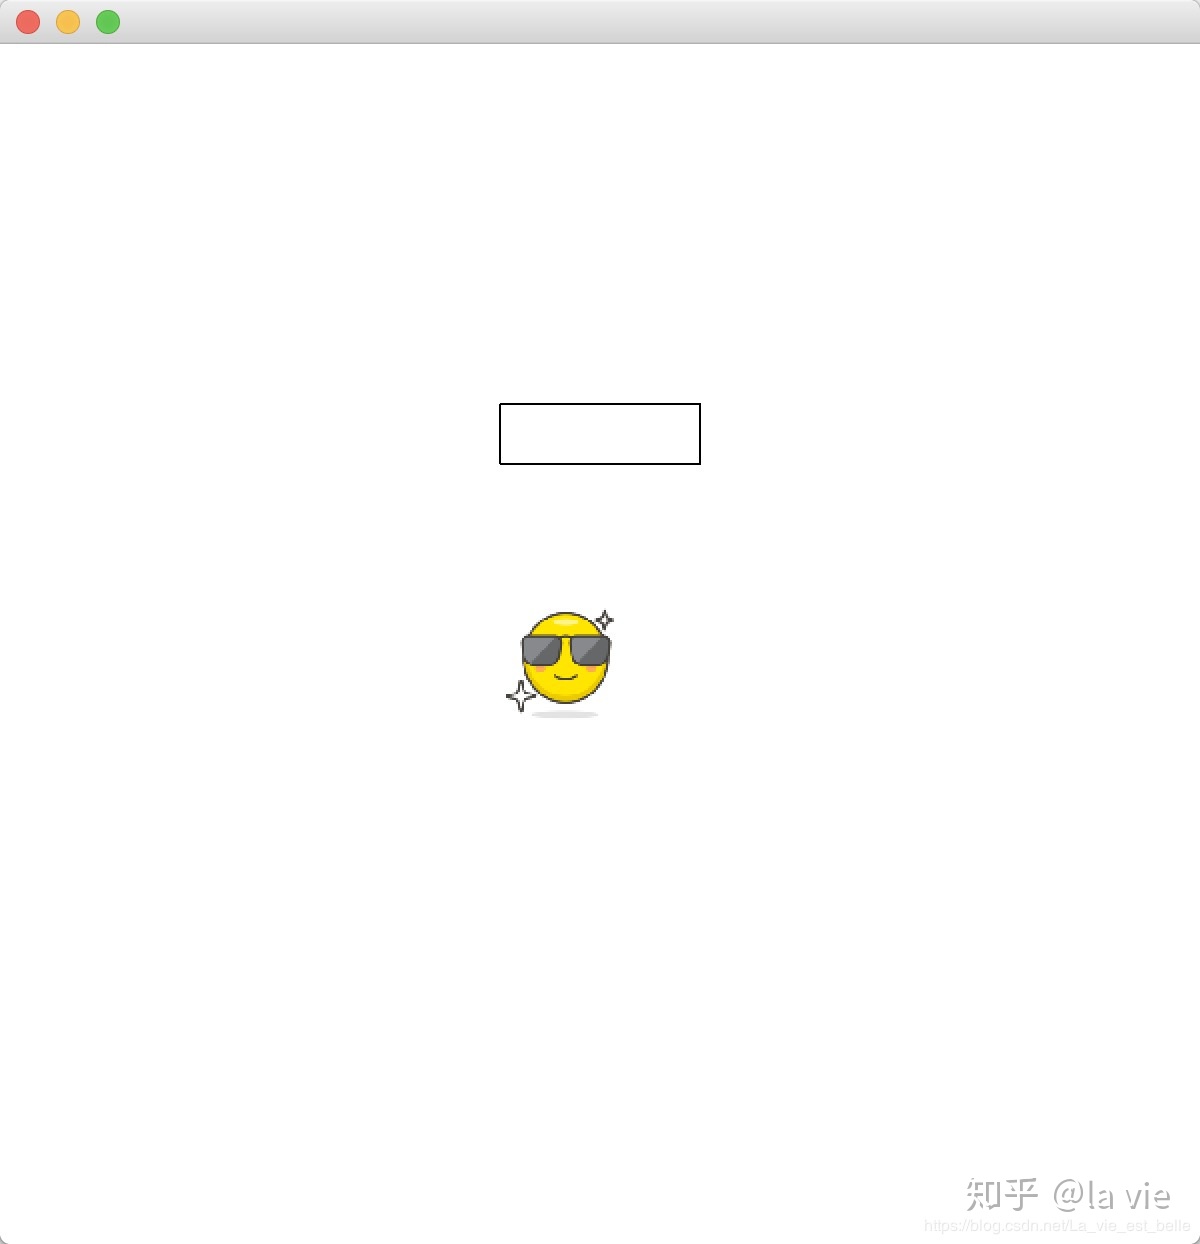
The screenshot of the operation is as follows, and the ellipse is deleted:
34.5 summary
-
The transfer order of events is view - > scene - > primitive. If it is transferred between the parent and child classes of primitive, the transfer order is from the child class to the parent class;
-
The scope of collision detection is divided into boundary and shape, and we need to understand the differences between them;
-
To add signal, slot mechanism and animation to QGraphicsItem, customize a class inherited from QGraphicsObject;
-
Add qlabel, qlinedit, QPushButton and other controls to the scene. We need to use QGraphicsProxyWidget;
-
Views, scenes and primitives have their own coordinate systems. Pay attention to using coordinate conversion functions for conversion;
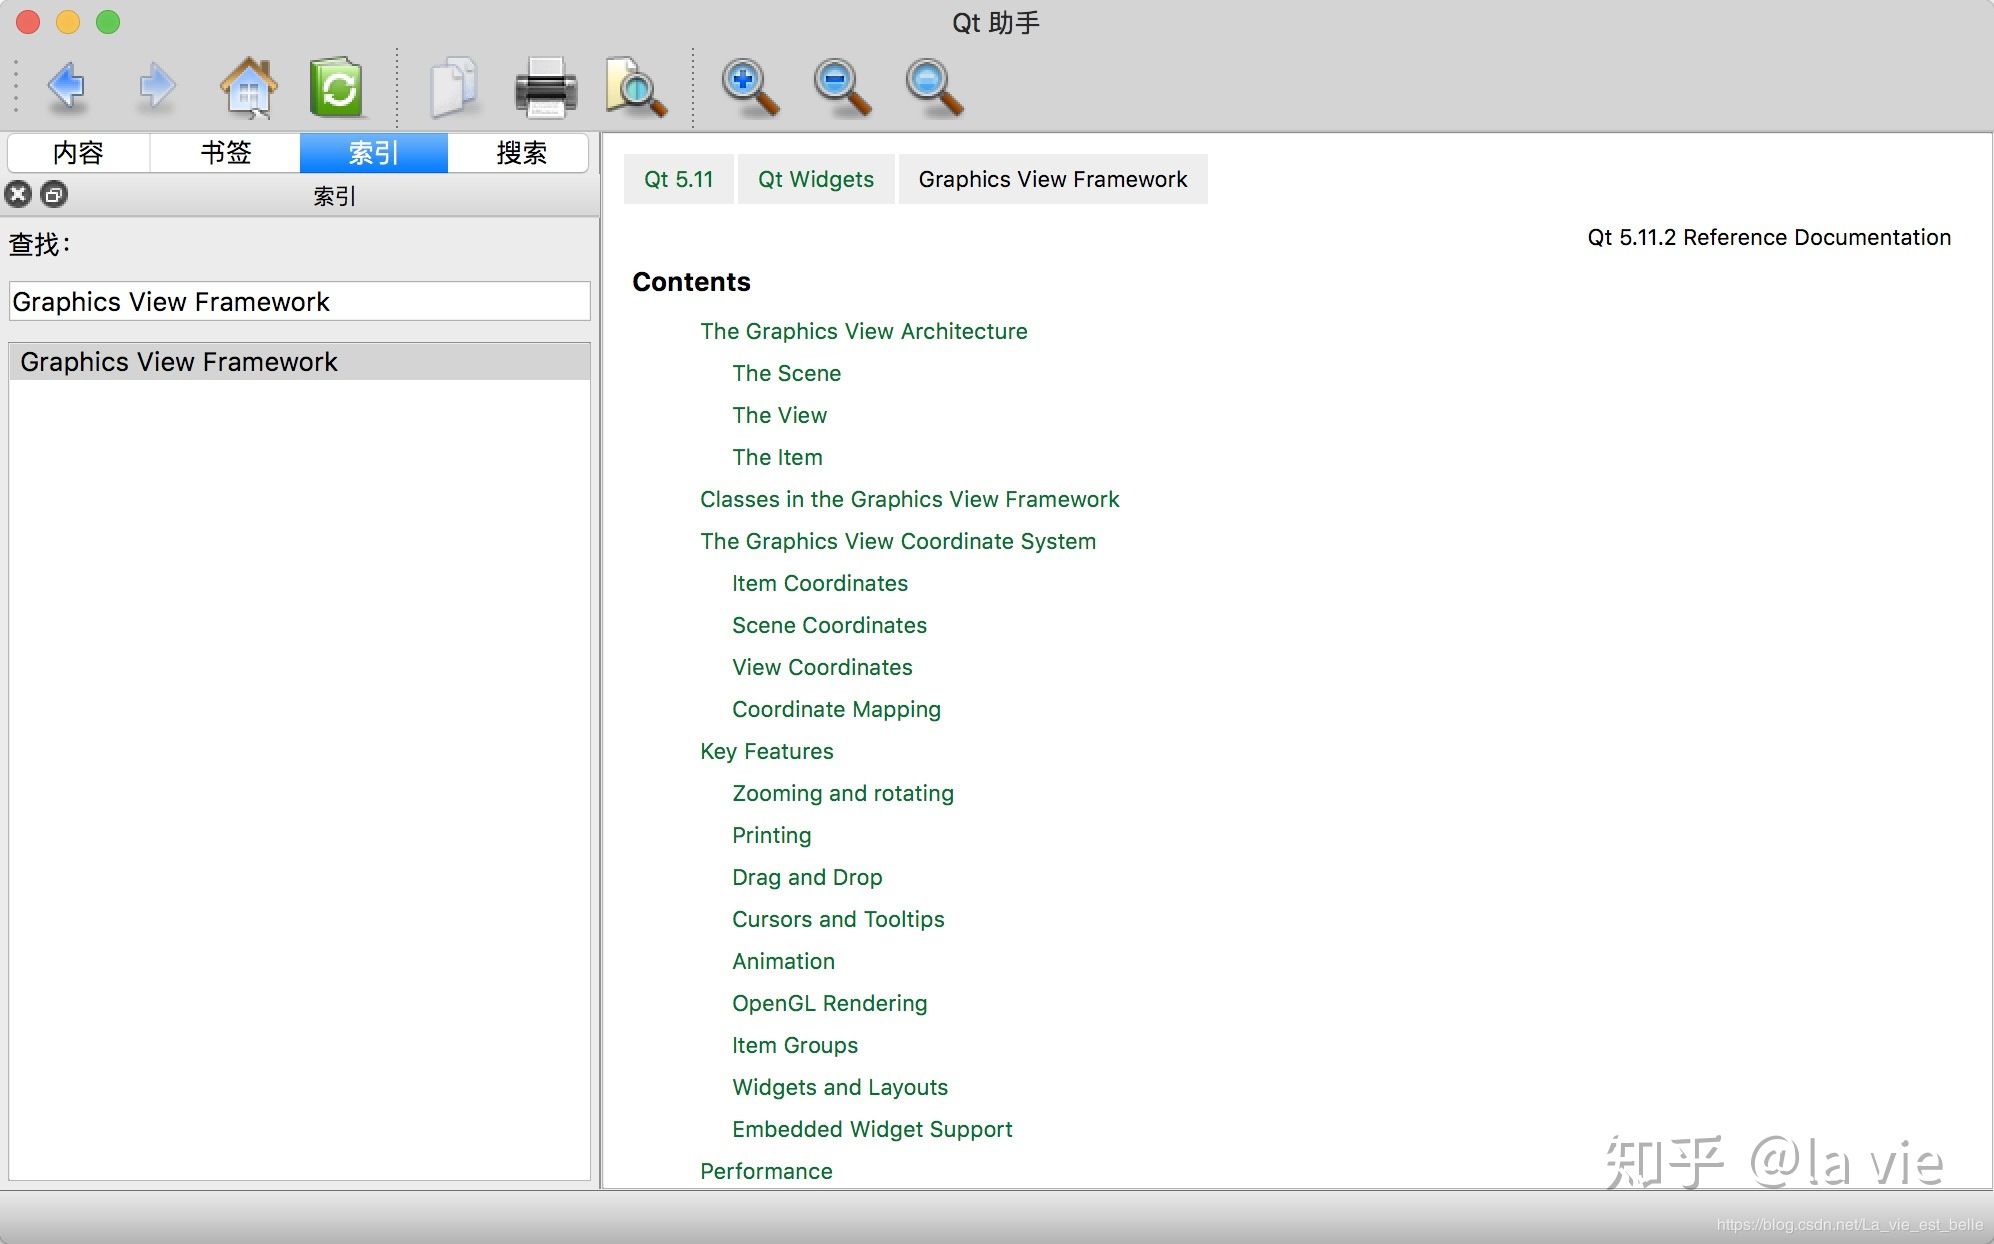
-
There are too many knowledge points of graphical view framework. The purpose of writing this chapter is to introduce you as much as possible. There may be no detailed explanation in some places. Please understand. For more details, you can search "Graphics View Framework" in Qt Assistant to learn more.