4.1.8 Processing Empty ListView
ListView is used to display list data, but when there is no data in the list, ListView will not display any data or prompts. According to the need to improve the user experience, there should be no data prompts here. Fortunately, ListView provides a method, setEmptyView(), through which we can set a default prompt for ListView to display under empty data. The layout settings containing ListView are as follows:
<?xml version="1.0" encoding="utf-8"?>
<FrameLayout xmlns:android="http://schemas.android.com/apk/res/android"
    android:layout_width="match_parent"
    android:layout_height="match_parent">

    <ListView
        android:id="@+id/list_view"
        android:layout_width="match_parent"
        android:layout_height="match_parent"
        android:scrollbars="none" />

    <ImageView
        android:id="@+id/img_empty"
        android:layout_width="match_parent"
        android:layout_height="match_parent"
        android:src="@mipmap/ic_launcher" />

</FrameLayout>
In the code, we set the layout of empty data for ListView in the following way. The code is as follows:
listView = (ListView) findViewById(R.id.list_view);
imgEmpty = (ImageView) findViewById(R.id.img_empty);
listView.setEmptyView(imgEmpty);
With the above code, ListView is given a default image to prompt the user when empty data is available, but not when data is available. The code for MainActivity is as follows:
package com.example.test;

import android.app.Activity;
import android.content.Intent;
import android.os.Bundle;
import android.view.View;
import android.widget.ImageView;
import android.widget.ListView;

import java.util.ArrayList;
import java.util.List;

public class MainActivity extends Activity {

    private ListView listView;
    private List<String> mData = new ArrayList<>();
    private ViewHolderAdapter adapter;
    private ImageView imgEmpty;

    @Override
    protected void onCreate(Bundle savedInstanceState) {
        super.onCreate(savedInstanceState);
        setContentView(R.layout.activity_main);
        listView = (ListView) findViewById(R.id.list_view);
        imgEmpty = (ImageView) findViewById(R.id.img_empty);
//The following code is commented out to indicate that there is no data
//        for (int i = 0; i < 30; i++) {
//            mData.add(i + "");
//        }
        adapter = new ViewHolderAdapter(this, mData);
        listView.setAdapter(adapter);
        listView.setEmptyView(imgEmpty);
    }

}
4.1.9 ListView Slide Monitor
Sliding monitoring of ListView is the most important skill in ListView. Many rewritten ListViews basically focus on the processing of sliding events, and make different logical processing by judging the sliding events. In order to monitor sliding events more accurately, developers usually need to use Gesture Detector gesture recognition, Velocity Tracker sliding speed detection and other auxiliary classes to complete better monitoring. Here we introduce two ways to monitor ListView sliding events. One is through OnTouchListener, the other is using OnScrollListener.
(1)OnTouchListener
OnTouchListener is a listening event in View. By monitoring the coordinates of ACTION_DOWN, ACTION_MOVE and ACTION_UP when these three events occur, the user can judge the direction of sliding according to the coordinates, and carry out corresponding logical processing in different events. The use code of this way is as follows:
listView.setOnTouchListener(new View.OnTouchListener() {
            @Override
            public boolean onTouch(View v, MotionEvent event) {
                switch (event.getAction()) {
                    case MotionEvent.ACTION_DOWN:
                        //Operation while touching
                        break;
                    case MotionEvent.ACTION_MOVE:
                        //Mobile operation
                        break;
                    case MotionEvent.ACTION_UP:
                        //Operation on departure
                        break;
                }
                return false;
            }
        });
(2)OnScrollListener
OnScrollListener is a listening event in AbsListView. It encapsulates a lot of information related to ListView and is more flexible to use. First, let's look at the general usage of OnScrollListener. The code is as follows:
listView.setOnScrollListener(new AbsListView.OnScrollListener() {
    @Override
    public void onScrollStateChanged(AbsListView view, int scrollState) {
        switch (scrollState) {
            case SCROLL_STATE_IDLE:
                //When sliding stops

                Log.i(TAG, "SCROLL_STATE_IDLE");
                break;
            case SCROLL_STATE_TOUCH_SCROLL:
                //Rolling

                Log.i(TAG, "SCROLL_STATE_TOUCH_SCROLL");
                break;
            case SCROLL_STATE_FLING:
                //When the finger is thrown, that is, the finger is forced to slide. After leaving, ListView continues to slide due to inertia.

                Log.i(TAG, "SCROLL_STATE_FLING");
                break;
        }
    }

    @Override
    public void onScroll(AbsListView view, int firstVisibleItem, int visibleItemCount, int totalItemCount) {
        //Always call when scrolling

        Log.i(TAG, "onScroll");
    }
});
OnScrollStateChanged() and onScroll() are two callback methods in OnScrollListener.
Let's first look at the first method, OnScrollStateChanged(), which determines the number of callbacks based on its parameter scrollState. There are three modes of scrollState:
- SCROLL_STATE_IDEL: When the scroll stops.
- SCROLL_STATE_TOUCH_SCROLL: While scrolling.
-
SCROLL_STATE_FLING: When a finger is thrown, the finger is forced to slide, and after leaving, ListView continues to slide due to inertia.
When the user does not do the state of finger throwing, this method will only call back twice, otherwise it will call back three times, the difference is the state of finger throwing. Usually, in this method, we will set some flags Flag by different states to distinguish different sliding states for other methods to deal with.
Let's take a look at OnScroll() as a callback method, which always calls back when the ListView scrolls. The last three int parameters in the method show the current status of the ListView scroll very accurately. These three parameters are as follows:- First Visible Item: The ID of the first Item currently visible (starting from 0).
- Visible ItemCount: The total number of Items currently visible.
-
TotItemCount: The total number of Items for the entire ListView.
It should be noted here that the number of Items currently visible, including those that do not display the complete Item, i.e. a half of the Item, is also included. Through these parameters, it is easy to make some judgments, such as whether to scroll to the last line, you can use the following code to make judgments. When the ID of the current visual first Item plus the sum of the current visual Item equals the total number of Items, that is, scroll to the last line.
if (firstVisibleItem + visivleItemCount == totalItemCount & totalItemCount >0){
    //Scroll to the last line
}
For example, the direction of the scroll can be determined by the following code, which is as follows:
if (firstVisibleItem > lastVisibleItemPosition){
    //Up slide
}else if (firstVisibleItem < lastVisibleItemPosition){
    //Slide downward
}
lastVisibleItemPosition = firstVisibleItem;
A member variable lastVisibleItemPosition is used to record the ID of the last visible Item and compare it with the ID of the current visible Item to know the direction of the current scroll.
To understand the whole OnScrollListener, the best way is to add Log to the code and print out the status information for analysis and learning. In the above code, the corresponding Log has been added, compared with Log analysis, will quickly grasp the use of OnScrollListener.
Of course, ListView also provides us with some encapsulation methods to get information about the location of the current visual Item, etc.
//Get the ID of the last Item in the visual area
listView.getLastVisiblePosition();
//Get the ID of the first Item in the visual area
listView.getFirstVisiblePosition();
4.2 Common Extensions of ListView
Although ListView is widely used, the original ListView of the system obviously can not meet the users'increasing aesthetic and functional needs. Nevertheless, it doesn't matter. Android can be completely customized, which makes it very convenient for us to expand and modify the native ListView. As a result, with the innovations of developers, ListView is becoming more and more colorful, and various extensions based on native ListView are dazzling. Here are some common ListView extensions.
4.2.1 ListView with Elasticity
Android's default ListView does not give a good hint when scrolling to the top or bottom. In Android 5.X, Google added only a half-moon shadow effect to such behavior. In IOS systems, lists are resilient, that is, they scroll to the bottom or the top and continue to slide down or up for a certain distance. It has to be said that such a design is indeed more friendly, although I don't know why Google does not imitate such a design, but we can modify ListView ourselves, so that ListView can also be "flexible".
Here we can use a very simple way to achieve this effect. When we look at the ListView source code, we can see that there is a way to control sliding to the edge in ListView, as follows:
protected boolean overScrollBy(int deltaX, int deltaY, int scrollX, int scrollY, int scrollRangeX
          int scrollRangeY, int maxOverScrollX, int maxOverScrollY, boolean isTouchEvent)
You can see this parameter: maxOverScrollY, which is written in the Commentary --- Number of pixels to overscroll by in either direction along the Y axis. It can be found that, although its default value is 0, in fact, as long as the value of this parameter is modified, ListView can be flexible! Rewrite this method and change maxOverScrollY to the set value, mMaxOverDistance, as follows:
@Override
protected boolean overScrollBy(int deltaX, int deltaY, int scrollX, int scrollY, int scrollRangeX, int scrollRangeY,
                              int maxOverScrollX, int maxOverScrollY, boolean isTouchEvent) {
    return super.overScrollBy(deltaX, deltaY, scrollX, scrollY, scrollRangeX,
                              scrollRangeY, maxOverScrollX, mMaxOverDistance, isTouchEvent);
}
Thus, by modifying this value, an elastic ListView is implemented. Of course, in order to meet the needs of multi-resolution, we can modify the value of maxOverScrollY by calculating the specific value through the density of the screen, so that the elastic distances of different resolutions are basically the same. The code is as follows:
private void initView() {
    DisplayMetrics dm = this.getResources().getDisplayMetrics();
    mMaxOverDistance = (int) (dm.density * mMaxOverDistance);
}
Finally, all the code is sorted out as follows:
Custom ListView:
package com.example.test;

import android.content.Context;
import android.util.AttributeSet;
import android.util.DisplayMetrics;
import android.widget.ListView;

/**
* Custom ListView
* Created by HourGlassRemember on 2016/9/28.
*/
public class CustomListView extends ListView {

    private int mMaxOverDistance = 60;

    public CustomListView(Context context) {
        this(context, null);
    }

    public CustomListView(Context context, AttributeSet attrs) {
        this(context, attrs, 0);
    }

    public CustomListView(Context context, AttributeSet attrs, int defStyleAttr) {
        super(context, attrs, defStyleAttr);
        initView();
    }

    /**
    * Initialization

    */
    private void initView() {
        DisplayMetrics dm = this.getResources().getDisplayMetrics();
        mMaxOverDistance = (int) (dm.density * mMaxOverDistance);
    }

    @Override
    protected boolean overScrollBy(int deltaX, int deltaY, int scrollX, int scrollY, int scrollRangeX,
                      int scrollRangeY, int maxOverScrollX, int maxOverScrollY, boolean isTouchEvent) {
        return super.overScrollBy(deltaX, deltaY, scrollX, scrollY, scrollRangeX, scrollRangeY,
                                  maxOverScrollX, mMaxOverDistance, isTouchEvent);
    }

}
Layout file:
<?xml version="1.0" encoding="utf-8"?>
<LinearLayout xmlns:android="http://schemas.android.com/apk/res/android"
    android:layout_width="match_parent"
    android:layout_height="match_parent">

    <com.example.test.CustomListView
        android:id="@+id/list_view"
        android:layout_width="match_parent"
        android:layout_height="match_parent"
        android:scrollbars="none" />

</LinearLayout>
Adapter:
package com.example.test;

import android.content.Context;
import android.view.LayoutInflater;
import android.view.View;
import android.view.ViewGroup;
import android.widget.BaseAdapter;
import android.widget.ImageView;
import android.widget.TextView;

import java.util.List;

/**
* Created by HourGlassRemember on 2016/9/18.
*/
public class ViewHolderAdapter extends BaseAdapter {

    private List<String> mData;
    private LayoutInflater mInflater;

    public ViewHolderAdapter(Context context, List<String> mData) {
        this.mData = mData;
        mInflater = LayoutInflater.from(context);
    }

    @Override
    public int getCount() {
        return mData.size();
    }

    @Override
    public Object getItem(int position) {
        return mData.get(position);
    }

    @Override
    public long getItemId(int position) {
        return position;
    }

    @Override
    public View getView(int position, View convertView, ViewGroup parent) {
        ViewHolder holder = null;
        //Determine whether to cache or not

        if (convertView == null) {
            holder = new ViewHolder();
            //Instantiate layout through LayoutInflate

            convertView = mInflater.inflate(R.layout.viewholder_item, null);
            holder.imgIcon = (ImageView) convertView.findViewById(R.id.img_icon);
            holder.txtTitle = (TextView) convertView.findViewById(R.id.txt_title);
            convertView.setTag(holder);
        } else {
            //Find the layout of the cache by tag

            holder = (ViewHolder) convertView.getTag();
        }
        //Set the view to be displayed by the control in the layout

        holder.imgIcon.setBackgroundResource(R.mipmap.ic_launcher);
        holder.txtTitle.setText(mData.get(position));
        return convertView;
    }

    public final class ViewHolder {
        public ImageView imgIcon;
        public TextView txtTitle;
    }

}
MainActivity class:
package com.example.test;

import android.app.Activity;
import android.os.Bundle;

import java.util.ArrayList;
import java.util.List;

public class MainActivity extends Activity {

    private static final String TAG = "MainActivity";

    private CustomListView listView;
    private List<String> mData = new ArrayList<>();
    private ViewHolderAdapter adapter;

    @Override
    protected void onCreate(Bundle savedInstanceState) {
        super.onCreate(savedInstanceState);
        setContentView(R.layout.activity_main);
        listView = (CustomListView) findViewById(R.id.list_view);
        for (int i = 0; i < 30; i++) {
            mData.add(i + "");
        }
        adapter = new ViewHolderAdapter(this, mData);
        listView.setAdapter(adapter);
    }

}
4.2.2 ListView that automatically displays and hides layout
I believe that friends who have used Google + should be very familiar with the effect that when we slide on ListView, the top ActionBar or Toolbar will be hidden or displayed accordingly. You can find that the title bar above and the suspension editing button in the lower right corner are loaded on the scroll front interface. When the user scrolls down, the title bar and the suspension button disappear, giving the user more space to read. Let's follow this example to design a similar effect. The code is as follows:
Layout file:
<?xml version="1.0" encoding="utf-8"?>
<LinearLayout xmlns:android="http://schemas.android.com/apk/res/android"
    android:layout_width="match_parent"
    android:layout_height="match_parent"
    android:orientation="vertical">

    <android.support.v7.widget.Toolbar
        android:id="@+id/toolbar"
        android:layout_width="match_parent"
        android:layout_height="wrap_content"
        android:background="#FF0000" />

    <ListView
        android:id="@+id/list_view"
        android:layout_width="match_parent"
        android:layout_height="match_parent"
        android:scrollbars="none" />

</LinearLayout>
MainActivity class:
package com.example.test;

import android.animation.ObjectAnimator;
import android.app.Activity;
import android.os.Bundle;
import android.support.v7.widget.Toolbar;
import android.view.MotionEvent;
import android.view.View;
import android.view.ViewConfiguration;
import android.widget.AbsListView;
import android.widget.ListView;

import java.util.ArrayList;
import java.util.List;

public class MainActivity extends Activity {

    private static final String TAG = "MainActivity";

    private ListView listView;
    private List<String> mData = new ArrayList<>();
    private ViewHolderAdapter adapter;
    //The minimum sliding distance considered by the system

    private float mTouchSlop;
    private float mFirstY, mCurrentY;
    //Describe the sliding direction of the finger. Direction 1 represents upward and direction 0 represents downward.

    private int direction;
    private boolean mShow = true;
    private Toolbar mToolbar;
    private ObjectAnimator mAnimator;

    @Override
    protected void onCreate(Bundle savedInstanceState) {
        super.onCreate(savedInstanceState);
        setContentView(R.layout.activity_main);
        mToolbar = (Toolbar) findViewById(R.id.toolbar);
        listView = (ListView) findViewById(R.id.list_view);

        //Add HeaderView to ListView to avoid the first Item being blocked by Toolbar

        View headerView = new View(this);
        headerView.setLayoutParams(new AbsListView.LayoutParams(AbsListView.LayoutParams.MATCH_PARENT,
                (int) getResources().getDimension(R.dimen.abc_action_bar_default_height_material)));
        listView.addHeaderView(headerView);

        for (int i = 0; i < 30; i++) {
            mData.add(i + "");
        }
        adapter = new ViewHolderAdapter(this, mData);
        listView.setAdapter(adapter);

        //Obtain the minimum sliding distance considered by the system

        mTouchSlop = ViewConfiguration.get(this).getScaledTouchSlop();
        listView.setOnTouchListener(mTouchListener);
    }

    View.OnTouchListener mTouchListener = new View.OnTouchListener() {
        @Override
        public boolean onTouch(View v, MotionEvent event) {
            switch (event.getAction()) {
                case MotionEvent.ACTION_DOWN:
                    mFirstY = event.getY();
                    break;
                case MotionEvent.ACTION_MOVE:
                    mCurrentY = event.getY();
                    //Calculate whether the finger is sliding up or down

                    direction = mCurrentY - mFirstY > mTouchSlop ? 0 : 1;
                    if (direction == 1 && mShow) {//wipe up

                        toolbarAnim(1);//Hide HeaderView
                    } else if (direction == 0 && !mShow) {//Slide down

                        toolbarAnim(0);//Display HeaderView
                    }
                    mShow = !mShow;
                    break;
                case MotionEvent.ACTION_UP:
                    break;
            }
            return false;
        }
    };

    /**
    * Control layout to display hidden animations

    *
    * @param flag
    */
    private void toolbarAnim(int flag) {
        //Cancel the previous animation before starting a new animation

        if (mAnimator != null && mAnimator.isRunning()) {
            mAnimator.cancel();
        }
        mAnimator = ObjectAnimator.ofFloat(mToolbar, "translationY",
              mToolbar.getTranslationY(), flag == 0 ? 0 : -mToolbar.getHeight());
        mAnimator.start();
    }

}
4.2.3 Chat ListView
Usually, each of the ListViews we use has the same layout, so the layout should be similar except for the different data, as long as you don't hide the layout. We are familiar with QQ, Wechat and other chat App s, in the chat interface, will show at least two layouts, namely, received messages and messages sent by ourselves. In fact, this effect is also achieved through ListView. Here we will imitate a chat list interface of chat software. The effect is as follows: 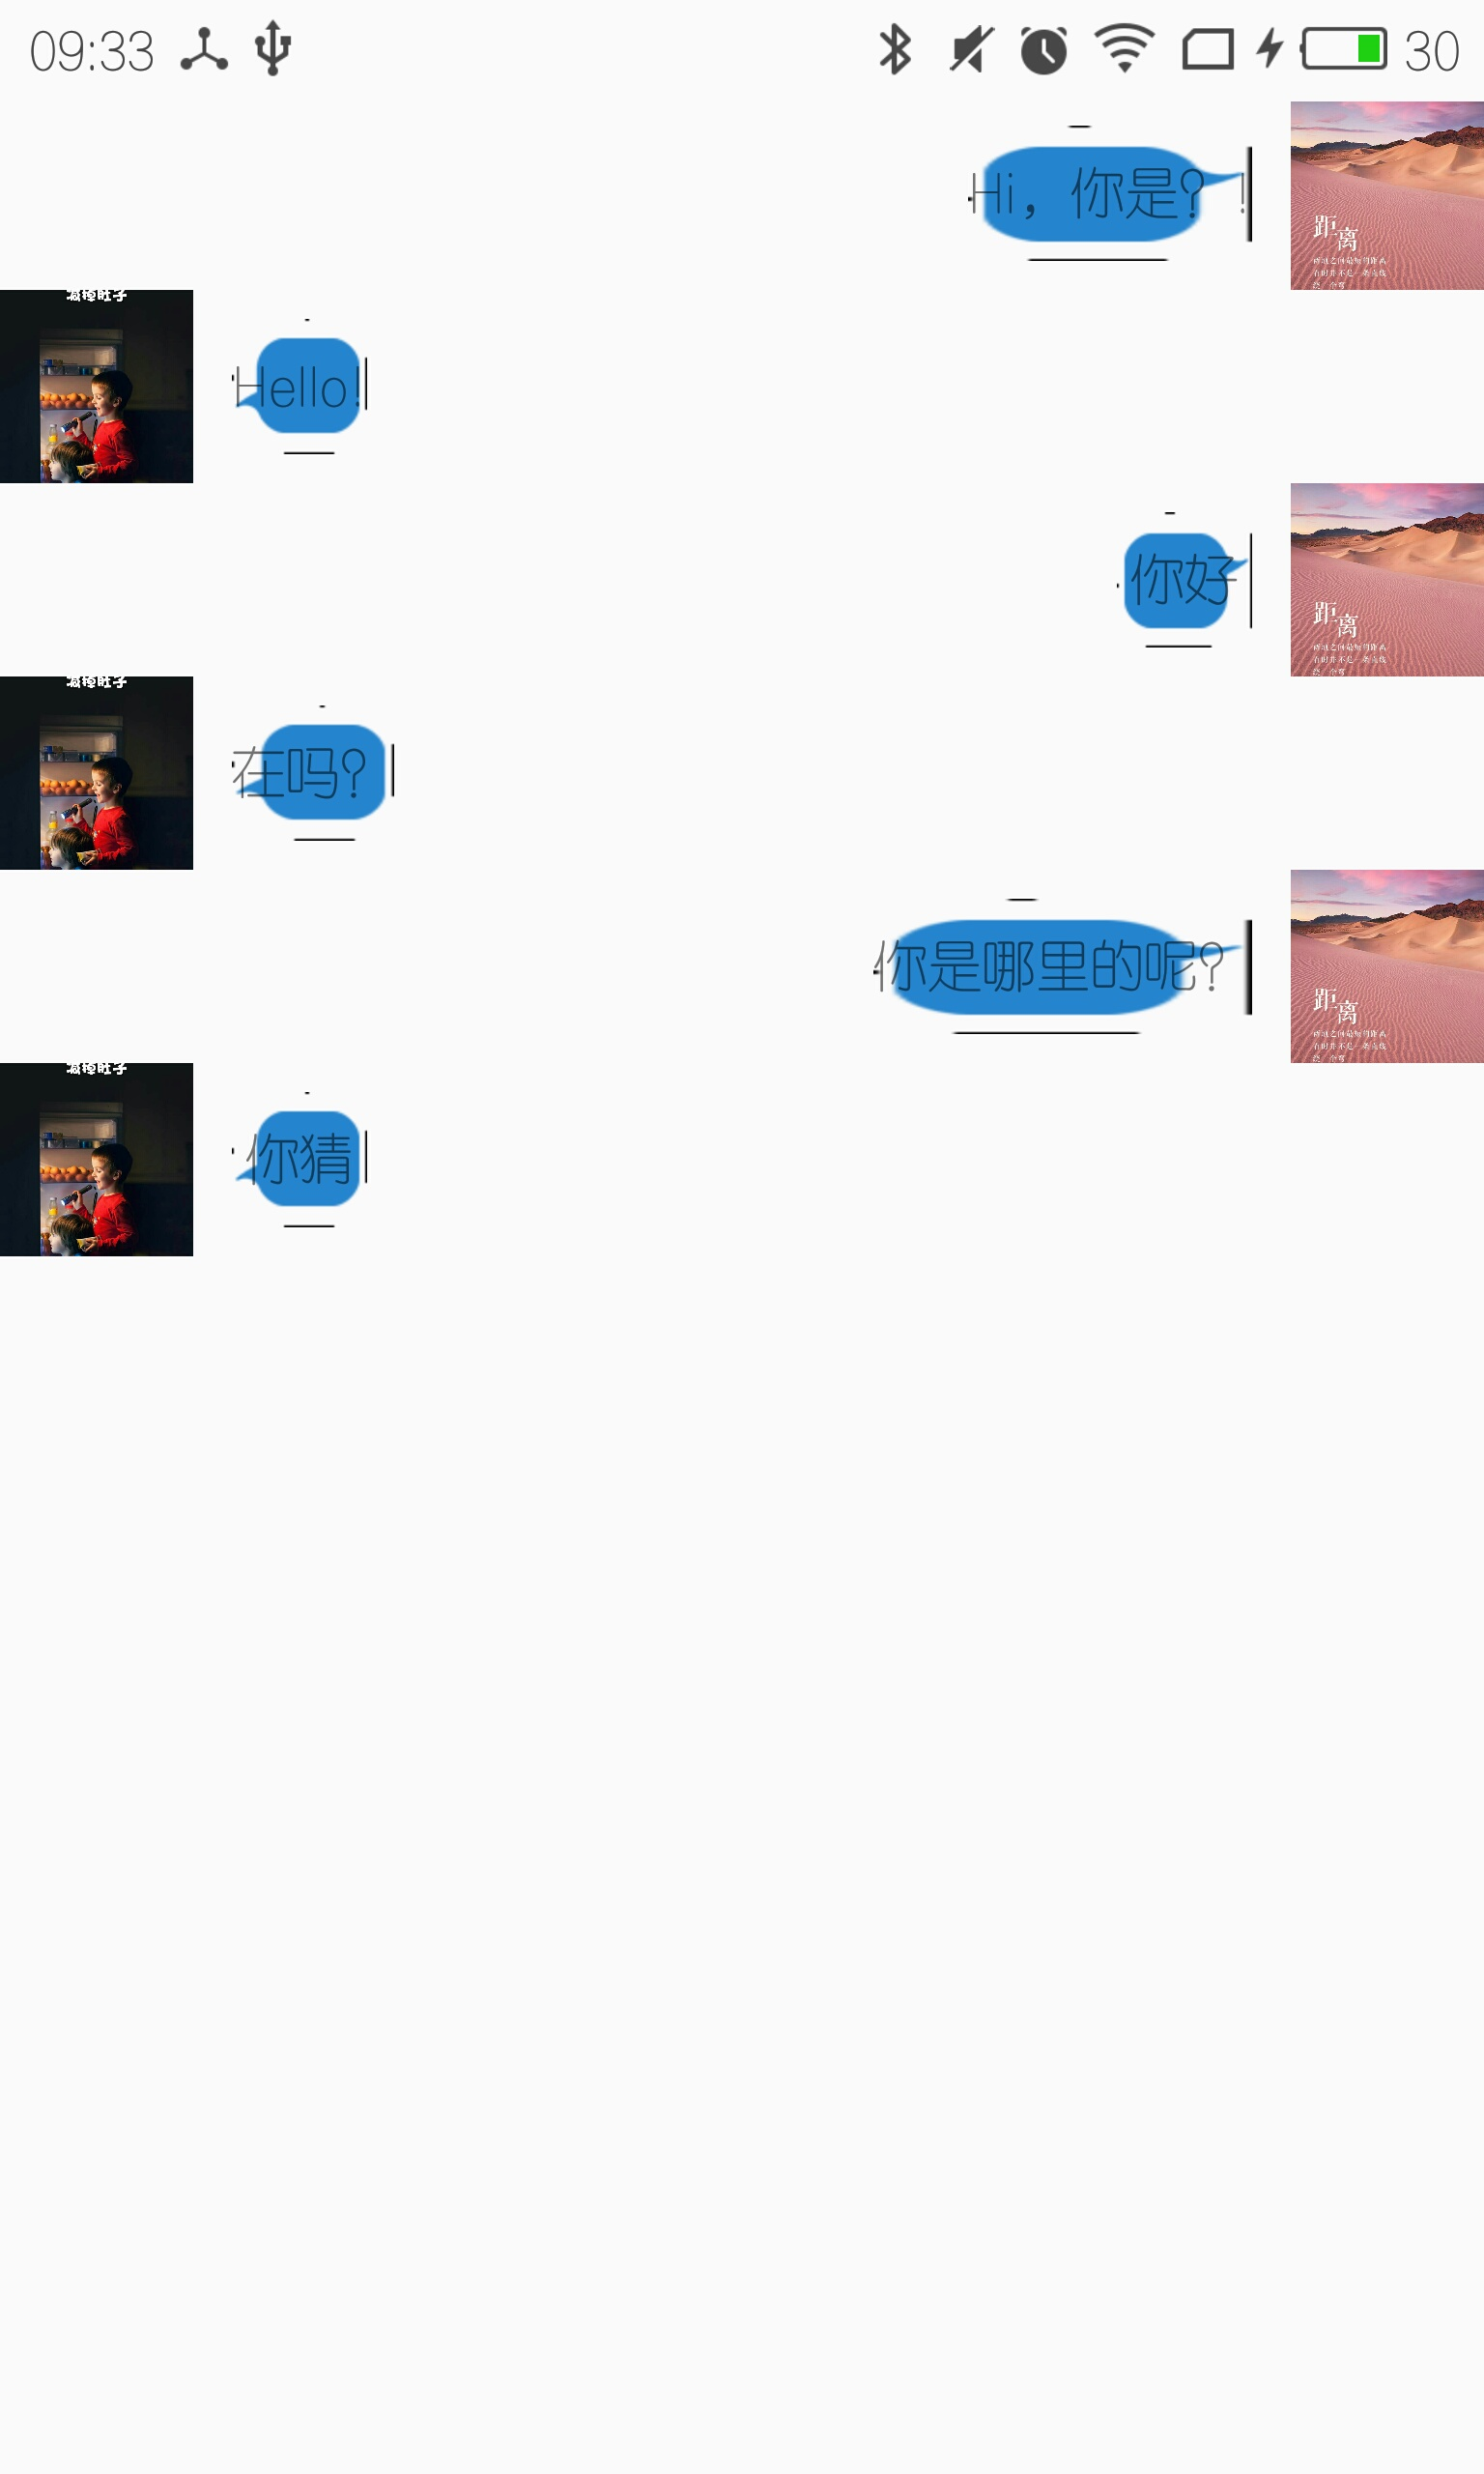
The biggest difference between such a ListView and the ListView that we usually use is that it has two different layouts -- the layout received and the layout sent. To achieve this effect, you need to use ListView's Adapter to "open the knife". The specific code is as follows:
The layout of sender Item (chat_item_send.xml):
<?xml version="1.0" encoding="utf-8"?>
<RelativeLayout xmlns:android="http://schemas.android.com/apk/res/android"
    android:layout_width="match_parent"
    android:layout_height="wrap_content">

    <ImageView
        android:id="@+id/img_send"
        android:layout_width="50dp"
        android:layout_height="50dp"
        android:layout_alignParentRight="true"
        android:layout_centerVertical="true"
        android:scaleType="centerCrop"
        android:src="@drawable/img2" />

    <TextView
        android:id="@+id/txt_send"
        android:layout_width="wrap_content"
        android:layout_height="wrap_content"
        android:layout_centerVertical="true"
        android:layout_marginRight="10dp"
        android:layout_toLeftOf="@+id/img_send"
        android:background="@drawable/chat_send"
        android:gravity="center"
        android:text="Sender" />

</RelativeLayout>
The layout of the receiver Item (chat_item_receive.xml):
<?xml version="1.0" encoding="utf-8"?>
<RelativeLayout xmlns:android="http://schemas.android.com/apk/res/android"
    android:layout_width="match_parent"
    android:layout_height="wrap_content">

    <ImageView
        android:id="@+id/img_receive"
        android:layout_width="50dp"
        android:layout_height="50dp"
        android:layout_centerVertical="true"
        android:scaleType="centerCrop"
        android:src="@drawable/img1" />

    <TextView
        android:id="@+id/txt_receive"
        android:layout_width="wrap_content"
        android:layout_height="wrap_content"
        android:layout_centerVertical="true"
        android:layout_marginLeft="10dp"
        android:layout_toRightOf="@+id/img_receive"
        android:background="@drawable/chat_receive"
        android:gravity="center"
        android:text="Receiver" />

</RelativeLayout>
ViewHolder Adapter for ListView:
package com.example.test;

import android.content.Context;
import android.view.LayoutInflater;
import android.view.View;
import android.view.ViewGroup;
import android.widget.BaseAdapter;
import android.widget.ImageView;
import android.widget.TextView;

import java.util.List;

/**
* Created by HourGlassRemember on 2016/9/18.
*/
public class ViewHolderAdapter extends BaseAdapter {

    private List<ChatItemBean> mData;
    private LayoutInflater mInflater;

    public ViewHolderAdapter(Context context, List<ChatItemBean> mData) {
        this.mData = mData;
        mInflater = LayoutInflater.from(context);
    }

    @Override
    public int getCount() {
        return mData.size();
    }

    @Override
    public Object getItem(int position) {
        return mData.get(position);
    }

    @Override
    public long getItemId(int position) {
        return position;
    }

    /**
    * What type of Item to get the position

    *
    * @param position
    * @return
    */
    @Override
    public int getItemViewType(int position) {
        return mData.get(position).getType();
    }

    /**
    * Returns the total number of different types of layouts

    *
    * @return
    */
    @Override
    public int getViewTypeCount() {
        return 2;
    }

    @Override
    public View getView(int position, View convertView, ViewGroup parent) {
        ViewHolder holder;
        //Determine whether to cache or not

        if (convertView == null) {
            //Determine which layout is based on the type of getItemViewType

            if (getItemViewType(position) == 0) {//Receiver -- "the other party"
                holder = new ViewHolder();
                convertView = mInflater.inflate(R.layout.chat_item_receive, parent, false);
                holder.imgHead = (ImageView) convertView.findViewById(R.id.img_receive);
                holder.txtContent = (TextView) convertView.findViewById(R.id.txt_receive);
            } else {//Sender - "I"
                holder = new ViewHolder();
                convertView = mInflater.inflate(R.layout.chat_item_send, parent, false);
                holder.imgHead = (ImageView) convertView.findViewById(R.id.img_send);
                holder.txtContent = (TextView) convertView.findViewById(R.id.txt_send);
            }
            convertView.setTag(holder);
        } else {
            //Find the layout of the cache by tag

            holder = (ViewHolder) convertView.getTag();
        }
        if (mData != null && mData.size() > 0) {
            holder.imgHead.setImageBitmap(mData.get(position).getHead());
            holder.txtContent.setText(mData.get(position).getContent());
        }
        return convertView;
    }

    public final class ViewHolder {
        public ImageView imgHead;
        public TextView txtContent;
    }

}
MainActivity layout file:
<?xml version="1.0" encoding="utf-8"?>
<LinearLayout xmlns:android="http://schemas.android.com/apk/res/android"
    android:layout_width="match_parent"
    android:layout_height="match_parent"
    android:orientation="vertical">

    <ListView
        android:id="@+id/list_view"
        android:layout_width="match_parent"
        android:layout_height="match_parent"
        android:scrollbars="none" />

</LinearLayout>
MainActivity class:
package com.example.test;

import android.app.Activity;
import android.graphics.BitmapFactory;
import android.os.Bundle;
import android.widget.ListView;

import java.util.ArrayList;
import java.util.List;

public class MainActivity extends Activity {

    private static final String TAG = "MainActivity";

    private ListView listView;

    @Override
    protected void onCreate(Bundle savedInstanceState) {
        super.onCreate(savedInstanceState);
        setContentView(R.layout.activity_main);
        listView = (ListView) findViewById(R.id.list_view);

        List<ChatItemBean> data = new ArrayList<>();
        data.add(addChatContent(1, "Hi,You are?!"));
        data.add(addChatContent(0, "Hello!"));
        data.add(addChatContent(1, "Hello"));
        data.add(addChatContent(0, "Are you there?"));
        data.add(addChatContent(1, "Where are you from?"));
        data.add(addChatContent(0, "Have a guess"));
        listView.setAdapter(new ViewHolderAdapter(this, data));
        listView.setDivider(null);
    }

    /**
    * Add chat content

    *
    * @param type
    * @param content
    */
    private ChatItemBean addChatContent(int type, String content) {
        ChatItemBean chatItemBean = new ChatItemBean();
        chatItemBean.setType(type);
        chatItemBean.setHead(BitmapFactory.decodeResource(getResources(),
                             type == 0 ? R.drawable.img1 : R.drawable.img2));
        chatItemBean.setContent(content);
        return chatItemBean;
    }

}
4.2.4 Dynamic Change ListView Layout
Usually, if you want to dynamically change the layout of clicking on Item to hit a Focus effect, there are two ways: one is to write the two layouts together, by controlling the display and hiding of the layout, to achieve the effect of switching the layout; the other is to select the addition by judgment when getView(). Load different layouts. Both methods have their own advantages and disadvantages, the key is to use the occasion. Here is a second way to demonstrate this effect. After the program runs, the initial effect is as follows. The first Item defaults to Focus state. When clicking on other Items, the Item clicked becomes Focus and the other Items are restored.
(Initial state of program)

(Focus change)
The code for the implementation is as follows:
Layout file:
<?xml version="1.0" encoding="utf-8"?>
<LinearLayout xmlns:android="http://schemas.android.com/apk/res/android"
    android:layout_width="match_parent"
    android:layout_height="match_parent"
    android:orientation="vertical">

    <ListView
        android:id="@+id/list_view"
        android:layout_width="match_parent"
        android:layout_height="match_parent"
        android:scrollbars="none" />

</LinearLayout>
ViewHolder Adapter for ListView:
package com.example.test;

import android.content.Context;
import android.view.Gravity;
import android.view.View;
import android.view.ViewGroup;
import android.widget.BaseAdapter;
import android.widget.ImageView;
import android.widget.LinearLayout;
import android.widget.TextView;

import java.util.List;

/**
* Created by HourGlassRemember on 2016/9/18.
*/
public class ViewHolderAdapter extends BaseAdapter {

    private List<String> mData;
    private Context mContext;
    //Location of the current Item

    private int mCurrentItem;

    public ViewHolderAdapter(Context mContext, List<String> mData) {
        this.mContext = mContext;
        this.mData = mData;
    }

    public void setCurrentItem(int mCurrentItem) {
        this.mCurrentItem = mCurrentItem;
    }

    @Override
    public int getCount() {
        return mData.size();
    }

    @Override
    public Object getItem(int position) {
        return mData.get(position);
    }

    @Override
    public long getItemId(int position) {
        return position;
    }

    /**
    * Add the layout of selected Item

    *
    * @param i
    * @return
    */
    private View addFocusView(int i) {
        LinearLayout layout = new LinearLayout(mContext);
        ImageView imageView = new ImageView(mContext);
        imageView.setImageResource(R.drawable.img1);
        layout.addView(imageView, new LinearLayout.LayoutParams(200, 200));
        layout.setGravity(Gravity.CENTER);
        return layout;
    }

    /**
    * Add normal Item layout

    *
    * @param i
    * @return
    */
    private View addNormalView(int i) {
        LinearLayout layout = new LinearLayout(mContext);
        layout.setOrientation(LinearLayout.HORIZONTAL);
        ImageView imageView = new ImageView(mContext);
        imageView.setImageResource(R.drawable.img3);
        layout.addView(imageView, new LinearLayout.LayoutParams(200, 200));
        TextView textView = new TextView(mContext);
        textView.setText(mData.get(i));
        layout.addView(textView, new LinearLayout.LayoutParams(200, 200));
        return layout;
    }

    @Override
    public View getView(int position, View convertView, ViewGroup parent) {
        LinearLayout layout = new LinearLayout(mContext);
        layout.setOrientation(LinearLayout.VERTICAL);
        //By judging whether the current current Item is the position of that click, you can dynamically control the layout of the display.

        layout.addView(mCurrentItem == position ? addFocusView(position) : addNormalView(position));
        return layout;
    }

}
MainActivity class:
package com.example.test;

import android.app.Activity;
import android.os.Bundle;
import android.view.View;
import android.widget.AdapterView;
import android.widget.ListView;

import java.util.ArrayList;
import java.util.List;

public class MainActivity extends Activity {

    private static final String TAG = "MainActivity";

    private ListView listView;
    private ViewHolderAdapter adapter;
    private List<String> mData = new ArrayList<>();

    @Override
    protected void onCreate(Bundle savedInstanceState) {
        super.onCreate(savedInstanceState);
        setContentView(R.layout.activity_main);
        listView = (ListView) findViewById(R.id.list_view);

        for (int i = 0; i < 20; i++) {
            mData.add(i + "");
        }
        adapter = new ViewHolderAdapter(this, mData);
        listView.setAdapter(adapter);
        //Rewrite the monitoring event of Item click in ListView and record the location of Item click.
        //And let ListView refresh once to update the content of the interface

        listView.setOnItemClickListener(new AdapterView.OnItemClickListener() {
            @Override
            public void onItemClick(AdapterView<?> parent, View view, int position, long id) {
                adapter.setCurrentItem(position);
                adapter.notifyDataSetChanged();
            }
        });
    }

}