vue:Router route
Cognitive routing
Simple understanding
1. Terms in network engineering
2. Routing (Wikipedia): the activity of transmitting information from the source address to the destination address through the Internet
Back-end routing
The back end processes the mapping relationship between url and page, returns the data to the front end, and then renders
My backend development engineer is not explaining
Front-end routing
ajax stage of front-end and back-end separation technology: the back-end only provides data support and does not render data. The front-end initiates ajax asynchronous request, then requests the data in the background, and then renders dom through js

Single page rich application stage
In fact, the main feature of SPA(simple page web application) is the separation of front and back ends, plus a layer of front-end routing. That is, the front-end maintains a set of routing rules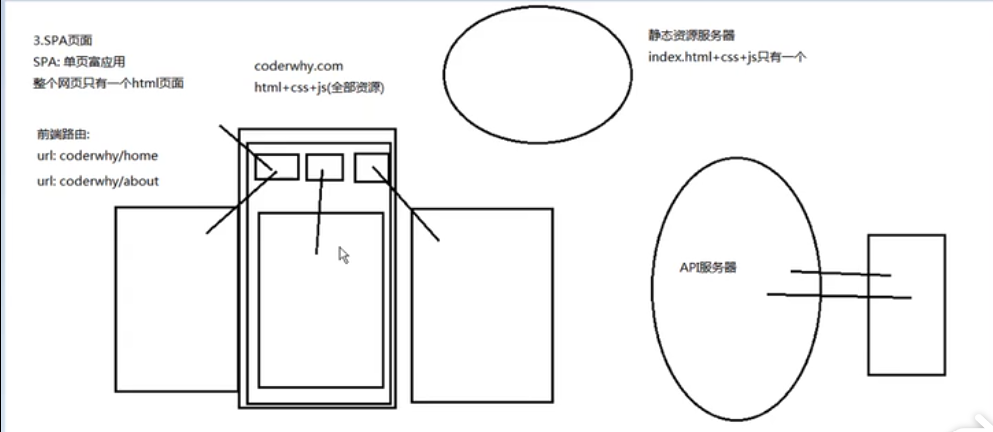
The core of front-end routing is:
1. Change the URL but do not refresh the page as a whole
2. How to achieve it?
hash of URL and history of h5
1. Hash of URL (the default way)
location.hash = "xxx"
2.history mode
history.pushState({},'','home');
history.pushState({},'','me');
history.pushState({},'','index');
//The following two methods are the same
history.back();
history.go(-1);
//Take a step forward
history.forward();
history.go(1)
Stack structure: take the top element of stack, and the back() method takes the new top element
4. Change router mode to history
const rooter = new VueRooter({
    routers,
    mode: 'history'
})
Basic use of Vue router
Installation configuration
npm installation
Step 1: install Vue route
npm install vue-route --save
Step 2: use it in the modular project (because it is a plug-in, you can install the routing function through vue.use())
Step 1: import the route object and call Vue.use(VueRoute)
Step 2: create a route instance and pass in a route map
Step 3: mount the route instance in the Vue instance again
To use Vue router
Step 1: create a routing component
Step 2: configure route mapping, component and path mapping relationship
Step 3: use the route, through (finally rendered as a label) and
Simple use
1. cases
index.js under router folder
import Vue from 'vue'
import Router from 'vue-router'
import HelloWorld from '@/components/HelloWorld'
import home from '../components/home'
import about from '../components/about'
Vue.use(Router)

const routers =[
    {
      path: '/home',
      name: 'home',
      component: home
    },{
      path: '/about',
      name: 'about',
      component: about
    }
]

export default new Router({
    router: routers
})
main.js file
// The Vue build version to load with the `import` command
// (runtime-only or standalone) has been set in webpack.base.conf with an alias.
import Vue from 'vue'
import App from './App'
import router from './router'

Vue.config.productionTip = false

/* eslint-disable no-new */
new Vue({
  el: '#app',
  router,
  components: { App },
  template: '<App/>'
})
about.vue and home.vue components lue
App.vue
<template>
  <div id="app">
    <img src="./assets/logo.png">
    <router-link to="/home">home page</router-link>
    <router-link to="/about">about</router-link>
    <router-view/>
  </div>
</template>

<script>
export default {
  name: 'App'
}
</script>

<style>
#app {
  font-family: 'Avenir', Helvetica, Arial, sans-serif;
  -webkit-font-smoothing: antialiased;
  -moz-osx-font-smoothing: grayscale;
  text-align: center;
  color: #2c3e50;
  margin-top: 60px;
}
</style>
2. Configure the default home page
Use of redirect
import Vue from 'vue'
import Router from 'vue-router'
import HelloWorld from '@/components/HelloWorld'
import home from '../components/home'
import about from '../components/about'

Vue.use(Router)

export default new Router({
  routes: [
    {
      path: '/',
      name: "index",
      redirect: "/home"
    },{
      path: '/home',
      name: 'home',
      component: home
    },{
      path: '/about',
      name: 'about',
      component: about
    }
  ]
})
Properties of router link
1.tag
Render router link tags to specified Tags
Example:
<template>
  <div id="app">
    <router-link tag="button" to="/home">home page</router-link>
    <router-link tag="button" to="/about">about</router-link>
    <router-view/>
  </div>
</template>

<script>
export default {
  name: 'App'
}
</script>

<style>
#app {
  font-family: 'Avenir', Helvetica, Arial, sans-serif;
  -webkit-font-smoothing: antialiased;
  -moz-osx-font-smoothing: grayscale;
  text-align: center;
  color: #2c3e50;
  margin-top: 60px;
}
</style>
2.to
router route mapping relationship
3.active-class
When the corresponding route matches successfully, a router link active class will be automatically set for the current element. Setting the active class can modify the default name
This class is used in the highlighted navigation bar menu or tabbar at the bottom
However, it usually does not modify the properties of the class, and will directly use the default router link active
Example: Click to trigger this attribute
<template>
  <div id="app">
    <router-link tag="button" to="/home">home page</router-link>
    <router-link tag="button" to="/about">about</router-link>
    <router-view/>
  </div>
</template>

<script>
export default {
  name: 'App'
}
</script>

<style>
  .router-link-active{
    color: red;
  }
#app {
  font-family: 'Avenir', Helvetica, Arial, sans-serif;
  -webkit-font-smoothing: antialiased;
  -moz-osx-font-smoothing: grayscale;
  text-align: center;
  color: #2c3e50;
  margin-top: 60px;
}
</style>
4.replace
Replace does not leave a history record, so when replace is specified, the back key cannot return to the previous page
Route by code jump
Example
<template>
  <div id="app">
   <!-- <router-link tag="button" to="/home" @click="homeClick">home page</router-link>
    <router-link tag="button" to="/about" @click="aboutClick">about</router-link>
-->
    <button @click="homeClick">home page</button>
    <button @click="aboutClick">about</button>
    <router-view/>
  </div>
</template>

<script>
export default {
  name: 'App',
  methods:{
    homeClick(){
      this.$router.push("/home")
      console.log("I am the front page.")
    },
    aboutClick(){
      this.$router.push("/about")
      console.log("I am about")
    }
  }
}
</script>

<style>
  .router-link-active{
    color: red;
  }
#app {
  font-family: 'Avenir', Helvetica, Arial, sans-serif;
  -webkit-font-smoothing: antialiased;
  -moz-osx-font-smoothing: grayscale;
  text-align: center;
  color: #2c3e50;
  margin-top: 60px;
}
</style>
Dynamic routing
In some cases, the path path of a page may be uncertain. For example, when we enter the user interface, we want the following path:
1./user/aaaa or / user/bbbb
2. In addition to the front / user, the user ID is also followed
3. This matching relationship between path and Component is called dynamic routing (also a form of routing parameters)
Example:
index.js under router folder
import Vue from 'vue'
import Router from 'vue-router'
import HelloWorld from '@/components/HelloWorld'
import home from '../components/home'
import about from '../components/about'
import user from '../components/user'

Vue.use(Router)

export default new Router({
  routes: [
    {
      path: '/',
      name: "index",
      redirect: "/home"
    },{
      path: '/home',
      name: 'home',
      component: home
    },{
      path: '/user/:userId',
      name: 'user',
      component: user
    },{
      path: '/about',
      name: 'about',
      component: about
    }
  ]
})
Note: the definition format of parameter transfer above
user.vue file
<template>
  <div>
    <h2>{{ message }}</h2>
    <p>{{ page }}</p>
    <h1>{{ userId }}</h1>
  </div>
</template>

<script>
  export default {
    name: "user",
    data(){
      return{
        message: 'I am the user.',
        page: 'I'm the user's content,Hehe hehe hehe~'
      }
    },
    computed: {
      userId(){
        return this.$route.params.userId
      }
    }
  }
</script>

<style scoped>

</style>
App.vue file
<template>
  <div id="app">
    <router-link tag="button" to="/home">home page</router-link>
    <router-link tag="button" to="/about">about</router-link>
    <router-link tag="button" :to="'/user/'+ userId">user</router-link>
    <router-view/>
  </div>
</template>

<script>
export default {
  name: 'App',
  data(){
    return{
     userId: 'lisi',
     imgUrl: 'http://www.baidu.com/logo.png'
    }
  }
}
</script>

<style>
  .router-link-active{
    color: red;
  }
#app {
  font-family: 'Avenir', Helvetica, Arial, sans-serif;
  -webkit-font-smoothing: antialiased;
  -moz-osx-font-smoothing: grayscale;
  text-align: center;
  color: #2c3e50;
  margin-top: 60px;
}
</style>
Effect
Summary: the contents of the template tag must be placed in the div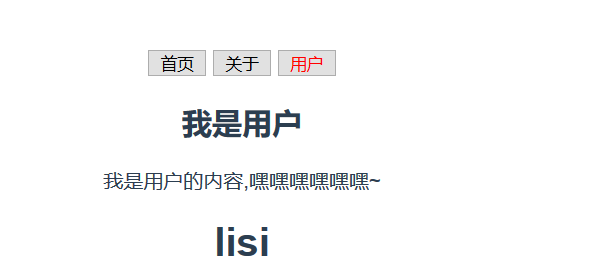
Lazy loading of routes
Official explanation
1. When packaging and building applications, JavaScript packages will become very large, affecting page loading
2. If we can divide the components corresponding to different routes into different code blocks, and then load the corresponding components when the routes are accessed, it will be more efficient
3. Personal understanding: load when used
Official understanding
1. We will define many pages in the route
2. In general, the package is placed in a js
3. Multiple pages in a js file will inevitably cause this page to be large
4. As a result, it will take a long time for us to request this page from the server at a time, resulting in a short blank page and affecting the user experience
5. So using route lazy loading can solve this problem
What does routing lazy load do:
1. The main function is to package the components corresponding to the route into js code blocks
2. Load the corresponding components only when accessing
The effect of route lazy loading
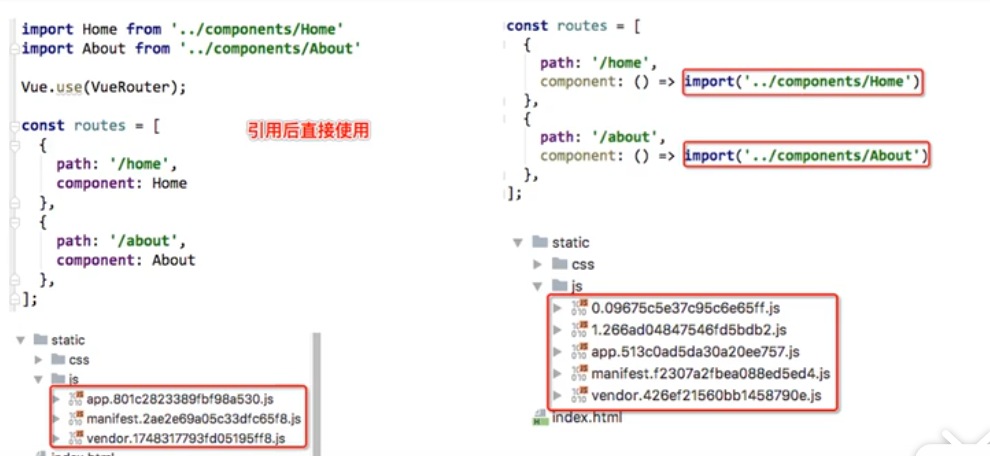
1. app.801c on the left : function the business logic code after packing, that is, the file after packing the code written by oneself
2.mainfest: underlying support file
3.vendor: the packaged file of the third-party resources
Realization way
1. Combining the asynchronous component of vue and the code analysis of webpack
const home = resolve => {require.ensure(['../components/home.vue'],()=>{resolve(require('../componennts/home.vue'))})};
2.AMD writing
const About = resolve=> require(['../componennts/about.vue'],resolve);
3. In ES6, we can have a simpler way to organize the code division between vue asynchronous components and webback
const home = ()=>import('../componenets/home.vue')
Example
import Vue from 'vue'
import Router from 'vue-router'
import HelloWorld from '@/components/HelloWorld'
/*import home from '../components/home'
import about from '../components/about'
import user from '../components/user'*/

const home = () => import('../components/home');
const about = () => import('../components/about');
const user = () => import('../components/user')
Vue.use(Router)

export default new Router({
  routes: [
    {
      path: '/',
      name: "index",
      redirect: "/home"
    },{
      path: '/home',
      name: 'home',
      component: home
    },{
      path: '/user/:userId',
      name: 'user',
      component: user
    },{
      path: '/about',
      name: 'about',
      component: about
    }
  ]
})
Vue router nested route
Introduction:
Nested routing is a common feature
1. For example, in the home page, we want to access some content through / home/newsh and / home/message
2. One path maps one component, and accessing the two paths will render two components respectively
Example
Subcomponents under home.vue
<template>
    <div>
      <ul>
        <li>News 1</li>
        <li>News 2</li>
        <li>News 3</li>
      </ul>
    </div>
</template>

<script>
    export default {
        name: "homeNews"
    }
</script>

<style scoped>

</style>
Configure route index.js
import Vue from 'vue'
import Router from 'vue-router'
import HelloWorld from '@/components/HelloWorld'
/*import home from '../components/home'
import about from '../components/about'
import user from '../components/user'*/

const home = () => import('../components/home');
const about = () => import('../components/about');
const user = () => import('../components/user');
const news = () => import('../components/homeNews')
Vue.use(Router)

export default new Router({
  routes: [
    {
      path: '/',
      name: "index",
      redirect: "/home"
    },{
      path: '/home',
      name: 'home',
      component: home,
      children: [
        {
        path: 'news',
        component: news
        }
      ]
    },{
      path: '/user/:userId',
      name: 'user',
      component: user
    },{
      path: '/about',
      name: 'about',
      component: about
    }
  ]
})
Use in home, router view and router link
<template>
    <div>
      <h2>{{message}}</h2>
      <p>{{page}}</p>
      <router-link to="/home/news">Journalism</router-link>
      <router-view></router-view>
    </div>
</template>

<script>
    export default {
        name: "home",
        data(){
          return{
            message: 'I am the front page.',
            page: 'I am the content of the home page,Ha ha ha ha ha ha~'
          }
        }
    }
</script>

<style scoped>

</style>
Vue route parameter passing
Pass parameter 1:
There are two main ways to pass parameters: params and query
Type of params (small pass):
1. Configure the routing format (dynamic routing): / user/:userId
2. Transfer method: follow the corresponding value after path
3. path in the form after passing: /router/123,/router/abc
query type: (mass transfer)
1. Configure routing format / router, that is, general configuration
2. Delivery method: query key is used as the delivery method in the object
3. form of path after passing: /router?id=123;/router?id=abc
Example:
New component: profile.vue
<template>
  <div>
    <h2>I am Profile assembly</h2>
    <p>{{$route.query.name}}</p>
    <p>{{$route.query.age}}</p>
    <p>{{$route.query.sex}}</p>
  </div>
</template>

<script>
    export default {
        name: "Profile",
    }
</script>

<style scoped>

</style>
Configure routes:
import Vue from 'vue'
import Router from 'vue-router'
import HelloWorld from '@/components/HelloWorld'
/*import home from '../components/home'
import about from '../components/about'
import user from '../components/user'*/

const home = () => import('../components/home');
const about = () => import('../components/about');
const user = () => import('../components/user');
const news = () => import('../components/homeNews');
const profile = () => import('../components/Profile')
Vue.use(Router)

export default new Router({
  routes: [
    {
      path: '/profile',
      component: profile
    }, {
      path: '/',
      name: "index",
      redirect: "/home"
    },{
      path: '/home',
      name: 'home',
      component: home,
      children: [
        {
        path: 'news',
        component: news
        }
      ]
    },{
      path: '/user/:userId',
      name: 'user',
      component: user
    },{
      path: '/about',
      name: 'about',
      component: about
    }
  ]
})
Use components:
<template>
  <div id="app">
    <router-link tag="button" to="/home">home page</router-link>
    <router-link tag="button" to="/about">about</router-link>
    <router-link tag="button" :to="'/user/'+ userId">user</router-link>
    <router-link :to="{path:'/profile', query:{name: 'Zhang San', age: 18, sex: 'male'}}" tag="button">archives</router-link>
    <router-view/>
  </div>
</template>

<script>
export default {
  name: 'App',
  data(){
    return{
     userId: 'lisi',
     imgUrl: 'http://www.baidu.com/logo.png'
    }
  }
}
</script>

<style>
  .router-link-active{
    color: red;
  }
}
</style>
Transfer parameter two
<template>
  <div id="app">
    <router-link tag="button" to="/home">home page</router-link>
    <router-link tag="button" to="/about">about</router-link>
    <router-link tag="button" :to="'/user/'+ userId">user</router-link>
<!--    <router-link :to="{path:'/profile', query:{name: 'Zhang San', age: 18, sex: 'male'}}" tag="button">archives</router-link>-->
    <button @click="proClick">archives</button>
    <router-view/>
  </div>
</template>

<script>
export default {
  name: 'App',
  data(){
    return{
     userId: 'lisi',
     imgUrl: 'http://www.baidu.com/logo.png'
    }
  },
  methods:{
    proClick(){
      this.$router.push({
        path: '/profile',
        query:{
          name: 'Zhang San',
          age: 18,
          sex: 'male'
        }
      })
    }
  }
}
</script>

<style>
  .router-link-active{
    color: red;
  }
#app {
  font-family: 'Avenir', Helvetica, Arial, sans-serif;
  -webkit-font-smoothing: antialiased;
  -moz-osx-font-smoothing: grayscale;
  text-align: center;
  color: #2c3e50;
  margin-top: 60px;
}
</style>
Vue route navigation guard
Function: the main function of navigation guard is to monitor jump
Requirement: the title on which interface to open must be the same as the title of the current interface
Idea: 1. Life cycle function create(), but every interface should write this function, so it is not recommended to use
2. Vue router global guard
import Vue from 'vue'
import Router from 'vue-router'
import HelloWorld from '@/components/HelloWorld'
/*import home from '../components/home'
import about from '../components/about'
import user from '../components/user'*/

const home = () => import('../components/home');
const about = () => import('../components/about');
const user = () => import('../components/user');
const news = () => import('../components/homeNews');
const profile = () => import('../components/Profile')
Vue.use(Router)


const router = new Router({
  mode: 'history',
  routes: [
    {
      path: '/profile',
      component: profile,
      meta:{
        title: 'archives'
      }
    }, {
      path: '/',
      name: "index",
      redirect: "/home"
    },{
      path: '/home',
      name: 'home',
      component: home,
      meta:{
        title: 'home page'
      },
      children: [
        {
        path: 'news',
        component: news
        }
      ]
    },{
      path: '/user/:userId',
      name: 'user',
      component: user,
      meta:{
        title: 'user'
      }
    },{
      path: '/about',
      name: 'about',
      component: about,
      meta:{
        title: 'About us'
      }
    }
  ]
});

router.beforeEach((to,from,next) => {
  document.title = to.meta.title;
  next();
})

export default router;
Effect: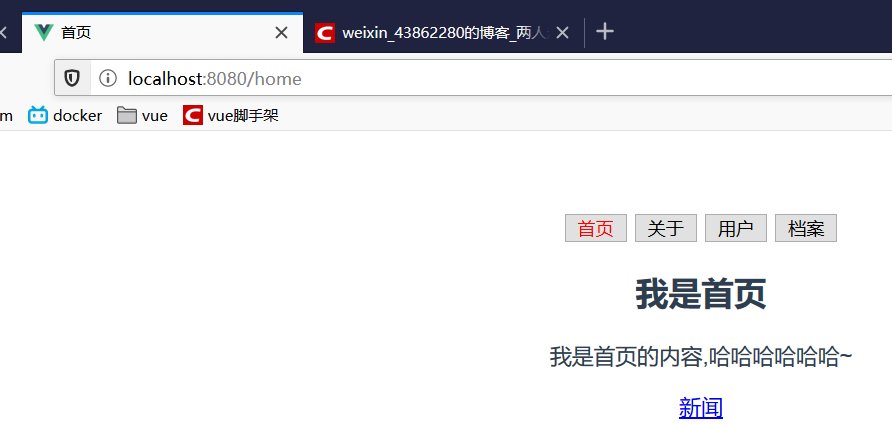
Conclusion:
[][]Learn in detail
keep-alive
1. Keep alive is a built-in component of Vue, which can keep the contained components in state or avoid repeated rendering
2. Router view is also a component. If it is directly wrapped in keep alive, all matching views of components will be saved
Properties:
1.exclude: string or regular expression, any matching will not be cached
2.include: string or regular expression, any matching will be cached

