In this issue, we will learn how to use computer vision technology to recognize chess pieces and their positions on the chessboard

We use computer vision technology and convolutional neural network (CNN) to create a classification algorithm for this project and determine the position of chess pieces on the chessboard. The final application will save the whole image and display it visually, and output the 2D image of the chessboard to view the results.
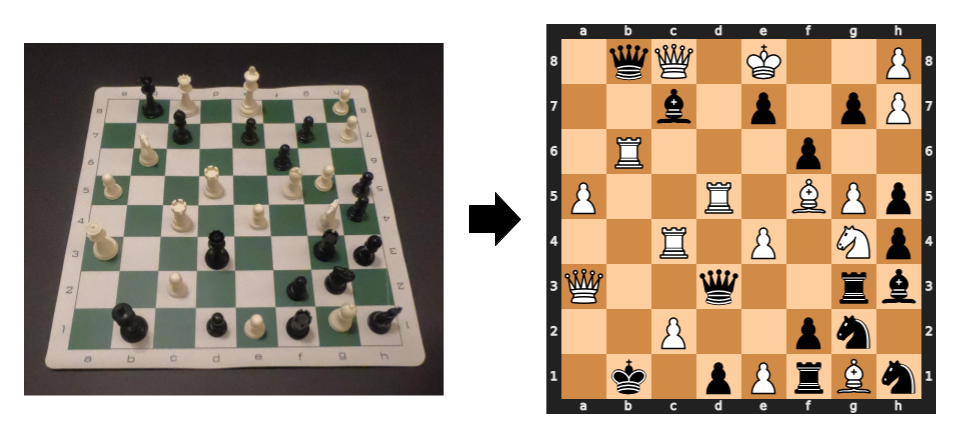
(left) the frame fed by the real-time camera and the (right) two-dimensional image of the chessboard
01. Data
We have high requirements for the data set of the project, because it will eventually affect our experimental results. The chess data sets we can find on the Internet are taken with different chess sets and different cameras, which leads us to create our own data sets. I generated a custom dataset using chess and a camera (GoPro Hero6 Black from a "first person perspective"), which made my model more accurate. The dataset contains 2406 images, divided into 13 categories (see below). Summary: this takes us a lot of time, but it makes the training image as close as possible to the image we see when we use it in the application.

Subdivisions of custom datasets
To build this dataset, I first created capture_data.py, when you click the S key, the video will get a frame from the video stream and save it. This program enables me to seamlessly change the pieces on the chessboard and capture the image of the chessboard again and again until I have established a large number of different chessboard configurations. Next, I created create_data.py to cut it into individual pieces using the detection techniques discussed in the next section. Finally, I classify the cropped images by dividing them into labeled folders.
02. Chessboard detection
For chessboard detection, what I want to do is much more complex than using the OpenCV function findchess board corners, but it is not as advanced as CNN. Use low-level and intermediate computer vision technology to find the features of the chessboard, and then convert these features into the coordinates of the outer boundary and 64 independent squares. This process takes the intersection of horizontal and vertical lines generated by Canny edge detection and Hough transform as the center. Hierarchical clustering is used to group intersections by distance and average each group to create final coordinates (see below).

Complete chessboard detection process
03. Chessboard classification
At the beginning of the project, we want to use Keras / TensorFlow to create CNN model and classify the pieces. However, after creating the dataset, only considering the size of CNN, CNN alone can not obtain the desired results. To overcome this obstacle, I used ImageDataGenerator and transfer learning, which added my data and used other pre trained models as the basis.
Create CNN model
In order to use GPU, I created and trained CNN model in the cloud, which greatly reduced the training time. Quick tip: Google Colab is an easy way to get started using GPU. To improve the effectiveness of the data, I used the ImageDataGenerator to expand the original image and expose the model to different versions of the data. The ImageDataGenerator function randomly rotates, rescales, and flips (horizontally) the training data for each period, essentially creating more data. Although there are more conversion options, these conversion options are most effective for the project.
from keras.preprocessing.image import ImageDataGenerator
datagen = ImageDataGenerator(
        rotation_range=5,
        rescale=1./255,
        horizontal_flip=True,
        fill_mode='nearest')
test_datagen = ImageDataGenerator(rescale=1./255)
train_gen = datagen.flow_from_directory(
    folder + '/train',
    target_size = image_size,
    batch_size = batch_size,
    class_mode = 'categorical',
    color_mode = 'rgb',
    shuffle=True)
test_gen = test_datagen.flow_from_directory(
    folder + '/test',
    target_size = image_size,
    batch_size = batch_size,
    class_mode = 'categorical',
    color_mode = 'rgb',
    shuffle=False)
Instead of training the model from scratch, we realized transfer learning by using the pre trained model and adding the top-level model trained with my custom dataset. I followed a typical transfer learning workflow:
1. Obtain layers from the previously trained model (VGG16).
from keras.applications.vgg16 import VGG16
model = VGG16(weights='imagenet')
model.summary()
2. Freeze them to avoid damaging any information they contain in the training round.
3. Add a new trainable layer at the top of the frozen layer.
from keras.models import Sequential
from keras.layers import Dense, Conv2D, MaxPooling2D, Flatten
from keras.models import Model
base_model = VGG16(weights='imagenet', include_top=False, input_shape=(224,224,3))

# Freeze convolutional layers from VGG16
for layer in base_model.layers:
    layer.trainable = False
# Establish new fully connected block
x = base_model.output
x = Flatten()(x)
x = Dense(500, activation='relu')(x)
x = Dense(500, activation='relu')(x)
predictions = Dense(13, activation='softmax')(x)
# This is the model we will train
model = Model(inputs=base_model.input, outputs=predictions)
model.compile(optimizer='adam', loss='categorical_crossentropy', metrics=['categorical_accuracy'])
4. Train a new layer on a custom dataset.
epochs = 10
history = model.fit(
    train_gen,
    epochs=epochs,
    verbose = 1,
    validation_data=test_gen)
model.save_weights('model_VGG16.h5')
When we use VGG16 or VGG19 as the pre training model to create the model, we choose the model using VGG16 because of the higher verification accuracy. In addition, the best epochs is 10. Any number greater than 10 will not improve the accuracy of verification, nor will it increase the difference between training and verification accuracy. Conclusion: transfer learning enables us to make full use of the advantages of deep learning in image classification without large data sets.
04. Results
In order to better visually verify the accuracy, I created the confusion matrix of model prediction. With this chart, you can easily evaluate the advantages and disadvantages of the model. Advantages: the empty - accuracy rate is 99%, and the recall rate is 100%; White and black (WP and BP) - F1 scores about 95%. Disadvantages: White Knight (WN) - high recall rate (98%), but low accuracy (65%); White bishop (WB) - lowest recall rate, 74%.

Confusion matrix of test data
05. Application
The goal of the application is to use the CNN model and visualize the performance of each step. We created cv_chess.py, which clearly shows the steps and creates cv_chess_functions.py, which shows the details of each step. This application saves the original frame in the real-time video stream, 64 cropped images of each square and the final 2D image of the chessboard.
print('Working...')

# Save the frame to be analyzed
cv2.imwrite('frame.jpeg', frame)

# Low-level CV techniques (grayscale & blur)
img, gray_blur = read_img('frame.jpeg')

# Canny algorithm
edges = canny_edge(gray_blur)

# Hough Transform
lines = hough_line(edges)

# Separate the lines into vertical and horizontal lines        h_lines, v_lines = h_v_lines(lines)

# Find and cluster the intersecting
intersection_points = line_intersections(h_lines, v_lines)        points = cluster_points(intersection_points)

# Final coordinates of the board
points = augment_points(points)

# Crop the squares of the board a organize into a sorted list        x_list = write_crop_images(img, points, 0)
img_filename_list = grab_cell_files()        img_filename_list.sort(key=natural_keys)

# Classify each square and output the board in Forsyth-Edwards Notation (FEN)
fen = classify_cells(model, img_filename_list)

# Create and save the board image from the FEN
board = fen_to_image(fen)

# Display the board in ASCII
print(board)
# Display and save the chessboard image
board_image = cv2.imread('current_board.png')        cv2.imshow('current board', board_image)

print('Completed!')
Code link: https://github.com/andrewleeunderwood/project_MYM