##CI/CD Automated Deployment
1 case 1: deploying GitLab
1.1 problems
This case requires to build a GitLab server, and the requirements are as follows:
- Preparation environment (container environment)
- Installing GitLab
1.2 scheme
Preparation of experimental environment (follow the experimental environment of DAY01):
1) Prepare two RHEL8 virtual machines with host names of develop ep and git.
2) The IP address of the develop ment host is 192.168.4.10, and there is no need to configure gateway and DNS.
3) The IP address of git host is 192.168.4.20, and there is no need to configure gateway and DNS.
4) Configure the available YUM source for both develop ep and git hosts.
Note: routing across network segments, the same network segment can be interconnected without configuring a gateway!
The experimental topology is shown in figure-1.
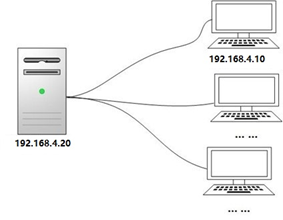
Figure-1
1.3 steps
To realize this case, you need to follow the following steps.
Step 1: environment preparation (in 192.168.4.20 host operation)
1) Firewall, SELinux.
[root@git ~]# firewall-cmd --set-default-zone=trusted[root@git ~]# setenforce 0[root@git ~]# sed -i '/SELINUX/s/enforcing/permissive/' /etc/selinux/config
2) Modify the sshd default port.
Because Git is accessed through SSH protocol, the GitLab container needs to be started later, which needs to occupy port 22, and the sshd service of the computer also needs to occupy port 22 (Port conflict). Therefore, it is necessary to modify the sshd default port in advance and change the port to 2022.
Note: after modification, you need to log in to the virtual machine again (you need to specify the port to log in again).
[root@git ~]# vim /etc/ssh/sshd_configPort 2022 #17 that 's ok[root@git ~]# systemctl restart sshd[root@git ~]# exit Real machine# ssh -p 2022 192.168.4.20
3) Prepare the container environment.
Tip: gitlab_zh.tar is in the second stage material directory. You need to copy the material to the 192.168.4.20 host first. (for example, copy to / root directory)
[root@git ~]# dnf  -y   install   podman
[root@git ~]# podman load < ./gitlab_zh.tar    #This package has no resources to find
[root@git ~]# podman imagesREPOSITORY               TAG      IMAGE ID          CREATED       SIZElocalhost/gitlab_zh   latest   1f71f185271a       2 years ago   1.73 GB
4) Create data directory
The container cannot store data permanently. It is necessary to bind the real machine directory and the container directory to realize permanent data storage.
[root@git ~]# mkdir -p /srv/gitlab/{config,logs,data}
Step 2: start GitLab container (192.168.4.20 operation)
1) Start container
[root@git ~]# touch /etc/resolv.conf #If there is no such file, create a file to prevent it from failing podman run Start container[root@git ~]# podman run -d -h gitlab --name gitlab \-p 443:443 -p 80:80 -p 22:22 \--restart=always \-v /srv/gitlab/config:/etc/gitlab \-v /srv/gitlab/logs:/var/log/gitlab \-v /srv/gitlab/data:/var/opt/gitlab \gitlab_zh
notes:
-d put the container into the background and start it.
-h set the host name of the container to gitlab.
– name set the container name to gitlab.
-p for port mapping, bind ports 443, 80 and 22 of git host with container ports running on git
In this way, anyone can access port 22 of the git host (192.168.4.20), that is, port 22 in the access container, and anyone can access port 80 of the git host (192.168.4.20), that is, port 80 in the access container.
-v bind the directory on the git host to the directory in the container. The / srv/gitlab/config directory of the git host corresponds to the / etc/gitlab / directory in the container. Other directories are the same.
The last gitlab_zh is the mirror name.
2) Configure systemd to realize the container startup and self startup (select experiment)
Generate a service file, - n is the name of the container, and generate a service file for the gitlab container
[root@git ~]# cd /usr/lib/systemd/system
[root@git ~]# podman generate systemd -n gitlab --files[root@git ~]# cd ~
Set startup and self startup
[root@git ~]# systemctl enable container-gitlab.service
3) Initialize login password (real machine uses browser to access GitLab page)
# firefox http://192.168.4.20
The default user name of GitLab is root. The password needs to be set for the first access. The effect is shown in figure-2.

Figure-2
After setting the password, you can log in with the newly set password (the password should be 8 digits and composed of letters, symbols and numbers). The effect is shown in figure-3.
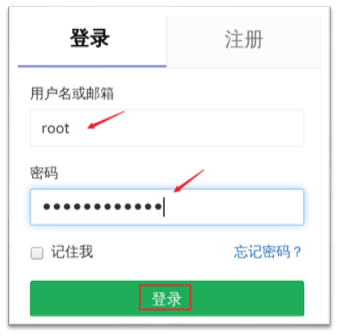
Figure-3
2 case 2: configuring GitLab
2.1 problems
Follow exercise 1 to configure GitLab. The specific requirements are as follows:
- Create GitLab users and groups
- Create GitLab project
- Client management GitLab project
- Upload code
2.2 steps
To implement this case, you need to follow the following steps.
Step 1: create users and groups
1) To create a user, click the small wrench icon on the GitLab page to create a user. The effect is shown in figure-4.
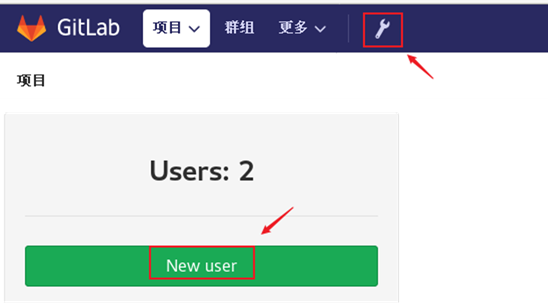
Figure-4
Create jerry user, click Edit to set the user's password, and the effect is shown in figure-5.
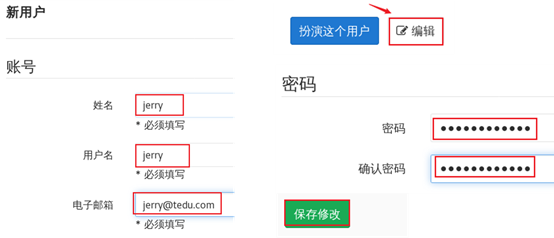
Figure-5
2) Create group
Click the small wrench icon on GitLab page to create a group, and the effect is shown in figure-6.

Figure-6
Set the group name (the group name is devops) and the visible level (the level is public), and the effect is shown in figure-7.
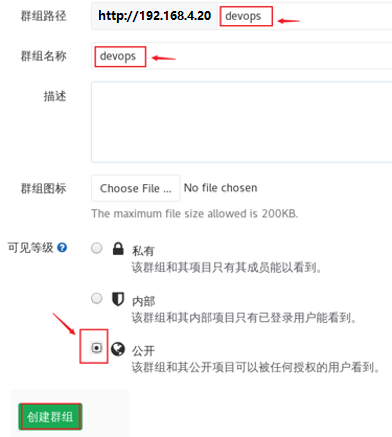
Figure-7
3) Add the user to the group (add jerry user to the devops group), and the effect is shown in figure-8.
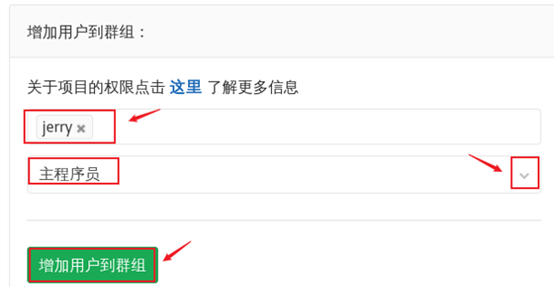
Figure-8
Step 2: create GitLab project
1) Create the project, and the effect is shown in figure-9.
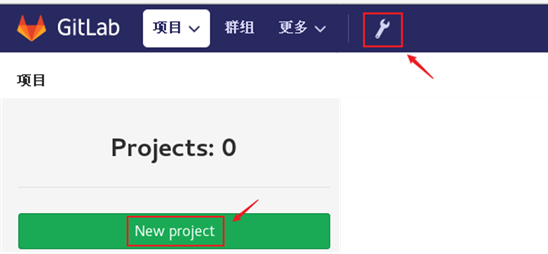
Figure-9
2) Set the project name, group and visibility level, and the effect is shown in figure-10.
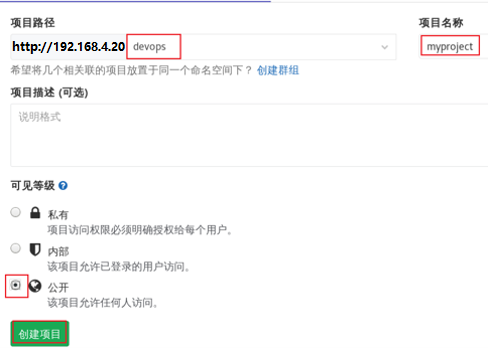
Figure-10
Step 3: manage GitLab project
1) Client uses password to manage GitLab project (operated on 192.168.4.10 host)
[root@develop ~]# git config --global user.name "Administrator"
[root@develop ~]# git config --global user.email "admin@example.com"
[root@develop ~]# git clone http://192.168.4.20/devops/myproject.git
[root@develop ~]# cd myproject[root@develop myproject]# touch README.md
[root@develop myproject]# git add README.md
[root@develop myproject]# git commit -m "add README"[root@develop myproject]# git push -u origin masterUsername for 'http://192.168.4.20': jerry # here, enter the user name password for' http://jerry @192.168.4.20 ': # enter the password here
2) The client generates the SSH key (in 192.168.4.10 host operation)
[root@develop myproject]# rm -rf /root/.ssh/known_hosts #Delete previous ssh Remote recording[root@develop myproject]# ssh-keygen #generate ssh Key file[root@develop myproject]# cat ~/.ssh/id_rsa.pub #View the key file SSH RSA aaaaab3nzac1yc2eaaadaqabaaqdpvwp8e7tka9h8ec + cu2n19aipo9sua / pdm7graf0yg + bcdyq7hgi6pi51ihx6tat46l5tlkay7urveemnptuk / tviuc0smjpxykiggocr2dd9s1s0
3) Log in to GitLab page using jerry user
jerry needs to reset his password for the first time when he logs in to the page. The password can be the same as the old password. The effect is shown in figure-11.
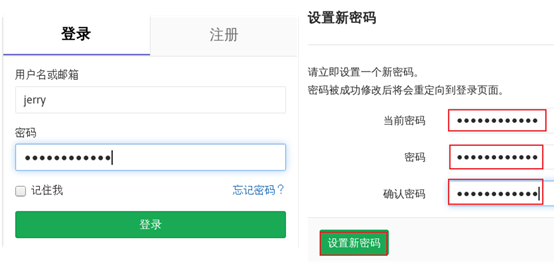
Figure-11
4) Upload key
Upload the contents of the key file just created on 192.168.4.10 to GitLab.
Click the account icon in the upper right corner, click settings, click the expand button, click SSH key, and then copy the contents of the key file generated by the develop ment host to GitLab. The effect is shown in figure-12 and figure-13.
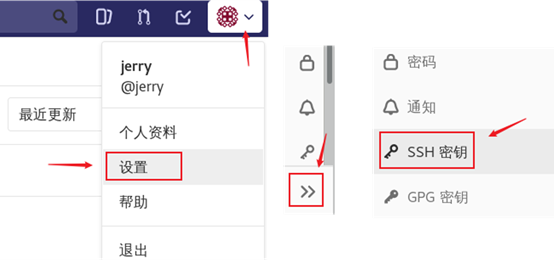
Figure-12
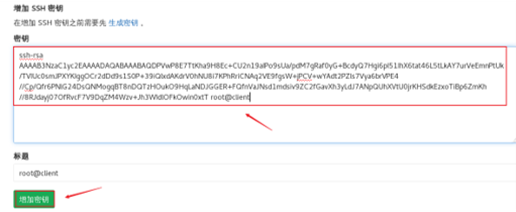
Figure-13
5) Managing GitLab projects using keys
First, check the link based on SSH connection mode, as shown in figure-14.
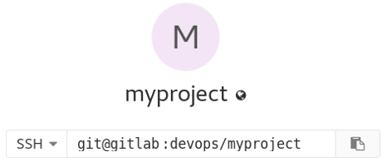
Figure-14
[root@develop myproject]# git remote remove origin
[root@develop myproject]# git remote add \origin git@192.168.4.20:devops/myproject.git
#Important remarks:
The previous case uses the http protocol to access the code warehouse of the clone server. Here, delete the previous http server information (remove: delete), and then add new server information (add): add), and use the ssh protocol to access the server.
[root@develop myproject]# echo hello word >> README.md[root@develop myproject]# git add .
[root@develop myproject]# git commit -m "modify readme"
[root@develop myproject]# git push -u origin master
\6) Upload static page code (the code is in the second stage material lnmp_soft.tar.gz)
You need to copy the real machine's web material scp to the develop er virtual machine user's home directory in advance, and unzip lnmp_soft.tar.gz, there is a WWW in the compressed package_ template. Zip file.
[root@develop ~]# dnf  -y  install   unzip tar[
root@develop ~]# unzip  www_template.zip[root@develop ~]# cp -r www_template/*   myproject/[root@develop ~]# cd  myproject/
[root@develop myproject]# git add
.[root@develop myproject]# git commit -m  "web site"
[root@develop myproject]# git push -u origin master
[root@develop myproject]# git tag  v1
[root@develop myproject]# git push -u origin v1
Using tag, you can set version labels for your code, such as v1, v2, v3, and so on.
3 case 3: deploying Jenkins
3.1 problems
Follow exercise 2 to deploy CI/CD environment and Jenkins. The specific requirements are as follows:
- Prepare the experimental environment
- Deploy Jenkins and initialize Jenkins
- Manage Jenkins plug-ins and adjust system configuration
3.2 scheme
Preparation of experimental environment:
1) Five RHEL8 virtual machines with host names of develop ep, git, jenkins, web1 and web2.
2) The IP address of the develop ment host is 192.168.4.10, and there is no need to configure gateway and DNS.
3) The IP address of git host is 192.168.4.20, and there is no need to configure gateway and DNS.
4) The IP address of jenkins host is 192.168.4.30, and there is no need to configure gateway and DNS.
5) The IP addresses of web1 and web2 hosts are 192.168.4.100 and 192.168.4.200 respectively. Gateway and DNS do not need to be configured.
6) All hosts need to configure the available system YUM source, set the firewall, trust all, and release all by SELinux.
Note: routing across network segments, the same network segment can be interconnected without configuring a gateway! The experimental topology is shown in figure-15.

Figure-15
Step 1: Environmental preparation
1) Set up firewall and SELinux (take only one host as an example, all other hosts need to operate)
[root@git ~]# firewall-cmd --set-default-zone=trusted
[root@git ~]# setenforce 0
[root@git ~]# sed -i '/SELINUX/s/enforcing/permissive/' /etc/selinux/config
2) Install dependent software (git, postfix, java JDK).
Note: only operate on jenkins host!
[root@jenkins ~]# dnf -y install git
[root@jenkins ~]# dnf -y install postfix
[root@jenkins ~]# dnf -y install mailx
[root@jenkins ~]# dnf -y install java-11-openjdk
[root@jenkins ~]# systemctl enable postfix --now
Note: Git (version control software), postfix (mail server software), mailx (mail client software), openjdk (Java JDK tool).
Step 2: deploy and initialize Jenkins
1) Install and start Jenkins.
[root@jenkins ~]# dnf -y install ./jenkins-2.263.1-1.1.noarch.rpm
[root@jenkins ~]# systemctl enable jenkins
[root@jenkins ~]# systemctl start jenkins#Set jenkins service as startup self startup service, and start the service immediately
2) Initialize Jenkins
Visit Jenkins page (Firefox) with real browser http://192.168.4.30:8080 ).
The first access will prompt the location of the initial password (the password is in the / var/lib/Jenkins/secrets/initialAdminPassword file). The effect is shown in figure-16.
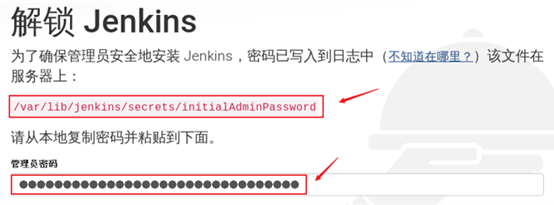
Figure-16
Choose not to install plug-ins during initialization, and the effect is shown in figure-17 and figure-18.
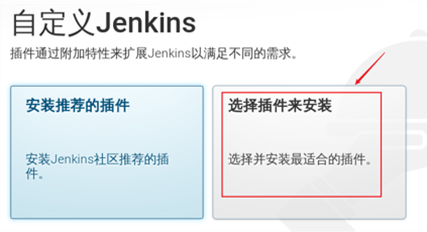
Figure-17
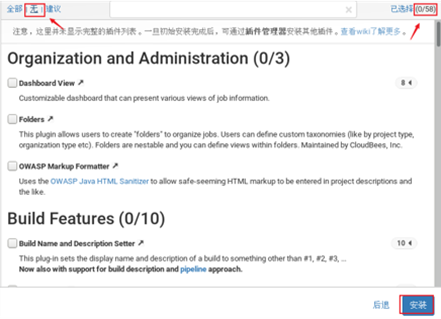
Figure-18
Use the default admin user to log in and complete the initialization operation. The effect is shown in figure-19, figure-20 and figure-21.
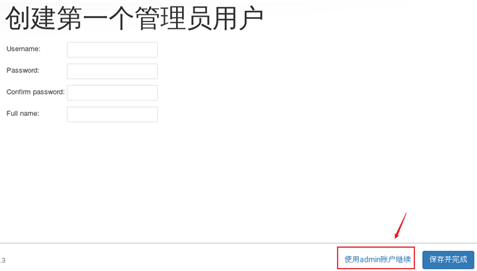
Figure-19

Figure-20
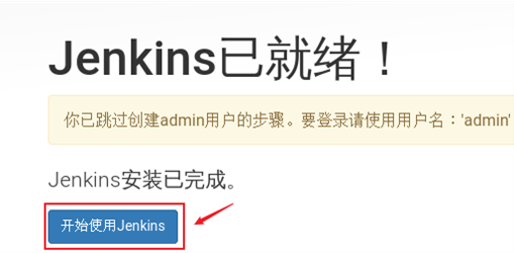
Figure-21
Step 3: manage Jenkins plug-in and system configuration
1) Reset the administrator password.
Reset the password as shown in figure-22.
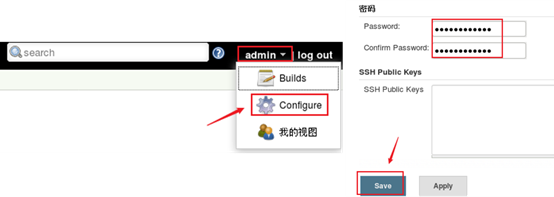
Figure-22
Log in again with the new password, as shown in figure-23.
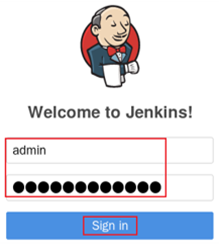
Figure-23
2) Plug in management.
View the list of plug-ins, and the effect is shown in figure-24 and figure-25.
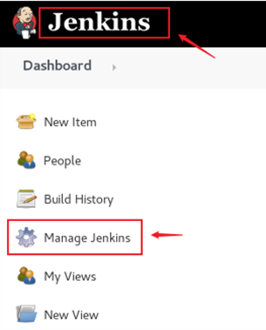
Figure-24
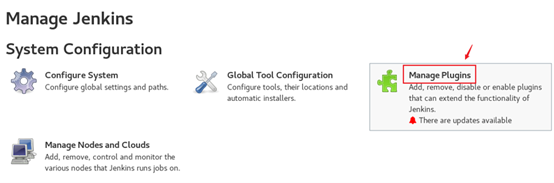
Figure-25
Copy the plug-in file to the Jenkins directory, which is the plug-in Directory: / var/lib/jenkins/plugins /.
The Jenkins plug-in file is in the second stage material Directory: jenkins_plugins.tar.gz.
Plug ins include: Chinese plug-ins, Git plug-ins, etc.
You need to copy the real machine material to the Jenkins virtual machine in advance.
Warning: cp copy requires - p option to reserve permission!!!
[root@jenkins ~]# tar -xf  jenkins_plugins.tar.gz
[root@jenkins ~]# cp -rp jenkins_plugins/* /var/lib/jenkins/plugins/
[root@jenkins ~]# systemctl restart jenkins
Log in to Jenkins web console again, as shown in figure-26.
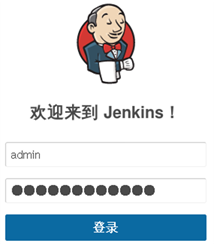
Figure-26
Check the plug-in list again, and the effect is shown in figure-27 and figure-28.
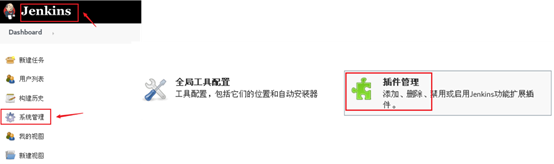
Figure-27
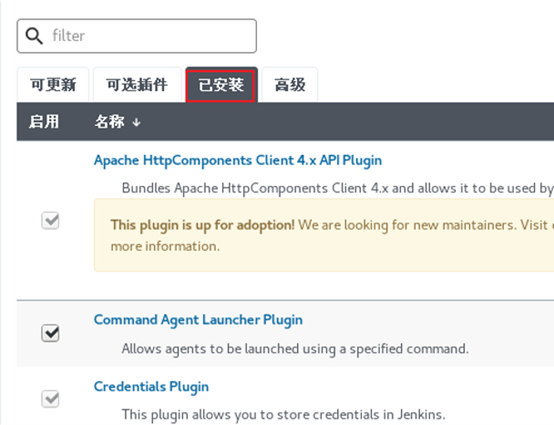
Figure-28
3) Adjust the system settings and configure the mailbox. The effect is shown in figure-29 and figure-30.
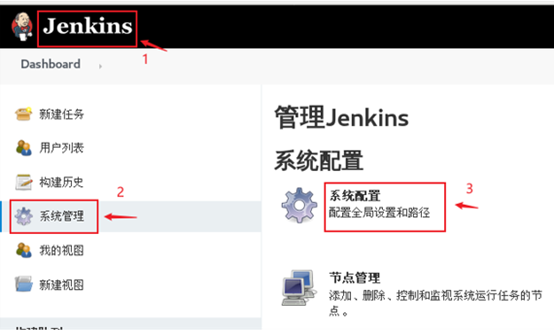
Figure-29
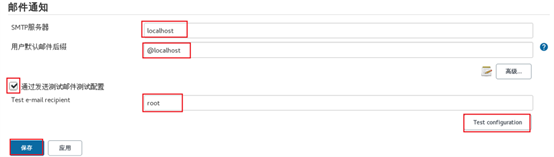
Figure-30
Additional mind map, as shown in figure-31.
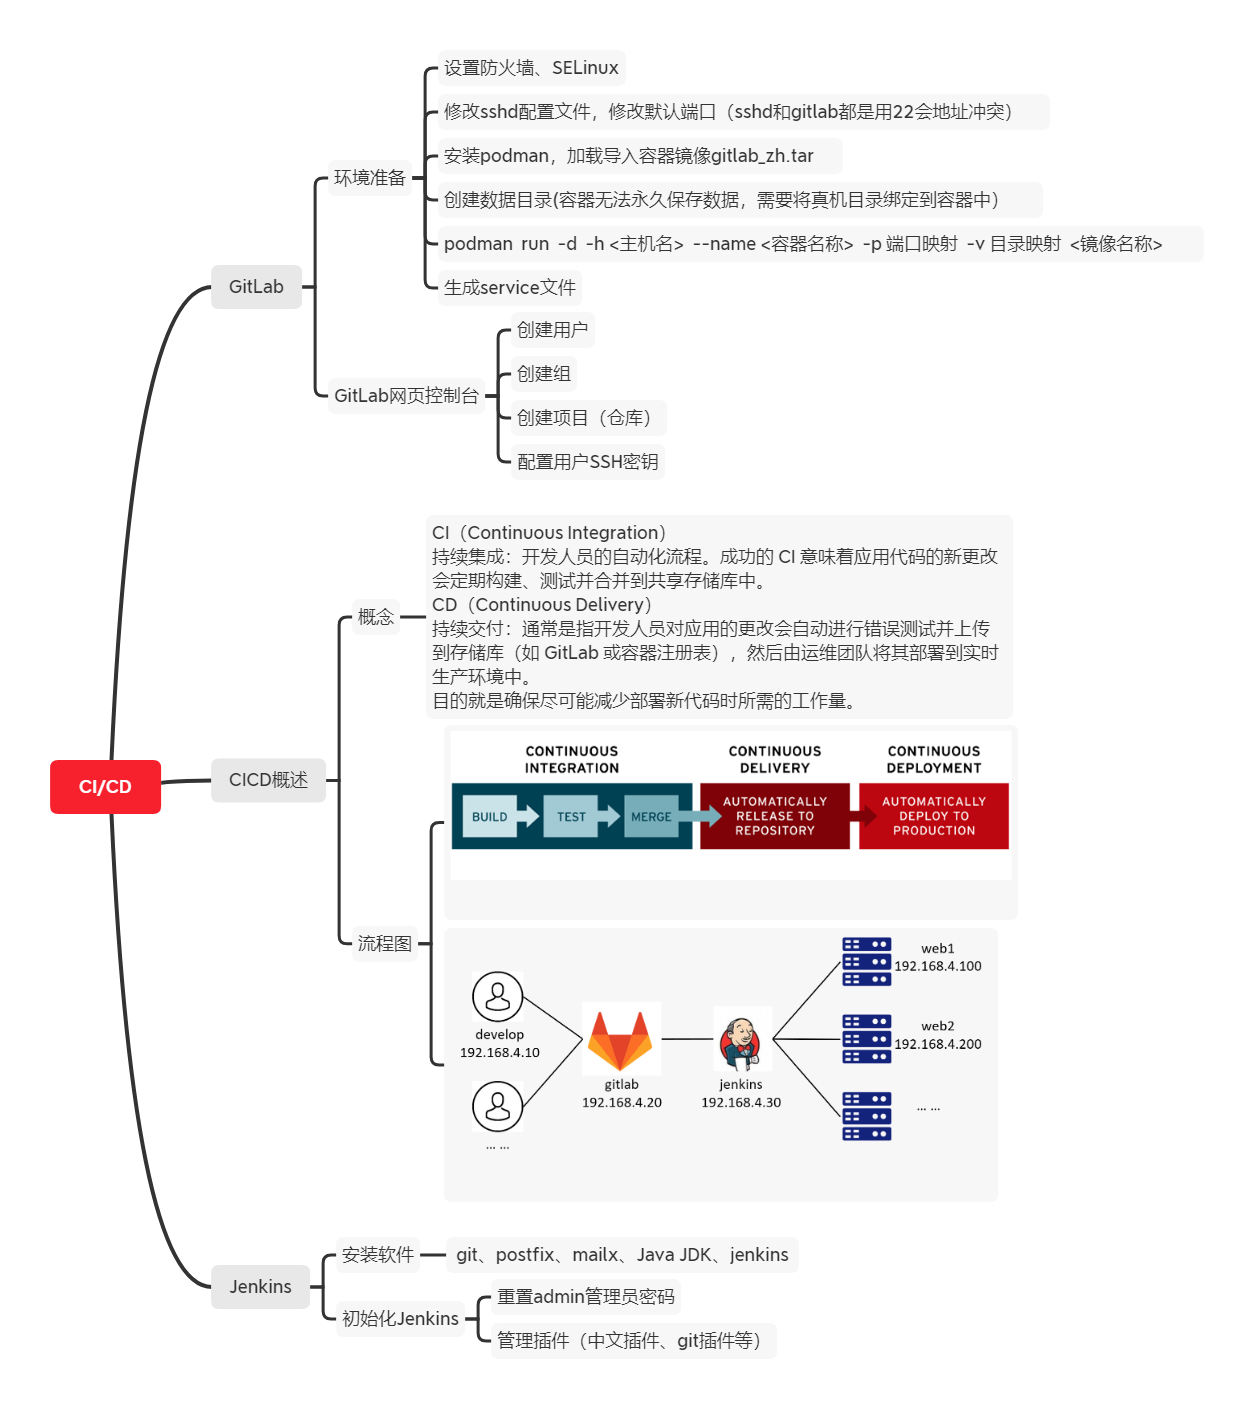
Figure-31
NSD AUTOMATION DAY03
- Case 1: Jenkins project management
- Case 2: building a distributor
- Case 3: automation Online
- Case 1: deploy Ansible
1 case 1: Jenkins project management
1.1 problems
This case requires the management of Jenkins project. The requirements are as follows:
- Create Jenkins project
- Modify Jenkins project configuration
1.2 scheme
Preparation of experimental environment (follow the experimental environment of DAY02):
1) Five RHEL8 virtual machines with host names of develop ep, git, jenkins, web1 and web2.
2) The IP address of the develop ment host is 192.168.4.10, and there is no need to configure gateway and DNS.
3) The IP address of git host is 192.168.4.20, and there is no need to configure gateway and DNS.
4) The IP address of jenkins host is 192.168.4.30, and there is no need to configure gateway and DNS.
5) The IP addresses of web1 and web2 hosts are 192.168.4.100 and 192.168.4.200 respectively. Gateway and DNS do not need to be configured.
6) All hosts need to configure the available system YUM source, set the firewall, trust all, and release all by SELinux.
Note: routing across network segments, the same network segment can be interconnected without configuring a gateway! The experimental topology is shown in figure-1.
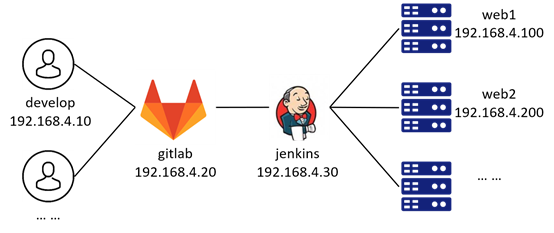
Figure-1
Program types: compiled (such as C and C + +) and interpreted (such as Python and JavaScript).
CI/CD process: Jenkins downloads code, packs code, compiles code, tests code, and launches the server.
1.3 steps
To realize this case, you need to follow the following steps.
Step 1: create a project
1) The browser accesses port 8080 of Jenkins server.
firefox or Google Chrome http://192.168.4.30:8080 .
After logging in, click new task to create jenkins project, and the effect is shown in figure-2.
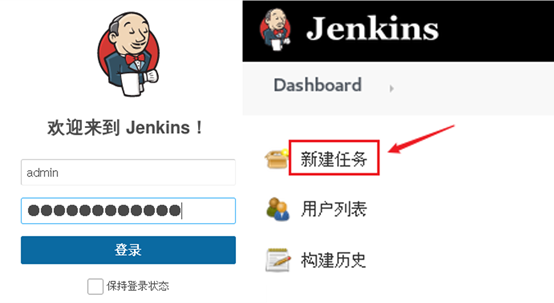
Figure-2
Fill in the task name and select the task style. The effect is shown in figure-3.
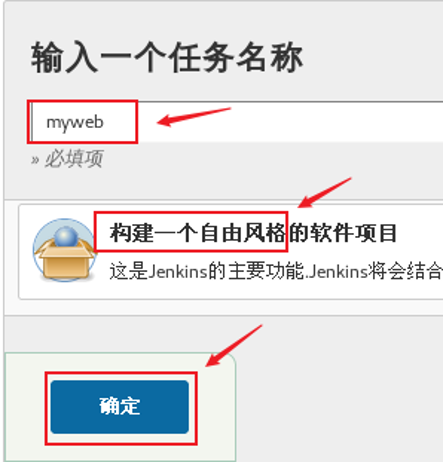
Figure-3
Set Git parameters, and the effect is shown in figure-4.
By default, Jenkins will pull the latest version of code. The settings here allow Jenkins to pull the code of a specific branch or tag. Note: the git parameter name here is often used after it!
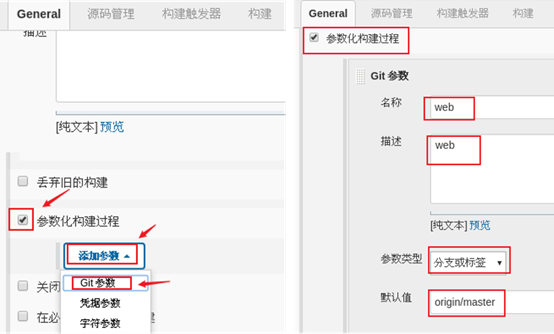
Figure-4
Continue to set Git parameters, define the URL path of Git warehouse, and the version or branch to be downloaded. The effect is shown in figure-5. Note that the URL here is the link address of the code warehouse created by GitLab in the previous course.
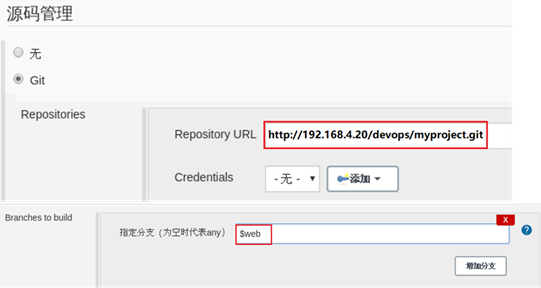
Figure-5
2) build the Jenkins project.
First, you need to find the common items just now, as shown in figure-6.
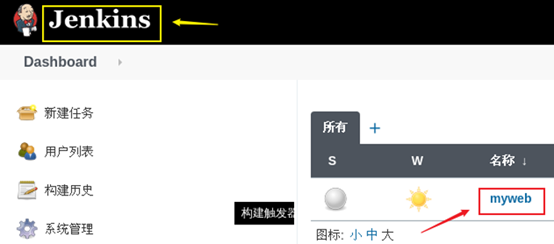
Figure-6
Select Build with Parameters under the Project menu, and the effect is shown in figure-7.

Figure-7
At this time, Jenkins will automatically connect to GitLab server to obtain warehouse data. We can select a version and click start construction. The effect is shown in figure-8.
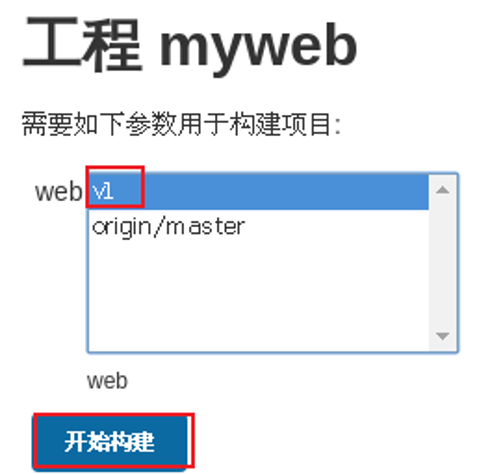
Figure-8
Next, you can view the build log and the build process in the console. The effect is shown in figure-9.
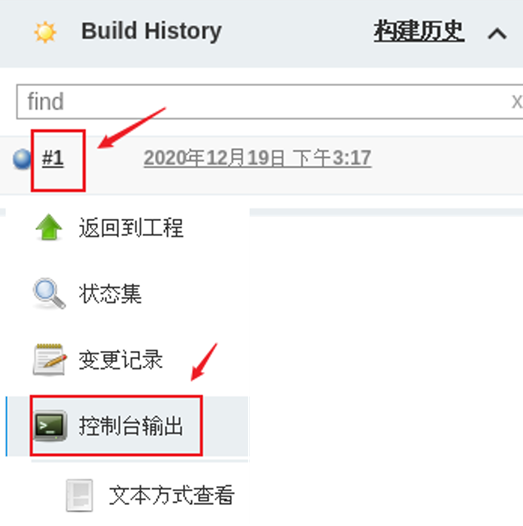
Figure-9
3) View the code data pulled by Jenkins.
In Jenkins server operation (192.168.4.30 host operation), by default, Jenkins will save the retrieved code data to / var/lib/Jenkins/workspace /.
[root@jenkins ~]# ls /var/lib/jenkins/
[root@jenkins ~]# ls /var/lib/jenkins/workspace/
[root@jenkins ~]# ls /var/lib/jenkins/workspace/myweb/
[root@jenkins ~]# rm -rf  /var/lib/jenkins/workspace/myweb/*
4) Modify project configuration
If the code has multiple versions or branches, pulling the code to the same location each time will produce data coverage. We can modify the project configuration and save different versions and branch data to different subdirectories.
Click configuration to modify the Jenkins project configuration again, as shown in figure-10.
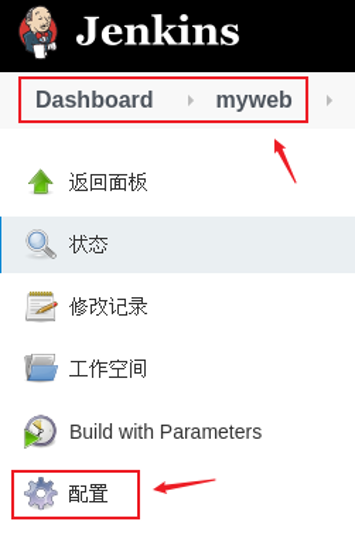
Figure-10
Add additional actions for the Jenkins project, pull and output the code to the subdirectory, and the effect is shown in figure-11.
Note: the subdirectory here calls the name of the previous Git parameter ($web).
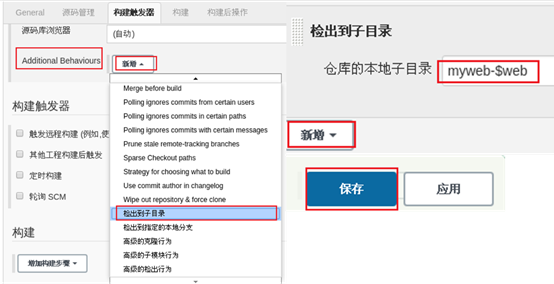
Figure-11
Set email notification. When the construction fails, you can send email to specific personnel. The effect is shown in figure-12.
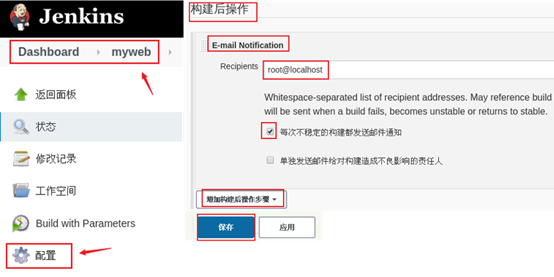
Figure-12
5) Build the project again and view the data.
Rebuild the project, and the effect is shown in figure-13.
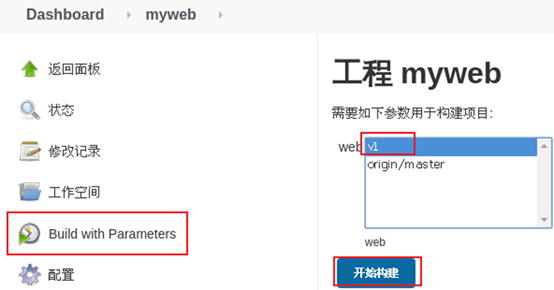
Figure-13
View the data on the Jenkins server (operate on the 192.168.4.30 host).
[root@jenkins ~]# # ls /var/lib/jenkins/workspace/myweb/
2 case 2: building a distributor
2.1 problems
Follow exercise 1 to build a distributor. The specific requirements are as follows:
- Install and configure vsftpd
- Modify project configuration
- Rebuild project
2.2 steps
To realize this case, you need to follow the following steps.
Step 1: install and configure FTP shared server (only operate on 192.168.4.30 host)
1) Set firewall and SELinux.
[root@jenkins ~]# firewall-cmd --set-default-zone=trusted
[root@jenkins ~]# setenforce 0
[root@jenkins ~]# sed -i '/SELINUX/s/enforcing/permissive/' /etc/selinux/config
\2) Install and configure vsftpd and start service
[root@jenkins ~]# dnf -y install vsftpd #Install software[root@jenkins ~]# vim /etc/vsftpd/vsftpd.conf #modify vsftpd configuration file anonymous_enable=YES #12 that 's ok #Allow anonymous access ftp[root@jenkins ~]# mkdir -p /var/ftp/deploy/packages#Create directory, future jenkins Copy the pulled code data to the directory and share it with the application server#-p Is to create multi-level subdirectories[root@jenkins ~]# chown -R :jenkins /var/ftp/deploy/#Modify permission to modify the group to which the directory belongs to jenkins[root@jenkins ~]# chmod -R 775 /var/ftp/deploy/#Modify permission jenkins The group has read and write permissions to this directory[root@jenkins ~]# systemctl enable vsftpd --now#Set the service as startup self startup service, and start the service immediately
Step 2: modify GitLab project configuration
1) Modify the project configuration and add construction steps.
Add construction steps, and the effect is shown in figure-14.
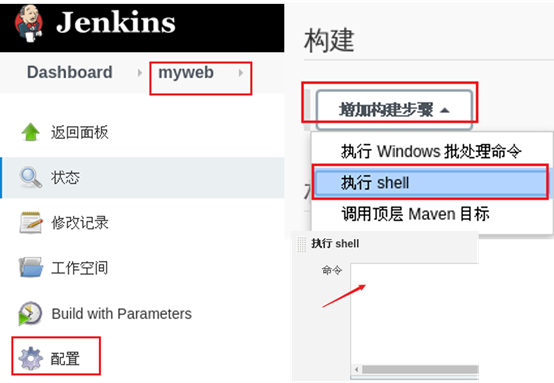
Figure-14
2) Write a build script as follows.
Be sure to note that your path is right. This is different from the path and file built above. This is the idea. Don't copy it.
#ftp shared directory
pkg_dir=/var/ftp/deploy/packages;

#jenkins server pulls the directory (if there is a subdirectory, the following one should be replaced with your 'local subdirectory of the warehouse')
sour_dir=jenkins-project-$web;

#The current working path is jenkins' path, which is / var/lib/jenkins/workspace / 'your project name'/
#Delete the in the version to build git hides the file, then packages it, and stores the md5 value into the variable md5;
rm -rf ${sour_dir}/.git;        tar czf ${sour_dir}.tar.gz ${sour_dir};         md5=$(md5sum ${sour_dir}.tar.gz | awk '{print $1}');

#Open the jenkins process write permission of the shared directory and move the tar package to the ftp shared directory
#chown -R :jenkins $pkg_dir;    chmod -R 775 $pkg_dir;
mv ${sour_dir}.tar.gz $pkg_dir/;        rm -rf ${sour_dir}.tar.gz;

#The md5 value is written to the same file as the version information
echo "$md5  $web" > ${pkg_dir}/version.md;
Notes:
The first line defines the variable pkg_dir, the variable value is ftp shared directory.
In the second line, pull jenkins to the ftp shared directory of the data copy of / var/lib/Jenkins/workspace/myweb-$web directory.
In the third line, the data directory copied in the previous step contains a hidden directory git directory, delete the git warehouse directory.
The fourth line, cd to ftp shared directory.
In the fifth line, package the code data in the ftp shared directory.
In the sixth line, delete the code data directory under the ftp shared directory (the data has been packaged in the previous step).
The seventh line verifies the HASH value (HASH value) of the packaged file and writes the result to a file.
Line 8, return to the previous directory.
In the ninth line, write the current Git version information to ver Txt file.
3) Rebuild the project and view the data.
Rebuild the project, as shown in figure-15.
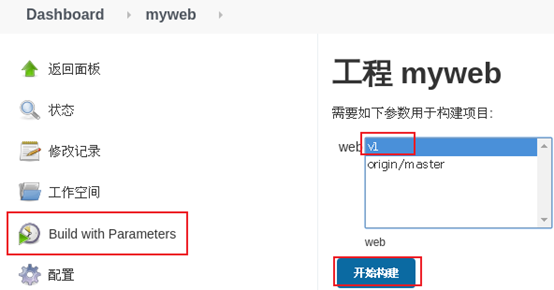
Figure-15
Use the browser to access the FTP service and view the data.
firefox or Google Chrome access ftp://192.168.4.30/deploy/packages/
The effect is shown in figure-16.
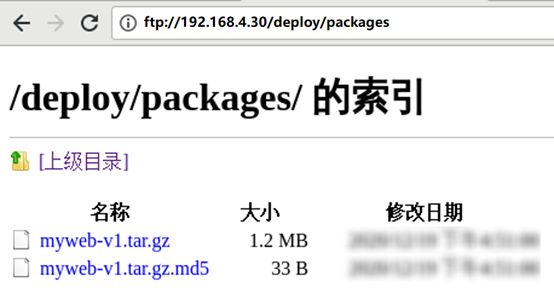
Figure-16
Case 3: automation Online
3.1 problems
Following exercise 2, deploy the web server to complete the automatic launch. The specific requirements are as follows:
- Installing and configuring httpd
- Write online script
- Complete the whole workflow
3.2 scheme
The experimental topology is shown in figure-17.

Figure-17
Step 1: deploy the Web server
1) Set up firewall and SELinux
[root@web1 ~]# firewall-cmd --set-default-zone=trusted
[root@web1 ~]# setenforce 0
[root@web1 ~]# sed -i '/SELINUX/s/enforcing/permissive/' /etc/selinux/config
[root@web2 ~]# firewall-cmd --set-default-zone=trusted
[
root@web2 ~]# setenforce 0
[root@web2 ~]# sed -i '/SELINUX/s/enforcing/permissive/' /etc/selinux/config
2) Install and configure httpd.
[root@web1 ~]# dnf  -y  install   httpd  wget   tar        #install httpd,tar and wget[root@web1 ~]# systemctl  enable  httpd   --now     #Set to start automatically and start immediately
[root@web2 ~]# dnf  -y  install   httpd  wget  tar          #install httpd,tar and wget[root@web2 ~]# systemctl  enable  httpd   --now     #Set to start automatically and start immediately
Step 2: write automatic online script
1) web1 and web2 automatically download code from jenkins shared server for continuous deployment.
Here, we only take web1 as an example to write scripts, which can be combined with planned tasks to realize periodic automatic online continuous deployment.
Note: the path of the current script is different from that of the previous experiment, focusing on understanding and not copying
#Current web server access path (where index.html and version information are stored)
WebDir=/var/www/myweb;

#Version directory of ftp shared server
FtpUrl=ftp://192.168.4.30/deploy/packages;

#Soft links are used to point to the access path of the current web server
WebLink=/var/www/html/WebLink;

#Deployment function
function install(){

        #Get the current ftp server version and md5 value
        FtpVersion=$(curl -s ${FtpUrl}/version.md | awk '{print $2}');
        FtpHash=$(curl -s ${FtpUrl}/version.md | awk '{print $1}');

        #Download the entire version
        wget -q ${FtpUrl}/jenkins-project-${FtpVersion}.tar.gz -O ${WebDir}/jenkins-project-${FtpVersion}.tar.gz;
        wget -q ${FtpUrl}/version.md -O ${WebDir}/version.md;

        #Get the md5 value and unzip the version code package
        WebVersion=$(awk '{print $2}' ${WebDir}/version.md);
        WebHash=$(md5sum ${WebDir}/jenkins-project-${WebVersion}.tar.gz | awk '{print $1}')
        [ $WebHash == $FtpHash ] && tar -xf ${WebDir}/jenkins-project-${WebVersion}.tar.gz -C ${WebDir}/;

        #Update soft connection
        [ -e $WebLink ] && rm -f $WebLink;
        ln -s $WebDir $WebLink;

}

#If the address of the current web server does not exist, create this path
[ ! -e $WebDir ] && mkdir $WebDir;

#If the soft connection does not exist, it indicates that it is a new web server, and the deployment function is called
[ ! -f $WebDir/version.md ] && install;

#If the soft connection exists but the web server template path does not exist, the deployment function is called
[ -e $WebLink ] && [ ! -f ${WebDir}/version.md ] && echo "Has been reinstalled" && install && exit;

#If the soft connection exists and the version information of the web server it points to is lower than that of the ftp shared server, call the deployment function
if [ -e $WebLink ];then
         FtpVersion=$(curl -s ${FtpUrl}/version.md | awk '{print $2}');
         WebVersion=$(awk '{print $2}' ${WebLink}/version.md);
        [ $FtpVersion != $WebVersion ] && install || echo "It is already the latest version";

fi
Step 3: complete the sorting workflow.
1) Workflow.
The developer writes the code and uploads the code to the GitLab server. Jenkins pulls the latest code data from the GitLab server to the local. According to the Jenkins project configuration, after pulling the code to the local, it can be compiled, tested and packaged. Finally, the data package is written to the shared server, Finally, the application server pulls data from the shared server to realize the online function.
2) Developers modify code and upload code (host 192.168.4.10 operation)
[root@develop ~]# cd myproject                   #Enter warehouse directory
[root@develop myproject]# vim  index.html                #Modify the content of line 4 of the home page file before modification: < title > Home < / Title > after modification: < title > tarena < / Title >
[root@develop myproject]# git add .                       #Add modification record
[root@develop myproject]# git commit -m "modify index"      #Submit modification
 [root@develop myproject]# git tag  v2                         #Add representative version label
[root@develop myproject]# git push origin master             #Push data to server
[root@develop myproject]# git push origin v2                 #Push data to server
3) Jenkins rebuilt the project, and the effect is shown in figure-18.
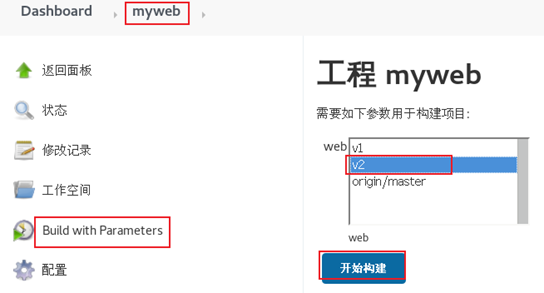
Figure-18
4) Execute the online script on the web server to complete the continuous deployment.
Operate at 192.168.4.100 and 192.168.4.200. Here, only web1 is taken as an example.
[root@web1 ~]# ./web.sh
4 case 1: deploy Ansible
4.1 problems
In this case, it is required to quickly build an Ansible platform and test the environment. The requirements are as follows:
- Create experimental host (control end and controlled end)
- Configure SSH experiment environment
- Install Ansible automation software
- Modify Ansible configuration
4.2 scheme
Prepare the experimental environment as shown in TABLE-1. The operating system is RHEL8. Configure the host name, IP address and YUM source.
TABLE-1 host list

ansible principle:
The control end host comes with many modules (modules are scripts);
ansible transmits the modules (scripts) or commands of the control end to the managed host remotely through ssh;
Execute modules (scripts) or commands on the managed host, and execute different modules or commands to achieve different functions;
Finally, ansible exits ssh Remote.
Most modules (scripts) need parameters to execute successfully!!! Location variables similar to shell scripts!
The topology is shown in figure-19.
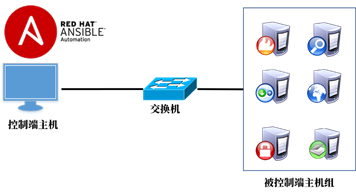
Figure-19
Reminder: you don't need to memorize every parameter of each module for the whole day's experiment. You can view help for all parameters!
4.3 steps
To realize this case, you need to follow the following steps.
Step 1: prepare the basic environment
Control node requirements:
- Domain name resolution (not required for later operation)
- Configure SSH key (ansible is remote control based on SSH)
- Install Ansible software
1) Control node
Modify / etc/hosts and manually add the following contents to the file. The purpose of modifying the file is domain name resolution.
[root@control ~]# vim  /etc/hosts        #Modify the file and manually add the following contents (do not delete the original contents of the file)
192.168.4.253    control    192.168.4.11        node1    192.168.4.12        node2    192.168.4.13        node3    192.168.4.14        node4    192.168.4.15        node5
How to verify?
[root@control ~]# ping node1 #You can use the ping command to Ping all domain names in sequence
Configure SSH key to realize password free login (very important)
Ansible realizes remote control based on the principle of SSH Remote control. If the control end host cannot log in to the managed end host without secret, all subsequent tests will fail!!
[root@control ~]#  ssh-keygen         #Generate ssh key
[root@control ~]#  for i in node1 node2 node3 node4 node5dossh-copy-id   $i done#Copy key to remote host#Tip: when copying the key to the remote host, you need to enter the account password of the other computer!!#To copy the key to node1, you need to enter the password of the account corresponding to node1, and to copy the key to node2, you need to enter the password corresponding to node2
How to verify?
Warning: if any remote host still needs a password, do not continue to operate, and the subsequent experiments will fail!!!
[root@control ~]# ssh node1 #use ssh All remote hosts can log in without password[root@node1 ~]# exit #Exit ssh Remote Login
2) Deploy Ansible software (only Control host operation, and the software package is in ansible_soft directory).
Install software scheme 1(Copy the software package directly to control install):
[root@control ~]# tar -xf   ansible_soft.tar.gz[root@control ~]# cd ansible_soft
[root@control ansible_soft]# dnf  -y  install   *
Install software scheme 2(to configure YUM install ansible Software):1)Real machine YUM Source server
[root@localhost ~]# tar -xf /linux-soft/2/ansible_soft.tar.gz -C /var/ftp/
[root@localhost ~]# dnf -y install createrepo
[root@localhost ~]# createrepo /var/ftp/ansible_soft/2)control Virtual machine configuration YUM,Install software[root@control ~]# vim  /etc/yum.repos.d/ansible.repo[ansible]name=ansiblebaseurl=ftp://192.168.4.254/ansible_soft/gpgcheck=0[root@control ~]# dnf  -y  install   ansible
Requirements for controlled nodes:
- Ansible manages the machine through SSH protocol by default
- The managed host should start the SSH service and allow the control host to log in
- The managed host needs to have Python installed
Step 2: modify the configuration file
Main profile description:
The main configuration file is ansible CFG (refer to / etc/ansible/ansible.cfg for the contents of the main configuration file)
ansible configuration file lookup order
Firstly, ansible is detected_ Configuration file defined by config variable (this variable is not available by default)
Secondly, check the current directory/ ansible.cfg file
Check the current user's home directory again ~ / ansible Cfg file
Finally, check / etc / ansible / ansible Cfg file
\1) Modify the master profile.
[root@control ~]# mkdir  ~/ansible
[root@control ~]# vim  ~/ansible/ansible.cfg[defaults]inventory = ~/ansible/inventory            #Host manifest configuration file( inventory Can be any file name), English Vocabulary: inventory(Inventory, property inventory)#forks = 5                                    #ssh Concurrent quantity#host_key_checking = False                  #Whether to verify the key (whether to prompt yes/no during the first ssh)
\2) Modify the host manifest file (the manifest file name must be consistent with that defined in the inventory of the main configuration file).
[root@control ~]# vim  ~/ansible/inventory[test]                    #Define host group (any group name) node1                    #Define the specific hosts in the group, which includes one host node1[proxy]                    #Define host group (any group name), English Vocabulary: proxy((agent, principal) node2                      #The proxy group includes a host node2
[webserver]node[3:4]                 #there node[3:4]Equivalent to node3 and node4[database]node5[cluster:children]        #Nested group( children Keyword), you do not need or do not need to create nested groups webserver                  #Nested groups can contain other groups database s in the group
Additional mind map, as shown in figure-20.
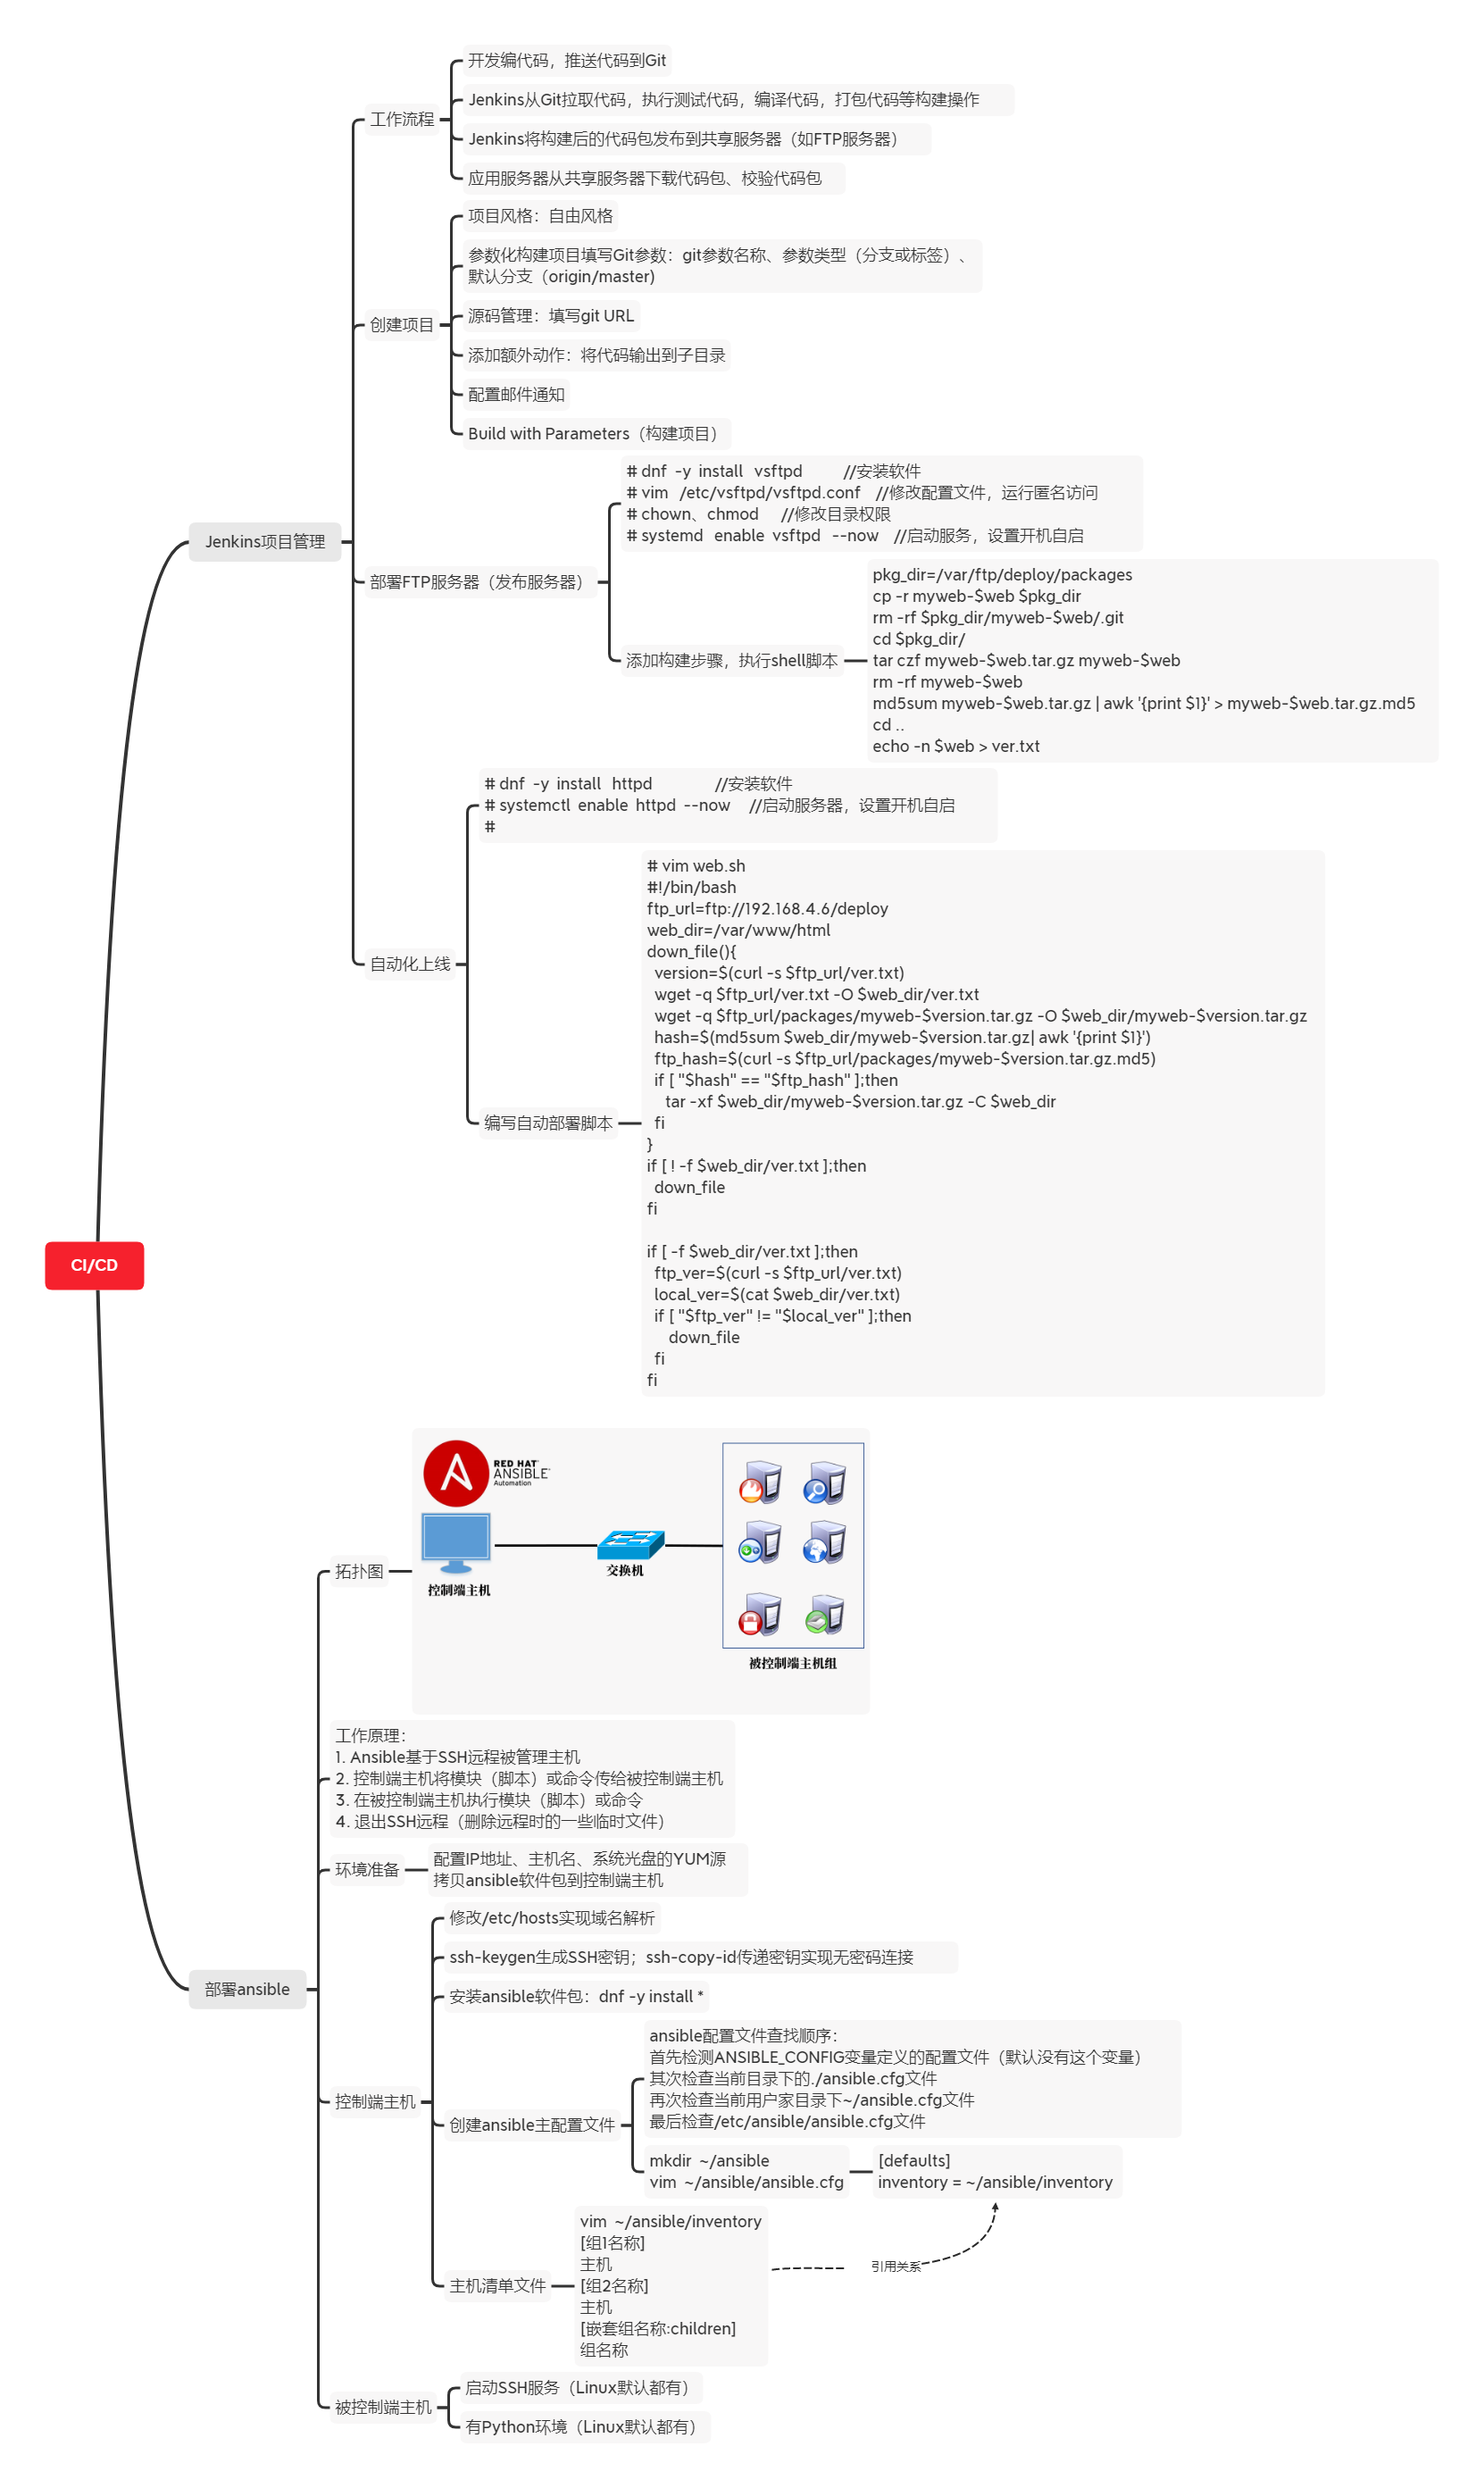
Figure-20