In this tutorial, let's see how to reasonably display various items or props in the backpack column. We mainly consider the following points:
- The properties of all props, including name, introduction, picture path, etc., should be written in the configuration file to facilitate the later addition or deletion of props.
- Add each props prefabrication to the node where the GridLayout component is hung.
- Consider the screen adaptation of GridLayout related properties.
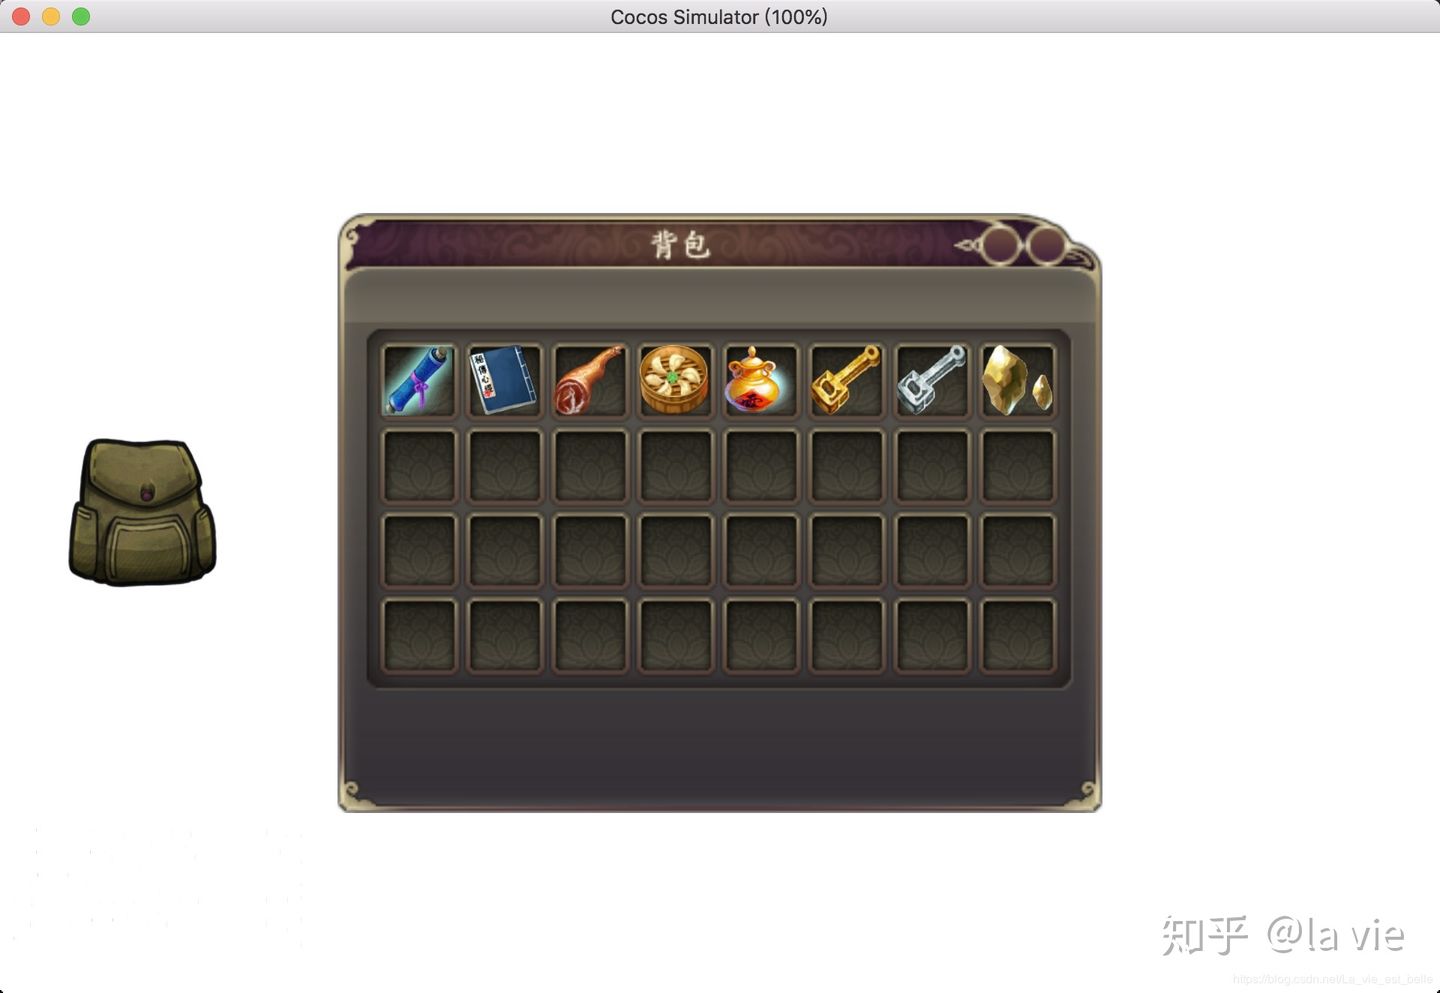
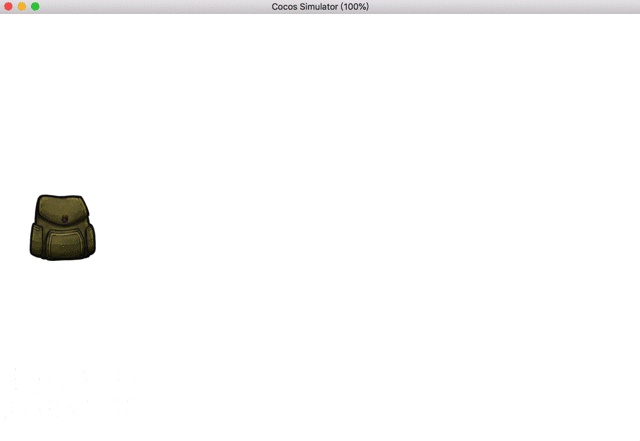
The operation effect is as follows:
Cocos Creator version: 2.2 0
The public account "All Codes" replied to the "backpack column" in the background to obtain the complete file of the project.
Create node
Create the following nodes in the hierarchy Manager:
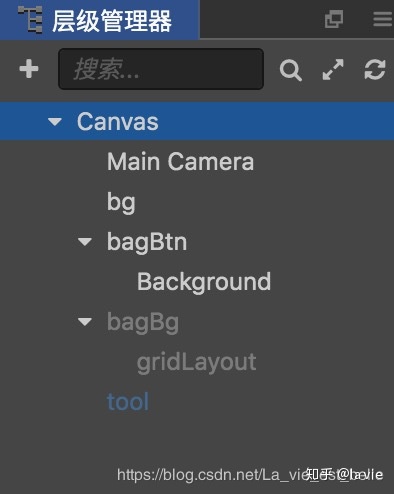
- bg is white background, sprite type.
- bagBtn is a button node used to open and close the backpack bar
- bagBg is the background of the backpack bar, and GridLayout is the node used to add various props, on which the GridLayout component is hung.
- tool is prefabricated for props, sprite type.
Write configuration file
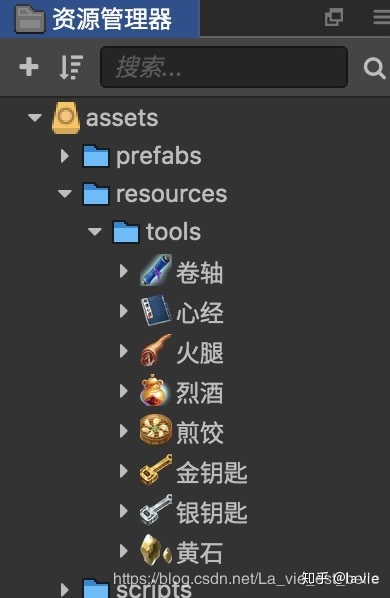
First, let's create a Conf.js script and write the properties of each prop:
// Conf.js
const TOOLS = [
    {
        name: 'Scroll',                        // Prop name, corresponding to the picture name in resources/tools
        intro: 'This is a scroll',                // Props introduction: when the player clicks the props in the backpack, the introduction will be displayed
        picUrl: 'tools/Scroll'                 // Dynamic load path
    },
    {
        name: 'Heart Sutra',
        intro: 'If you want to practice this skill, you must go to the Palace first',
        picUrl: 'tools/Heart Sutra'
    },
    {
        name: 'Ham',
        intro: 'From Jinhua',
        picUrl: 'tools/Ham'
    },
    {
        name: 'Fried dumplings',
        intro: 'It's delicious',
        picUrl: 'tools/Fried dumplings'
    },
    {
        name: 'liquor',
        intro: 'If Wu Song drank this, he might not be able to pass the post',
        picUrl: 'tools/liquor'
    },
    {
        name: 'Golden key',
        intro: 'Golden key',
        picUrl: 'tools/Golden key'
    },
    {
        name: 'Silver Key',
        intro: 'Silver Key',
        picUrl: 'tools/Silver Key'
    },
    {
        name: 'Yellowstone',
        intro: 'The stone from Yellowstone Park is called Yellowstone',
        picUrl: 'tools/Yellowstone'
    }
];

export {TOOLS};
I just put the name, intro and picUrl attributes here. Of course, you can add them according to your own ideas. However, it is best to ensure that the attribute names of each prop are the same (that is, the key names of Jason are the same). Finally, export the TOOLS constant because we want to use it in other scripts.
Note: if props need to be added later, we only need to modify Conf.js, and there is no need to change other parts of the project.Prepare props prefabrication script
New tool JS script and hang it on the tool node. The script is as follows:
// Tool.js
cc.Class({
    extends: cc.Component,

    properties: {
    },

    // LIFE-CYCLE CALLBACKS:

    initInfo (info) {
        // Initialize the prop related information

        // picture
        var self = this;
        cc.loader.loadRes(info['picUrl'], cc.SpriteFrame, function (err, spriteFrame) {
            self.node.getComponent(cc.Sprite).spriteFrame = spriteFrame;
        });

        // introduce
        this.node.intro = info['intro'];
    },
});
When generating prefabrication, we will call tool JS to initialize the prefabrication related information.
Here, we use the method of dynamically loading resources to display pictures, so we should put all the pictures in the Resources folder:
Please take a look at the introduction of dynamic loading Official documents.
Note: in fact, we can also do many articles in this script, such as adding touch monitoring, so that when players click the prop, they can display the prop introduction, etc. Everyone is free to play this.Generate and add props
First, let's focus on the gridLayout node:

The size of gridLayout is not equal to bagBg, but equal to the size of the area where props are placed in bagBg. At this time, the size of gridLayout in the attribute inspector is shown in the following figure:
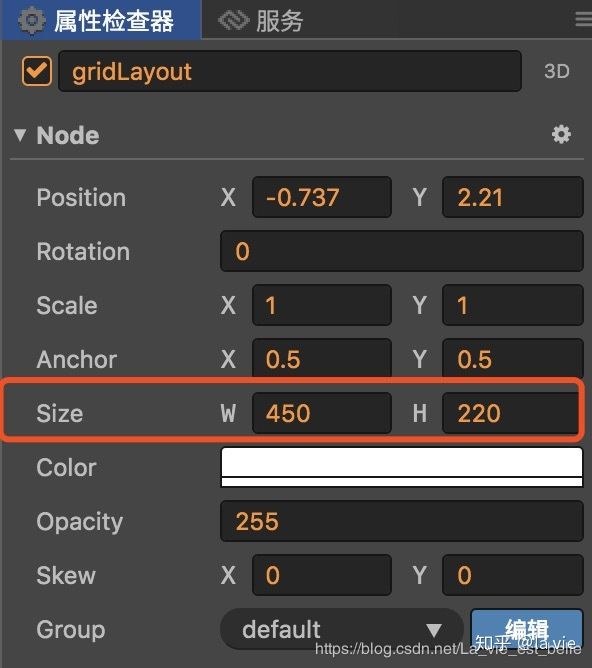
We can see that there are 8 spaces and 7 spacingx in the horizontal direction of the placement area; There are 4 vacancies and 3 spacingy in the longitudinal direction. Given that the total width of the placement area is 450 and the total height is 220, we can obtain the following equation by setting the side length of the vacancy as x and the interval width as y:
8x + 7y = 450
4x + 3y = 220
x=47.5, y=10. It's not over yet. We can't use absolute values in the code to set the width, height and interval of cellSize in gridLayout, but use percentage (screen adaptation). So we divide x and y by 450 and 220 to get the percentage:
47.5 / 450 = 0.105            // Keep 3 decimal places here, but remember not to round them
10 / 450 = 0.022
47.5 / 220 = 0.215
10 / 220 = 0.045
Next, create a new game JS script and hang it on the Canvas node. The script is as follows:
// Game.js
import {TOOLS} from './Conf';

cc.Class({
    extends: cc.Component,

    properties: {
        gridLayout: cc.Node,
        toolPrefab: cc.Prefab,
    },

    // LIFE-CYCLE CALLBACKS:

    spawnTools () {
        // First, determine the attributes of the gridLayout
        let cellWidth = this.gridLayout.width * 0.105;
        let cellHeight = this.gridLayout.height * 0.215;
        let spacingX = this.gridLayout.width * 0.022;
        let spacingY = this.gridLayout.height * 0.045;

        this.gridLayout.getComponent(cc.Layout).cellSize.width = cellWidth;
        this.gridLayout.getComponent(cc.Layout).cellSize.height = cellHeight;
        this.gridLayout.getComponent(cc.Layout).spacingX = spacingX;
        this.gridLayout.getComponent(cc.Layout).spacingY = spacingY;

        // Generate corresponding props according to TOOLS
        this.toolsArray = [];
        for (let i=0; i<TOOLS.length; i++) {
            let tool = cc.instantiate(this.toolPrefab);
            tool.getComponent('Tool').initInfo(TOOLS[i]);
            this.toolsArray.push(tool);
            this.gridLayout.addChild(tool);
        }
    },

    bagBtn () {
        // Backpack button
        if (this.gridLayout.parent.active) {
            // Hide node
            this.gridLayout.parent.active = false;

            // Delete all props (or not delete, just hide, decide by yourself)
            this.toolsArray.forEach(element => {
                element.removeFromParent();
            });
        }
        else {
            // Display node
            this.gridLayout.parent.active = true;

            // Generate all props
            this.spawnTools();
        }
    },
});
1. The spawntools method is used to generate props. Among them, we first determine the attributes of the GridLayout component, then cycle the TOOLS constant to generate the corresponding props, and finally add them to the GridLayout node.
2. bagBtn is the event function of the button node. When the backpack bar is not visible, click the button to display the backpack bar, and call the spawnTools method to generate props; When the backpack bar is visible, click the button to hide the backpack bar, and then delete all props.
The operation screenshot is as follows: