Abstract: Design Pattern is a set of code design experience that is repeatedly used, known by most people, classified and catalogued. The purpose of using Design Pattern is to reuse code, make code easier to be understood by others and ensure code reliability.
This article is shared from Huawei cloud community< Come on, here are the Go language implementations of 23 design patterns >Original author: yuan Runzi.
preface
Twenty five years have passed since GoF proposed 23 design patterns in 1995. Design patterns are still a hot topic in the software field. At present, if you don't know any design patterns, you are embarrassed to say that you are a qualified programmer. Design patterns are usually defined as:
Design Pattern is a set of code design experience that is repeatedly used, known by most people, classified and catalogued. The purpose of using Design Pattern is to reuse code, make code easier to be understood by others and ensure code reliability.
From the definition, design pattern is actually a summary of experience and a concise and elegant solution to specific problems. Since it is a summary of experience, the most direct benefit of learning design patterns is that they can solve some specific problems in the process of software development on the shoulders of giants. However, the highest level of learning design patterns is to acquire the ideas used to solve problems. When you understand their essential ideas, you can do it easily when solving specific problems even if you have forgotten the name and structure of a design pattern.
Good things are touted, and of course they will attract black people. The design pattern was attacked mainly because of the following two points:
1. Design patterns will increase the amount of code and complicate the program logic. This is inevitable, but we can't just consider the cost of the development stage. Of course, the simplest program is a function from beginning to end, but the later maintenance cost will become very large; Although the design pattern increases the development cost a little, it can enable people to write reusable and maintainable programs. Quoting the concept in the philosophy of software design, the former is tactical programming and the latter is strategic programming. We should Say No to tactical programming!
2. Abuse of design patterns. This is the most common mistake for beginners. When they learn a pattern, they want to use it in all the code, so they deliberately use the pattern where they shouldn't use the pattern, resulting in the complexity of the program. In fact, each design pattern has several key elements: applicable scenarios, solutions, advantages and disadvantages. Model is not a panacea. It can only show its effect on specific problems. Therefore, before using a pattern, ask yourself, is this pattern applicable to the current scenario?
The subtitle of "design patterns" is "the foundation of reusable object-oriented software", but it does not mean that only object-oriented languages can use design patterns. Pattern is just an idea to solve a specific problem, which has nothing to do with language. Like Go language, it is not an object-oriented language like C + + and Java, but design patterns also apply. This series of articles will use Go language to realize the 23 design patterns proposed by GoF, which are organized according to three categories: creative pattern, Structural Pattern and Behavioral Pattern. The text mainly introduces the creative pattern.
Singleton Pattern
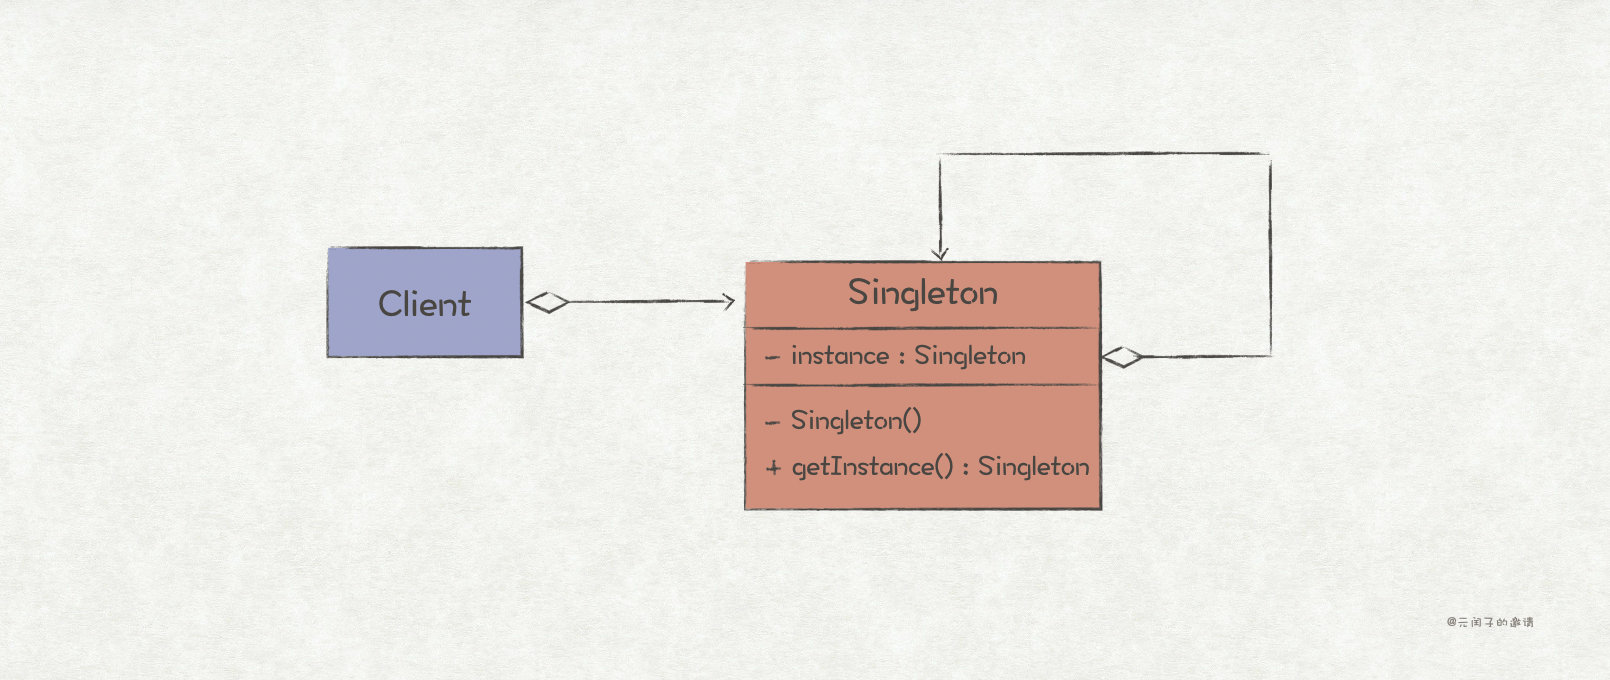
sketch
Singleton pattern is the simplest of the 23 design patterns. It is mainly used to ensure that a class has only one instance and provide a global access point to access it.
In programming, there are some objects. Usually, we only need a shared instance, such as thread pool, global cache, object pool, etc. in this scenario, the singleton mode is suitable for use.
However, not all globally unique scenarios are suitable for using singleton mode. For example, consider the need to count an API call. There are two indicators: the number of successful calls and the number of failed calls. These two indicators are globally unique, so someone may model them as two singleton success ApiMetric and FailApiMetric. According to this idea, with the increase of the number of indicators, you will find that the definition of classes in the code will be more and more bloated. This is also the most common misuse scenario of singleton mode. A better way is to design the two indicators into two instances of ApiMetric success and ApiMetric fail under one object ApiMetric.
How to determine whether an object should be modeled as a singleton?
Usually, objects modeled as singletons have the meaning of "central point". For example, thread pool is the center that manages all threads. Therefore, when judging whether an object is suitable for singleton mode, first think about whether this object is a central point?
Go implementation
When implementing singleton mode for an object, two points must be paid attention to: (1) restrict the caller from directly instantiating the object; (2) Provide a globally unique access method for the singleton of the object.
For C++/Java, you only need to design the constructor of the class as private and provide a static method to access the unique instance of the class point. But for Go language, there is neither the concept of constructor nor static method, so we need to find another way out.
We can use the access rules of Go language package to realize it. By designing the singleton structure into lowercase, we can limit its access range. Only under the current package, we simulate the private constructor in C++/Java; Then implement an access function with uppercase under the current package, which is equivalent to the function of static method.
In actual development, we often encounter objects that need to be created and destroyed frequently. Frequent creation and destruction consume CPU, and memory utilization is not high. Usually, we use object pool technology for optimization. Considering that we need to implement a Message object pool, because it is the global center point and manages all Message instances, we use it as a ready-made single instance. The implementation code is as follows:
 package msgpool
 ...
 // Message pool
 type messagePool struct {
 pool *sync.Pool
 }
 // Message pool singleton
 var msgPool = &messagePool{
 // If there is no Message in the Message pool, create a new Message instance with Count value of 0
 pool: &sync.Pool{New: func() interface{} { return &Message{Count: 0} }},
 }
 // The only way to access a message pool singleton
 func Instance() *messagePool {
 return msgPool
 }
 // Add message to message pool
 func (m *messagePool) AddMsg(msg *Message) {
 m.pool.Put(msg)
 }
 // Get message from message pool
 func (m *messagePool) GetMsg() *Message {
 return m.pool.Get().(*Message)
 }
 ...
The test code is as follows:
package test
 ...
 func TestMessagePool(t *testing.T) {
 msg0 := msgpool.Instance().GetMsg()
 if msg0.Count != 0 {
 t.Errorf("expect msg count %d, but actual %d.", 0, msg0.Count)
 }
 msg0.Count = 1
 msgpool.Instance().AddMsg(msg0)
 msg1 := msgpool.Instance().GetMsg()
 if msg1.Count != 1 {
 t.Errorf("expect msg count %d, but actual %d.", 1, msg1.Count)
 }
 }
 // Operation results
 === RUN   TestMessagePool
 --- PASS: TestMessagePool (0.00s)
 PASS
The above singleton mode is a typical "hungry man mode". The instance has been initialized when the system is loaded. Correspondingly, there is also a "lazy mode", which only initializes the object when it is used, thus saving memory to a certain extent. As we all know, "lazy mode" will bring thread safety problems, which can be optimized by ordinary locking or more efficient double check locking. For "lazy mode", Go language has a more elegant implementation, that is, using sync Once, it has a Do method whose input parameter is a method. The Go language will ensure that the method is called only once.
 // Implementation of "lazy mode" in singleton mode
 package msgpool
 ...
 var once = &sync.Once{}
 // The message pool singleton is initialized at the first call
 var msgPool *messagePool
 // Globally unique method to get message pool pool
 func Instance() *messagePool {
 // The initialization logic is implemented in the anonymous function, and the Go language guarantees that it will be called only once
 once.Do(func() {
 msgPool = &messagePool{
 // If there is no Message in the Message pool, create a new Message instance with Count value of 0
 pool: &sync.Pool{New: func() interface{} { return &Message{Count: 0} }},
 }
 })
 return msgPool
 }
 ...
Builder Pattern
sketch
In program design, we often encounter some complex objects, in which there are many member attributes, and even nested multiple complex objects. In this case, creating this complex object will become cumbersome. For C++/Java, the most common manifestation is that the constructor has a long parameter list:
MyObject obj = new MyObject(param1, param2, param3, param4, param5, param6, ...)
For Go language, the most common expression is multi-layer nested instantiation:
obj := &MyObject{
   Field1: &Field1 {
     Param1: &Param1 {
       Val: 0,
    },
     Param2: &Param2 {
       Val: 1,
    },
     ...
  },
   Field2: &Field2 {
     Param3: &Param3 {
       Val: 2,
    },
     ...
  },
   ...
 }
The above object creation method has two obvious disadvantages: (1) it is not friendly to the object user, and the user needs to know too many details when creating the object; (2) The code is poorly readable.
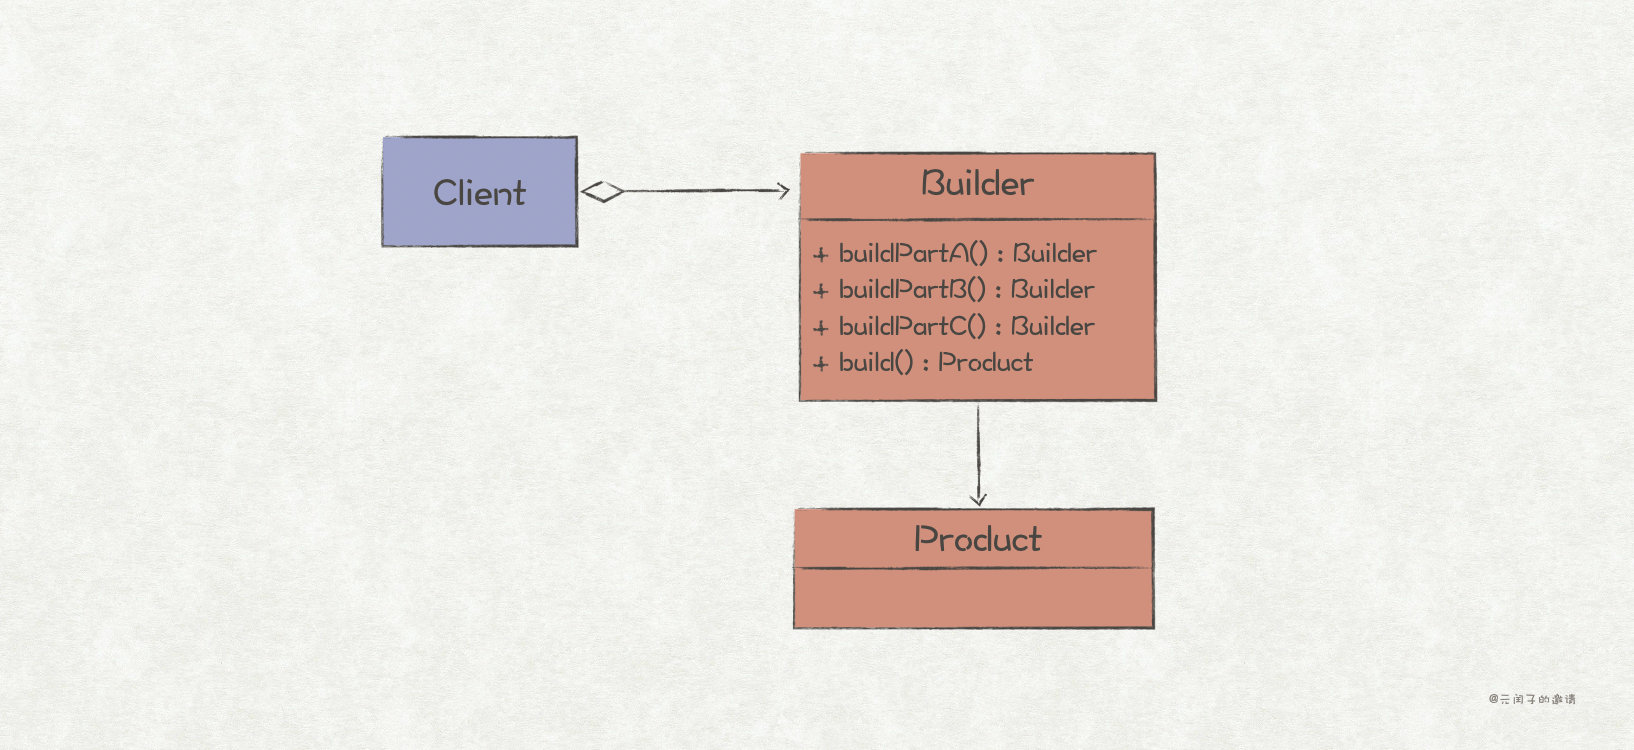
For this kind of scene with many object members and complicated object logic, it is suitable to use the builder mode for optimization.
The role of builder mode is as follows:
1. Encapsulate the creation process of complex objects, so that object users do not perceive the complex creation logic.
2. You can assign values to members step by step, or create nested objects, and finally complete the creation of the target object.
3. Reuse the same object creation logic for multiple objects.
Among them, points 1 and 2 are commonly used. The following implementation of builder mode is also an example for these two points.
Go implementation
Consider the following Message structure, which is mainly composed of Header and Body:
package msg
 ...
 type Message struct {
 Header *Header
 Body   *Body
 }
 type Header struct {
 SrcAddr  string
 SrcPort  uint64
 DestAddr string
 DestPort uint64
 Items    map[string]string
 }
 type Body struct {
 Items []string
 }
 ...
If you create objects directly, the creation logic should be as follows:
 // Nested instantiation of multiple layers
 message := msg.Message{
 Header: &msg.Header{
 SrcAddr:  "192.168.0.1",
 SrcPort:  1234,
 DestAddr: "192.168.0.2",
 DestPort: 8080,
 Items:    make(map[string]string),
 },
 Body:   &msg.Body{
 Items: make([]string, 0),
 },
 }
 // You need to know the implementation details of the object
 message.Header.Items["contents"] = "application/json"
 message.Body.Items = append(message.Body.Items, "record1")
 message.Body.Items = append(message.Body.Items, "record2")
Although the nesting level of Message structure is not much, from the code it creates, it does have the disadvantages of being unfriendly to object users and poor code readability. Let's introduce the builder mode to refactor the code:
package msg
 ...
 // Builder object of Message object
 type builder struct {
 once *sync.Once
 msg *Message
 }
 // Return Builder object
 func Builder() *builder {
 return &builder{
 once: &sync.Once{},
 msg: &Message{Header: &Header{}, Body: &Body{}},
 }
 }
 // The following is the construction method of Message member pair
 func (b *builder) WithSrcAddr(srcAddr string) *builder {
 b.msg.Header.SrcAddr = srcAddr
 return b
 }
 func (b *builder) WithSrcPort(srcPort uint64) *builder {
 b.msg.Header.SrcPort = srcPort
 return b
 }
 func (b *builder) WithDestAddr(destAddr string) *builder {
 b.msg.Header.DestAddr = destAddr
 return b
 }
 func (b *builder) WithDestPort(destPort uint64) *builder {
 b.msg.Header.DestPort = destPort
 return b
 }
 func (b *builder) WithHeaderItem(key, value string) *builder {
   // Ensure that the map is initialized only once
 b.once.Do(func() {
 b.msg.Header.Items = make(map[string]string)
 })
 b.msg.Header.Items[key] = value
 return b
 }
 func (b *builder) WithBodyItem(record string) *builder {
 b.msg.Body.Items = append(b.msg.Body.Items, record)
 return b
 }
 // Create a Message object and call it in the last step
 func (b *builder) Build() *Message {
 return b.msg
 }
The test code is as follows:
package test
 ...
 func TestMessageBuilder(t *testing.T) {
   // Object creation using message builder
 message := msg.Builder().
 WithSrcAddr("192.168.0.1").
 WithSrcPort(1234).
 WithDestAddr("192.168.0.2").
 WithDestPort(8080).
 WithHeaderItem("contents", "application/json").
 WithBodyItem("record1").
 WithBodyItem("record2").
 Build()
 if message.Header.SrcAddr != "192.168.0.1" {
 t.Errorf("expect src address 192.168.0.1, but actual %s.", message.Header.SrcAddr)
 }
 if message.Body.Items[0] != "record1" {
 t.Errorf("expect body item0 record1, but actual %s.", message.Body.Items[0])
 }
 }
 // Operation results
 === RUN   TestMessageBuilder
 --- PASS: TestMessageBuilder (0.00s)
 PASS
From the test code, it can be seen that using the builder mode to create objects, users no longer need to know the specific implementation details of objects, and the code readability is better.
Factory Method Pattern
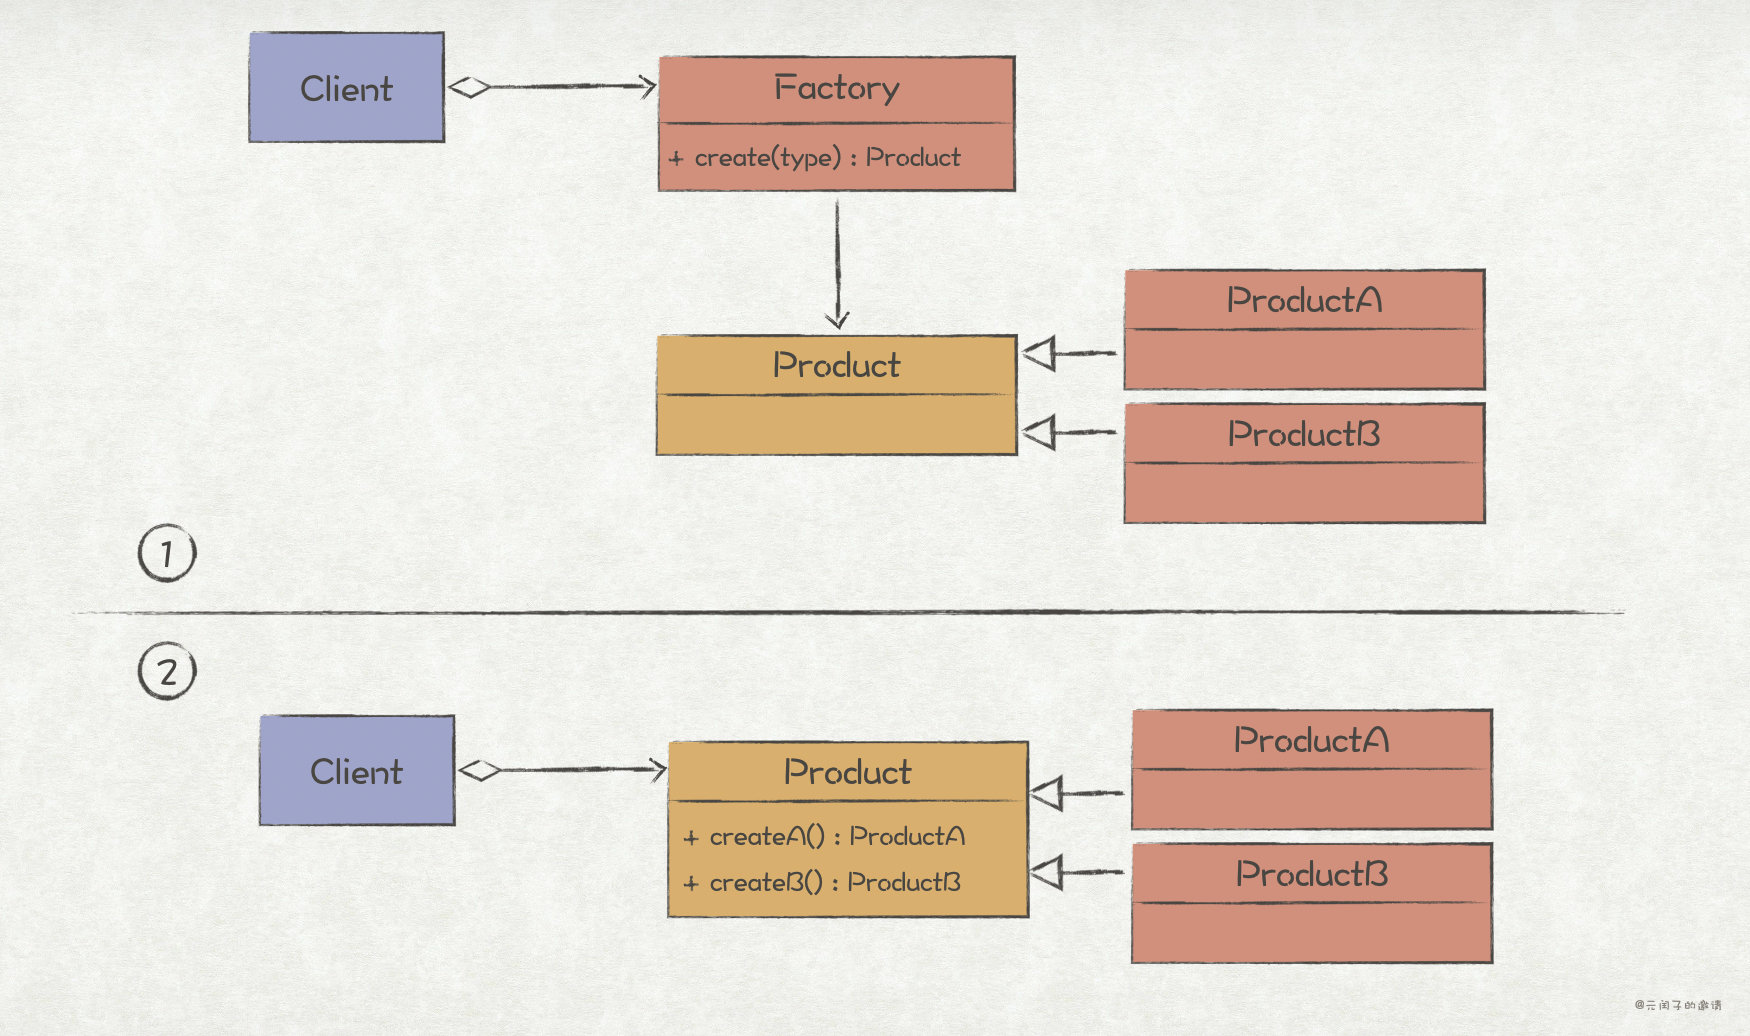
sketch
The factory method pattern is similar to the builder pattern discussed in the previous section. It encapsulates the logic of object creation and provides users with a simple and easy-to-use object creation interface. The two are slightly different in application scenarios. The builder mode is more often used in scenarios where multiple parameters need to be passed for instantiation.
Using the factory method to create objects has two main benefits:
1. Better code readability. Compared with using the constructor in C++/Java or {} in Go to create objects, the factory method has better readability because it can express the meaning of the code through the function name. For example, using the factory method ProductA: = createproducta() to create a ProductA object is better readable than directly using ProductA: = ProductA {}.
2. Decouple from user code. In many cases, the creation of objects is often a point that is easy to change. Encapsulating the creation process of objects through factory methods can avoid shotgun modification when creating logical changes.
There are also two ways to implement the factory method pattern: (1) provide a factory object and create a product object by calling the factory method of the factory object; (2) Integrate factory methods into product objects (static methods of objects in C++/Java, functions in the same package in Go)
Go implementation
Consider an Event object Event, which has two effective time types: Start and End:
package event
 ...
 type Type uint8
 // Event type definition
 const (
 Start Type = iota
 End
 )
 // Event abstraction interface
 type Event interface {
 EventType() Type
 Content() string
 }
 // Start the Event and implement the Event interface
 type StartEvent struct{
 content string
 }
 ...
 // End the Event and implement the Event interface
 type EndEvent struct{
 content string
 }
 ...
1. According to the first implementation method, a factory object is provided for Event. The specific code is as follows:
 package event
 ...
 // Event factory object
 type Factory struct{}
 // Create specific events with more event types
 func (e *Factory) Create(etype Type) Event {
 switch etype {
 case Start:
 return &StartEvent{
 content: "this is start event",
 }
 case End:
 return &EndEvent{
 content: "this is end event",
 }
 default:
 return nil
 }
 }
The test code is as follows:
package test
 ...
 func TestEventFactory(t *testing.T) {
 factory := event.Factory{}
 e := factory.Create(event.Start)
 if e.EventType() != event.Start {
 t.Errorf("expect event.Start, but actual %v.", e.EventType())
 }
 e = factory.Create(event.End)
 if e.EventType() != event.End {
 t.Errorf("expect event.End, but actual %v.", e.EventType())
 }
 }
 // Operation results
 === RUN   TestEventFactory
 --- PASS: TestEventFactory (0.00s)
 PASS
2. According to the second implementation method, a separate factory method is provided for Start and End events respectively. The code is as follows:
package event
 ...
 // Factory method of Start type Event
 func OfStart() Event {
 return &StartEvent{
 content: "this is start event",
 }
 }
 // Factory method of End type Event
 func OfEnd() Event {
 return &EndEvent{
 content: "this is end event",
 }
 }
The test code is as follows:
package event
 ...
 func TestEvent(t *testing.T) {
 e := event.OfStart()
 if e.EventType() != event.Start {
 t.Errorf("expect event.Start, but actual %v.", e.EventType())
 }
 e = event.OfEnd()
 if e.EventType() != event.End {
 t.Errorf("expect event.End, but actual %v.", e.EventType())
 }
 }
 // Operation results
 === RUN   TestEvent
 --- PASS: TestEvent (0.00s)
 PASS
Abstract Factory Pattern
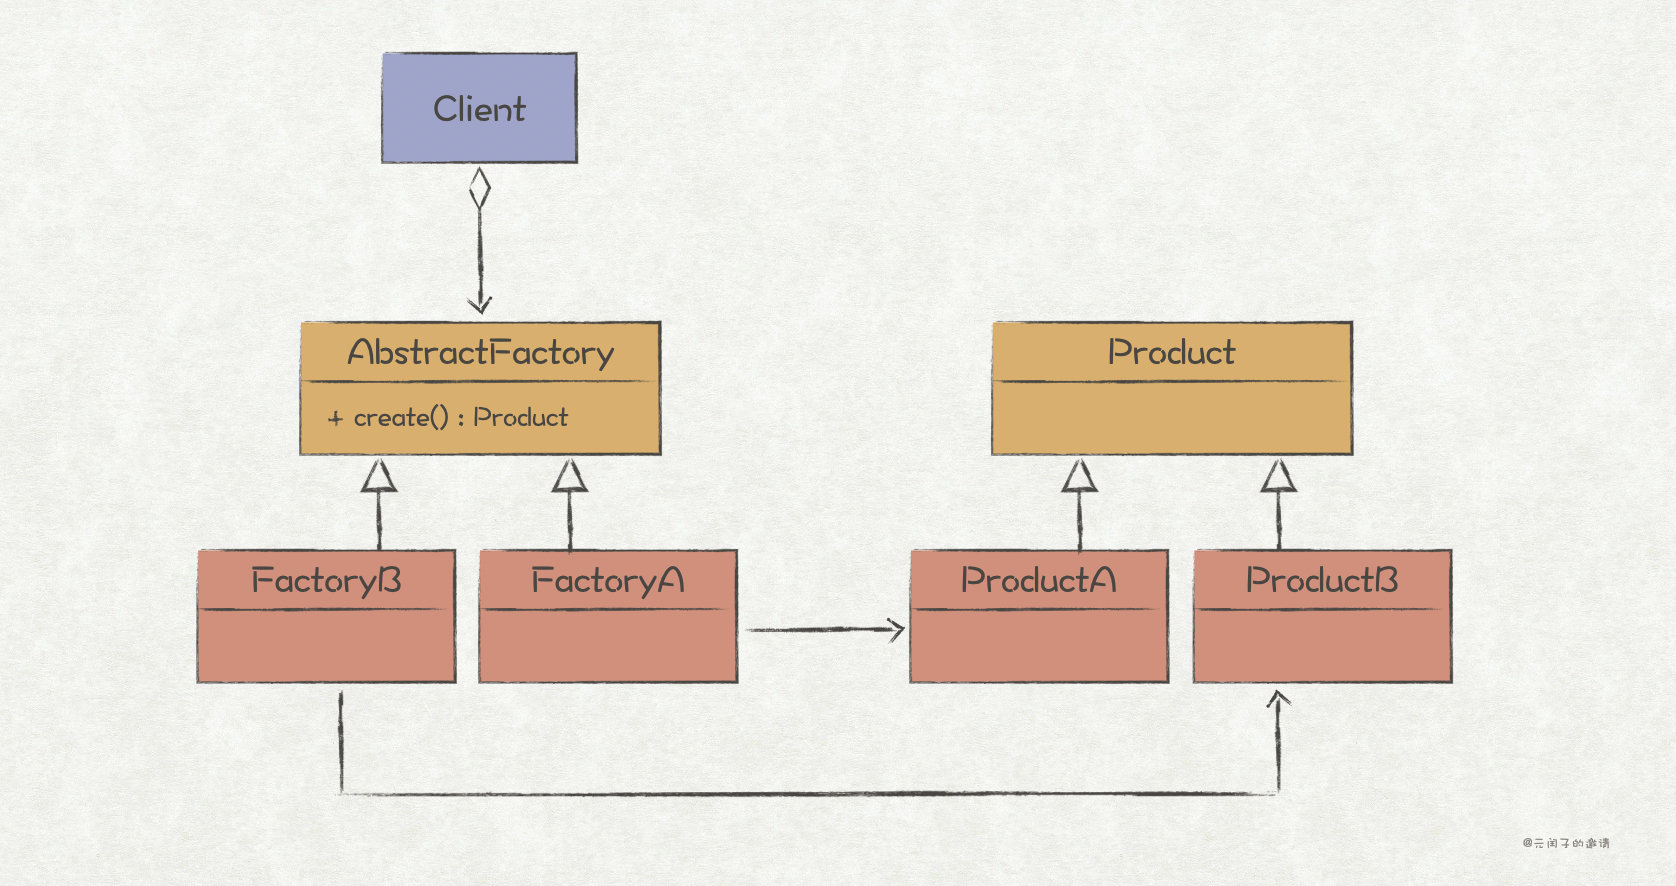
sketch
In the factory method mode, we create a product family through a factory object, and the specific product to be created is judged through swtich case. This also means that for each new type of product object in the product group, the code of the original factory object must be modified; Moreover, with the increasing number of products, the responsibilities of factory objects are becoming heavier and heavier, which violates the principle of single responsibility.
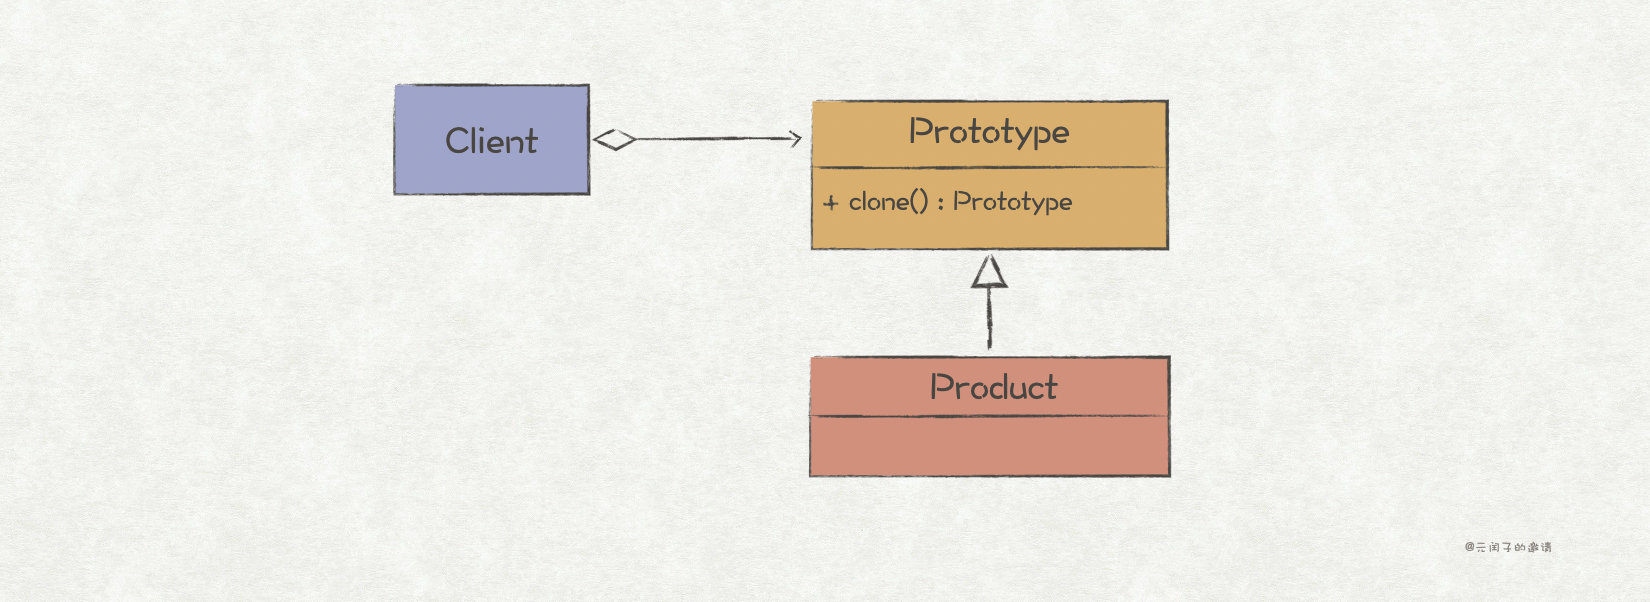
The abstract factory pattern solves this problem by adding an abstraction layer to the factory class. As shown in the above figure, FactoryA and FactoryB both implement the abstract factory interface, which is used to create ProductA and ProductB respectively. If ProductC is added subsequently, you only need to add a FactoryC without modifying the original code; Because each factory is only responsible for creating one product, it also follows the principle of single responsibility.
Go implementation
Consider the following plug-in architecture style message processing system. Pipeline is the message processing pipeline, which includes three plug-ins: input, filter and output. We need to realize the creation of pipeline according to the configuration. The implementation of loading plug-in process is very suitable for using factory mode. The creation of input, filter and output plug-ins uses abstract factory mode, while the creation of pipeline uses factory method mode.
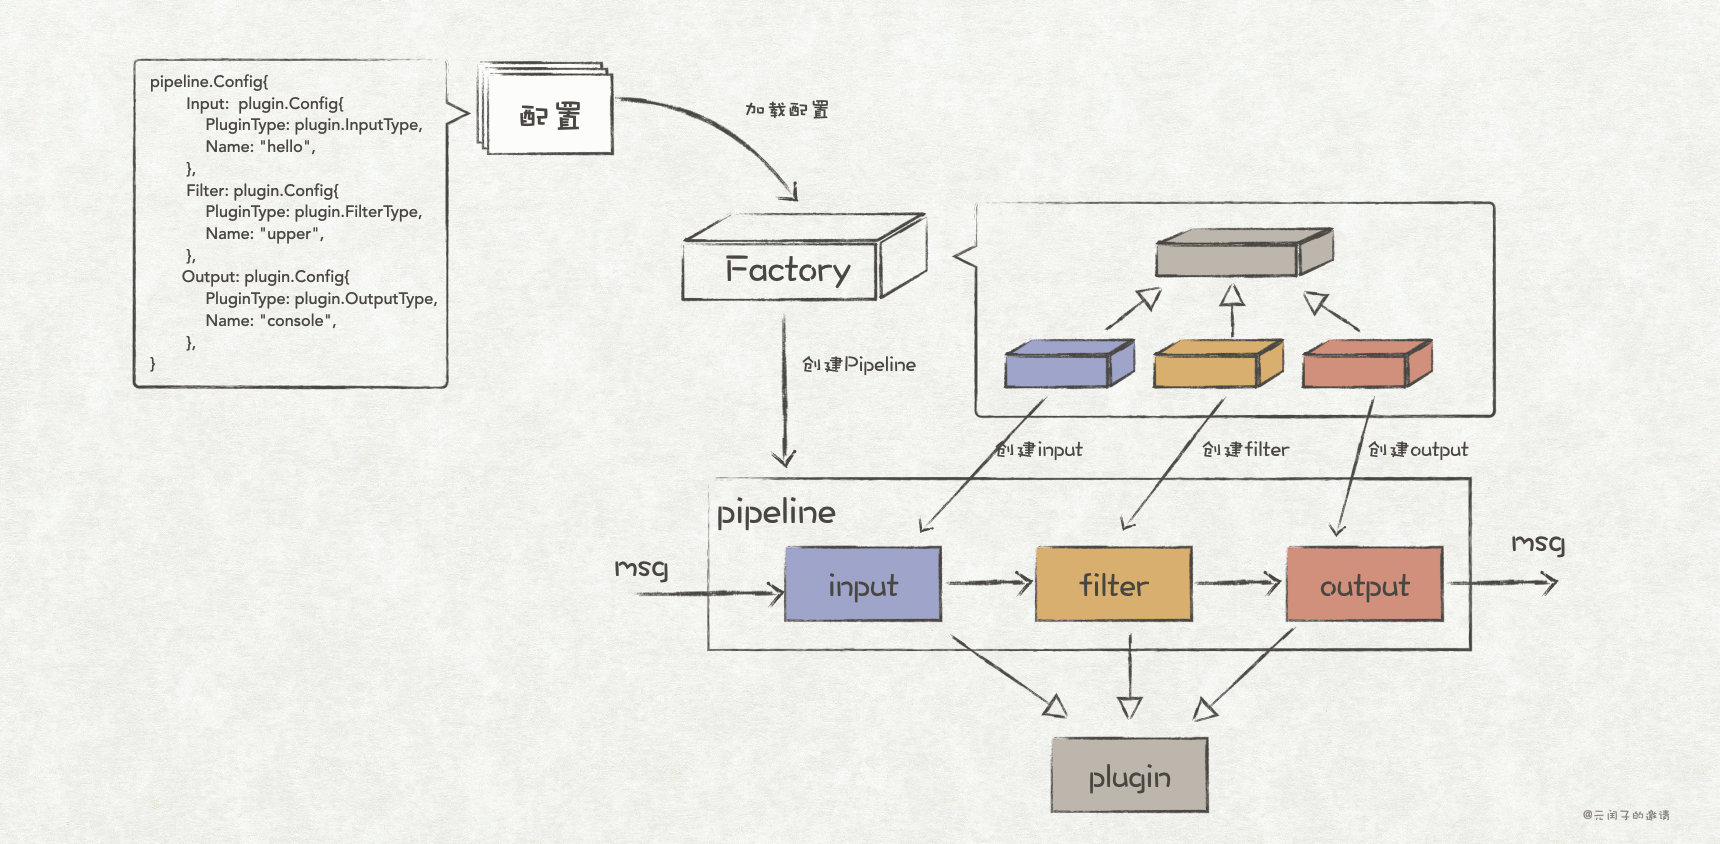
The interfaces between various plug-ins and pipeline are defined as follows:
package plugin
 ...
 // Plug in abstract interface definition
 type Plugin interface {}
 // Input plug-in for receiving messages
 type Input interface {
 Plugin
 Receive() string
 }
 // Filter plug-in for processing messages
 type Filter interface {
 Plugin
 Process(msg string) string
 }
 // Output plug-in for sending messages
 type Output interface {
 Plugin
 Send(msg string)
 }
package pipeline
...
// Definition of message pipeline
type Pipeline struct {
input plugin.Input
filter plugin.Filter
output plugin.Output
}
// The processing flow of a message is input - > filter - > output
func (p *Pipeline) Exec() {
msg := p.input.Receive()
msg = p.filter.Process(msg)
p.output.Send(msg)
}Next, we define the specific implementation of input, filter and output plug-in interfaces:
package plugin
...
// The mapping relationship between input plug-in name and type is mainly used to create input objects through reflection
var inputNames = make(map[string]reflect.Type)
// Hello input plug-in to receive "Hello World" messages
type HelloInput struct {}
func (h *HelloInput) Receive() string {
return "Hello World"
}
// Initialize the input plug-in mapping table
func init() {
inputNames["hello"] = reflect.TypeOf(HelloInput{})
} package plugin
...
// The mapping relationship between filter plug-in name and type is mainly used to create filter objects through reflection
var filterNames = make(map[string]reflect.Type)
// The Upper filter plug-in converts all letters of the message to uppercase
type UpperFilter struct {}
func (u *UpperFilter) Process(msg string) string {
return strings.ToUpper(msg)
}
// Initialize the filter plug-in mapping table
func init() {
filterNames["upper"] = reflect.TypeOf(UpperFilter{})
} package plugin
...
// The mapping relationship between output plug-in name and type is mainly used to create output objects through reflection
var outputNames = make(map[string]reflect.Type)
// Console output plug-in, which outputs messages to the console
type ConsoleOutput struct {}
func (c *ConsoleOutput) Send(msg string) {
fmt.Println(msg)
}
// Initialize the output plug-in mapping table
func init() {
outputNames["console"] = reflect.TypeOf(ConsoleOutput{})
}Then, we define the plug-in abstract factory interface and the factory implementation of the corresponding plug-in:
package plugin
 ...
 // Plug in abstract factory interface
 type Factory interface {
 Create(conf Config) Plugin
 }
 // The input plug-in Factory object implements the Factory interface
 type InputFactory struct{}
 // Read the configuration and instantiate the object through the reflection mechanism
 func (i *InputFactory) Create(conf Config) Plugin {
 t, _ := inputNames[conf.Name]
 return reflect.New(t).Interface().(Plugin)
 }
 // The implementation of filter and output plug-in factory is similar
 type FilterFactory struct{}
 func (f *FilterFactory) Create(conf Config) Plugin {
 t, _ := filterNames[conf.Name]
 return reflect.New(t).Interface().(Plugin)
 }
 type OutputFactory struct{}
 func (o *OutputFactory) Create(conf Config) Plugin {
 t, _ := outputNames[conf.Name]
 return reflect.New(t).Interface().(Plugin)
 }
Finally, define the factory method of pipeline and call plugin The factory Abstract Factory completes the instantiation of the pipeline object:
package pipeline
 ...
 // Save the factory instance used to create the Plugin, where the key of the map is the plug-in type and the value is the abstract factory interface
 var pluginFactories = make(map[plugin.Type]plugin.Factory)
 // According to Plugin Type returns the factory instance of the corresponding Plugin type
 func factoryOf(t plugin.Type) plugin.Factory {
 factory, _ := pluginFactories[t]
 return factory
 }
 // The pipeline factory method creates a pipeline instance according to the configuration
 func Of(conf Config) *Pipeline {
 p := &Pipeline{}
 p.input = factoryOf(plugin.InputType).Create(conf.Input).(plugin.Input)
 p.filter = factoryOf(plugin.FilterType).Create(conf.Filter).(plugin.Filter)
 p.output = factoryOf(plugin.OutputType).Create(conf.Output).(plugin.Output)
 return p
 }
 // Initialize plug-in factory object
 func init() {
 pluginFactories[plugin.InputType] = &plugin.InputFactory{}
 pluginFactories[plugin.FilterType] = &plugin.FilterFactory{}
 pluginFactories[plugin.OutputType] = &plugin.OutputFactory{}
 }
The test code is as follows:
package test
 ...
 func TestPipeline(t *testing.T) {
   // Where pipeline See [example diagram of abstract factory mode] for the configuration content of defaultconfig()
   // The message processing flow is helloinput - > upperfilter - > consoleoutput
 p := pipeline.Of(pipeline.DefaultConfig())
 p.Exec()
 }
 // Operation results
 === RUN   TestPipeline
 HELLO WORLD
 --- PASS: TestPipeline (0.00s)
 PASS
Prototype Pattern
sketch
Prototype pattern mainly solves the problem of object replication. Its core is the clone() method, which returns the replica of prototype object. In the process of programming, we often encounter that some scenes need a large number of the same objects. If we do not use the prototype mode, we may create objects in this way: create a new instance of the same object, then traverse all the member variables of the original object, and copy the member variable values into the new object. The disadvantage of this method is obvious, that is, the user must know the implementation details of the object, resulting in the coupling between the codes. In addition, the object is likely to have variables that are not visible except the object itself, in which case this method will not work.
In this case, the better way is to use the prototype pattern to delegate the replication logic to the object itself. In this way, the above two problems are solved.
Go implementation
Take the Message in the builder mode section as an example. Now design a Prototype abstract interface:
package prototype
...
// Prototype replication abstract interface
type Prototype interface {
clone() Prototype
}
type Message struct {
Header *Header
Body *Body
}
func (m *Message) clone() Prototype {
msg := *m
return &msg
}The test code is as follows:
package test
 ...
 func TestPrototype(t *testing.T) {
 message := msg.Builder().
 WithSrcAddr("192.168.0.1").
 WithSrcPort(1234).
 WithDestAddr("192.168.0.2").
 WithDestPort(8080).
 WithHeaderItem("contents", "application/json").
 WithBodyItem("record1").
 WithBodyItem("record2").
 Build()
   // Copy a message
 newMessage := message.Clone().(*msg.Message)
 if newMessage.Header.SrcAddr != message.Header.SrcAddr {
 t.Errorf("Clone Message failed.")
 }
 if newMessage.Body.Items[0] != message.Body.Items[0] {
 t.Errorf("Clone Message failed.")
 }
 }
 // Operation results
 === RUN   TestPrototype
 --- PASS: TestPrototype (0.00s)
 PASS
summary
This paper mainly introduces five creation patterns of GoF's 23 design patterns. The purpose of creation patterns is to provide a simple interface to decouple the object creation process from the user. The singleton mode is mainly used to ensure that a class has only one instance and provide a global access point to access it; The builder mode mainly solves the scenarios where multiple parameters need to be passed in when creating objects, or the initialization sequence is required; Factory method mode hides the details of object creation for users by providing a factory object or factory method; Abstract factory mode is the optimization of factory method mode. By adding an abstract layer to the factory object, the factory object follows the principle of single responsibility and avoids shotgun modification; Prototype mode makes object replication easier.
Click follow to learn about Huawei's new cloud technology for the first time~