k8s learning
Kubernetes(K8S) introduction advanced actual combat complete tutorial, dark horse programmer K8S complete tutorial
See Kubernetes for more detailed tutorials md
Other commands
Boot auto start application
# Start the chronyd service
[root@master ~]# systemctl start chronyd
# Set startup and self startup
[root@master ~]# systemctl enable chronyd
Reload configuration
sysctl -p
Set variables and run scripts
Command line direct input
images=(
	kube-apiserver:v1.17.4
	etcd:3.4.3-0
	coredns:1.6.5
)

for imageName in ${images[@]};do
	docker pull registry.cn-hangzhou.aliyuncs.com/google_containers/$imageName
	docker tag registry.cn-hangzhou.aliyuncs.com/google_containers/$imageName k8s.gcr.io/$imageName
	docker rmi registry.cn-hangzhou.aliyuncs.com/google_containers/$imageName
done
kubectl command
Kubectl is the command line tool of kubernetes cluster. It can manage the cluster itself and install and deploy container applications on the cluster. The syntax of the kubectl command is as follows:
kubectl [command] [type] [name] [flags]

comand: Specify the action to perform on the resource, for example create,get,delete
type: Specify the resource type, such as deployment,pod,service
name: Specifies the name of the resource, which is case sensitive
flags: Specify additional optional parameters
# View all pod s
kubectl get pod
# View a pod
kubectl get pod pod_name
# View a pod and display the results in yaml format
kubectl get pod pod_name -o yaml
kubectl get pod pod_name -o json     with json Formal display
Imperative object management
kubernetes allows multiple operations on resources. You can view detailed operation commands through – help
kubectl --help

Create and delete a namespace / pod to demonstrate the use of commands
# Create a namespace
[root@master ~]# kubectl create namespace dev
namespace/dev created

# Get namespace
[root@master ~]# kubectl get ns
NAME              STATUS   AGE
default           Active   21h
dev               Active   21s
kube-node-lease   Active   21h
kube-public       Active   21h
kube-system       Active   21h

# Create and run an nginx Pod in this namespace
[root@master ~]# kubectl run pod --image=nginx:latest -n dev
kubectl run --generator=deployment/apps.v1 is DEPRECATED and will be removed in a future version. Use kubectl run --generator=run-pod/v1 or kubectl create instead.
deployment.apps/pod created

# View the newly created pod
[root@master ~]# kubectl get pod -n dev
NAME  READY   STATUS    RESTARTS   AGE
pod   1/1     Running   0          21s

# Delete the specified pod
[root@master ~]# kubectl delete pod pod-864f9875b9-pcw7x
pod "pod" deleted

# Deletes the specified namespace
[root@master ~]# kubectl delete ns dev
namespace "dev" deleted
Imperative object configuration
Imperative object configuration is to use commands to operate kubernetes resources together with configuration files.
1) Create an nginxpod Yaml, as follows:
apiVersion: v1
kind: Namespace
metadata:
  name: dev

---

apiVersion: v1
kind: Pod
metadata:
  name: nginxpod
  namespace: dev
spec:
  containers:
  - name: nginx-containers
    image: nginx:latest
2) Execute the create command to create resources:
[root@master ~]# kubectl create -f nginxpod.yaml
namespace/dev created
pod/nginxpod created
At this time, it is found that two resource objects are created, namely namespace and pod
3) Execute the get command to view resources:
[root@master ~]#  kubectl get -f nginxpod.yaml
NAME            STATUS   AGE
namespace/dev   Active   18s

NAME            READY   STATUS    RESTARTS   AGE
pod/nginxpod    1/1     Running   0          17s
The information of the two resource objects is displayed
4) Execute the delete command to delete resources:
[root@master ~]# kubectl delete -f nginxpod.yaml
namespace "dev" deleted
pod "nginxpod" deleted
At this time, two resource objects are found to be deleted
summary:
    To operate resources in the way of command object configuration, you can simply think of: command  +  yaml Configuration file (which contains various parameters required by the command)
Declarative object configuration
Declarative object configuration is similar to imperative object configuration, but it has only one command, apply.
# First, execute the kubectl apply -f yaml file once and find that the resource is created
[root@master ~]#  kubectl apply -f nginxpod.yaml
namespace/dev created
pod/nginxpod created

# Execute the kubectl apply -f yaml file again and find that the resource has not changed
[root@master ~]#  kubectl apply -f nginxpod.yaml
namespace/dev unchanged
pod/nginxpod unchanged
summary:
    In fact, declarative object configuration is to use apply Describe the final state of a resource (in yaml (status defined in)
    use apply Operational resources:
        If the resource does not exist, it is created, which is equivalent to kubectl create
        If the resource already exists, it is updated, which is equivalent to kubectl patch
Extension: can kubectl run on node nodes?
kubectl needs to be configured to run. Its configuration file is $home / kube, if you want to run this command on the node node, you need to Copy the kube file to the node node, that is, perform the following operations on the master node:
scp -r HOME/.kube node1: HOME/
Usage recommendation: how to use the three methods?
establish/Update resource use declarative object configuration kubectl apply -f XXX.yaml
 Delete resource        Use command object configuration kubectl delete -f XXX.yaml
 Query resources        Using imperative object management kubectl get(describe) Resource name

-f, --filename=[]: Filename, directory, or URL to files to use to create the resource
Introduction to actual combat
Namespace
Namespace is a very important resource in kubernetes system. Its main function is to realize resource isolation of multiple environments or multi tenant resources.
By default, all pods in the kubernetes cluster can access each other. However, in practice, you may not want two pods to access each other. At this time, you can divide the two pods into different namespaces. Kubernetes can form logical "groups" by allocating resources in the cluster to different namespaces, so as to facilitate the isolated use and management of resources in different groups.
Different namespace s can be managed by different tenants through the authorization mechanism of kubernetes, so as to realize multi tenant resource isolation. At this time, the resource quota mechanism of kubernetes can be combined to limit the resources that can be occupied by different tenants, such as CPU usage, memory usage, etc., so as to realize the management of available resources for tenants.

kubernetes will create several namespace s by default after the cluster is started
[root@master ~]# kubectl  get namespace
NAME              STATUS   AGE
default           Active   45h     #  All objects that do not specify a Namespace are assigned in the default Namespace
kube-node-lease   Active   45h     #  Heartbeat maintenance between cluster nodes, v1 13 start introduction
kube-public       Active   45h     #  Resources under this namespace can be accessed by everyone (including unauthenticated users)
kube-system       Active   45h     #  All resources created by the Kubernetes system are in this namespace
see
1 view all ns commands: kubectl get ns
[root@master ~]# kubectl get ns
NAME              STATUS   AGE
default           Active   45h
kube-node-lease   Active   45h
kube-public       Active   45h
kube-system       Active   45h
2 view the specified ns command: kubectl get ns name
[root@master ~]# kubectl get ns default
NAME      STATUS   AGE
default   Active   45h
3 specify the output format
kubectl get ns ns name  -o Format parameters

# kubernetes supports many formats, such as wide, json and yaml
[root@master ~]# kubectl get ns default -o yaml
apiVersion: v1
kind: Namespace
metadata:
  creationTimestamp: "2021-05-08T04:44:16Z"
  name: default
  resourceVersion: "151"
  selfLink: /api/v1/namespaces/default
  uid: 7405f73a-e486-43d4-9db6-145f1409f090
spec:
  finalizers:
  - kubernetes
status:
  phase: Active
4. View ns details command: kubectl describe ns name
[root@master ~]# kubectl describe ns default
Name:         default
Labels:       <none>
Annotations:  <none>
Status:       Active  # Active namespace in use Terminating deleting namespace

# ResourceQuota resource restrictions for namespace
# LimitRange is the resource limit for each component in the namespace
No resource quota.
No LimitRange resource.
establish
Create namespace
[root@master ~]# kubectl create ns dev
namespace/dev created
delete
Delete namespace
[root@master ~]# kubectl delete ns dev
namespace "dev" deleted
collocation method
First, prepare a yaml file: ns-dev.yaml
Fixed writing

apiVersion: v1
kind: Namespace
metadata:              metadata
  name: dev
Then you can execute the corresponding create and delete commands:
establish: kubectl create -f ns-dev.yaml

Delete: kubectl delete -f ns-dev.yaml
Pod
Pod is the smallest unit for kubernetes cluster management. The program must be deployed in the container to run, and the container must exist in pod.
A Pod can be considered as a package of containers. One or more containers can exist in a Pod.
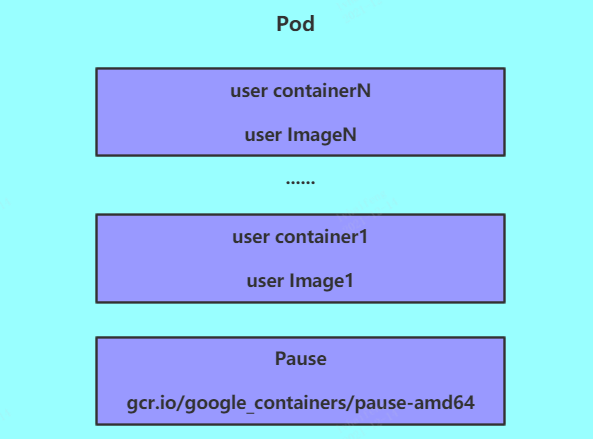
After kubernetes starts the cluster, all components in the cluster also run in Pod mode. You can view it with the following command:
[root@master ~]# kubectl get pod -n kube-system
NAMESPACE     NAME                             READY   STATUS    RESTARTS   AGE
kube-system   coredns-6955765f44-68g6v         1/1     Running   0          2d1h
kube-system   coredns-6955765f44-cs5r8         1/1     Running   0          2d1h
kube-system   etcd-master                      1/1     Running   0          2d1h
kube-system   kube-apiserver-master            1/1     Running   0          2d1h
kube-system   kube-controller-manager-master   1/1     Running   0          2d1h
kube-system   kube-flannel-ds-amd64-47r25      1/1     Running   0          2d1h
kube-system   kube-flannel-ds-amd64-ls5lh      1/1     Running   0          2d1h
kube-system   kube-proxy-685tk                 1/1     Running   0          2d1h
kube-system   kube-proxy-87spt                 1/1     Running   0          2d1h
kube-system   kube-scheduler-master            1/1     Running   0          2d1h
Create and run
kubernetes does not provide the command to run Pod separately, but is implemented through the Pod controller
# Command format: kubectl run pod controller name -- Image = image: version -- port = exposed port -- namespace namespace
# --Image specifies the image of the Pod
# --Port specifies the port
# --Namespace specifies the namespace


[root@master ~]# kubectl create ns dev creates a namespace before creating a pod in the namespace

[root@master ~]# kubectl run nginx --image=nginx:latest --port=80 --namespace dev
deployment.apps/nginx created
NAME                     READY   STATUS    RESTARTS   AGE   IP           NODE    NOMINATED NODE   READINESS GATES
nginx-6867cdf567-6jrln   1/1     Running   0          16h   10.244.2.2   node2   <none>           <none>
NAME         	pod name
READY       	current pod There are several containers running in the/current pod There are several containers in the
RESTARTS    	Restart times
AGE         	How long has it started
NODE         	current pod Which node is scheduled to run
View more details
[root@master ~]# kubectl describe pod nginx-dd6b5d745-sbfpj -n dev

Name:         nginx-dd6b5d745-sbfpj
Namespace:    dev
Priority:     0
Node:         node1/192.168.182.101            To which node
Start Time:   Tue, 14 Dec 2021 18:00:17 +0800			Start time
Labels:       pod-template-hash=dd6b5d745
              run=nginx
Annotations:  <none>
Status:       Running
IP:           10.244.1.7				pod of ip
IPs:
  IP:           10.244.1.7
Controlled By:  ReplicaSet/nginx-dd6b5d745
Containers:						pod Containers in
  nginx:
    Container ID:   docker://513e75ca4bed0b3bc08c68dbffed8b0069b68049dc802107b87d4b99913c9d08
    Image:          nginx:latest								Use mirror
    Image ID:       docker-pullable://nginx@sha256:9522864dd661dcadfd9958f9e0de192a1fdda2c162a35668ab6ac42b465f0603
    Port:           80/TCP					Container port
    Host Port:      0/TCP				Host port
    State:          Running
      Started:      Tue, 14 Dec 2021 18:00:34 +0800
    Ready:          True
    Restart Count:  0
    Environment:    <none>
    Mounts:						Mount point
      /var/run/secrets/kubernetes.io/serviceaccount from default-token-d28j7 (ro)
Conditions:
  Type              Status
  Initialized       True
  Ready             True
  ContainersReady   True
  PodScheduled      True
Volumes:
  default-token-d28j7:
    Type:        Secret (a volume populated by a Secret)
    SecretName:  default-token-d28j7
    Optional:    false
QoS Class:       BestEffort
Node-Selectors:  <none>
Tolerations:     node.kubernetes.io/not-ready:NoExecute for 300s
                 node.kubernetes.io/unreachable:NoExecute for 300s
Events:				Start event, which can be used to eliminate errors
  Type    Reason     Age    From               Message
  ----    ------     ----   ----               -------
  Normal  Scheduled  9m23s  default-scheduler  Successfully assigned dev/nginx-dd6b5d745-sbfpj to node1
  Normal  Pulling    9m16s  kubelet, node1     Pulling image "nginx:latest"
  Normal  Pulled     9m     kubelet, node1     Successfully pulled image "nginx:latest"
  Normal  Created    9m     kubelet, node1     Created container nginx
  Normal  Started    9m     kubelet, node1     Started container nginx


error run Example
[root@master ~]# kubectl run nginx1 --image=nginx:1111 --port=80 --namespace dev
[root@master ~]# kubectl describe pod nginx1-78f86cf8dd-msszb -n dev

Events:
  Type     Reason     Age                From               Message
  ----     ------     ----               ----               -------
  Normal   Scheduled  63s                default-scheduler  Successfully assigned dev/nginx1-78f86cf8dd-msszb to node2
  Normal   BackOff    38s                kubelet, node2     Back-off pulling image "nginx:1111"
  Warning  Failed     38s                kubelet, node2     Error: ImagePullBackOff
  Normal   Pulling    25s (x2 over 58s)  kubelet, node2     Pulling image "nginx:1111"
  Warning  Failed     5s (x2 over 38s)   kubelet, node2     Failed to pull image "nginx:1111": rpc error: code = Unknown desc = Error response from daemon: manifest for nginx:1111 not found
  Warning  Failed     5s (x2 over 38s)   kubelet, node2     Error: ErrImagePull

As you can see, yes pull image error
Access Pod
Use - o wide
# Get podIP
[root@master ~]# kubectl get pods -n dev -o wide
NAME    READY   STATUS    RESTARTS   AGE    IP             NODE    ...
nginx   1/1     Running   0          190s   10.244.1.23   node1   ...

#Access POD
[root@master ~]# curl http://10.244.1.23:80
<!DOCTYPE html>
<html>
<head>
	<title>Welcome to nginx!</title>
</head>
<body>
	<p><em>Thank you for using nginx.</em></p>
</body>
</html>
Delete specified Pod
# Delete specified Pod
[root@master ~]# kubectl delete pod nginx-dqewacdaeq-32fw -n dev
pod "ginx-dqewacdaeq-32fw" deleted

# At this point, it is displayed that the Pod was deleted successfully, but after querying again, it is found that a new one has been generated
[root@master ~]# kubectl get pods -n dev
NAME			    READY   STATUS    RESTARTS   AGE
nginx-feew-32few     1/1     Running   0          21s

# This is because the current Pod (nginx-feew-32fee) is created by the Pod controller (ngnix). The controller will monitor the status of the Pod. Once the Pod is found dead, it will be rebuilt immediately
# To delete the Pod (nginx-feew-32fee), you must delete the Pod controller (nginx)


# Let's first query the Pod controller in the current namespace
[root@master ~]# kubectl get deploy -n  dev
NAME    READY   UP-TO-DATE   AVAILABLE   AGE
nginx   1/1     1            1           9m7s

# Next, delete this PodPod controller
[root@master ~]# kubectl delete deploy nginx -n dev
deployment.apps "nginx" deleted

# Wait a moment, then query the Pod and find that the Pod has been deleted
[root@master ~]# kubectl get pods -n dev
No resources found in dev namespace.
Configuration operation
Create a pod nginx Yaml, as follows:
apiVersion: v1
kind: Pod     		yes pod no pod controller
metadata:
  name: nginx      	Here is pod Your name, No pod Controller name
  namespace: dev
spec:
  containers:
  - image: nginx:latest
    name: pod
    ports:
    - name: nginx-port
      containerPort: 80
      protocol: TCP
Then you can execute the corresponding create and delete commands:
establish: kubectl create -f pod-nginx.yaml

Delete: kubectl delete -f pod-nginx.yaml
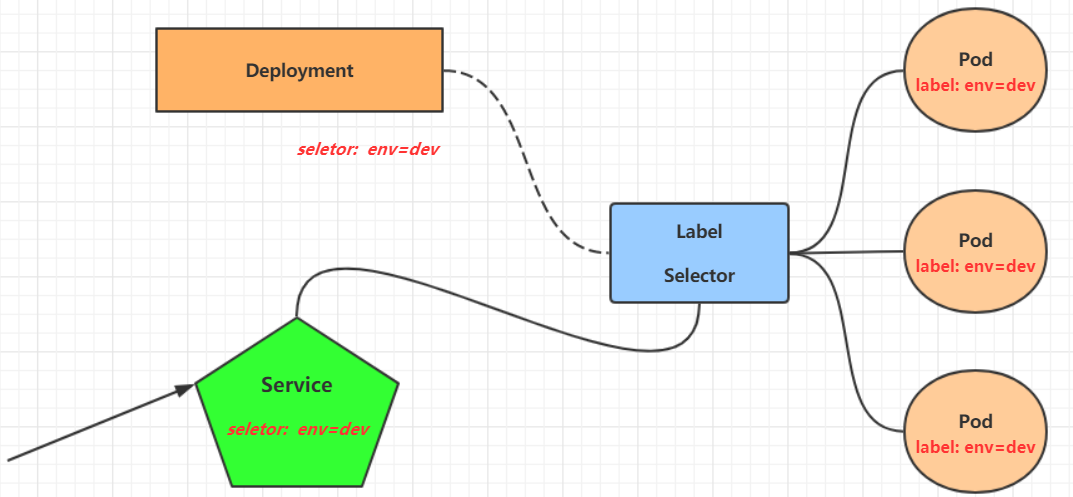
Label
Label is an important concept in kubernetes system. Its function is to add identification on resources to distinguish and select them.
Features of Label:
One Label Will take key/value The form of key value pairs is attached to various objects, such as Node,Pod,Service wait
 A resource object can define any number of resources Label ,Same Label It can also be added to any number of resource objects
Label It is usually determined when the resource object is defined. Of course, it can also be dynamically added or deleted after the object is created
Multi dimensional grouping of resources can be realized through Label, so that resource allocation, scheduling, configuration, deployment and other management can be carried out flexibly and conveniently.
Some commonly used Label Examples are as follows:

Version label:"version":"release", "version":"stable"......
Environmental label:"environment":"dev","environment":"test","environment":"pro"
Schema label:"tier":"frontend","tier":"backend"
After the label is defined, the label selection should also be considered, which requires the use of the Label Selector, namely:
Label Used to define an identity for a resource object

Label Selector Used to query and filter resource objects with certain tags
There are currently two types of label selectors:
- Equation based Label Selector
name = slave: Select all include Label in key="name"And value="slave"Object of

env != production: Select all include Label Medium key="env"And value Not equal to"production"Object of
- Collection based Label Selector
name in (master, slave): Select all include Label Medium key="name"And value="master"or"slave"Object of

name not in (frontend): Select all include Label Medium key="name"And value Not equal to"frontend"Object of
- Multiple label selectors can be used for label selection. In this case, multiple label selectors can be combined and separated by comma "," and ". For example:
name=slave,env!=production

name not in (frontend),env!=production
Command mode
# Tag pod resources
[root@master ~]# kubectl label pod nginx-pod version=1.0 -n dev
pod/nginx-pod labeled

# Update tags for pod resources
[root@master ~]# kubectl label pod nginx-pod version=2.0 -n dev --overwrite
pod/nginx-pod labeled

# View label
[root@master ~]# kubectl get pod nginx-pod  -n dev --show-labels
NAME        READY   STATUS    RESTARTS   AGE   LABELS
nginx-pod   1/1     Running   0          10m   version=2.0

# Filter tag - l means -- selector = '' can be viewed through kubectl label --help
[root@master ~]# kubectl get pod -n dev -l version=2.0  --show-labels
NAME        READY   STATUS    RESTARTS   AGE   LABELS
nginx-pod   1/1     Running   0          17m   version=2.0
[root@master ~]# kubectl get pod -n dev -l version!=2.0 --show-labels
No resources found in dev namespace.

#delete a tap
[root@master ~]# kubectl label pod nginx-pod version- -n dev
pod/nginx-pod labeled
collocation method
apiVersion: v1
kind: Pod
metadata:
  name: nginx
  namespace: dev
  labels:      		  #Tagging profiles
    version: "3.0"
    env: "test"
spec:
  containers:
  - image: nginx:latest
    name: pod
    ports:
    - name: nginx-port
      containerPort: 80
      protocol: TCP
Then you can execute the corresponding update command: kubectl apply - f pod nginx yaml
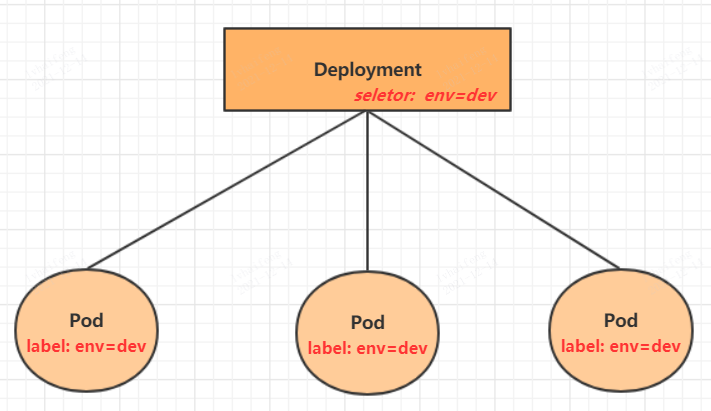
Deployment
In kubernetes, pod is the smallest control unit, but kubernetes rarely directly controls pod, which is generally completed through pod controller. The pod controller is used for pod management to ensure that the pod resources meet the expected state. When the pod resources fail, it will try to restart or rebuild the pod.
There are many types of Pod controllers in kubernetes. This chapter only introduces one: Deployment.
Command operation
# Command format: kubectl create deployment name [parameter]
# --Image specifies the image of the pod
# --Port specifies the port
# --replicas specifies the number of created pod s
# --Namespace specifies the namespace

[root@master ~]# kubectl run nginx --image=nginx:latest --port=80 --replicas=3 -n dev
deployment.apps/nginx created

# View the created Pod
[root@master ~]# kubectl get pods -n dev
NAME                     READY   STATUS    RESTARTS   AGE
nginx-5ff7956ff6-6k8cb   1/1     Running   0          19s
nginx-5ff7956ff6-jxfjt   1/1     Running   0          19s
nginx-5ff7956ff6-v6jqw   1/1     Running   0          19s

# View deployment information
[root@master ~]# kubectl get deploy -n dev
NAME    READY   UP-TO-DATE   AVAILABLE   AGE
nginx   3/3     3            3           2m42s

#View both deploy and pod
kubectl get deploy,pod -n dev

# UP-TO-DATE: number of copies successfully upgraded
# AVAILABLE: number of AVAILABLE copies
[root@master ~]# kubectl get deploy -n dev -o wide
NAME    READY UP-TO-DATE  AVAILABLE   AGE     CONTAINERS   IMAGES              SELECTOR
nginx   3/3     3         3           2m51s   nginx        nginx:latest        run=nginx

# View deployment details
[root@master ~]# kubectl describe deploy nginx -n dev
Name:                   nginx   	 pod Controller name
Namespace:              dev     	 Namespace
CreationTimestamp:      Wed, 08 May 2021 11:14:14 +0800
Labels:                 run=nginx    		label
Annotations:            deployment.kubernetes.io/revision: 1
Selector:               run=nginx    		tag chooser
Replicas:               3 desired | 3 updated | 3 total | 3 available | 0 unavailable
StrategyType:           RollingUpdate
MinReadySeconds:        0
RollingUpdateStrategy:  25% max unavailable, 25% max surge
Pod Template:
  Labels:  run=nginx
  Containers:
   nginx:
    Image:        nginx:latest
    Port:         80/TCP
    Host Port:    0/TCP
    Environment:  <none>
    Mounts:       <none>
  Volumes:        <none>
Conditions:
  Type           Status  Reason
  ----           ------  ------
  Available      True    MinimumReplicasAvailable
  Progressing    True    NewReplicaSetAvailable
OldReplicaSets:  <none>
NewReplicaSet:   nginx-5ff7956ff6 (3/3 replicas created)
Events:
  Type    Reason             Age    From                   Message
  ----    ------             ----   ----                   -------
  Normal  ScalingReplicaSet  5m43s  deployment-controller  Scaled up replicaset nginx-5ff7956ff6 to 3

# delete
[root@master ~]# kubectl delete deploy nginx -n dev
deployment.apps "nginx" deleted
Configuration operation
Create a deploy nginx Yaml, as follows:
apiVersion: apps/v1
kind: Deployment
metadata:
  name: nginx
  namespace: dev
spec:
  replicas: 3
  selector:
    matchLabels:
      run: nginx
  template:
    metadata:
      labels:
        run: nginx
    spec:
      containers:
      - image: nginx:latest
        name: nginx
        ports:
        - containerPort: 80
          protocol: TCP
Then you can execute the corresponding create and delete commands:
establish: kubectl create -f deploy-nginx.yaml

Delete: kubectl delete -f deploy-nginx.yaml
Service
Through the previous lesson, we have been able to use Deployment to create a group of pods to provide services with high availability.
Although each Pod is assigned a separate Pod IP, there are two problems:
Pod IP Will follow Pod Changes in reconstruction
Pod IP It's just a virtual that's visible in the cluster IP,External cannot be accessed
This makes it difficult to access the Service. Therefore, kubernetes designed Service to solve this problem.
Service can be regarded as a group of external access interfaces of similar pods. With the help of service, applications can easily realize service discovery and load balancing.
Create accessible services within the cluster
# Expose Service
[root@master ~]# kubectl expose deploy nginx --name=svc-nginx1 --type=ClusterIP --port=80 --target-port=80 -n dev
service/svc-nginx1 exposed

ClusterIP The creation method of can only be accessed within the cluster

# View service
[root@master ~]# kubectl get svc svc-nginx1 -n dev -o wide
NAME         TYPE        CLUSTER-IP       EXTERNAL-IP   PORT(S)   AGE     SELECTOR
svc-nginx1   ClusterIP   10.109.179.231   <none>        80/TCP    3m51s   run=nginx

# A CLUSTER-IP is generated here, which is the IP of the service. This address will not change during the service life cycle
# You can access the POD corresponding to the current service through this IP


[root@master ~]# curl 10.109.179.231:80
<!DOCTYPE html>
<html>
<head>
<title>Welcome to nginx!</title>
</head>
<body>
<h1>Welcome to nginx!</h1>
.......
</body>
</html>
Create a Service that can also be accessed outside the cluster
# The type of the Service created above is ClusterIP. This ip address is accessible only within the cluster
# If you need to create a Service that can also be accessed externally, you need to modify the type to NodePort

[root@master ~]# kubectl expose deploy nginx --name=svc-nginx2 --type=NodePort --port=80 --target-port=80 -n dev
service/svc-nginx2 exposed

# At this time, you will find that a Service of NodePort type appears, and there is a pair of ports (80:31928/TC)
[root@master ~]# kubectl get svc  svc-nginx2  -n dev -o wide
NAME          TYPE        CLUSTER-IP       EXTERNAL-IP   PORT(S)        AGE    SELECTOR
svc-nginx2    NodePort    10.100.94.0      <none>        80:31928/TCP   9s     run=nginx

# Next, you can access the node IP:31928 to access the service through the host outside the cluster
# For example, access the following address through a browser on the host computer
http://192.168.90.100:31928/
Delete Service
[root@master ~]# kubectl delete svc svc-nginx-1 -n dev
service "svc-nginx-1" deleted
collocation method
Create an SVC nginx Yaml, as follows:
apiVersion: v1
kind: Service
metadata:
  name: svc-nginx
  namespace: dev
spec:
  clusterIP: 10.109.179.231    #Fixed svc intranet ip, not written, default
  ports:
  - port: 80
    protocol: TCP
    targetPort: 80
  selector:
    run: nginx
  type: ClusterIP
Then you can execute the corresponding create and delete commands:
establish: kubectl create -f svc-nginx.yaml

Delete: kubectl delete -f svc-nginx.yaml