summary
What is Nginx?
Nginx (engine x) is a lightweight Web server, reverse proxy server and email (IMAP/POP3) proxy server.
What is reverse proxy?
Reverse Proxy means that the proxy server accepts the connection request on the internet, then forwards the request to the server on the internal network, and returns the result from the server to the client requesting connection on the internet. At this time, the proxy server acts as a Reverse Proxy server.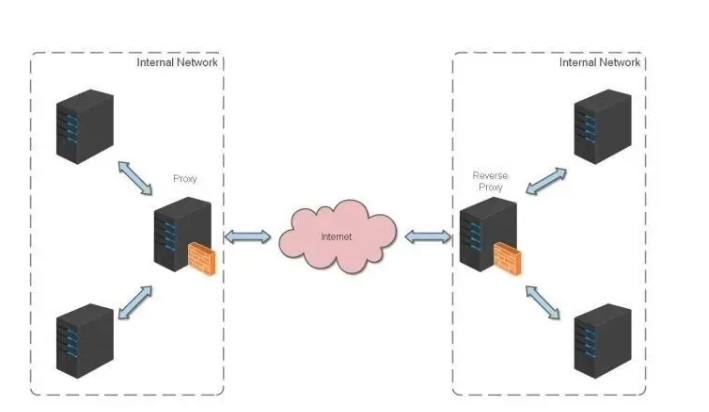
use
nginx is easy to use, just a few commands.
The commonly used commands are as follows:
nginx -s stop quickly shuts down nginx, may not save relevant information, and quickly terminates the web service.
Nginx-s quit smoothly closes nginx, saves relevant information, and ends web services in a planned way.
nginx -s reload is reloaded due to the change of nginx related configuration.
nginx -s reopen reopens the log file.
nginx -c filename specifies a configuration file for nginx instead of the default.
nginx -t doesn't run, just tests the configuration file. nginx will check the syntax of the configuration file for correctness and try to open the file referenced in the configuration file.
nginx -v shows the version of nginx.
nginx -V displays the version of nginx, compiler version, and configuration parameters.
**Use under Windows**
If you don't want to hit the command every time, you can add a new startup batch file in the nginx installation directory startup.bat , double click to run. The contents are as follows:
@echo off
rem If started before nginx And record it pid File, yes kill Specify process
nginx.exe -s stop

rem Test configuration file syntax correctness
nginx.exe -t -c conf/nginx.conf

rem display version information
nginx.exe -v

rem Start according to the specified configuration nginx
nginx.exe -c conf/nginx.conf
If you are running under Linux, write a shell script, which is the same.
nginx configuration practice
I always think that the configuration of various development tools will be easier to understand if it is described in combination with actual combat.
Let's achieve a small goal first: to complete an http reverse proxy without considering complicated configuration.
nginx.conf The configuration file is as follows:
Note: conf/ nginx.conf Is the default configuration file for nginx. You can also use nginx -c to specify your profile
#Run user
#user somebody;

#Start process,Usually set to and cpu Equal number of
worker_processes  1;

#Global error log
error_log  D:/Tools/nginx-1.10.1/logs/error.log;
error_log  D:/Tools/nginx-1.10.1/logs/notice.log  notice;
error_log  D:/Tools/nginx-1.10.1/logs/info.log  info;

#PID file, recording the process ID of the currently started nginx
pid        D:/Tools/nginx-1.10.1/logs/nginx.pid;

#Working mode and maximum number of connections
events {
    worker_connections 1024;    #Maximum number of concurrent links for a single background worker process
}

#Set up http server and use its reverse proxy function to provide load balancing support
http {
    #Set mime type(Mail support type),Type by mime.types Document definition
    include       D:/Tools/nginx-1.10.1/conf/mime.types;
    default_type  application/octet-stream;

    #Set log
    log_format  main  '[$remote_addr] - [$remote_user] [$time_local] "$request" '
                      '$status $body_bytes_sent "$http_referer" '
                      '"$http_user_agent" "$http_x_forwarded_for"';

    access_log    D:/Tools/nginx-1.10.1/logs/access.log main;
    rewrite_log     on;

    #The sendfile instruction specifies whether nginx calls the sendfile function (zero copy mode) to output files. For normal applications,
    #Must be set to on,If it is used for downloading and other application disks IO Heavy duty application, can be set to off,To balance disk and network I/O Processing speed, reducing the system's uptime.
    sendfile        on;
    #tcp_nopush     on;

    #Connection timeout
    keepalive_timeout  120;
    tcp_nodelay        on;

    #gzip compression switch
    #gzip  on;

    #Set the actual server list
    upstream zp_server1{
        server 127.0.0.1:8089;
    }

    #HTTP server
    server {
        #monitor80Port,80Port is a well-known port number for HTTP agreement
        listen       80;

        #Definition use www.xx.com visit
        server_name  www.helloworld.com;

        #home page
        index index.html

        #Directory to webapp
        root D:\01_Workspace\Project\github\zp\SpringNotes\spring-security\spring-shiro\src\main\webapp;

        #Encoding format
        charset utf-8;

        #Agent configuration parameters
        proxy_connect_timeout 180;
        proxy_send_timeout 180;
        proxy_read_timeout 180;
        proxy_set_header Host $host;
        proxy_set_header X-Forwarder-For $remote_addr;

        #The path of the reverse agent (bound to upstream), and the mapped path is set after the location
        location / {
            proxy_pass http://zp_server1;
        }

        #Static files, handled by nginx itself
        location ~ ^/(images|javascript|js|css|flash|media|static)/ {
            root D:\01_Workspace\Project\github\zp\SpringNotes\spring-security\spring-shiro\src\main\webapp\views;
            #be overdue30Days, the static file is not updated very much, and it can be set a little larger if it expires. If it is updated frequently, it can be set a little smaller.
            expires 30d;
        }

        #Set the address for viewing Nginx status
        location /NginxStatus {
            stub_status           on;
            access_log            on;
            auth_basic            "NginxStatus";
            auth_basic_user_file  conf/htpasswd;
        }

        #No access .htxxx file
        location ~ /\.ht {
            deny all;
        }

        #Error handling page (optional configuration)
        #error_page   404              /404.html;
        #error_page   500 502 503 504  /50x.html;
        #location = /50x.html {
        #    root   html;
        #}
    }
}
Well, let's try:
Start webapp, pay attention to the end of starting binding
Well, let's try:
Start webapp, and note that the port to start binding should be consistent with the port set by upstream in nginx.
Change host: add a DNS record to the host file in the directory C:\Windows\System32\drivers\etc
127.0.0.1 www.helloworld.com
1. Start up startup.bat Command of
2. Access in browser www.helloworld.com , no accident, it's already accessible.
Load balancing configuration
In the previous example, the proxy pointed to only one server.
However, in the actual operation process of the website, most of the servers are running the same app, at this time, load balancing needs to be used to split.
nginx can also realize simple load balancing function.
Suppose an application scenario: deploy the application on three linux servers: 192.168.1.11:80, 192.168.1.12:80, and 192.168.1.13:80. Website domain name www.helloworld.com , public IP is 192.168.1.11. nginx is deployed on the server where the public IP address is located to balance the load of all requests.
nginx.conf The configuration is as follows:
http {
     #Set mime type,Type by mime.type Document definition
    include       /etc/nginx/mime.types;
    default_type  application/octet-stream;
    #Format log
    access_log    /var/log/nginx/access.log;

    #List of servers for load balancing
    upstream load_balance_server {
        #The weight parameter indicates the weight. The higher the weight, the greater the probability of being assigned
        server 192.168.1.11:80   weight=5;
        server 192.168.1.12:80   weight=1;
        server 192.168.1.13:80   weight=6;
    }

   #HTTP server
   server {
        #Listening80port
        listen       80;

        #Definition use www.xx.com visit
        server_name  www.helloworld.com;

        #Load balancing requests for all requests
        location / {
            root        /root;                 #Define the default site root location for the server
            index       index.html index.htm;  #Define the name of the first page index file
            proxy_pass  http://load_balance_server ;#Request to turn to load_balance_server defined server list

            #Here are the configuration of some reverse agents(Optional configuration)
            #proxy_redirect off;
            proxy_set_header Host $host;
            proxy_set_header X-Real-IP $remote_addr;
            #The back-end Web server can use X-Forwarded-For Get user reality IP
            proxy_set_header X-Forwarded-For $remote_addr;
            proxy_connect_timeout 90;          #Timeout for nginx to connect with backend server(Agent connection timeout)
            proxy_send_timeout 90;             #Back end server data return time(Agent send timeout)
            proxy_read_timeout 90;             #Response time of back-end server after successful connection(Agent receive timeout)
            proxy_buffer_size 4k;              #Set the buffer size for the proxy server (nginx) to save the user header information
            proxy_buffers 4 32k;               #proxy_buffers buffer, average pages in32k Set as follows
            proxy_busy_buffers_size 64k;       #Buffer size under high load (proxy_buffers*2)
            proxy_temp_file_write_size 64k;    #Set the cache folder size. If it is larger than this value, it will be transferred from the upstream server

            client_max_body_size 10m;          #Maximum single file bytes allowed for client requests
            client_body_buffer_size 128k;      #Buffer agent the maximum number of bytes requested by the buffer client
        }
    }
}
The website has multiple webapp configurations
When a website has more and more functions, it is often necessary to separate some relatively independent modules and maintain them independently. In this way, there are usually multiple webapp s.
For example: if www.helloworld.com There are several sites
webapp, finance, product, admin. The ways to access these applications are distinguished by context:
- www.helloworld.com/finance/
- www.helloworld.com/product/
- www.helloworld.com/admin/
We know that the default port number of http is 80. If you start these three webapp applications on a server at the same time, you can't use 80 port. Therefore, these three applications need to bind different port numbers.
So, here's the problem. The user is actually accessing www.helloworld.com When you visit different webapp s, you will not visit them with the corresponding port number. So, you need to use reverse proxy again.
Configuration is not difficult, let's see how to do it:
http {
    #Some basic configurations are omitted here

    upstream product_server{
        server www.helloworld.com:8081;
    }

    upstream admin_server{
        server www.helloworld.com:8082;
    }

    upstream finance_server{
        server www.helloworld.com:8083;
    }

    server {
        #Some basic configurations are omitted here
        #server pointing to product by default
        location / {
            proxy_pass http://product_server;
        }

        location /product/{
            proxy_pass http://product_server;
        }

        location /admin/ {
            proxy_pass http://admin_server;
        }

        location /finance/ {
            proxy_pass http://finance_server;
        }
    }
}
https reverse proxy configuration
Some sites with high security requirements may use HTTPS (a secure HTTP protocol using ssl communication standard).
HTTP protocol and SSL standard are not popular here. However, to configure https with nginx, you need to know several things:
The fixed port number of HTTPS is 443, which is different from port 80 of HTTP
SSL standard needs to introduce security certificate, so nginx.conf You need to specify the certificate and its corresponding key
The other is basically the same as http reverse agent, except that there are some differences in the configuration of the Server part.
 #HTTP server
  server {
      #monitor443Port.443Is a well-known port number, mainly used for HTTPS agreement
      listen       443 ssl;

      #Definition use www.xx.com visit
      server_name  www.helloworld.com;

      #ssl certificate file location (common certificate file format: crt/pem)
      ssl_certificate      cert.pem;
      #ssl certificate key location
      ssl_certificate_key  cert.key;

      #ssl configuration parameters (optional configuration)
      ssl_session_cache    shared:SSL:1m;
      ssl_session_timeout  5m;
      #Digital signature, MD5 is used here
      ssl_ciphers  HIGH:!aNULL:!MD5;
      ssl_prefer_server_ciphers  on;

      location / {
          root   /root;
          index  index.html index.htm;
      }
  }
Static site configuration
Sometimes, we need to configure static sites (that is, html files and a bunch of static resources).
For example: if all the static resources are in the / app/dist directory, we only need to nginx.conf Specify the home page and the host of this site.
The configuration is as follows:
worker_processes  1;

events {
    worker_connections  1024;
}

http {
    include       mime.types;
    default_type  application/octet-stream;
    sendfile        on;
    keepalive_timeout  65;

    gzip on;
    gzip_types text/plain application/x-javascript text/css application/xml text/javascript application/javascript image/jpeg image/gif image/png;
    gzip_vary on;

    server {
        listen       80;
        server_name  static.zp.cn;

        location / {
            root /app/dist;
            index index.html;
            #Forward any request to index.html
        }
    }
}
Then, add HOST:
127.0.0.1 static.zp.cn
At this point, access the static.zp.cn , you can access the static site.
Set up file server
Sometimes, the team needs to archive some data or materials, so the file server is essential. Using Nginx can quickly and easily build a simple file service.
Key configuration points in Nginx:
- Turn autoindex on to display the directory. It is not turned on by default.
- autoindex_exact_size turn on to display the size of the file.
- Autoindex_ When Localtime is turned on, the modification time of the file can be displayed.
- Root is used to set the root path to open as a file service.
- Charset is set to charset utf-8,gbk;, which can avoid the problem of Chinese scrambling (windows
After setting under the server, it is still garbled, and I haven't found a solution yet).
The simplest configuration is as follows:
autoindex on;# display contents
autoindex_exact_size on;# display files size
autoindex_localtime on;# Show file time

server {
    charset      utf-8,gbk; # After setting under windows Server, the code is still disorderly and there is no solution for now
    listen       9050 default_server;
    listen       [::]:9050 default_server;
    server_name  _;
    root         /share/fs;
}
Cross domain solutions
In the field of web development, the front and back-end separation mode is often used. In this mode, the front-end and the back-end are independent web applications, for example, the back-end is Java programs, and the front-end is React or Vue applications.
When the independent web app s access each other, there is bound to be a cross domain problem. There are generally two ways to solve cross domain problems:
1,CORS
Set the HTTP response header on the back-end server, and add the domain name you need to run to access into access control allow origin.
2,jsonp
According to the request, the back end constructs json data and returns it. The front end uses json to cross domains.
These two ideas are not discussed in this paper.
It should be noted that according to the first idea, nginx also provides a cross domain solution.
give an example: www.helloworld.com The website is composed of a front-end app and a back-end app. The front-end port number is 9000 and the back-end port number is 8080.
If the front-end and back-end use http for interaction, the request will be rejected because of cross domain problems. Let's see how nginx solves this problem:
First, in enable-cors.conf To set CORS in the file:
# allow origin list
set $ACAO '*';

# set single origin
if ($http_origin ~* (www.helloworld.com)$) {
  set $ACAO $http_origin;
}

if ($cors = "trueget") {
    add_header 'Access-Control-Allow-Origin' "$http_origin";
    add_header 'Access-Control-Allow-Credentials' 'true';
    add_header 'Access-Control-Allow-Methods' 'GET, POST, OPTIONS';
    add_header 'Access-Control-Allow-Headers' 'DNT,X-Mx-ReqToken,Keep-Alive,User-Agent,X-Requested-With,If-Modified-Since,Cache-Control,Content-Type';
}

if ($request_method = 'OPTIONS') {
  set $cors "${cors}options";
}

if ($request_method = 'GET') {
  set $cors "${cors}get";
}

if ($request_method = 'POST') {
  set $cors "${cors}post";
}
Next, include enable in your server- cors.conf To introduce cross domain configuration:
# ----------------------------------------------------
# This file is the nginx configuration fragment of the project
# You can include it directly in nginx config (recommended)
# Or copy to the existing nginx and configure by yourself
# www.helloworld.com  Domain name needs to be configured with dns hosts
# Among them, the api opens cors, which needs to cooperate with another configuration file in this directory
# ----------------------------------------------------
upstream front_server{
  server www.helloworld.com:9000;
}
upstream api_server{
  server www.helloworld.com:8080;
}

server {
  listen       80;
  server_name  www.helloworld.com;

  location ~ ^/api/ {
    include enable-cors.conf;
    proxy_pass http://api_server;
    rewrite "^/api/(.*)$" /$1 break;
  }

  location ~ ^/ {
    proxy_pass http://front_server;
  }
}
That's it.
By dunwu
https://github.com/dunwu/nginx-tutorial
Reference link:
Super practical Nginx minimalist tutorial, covering common scenes
https://mp.weixin.qq.com/s/kpLtu_aMdwxzLsZ9BowFJg