The first is the official document of litchi sect, which is not very detailed. It should be said that we must clarify the following points:
- When leaving the factory, SPI Flash comes with a U-Boot+Linux Kernel (it may have been burned before leaving the factory), which can be used directly. If you want to burn the firmware yourself, you need the next steps
- The migrated version of Sunxi tools must be used instead of the official version
- You must use the ported version of the U-Boot tool instead of the official version
- You can use the latest mainline Linux kernel
- The litchi pie Nano does not have a reset button, and uses an on-chip DDR1 DRAM with a size of 32MB and an external SPI Flash of 16MB. Chip architecture ARM926EJ-S
Compiling U-Boot
Download and install the cross compiler
wget http://releases.linaro.org/components/toolchain/binaries/7.2-2017.11/arm-linux-gnueabi/gcc-linaro-7.2.1-2017.11-x86_64_arm-linux-gnueabi.tar.xz
 The download above is quite slow. I don't know if it's the reason for my network. I directly windows Download Xunlei and copy it to the previously established shared directory
sudo tar -vxJf gcc-linaro-7.2.1-2017.11-x86_64_arm-linux-gnueabi.tar.xz --directory=/opt/
Unzip to /opt/Directory
sudo vim /etc/bash.bashrc
# Add the following at the end of the file
PATH="$PATH:/opt/gcc-linaro-7.2.1-2017.11-x86_64_arm-linux-gnueabi/bin"
# Add complete

# Make path effective
sudo source /etc/bash.bashrc
Be careful to add here sudo ,Otherwise use sudo The compiler will prompt you that you can't find it arm-linux-gnueabi-gcc
 Available at this time arm-linux-gnueabi-gcc -v Conduct tests; If it fails in the normal user status, pass sudo su Switch to root The user tries again;

Download and compile u-boot
 Because the small board of litchi pie is used, it is obtained from the code warehouse of litchi pie
sudo git clone https://github.com/Lichee-Pi/u-boot.git -b nano-v2018.01 # clone code from warehouse to local
cd u-boot                                   #Enter the u-boot directory
git branch -a                              #View branch
git checkout nano-v2018.01      #Switch to the desired branch
make ARCH=arm CROSS_COMPILE=arm-linux-gnueabi- licheepi_nano_spiflash_defconfig
# Here, tell make to use all cross compiling tools under Arm linux gnueabi. The target architecture is Arm. Set the default configuration to the spiflash support version of nano
# If there is no board with SPI flash, please replace it with licheepi_nano_defconfig
make ARCH=arm menuconfig   # Visual configuration
 If the prompt is not curses.h,It needs to be installed libncurses5-dev library
sudo apt-get install libncurses5-dev
 Execute compilation
make ARCH=arm CROSS_COMPILE=arm-linux-gnueabi- -j8   # -j8 refers to 8-thread compilation
 If prompted recipe for target 'scripts/dtc/pylibfdt/_libfdt.so' failed, lack python library
apt-get install swig python-dev python3-dev


4. upgrade gcc edition
 In execution make An error is reported during: Your GCC is older than 6.0 and is not supported ubuntu update gcc-6.1
 Solution: update GCC
 Method 1 download and compile yourself
(1)wget http://ftp.gnu.org/gnu/gcc/gcc-6.1.0/gcc-6.1.0.tar.gz # download the compressed package, which can be downloaded under windows
(2)tar -zvxf gcc-6.1.0.tar.gz --directory=/usr/local/                    #Unzip to / usr/local directory
(3)cd /usr/local/gcc-6.1.0                                                          #Enter directory
(4)sudo ./contrib/download_prerequisites                                #Download the required files
(5)sudo mkdir build                                                                  #Create build directory
(6)cd build                                                                                #Lost my way into build
(7)sudo ../configure -enable-checking=release -enable-languages=c,c++ -disable-multilib  #Generate Makefile
(8)sudo make -j4                                                                      #The process of executing make is very slow. Wait patiently
(9)sudo make install                                                                 #Execute make install
 Method 2 download ubuntu Packed gcc
(1)add to ppa To Library
         sudo add-apt-repository ppa:ubuntu-toolchain-r/test
         sudo apt-get update
(2)Install the latest version of gcc9
         sudo apt-get install gcc-9 g++-9
         sudo apt-get install gcc-9 g++-9
(3)Update system(Optional)
         sudo apt-get upgrade
(4)Force package updates to the latest version and resolve missing dependent packages
         sudo apt-get dist-upgrade
(5)Refresh db and locate
         sudo updatedb
         sudo ldconfig
         locate gcc | grep -E "/usr/bin/gcc-[0-9]"          #This directive allows you to view all installed gcc versions
         locate g++ | grep -E "/usr/bin/g\+\+-[0-9]"       #This directive allows you to view all installed g + + versions
(6)switch gcc/g++edition
         We use it normally gcc/g++Actually, they are/usr/bin/gcc and/usr/bin/g++, They point to/usr/bin The next real version gcc/g++program
         cd /usr/bin
         sudo rm gcc
         sudo ln -s gcc-9 gcc
         sudo rm g++
         sudo ln -s g++-9 g++
(7)View current gcc/g++edition
         gcc  -v
         g++  -v
It is said that because the price of Winbond has increased, the SPI Flash on the board has been replaced with xt25f128 made in mainland China. It is necessary to modify the arch / arm / DTS / suniv-f1c100s-licheepi-nano of U-Boot dts:
&spi0 {
	pinctrl-names = "default";
	pinctrl-0 = <&spi0_pins_a>;
	status = "okay";

	flash@0 {
		#address-cells = <1>;
		#size-cells = <1>;
		compatible = "winbond,xt25f128", "jedec,spi-nor";
		reg = <0>;
		spi-max-frequency = <40000000>;
	};
};
Then modify drivers/mtd/spi/spi_flash_ids.c. Add in Winbond section:
{"xt25f128", INFO(0x0b4018, 0x0, 64*1024, 256, RD_FULL | WR_QPP | SECT_4K) },
The transplanted version of U-Boot didn't do this step and didn't give any instructions. Isn't this an intentional pit?
Burn
It is necessary to burn U-Boot to SPI Flash. As for booting Linux, you can put the Linux image into SD and TF cards, or burn it directly into SPI Flash. Here I use the latter. For this purpose, we prepare a packaging script (because I use initramfs here, there is no need for additional rootfs):
dd if=/dev/zero of=firmware.bin bs=1M count=16 2>/dev/null
printf "create firmware.bin, size 0x%04x\n" $[1024*1024*16]

echo "+======================+"
echo "| Bootloader: 1MB"
echo "+----------------------+"
echo "| dtb:        32KB"
echo "+----------------------+"
echo "| zImage:     8MB"
echo "+----------------------+"
echo "| rootfs:     .MB"
echo "+======================+"

dd if=u-boot/u-boot-sunxi-with-spl.bin of=firmware.bin bs=1k conv=notrunc 2>/dev/null
printf "uboot: 0x0000, size 0x%04x\n" $[1024*1024]

dd if=linux/arch/arm/boot/dts/suniv-f1c100s-licheepi-nano.dtb of=firmware.bin bs=1k seek=1024 conv=notrunc 2>/dev/null
printf "dtb:   0x%04x, size 0x%04x\n" $[1024*1024] $[32*1024]

dd if=linux/arch/arm/boot/zImage of=firmware.bin bs=1k seek=$[1024+32] conv=notrunc 2>/dev/null
printf "zImage: 0x%04x, size 0x%04x\n" $[1024*(1024+32)] $[1024*1024*8]

#dd if=jffs2.img of=firmware.bin bs=1K seek=$((1024+32+8192)) conv=notrunc 2>/dev/null
printf "rootfs: 0x%04x, size 0x%04x\n" $[1024*(1024+32+1024*8)] $[1024*(1024*16 - 1024*9 - 32)]

echo "sf probe 0 50000000 0; sf erase 0 0x1000000; reset"
echo "sudo sunxi-fel -p spiflash-write 0 firmware.bin"
Note that this dtb file should be generated using the target dtbs compiled by linux, not the dtb file generated by U-Boot.
Then burn. According to the official documents, first pull down the CS pin of SPI Flash, and then operate after the chip enters FEL mode. The test found that the burn command of Sunxi tools did not seem to erase, resulting in no change in the data when I burn later.
Therefore, before burning a new U-Boot, we should first enter the factory U-Boot and empty the 16MB space of SPI Flash with the following command (note that there is no colon between 0 and 50000000, so don't be ignored) Official documents Cheated):
sf probe 0 50000000 0
sf erase 0 0x1000000
reset
Power on again. Since there is no SPL head, the chip will automatically enter FEL mode. Then you can use Sunxi tools to burn.
Such a hidden pit, that feeling, who tries, who knows
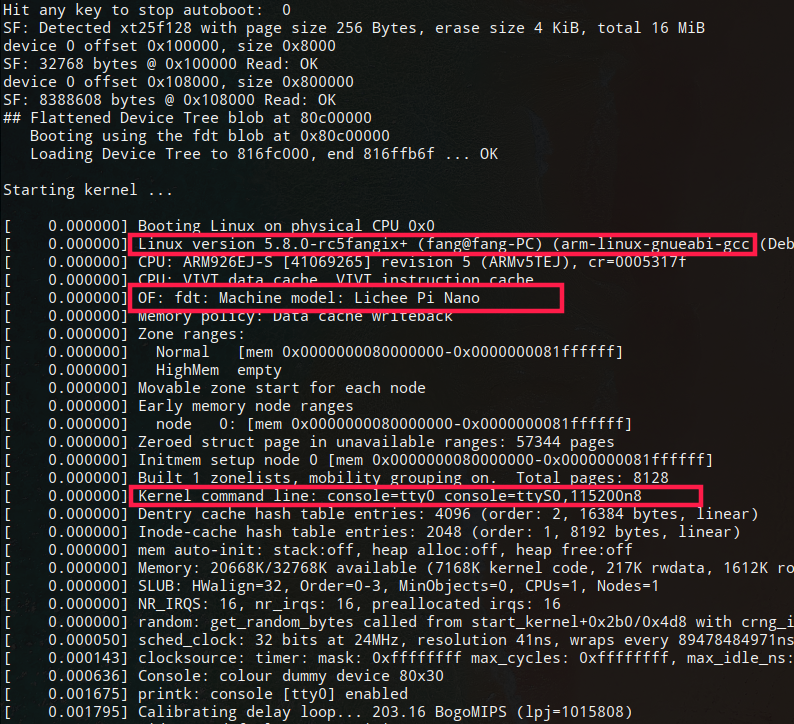
Boot Kernel
Power on again and execute in U-Boot:
setenv bootargs 'console=tty0 console=ttyS0,115200n8'
sf probe 0 50000000 0
sf read 0x80C00000 0x100000 0x8000
sf read 0x80008000 0x108000 0x800000
bootz 0x80008000 - 0x80C00000
If your kernel image is on the SD card:
setenv bootargs 'console=tty0 console=ttyS0,115200n8'
load mmc 0:1 0x80C00000 suniv-f1c100s-licheepi-nano.dtb
load mmc 0:1 0x80008000 zImage
bootz 0x80008000 - 0x80C00000
Final effect
 There is always a problem when users log in. When they have closed the password, they still prompt the wrong password. Setting a valid password is still the wrong password, damn it. Finally, you simply don't need to log in.
Draw your own board
https://www.thirtythreeforty.net/posts/2019/12/my-business-card-runs-linux/#source-code
Source code:
https://github.com/thirtythreeforty/businesscard-linux
The circuit principle diagram:
https://www.thirtythreeforty.net/posts/2019/12/my-business-card-runs-linux/businesscard.pdf
FC100s technical documentation:
https://www.thirtythreeforty.net/media/F1C100s_Datasheet_V1.0.pdf
https://www.thirtythreeforty.net/media/Allwinner_F1C600_User_Manual_V1.0.pdf