introduction
You must be familiar with RabbitMq. We often use it for asynchronous communication between services, such as SMS, log, e-mail sending and other business scenarios. However, in the process of using RabbitMq, we will encounter the problem of message loss and the need to delay consuming messages. I believe you will find the answer you want through this article, Let's have a look.
Message reliability
A message goes through the following process in RabbitMq from sending to receiving, as shown in the figure:
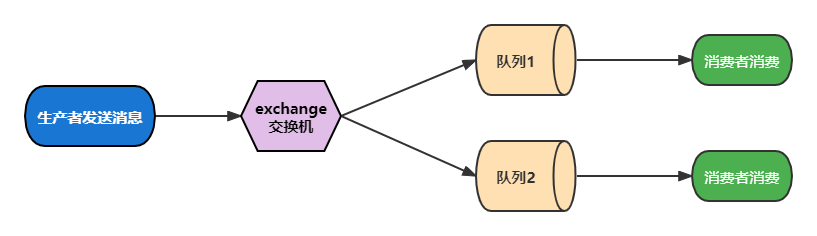
In each step in the figure above, there may be message loss. The reasons for message loss include the following:
- Lost when sending: messages are lost during sending to exchange; The message arrived at exchange successfully, but was lost in the process of sending to queue
- The mq service is down, and the messages in the queue are lost
- The consumer successfully received the message, but the message was not consumed, and the service was down, resulting in message loss
RabbitMq provides its own solutions to the above problems, as follows:
- Producer recognition mechanism
- Message persistent storage
- Consumer recognition mechanism
- Failure retry mechanism
Through the above mechanisms, we can solve the problem of message loss and ensure the reliability of messages. Next, we use a case to demonstrate the above four mechanisms (a RabbitMq service needs to be built in advance, which will not be repeated) to realize the reliable transmission of messages.
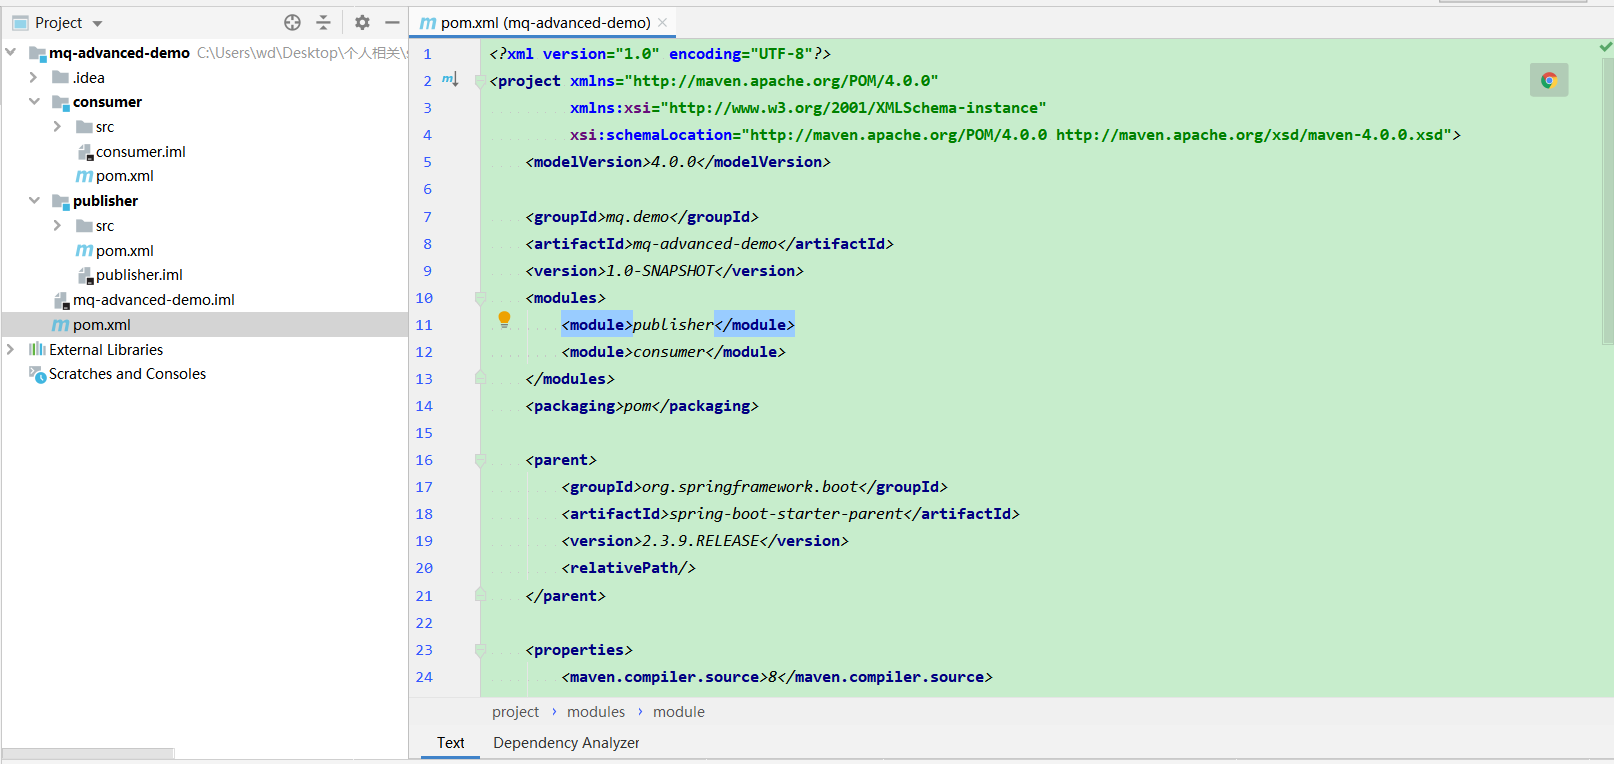
1. Project construction
First, create the pom parent project MQ advanced demo, pom The XML configuration is as follows:
<?xml version="1.0" encoding="UTF-8"?>
<project xmlns="http://maven.apache.org/POM/4.0.0"
         xmlns:xsi="http://www.w3.org/2001/XMLSchema-instance"
         xsi:schemaLocation="http://maven.apache.org/POM/4.0.0 http://maven.apache.org/xsd/maven-4.0.0.xsd">
    <modelVersion>4.0.0</modelVersion>

    <groupId>mq.demo</groupId>
    <artifactId>mq-advanced-demo</artifactId>
    <version>1.0-SNAPSHOT</version>
    <modules>
        <module>publisher</module>
        <module>consumer</module>
    </modules>
    <packaging>pom</packaging>

    <parent>
        <groupId>org.springframework.boot</groupId>
        <artifactId>spring-boot-starter-parent</artifactId>
        <version>2.3.9.RELEASE</version>
        <relativePath/>
    </parent>

    <properties>
        <maven.compiler.source>8</maven.compiler.source>
        <maven.compiler.target>8</maven.compiler.target>
    </properties>

    <dependencies>
        <dependency>
            <groupId>org.projectlombok</groupId>
            <artifactId>lombok</artifactId>
        </dependency>
        <!--AMQP Dependency, including RabbitMQ-->
        <dependency>
            <groupId>org.springframework.boot</groupId>
            <artifactId>spring-boot-starter-amqp</artifactId>
        </dependency>
        <!--unit testing -->
        <dependency>
            <groupId>org.springframework.boot</groupId>
            <artifactId>spring-boot-starter-test</artifactId>
        </dependency>
        <dependency>
            <groupId>com.fasterxml.jackson.core</groupId>
            <artifactId>jackson-databind</artifactId>
        </dependency>
    </dependencies>
</project>
Then create sub projects publisher and consumer respectively:
publisher's POM xml:
<?xml version="1.0" encoding="UTF-8"?>
<project xmlns="http://maven.apache.org/POM/4.0.0"
         xmlns:xsi="http://www.w3.org/2001/XMLSchema-instance"
         xsi:schemaLocation="http://maven.apache.org/POM/4.0.0 http://maven.apache.org/xsd/maven-4.0.0.xsd">
    <parent>
        <artifactId>mq-advanced-demo</artifactId>
        <groupId>mq.demo</groupId>
        <version>1.0-SNAPSHOT</version>
    </parent>
    <modelVersion>4.0.0</modelVersion>

    <artifactId>publisher</artifactId>

    <properties>
        <maven.compiler.source>8</maven.compiler.source>
        <maven.compiler.target>8</maven.compiler.target>
    </properties>

</project>
POM of consumer xml:
<?xml version="1.0" encoding="UTF-8"?>
<project xmlns="http://maven.apache.org/POM/4.0.0"
         xmlns:xsi="http://www.w3.org/2001/XMLSchema-instance"
         xsi:schemaLocation="http://maven.apache.org/POM/4.0.0 http://maven.apache.org/xsd/maven-4.0.0.xsd">
    <parent>
        <artifactId>mq-advanced-demo</artifactId>
        <groupId>mq.demo</groupId>
        <version>1.0-SNAPSHOT</version>
    </parent>
    <modelVersion>4.0.0</modelVersion>

    <artifactId>consumer</artifactId>

    <properties>
        <maven.compiler.source>8</maven.compiler.source>
        <maven.compiler.target>8</maven.compiler.target>
    </properties>

</project>
The overall project structure is as follows:
So far, the project model has been basically built (the complete code of the project can be obtained at the end of the text).
2. Producer recognition mechanism
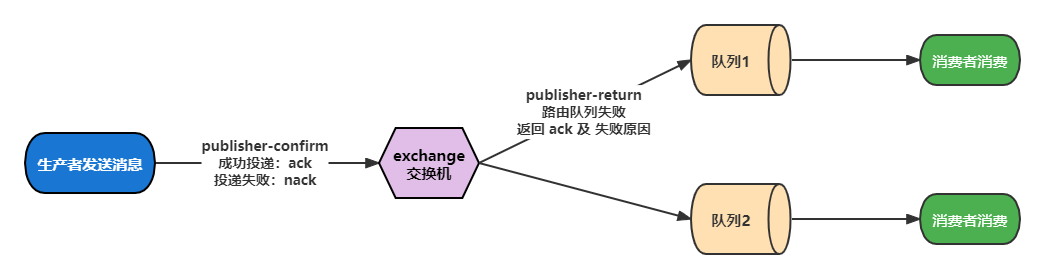
RabbitMQ provides a producer confirmation mechanism to avoid message loss during sending to MQ. This mechanism must assign a unique ID to each message. After the message is sent to MQ, the result will be returned to the sender, indicating whether the message is processed successfully.
There are two returned results:
- Publisher confirm: the sender confirms that the message is successfully delivered to the switch and returns ack; If the message is not delivered to the switch, nack is returned
- Publisher return: sender's receipt: the message was successfully delivered to the switch, but was not routed to the queue. ack returned, and the reason for routing failure
The diagram is as follows:
Let's code and implement it. First, modify the application. In the publisher service YML, add the following:
logging:
  pattern:
    dateformat: HH:mm:ss
  level:
    mq: debug
spring:
  rabbitmq:
    # ip address of rabbitMQ
    host: 127.0.0.1
    # port
    port: 5672
    # Cluster mode configuration
    # addresses: 127.0.0.1:8071, 127.0.0.1:8072, 127.0.0.1:8073
    username: admin
    password: 123456
    virtual-host: /
    # Configuration of consumer confirmation mechanism
    # Open publisher confirm,
    # Two types are supported here: simple: synchronize and wait for the confirm result until timeout;
    # correlated: asynchronous callback, defining ConfirmCallback, which will be called back when MQ returns the result
    publisher-confirm-type: correlated
    # Publish returns: enable the publish return function, which is also based on the callback mechanism, but defines the ReturnCallback
    publisher-returns: true
   	# Define the policy when message routing fails. true, ReturnCallback will be called; false: the message will be discarded directly
    template:
      mandatory: true
Then define the ReturnCallback in the code. Each RabbitTemplate can only be configured with one ReturnCallback. Therefore, it needs to be configured when the project is loaded. Create the CommonConfig class under the congfig package:
package mq.config;

import lombok.extern.slf4j.Slf4j;
import org.springframework.amqp.rabbit.core.RabbitTemplate;
import org.springframework.beans.BeansException;
import org.springframework.context.ApplicationContext;
import org.springframework.context.ApplicationContextAware;
import org.springframework.context.annotation.Configuration;

@Slf4j
@Configuration
public class CommonConfig implements ApplicationContextAware {

    @Override
    public void setApplicationContext(ApplicationContext applicationContext) throws BeansException {
        // Gets the RabbitTemplate object
        RabbitTemplate rabbitTemplate = applicationContext.getBean(RabbitTemplate.class);
        // Configure ReturnCallback
        rabbitTemplate.setReturnCallback((message, replyCode, replyText, exchange, routingKey) -> {
            // Log
            log.error("Failed to send message to queue, response code:{}, Failure reason:{}, Switch: {}, route key: {}, news: {}",
                     replyCode, replyText, exchange, routingKey, message.toString());
            // Resend the message if necessary
        });
    }
}
Next, define ConfirmCallback, which can be specified when sending messages, because the logic of success or failure of each business processing confirm is not necessarily the same. Create the exchange and queue on the mq console in advance, and create the SpringAmqpTest class under the test package under the publisher Service:
package mq.spring;

import lombok.extern.slf4j.Slf4j;
import org.junit.Test;
import org.junit.runner.RunWith;
import org.springframework.amqp.core.Message;
import org.springframework.amqp.core.MessageBuilder;
import org.springframework.amqp.core.MessageDeliveryMode;
import org.springframework.amqp.rabbit.connection.CorrelationData;
import org.springframework.amqp.rabbit.core.RabbitTemplate;
import org.springframework.beans.factory.annotation.Autowired;
import org.springframework.boot.test.context.SpringBootTest;
import org.springframework.test.context.junit4.SpringRunner;

import java.nio.charset.StandardCharsets;
import java.util.UUID;

@Slf4j
@RunWith(SpringRunner.class)
@SpringBootTest
public class SpringAmqpTest {
	@Autowired
	private RabbitTemplate rabbitTemplate;

	@Test
	public void testSendMessage2SimpleQueue() throws InterruptedException {
		// 1. Prepare message
		String message = "hello, spring amqp!";
		// 2. Prepare CorrelationData
		// 2.1. Message ID
		CorrelationData correlationData = new CorrelationData(UUID.randomUUID().toString());
		// 2.2. Prepare ConfirmCallback
		correlationData.getFuture().addCallback(result -> {
			// Judgment result
			if (result.isAck()) {
				// ACK
				log.debug("The message was successfully delivered to the switch! news ID: {}", correlationData.getId());
			} else {
				// NACK
				log.error("Message delivery to switch failed! news ID: {},reason:{}", correlationData.getId(), result.getReason());
				// Resend message
			}
		}, ex -> {
			// Log
			log.error("Message sending exception, ID:{}, reason{}", correlationData.getId(), ex.getMessage());
			// You can resend the message
		});
		// 3. To send a message, create an mqtest switch and bind a routingKey as mqtest_queue, which can be modified according to the actual situation
		rabbitTemplate.convertAndSend("mqtest", "mqtest_queue", message, correlationData);

		// Sleep for a while and wait for ack receipt
		Thread.sleep(2000);
	}
}
Execute the test class and print the log as follows:

Abnormal conditions can be tested by ourselves.
3. Message persistent storage
The producer confirmation mechanism can ensure that messages are delivered to the queue of RabbitMQ, but after messages are sent to RabbitMQ, sudden downtime may also lead to message loss.
To ensure that messages are safely saved in RabbitMQ, the message persistence mechanism must be enabled, that is, switch persistence, queue persistence and message persistence.
By default, the switches, queues and messages declared by springAmqp are persistent and do not need to be specially specified, that is, the Durability attribute is Durable.
4. Consumer recognition mechanism
RabbitMQ is a burn after reading mechanism. RabbitMQ confirms that the message will be deleted immediately after being consumed by consumers.
RabbitMQ confirms whether the consumer has successfully processed the message through the consumer receipt: after obtaining the message, the consumer sends an ACK receipt to RabbitMQ to indicate that he has processed the message.
Spring AMQP allows you to configure three confirmation modes:
- Manual: manual ack requires api to send ack after the end of the business code, though flexible, but it will improve the encoding complexity.
- auto: auto ack. If there is no exception, ACK is returned; If an exception is thrown, nack will be returned and the message will be re queued until there is no exception. You can also set the maximum number of retries. After that, it will be sent to the queue dedicated to collecting error messages for further processing
- none: turn off ack. MQ assumes that the consumer will process the message successfully after obtaining it, so the message will be deleted immediately after delivery (message delivery is unreliable and may be lost)
Generally, we can choose to use auto mode, and then code it.
Application to consumer service YML add the following:
logging:
  pattern:
    dateformat: HH:mm:ss
  level:
    mq: debug
spring:
  rabbitmq:
    #ip address of rabbitMQ
    host: 127.0.0.1
    #port
    port: 5672
    #Cluster mode configuration
    #addresses: 127.0.0.1:8071, 127.0.0.1:8072, 127.0.0.1:8073
    username: admin
    password: 123456
    virtual-host: /
    listener:
      simple:
        prefetch: 1
        acknowledge-mode: auto
Add the SpringRabbitListener class under the listener package:
package mq.listener;

import lombok.extern.slf4j.Slf4j;
import org.springframework.amqp.rabbit.annotation.RabbitListener;
import org.springframework.stereotype.Component;

@Slf4j
@Component
public class SpringRabbitListener {
	@RabbitListener(queues = "mqtest_queue")
	public void listenSimpleQueue(String msg) {
		log.debug("Consumer received mqtest_queue Message:[" + msg + "]");
		//System.out.println(1 / 0);
		log.info("Consumer processed the message successfully!");
	}
}
Start the service and the message is successfully consumed:

However, if an exception occurs during message processing, the message will continue to rejoin the queue and consume, resulting in a surge in cpu. At this time, the message needs to be processed in combination with the failure retry mechanism.
5. Failure retry mechanism
We can use Spring's retry mechanism to retry locally when consumers have exceptions, instead of unlimited requests to the mq queue to modify the application of the consumer service YML file:
logging:
  pattern:
    dateformat: HH:mm:ss
  level:
    mq: debug
spring:
  rabbitmq:
    #ip address of rabbitMQ
    host: 127.0.0.1
    #port
    port: 5672
    #Cluster mode configuration
    #addresses: 127.0.0.1:8071, 127.0.0.1:8072, 127.0.0.1:8073
    username: admin
    password: 123456
    virtual-host: /
    listener:
      simple:
        prefetch: 1
        acknowledge-mode: auto
        # Failed to retry
        retry:
          # Failed to open consumer. Try again
          enabled: true
          # The initial failure wait time is 1 second
          initial-interval: 1000
          # Failed waiting time multiple, next waiting time = multiplier * last interval
          multiplier: 3
          # max retries
          max-attempts: 4
          # true: stateless; False has status. If the transaction is included in the business, it is changed to false here
          stateless: true
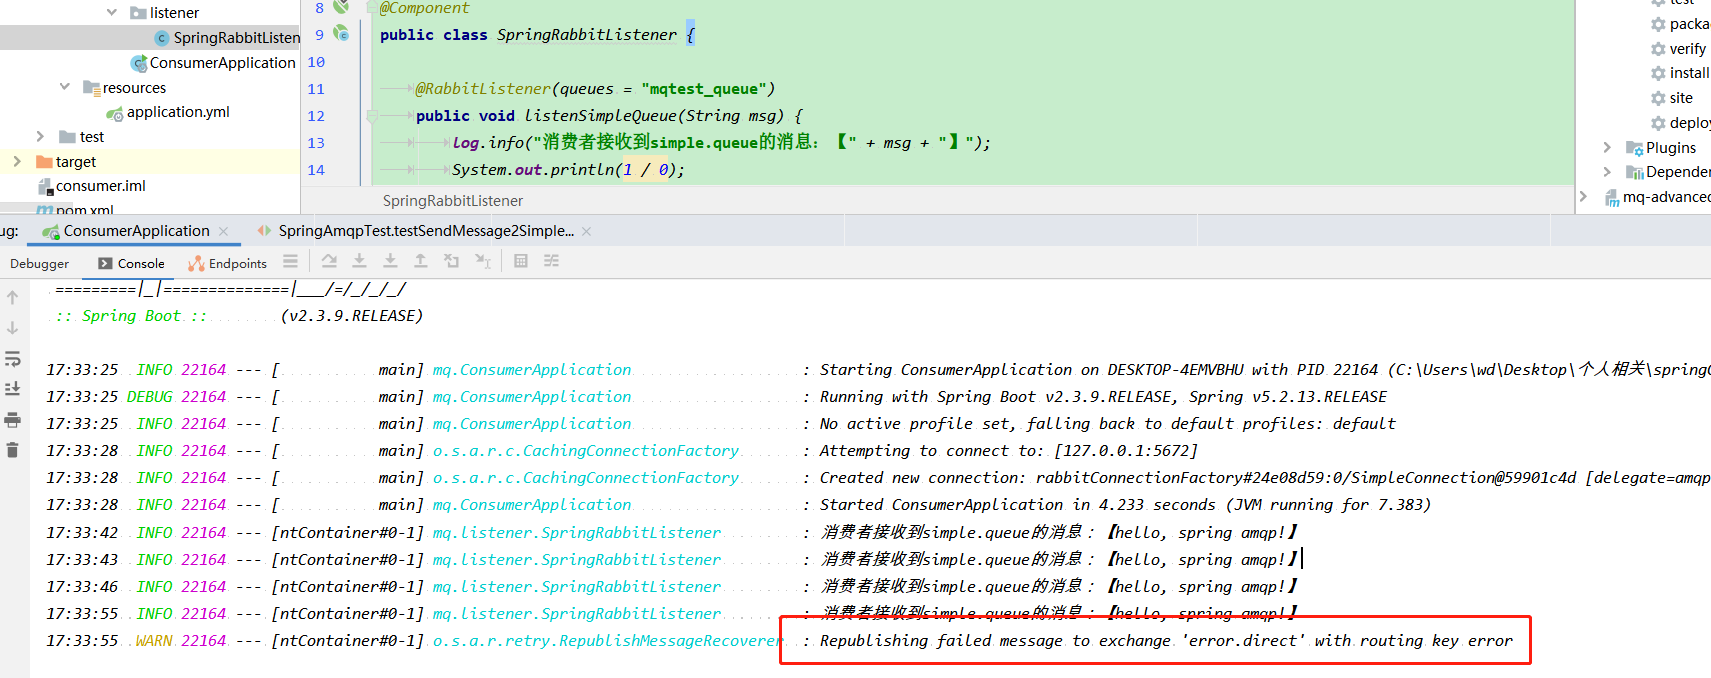
Next, resend the message to the queue, deliberately make the listening code generate an exception, start the consumer service, and print the log as follows:

As shown in the figure above, the message is retried 4 times and finally throws an exception, but the message is also deleted by mq, so we will get the following conclusions:
- When local retry is enabled, an exception is thrown during message processing. Instead of a request to the queue, it is retried locally by the consumer
- When the maximum number of retries is reached, Spring will return ack and the message will be discarded
After the retry mode is enabled, the number of retries is exhausted. If the message still fails, in order to prevent the message from being directly discarded, a MessageRecovery interface is required. It includes three different implementations:
- RejectAndDontRequeueRecoverer: after the retry is exhausted, reject directly and discard the message. This is the default
- ImmediateRequeueMessageRecoverer: after the retry is exhausted, nack is returned and the message is re queued
- RepublishMessageRecoverer: after the retry is exhausted, post the failure message to the specified switch
Obviously, the RepublishMessageRecoverer method is more friendly. After failure, messages can be delivered to a specified queue dedicated to storing exception messages for subsequent centralized processing.
Define the switch and queue for processing failure messages in the consumer service:
@Bean
public DirectExchange errorMessageExchange(){
    return new DirectExchange("error.direct");
}
@Bean
public Queue errorQueue(){
    return new Queue("error.queue", true);
}
@Bean
public Binding errorBinding(Queue errorQueue, DirectExchange errorMessageExchange){
    return BindingBuilder.bind(errorQueue).to(errorMessageExchange).with("error");
}
Define a RepublishMessageRecoverer to associate queues and switches:
@Bean
public MessageRecoverer republishMessageRecoverer(RabbitTemplate rabbitTemplate){
    return new RepublishMessageRecoverer(rabbitTemplate, "error.direct", "error");
}
After restarting the consumer service, you can find that the error message has been successfully sent to the specified queue:
6. Summary
Through the above case analysis, we can summarize the following points to ensure the reliable transmission of RabbitMq messages:
- Turn on the producer confirmation mechanism to ensure that the producer's messages can reach the queue
- Enable the persistence function to ensure that messages will not be lost in the queue before consumption
- Turn on the consumer confirmation mechanism to auto, and spring will complete the ack after confirming that the message is processed successfully
- Enable the consumer failure retry mechanism and set the MessageRecoverer. After multiple failed retries, the message will be delivered to the exception switch for subsequent centralized processing
Implement delay queue
When a message in a queue meets one of the following conditions, it can become a dead letter:
- Consumer uses basic Reject or basic NACK failed to declare consumption, and the request parameter of the message is set to false
- The message is an expired message. No one consumes it when it times out
- The queue message to be delivered is full and cannot be delivered
If the queue containing dead letters is configured with the Dead Letter Exchange attribute and a switch is specified, the dead letters in the queue will be delivered to the switch, which is called Dead Letter Exchange (DLX).
If the dead letter routing key parameter is also configured, the message will be sent to the specified queue by the dead letter switch, that is, the dead letter queue.
Next, in the consumer service, define a group of dead letter switches and dead letter queues:
	@Bean
	public DirectExchange dlExchange() {
		// Declare dead letter switch dl direct
		return new DirectExchange("dl.direct", true, false);
	}


	@Bean
	public Queue dlQueue() {
		// Declare the queue dl for storing dead letters queue
		return new Queue("dl.queue", true);
	}


	@Bean
	public Binding dlBinding() {
		// Bind dead letter queue to dead letter switch
		return BindingBuilder.bind(dlQueue()).to(dlExchange()).with("dl");
	}
In order to realize the delayed consumption of messages, we need to define a group of switches and queues that receive timeout messages, bind them, and set the timeout time to 10s:
@Bean
public DirectExchange ttlExchange(){
    return new DirectExchange("ttl.direct");
}

@Bean
public Queue ttlQueue(){
    return QueueBuilder.durable("ttl.queue")
        // Set the timeout of the queue, 10 seconds
        .ttl(10000)
        .deadLetterExchange("dl.direct")
        .deadLetterRoutingKey("dl")
        .build();
}

@Bean
public Binding ttlBinding(){
    return BindingBuilder.bind(ttlQueue()).to(ttlExchange()).with("ttl");
}
Listening timeout dead letter queue:
@RabbitListener(bindings = @QueueBinding(
			value = @Queue(name = "dl.queue", durable = "true"),
			exchange = @Exchange(name = "dl.direct"),
			key = "dl"
	))
	public void listenDlQueue(String msg) {
		log.info("Consumer received dl.queue Delayed message for:{}", msg);
	}
Send a message in publisher Service Test:
@Test
public void testTTLMessage() throws InterruptedException {
// 1. Prepare message
Message message = MessageBuilder
.withBody("hello, ttl messsage".getBytes(StandardCharsets.UTF_8))
.setDeliveryMode(MessageDeliveryMode.PERSISTENT)
.build();
// 2. Send message
rabbitTemplate.convertAndSend("ttl.direct", "ttl", message);
// 3. Log
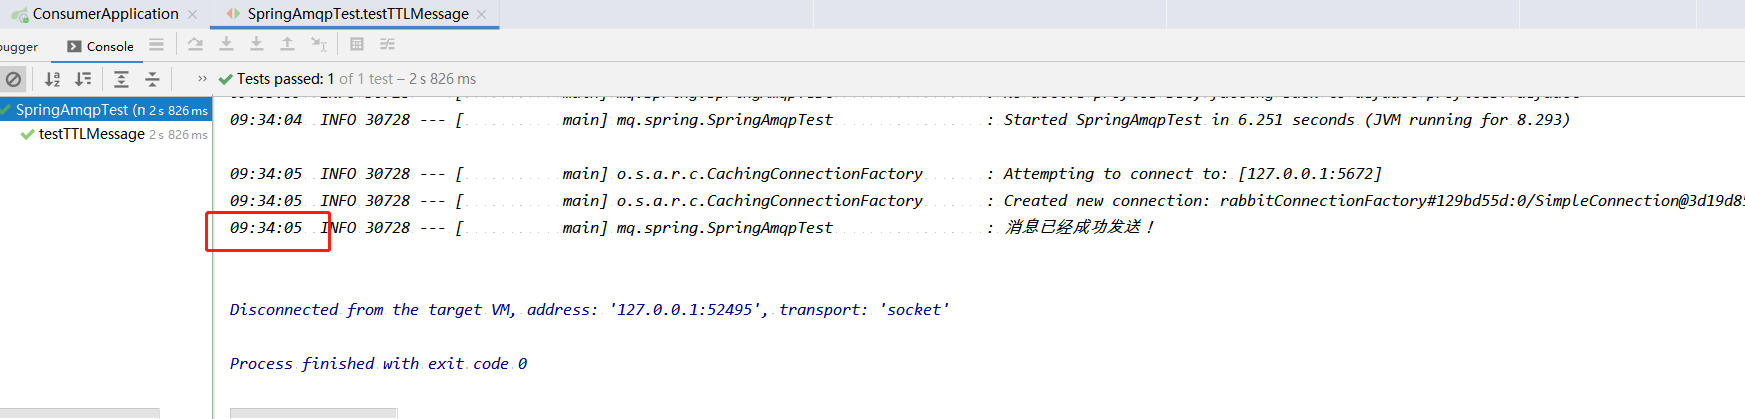
log.info("The message has been sent successfully!");
}
Restart the consumer service, execute the test code, and view the log:
View the log of consumer service:

By comparing the time of message sending and consumption, it is found that the difference between them is 10s, which is the same as the queue timeout we set, and the delayed message can be realized.
We can also set the message expiration time when sending a message:
	@Test
	public void testTTLMessage() throws InterruptedException {
		// 1. Prepare message
		Message message = MessageBuilder
				.withBody("hello, ttl messsage".getBytes(StandardCharsets.UTF_8))
				.setDeliveryMode(MessageDeliveryMode.PERSISTENT)
				//Set the timeout to 5s
				.setExpiration("5000")
				.build();
		// 2. Send message
		rabbitTemplate.convertAndSend("ttl.direct", "ttl", message);
		// 3. Log
		log.info("The message has been sent successfully!");
	}
Execute the test code and view the log:

View the log of consumer service:

It can be seen that the time difference between sending and consumption is 5s, which is the same as the message timeout we set.
Several usage scenarios of delay queue are listed below:
- Delay sending SMS
- If the user places an order and fails to pay within one hour, it will be automatically cancelled
- Make an appointment for the meeting and notify all participants in half an hour
Of course, we can also use timed tasks to achieve these, but it will add many meaningless queries. If the amount of data is large, it will cost performance.
To sum up, there are two main ways to set message timeout:
- Set the ttl attribute for the queue, and the messages that exceed the ttl time after entering the queue will become dead letters
- Set the ttl property for the message, and the queue will become dead letter after receiving the message for more than ttl time
Steps to delay consumption:
- Create a switch as a dead letter switch and bind a queue as a dead letter queue
- Set the queue timeout for the target queue of the message, and specify the dead letter switch and routing key
- Bind the destination queue of the message to the dead letter switch
- Consumer listens to dead letter queue to get timeout message
epilogue
This article explains RabbitMq's message reliability and delay queue solution in detail. In our usual development work, we can choose to use it in combination with specific business scenarios. I hope it can help you. We'll update it next time. Bye!
Pay attention to the official account spiral programming geek mq, which can get the source information of this article.