Detailed description of server configuration
Recently, the server has just been configured. For the sake of memorandum, this document will explain in detail how to configure the server and record all the problems that arise in the process of configuring the server.
-
Detailed description of server configuration
-
Installation Chapter
-
Installation of rpm for MySQL 5711
- View the MySQL version of CentOS and uninstall it
- Installation of MySQL 55 dependency does not require this dependency, but 57 must be otherwise the server component cannot be installed successfully
- Install MySQL in the correct order or the installation will fail
- Modify database coding
- Start MySQL
- Get MySQL initial password
- Log in to MySQL with the password obtained in the previous step and modify the initial password
- Open external login account
- Open port 3306
- MySQL self-startup
- JDK 170_45 Installation rpm
- WildFly 800Final installation configuration targz
- OpenOffice 413 Installs targz
- Installation of ActiveMQ 590
-
Installation of rpm for MySQL 5711
-
Installation Chapter
Installation Chapter
MySQL 5.7.11 Installation (rpm)
1. View the MySQL version of CentOS and uninstall it
rpm -qa | grep -i mysql
rpm -e --nodeps mysql-libs-*
2. Installation dependency (MySQL 5.5 does not need this dependency, but 5.7 must, otherwise the server component cannot be installed successfully)
rpm -ivh numactl-2.0.9-2.el6.x86_64.rpm
3. Install MySQL (the following installation sequence can not be wrong, otherwise the installation will fail)
rpm ivh mysql-community-common-5.7.11-1.el6.x86_64.rpm
rpm ivh mysql-community-libs-5.7.11-1.el6.x86_64.rpm
rpm ivh mysql-community-client-5.7.11-1.el6.x86_64.rpm
rpm ivh mysql-community-server-5.7.11-1.el6.x86_64.rpm
4. Modify database coding
In order to ensure that the database can handle Chinese correctly, we need to set the default encoding of the database as utf8.
vi /etc/my.cnfModify the/etc/my.cnf file and add the following:
[client]
default-character-set=utf8mb4
[mysqld]
character_set_server=utf8mb4
MySQL default database table names and database names are case-sensitive, so we will encounter errors when logging in:
Table 'xxx' doesn't exist
So you need to add the following to my.cnf file:
[mysqld]
lower_case_table_names = 1
The entire my.cnf file is as follows
# For advice on how to change settings please see
# http://dev.mysql.com/doc/refman/5.7/en/server-configuration-defaults.html[mysqld]
#
# Remove leading # and set to the amount of RAM for the most important data
# cache in MySQL. Start at 70% of total RAM for dedicated server, else 10%.
# innodb_buffer_pool_size = 128M
#
# Remove leading # to turn on a very important data integrity option: logging
# changes to the binary log between backups.
# log_bin
#
# Remove leading # to set options mainly useful for reporting servers.
# The server defaults are faster for transactions and fast SELECTs.
# Adjust sizes as needed, experiment to find the optimal values.
# join_buffer_size = 128M
# sort_buffer_size = 2M
# read_rnd_buffer_size = 2M
datadir=/var/lib/mysql
socket=/var/lib/mysql/mysql.sock
lower_case_table_names = 1
character_set_server=utf8mb4# Disabling symbolic-links is recommended to prevent assorted security risks symbolic-links=0
log-error=/var/log/mysqld.log
pid-file=/var/run/mysqld/mysqld.pid[client]
default-character-set=utf8mb4
The boldface is a new sentence. When the comment part of Italic character inserts the above statement, it may make it into two lines, which will cause errors when running.
5. Start MySQL
service mysqld start
6. Get MySQL initial password
grep 'temporary password' /var/log/mysqld.log
7. Log in to MySQL with the password obtained in the previous step and modify the initial password
mysql -uroot -p'Initial password'
ALTER USER 'root'@'localhost' IDENTIFIED BY 'New password';
8. Opening up external login accounts
Initialized root accounts can only be logged in locally. For example, in this project, proxy servers and application servers are required to access the database, but root accounts are not available. Although you can set the root account to be accessible to all ip s, it is not recommended. It is recommended to open an external access account database in the following ways:
GRANT ALL PRIVILEGES ON *.* TO 'Account number'@'%' IDENTIFIED BY 'Password' WITH GRANT OPTION;
Explain the above command: Give the account permission on all tables of all databases. Among them, ALL PRIVILEGES represents all rights, of course, you can also set the account only to view the rights, specific can Baidu. * * Represents all tables in all databases, such as dataBase sys_user for sys_user tables in dataBase databases. % It means that all addresses can be accessed. You can also specify specific addresses to be accessed, such as'192.168.1.1'.
9. Open port 3306
There are two ways to open a firewall:
    iptables -I INPUT -p tcp -m state --state NEW -m tcp --dport 3306 -j ACCEPT
    /etc/init.d/iptables save
    service iptables restart
vi /etc/sysconfig/iptables
-A INPUT -p tcp -m state --state NEW -m tcp --dport 61616 -j ACCEPT
service iptables restartPersonally, the first method is the most convenient, unlike the second method, which requires modification of the configuration file.
10. MySQL self-startup
Because mysqld is automatically added to the init.d folder when rpm is installed, and it is automatically added to the chkconfig boot directory, so only (or not?) Enter the following commands
chkconfig mysqld on
JDK 1.7.0_45 Installation (rpm)
1. View the original JDK environment in CentOs 6.5 and uninstall it
rpm -qa | grep jdk
rpm -e --nodeps java-1.6.0-openjdk-1.6.0.0-1.66.1.13.0.el6.x86_64
2. Installing JDK
rpm -ivh jdk-7u45-linux-x64.rpm
3. Configuration environment
Open the configuration file
vi /etc/profile
Add configuration information
JAVA_HOME=/usr/java/jdk1.7.0_45
PATH=$JAVA_HOME/bin:$PATH
CLASSPATH=.:$JAVA_HOME/lib/dt.jar:$JAVA_HOME/lib/tools.jar
export JAVA_HOME
export PATH
export CLASSPATH
Make the configuration file take effect immediately
source /etc/profile
WildFly 8.0.0.Final Installation Configuration (tar.gz)
Install JBoss. At first I used AS 7.1.1 Final, but there were always errors when deploying war files:
Failed to start service jboss.deployment.unit.
It took a long time to find this problem on stack overflow:
http://stackoverflow.com/questions/18855728/error-deploying-war-into-jboss-as-7-domain-mode-failed-to-process-phase-stru It turns out that the 7.1.1 version of jboss has a lot of bug s. It is explained in this article that: https://henk53.wordpress.com/2013/01/09/the-curious-case-of-jboss-as-7-1-2-and-7-1-3/ So I used Wildfly 8.0.0 instead of 7.1.1 as a container.
1. Installation
Copy the wildfly-8.0.0.Final.tar.gz file to the / home folder and decompress it.
tar -zxvf wildfly-8.0.0.Final.tar.gz
Then enter the wildfly directory
cd wildfly-8.0.0.Final
Where bin folder is the startup directory and standalone folder is the configuration and deployment folder
2. Configuring Outer Network Access
The default setting for wildfly is to allow only local access, so set up to allow all IP access to the server
Execute commands to enter the standalone/configuration folder
Open the configuration file
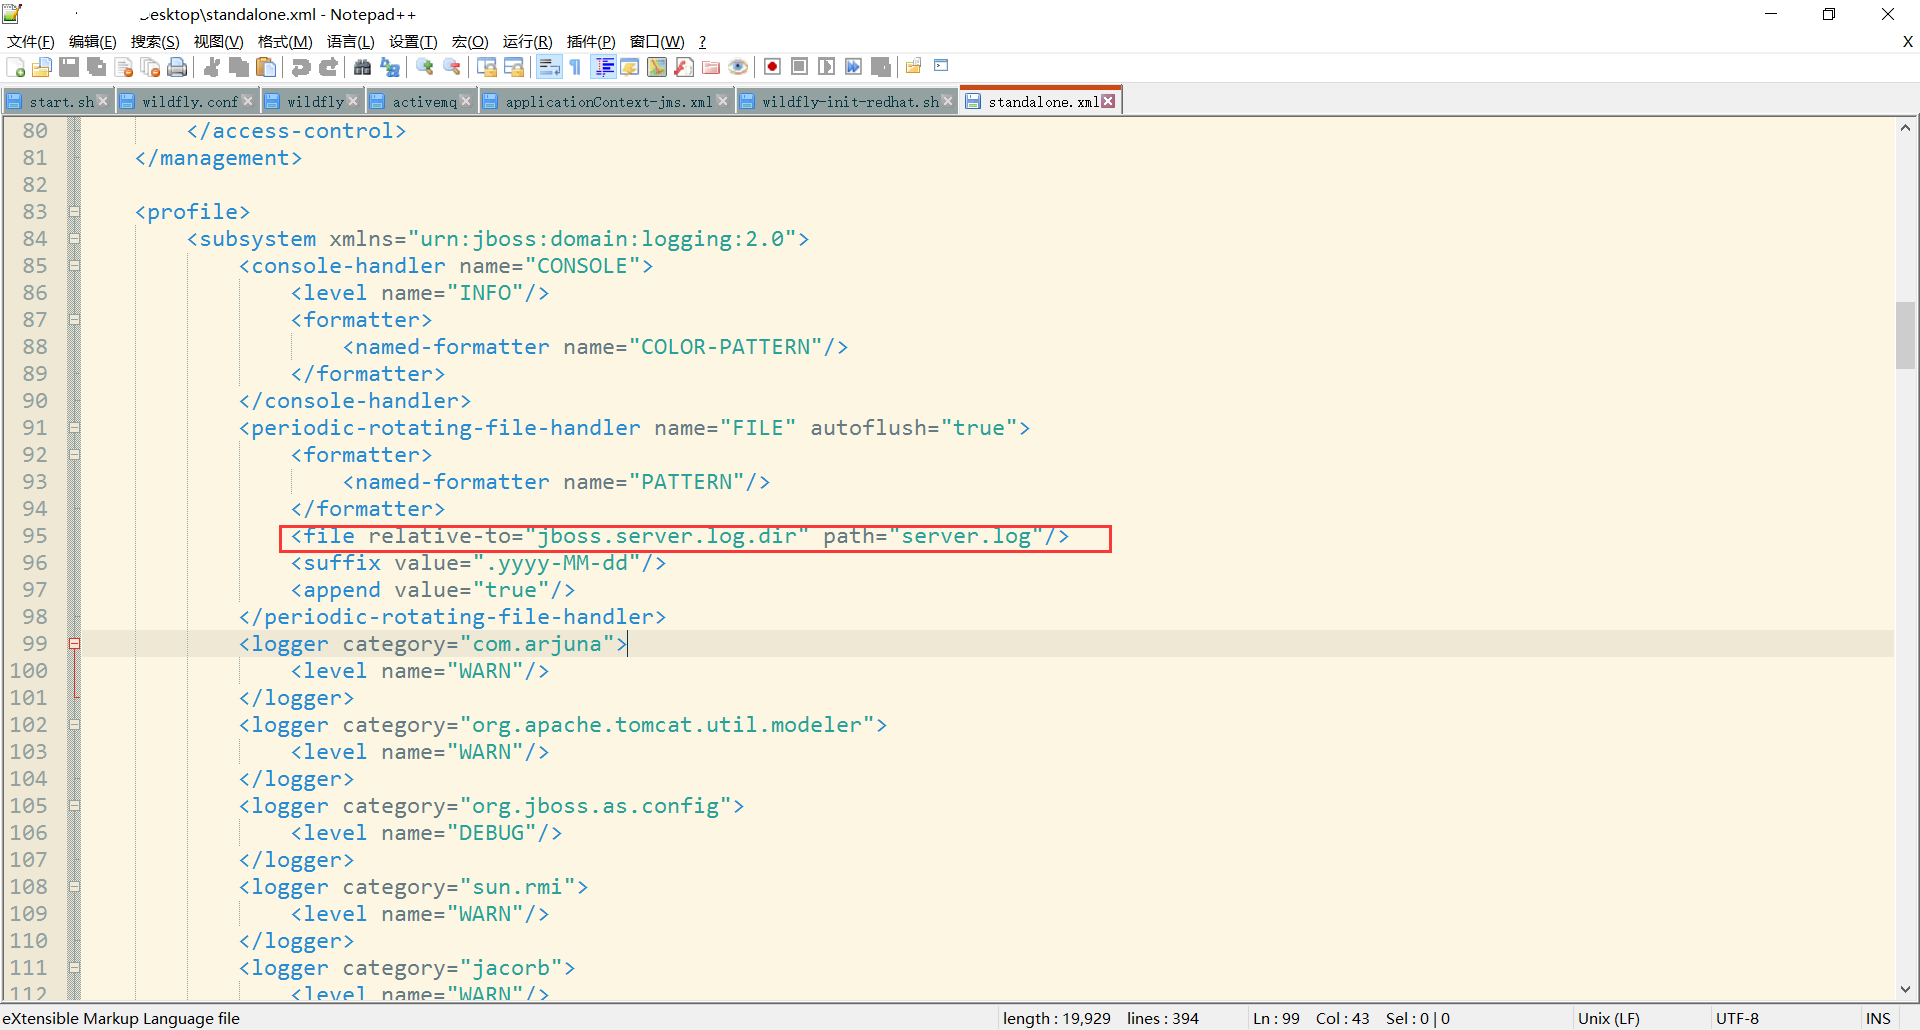
vi /home/wildfly-8.0.0.Final/standalone/configuration/standalone.xml
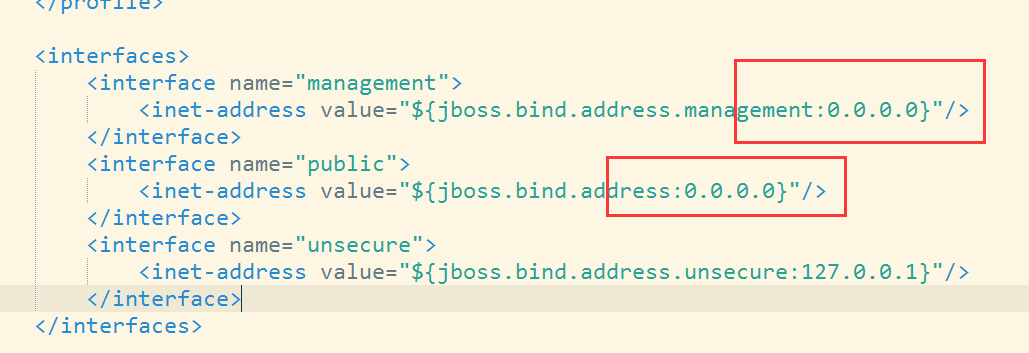
Modify 127.0.0.1 in the red box above to 0.0.0.0
So all users can log in.
3. Configure WildFly self-startup
Softlink the startup file configuration under wildfly to the init.d folder
ln -s /home/wildfly-8.0.0.Final/bin/init.d/wildfly-init-redhat.sh /etc/init.d/wildfly
Configure permissions for this soft link
chmod +x wildfly
Add to the list of bootstrappers
chkconfig --add wildfly
Open wildfly self-startup
chkconfig wildfly on
Modify configuration
vi /home/wildfly-8.0.0.Final/bin/init.d/wildfly.conf
Remove and modify the following comments 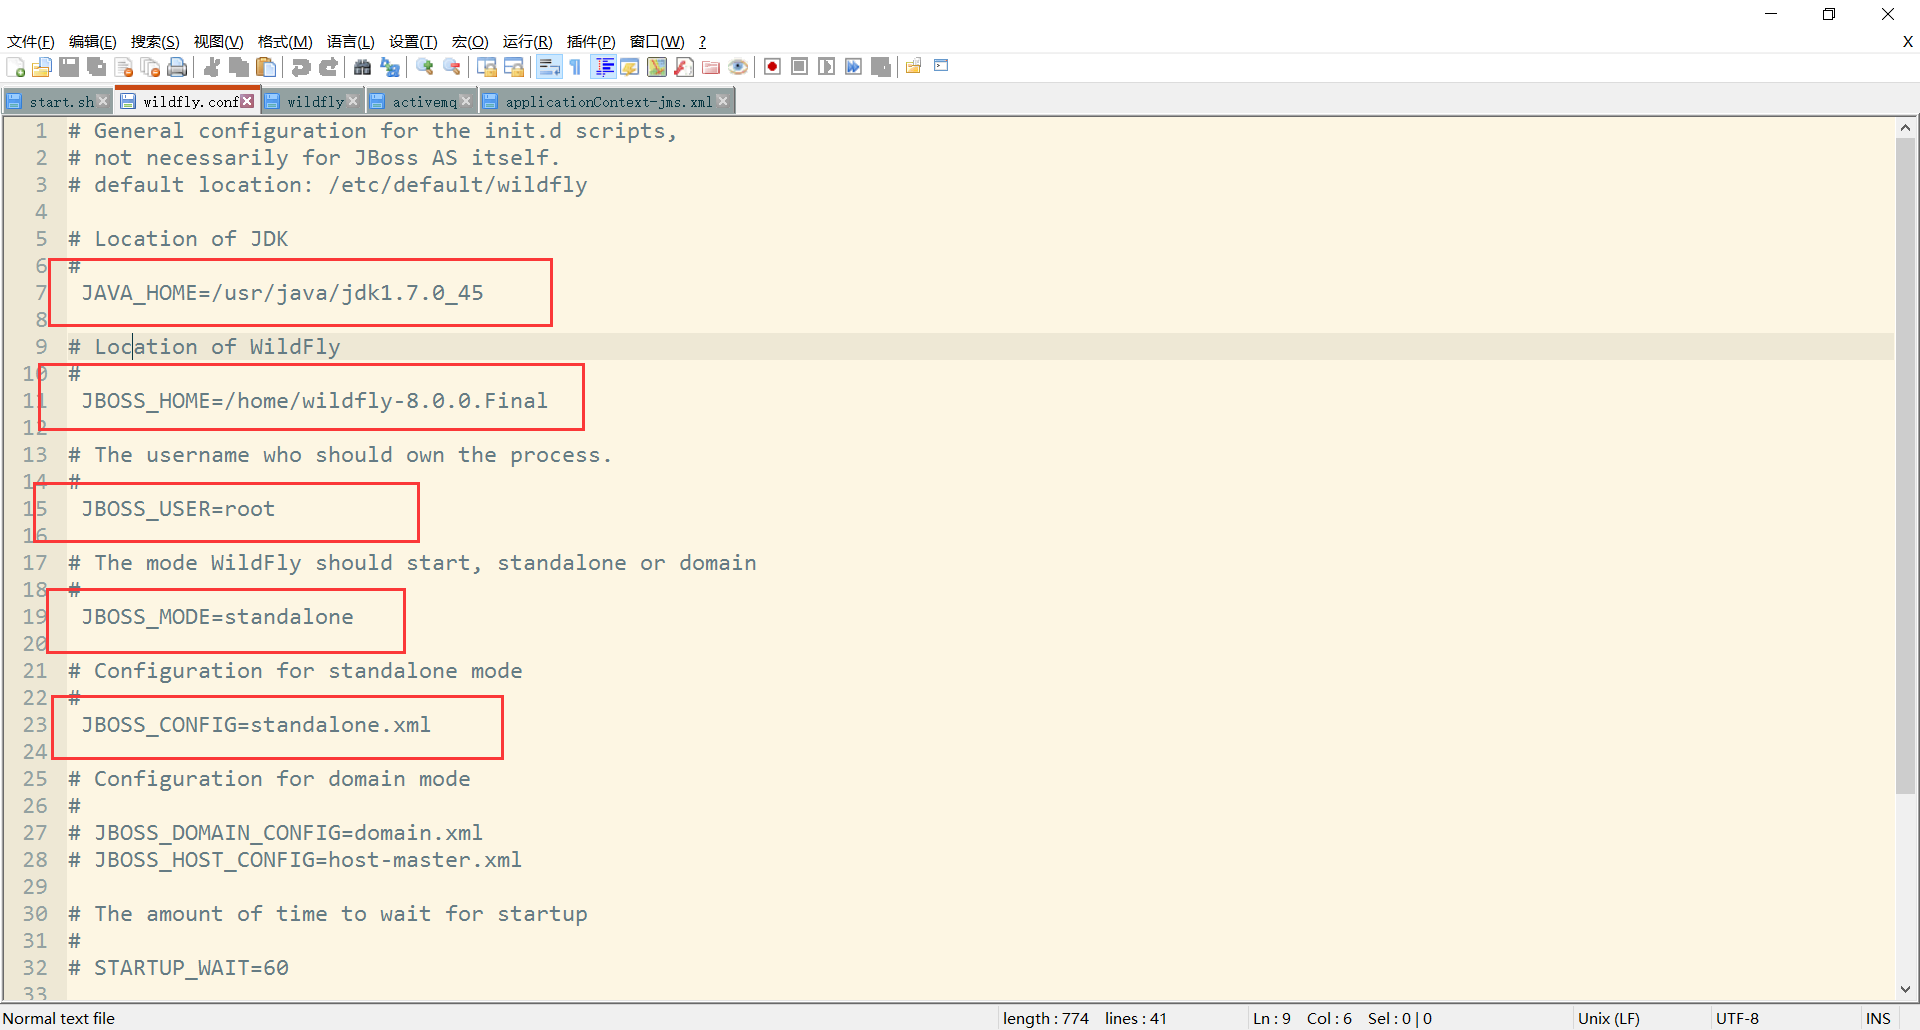
Amend to read
JAVA_HOME=/usr/java/jdk1.7.0_45
JBOSS_HOME=/home/wildfly-8.0.0.Final
JBOSS_USER=root
Modify the startup script
vi /home/wildfly-8.0.0.Final/bin/init.d/wildfly-init-redhat.sh
Find the following places 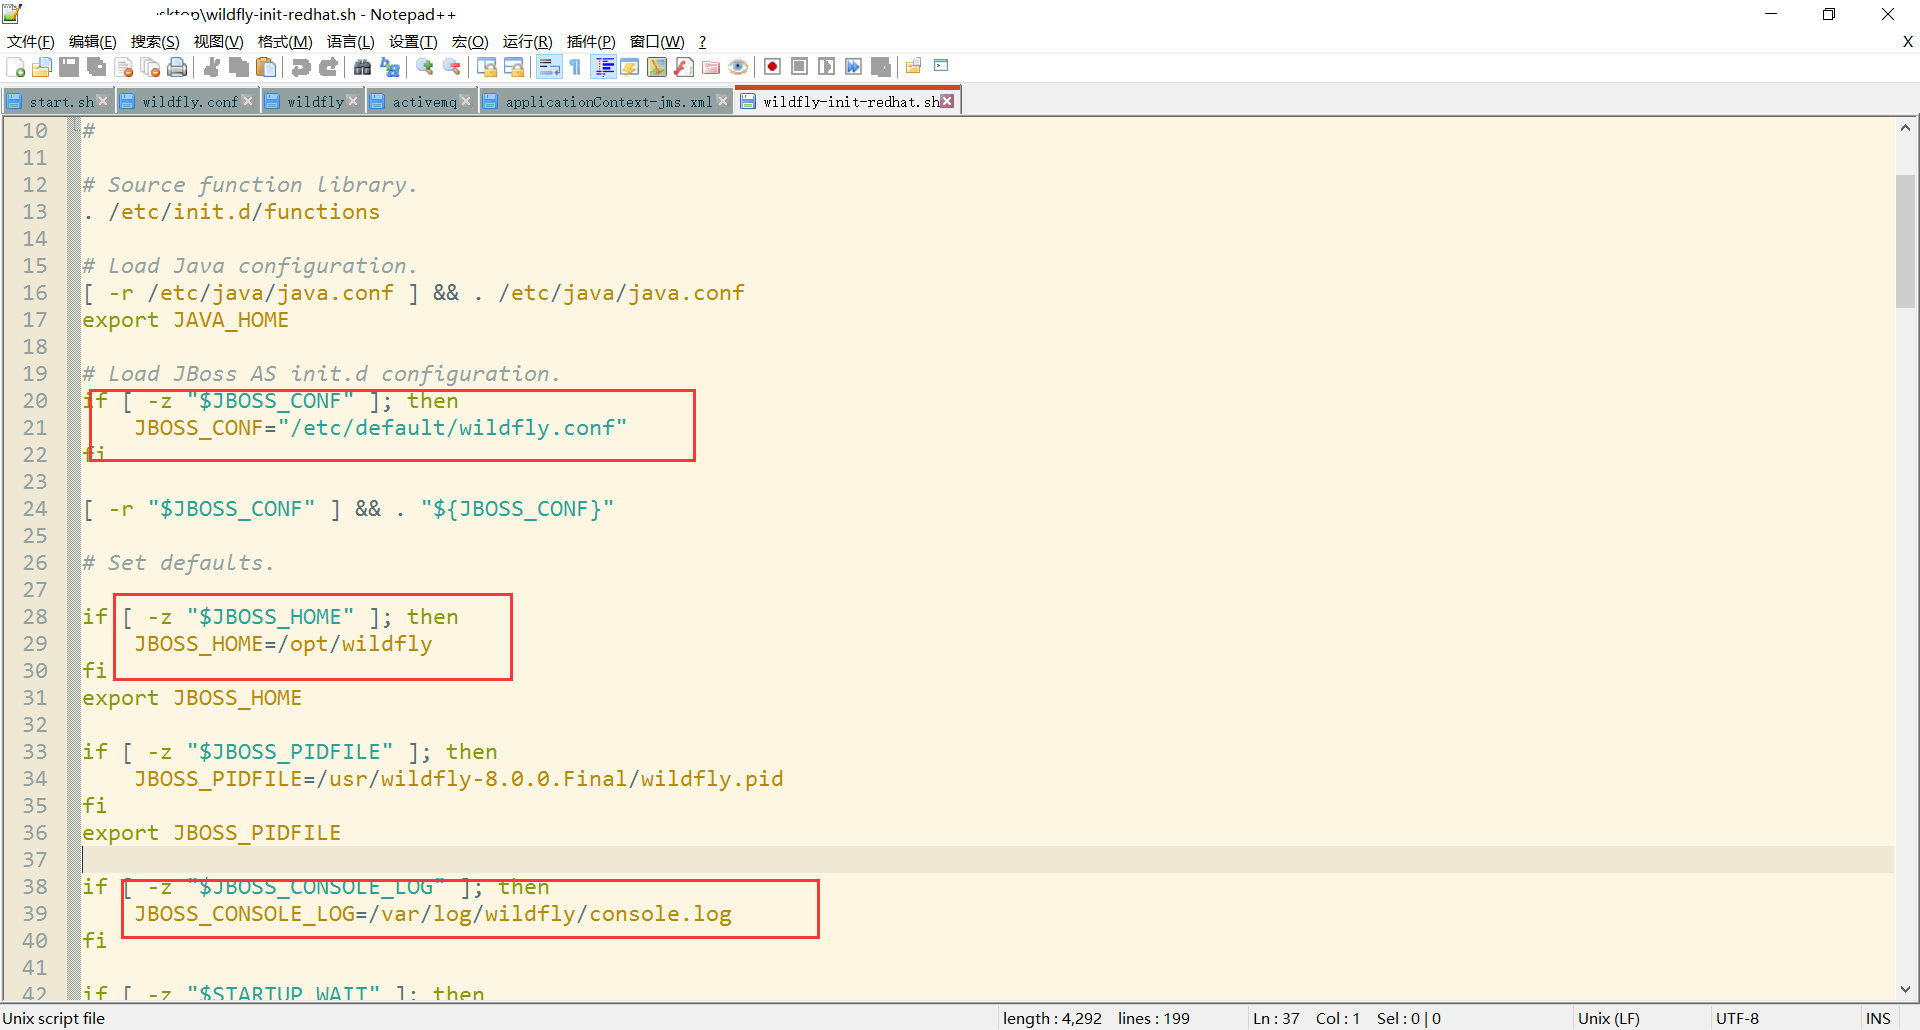
Amend to read:
JBOSS_HOME=/home/wildfly-8.0.0.Final
JBOSS_CONF=/home/wildfly-8.0.0.Final/bin/init.d/wildfly.conf
JBOSS_CONSOLE_LOG=/home/wildfly-8.0.0.Final/logs/console.log
Modify the log4j.properties of the project to output the log file to / home/wildfly-8.0.0.Final/logs 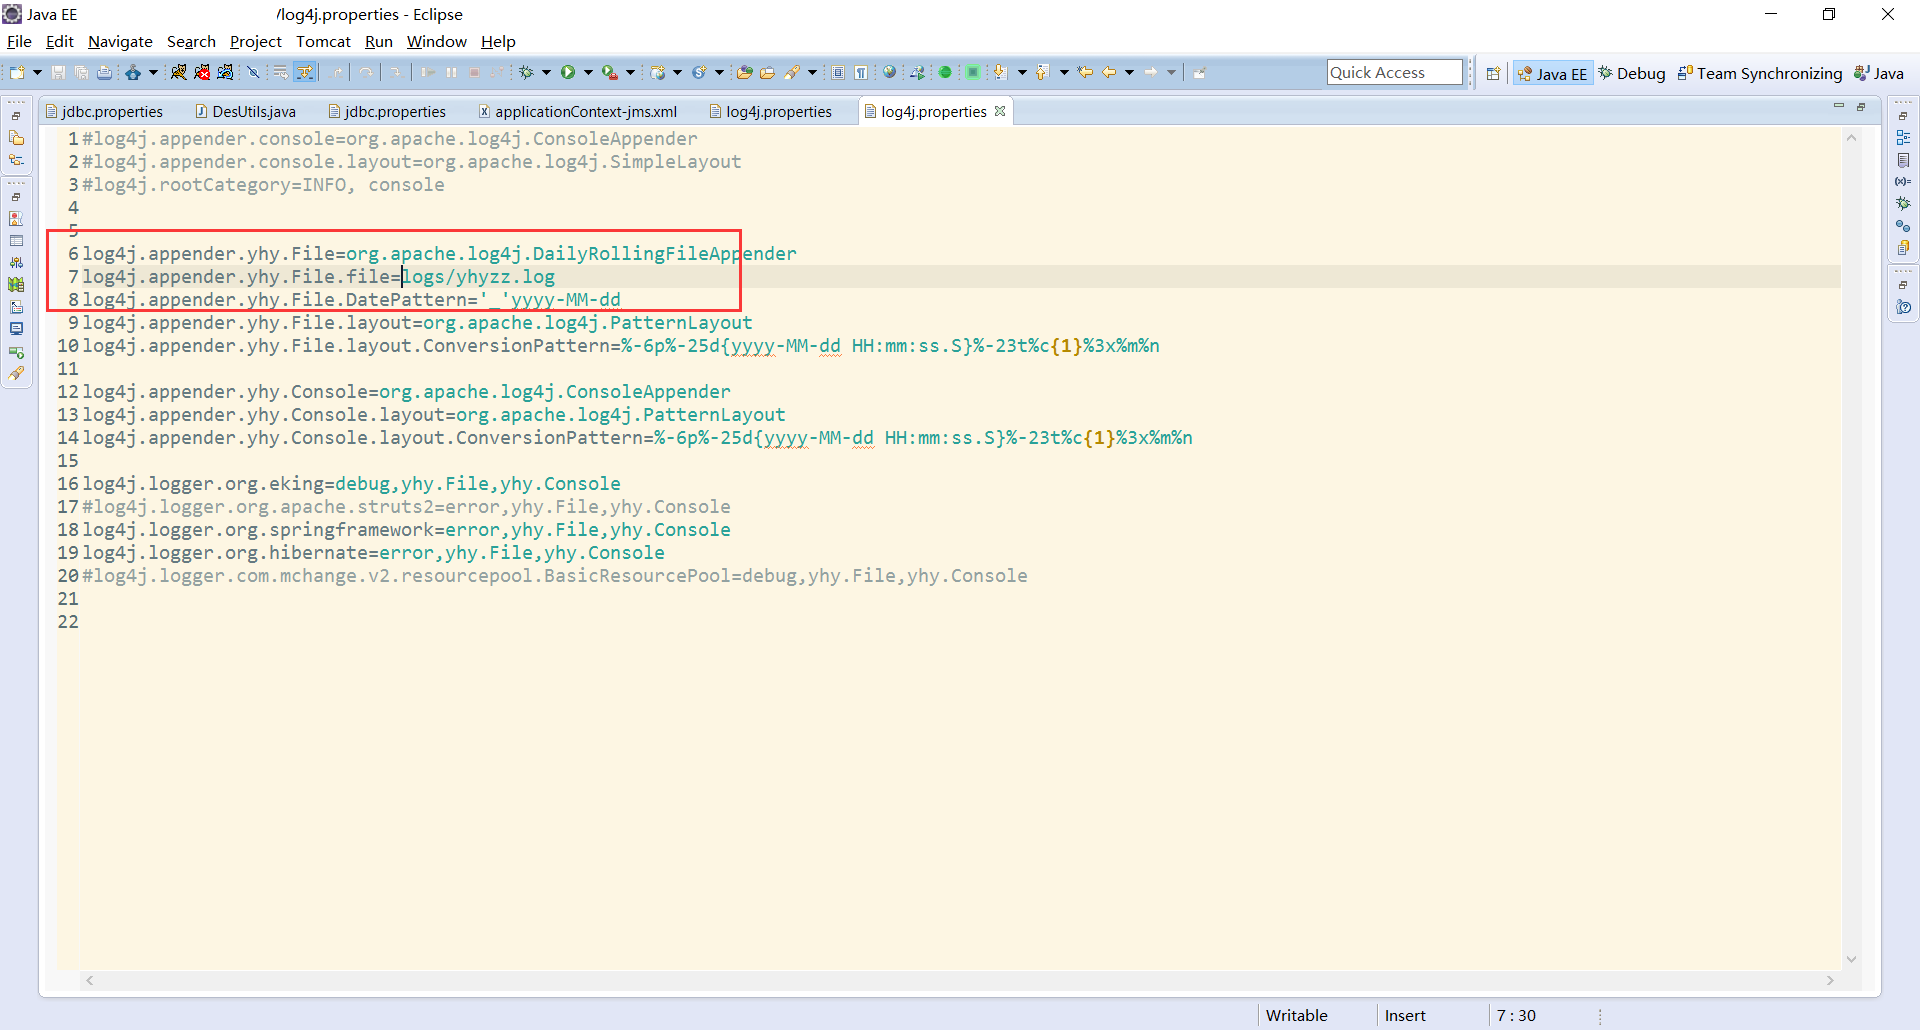
Edit the following file (if you want to change the location of server.log file)
vi /home/wildfly-8.0.0.Final/standalone/configuration/standalone.xml
Amendment to
/www/log/jboss/server.log
OpenOffice 4.1.3 Installation (tar.gz)
Unzip the folder under directory / home
tar -zxvf Apache_OpenOffice_4.1.3_Linux_x86-64_install-rpm_zh-CN.tar.gz
Enter the catalogue
cd /zh-CN/RPMS
Install all files in the directory
rpm -ivh openoffice*.rpm
One problem with openoffice is that if the openoffice service is turned on in the program, it will report an error if jboss is turned off and openoffice is turned on again.
Installation of ActiveMQ 5.9.0
1. Installation
Copy files to / home directory and decompress them
tar -zxvf apache-activemq-5.9.0-bin.tar.gz
Configure the proxy server to access port 61616 of activmq
2. Open port 61616
   iptables -I INPUT -p tcp -m state --state NEW -m tcp --dport 61616 -j ACCEPT
    /etc/init.d/iptables save
    service iptables restart
3. Increase activemq self-startup
Establish a soft link to init.d
ln -s /usr/apache-activemq-5.9.0/bin/activemq /etc/init.d/
Modify Startup Profile
vi /usr/apache-activemq-5.9.0/bin/activemq
Join at the beginning
#### BEGIN INIT INFO
# Provides: activemq
# Required-Start: $remote_fs $syslog
# Required-Stop: $remote_fs $syslog
# Default-Start: 2 3 4 5
# Default-Stop: 0 6
# chkconfig: 2345 64 36
# Short-Description: ActiveMQ server
### END INIT INFO
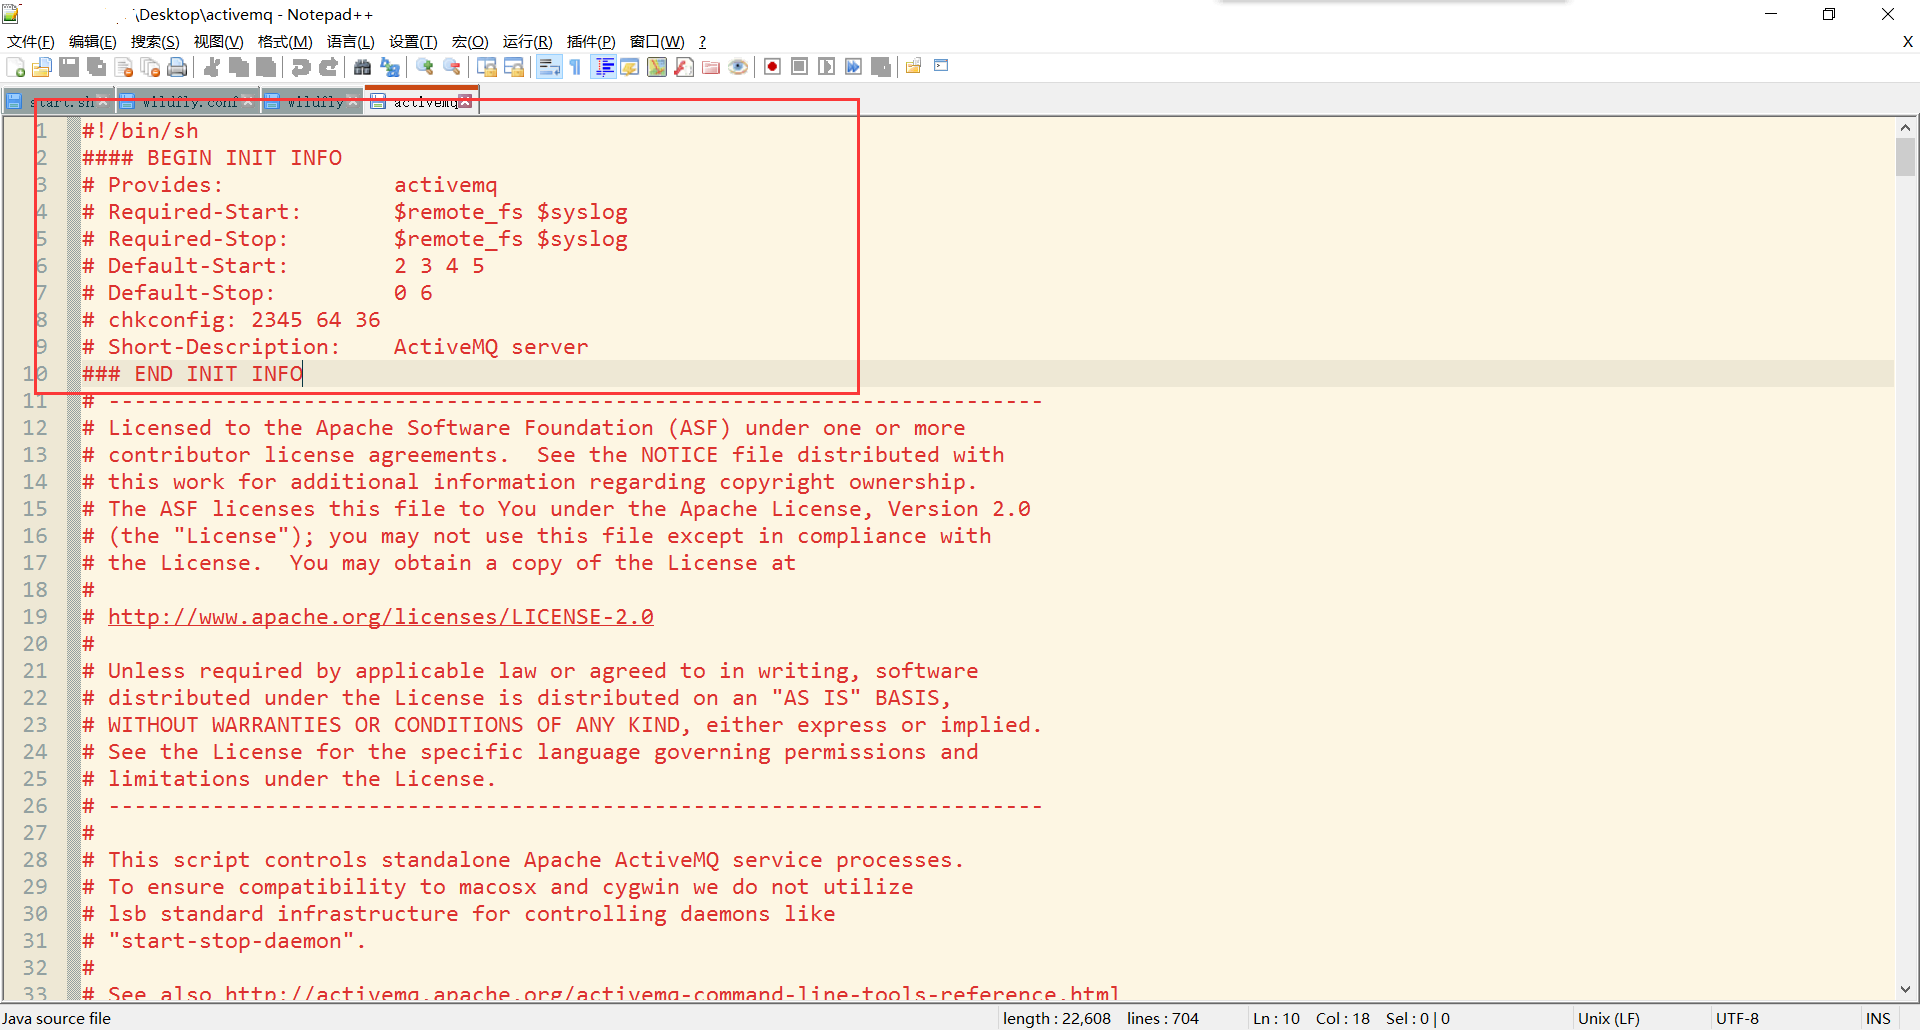
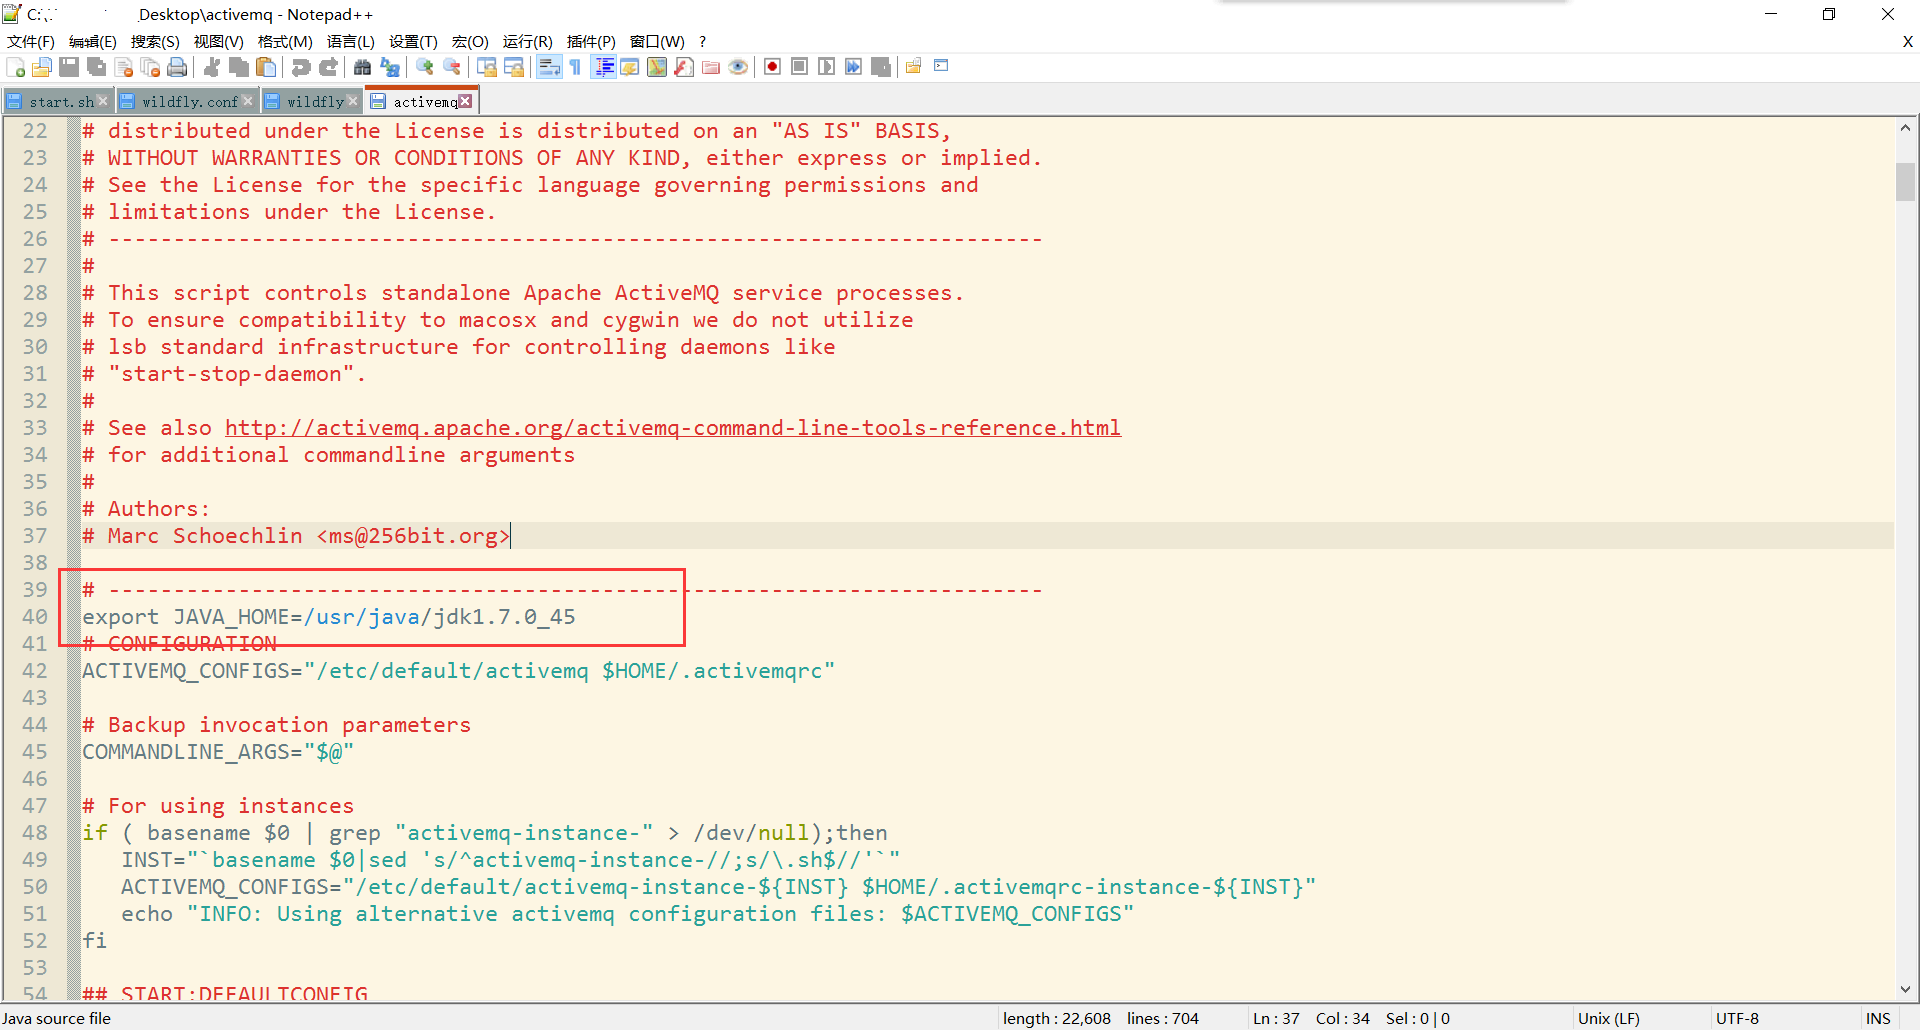
Then add:
export JAVA_HOME=/usr/java/jdk1.7.0_45
Increase authority
chmod +x activemq
Join the self-startup list
chkconfig --add activemq
Turn on self-startup
chkconfig activemq on