First issue of this article: https://www.cnblogs.com/somata/p/LinuxLDAPUserAuthentication.html
I use the LDAP user management completed by CentOS, which may be different from most of the online tutorials, but if I write it out, it will certainly be useful, but there will be some files, forget to teach.
The OPENLdap used here cooperates with the user management completed by CentOS 7. It needs to configure three services: nssswitch, pam and sssd. It needs some understanding before the configuration of this paper can be completed.
Basic configuration
- Complete the configuration of yum source
mkdir /root/back
tar -Jcvf /root/back/yum.repos.d-`date  '+(%Y.%m.%d_%H:%M:%S)'`.tar.xz /etc/yum.repos.d/
rm -rf /etc/yum.repos.d/*
curl -o /etc/yum.repos.d/CentOS-Base.repo http://mirrors.aliyun.com/repo/Centos-7.repo
curl -o /etc/yum,repos.d/CentOS-epel.repo http://mirrors.aliyun.com/repo/epel-7.repo
yum makecache
- Install necessary software
yum -y install vim bash-completion openldap-servers openldap-clients nss-pam-ldapd sssd
OPENLdap service initialization
Initialization process will not go into too much detail, detailed queries< OPENLDAP Service Construction and Post-management>.
- First stop the database service:
systemctl stop slapd
- Then edit the file:
# Back up the file first so that it won't be restored
mkdir /root/back
tar -Jcvf /root/back/slapd.config-`date  '+(%Y.%m.%d_%H:%M:%S)'`.tar.xz /etc/openldap/slapd.d/
tar -Jcvf /root/back/slapd.data-`date  '+(%Y.%m.%d_%H:%M:%S)'`.tar.xz /var/lib/ldap/
# Then delete the configuration file
rm -rf /etc/openldap/slapd.d/*
rm -rf /var/lib/ldap/*
# Copy configuration files to temporary directories
mkdir /root/ldap
cd /root/ldap
- Write the configuration file of slapd. The configuration file here evolved from / usr/share/openldap-servers/slapd.ldif, mainly modifying baseDN(suffix), OPENLDAPTLS, olcRootPW (password generated by slappasswd, password in this article is 123456) and include.
# file: /root/ldap/slapd.ldif

dn: cn=config
objectClass: olcGlobal
cn: config
olcArgsFile: /var/run/openldap/slapd.args
olcPidFile: /var/run/openldap/slapd.pid
olcTLSCertificateFile: /etc/openldap/certs/server.crt
olcTLSCertificateKeyFile: /etc/openldap/certs/server.key
olcTLSCACertificateFile: /etc/openldap/cacerts/cacert.pem

dn: cn=schema,cn=config
objectClass: olcSchemaConfig
cn: schema

include: file:///etc/openldap/schema/core.ldif
include: file:///etc/openldap/schema/cosine.ldif
include: file:///etc/openldap/schema/nis.ldif
include: file:///etc/openldap/schema/inetorgperson.ldif

dn: olcDatabase=frontend,cn=config
objectClass: olcDatabaseConfig
objectClass: olcFrontendConfig
olcDatabase: frontend

dn: olcDatabase=config,cn=config
objectClass: olcDatabaseConfig
olcDatabase: config
olcAccess: to *
  by dn.base="gidNumber=0+uidNumber=0,cn=peercred,cn=external,cn=auth" manage
  by * none

dn: olcDatabase=monitor,cn=config
objectClass: olcDatabaseConfig
olcDatabase: monitor
olcAccess: to *
  by dn.base="gidNumber=0+uidNumber=0,cn=peercred,cn=external,cn=auth" read
  by dn.base="cn=Manager,dc=black,dc=com" read
  by * none

dn: olcDatabase=hdb,cn=config
objectClass: olcDatabaseConfig
objectClass: olcHdbConfig
olcDatabase: hdb
olcSuffix: dc=black,dc=com
olcRootDN: cn=Manager,dc=black,dc=com
olcRootPW: {SSHA}l1vBI/HOMKLEiQZgcm3Co+hFQI68rH1Q
olcDbDirectory: /var/lib/ldap
olcDbIndex: objectClass eq,pres
olcDbIndex: ou,cn,mail,surname,givenname eq,pres,sub- Configure OPENSSL certificates. Encrypted tunnel for openldap server.
# First, create the certificate file for the CA service
cd /etc/pki/CA
openssl genrsa -out private/cakey.pem 2048
openssl req -new -x509 -key private/cakey.pem -out cacert.pem   # The Certificate creation process here is omitted.
# However, it should be noted that it is necessary to ensure that the beginning of the application for server certificate must be the same as the beginning of the certificate, otherwise the certificate can not be issued through CA.
touch index.txt
echo "01" > serial
# Then apply for the issuance of server certificates
cd /etc/openldap/certs/
openssl genrsa -out server.key 2048
openssl ca -in server.csr -out server.crt -days 365
# Copy CA certificate to specified location
mkdir /etc/openldap/cacerts
cp /etc/pki/CA/cacert.pem /etc/openldap/cacerts/
- Generate server configuration files based on configuration
slapadd -F "/etc/openldap/slapd.d/" -b "cn=config" -l slapd.ldif
# You also need to pay attention to whether the file belongs to the owner or root, and you need to change it back to openldap.
chown -R ldap:ldap /etc/openldap/slapd.d/*
# Then open the service.
systemctl start slapd
_#################### 100.00% eta none elapsed none fast!
Closing DB...
- Initialize the database
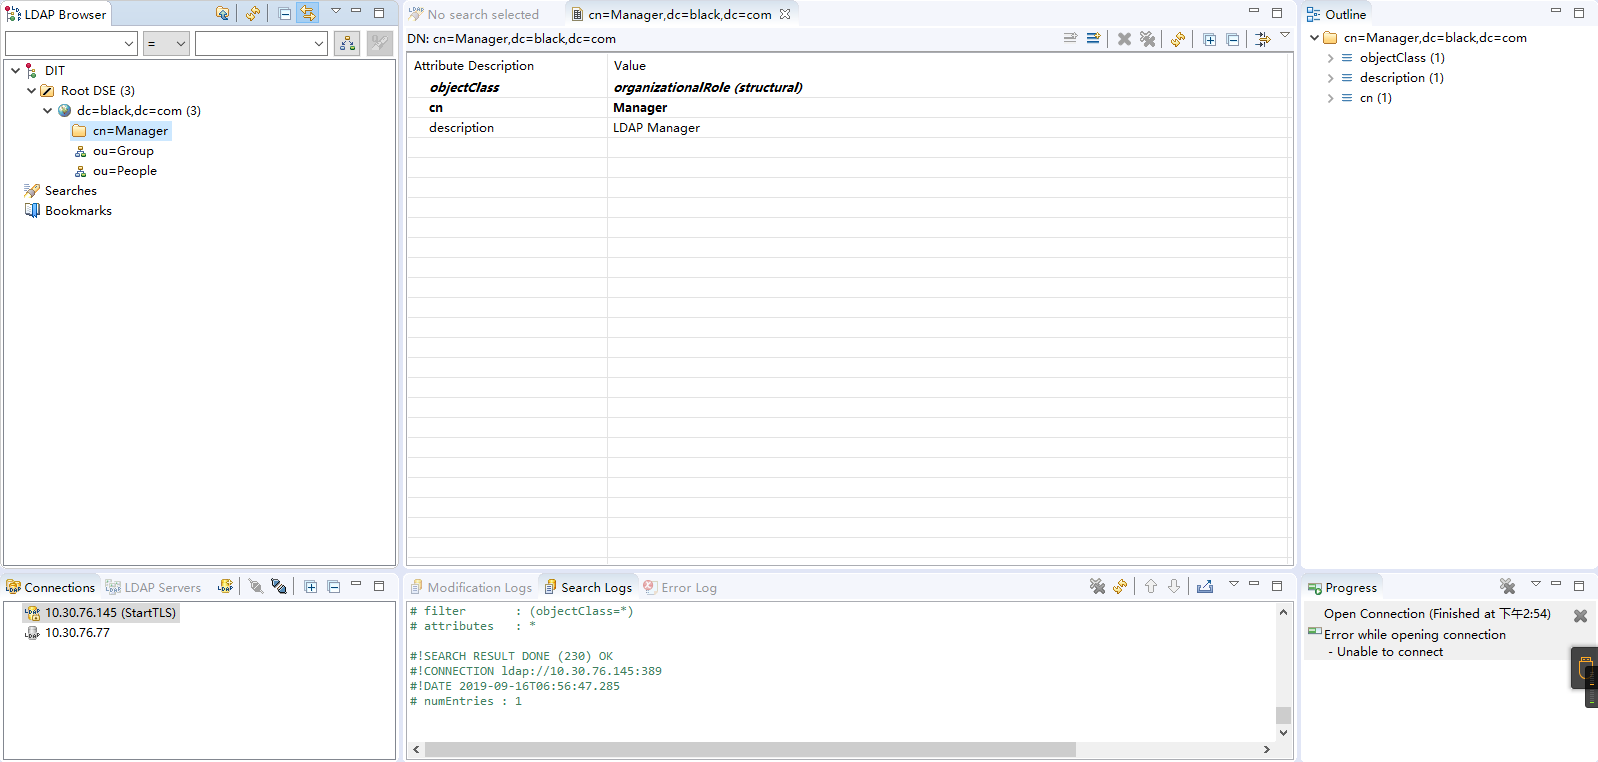
dn: dc=black,dc=com
dc: black
objectClass: top
objectClass: domain

dn: cn=Manager,dc=black,dc=com
objectClass: organizationalRole
cn: Manager
description: LDAP Manager

dn: ou=People,dc=black,dc=com
ou: People
objectClass: top
objectClass: organizationalUnit
objectClass: domainRelatedObject
associatedDomain: black.com

dn: ou=Group,dc=black,dc=com
ou: Group
objectClass: top
objectClass: organizationalUnit
objectClass: domainRelatedObject
associatedDomain: black.com
- Import to database
ldapadd -x -D "cn=Manager,dc=black,dc=com" -w 123456 -f base.ldif # Import basic information into the database.
adding new entry "dc=black,dc=com"
adding new entry "cn=root,dc=black,dc=com"
adding new entry "ou=People,dc=black,dc=com"
adding new entry "ou=Group,dc=black,dc=com"
- Then use apache directory studio to see if the server has been successfully configured.
First, open the firewall.
firewall-cmd --add-service=ldap
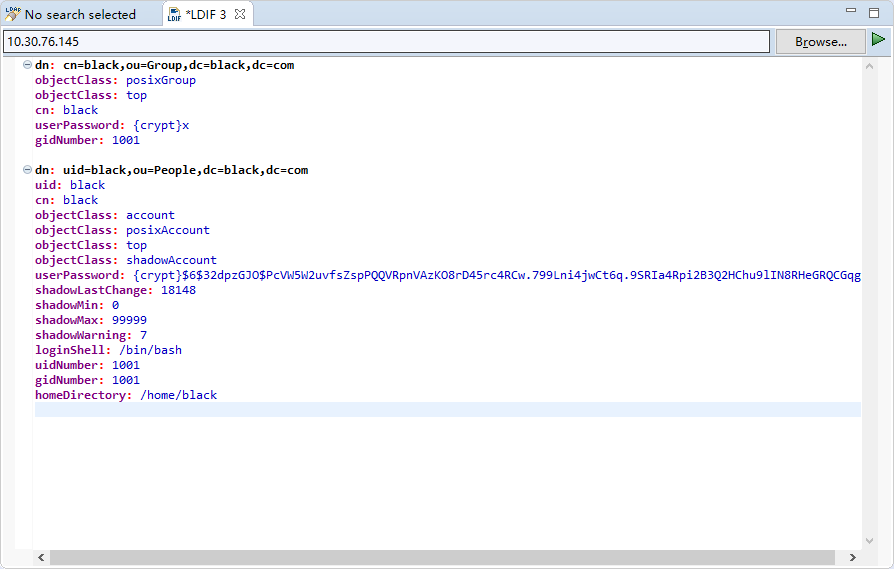
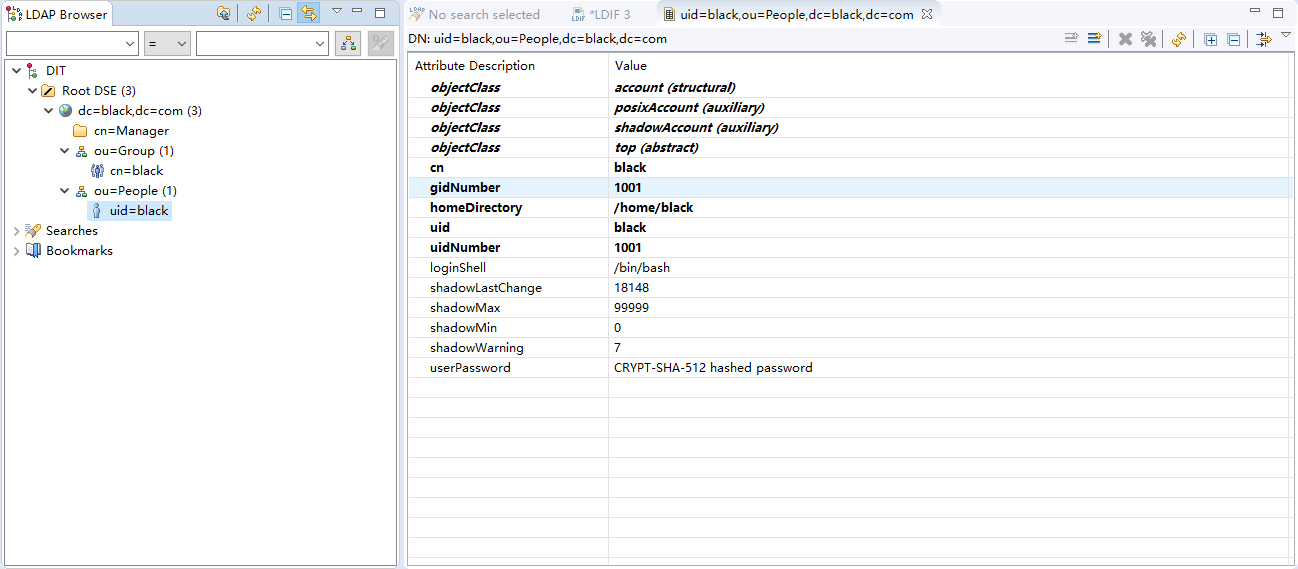
- Let's import a user here for later test usage
NSS, PAM and SSD configuration
NSS Service Configuration
If you want nss to query ldap, you first need to enable a service called nslcd. Here is the configuration file for that service.
# file: /etc/nslcd.conf

uid nslcd
gid ldap
uri ldap://127.0.0.1/
base dc=black,dc=com
binddn cn=Manager,dc=black,dc=com
bindpw 123456
ssl no
tls_cacertdir /etc/openldap/cacerts
Startup service
chmod 600 /etc/nslcd.conf
systemctl start nslcd
systemctl enable nslcd
Configure nss
# file: /etc/nsswitch.conf

passwd:     files ldap          # The main thing is that passwd, shadow and group need to add ldap later.
shadow:     files ldap
group:      files ldap
hosts:      files dns myhostname
bootparams: nisplus [NOTFOUND=return] files
ethers:     files
netmasks:   files
networks:   files
protocols:  files
rpc:        files
services:   files sss
netgroup:   nisplus sss
publickey:  nisplus
automount:  files nisplus sss
aliases:    files nisplus
Test for availability:
getent passwd | grep black
black❌1001:1001:black:/home/black:/bin/bash
PAM Service Configuration
Here I copied the PAM configuration file from another one using authconfig-tui configuration content.
# file: /etc/pam.d/system-auth

auth        required      pam_env.so
auth        required      pam_faildelay.so delay=2000000
auth        [default=1 ignore=ignore success=ok] pam_succeed_if.so uid >= 1000 quiet
auth        [default=1 ignore=ignore success=ok] pam_localuser.so
auth        sufficient    pam_unix.so nullok try_first_pass
auth        requisite     pam_succeed_if.so uid >= 1000 quiet_success
auth        sufficient    pam_sss.so forward_pass
auth        required      pam_deny.so

account     required      pam_unix.so broken_shadow
account     sufficient    pam_localuser.so
account     sufficient    pam_succeed_if.so uid < 1000 quiet
account     [default=bad success=ok user_unknown=ignore] pam_sss.so
account     required      pam_permit.so

password    requisite     pam_pwquality.so try_first_pass local_users_only retry=3 authtok_type=
password    sufficient    pam_unix.so sha512 shadow nullok try_first_pass use_authtok
password    sufficient    pam_sss.so use_authtok
password    required      pam_deny.so

session     optional      pam_keyinit.so revoke
session     required      pam_limits.so
-session     optional      pam_systemd.so
session     [success=1 default=ignore] pam_succeed_if.so service in crond quiet use_uid
session     required      pam_unix.so
session     optional      pam_sss.so
PAM can be used directly without service restart
sssd service configuration
For LDAP user login, the PAM configuration forwards it to SSSD, which authenticates the user.
# file: /etc/sssd/sssd.conf

[domain/black.com]
autofs_provider = ldap
cache_credentials = True
ldap_search_base = dc=black,dc=com
id_provider = ldap
auth_provider = ldap
chpass_provider = ldap
ldap_uri = ldap://127.0.0.1/
ldap_id_use_start_tls = True
ldap_tls_reqcert = never
ldap_tls_cacertdir = /etc/openldap/cacerts

[sssd]
services = nss, pam, autofs
domains = black.com

[nss]
homedir_substring = /home

[pam]

[sudo]

[autofs]

[ssh]

[pac]

[ifp]

[secrets]

[session_recording]
Configure the startup service and set the startup self-startup.
chmod 600 /etc/sssd/sssd.conf   # Pay attention to the configuration of permissions, otherwise it will not start.
systemctl start sssd
systmctl enable sssd
test
Then the user authentication part is made. Now let's test it.
Because the system-auth file is configured and no ssh file is configured, ssh is not connected. So login is used here to test the feasibility.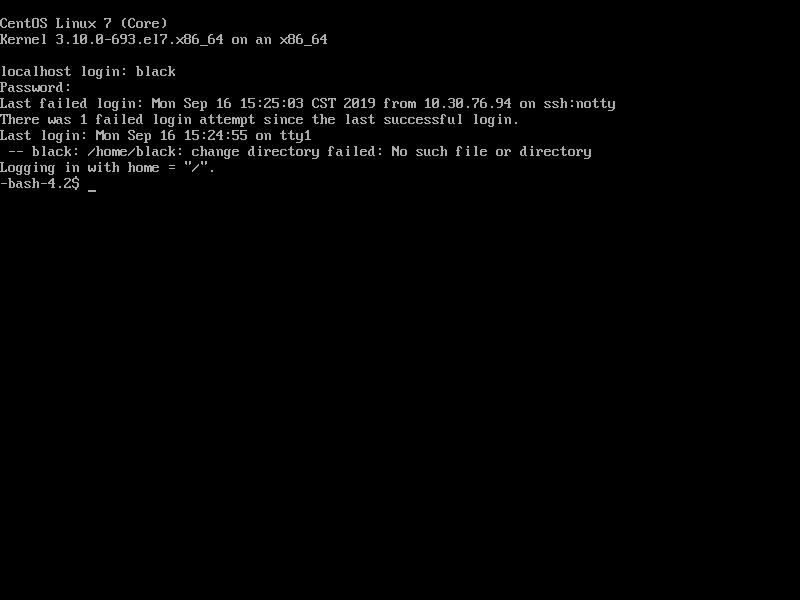
Script
I wrote a script for this LDAP user authentication to facilitate adding users. I would like to emphasize that although CentOS provides migration tools to store users in LDAP databases, if you mention all local users to LDAP databases without retaining local users, then you will find that the computer will not be able to restart, so it is recommended that users with UID s less than 1000 not be restarted. Store it on the LDAP server.
The script is on gitee. https://gitee.com/somata/script/blob/master/ldap_adduser.sh
It's easy to use.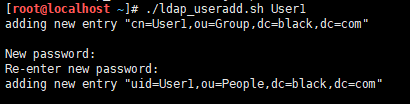
Then test whether the added user can log in: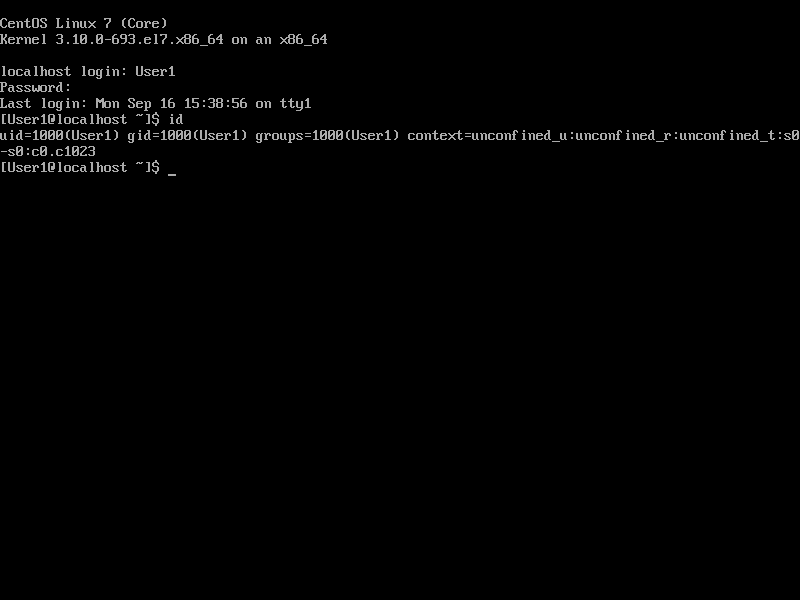
This article is authenticated by the original. The author visited yuanben.io to get authorization information.