Background:
This is the first time that a rookie has tried to build an active and standby cluster of Damon database. Three CentOS7 virtual machines are installed under VMware. Each virtual machine is installed with dm8 database, and the installation directory is / dm8.
Things to say:
1. The three virtual machines are called host, standby and monitor. The host and standby need to create database instances, but the monitor does not. The instance names of the host and standby are different. The instance name (INSTANCE_NAME) is the thing called DMSERVER by default.
2. Before starting, check the ip addresses of the three machines and ensure that they can ping each other. For example, the ip addresses of my three virtual machines are 192.168.116.129, 192.168.116.130 and 192.168.116.131, respectively, the host, standby and monitor.
Steps:
Step 1: synchronize data
Backup the host data offline and restore it on the standby machine. Please ensure that the database instance is closed by executing ". / DmService + your instance name stop" under the database installation directory / bin. what? You asked me why I shut down the service? Offline! Offline! What is offline? Tactical pitch back (=, =) ~ why do you want to backup offline? Because when the database is offline, there will be no new operations and data during the backup process, which can ensure the absolute consistency of the data. Is online backup OK? Yes, this is not the first attempt. For details of what kind of bicycle you want, please refer to the DM8 data guard and read-write separation cluster V4.0.pdf under the doc directory under the DM8 installation directory.
Use the dmrman tool to make an offline backup of the database, and execute the command in the / dm8/bin directory:
./dmrman CTLSTMT="BACKUP DATABASE 'dm Installation directory/data/Instance name/dm.ini' FULL TO file name BACKUPSET 'Backup directory name'" .
In this way, there will be backup files under the directory you entered. Send the whole backup directory to the standby machine. Note that the directory is sent! Execute the command (turn off the firewall of the standby machine first):
scp -r Backup directory of the host ip+colon+Target directory of standby machine
Restore and update data on the standby machine. Execute three commands under the installation directory / bin of the standby machine dm:
./dmrman ctlstmt="restore database 'dm Installation directory for/data/Instance name/dm.ini' from backupset 'Copied backup directory'"
./dmrman ctlstmt="recover database 'dm Installation directory for/data/Instance name/dm.ini' from backupset 'Copied backup directory'"
./dmrman ctlstmt="recover database 'dm Installation directory for/data/Instance name/dm.ini' update db_magic"
Step 2: configure the host
1. You can find dm in the installation directory of host dm under / data / instance name INI file, VI dm Ini edit and modify the following parameters:
INSTANCE_NAME=  Your instance name  ps: It is generally corresponding and does not need to be modified
ARCH_INI=1
MAL_INI=1
ALTER_MODE_STATUS= 0
ENABLE_OFFLINE_TS = 2
In general, DM The INI file is very long. How to find these parameters quickly? When editing a file with vim, enter a question mark in the command mode (that is, the mode in which the last file is saved: wq, which can be switched by pressing esc) and the parameter to be found (case sensitive). Press enter to quickly find it, for example:
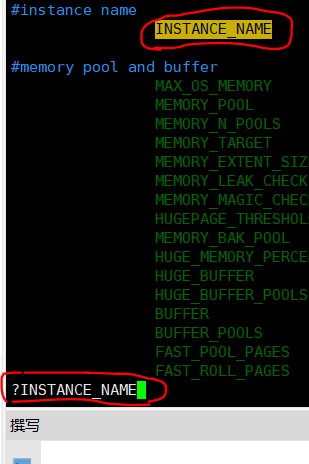
After modification, you can accurately check whether the file parameters are accurate on the command line, such as:

2. Configure dmmal Ini, in DM Create a new dmmal.ini file in the same directory as the. INI file ini:
MAL_CHECK_INTERVAL = 5         #MAL link detection interval
MAL_CONN_FAIL_INTERVAL = 5     #MAL determination of link disconnection time

[MAL_INST1]     #host
 MAL_INST_NAME =                  #Instance name, and DM Instance in ini_ Name consistent
 MAL_HOST =                       #The MAL system listens to the IP address of the TCP connection
 MAL_PORT = 61141                 #MAL system listens to the port of TCP connection
 MAL_INST_HOST =                  #External service IP address of the instance
 MAL_INST_PORT = 32141            #The external service port of the instance, and DM Port in ini_ Num consistent
 MAL_DW_PORT = 52141              #The local daemon of the instance listens to the port of the TCP connection
MAL_INST_DW_PORT = 33141          #The port on which the instance listens for daemon TCP connections


[MAL_INST2]     #Standby machine
 MAL_INST_NAME =
 MAL_HOST =
 MAL_PORT = 61142
 MAL_INST_HOST =
 MAL_INST_PORT = 32142
 MAL_DW_PORT = 52142
 MAL_INST_DW_PORT = 33142
The instance name, ports and ip of the active and standby machines shall be filled in according to their own conditions.
3. Configure dmarch Ini, create or modify dmarch.ini in the same directory Ini. Note that the host synchronizes data with the standby, so arch is archived in real time_ Dest is configured as the instance name of the standby machine:
[ARCHIVE_REALTIME]
ARCH_TYPE = REALTIME                    #Real time archive type
ARCH_DEST = Database instance name of the standby machine          #Real time archive target instance name


[ARCHIVE_LOCAL1]
ARCH_TYPE = LOCAL                     #Local archive type
ARCH_DEST = Own archive path            #Local archive file storage path
ARCH_FILE_SIZE = 128                  #Unit Mb, maximum value of local single archive
ARCH_SPACE_LIMIT = 0                  #Unit Mb, 0 means unlimited, range 1024~2147483647M
4. Configure dmwatcher Ini, new under the same path:
[GRP1]                           #Group name
DW_TYPE = GLOBAL                 #Global daemon type
DW_MODE = AUTO                   #Automatic switching mode
DW_ERROR_TIME = 10               #Remote daemon failure determination time
INST_RECOVER_TIME = 60           #The interval between the main library daemon starting recovery
INST_ERROR_TIME = 10             #Local instance fault determination time
INST_OGUID = 453331              #Unique OGUID value of the guard system (modified as appropriate)
INST_INI =                       #dm.ini configuration file path
INST_AUTO_RESTART = 1            #Turn on the auto start function of the instance
INST_STARTUP_CMD = dm Installation directory/bin/dmserver         #Command line startup
RLOG_SEND_THRESHOLD = 0          #Specifies the time threshold for sending logs from the primary database to the standby database. It is closed by default
RLOG_APPLY_THRESHOLD = 0         #Specifies the time threshold of the backup database replay log. It is off by default
5. Start the main library in mount mode and execute it in / bin of dm installation directory:
./dmserver dm Installation directory/data/Instance name/dm.ini mount
Note that the database instance must be started in mount mode, otherwise the system will reconstruct the roll table space, generate redo logs and destroy data consistency.
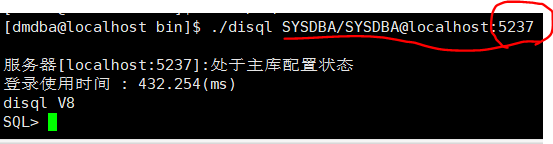
Then, open a new command line window, start the disql command line tool, log in to the database, set the database to the primary mode and set the oguid value (set in dmwatcher.ini). Note that when connecting to the database with disql, if the ip and port number are not set, the local port 5236 will be connected by default, At this time, if the database instance is not the default port, a network connection error will be reported.
The sql script is as follows:
SP_SET_PARA_VALUE(1, 'ALTER_MODE_STATUS', 1);
sp_set_oguid(453331);
alter database primary;
SP_SET_PARA_VALUE(1, 'ALTER_MODE_STATUS', 0);
Step 3: configure the standby machine
1. Standby DM ini,dmmal.ini and dmwatcher configurations are basically the same as those of the host (only the instance name and installation path may be different and need to be adjusted). It is not repeated here, but can be transmitted directly by scp command.
2. Configure dmarch Ini, because this is a standby machine and the archive is sent to the host, ARCH_DEST wants to write an instance of the host. There may be a good-looking one to ask: "ah ~ why does the standby send an archive to the host?", I guess it is because there may be a host failure in the future and the standby machine needs to be switched to the host. Therefore, the standby machine that may become the host needs to know who the log may be sent to in the future.
[ARCHIVE_REALTIME]
ARCH_TYPE = REALTIME                    #Real time archive type
ARCH_DEST = Database instance name of the host           #Real time archive target instance name


[ARCHIVE_LOCAL1]
ARCH_TYPE = LOCAL                     #Local archive type
ARCH_DEST = Own archive path             #Local archive file storage path
ARCH_FILE_SIZE = 128                  #Unit Mb, maximum value of local single archive
ARCH_SPACE_LIMIT = 0                  #Unit Mb, 0 means unlimited, range 1024~2147483647M
3. Start the standby database in mount mode:
./dmserver dm Installation directory/data/Instance name/dm.ini mount
Open a new command line and execute SQL using disql:
SP_SET_PARA_VALUE(1, 'ALTER_MODE_STATUS', 1);
sp_set_oguid(453331);
alter database standby;
SP_SET_PARA_VALUE(1, 'ALTER_MODE_STATUS', 0);
Step 4: configure monitor
Because of the automatic failover of this cluster, you need a third machine as a monitor and create a new dmmonitor in the dm installation directory Where Mon, ini_ DW_ IP and PORT in IP require and dmmal Mal in ini_ Host and Mal_ DW_ Consistent with PORT.
MON_DW_CONFIRM = 1                         #Confirm monitor mode
MON_LOG_PATH = Own monitor log path         #Monitor log file storage path
MON_LOG_INTERVAL = 60                      #Regularly record the system information to the log file every 60s
MON_LOG_FILE_SIZE = 32                     #Maximum 32M per log file
MON_LOG_SPACE_LIMIT = 0                    #Unlimited total log file space

[GRP1]
MON_INST_OGUID = 453331                     #Unique OGUID value for group GRP1
MON_DW_IP = Host MAL_HOST corresponding ip+colon+Host daemon listening port MAL_DW_PORT
MON_DW_IP = Standby machine
Step 5: register and start the service
1. Registration service. The database instance, daemon and monitor services need to be registered on the server. Of course, the previously registered database instances do not need to be registered again. The command line registers the database instance, daemon and monitor services using the root user in the bin directory of the dm installation directory:
--Register master library instance service
./dm_service_installer.sh -t dmserver -dm_ini dm Installation directory/data/Instance name/dm.ini -m mount -p Instance name
--Register master library daemon service
./dm_service_installer.sh -t dmwatcher -watcher_ini dm Installation directory/data/Instance name/dmwatcher.ini -p Daemon service name
--Register monitor service
./dm_service_installer.sh -t dmmonitor -monitor_ini New dmmonitor.ini Directory of/dmmonitor.ini -p Monitor name
2. Start the service. First start the database instance service and daemon of the active and standby computers, and then start the monitor. The startup method is to execute in the bin directory of the dm installation directory:
--Start database instance
./dmserver dm Installation directory/data/Database instance name/dm.ini
--Launch daemons
./dmwatcher dm Installation directory/data/Database instance name/dmwatcher.ini
--start monitor
./dmmonitor New dmmonitor.ini Directory/dmmonitor.ini