1, MMM overview
1. What is MMM
MMM (Master Master replication manager for MySQL) is a script program that supports dual master failover and dual master daily management. Mmm is developed in Perl. It mainly monitors and manages MySQL master master replication. Although it is called dual master replication, only one master is allowed to write at the same time, and the other alternative master provides partial read services to accelerate the preheating of the alternative master during the master master master switch, It can be said that MMM script program realizes the function of failover on the one hand, and its internal additional tools can also realize the read load balancing of multiple Slave.
2. Application scenarios
MMM provides automatic and manual methods to remove the virtual ip of servers with high replication delay in a group of servers. At the same time, it can also back up data and realize data synchronization between two nodes. Because MMM cannot completely guarantee the consistency of data, mmm is applicable to scenarios that do not require high data consistency, but want to ensure business availability to the greatest extent. For those businesses that require high data consistency, mmm is not recommended.
3. MMM features
- MMM is a flexible scripting program
- Implementation based on perl language
- Used to monitor and failover mysql replication
- Manage the configuration of MySQL master master replication
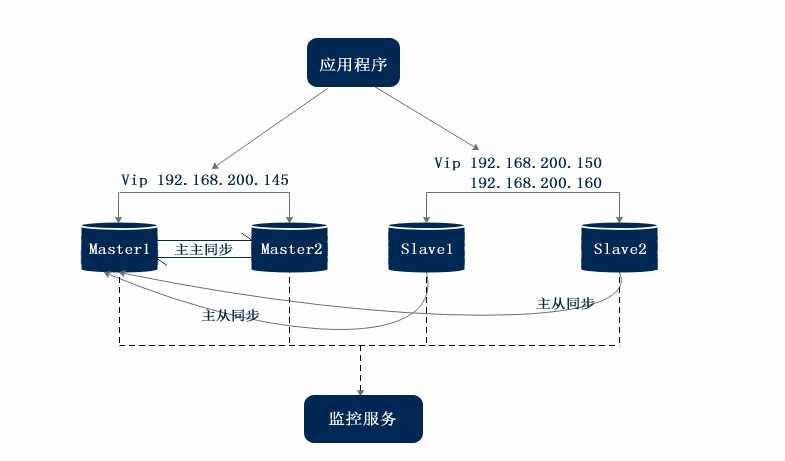
4. Description of MMM high availability architecture
- mmm_mon: monitor the process, take charge of all monitoring work, decide and handle all node role activities. This script needs to be run on the hypervisor.
- mmm_agent: the agent process running on each MySQL server to complete the monitoring probe work and execute simple remote service settings. This script needs to be run on the supervised machine.
- mmm_control: a simple script that provides management mmm_ Command of the Mond process.
- The supervision end of MySQL MMM will provide multiple virtual IPS (VIPs), including one writable VIP and multiple readable VIPs. Through the supervision management, these IPS will be bound to the available mysql. When a MySQL goes down, the supervision will migrate the VIPs to other mysql.
5. User and authorization
in the whole supervision process, it is necessary to add relevant authorization yoghurt in MySQL so that MySQL can support the maintenance of supervision machine. Authorized users include an mmm_monitor user and an MMM_ If the agent user wants to use the backup tool of MMM, he needs to add an mmm_tools user.
2, Case environment
1. Server configuration
| The server | host name | operating system | IP address | Main software |
|---|---|---|---|---|
| Master1 server | master1 | CentOS 7.6 | 192.168.10.20 | MySQL 5.7,MySQL-MMM |
| Master2 server | master2 | CentOS 7.6 | 192.168.10.30 | MySQL 5.7,MySQL-MMM |
| Slave1 server | slave1 | CentOS 7.6 | 192.168.10.40 | MySQL 5.7,MySQL-MMM |
| Slave2 server | slave2 | CentOS 7.6 | 192.168.10.50 | MySQL 5.7,MySQL-MMM |
| Monitor server | monitor | CentOS 7.6 | 192.168.10.90 | MySQL-MMM |
2. Server environment
systemctl stop firewalld && systemctl disable firewalld
setenforce 0
3. Modify host name
Master1 server
hostnamectl set-hostname master1
su
Master2 server
hostnamectl set-hostname master2
su
Slave1 server
hostnamectl set-hostname slave1
su
Slave2 server
hostnamectl set-hostname slave2
su
Monitor server
hostnamectl set-hostname monitor
su
3, Case implementation
1. Build MySQL multi master and multi slave architecture
(1) Install mysql on the master1, master2, slave1 and slave2 nodes
#!/bin/bash
#One click installation of mysql-5.7.17
#Download two source packages online, which are packaged on my virtual machine
#The installation package is downloaded in the / data directory
#Compilation and installation takes a long time, please wait patiently

mkdir /data
wget http://101.34.22.188/mysql-5.7.17/boost_1_59_0.tar.gz -P /data
wget http://101.34.22.188/mysql-5.7.17/mysql-5.7.17.tar.gz -P /data

systemctl stop firewalld && systemctl disable firewalld
setenforce 0
ntpdate ntp1.aliyun.com
tar zxvf /data/mysql-5.7.17.tar.gz -C /opt
tar zxvf /data/boost_1_59_0.tar.gz -C /usr/local
mv /usr/local/boost_1_59_0 /usr/local/boost
yum -y install gcc gcc-c++ ncurses ncurses-devel bison cmake make git perl expat-devel pcre-devel pcre
useradd -s /sbin/nologin mysql
cd /opt/mysql-5.7.17/

cmake \
-DCMAKE_INSTALL_PREFIX=/usr/local/mysql \
-DMYSQL_UNIX_ADDR=/usr/local/mysql/mysql.sock \
-DSYSCONFDIR=/etc \
-DSYSTEMD_PID_DIR=/usr/local/mysql \
-DDEFAULT_CHARSET=utf8  \
-DDEFAULT_COLLATION=utf8_general_ci \
-DWITH_EXTRA_CHARSETS=all \
-DWITH_INNOBASE_STORAGE_ENGINE=1 \
-DWITH_ARCHIVE_STORAGE_ENGINE=1 \
-DWITH_BLACKHOLE_STORAGE_ENGINE=1 \
-DWITH_PERFSCHEMA_STORAGE_ENGINE=1 \
-DMYSQL_DATADIR=/usr/local/mysql/data \
-DWITH_BOOST=/usr/local/boost \
-DWITH_SYSTEMD=1

cd /opt/mysql-5.7.17/
make -j 4 && make install
echo > /etc/my.cnf

cat > /etc/my.cnf<<EOF
[client]
port = 3306
default-character-set=utf8
socket=/usr/local/mysql/mysql.sock

[mysql]
port = 3306
default-character-set=utf8
socket=/usr/local/mysql/mysql.sock
auto-rehash

[mysqld]
user = mysql
basedir=/usr/local/mysql
datadir=/usr/local/mysql/data
port = 3306
character-set-server=utf8
pid-file = /usr/local/mysql/mysqld.pid
socket=/usr/local/mysql/mysql.sock
bind-address = 0.0.0.0
skip-name-resolve
max_connections=2048
default-storage-engine=INNODB
max_allowed_packet=16M
server-id = 1

sql_mode=NO_ENGINE_SUBSTITUTION,STRICT_TRANS_TABLES,NO_AUTO_CREATE_USER,NO_AUTO_VALUE_ON_ZERO,NO_ZERO_IN_DATE,NO_ZERO_DATE,ERROR_FOR_DIVISION_BY_ZERO,PIPES_AS_CONCAT,ANSI_QUOTES
EOF

chown -R mysql.mysql /usr/local/mysql/
chown mysql.mysql /etc/my.cnf
echo "PATH=$PATH:/usr/local/mysql/bin" >> /etc/profile
source /etc/profile

cd /usr/local/mysql/bin/
./mysqld --initialize-insecure --user=mysql --basedir=/usr/local/mysql --datadir=/usr/local/mysql/data

cp /usr/local/mysql/usr/lib/systemd/system/mysqld.service /usr/lib/systemd/system/
systemctl daemon-reload && systemctl start mysqld && systemctl enable mysqld
ln -s /usr/local/mysql/bin/mysql /usr/local/sbin/


pgrep "mysqld" &> /dev/null
if [ $? -eq 0 ];then
        echo -e "\033[32mmysqld The service is running normally\033[0m"
else
        echo -e "\033[31mmysqld The service is running abnormally. Please check\033[0m"
fi
sleep 2
echo ' '
echo -e "\033[32mMySQL No password set, execute mysql Command login\033[0m"
(2) Modify master1 configuration file
cat /etc/my.cnf
[client]
port = 3306
default-character-set=utf8
socket=/usr/local/mysql/mysql.sock

[mysql]
port = 3306
default-character-set=utf8
socket=/usr/local/mysql/mysql.sock
auto-rehash

[mysqld]
user = mysql
basedir=/usr/local/mysql
datadir=/usr/local/mysql/data
port = 3306
character-set-server=utf8
pid-file = /usr/local/mysql/mysqld.pid
socket=/usr/local/mysql/mysql.sock
server-id = 1
log-error=/usr/local/mysql/data/mysql_error.log
general_log=ON
general_log_file=/usr/local/mysql/data/mysql_general.log
slow_query_log=ON
slow_query_log_file=mysql_slow_query.log
long_query_time=5
binlog-ignore-db=mysql,information_schema
log_bin=mysql_bin
log_slave_updates=true
sync_binlog=1
innodb_flush_log_at_trx_commit=1
auto_increment_increment=2
auto_increment_offset=1


sql_mode=NO_ENGINE_SUBSTITUTION,STRICT_TRANS_TABLES,NO_AUTO_CREATE_USER,NO_AUTO_VALUE_ON_ZERO,NO_ZERO_IN_DATE,NO_ZERO_DATE,ERROR_FOR_DIVISION_BY_ZERO,PIPES_AS_CONCAT,ANSI_QUOTES
Restart mysqld
systemctl restart mysqld
Parameter interpretation
......
server-id = 1
#The server ID of each Mysql host cannot be the same
log-error=/usr/local/mysql/data/mysql_error.log
#Error log
general_log=ON
#General query log
general_log_file=/usr/local/mysql/data/mysql_general.log
slow_query_log=ON
#Slow query log
slow_query_log_file=mysql_slow_query.log
long_query_time=5
binlog-ignore-db=mysql,information_schema
#Library names that do not need to be synchronized
log_bin=mysql_bin
#Enable binary log for master-slave data replication
log_slave_updates=true
#The slave is allowed to write to its own binary log when copying data from the master
sync_binlog=1
#"Double 1 setting", MySQL will synchronize to the disk every time it writes a binary log
innodb_flush_log_at_trx_commit=1
#"Double 1 setting", MySQL will write the cached data to the log file and brush it to the disk every time the transaction is committed
auto_increment_increment=2
#How much does the auto increment field increment at a time
auto_increment_offset=1
#Start value of auto increment field
(3) Modify the other three mysql servers and restart the service
Copy the configuration file to the other three database servers and restart the mysql server
Note: the server ID in the configuration file cannot be the same and needs to be modified.
server-id = 1
server-id = 2
server-id = 3
server-id = 4
(4) Configure primary replication. Two primary servers replicate with each other
① The permission granted to the slave is executed on both master servers, and it is not necessary to execute on the slave server
master1 server (192.168.10.20)
mysql> grant replication slave on *.* to 'replication'@'192.168.10.%' identified by '123456';
mysql> flush privileges;

mysql> show master status;
+------------------+----------+--------------+--------------------------+-----------------
| File             | Position | Binlog_Do_DB | Binlog_Ignore_DB         | Executed_Gtid_Se
+------------------+----------+--------------+--------------------------+-----------------
| mysql_bin.000001 |     1023 |              | mysql,information_schema |
+------------------+----------+--------------+--------------------------+-----------------
1 row in set (0.00 sec)
master2 server (192.168.10.30)
mysql> grant replication slave on *.* to 'replication'@'192.168.10.%' identified by '123456';
mysql> flush privileges;

mysql> show master status;
+------------------+----------+--------------+--------------------------+-----------------
| File             | Position | Binlog_Do_DB | Binlog_Ignore_DB         | Executed_Gtid_Se
+------------------+----------+--------------+--------------------------+-----------------
| mysql_bin.000001 |     1023 |              | mysql,information_schema |
+------------------+----------+--------------+--------------------------+-----------------
1 row in set (0.00 sec)
② Configure synchronization on master1
192.168.10.20
change master to master_host='192.168.10.30',master_user='replication',master_password='123456',master_log_file='mysql_bin.000001',master_log_pos=1023;

start slave;
show slave status\G;
#Check whether the IO and SQL threads are YES and whether the position offset is correct
③ Configure synchronization on master2
192.168.10.30
change master to master_host='192.168.10.20',master_user='replication',master_password='123456',master_log_file='mysql_bin.000001',master_log_pos=1023;

start slave;
show slave status\G;
#Check whether the IO and SQL threads are YES and whether the position offset is correct
(5) Configure master-slave replication on two slave servers
① slave1 server
192.168.10.40
change master to master_host='192.168.10.20',master_user='replication',master_password='123456',master_log_file='mysql_bin.000001',master_log_pos=1023;

start slave;
show slave status\G;
② slave2 server
192.168.10.50
change master to master_host='192.168.10.20',master_user='replication',master_password='123456',master_log_file='mysql_bin.000001',master_log_pos=1023;

start slave;
show slave status\G;
(6) Test the master-slave synchronization
master1 server
create database test;
show databases;
master2 server
show databases;
slave1 server
show databases;
slave2 server
show databases;
2. Install and configure MySQL-MMM
(1) Install MySQL-MMM on all servers
yum -y install epel-release && yum -y install mysql-mmm*
Note: if the above software is not available in the local warehouse, the online source warehouse shall be configured for each server first.
Alicloud source warehouse configuration method
wget -O /etc/yum.repos.d/CentOS-Base.repo https://mirrors.aliyun.com/repo/Centos-7.repo
yum clean all && yum makecache
(2) Configure MySQL-MMM on master1
192.168.10.20
[root@master1 ~]# cd /etc/mysql-mmm/
[root@master1 mysql-mmm]# cp mmm_common.conf mmm_common.conf.bak
#Back up the configuration file before modifying it
[root@master1 mysql-mmm]# vim mmm_common.conf

active_master_role      writer

<host default>
    cluster_interface       ens33
    pid_path                /run/mysql-mmm-agent.pid
    bin_path                /usr/libexec/mysql-mmm/
    replication_user        replication
##Specify the primary and secondary replication users, which should be the same as before
    replication_password    123456
    agent_user              mmm_agent
##Specifies the user name of the monitor agent process
    agent_password          123456
</host>

<host db1>
    ip      192.168.10.20
    mode    master
    peer    db2
##Peer set peer database
</host>

<host db2>
    ip      192.168.10.30
    mode    master
    peer    db1
</host>

<host db3>
    ip      192.168.10.40
    mode    slave
</host>

<host db4>
    ip      192.168.10.50
    mode    slave
</host>

<role writer>
    hosts   db1, db2
    ips     192.168.10.200
##Set write VIP
    mode    exclusive
#Only one host can be in write mode
</role>

<role reader>
    hosts   db3, db4
    ips     192.168.10.201, 192.168.10.202
##Set read VIP
    mode    balanced
##Multiple slave hosts can perform read operation mode
</role>
No text version
active_master_role      writer

<host default>
    cluster_interface       ens33
    pid_path                /run/mysql-mmm-agent.pid
    bin_path                /usr/libexec/mysql-mmm/
    replication_user        replication
    replication_password    123456
    agent_user              mmm_agent
    agent_password          123456
</host>

<host db1>
    ip      192.168.10.20
    mode    master
    peer    db2
</host>

<host db2>
    ip      192.168.10.30
    mode    master
    peer    db1
</host>

<host db3>
    ip      192.168.10.40
    mode    slave
</host>

<host db4>
    ip      192.168.10.50
    mode    slave
</host>

<role writer>
    hosts   db1, db2
    ips     192.168.10.200
    mode    exclusive
</role>

<role reader>
    hosts   db3, db4
    ips     192.168.10.201, 192.168.10.202
    mode    balanced
</role>
(3) Copy the configuration file to the other 4 hosts
The content of this profile is the same for all hosts
scp mmm_common.conf root@192.168.10.30:/etc/mysql-mmm/
scp mmm_common.conf root@192.168.10.40:/etc/mysql-mmm/
scp mmm_common.conf root@192.168.10.50:/etc/mysql-mmm/
scp mmm_common.conf root@192.168.10.90:/etc/mysql-mmm/
(4) Modify the agent profile MMM for all database servers_ agent.conf
master1
[root@master1 ~]# vim /etc/mysql-mmm/mmm_agent.conf

include mmm_common.conf
this db1
##It is modified to db1/db2/db3/db4 according to different hosts. The default configuration is db1, so master1 does not need to be modified
master2
[root@master2 ~]# vim /etc/mysql-mmm/mmm_agent.conf

include mmm_common.conf
this db2
slave1
[root@slave ~]# vim /etc/mysql-mmm/mmm_agent.conf

include mmm_common.conf
this db3
slave2
[root@slave2 ~]# vim /etc/mysql-mmm/mmm_agent.conf

include mmm_common.conf
this db4
(5) Modify the monitoring configuration file MMM on the monitor monitoring server_ mon.conf
monitor server (192.168.10.90)
[root@monitor ~]# vim /etc/mysql-mmm/mmm_mon.conf

include mmm_common.conf

<monitor>
    ip                  127.0.0.1
    pid_path            /run/mysql-mmm-monitor.pid
    bin_path            /usr/libexec/mysql-mmm
    status_path         /var/lib/mysql-mmm/mmm_mond.status
    ping_ips            192.168.10.20,192.168.10.30,192.168.10.40,192.168.10.50
##Specify the IP of all database servers
    auto_set_online     10
##Specify the automatic online time

    # The kill_host_bin does not exist by default, though the monitor will
    # throw a warning about it missing.  See the section 5.10 "Kill Host
    # Functionality" in the PDF documentation.
    #
    # kill_host_bin     /usr/libexec/mysql-mmm/monitor/kill_host
    #
</monitor>

<host default>
    monitor_user        mmm_monitor
##Specify mmm_ User name of monitor
    monitor_password    123456
##Specify mmm_ Password for monitor
</host>

debug 0
(6) Mmm on all databases_ Agent process authorization
Execute the following statements for all databases
grant super,replication client,process on *.* to 'mmm_agent'@'192.168.10.%' identified by '123456';
flush privileges;
PS
| jurisdiction | function |
|---|---|
| process | Show or kill service threads belonging to other users |
| super | Allow the user to terminate any query; Modify the SET statement of the global variable; Use CHANGE MASTER, PURGE MASTER LOGS |
| replication client | Query master server and slave server status |
(7) Mmm on all databases_ Monitor authorization
grant replication client on *.* to 'mmm_monitor'@'192.168.10.%' identified by '123456';
flush privileges;
(8) Start MySQL MMM agent on all database servers
systemctl start mysql-mmm-agent.service && systemctl enable mysql-mmm-agent.service
(9) Start MySQL MMM monitor on the monitor server
systemctl start mysql-mmm-monitor.service && systemctl enable mysql-mmm-monitor.service
(10) Test the cluster on the monitor server
① View the status of each node
[root@monitor ~]#mmm_control show
  db1(192.168.10.20) master/ONLINE. Roles: writer(192.168.10.200)
  db2(192.168.10.30) master/ONLINE. Roles:
  db3(192.168.10.40) slave/ONLINE. Roles: reader(192.168.10.202)
  db4(192.168.10.50) slave/ONLINE. Roles: reader(192.168.10.201)
② Check whether the monitoring function is perfect
[root@monitor ~]#mmm_control checks all
db4  ping         [last change: 2021/11/04 16:13:20]  OK
db4  mysql        [last change: 2021/11/04 16:13:20]  OK
db4  rep_threads  [last change: 2021/11/04 16:13:20]  OK
db4  rep_backlog  [last change: 2021/11/04 16:13:20]  OK: Backlog is null
db2  ping         [last change: 2021/11/04 16:13:20]  OK
db2  mysql        [last change: 2021/11/04 16:13:20]  OK
db2  rep_threads  [last change: 2021/11/04 16:13:20]  OK
db2  rep_backlog  [last change: 2021/11/04 16:13:20]  OK: Backlog is null
db3  ping         [last change: 2021/11/04 16:13:20]  OK
db3  mysql        [last change: 2021/11/04 16:13:20]  OK
db3  rep_threads  [last change: 2021/11/04 16:13:20]  OK
db3  rep_backlog  [last change: 2021/11/04 16:13:20]  OK: Backlog is null
db1  ping         [last change: 2021/11/04 16:13:20]  OK
db1  mysql        [last change: 2021/11/04 16:13:20]  OK
db1  rep_threads  [last change: 2021/11/04 16:13:20]  OK
db1  rep_backlog  [last change: 2021/11/04 16:13:20]  OK: Backlog is null
③ Specify the host to bind the VIP
[root@monitor ~]#mmm_control move_role writer db2
OK: Role 'writer' has been moved from 'db1' to 'db2'. Now you can wait some time and check new roles info!
[root@monitor ~]#mmm_control show
  db1(192.168.10.20) master/ONLINE. Roles:
  db2(192.168.10.30) master/ONLINE. Roles: writer(192.168.10.200)
  db3(192.168.10.40) slave/ONLINE. Roles: reader(192.168.10.202)
  db4(192.168.10.50) slave/ONLINE. Roles: reader(192.168.10.201)

[root@monitor ~]#mmm_control move_role writer db1
OK: Role 'writer' has been moved from 'db2' to 'db1'. Now you can wait some time and check new roles info!
[root@monitor ~]#mmm_control show
  db1(192.168.10.20) master/ONLINE. Roles: writer(192.168.10.200)
  db2(192.168.10.30) master/ONLINE. Roles:
  db3(192.168.10.40) slave/ONLINE. Roles: reader(192.168.10.202)
  db4(192.168.10.50) slave/ONLINE. Roles: reader(192.168.10.201)
3. Fault test
(1) Simulate master downtime and recovery
① Stop mysql service of master1
master1
systemctl stop mysqld
② Check VIP drift
monitor
[root@monitor ~]#mmm_control show
  db1(192.168.10.20) master/HARD_OFFLINE. Roles:
  db2(192.168.10.30) master/ONLINE. Roles: writer(192.168.10.200)
  db3(192.168.10.40) slave/ONLINE. Roles: reader(192.168.10.202)
  db4(192.168.10.50) slave/ONLINE. Roles: reader(192.168.10.201)
VIP successfully drifts to master2, and master1 displays HARD_OFFLINE
③ Restart the mysql service of master1
master1
systemctl start mysqld
After master1 is restored, the VIP is still on master2 and has not been transferred to master1
(2) Simulate slave server downtime and recovery
① Stop the mysql service of slave1
slave1
systemctl stop mysqld
② Check VIP drift
monitor
[root@monitor ~]#mmm_control show
  db1(192.168.10.20) master/ONLINE. Roles:
  db2(192.168.10.30) master/ONLINE. Roles: writer(192.168.10.200)
  db3(192.168.10.40) slave/HARD_OFFLINE. Roles:
  db4(192.168.10.50) slave/ONLINE. Roles: reader(192.168.10.201), reader(192.168.10.202)
The VIP corresponding to slave1 is taken over by slave2
③ Restart the mysql service of slave1
slave1
systemctl start mysqld
④ Check whether slave1 is restored
monitor
[root@monitor ~]#mmm_control show
  db1(192.168.10.20) master/ONLINE. Roles:
  db2(192.168.10.30) master/ONLINE. Roles: writer(192.168.10.200)
  db3(192.168.10.40) slave/AWAITING_RECOVERY. Roles:
  db4(192.168.10.50) slave/ONLINE. Roles: reader(192.168.10.201), reader(192.168.10.202)

[root@monitor ~]#mmm_control show
  db1(192.168.10.20) master/ONLINE. Roles:
  db2(192.168.10.30) master/ONLINE. Roles: writer(192.168.10.200)
  db3(192.168.10.40) slave/ONLINE. Roles:
  db4(192.168.10.50) slave/ONLINE. Roles: reader(192.168.10.201), reader(192.168.10.202)

[root@monitor ~]#mmm_control show
  db1(192.168.10.20) master/ONLINE. Roles:
  db2(192.168.10.30) master/ONLINE. Roles: writer(192.168.10.200)
  db3(192.168.10.40) slave/ONLINE. Roles: reader(192.168.10.202)
  db4(192.168.10.50) slave/ONLINE. Roles: reader(192.168.10.201)
After a period of handover, slave1 obtains the VIP again and continues to work
(3) Client test
① Authorize login for the monitor server address on the master1 server
grant all on *.* to 'test'@'192.168.10.90' identified by '123456';
flush privileges;
② Log in using VIP on the monitor server
yum -y install mariadb-server mariadb
systemctl start mariadb.service && systemctl enable mariadb.service
mysql -utest -p123456 -h 192.168.10.200		#Successful login
③ The client creates data and tests the synchronization
monitor
MySQL [(none)]> create database client_test;
Query OK, 1 row affected (0.00 sec)

MySQL [(none)]> show databases;
+--------------------+
| Database           |
+--------------------+
| information_schema |
| client_test        |
| mysql              |
| performance_schema |
| sys                |
| test               |
+--------------------+
6 rows in set (0.01 sec)
master1
mysql> show databases;
+--------------------+
| Database           |
+--------------------+
| information_schema |
| client_test        |
| mysql              |
| performance_schema |
| sys                |
| test               |
+--------------------+
6 rows in set (0.00 sec)
master2
mysql> show databases;
+--------------------+
| Database           |
+--------------------+
| information_schema |
| client_test        |
| mysql              |
| performance_schema |
| sys                |
| test               |
+--------------------+
6 rows in set (0.00 sec)
slave1
mysql> show databases;
+--------------------+
| Database           |
+--------------------+
| information_schema |
| client_test        |
| mysql              |
| performance_schema |
| sys                |
| test               |
+--------------------+
6 rows in set (0.00 sec)
slave2
mysql> show databases;
+--------------------+
| Database           |
+--------------------+
| information_schema |
| client_test        |
| mysql              |
| performance_schema |
| sys                |
| test               |
+--------------------+
6 rows in set (0.00 sec)