catalogue
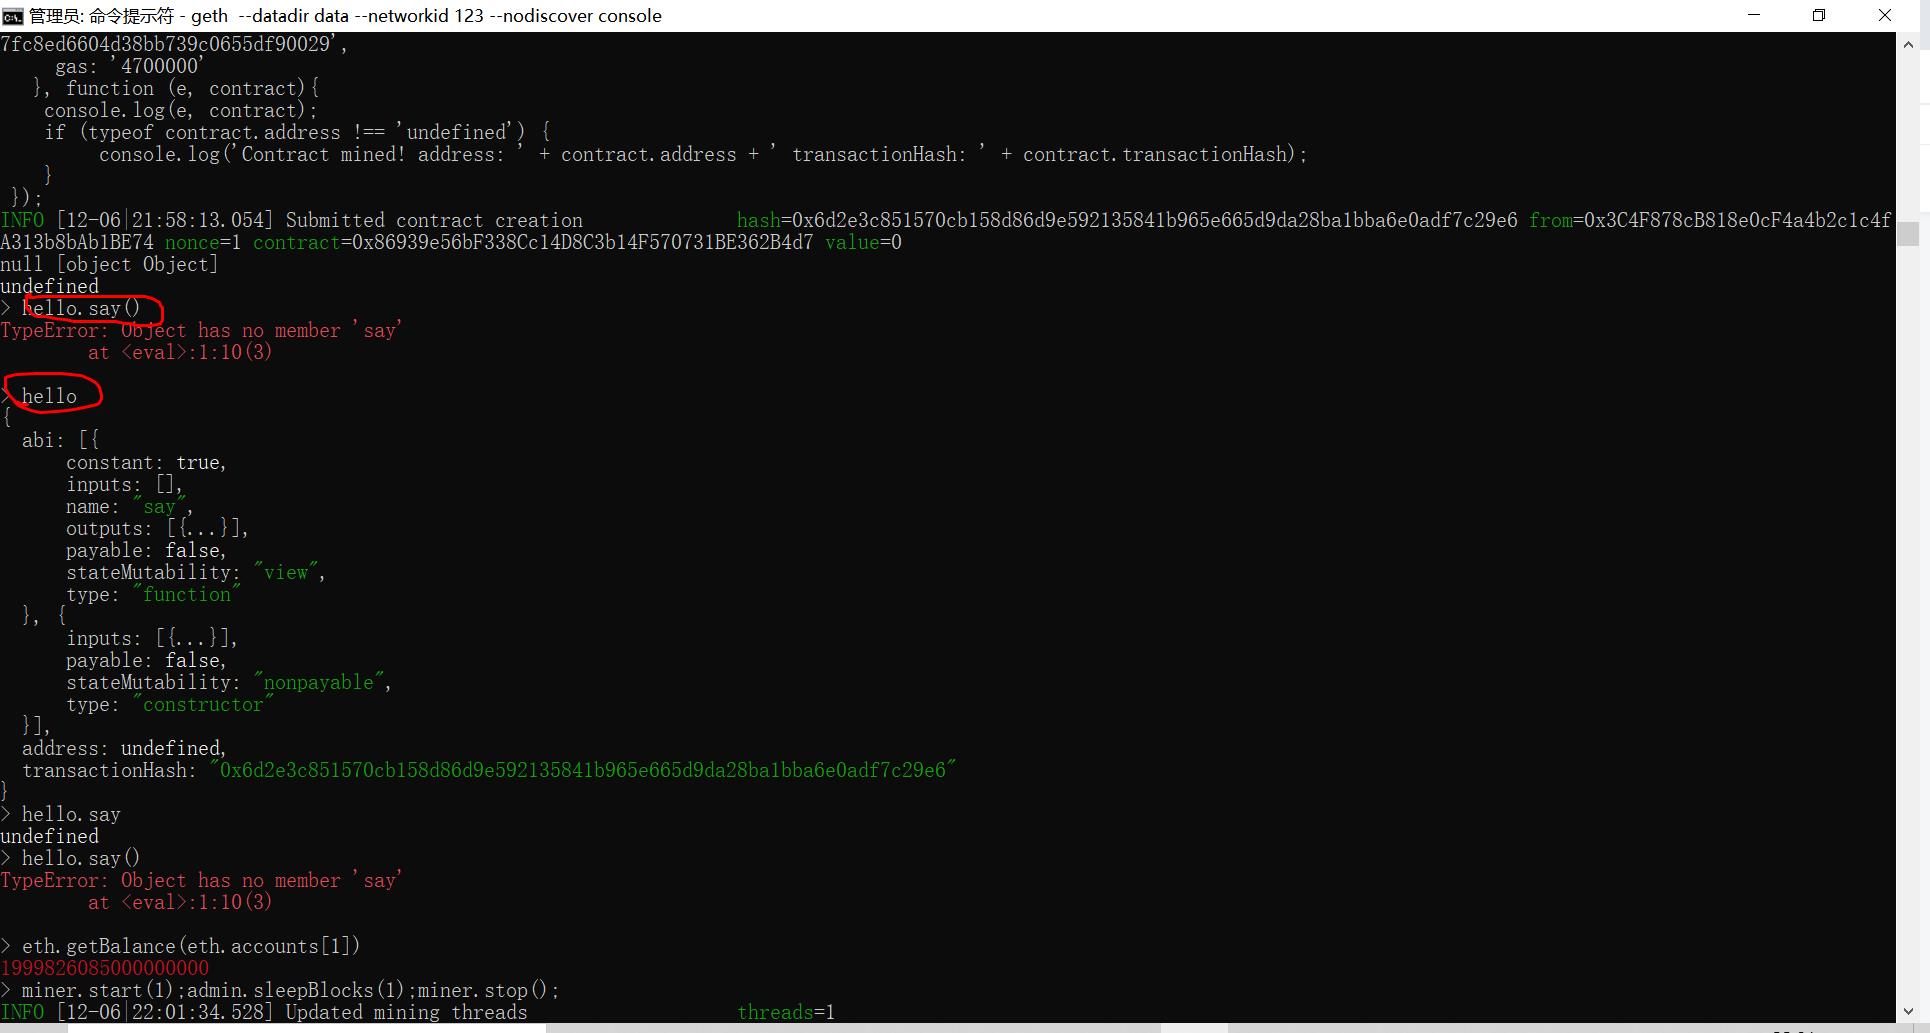
Object has no number say: hello.say() cannot be called
miner is needed at this time To dig the mine (bookkeeping)
A Contract appears mined ! hello.say()
Construction of development environment
err="authentication needed: password or unlock"
Error: authentication needed: password or unlock undefined
Unlock the following user: personal.unlockAccount(eth.accounts[1])

Object has no number say: hello.say() cannot be called
miner is needed at this time To dig the mine (bookkeeping)
miner.start();admin.sleepBlocks(1);miner.stop()
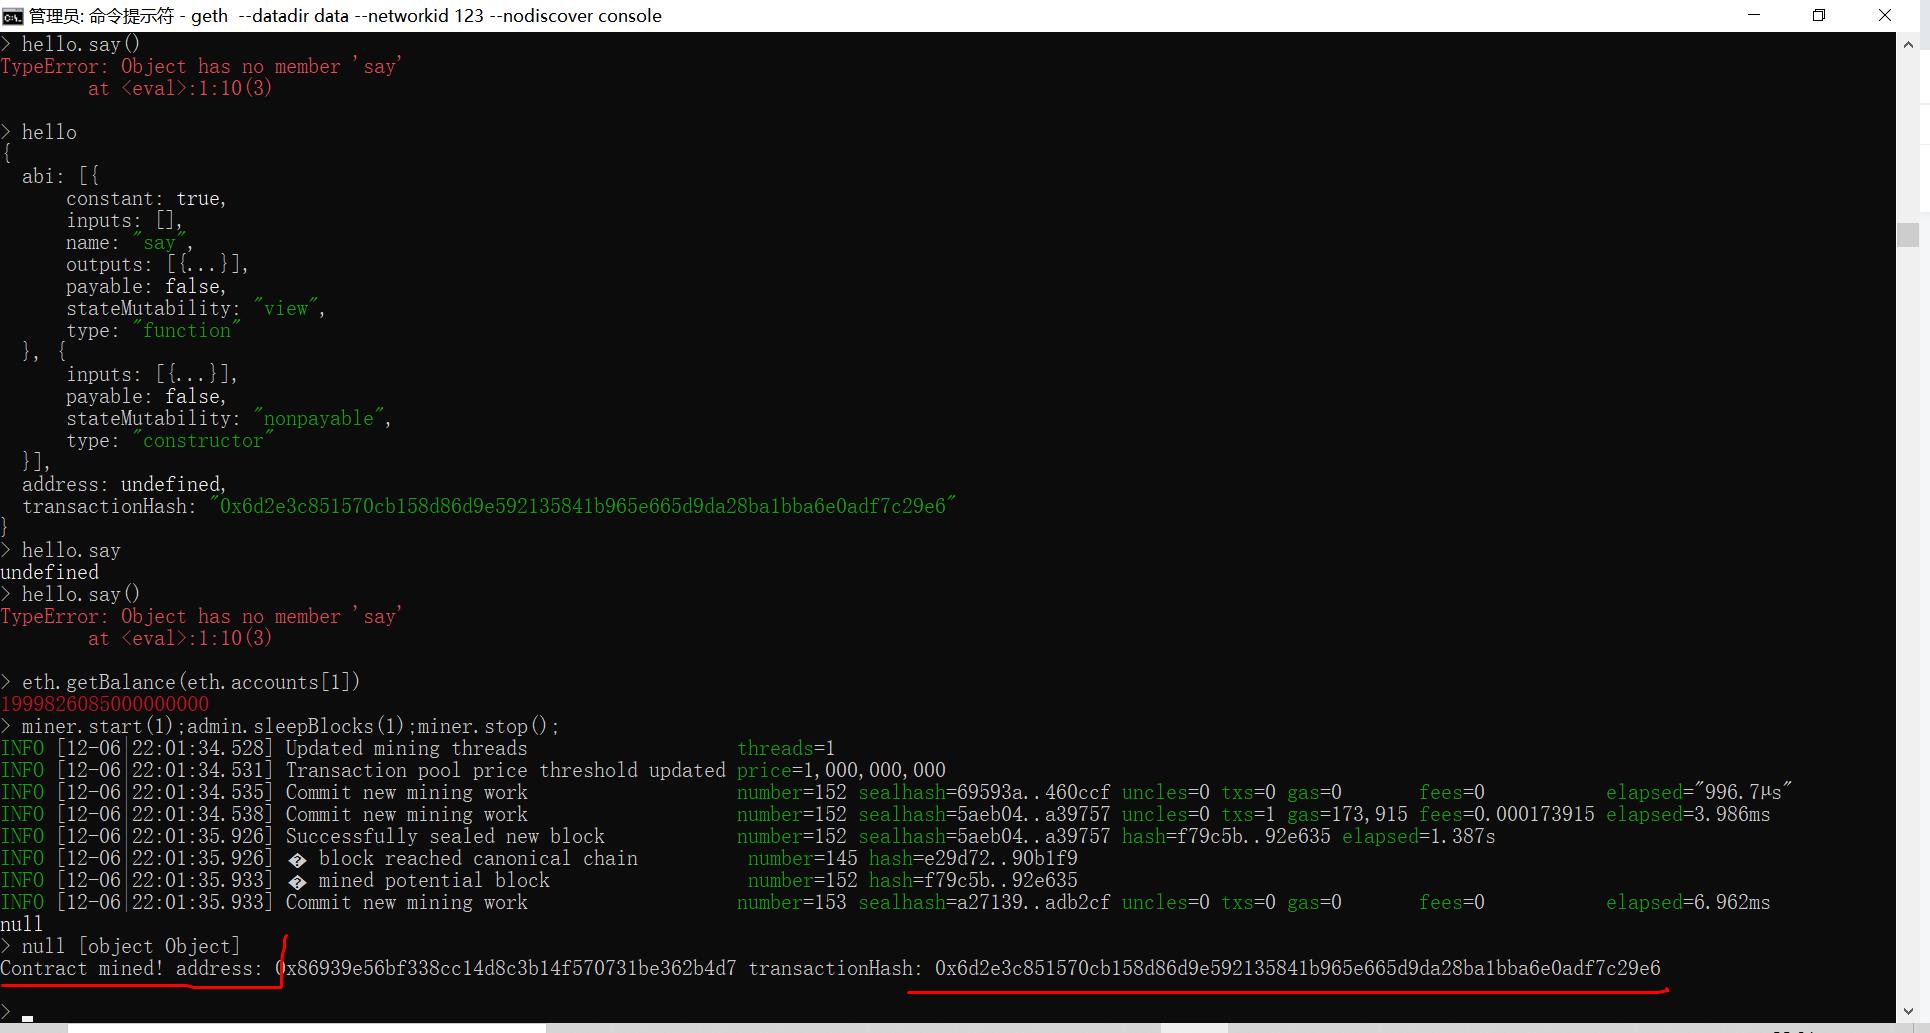
A Contract appears mined ! hello.say()

Construction of development environment
Solid Web Edition
It is strongly recommended for novices Remix -Solidity IDE To develop.
Remix is a browser based Solidity , you don't need to install Solidity. The Hello World tutorial in this article will also be based on Remix Solidity IDE.
If you want to install it yourself, please refer to Solid installation guidelines.
Update and build the development environment. You can also see another article: Building and using Remix IDE, a smart contract development environment.
geth installation
After installation, start the geth console.
Startup environment
As mentioned in the introduction, geth is a Ethereum Client, now use geth to start an Ethereum (developer) network node.
geth --datadir testNet --dev console 2>> test.log
After naming, you will enter the geth console. At this time, the cursor stops at a right arrow, like this:
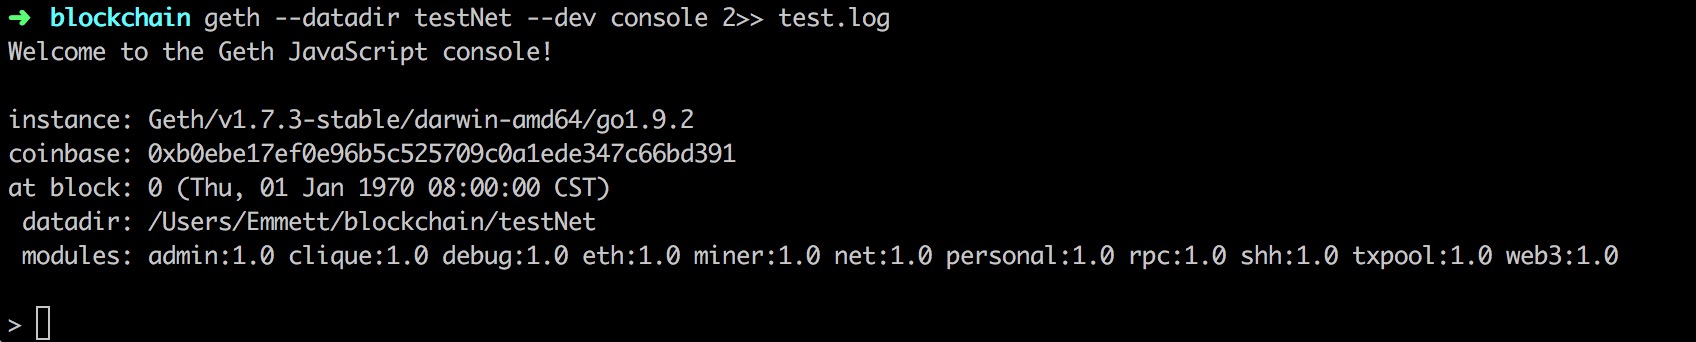
Description of command parameters (more detailed instructions of commands can be read) Geth command usage - parameter details):
--dev Enable the developer network (mode). The developer network will use the POA consensus, pre allocate a developer account by default, and automatically start mining.
--datadir The following parameters are block data and secret key storage directory.
After entering the command for the first time, it will be placed in the current directory and a new testNet directory will be created to store the data.
console rails c
2>> test.log Indicates that the console log is output to the test.log file
For better understanding, it is recommended to open a new command line terminal to display logs in real time:
tail -f test.log
Prepare account 1
An external account is required to deploy smart contracts. Let's take a look at the assigned developer account and use the following command on the console to view the account:
> eth.accounts
Press enter to return an account array with a default account, such as:

You can also use personal.listAccounts to view accounts,
Let's look at the balance in the account. Use the following command:
> eth.getBalance(eth.accounts[0])
**eth.accounts[0] * * indicates the first account in the account list
After entering, you can see a large amount of balance, such as:
1.15792089237316195423570985008687907853269... e+77
The developer account has too much balance. If you use this account to deploy the contract, you will not be able to see the balance change. In order to better experience the whole process, choose to create a new account here.
Create account 2
Create an account using the following command:
> personal.newAccount("TinyXiong")
TinyXiong is the password of the new account. Press enter to return to a new account.
At this time, we view the account list:
> eth.accounts
You can see that the account array contains two accounts, and the new account is in the second (index 1) position.
Now look at the balance of the account:
> eth.getBalance(eth.accounts[1])
0
After entering, 0 will be returned and the new account will be 0. The result is as follows:

Transfer to new account
We know that it is impossible to deploy a contract for an account without balance, so we will transfer 1 ether from the default account to the new account, and use the following command (please use the account corresponding to your own eth.accounts):
eth.sendTransaction({from: '0xb0ebe17ef0e96b5c525709c0a1ede347c66bd391', to: '0xf280facfd60d61f6fd3f88c9dee4fb90d0e11dfc', value: web3.toWei(1, "ether")})
In the open tail -f test.log log terminal, mining records can be seen at the same time
Check the balance of the new account again, and you can see that the new account has 1 ether

Unlock account
Before deploying the contract, you need to unlock the account (just like entering the password for bank transfer), and use the following command:
personal.unlockAccount(eth.accounts[1],"TinyXiong");
"TinyXiong" is the password used to create the account
After unlocking successfully, the account is ready. The next step is to write the contract code.
Write contract code
Now let's start to write the first smart contract code. The solid code is as follows:
pragma solidity ^0.4.18;
contract hello {
    string greeting;

    function hello(string _greeting) public {
        greeting = _greeting;
    }

    function say() constant public returns (string) {
        return greeting;
    }
}
For a simple explanation, we define a contract named hello. When the contract is initialized, a string is saved (we will pass in hello world). Each time we call say, the string is returned.
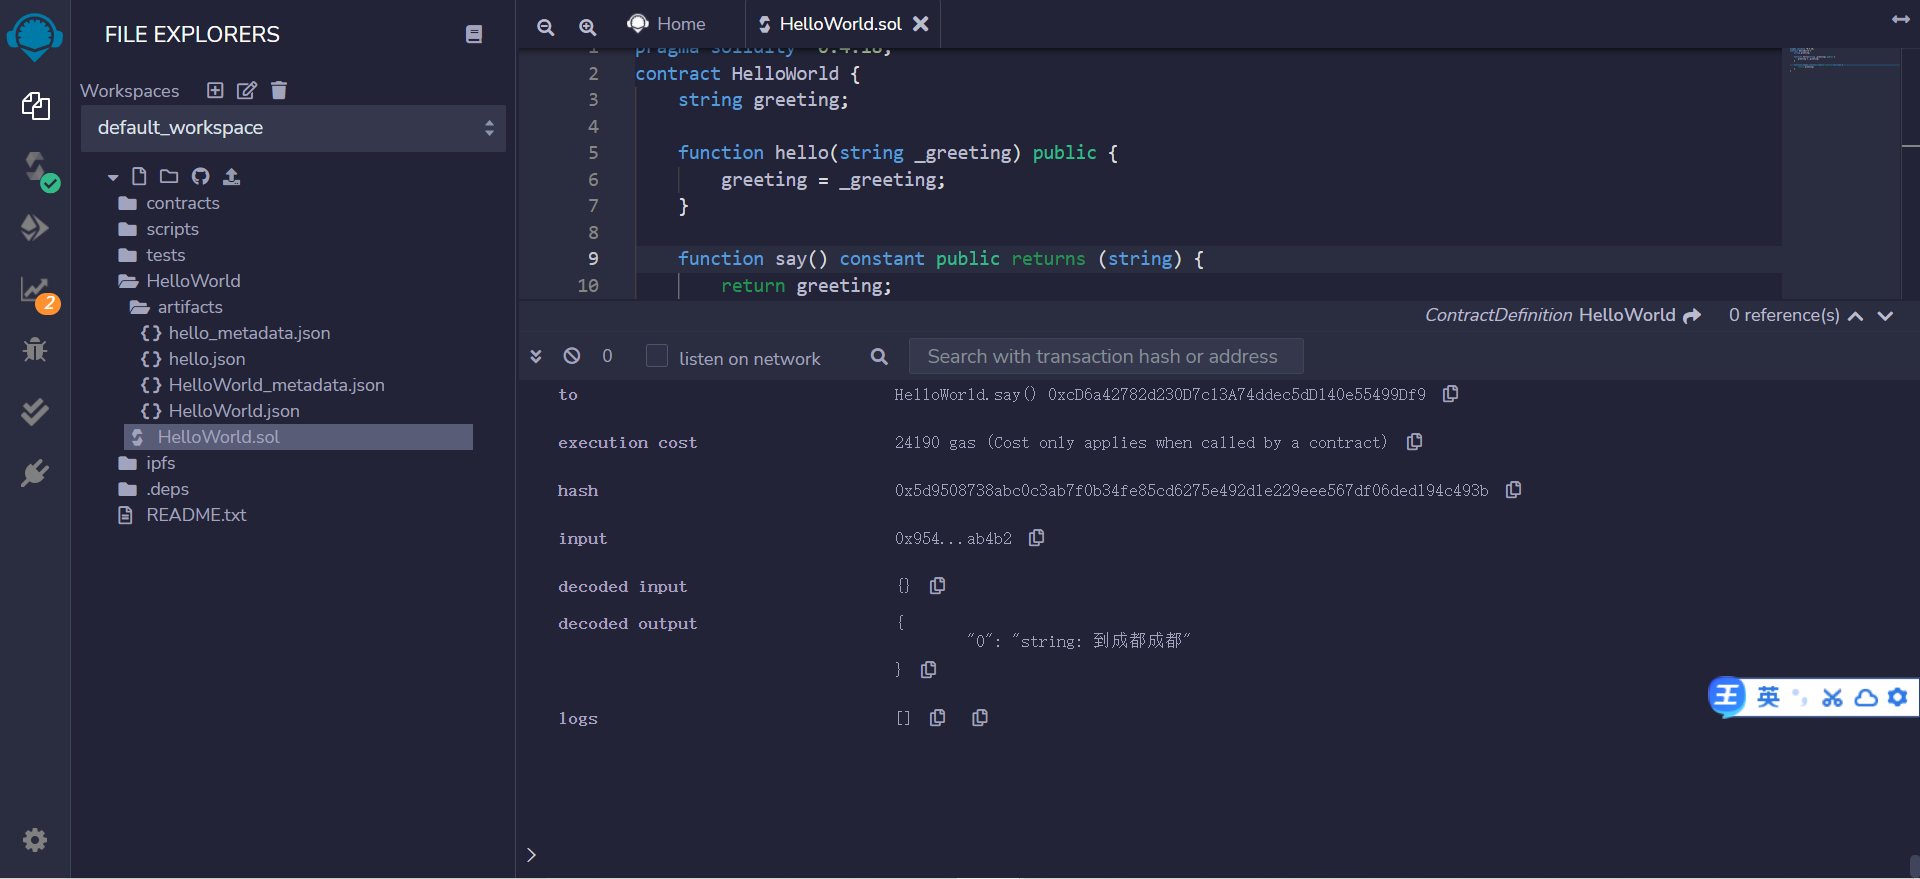
Write (copy) this code to Browser-Solidity , if there are no errors, click Details to obtain the deployment code, such as:

Find the WEB3DEPLOY part in the pop-up dialog box, click Copy, paste it into the editor, and modify the initialization string to hello world.
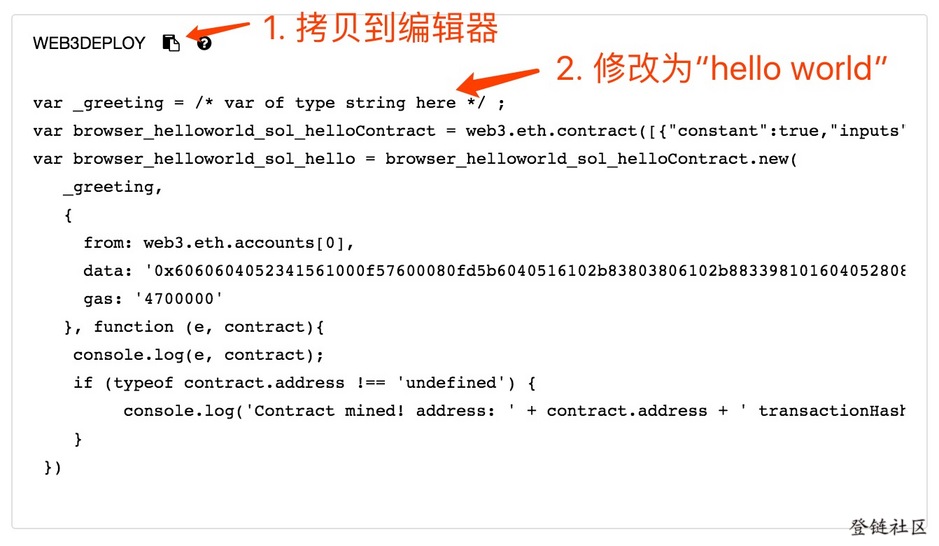
When writing a blog post (November 24, 2017), the version of solidity was 0.4.18. The development of solidity is very fast, and the versions of solidity may not be compatible. You can select the corresponding compiler version in the browser solidity Settings.
Browser solidity is also constantly updated. The screenshot may be different from the interface you see.
Deployment contract
Copy the code generated by browser solidity into the editor, and the modified code is as follows:
var _greeting = "Hello World" ;
var helloContract = web3.eth.contract([{"constant":true,"inputs":[],"name":"say","outputs":[{"name":"","type":"string"}],"payable":false,"stateMutability":"view","type":"function"},{"inputs":[{"name":"_greeting","type":"string"}],"payable":false,"stateMutability":"nonpayable","type":"constructor"}]);
var hello = helloContract.new(
   _greeting,
   {
     from: web3.eth.accounts[1],
     data: '0x6060604052341561000f57600080fd5b6040516102b83803806102b8833981016040528080518201919050508060009080519060200190610041929190610048565b50506100ed565b828054600181600116156101000203166002900490600052602060002090601f016020900481019282601f1061008957805160ff19168380011785556100b7565b828001600101855582156100b7579182015b828111156100b657825182559160200191906001019061009b565b5b5090506100c491906100c8565b5090565b6100ea91905b808211156100e65760008160009055506001016100ce565b5090565b90565b6101bc806100fc6000396000f300606060405260043610610041576000357c0100000000000000000000000000000000000000000000000000000000900463ffffffff168063954ab4b214610046575b600080fd5b341561005157600080fd5b6100596100d4565b6040518080602001828103825283818151815260200191508051906020019080838360005b8381101561009957808201518184015260208101905061007e565b50505050905090810190601f1680156100c65780820380516001836020036101000a031916815260200191505b509250505060405180910390f35b6100dc61017c565b60008054600181600116156101000203166002900480601f0160208091040260200160405190810160405280929190818152602001828054600181600116156101000203166002900480156101725780601f1061014757610100808354040283529160200191610172565b820191906000526020600020905b81548152906001019060200180831161015557829003601f168201915b5050505050905090565b6020604051908101604052806000815250905600a165627a7a723058204a5577bb3ad30e02f7a3bdd90eedcc682700d67fc8ed6604d38bb739c0655df90029',
     gas: '4700000'
   }, function (e, contract){
    console.log(e, contract);
    if (typeof contract.address !== 'undefined') {
         console.log('Contract mined! address: ' + contract.address + ' transactionHash: ' + contract.transactionHash);
    }
 });
Line 1: change the string to Hello World
Line 2: modify contract variable name
Line 3: modify the variable name of the contract instance, and then you can call the function directly with the instance.
Line 6: modify the deployment account as the new account index, that is, use the new account to deploy the contract.
Line 8: IDE has estimated the gas fee to be paid.
Line 9: set the deployment callback function.
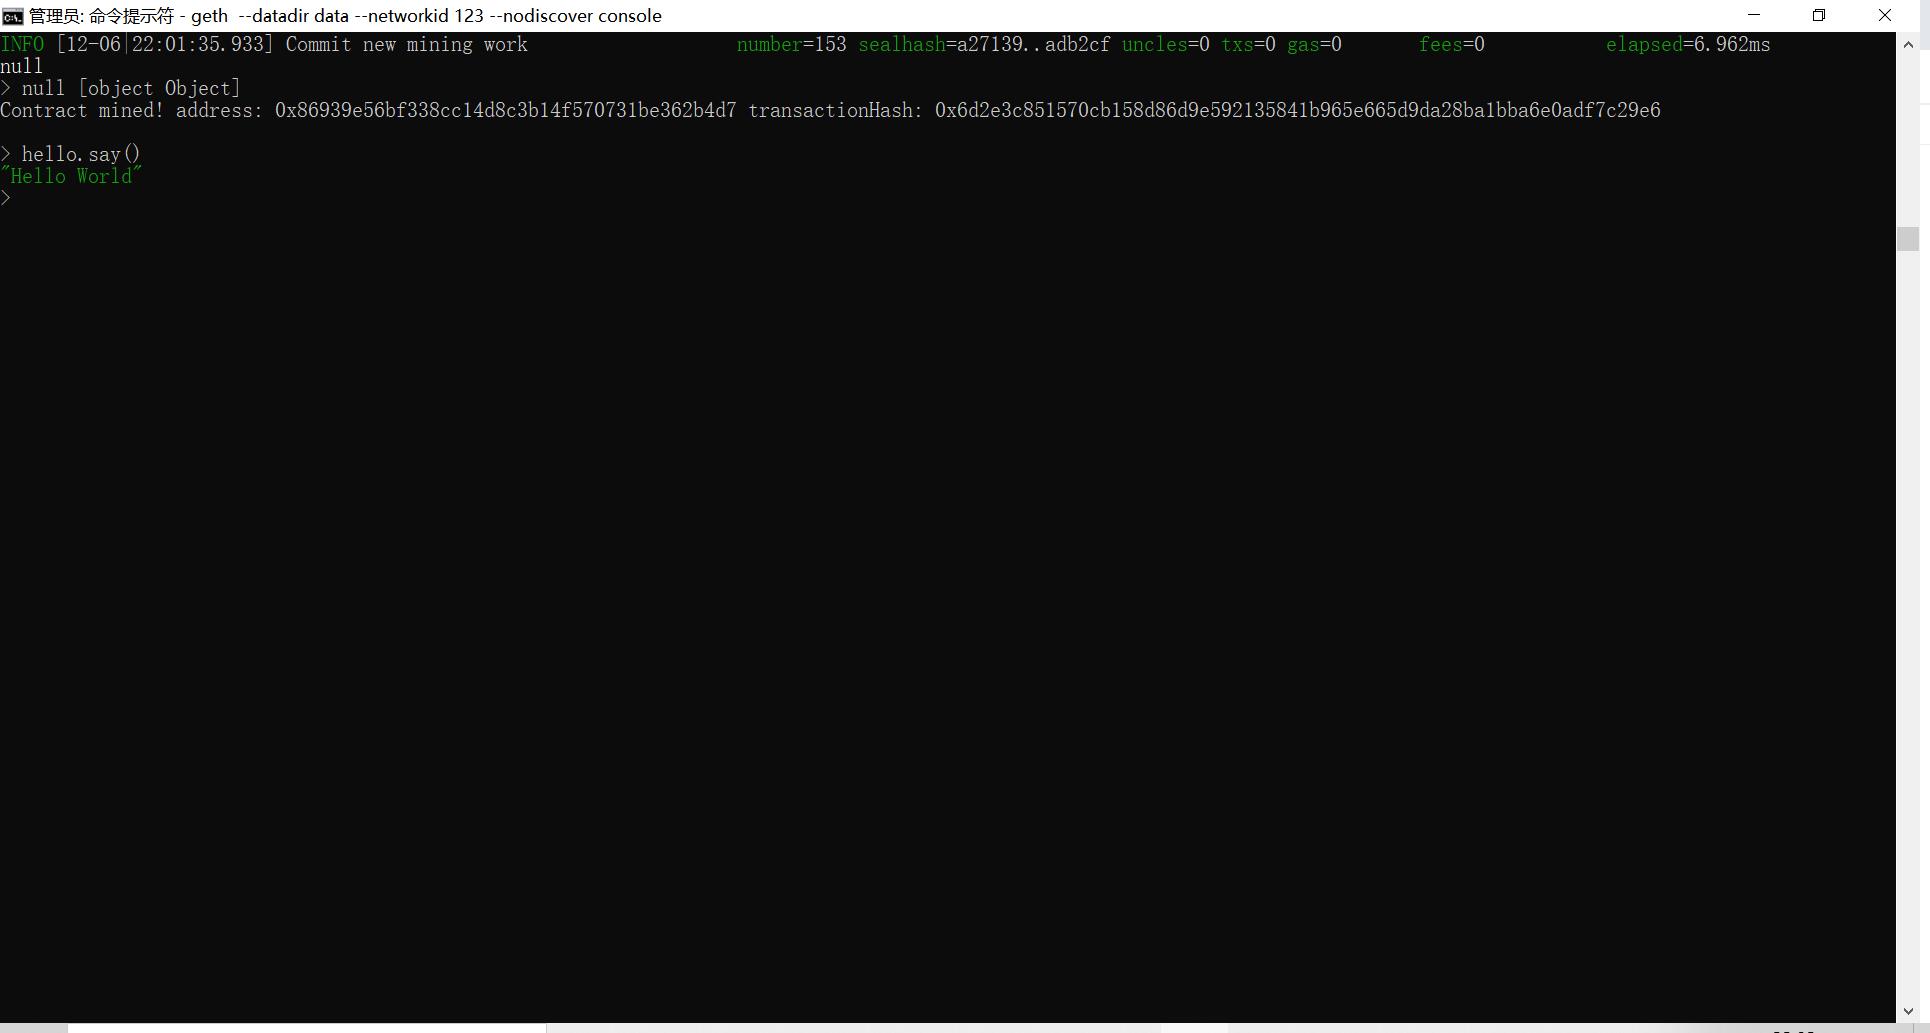
Copy it back to the geth console. After entering, you will see the output, such as:
Contract mined! address: 0x79544078dcd9d560ec3f6eff0af42a9fc84c7d19 transactionHash: 0xe2caab22102e93434888a0b8013a7ae7e804b132e4a8bfd2318356f6cf0480b3
This indicates that the contract has been successfully deployed.
In the open tail -f test.log log terminal, mining records can be seen at the same time
Now let's look at the balance of the new account:
> eth.getBalance(eth.accounts[1])
Is it less than the balance transferred before!
Operation contract
> hello.say()
"Hello World"
Output Hello World. Our first contract, Hello World, runs successfully.
The operation screenshot is as follows:
System learning DAPP development, this video course Ethereum DAPP development practice It's a good choice for you.
Blockchain in simple terms - Build a high-quality blockchain technology blog, and all school district blockchains come here