introduction
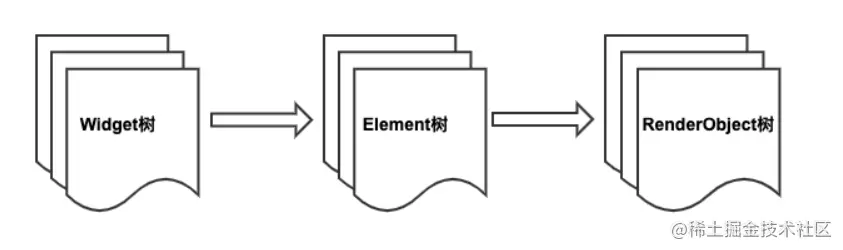
In fluent, many people know the three trees, and the most familiar one is the Widget tree, which is also the most commonly used thing in the process of normal development. Do you know what the other two trees are and their construction process?
Widget tree
In the development process, widgets are closely related to us. Almost all pages are displayed with widgets. Widget s are the core of fluent and the immutable description of the user interface.
In fact, the function of the widget is to describe the configuration data of a UI element, that is to say, the widget is not the element finally drawn on the screen, it just describes the configuration of the display element.
There is no clear concept of widget tree in the running process of the code. This tree is our description of widget nesting in the development process, because it really looks like a tree
abstract class Widget {
  const Widget({ this.key });
  final Key key;

  @protected
  Element createElement();//Note 1

  static bool canUpdate(Widget oldWidget, Widget newWidget) {//Note 2
   return oldWidget.runtimeType == newWidget.runtimeType
        && oldWidget.key == newWidget.key;
  }
}

Copy code
Widget itself is an abstract class that receives a key, For the principle and use of key, please check this article,
- Note 1 createElement is an abstract method, and subclasses must be implemented. This method creates an Element, so each Element will correspond to a widget object.
- Note 2 Judge whether the oldWidget and newWidget are the same widget. If the runtimeType and key are the same, it is considered to be the same widget.
It should be noted that the widget cannot be modified. If you want to modify it, you can only recreate it, because wdiget does not participate in rendering. It is just a configuration file. You only need to tell the rendering layer its own style.
Element tree
The Element that is really displayed on the screen in fluent is the Element class, that is, the widget only describes the configuration data of the Element, and the widget can correspond to multiple elements. This is because the same widget can be added to different parts of the Element tree. In real rendering, each Element will correspond to a widget object.
The so-called UI tree is composed of Element nodes. The final Layout and rendering of components are completed through RenderObject. The general process from creation to rendering is to generate elements according to widget s, and then create corresponding renderobjects and associate them to elements On the RenderObject attribute, finally, the Layout arrangement and drawing are completed through RenderObject.
Element represents an instance at a specific location in the widget tree. Most elements have only a unique RenderObject, but some elements have multiple child nodes, such as some classes inherited from RenderObjectElement, such as MultiChildRenderObjectObject. Finally, the renderobjects of all elements form a tree, which we call the rendering tree.
To sum up, we can think that the UI system of fluent includes three trees: Widget tree, Element tree and rendering tree. Their corresponding formula Element tree is generated according to the Widget tree, and the rendering tree depends on the Element tree, as shown in the figure:
Element class source code
abstract class Element extends DiagnosticableTree implements BuildContext {

  Element(Widget widget)
    : assert(widget != null),
      _widget = widget;

  Element _parent;

  @override
  Widget get widget => _widget;
  Widget _widget;

  RenderObject get renderObject { ... }

  @mustCallSuper
  void mount(Element parent, dynamic newSlot) { ... }

  @mustCallSuper
  void activate() { ... }

  @mustCallSuper
  void deactivate() { ... }

  @mustCallSuper
  void unmount() { ... }
}
Copy code
Life cycle of Element
- initial Initial state
_ElementLifecycle _lifecycleState = _ElementLifecycle.initial;
- active
//mount method of RenderObjectElement
@override
void mount(Element? parent, Object? newSlot) {
  super.mount(parent, newSlot);
  //.....
  _renderObject = widget.createRenderObject(this);
  assert(_slot == newSlot);
  attachRenderObject(newSlot);
  _dirty = false;
}
When fragment calls element After the mount method, the mount method will first call the createRenderObject method of the widget corresponding to the element to create the RenderObject object corresponding to the element. Then call Element.. Attachrenderobject Element The renderobject is added to the slot of the rendering tree (this step is not necessary. It is generally necessary to re attach when the Element tree structure changes. The element inserted into the rendering is in the active state. After it is in the active state, it can be displayed on the screen (it can be hidden).
super.mount(parent,newslot)
_lifecycleState = _ElementLifecycle.active
When the widget is updated, in order to avoid re creating the element, it will judge whether it can be updated and call the updateChild method
@protected
@pragma('vm:prefer-inline')
Element? updateChild(Element? child, Widget? newWidget, Object? newSlot) {
  //When there is no new widget and there is an original widget, move out of the original child because it no longer has a configuration
  if (newWidget == null) {
    if (child != null)
      deactivateChild(child);
    return null;
  }
  final Element newChild;
  //There was a child
  if (child != null) {
    bool hasSameSuperclass = true;
	assert(() {
        final int oldElementClass = Element._debugConcreteSubtype(child);
        final int newWidgetClass = Widget._debugConcreteSubtype(newWidget);
        hasSameSuperclass = oldElementClass == newWidgetClass;
        return true;
      }());
      // If the parent control type is the same and the child control is the same, update it directly
    if (hasSameSuperclass && child.widget == newWidget) {
      if (child.slot != newSlot)
        updateSlotForChild(child, newSlot);
      newChild = child;
    } else if (hasSameSuperclass && Widget.canUpdate(child.widget, newWidget))
        //If the parent control type is the same and the widget can be updated, the child is updated
      if (child.slot != newSlot)
        updateSlotForChild(child, newSlot);
      child.update(newWidget);
      assert(child.widget == newWidget);
      assert(() {
        child.owner!._debugElementWasRebuilt(child);
        return true;
      }());
      newChild = child;
    } else {
      //It cannot be updated. You need to remove the original child first, create a new child and add it
      deactivateChild(child);
      assert(child._parent == null);
      newChild = inflateWidget(newWidget, newSlot);
    }
  } else {
    //If there is no child, create a new child and add it directly
    newChild = inflateWidget(newWidget, newSlot);
  }
  return newChild;
}
weidget.canUpdate is used to judge whether the type and key are the same. If we need to force the update, we only need to modify the key. The official does not recommend modifying the runtimetype
static bool canUpdate(Widget oldWidget, Widget newWidget) {
  return oldWidget.runtimeType == newWidget.runtimeType
      && oldWidget.key == newWidget.key;
}
Transition from inactive to active lifecycle state In the updateChild method above, if the inflateWidget() method is called, you need to change the state from inactive to active
@mustCallSuper
void activate() {
  assert(_lifecycleState == _ElementLifecycle.inactive);
  assert(widget != null);
  assert(owner != null);
  assert(depth != null);
  final bool hadDependencies = (_dependencies != null && _dependencies!.isNotEmpty) || _hadUnsatisfiedDependencies;
  _lifecycleState = _ElementLifecycle.active;
  // We unregistered our dependencies in deactivate, but never cleared the list.
  // Since we're going to be reused, let's clear our list now.
  _dependencies?.clear();
  _hadUnsatisfiedDependencies = false;
  _updateInheritance();
  if (_dirty)
    owner!.scheduleBuildFor(this);
  if (hadDependencies)
    didChangeDependencies();
}- inactive Transition from active to inactive lifecycle state In the above updateChild method, we can see that the new widget is empty and there is an old one. It will call deactiveChild to remove child and then call the deactivate method. Set lifecycleState to inactive
@mustCallSuper
void deactivate() {
  assert(_lifecycleState == _ElementLifecycle.active);
  assert(_widget != null); // Use the private property to avoid a CastError during hot reload.
  assert(depth != null);
  if (_dependencies != null && _dependencies!.isNotEmpty) {
    for (final InheritedElement dependency in _dependencies!)
      dependency._dependents.remove(this);
  }
  _inheritedWidgets = null;
  _lifecycleState = _ElementLifecycle.inactive;
}
- defunct Transition from inactive to retired lifecycle state
@mustCallSuper
void unmount() {
  assert(_lifecycleState == _ElementLifecycle.inactive);
  assert(_widget != null); // Use the private property to avoid a CastError during hot reload.
  assert(depth != null);
  assert(owner != null);
  // Use the private property to avoid a CastError during hot reload.
  final Key? key = _widget!.key;
  if (key is GlobalKey) {
    owner!._unregisterGlobalKey(key, this);
  }
  // Release resources to reduce the severity of memory leaks caused by
  // defunct, but accidentally retained Elements.
  _widget = null;
  _dependencies = null;
  _lifecycleState = _ElementLifecycle.defunct;
}
StatelessElement
Let's just call the core code of Container statement and show it below!
class StatelessElement extends ComponentElement {
  //widget passed in when creating through createElement
  StatelessElement(StatelessWidget widget) : super(widget);

  @override
  StatelessWidget get widget => super.widget as StatelessWidget;

  //The build called here is our own build method
  @override
  Widget build() => widget.build(this);
}


abstract class ComponentElement extends Element {
  /// Creates an element that uses the given widget as its configuration.
  ComponentElement(Widget widget) : super(widget);

  Element? _child;

  bool _debugDoingBuild = false;
  @override
  bool get debugDoingBuild => _debugDoingBuild;

  @override
  void mount(Element? parent, Object? newSlot) {
    super.mount(parent, newSlot);
    _firstBuild();
  }

  void _firstBuild() {
    rebuild();
  }


  @override
  @pragma('vm:notify-debugger-on-exception')
  void performRebuild() {
   //.....
  }

  @protected
  Widget build();
}

abstract class Element extends DiagnosticableTree implements BuildContext {
  // Construction method to receive a widget parameter
  Element(Widget widget)
    : assert(widget != null),
      _widget = widget;

  @override
  Widget get widget => _widget;
  Widget _widget;

  void rebuild() {
    if (!_active || !_dirty)
      return;

    Element debugPreviousBuildTarget;

    // The performRebuild method called here is not implemented in the current class, so you can only find the implementation in your own class
    performRebuild();
  }

  /// Called by rebuild() after the appropriate checks have been made.
  @protected
  void performRebuild();
}
Copy code
Sort out the process as follows:
- StatelessElement is created here. After successful creation, the framework will call the mount method. Because StatelessElement does not implement mount, the mount of ComponentElement is called here.
- Called in mount The firstBuild method is used for the first build. (what is called here is the implementation of statelesselement.)_ firstBuild method)
- _ The firstBuild method finally calls super._. Firstbuild(), that is, the of ComponentElement_ The firstBuild method calls rebuild() in it. Because ComponentElement is not rewritten, the rebuild method of Element is called in the end.
- rebuild will eventually call the performRebuild method of ComponentElement. As follows:
 @override
  @pragma('vm:notify-debugger-on-exception')
  void performRebuild() {
    if (!kReleaseMode && debugProfileBuildsEnabled)
      Timeline.startSync('${widget.runtimeType}',  arguments: timelineArgumentsIndicatingLandmarkEvent);
    assert(_debugSetAllowIgnoredCallsToMarkNeedsBuild(true));
    Widget? built;
    try {
      assert(() {
        _debugDoingBuild = true;
        return true;
      }());
      // Call build. What is called here is to implement the StatelessElement class. Finally, it is called into our own build
      built = build();
      debugWidgetBuilderValue(widget, built);
    } catch (e, stack) {
      // catch
    } finally {
      _dirty = false;
      assert(_debugSetAllowIgnoredCallsToMarkNeedsBuild(false));
    }
    try {
      //Finally, the updateChild method is called
      _child = updateChild(_child, built, slot);
      assert(_child != null);
    } catch (e, stack) {
      //....
      _child = updateChild(null, built, slot);
    }
    if (!kReleaseMode && debugProfileBuildsEnabled)
      Timeline.finishSync();
  }
@pragma('vm:prefer-inline')
Element inflateWidget(Widget newWidget, Object? newSlot) {
  assert(newWidget != null);
  final Key? key = newWidget.key;
  if (key is GlobalKey) {
    final Element? newChild = _retakeInactiveElement(key, newWidget);
    if (newChild != null) {
      assert(newChild._parent == null);
      assert(() {
        _debugCheckForCycles(newChild);
        return true;
      }());
      newChild._activateWithParent(this, newSlot);
      final Element? updatedChild = updateChild(newChild, newWidget, newSlot);
      assert(newChild == updatedChild);
      return updatedChild!;
    }
  }
  //Create corresponding element
  final Element newChild = newWidget.createElement();
  assert(() {
    _debugCheckForCycles(newChild);
    return true;
  }());
  //  Call the mount method
  newChild.mount(this, newSlot);
  assert(newChild._lifecycleState == _ElementLifecycle.active);
  return newChild;
}
The updateChild method is finally called in the above code, which is mentioned in the life cycle of Element above. In the updateChild method, it will determine whether built needs to be updated or replaced. If it needs to be replaced, it will clear the original, and create the corresponding Element for the new built, and finally call built corresponding to the mount method of Element. The element here is not necessarily StatelessElement, but depends on what the element corresponding to the widget in the build method is.
To sum up
From the above process analysis, we can see that the whole process is like a ring. The initial framework calls mount. performRebuild is finally called in mount. In performRebuild, we call the build method we implemented. After getting the corresponding widget, if it needs to be replaced, we will recreate the element of the widget and call the mount method of this element.
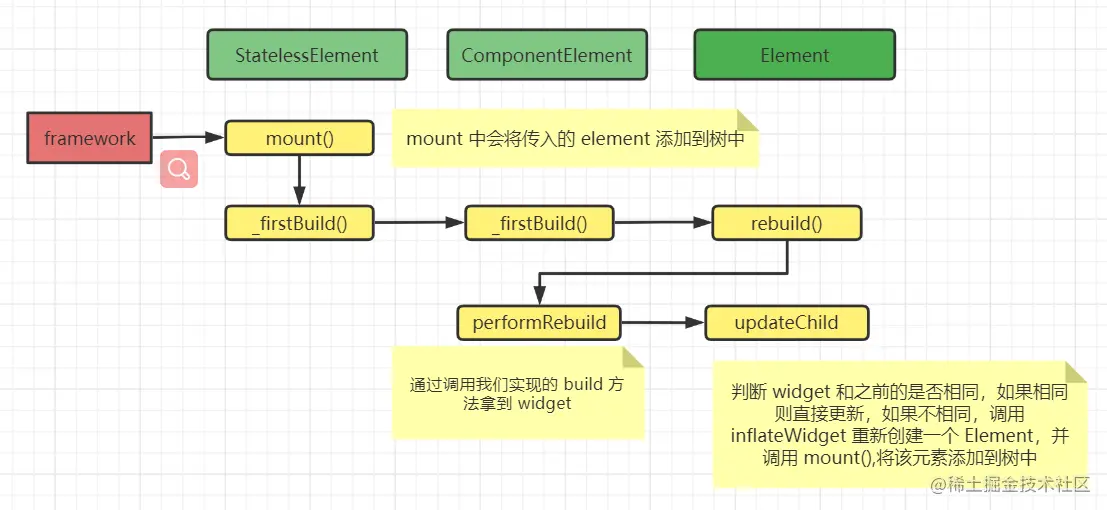
The whole process is roughly as shown in the figure above
RenderObjectElement
Let's take Flex as an example to see how to create an Element.
@override
MultiChildRenderObjectElement createElement() => MultiChildRenderObjectElement(this);
Copy code
Fiex is an Element created through the parent class SingleChildRenderObjectWidget, and MultiChildRenderObjectElement is inherited from RenderObjectElement.
Next, let's analyze the calling process of RenderObjectElement
class MultiChildRenderObjectElement extends RenderObjectElement {

      @override
  void mount(Element? parent, Object? newSlot) {
    //Call super Mount inserts the incoming parent into the tree
    super.mount(parent, newSlot);
     //
    final List<Element> children = List<Element>.filled(widget.children.length, _NullElement.instance, growable: false);
    Element? previousChild;
     //Traverse all child ren
    for (int i = 0; i < children.length; i += 1) {
      //Load child
      final Element newChild = inflateWidget(widget.children[i], IndexedSlot<Element?>(i, previousChild));
      children[i] = newChild;
      previousChild = newChild;
    }
    _children = children;
  }
}

abstract class RenderObjectElement extends Element {
  @override
  void mount(Element? parent, Object? newSlot) {
    //Insert the incoming parent into the tree
    super.mount(parent, newSlot);

    //Create a renderObject object associated with element
    _renderObject = widget.createRenderObject(this);
    //Set element Renderobjectz inserts into the render tree at the specified location
    attachRenderObject(newSlot);
    _dirty = false;
  }
}
Copy code
Let's make a rough analysis
- First, call the mount method of MultiChildRenderObjectElement and insert the passed in parent into the tree,
- Then, a renderObject is created in the RenderObjectElement and added to the specified position of the slot in the rendering tree
- Finally, go back to the MultiChildRenderObjectElement, traverse all the children, and call the inflateWidget to create the child and insert it into the specified slot.
StatefulElement
Compared with StatelessWidget, StatefulWidget has one more State. In StatefulWidget, a State will be created through createState, as shown below
abstract class StatefulWidget extends Widget {
  const StatefulWidget({ Key? key }) : super(key: key);

  @override
  StatefulElement createElement() => StatefulElement(this);

  @protected
  @factory
  State createState(); // ignore: no_logic_in_create_state, this is the original sin
}
Copy code
From the above code, we can see that the Element corresponding to StatefulWidget is StatefulElement.
class StatefulElement extends ComponentElement {
  /// Creates an element that uses the given widget as its configuration.
  StatefulElement(StatefulWidget widget)
      : _state = widget.createState(),
        super(widget) {
    assert(state._element == null);
    state._element = this;
    state._widget = widget;
  }

  State<StatefulWidget> get state => _state!;
  State<StatefulWidget>? _state;

  @override
  Widget build() => state.build(this);
}
Copy code
In StatefulElement, by calling widget Createstate got the state object
After StatefulElement is created, the framework will call the mount method in StatelessElement.
Unlike StatelessElement:
- Statelesselement is implemented by calling widget Build (this) method
- StatefulElement is created by calling state Build (this) method
summary
Through the above analysis, we know the life cycle of Element and its calling process. And if you carefully observe the above three elements, you will find that the above three elements can be divided into two categories: composite class and drawing class.
- Composite classes generally inherit from StatelessElement or StatefulElement. They belong to composite classes and do not participate in drawing. Multi-layer widgets are nested inside. If you check their mount methods, you will find that renderObject is not created and added to the rendering tree. For example, StatelessWidget, StatefulWidget, Text, container, image, etc.
- As the name suggests, the feature of drawing class is to participate in drawing. In the mount method, renderObject will be created and attachRenderObject will be placed in the rendering tree. Such as Column, SizedBox, Transform, etc.
In fact, there is another type. Let's borrow a picture from the boss:
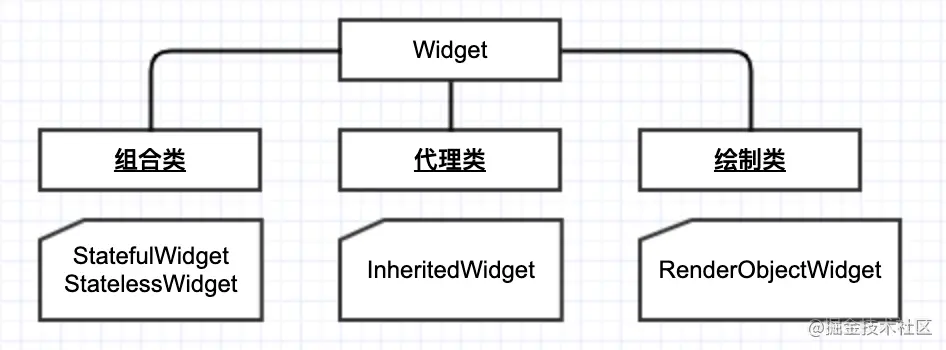
The element corresponding to the proxy class is ProxyElement.
RenderObject
As mentioned above, each Element corresponds to a RenderObject. We can use Element RenderObject. And the main responsibility of RenderObject is to draw Layout. All renderobjects will form a Render Tree.
Through the above analysis, we know that the core of the tree is in the mount method. We can directly view renderobjectelement Mount() method
@override
void mount(Element? parent, Object? newSlot) {
  super.mount(parent, newSlot);
  _renderObject = widget.createRenderObject(this);
  attachRenderObject(newSlot);
  _dirty = false;
}
Copy code
After executing super After mount (inserting the parent into the element tree), the attachRenderObject method is executed.
@override
void attachRenderObject(Object? newSlot) {
  assert(_ancestorRenderObjectElement == null);
  _slot = newSlot;
  //Query the current nearest RenderObject object
  _ancestorRenderObjectElement = _findAncestorRenderObjectElement();
  // Insert the RenderObject object of the current node under the RenderObject found above
  _ancestorRenderObjectElement?.insertRenderObjectChild(renderObject, newSlot);
  //.........
}

RenderObjectElement? _findAncestorRenderObjectElement() {
   Element? ancestor = _parent;
   while (ancestor != null && ancestor is! RenderObjectElement)
     ancestor = ancestor._parent;
   return ancestor as RenderObjectElement?;
 }
Copy code
The above code is not difficult to understand. It is an endless loop. The exit addition is that the ancestor parent node is empty and the parent node is renderobjectelement. It shows that this method will find a RenderObjectElement object nearest to the current node, then call the insertRenderObjectChild method. This method is an abstract method. We look at the rewrite logic in the two classes.
- SingleChildRenderObjectElement
void insertRenderObjectChild(RenderObject child, Object? slot) {
  final RenderObjectWithChildMixin<RenderObject> renderObject = this.renderObject as RenderObjectWithChildMixin<RenderObject>;
  renderObject.child = child;
}
In the above code, we found the RenderObjectElement of the current RenderObjectElement and gave the child we passed in to the child of the RenderObject. Therefore, the passed in child is hung on the RenderObject tree.
- MultiChildRenderObjectElement
@override
void insertRenderObjectChild(RenderObject child, IndexedSlot<Element?> slot) {
  final ContainerRenderObjectMixin<RenderObject, ContainerParentDataMixin<RenderObject>> renderObject = this.renderObject;
  assert(renderObject.debugValidateChild(child));
  renderObject.insert(child, after: slot.value?.renderObject);
  assert(renderObject == this.renderObject);
}
In the above code, after finding the renderObject, it is assigned to the class containerrenderobjectmixin < renderObject, containerparentdatamixin < renderObject > >. Let's take a look at this class
/// Generic mixin for render objects with a list of children.
///A generic blend of rendered objects with a list of children
/// Provides a child model for a render object subclass that has a doubly-linked
/// list of children.
///Provides a sub model for a subclass of rendered objects with a list of sub items that are linked in both directions
mixin ContainerRenderObjectMixin<ChildType extends RenderObject, ParentDataType extends ContainerParentDataMixin<ChildType>> on RenderObject {
}
Generic mixin s are objects used to render a set of sub objects. From here, we can know that MultiChildRenderObjectElement can have sub lists. Through the above notes, we can see a key point, the two-way linked list. Therefore, the child nodes of MultiChildRenderObjectElement are connected through a two-way linked list. The above insert will eventually call_ insertIntoChildList method, as follows:
ChildType? _firstChild;
ChildType? _lastChild;
void _insertIntoChildList(ChildType child, { ChildType? after }) {
  final ParentDataType childParentData = child.parentData! as ParentDataType;
  _childCount += 1;
  assert(_childCount > 0);
  if (after == null) {
    // after is null, insert to_ In firstChild
    childParentData.nextSibling = _firstChild;
    if (_firstChild != null) {
      final ParentDataType _firstChildParentData = _firstChild!.parentData! as ParentDataType;
      _firstChildParentData.previousSibling = child;
    }
    _firstChild = child;
    _lastChild ??= child;
  } else {
    final ParentDataType afterParentData = after.parentData! as ParentDataType;
    if (afterParentData.nextSibling == null) {
      // insert at the end (_lastChild); we'll end up with two or more children
      // Insert child at the end
      assert(after == _lastChild);
      childParentData.previousSibling = after;
      afterParentData.nextSibling = child;
      _lastChild = child;
    } else {
      // insert in the middle; we'll end up with three or more children
      // Insert into the middle
      childParentData.nextSibling = afterParentData.nextSibling;
      childParentData.previousSibling = after;
      // set up links from siblings to child
      final ParentDataType childPreviousSiblingParentData = childParentData.previousSibling!.parentData! as ParentDataType;
      final ParentDataType childNextSiblingParentData = childParentData.nextSibling!.parentData! as ParentDataType;
      childPreviousSiblingParentData.nextSibling = child;
      childNextSiblingParentData.previousSibling = child;
      assert(afterParentData.nextSibling == child);
    }
  }
}
According to the above notes, we can divide it into three parts: 1. Insert the child into the first node when after is null, 2. Insert the child into the end, 3. Insert the child into the middle. Let's take an example:
Column(
	children: [
	    SizedBox(.....),
	    Text(data),
 	    Text(data),
 	    Text(data),
 	 ],
)
After the first Stack finds Column (RenderObjectElement) up, it calls this method, and after is null at the moment. firstchild is sizedbox (the renderObject corresponding to sizedbox is RenderConstrainedBox) The second is Text. We know that Text is a composite type, so it will not be mounted in the tree. We can see that the final Text uses richtext by querying the source code. After looking up to Column (RenderObjectElement), RichText calls this method, and brings in two parameters. The first child is RichText corresponding RenderParagraph, and the second after is SizedBox corresponding RenderConstrainedBox. According to the above logic, execute the following code
final ParentDataType afterParentData = after.parentData! as ParentDataType;
if (afterParentData.nextSibling == null) {
  // insert at the end (_lastChild); we'll end up with two or more children
  assert(after == _lastChild);
  childParentData.previousSibling = after;
  afterParentData.nextSibling = child;
  _lastChild = child;
}
The childparentdata of child Previoussibling points to the first node and connects the first node to afterparentdata Nextsibling points to child, and finally lets_ lastchild executes child. The same is true later. When the process ends, you can get a RenderTree.
summary
This paper mainly introduces the construction process of three trees and the life cycle of elemnt. Although we use less in the development process, these are the door to the internal world of fluent.
In fact, when writing this article, I also know a little. I slowly understand it by constantly checking the source code and reading the blog. And in the final output of this article, there may be some errors in the article. If you see it, please put it forward below. Thank you!!
reference material
- juejin.cn/post/692149...
- juejin.cn/post/684490...
- Fluent Chinese network