1. About Consul
Consul It is an open-source distributed service discovery and configuration management system developed by HashiCorp using Go language, which provides the functions of service governance, configuration center, control bus and so on in the micro service system. Each function can be used alone or together to build a comprehensive service grid. Consul provides a complete set of service grid solutions.
Advantages: Based on raft protocol, simple; It supports health check, HTTP and DNS protocols, supports WAN clusters across data centers, and provides a graphical interface; Support cross platform, Linux, Mac and Windows.
Consul's functions:
- Realize service registration discovery, and provide HTTP and DNS discovery methods
- Health detection supports multiple methods, including Http, Tcp, Docker and Shell script customization
- KV storage (storage mode of key and value)
- Support multiple data centers
- Visual Web interface
Download address: https://www.consul.io/downloads
Consul Chinese tutorial: https://www.springcloud.cc/spring-cloud-consul.html
2. Install and run Consul
In the Mac OS environment, use homebrew to install Consul on the Mac. Record detailed process operations.
2-1. Installation and Application
Use the command $brew install consumer to install:
test-MBP:~ test$ brew install consul
Updating Homebrew...
==> Downloading https://ghcr.io/v2/homebrew/core/consul/manifests/1.9.5
######################################################################## 100.0%
==> Downloading https://ghcr.io/v2/homebrew/core/consul/blobs/sha256:043b458e21e
==> Downloading from https://pkg-containers.githubusercontent.com/ghcr1/blobs/sh
######################################################################## 100.0%
==> Pouring consul–1.9.5.big_sur.bottle.tar.gz
==> Caveats
To have launchd start consul now and restart at login:
brew services start consul
Or, if you don't want/need a background service you can just run:
consul agent -dev -bind 127.0.0.1
==> Summary
🍺 /usr/local/Cellar/consul/1.9.5: 8 files, 86MB
You can use $brew info consumer to view consumer information
test-MBP:~ test$ brew info consul
consul: stable 1.9.5 (bottled), HEAD
Tool for service discovery, monitoring and configuration
https://www.consul.io
/usr/local/Cellar/consul/1.9.5 (8 files, 86MB) *
Poured from bottle on 2021-09-14 at 16:42:56
From: https://github.com/Homebrew/homebrew-core/blob/HEAD/Formula/consul.rb
License: MPL-2.0
==> Dependencies
Build: go ✘, gox ✘
==> Options
–HEAD
Install HEAD version
==> Caveats
To have launchd start consul now and restart at login:
brew services start consul
Or, if you don't want/need a background service you can just run:
consul agent -dev -bind 127.0.0.1
==> Analytics
install: 2,450 (30 days), 7,613 (90 days), 31,886 (365 days)
install-on-request: 2,386 (30 days), 7,432 (90 days), 30,939 (365 days)
build-error: 0 (30 days)
2-2. Start consumer
There are two ways to start consumer: Server mode and Client mode.
Open the terminal and use the command $consumer agent - Dev to open the Client mode:
test-MBP:~ test$ consul agent -dev
==> Starting Consul agent...
Version: '1.9.5'
Node ID: '3ad13253-8515-2393-cec0-ed4703bece41'
Node name: 'test-MBP'
Datacenter: 'dc1' (Segment: '')
Server: true (Bootstrap: false)
Client Addr: [127.0.0.1] (HTTP: 8500, HTTPS: -1, gRPC: 8502, DNS: 8600)
Cluster Addr: 127.0.0.1 (LAN: 8301, WAN: 8302)
Encrypt: Gossip: false, TLS-Outgoing: false, TLS-Incoming: false, Auto-Encrypt-TLS: false
If the above method is started by the previous console, you only need to ctrl + c to close the consumer.
Open the terminal and use the command $consumer agent - Server - UI - bootstrap expect = 1 - client = 0.0.0.0 - bind your ip address - Data dir = / status data storage folder / Data > > / logging folder / logs / consumer.log & to start the Server mode:
test-MBP:~ test$ consul agent -server -ui -bootstrap-expect=1 -client=0.0.0.0 -bind 192.168.124.3 -data-dir=/Users/test/Desktop/consulData/data >> /Users/test/Desktop/consulData/logs/consul.log &
[1] 18513
test-MBP:~ tests$
PID: 18513 is given after executing the command
-bind: the bound internal communication address. The default is 0.0.0.0, that is, all local addresses. It can also be changed to its own ip address.
-Data dir: file directory for status data storage
Close command: as shown in the figure, the PID is generally given after execution. Just kill -9 PID directly.
test-MBP:~ test$ kill -9 18513
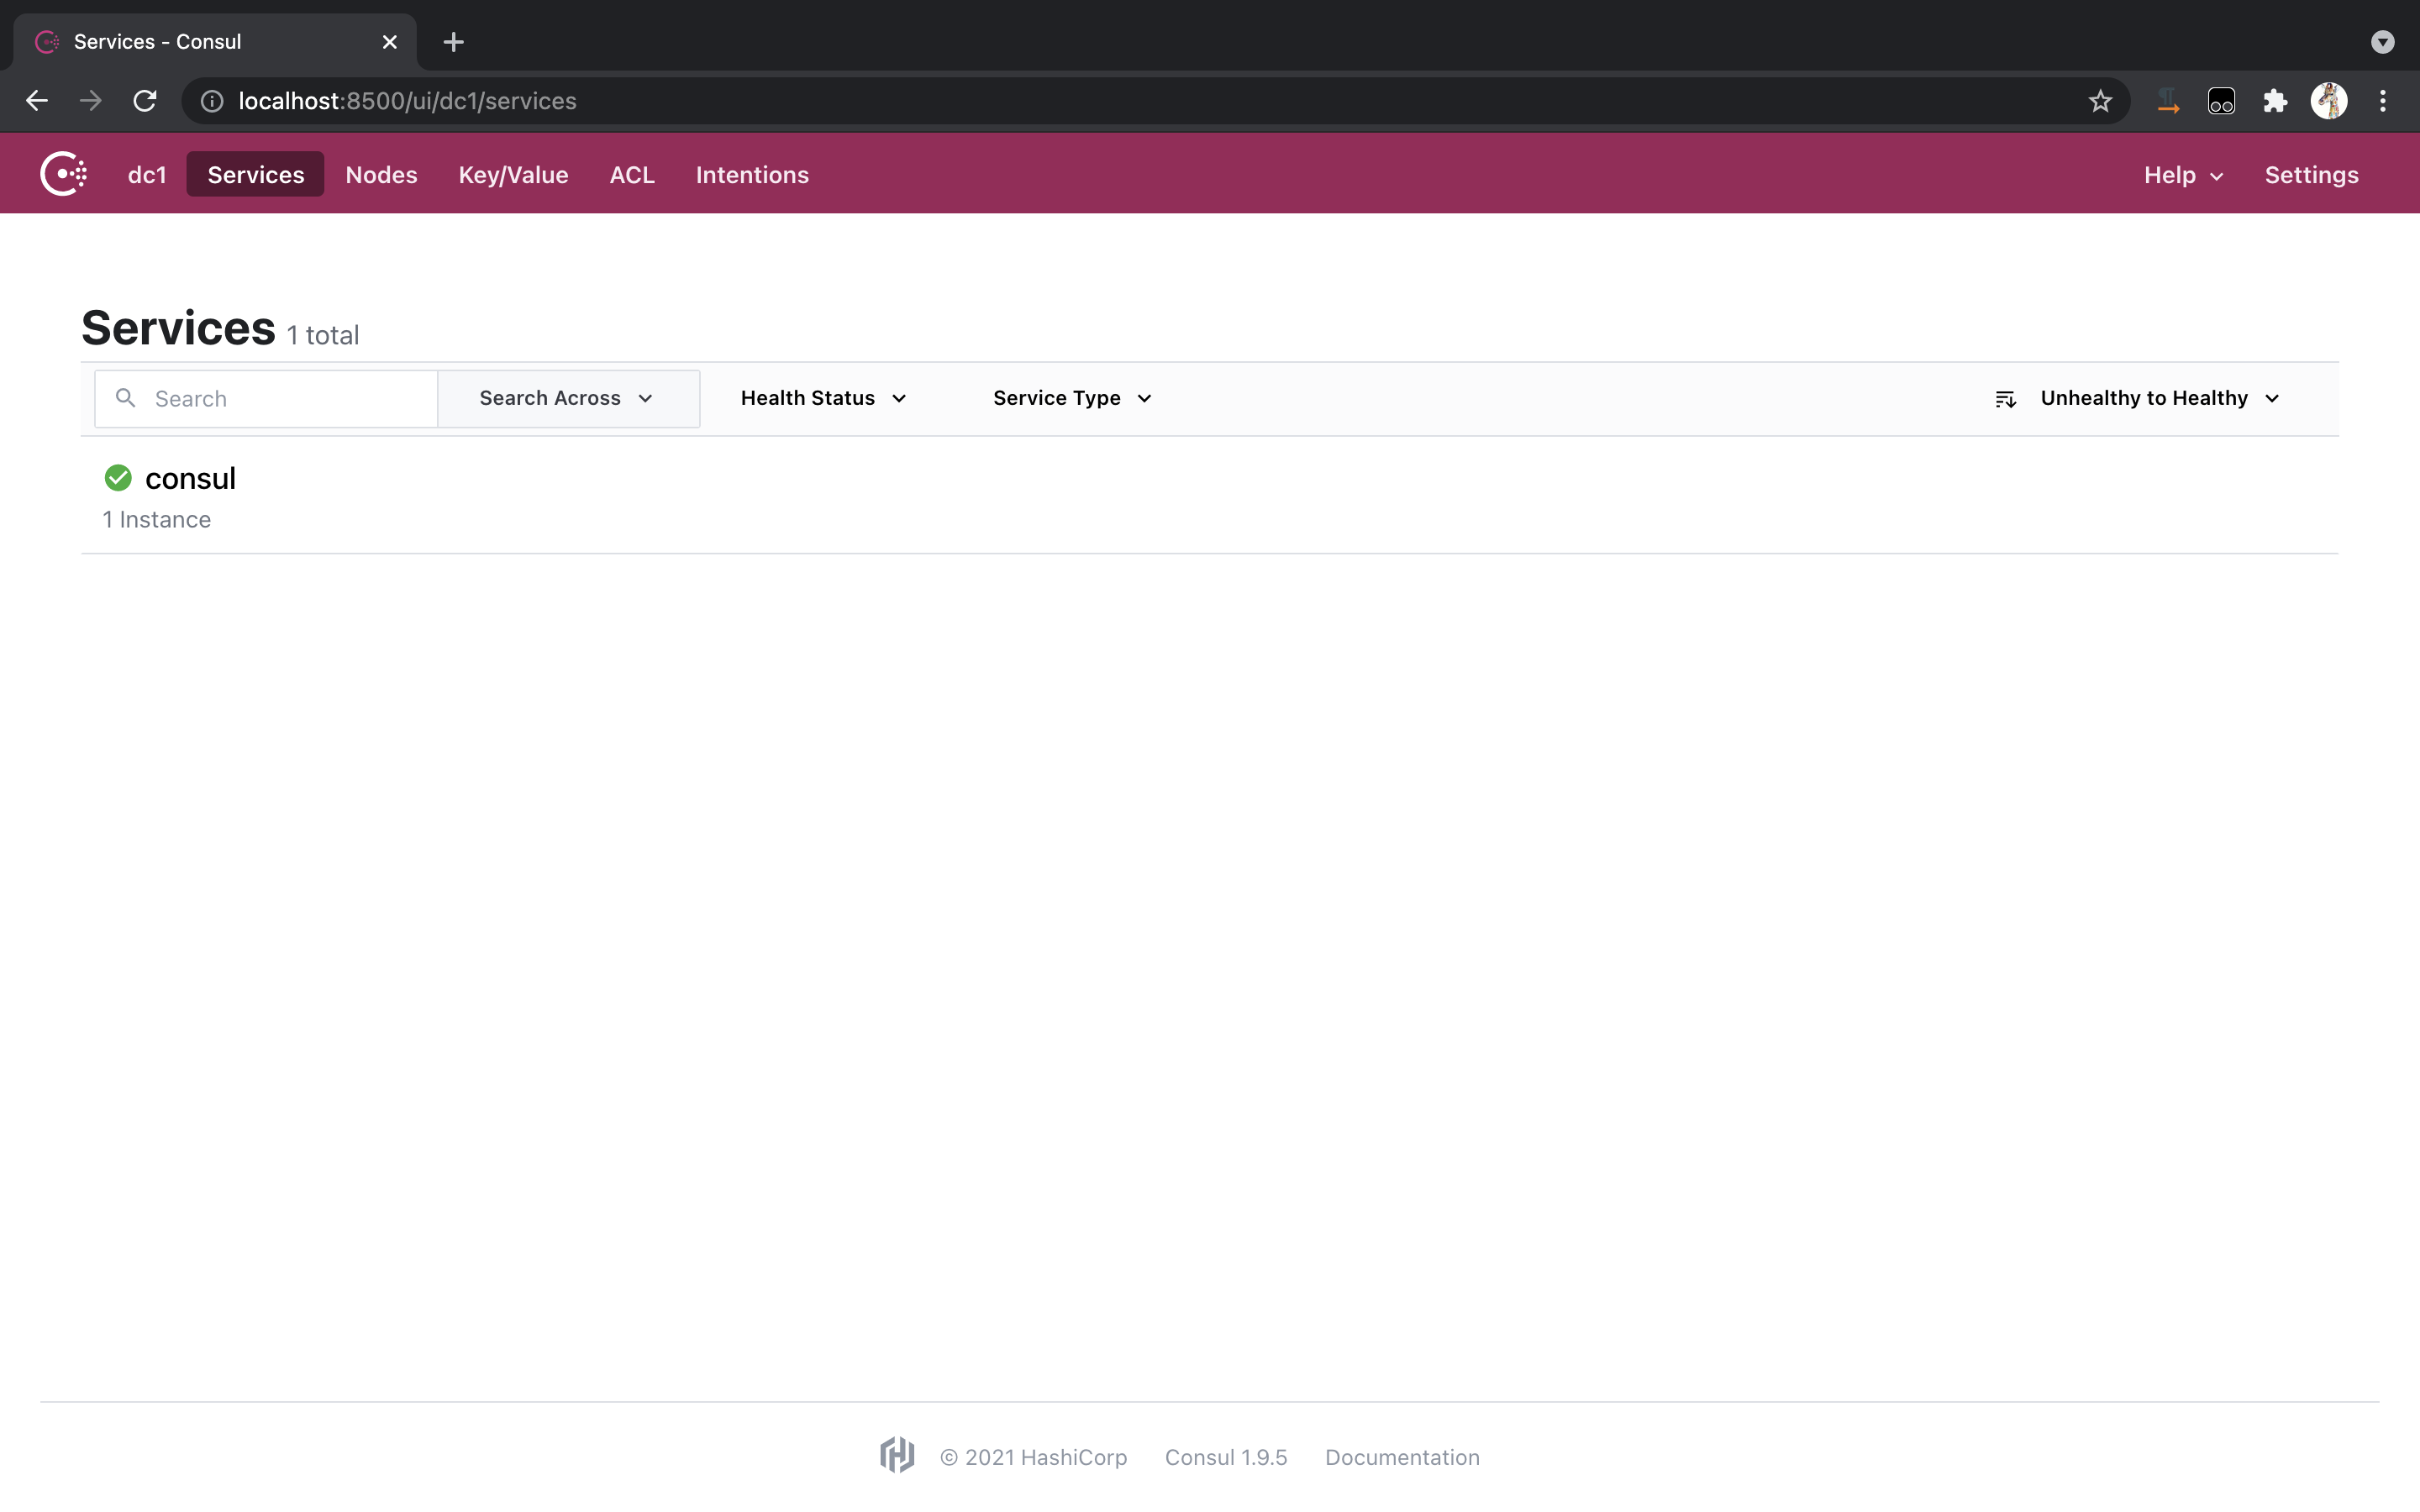
2-3. Access the consumer graphical interface
visit http://localhost:8500/ You can enter the interface, as shown in the figure below:
2-4. Close consumer
Close consumer and start it in Client mode: press ctrl + c directly on the terminal to exit.
Close the consumer and start it in the form of Server mode: kill the PID given after startup and execute kill -9 PID.
3. Const common command interpretation
- Agent: run a consumer agent
- join: add the agent to the consumer cluster
- Members: lists the members in the consumer cluster
- -bootstrap: startup mode. In this mode, nodes can elect themselves as leader s. A data center can only have one node started in this mode. This mode is not recommended for newly started nodes after cluster startup.
- -Bootstrap expect: set the number of service nodes required by a data center, which can not be set. The set number must match the actual number of service nodes. Consumer will wait until the service nodes under the data center meet the settings before starting the cluster service. Initialize the leader election. It cannot be mixed with bootstr- ap. Must be configured with - server.
- -bind: the bound internal communication address. The default is 0.0.0.0, that is, all local addresses will spread the first available ip address to the cluster. If there are multiple available ipv4, the consumer will start with an error. [::] ipv6, TCP, UDP protocol, same port. Firewall configuration.
- -Client: client mode, http dns, default 127.0.0.1, loopback token URL
- -Config file: configuration file location
- -Config dir: the folder where the configuration file is located. All configuration files,. json or. hcl files under it will be loaded in alphabetical order; This configuration can be configured to load multiple folders, and the configuration of subfolders will not be loaded.
- -Config format: configure the file format. If it is configured, the corresponding file will be loaded. If it is not configured, consumer will recognize it automatically.
- -Data dir: the status data storage folder, which is required for all nodes. The folder location does not need to be affected by the restart of the consumer node. It must be able to use the operating system file lock. Under UNIX based system, the folder file permission is 0600. Pay attention to account permission control,
- -datacenter: the name of the data center. By default, dc1. All nodes in a data center must be in one LAN.
- -dev: development mode, removing all persistence options, memory server mode.
- -Disable host node ID: node ID is generated without using host information. It is applicable to the case where multiple instances are deployed for testing on the same server. Randomly generated nodeID
- -dns port: after v7.0, customize the dns port and override the default 8600
- -Enable script checks: whether script is allowed for health check. The default is false. It is better to configure enable acl
- -encrypt: consumer network communication encryption key, base64 encryption, 16 bits; Consumer keygen generation. Each instance in the cluster must provide the same, only once, and then it will be saved to the data file. Restart automatic loading. Provided after the consumer node is started, it will be ignored.
- -hcl: add hcl format configuration and merge with existing configuration. You can use more than one of these configurations.
- -HTTP port: http api port, which overrides the default 8500. Applicable to cloud environment assignments.
- -Log file: log file. If no file name is provided, the default is Consul timestamp. Log
- -Log level: log level, default info, including: trace, debug, info, warn, err; Consumer monitor monitoring
- -Log rotate bytes: threshold size of new log file generation.
- -Log rotate rotation: new log generation time threshold
- -Join: addresses of other nodes that need to be added. It can be used multiple times to join multiple nodes.
- -Retry join: Join retry is performed. It is applicable to the case that the joining node is determined to be normal in the end. ipv4,ipv6,dns
- -Retry interval: the above, retry interval, default 30s
- -Retry Max: the number of retries. The default is 0. There are infinite retries
- -join-wan, -retry-join-wan, -retry-interval-wan, -retry-max-wan
- -Node: node name, default host name
- -Node ID: node ID
- -pid file: consumer stores the file location of pid for active signaling. Such as stopping nodes, reloading configuration, etc.
- -Protocol: the protocol used for upgrading. Consult - V view protocol version
- -Raft protocol: the raft protocol version is used. The default is 3
- -Raft snapshot threshold: the threshold of the number of times raft executes snapshots and commits. Generally, it does not need to be set. For io intensive applications, it can be raised. Avoid snapshots of all nodes at the same time. If this value is too large, the corresponding log file will become larger, and node restart and recovery will take longer. After 1.1.0, the default is 1 - 6384, before 8192
- -Raft snapshot interval: the snapshot interval is executed, and the impact is similar to that of the previous configuration. After 1.1.0, it defaults to 30s and before 5s.
- -Rejoin: the node will attempt to rejoin the cluster.
- -Server: server node mode.
- -Server port: server RPC port, provided after v1.2.2.
- -Non voting server: the service node does not participate in the election and accepts log replication. It is used for horizontal expansion and service query requests. (similar to zookeeper observer node)
- -syslog: linux OSX system, and the configuration log is output to the system log.
- -ui: built in web ui interface.
- -ui dir: web ui resource folder. If you use this configuration, you do not need or cannot use - ui configuration-
4. Default port number in consult
- Server RPC (default 8300): used by the server to process incoming requests from other agents. TCP only.
- Serf LAN (default 8301): used to handle gossip in the LAN. All agents require TCP and UDP.
- Serf WAN (default 8302): used by the server to chat with other servers on the WAN, TCP and UDP. Starting from Consul 0.8, it is recommended to enable the connection between servers for TCP and UDP on the LAN interface through port 8302, as well as the flooding function of Wan.
- HTTP API (default 8500): used by customers to talk with HTTP API. TCP only.
- DNS interface (default 8600): used to resolve DNS queries, TCP and UDP.
5. Create a service provider and register with the Consul registry
Create a new cloud provider consumer payment8006 module and modify pom.xml. Here, you need to add the dependency of spring cloud starter consumer discovery.
<?xml version="1.0" encoding="UTF-8"?>
<project xmlns="http://maven.apache.org/POM/4.0.0"
         xmlns:xsi="http://www.w3.org/2001/XMLSchema-instance"
         xsi:schemaLocation="http://maven.apache.org/POM/4.0.0 http://maven.apache.org/xsd/maven-4.0.0.xsd">
    <!-- Import parent module name -->
    <parent>
        <artifactId>cloud2020</artifactId>
        <groupId>com.king.springcloud</groupId>
        <version>1.0-SNAPSHOT</version>
    </parent>

    <modelVersion>4.0.0</modelVersion>

    <!-- Sub module name -->
    <artifactId>cloud-providerconsul-payment8006</artifactId>

    <dependencies>
        <!-- introduce spring cloud integration consul rely on -->
        <dependency>
            <groupId>org.springframework.cloud</groupId>
            <artifactId>spring-cloud-starter-consul-discovery</artifactId>
        </dependency>
        <!-- Reference parent spring boot Dependence of -->
        <dependency>
            <groupId>org.springframework.boot</groupId>
            <artifactId>spring-boot-starter-web</artifactId>
        </dependency>
        <!-- Reference parent spring boot Monitoring dependency -->
        <dependency>
            <groupId>org.springframework.boot</groupId>
            <artifactId>spring-boot-starter-actuator</artifactId>
        </dependency>
        <dependency>
            <groupId>org.springframework.boot</groupId>
            <artifactId>spring-boot-starter-test</artifactId>
            <scope>test</scope>
        </dependency>
        <!-- Configure hot deployment -->
        <dependency>
            <groupId>org.springframework.boot</groupId>
            <artifactId>spring-boot-devtools</artifactId>
            <scope>runtime</scope>
            <optional>true</optional>
        </dependency>
        <!-- Reference parent lombok rely on -->
        <dependency>
            <groupId>org.projectlombok</groupId>
            <artifactId>lombok</artifactId>
            <optional>true</optional>
        </dependency>
    </dependencies>

</project>
Add the application.yml configuration file.
server:
  port: 8006
spring:
  application:
    name: consul-provider-payment # apply name
  cloud:
    # Consumer registry address
    consul:
      host: 192.168.1.59 # Native IP
      port: 8500 # Consumer port number
      discovery:
        service-name: ${spring.application.name} # App name registered to the consumer registry
Write the main startup class.
package com.king.springcloud;

import org.springframework.boot.SpringApplication;
import org.springframework.boot.autoconfigure.SpringBootApplication;
import org.springframework.cloud.client.discovery.EnableDiscoveryClient;

/**
 * Main startup class of micro service provider service side payment module
 * @EnableDiscoveryClient: Indicates that DiscoveryClient service discovery is enabled, which is used to register services when using the Consul or Zookeeper registry
 */
@EnableDiscoveryClient
@SpringBootApplication
public class ConsulPaymentMain8006 {

    public static void main(String[] args) {
        SpringApplication.run(ConsulPaymentMain8006.class, args);
    }
}
Write the control layer.
package com.king.springcloud.controller;
import lombok.extern.slf4j.Slf4j;
import org.springframework.beans.factory.annotation.Value;
import org.springframework.web.bind.annotation.RequestMapping;
import org.springframework.web.bind.annotation.RestController;
import java.util.UUID;
@Slf4j
@RestController
public class ConsulPaymentController {
/**
* Get server port number
*/
@Value("${server.port}")
private String serverPort;
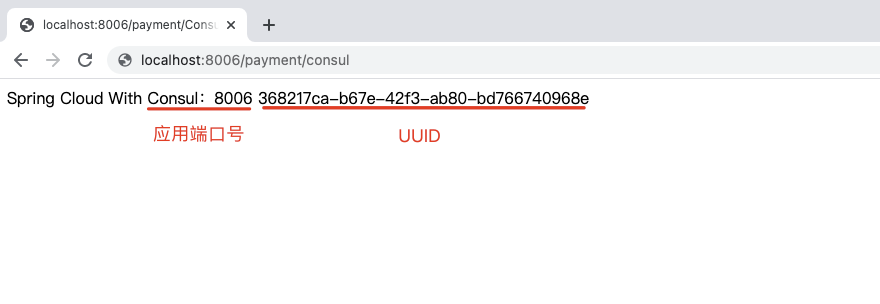
@RequestMapping("/payment/Consul")
public String paymentConsul() {
return "Spring Cloud With Consul: " + serverPort + "\t" + UUID.randomUUID();
}
}
Start browser access http://localhost:8006/payment/consul , you can access the content.
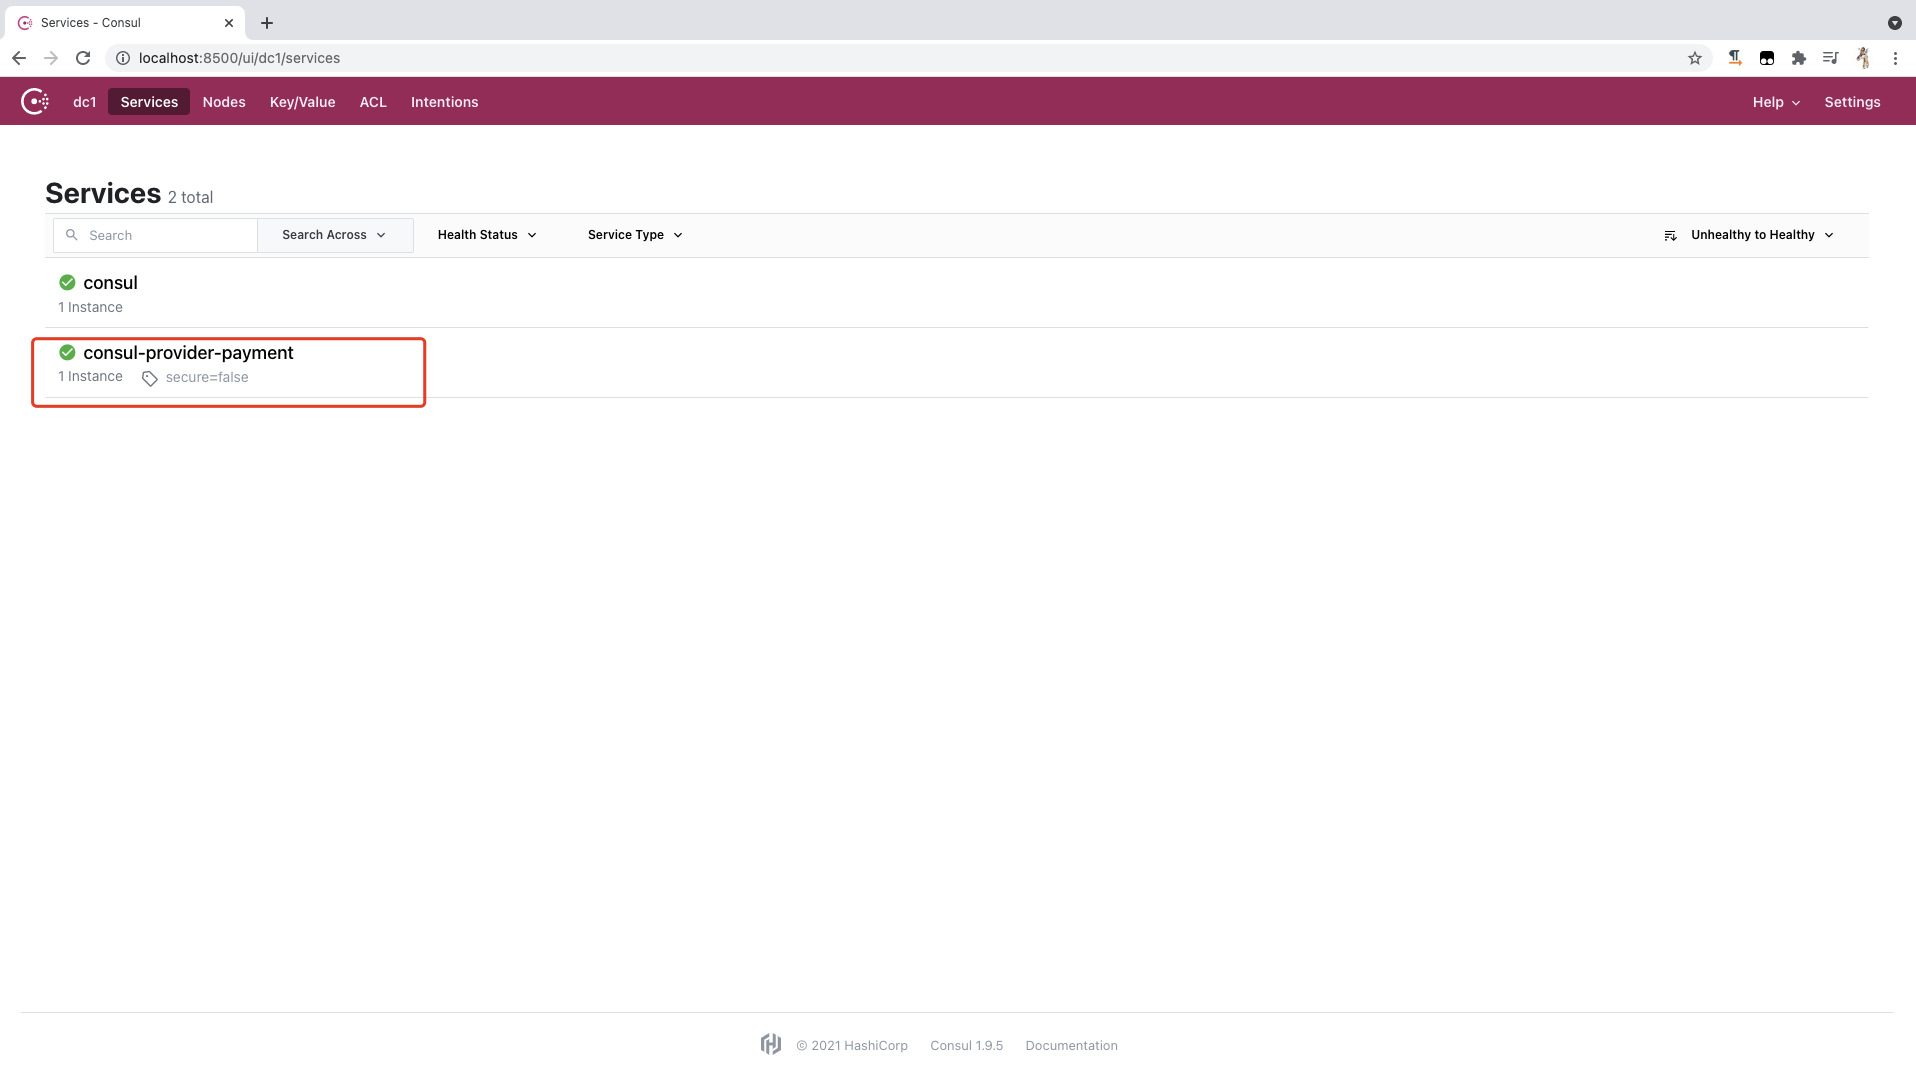
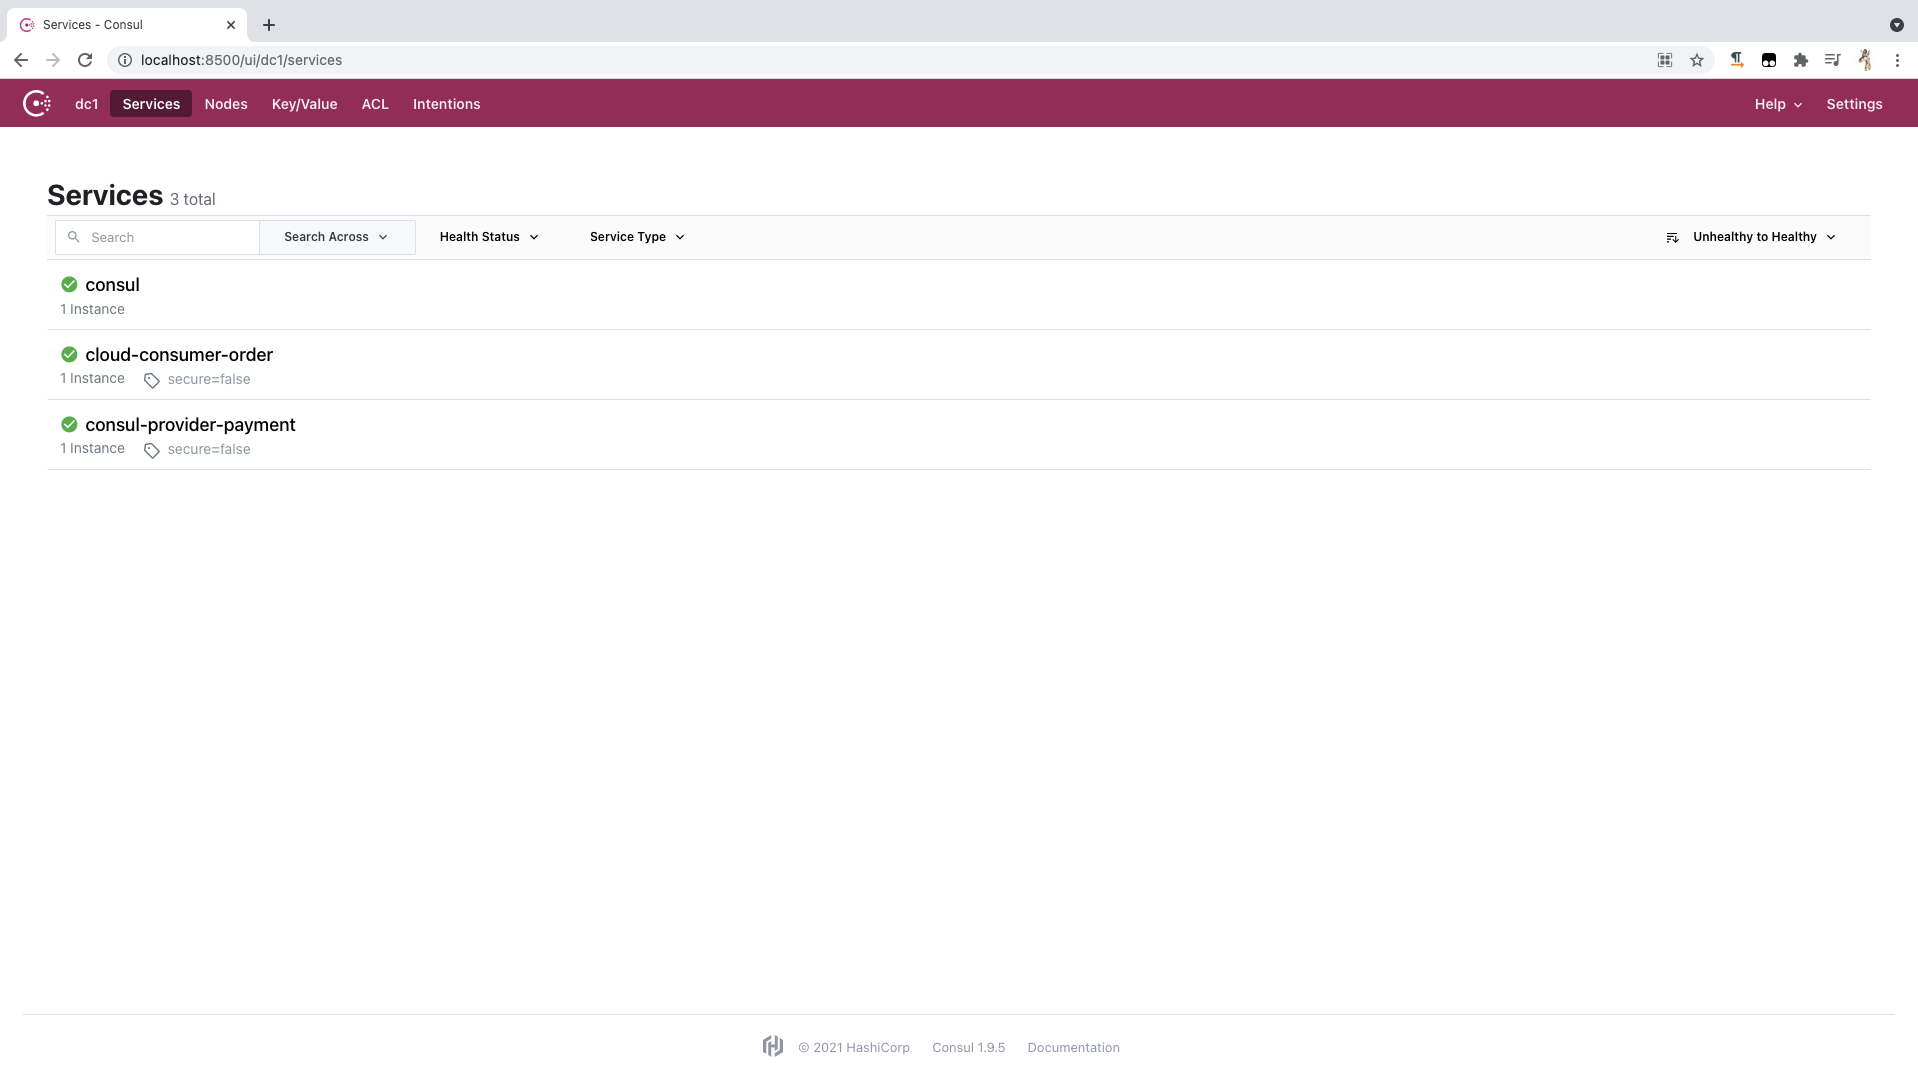
visit http://localhost:8500/ It can be seen that the name of the consumer provider payment in the consumer graphical interface indicates that it has been registered in the consumer registration.
6. Create a service consumer to register with the Consul registry
Create a new cloud-consumerconsul-order80 module and modify pom.xml. Here, you need to add the dependency of spring cloud starter consumer discovery.
<?xml version="1.0" encoding="UTF-8"?>
<project xmlns="http://maven.apache.org/POM/4.0.0"
         xmlns:xsi="http://www.w3.org/2001/XMLSchema-instance"
         xsi:schemaLocation="http://maven.apache.org/POM/4.0.0 http://maven.apache.org/xsd/maven-4.0.0.xsd">
    <!-- Import parent module name -->
    <parent>
        <artifactId>cloud2020</artifactId>
        <groupId>com.king.springcloud</groupId>
        <version>1.0-SNAPSHOT</version>
    </parent>

    <modelVersion>4.0.0</modelVersion>

    <!-- Sub module name -->
    <artifactId>cloud-consumerconsul-order80</artifactId>

    <dependencies>
        <!-- introduce spring cloud integration consul rely on -->
        <dependency>
            <groupId>org.springframework.cloud</groupId>
            <artifactId>spring-cloud-starter-consul-discovery</artifactId>
        </dependency>
        <!-- Reference parent spring boot Dependence of -->
        <dependency>
            <groupId>org.springframework.boot</groupId>
            <artifactId>spring-boot-starter-web</artifactId>
        </dependency>
        <!-- Reference parent spring boot Monitoring dependency -->
        <dependency>
            <groupId>org.springframework.boot</groupId>
            <artifactId>spring-boot-starter-actuator</artifactId>
        </dependency>
        <dependency>
            <groupId>org.springframework.boot</groupId>
            <artifactId>spring-boot-starter-test</artifactId>
            <scope>test</scope>
        </dependency>
        <!-- Configure hot deployment -->
        <dependency>
            <groupId>org.springframework.boot</groupId>
            <artifactId>spring-boot-devtools</artifactId>
            <scope>runtime</scope>
            <optional>true</optional>
        </dependency>
        <!-- Reference parent lombok rely on -->
        <dependency>
            <groupId>org.projectlombok</groupId>
            <artifactId>lombok</artifactId>
            <optional>true</optional>
        </dependency>
    </dependencies>

</project>
Add the application.yml configuration file.
server:
  port: 80
spring:
  application:
    name: cloud-consumer-order # apply name
  cloud:
    # Consumer registry address
    consul:
      host: 127.0.0.1 # Server IP for consumer deployment
      port: 8500 # Consumer port number
      discovery:
        service-name: ${spring.application.name} # App name registered to the consumer registry
Write the main startup class.
package com.king.springcloud;

import org.springframework.boot.SpringApplication;
import org.springframework.boot.autoconfigure.SpringBootApplication;
import org.springframework.cloud.client.discovery.EnableDiscoveryClient;

/**
 * Main startup class of micro service provider service side payment module
 * @EnableDiscoveryClient: Indicates that DiscoveryClient service discovery is enabled, which is used to register services when using the Consul or Zookeeper registry
 */
@EnableDiscoveryClient
@SpringBootApplication
public class ConsulOrderMain80 {

    public static void main(String[] args) {
        SpringApplication.run(ConsulOrderMain80.class, args);
    }
}
Write configuration classes.
package com.king.springcloud.config;

import org.springframework.cloud.client.loadbalancer.LoadBalanced;
import org.springframework.context.annotation.Bean;
import org.springframework.context.annotation.Configuration;
import org.springframework.web.client.RestTemplate;

/**
 * Configuration class
 */
@Configuration
public class ApplicationContextConfig {

    /**
     * Get RestTemplate object
     * @LoadBalanced: Enable RestTemplate load balancing and polling mode
     * @return Return RestTemplate object
     */
    @Bean
    @LoadBalanced
    public RestTemplate getRestTemplate(){

        return new RestTemplate();
    }
}
Write the control layer.
package com.king.springcloud.controller;

import lombok.extern.slf4j.Slf4j;
import org.springframework.web.bind.annotation.GetMapping;
import org.springframework.web.bind.annotation.RestController;
import org.springframework.web.client.RestTemplate;

import javax.annotation.Resource;

@Slf4j
@RestController
public class ConsulOrderController {

    /**
     * consul Application name of the service providing module of the registry
     */
    private static final String INVOKE_URL = "http://consul-provider-payment";

    /**
     * Get server port number
     */
    @Resource
    private RestTemplate restTemplate;

    /**
     * The consumer invokes the provider query method
     * @return
     */
    @GetMapping("/consumer/payment/consul")
    public String paymentInfo() {
        return restTemplate.getForObject(INVOKE_URL + "/payment/consul", String.class);
    }
}
Start the main startup classes of cloud-providerconsumer-payment8006 module and cloud-consumer consul-order80 module respectively. Access http://localhost:8500/ You can see that both modules have been registered in the consumer registry.
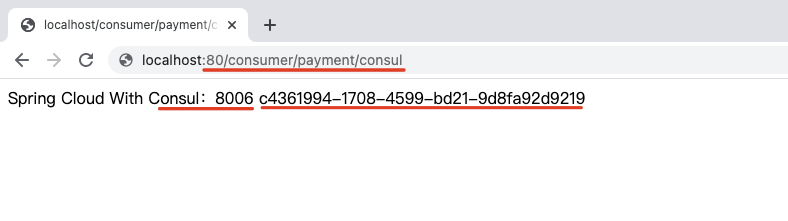
Revisit http://localhost/consumer/payment/consul You can see that the consumer successfully called the API method of the service provider.
7. Similarities and differences of the three registration centers
After learning Eureka, Zookeeper and consult, they are similar in basic configuration and use. Create a new module, modify pom.xml, add relevant dependencies, write the application.yml configuration file, indicate the application name and registry address, write the main startup class, write the configuration class and business class, and finally test.
Comparison of Eureka, Zookeeper and Consul:
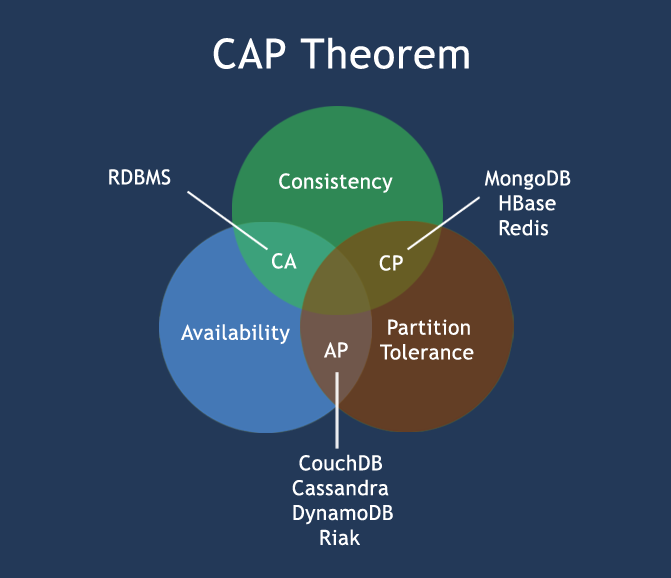
| Component name | language | CAP | Service health check | External exposure interface | Spring Cloud integration |
|---|---|---|---|---|---|
| Eureka | Java | AP | Configurable support | HTTP | Integrated |
| Zookeeper | Java | CP | support | client | Integrated |
| Consul | Go | CP | support | HTTP/DNS | Integrated |
The core of CAP theory is that a distributed system cannot meet the three requirements of consistency, availability and partition fault tolerance at the same time. Therefore, according to CAP principle, NoSQL database is divided into three categories: meeting CA principle, meeting CP principle and meeting AP principle:
CA - single point cluster, a system that meets consistency and availability, is usually not very powerful in scalability.
CP - systems that meet consistency and partition tolerance are usually not particularly high in performance.
AP - systems that meet availability and partition tolerance may generally have lower requirements for consistency.
CAP: at most two can be satisfied at the same time.
CAP theory focuses on the granularity of data rather than the overall system design strategy.