Container network is not difficult
Using containers always feels like magic. Containers work well for those who understand the underlying principles, but they are a nightmare for those who don't. Fortunately, we have studied container technology for a long time, and even successfully revealed that the container is only an isolated and restricted Linux process. Running the container does not need an image. On the other hand, building an image requires running some containers.

Now it's time to solve the container network problem. Or, more precisely, a single host container network problem. This article will answer these questions:
- How to virtualize network resources and make the container think it has an exclusive network?
- How to make the containers coexist peacefully, do not interfere with each other, and can communicate with each other?
- How do I access the outside world (e.g., the Internet) from inside the container?
- How do you access containers on a machine from the outside world (for example, port Publishing)?
The end result is clear that the single host container network is a simple combination of known Linux functions:
- Network namespace
- Virtual Ethernet device (veth)
- Virtual network switch (bridge)
- IP routing and network address translation (NAT)
And you don't need any code to make such network magic happen
prerequisite
Any Linux distribution can. All the examples in this article are executed on the virtual machine of vagrant CentOS 8:
$ vagrant init centos/8
$ vagrant up
$ vagrant ssh

[vagrant@localhost ~]$ uname -a
Linux localhost.localdomain 4.18.0-147.3.1.el8_1.x86_64
For simplicity, this article uses a container solution (for example, Docker or Podman). We will focus on basic concepts and use the simplest tools to achieve learning goals.
network namespace isolation container
What is the Linux network stack? Obviously, it is a series of network devices. Anything else? It may also include a series of routing rules. And don't forget that netfilter hook, including those defined by iptables rules.
We can quickly create a simple script inspect net stack sh:
#!/usr/bin/env bash
echo  "> Network devices"
ip link

echo -e "\n> Route table"
ip route

echo -e "\n> Iptables rules"
iptables --list-rules
Before running the script, let's modify the following iptable rule:
$ sudo iptables -N ROOT_NS
After that, execute the above script on the machine, and the output is as follows:
$ sudo ./inspect-net-stack.sh
    > Network devices
    1: lo: <LOOPBACK,UP,LOWER_UP> mtu 65536 qdisc noqueue state UNKNOWN mode DEFAULT group default qlen 1000 link/loopback 00:00:00:00:00:00 brd 00:00:00:00:00:00
    2: eth0: <BROADCAST,MULTICAST,UP,LOWER_UP> mtu 1500 qdisc fq_codel state UP mode DEFAULT group default qlen 1000 link/ether 52:54:00:e3:27:77 brd ff:ff:ff:ff:ff:ff
    > Route table
    default via 10.0.2.2 dev eth0 proto dhcp metric 100
    10.0.2.0/24 dev eth0 proto kernel scope link src 10.0.2.15 metric 100
    > Iptables rules
    -P INPUT ACCEPT
    -P FORWARD ACCEPT
    -P OUTPUT ACCEPT
    -N ROOT_NS
We are interested in these outputs because we want to ensure that each container we are about to create has its own independent network stack.
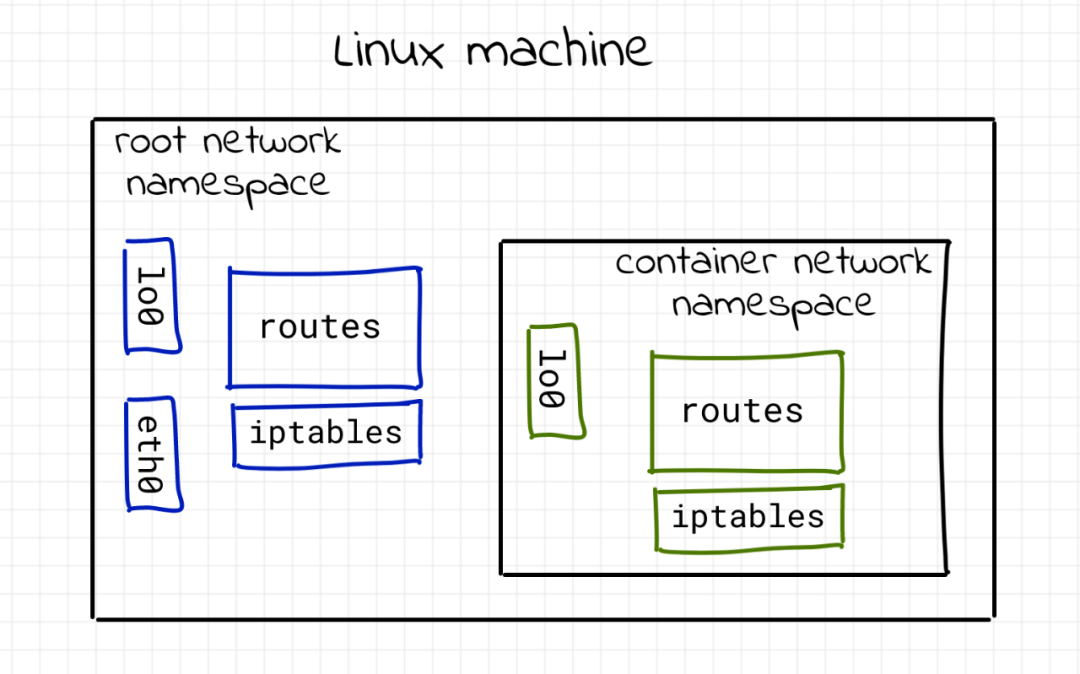
As you may already know, one Linux namespace used for container isolation is the network namespace. As can be seen from man IP netns, "the network namespace is another logical copy of the network stack. It has its own routing, firewall rules and network devices." For simplicity, this is the only namespace used in this article. Instead of creating a completely isolated container, we limited the scope to the network stack.
One way to create a network namespace is the ip tool - part of iproute2:
$ sudo ip netns add netns0
$ ip netns
netns0
How do I use the namespace I just created? A good command nsenter. Enter one or more specific namespaces and execute the specified script:
$ sudo nsenter --net=/var/run/netns/netns0 bash
     # The new bash process is in netns0
 $ sudo ./inspect-net-stack.sh
    > Network devices 1: lo: <LOOPBACK> mtu 65536 qdisc noop state DOWN mode DEFAULT group default qlen 1000
    link/loopback 00:00:00:00:00:00 brd 00:00:00:00:00:00
    > Route table
    > Iptables rules
    -P INPUT ACCEPT
    -P FORWARD ACCEPT
    -P OUTPUT ACCEPT
From the above output, you can clearly see that the bash process is running in the netns0 namespace. At this time, you see a completely different network stack. There are no routing rules, no customized iptables chain, and only one loopback network device.
Connect the container to the host using a virtual Ethernet device (veth)
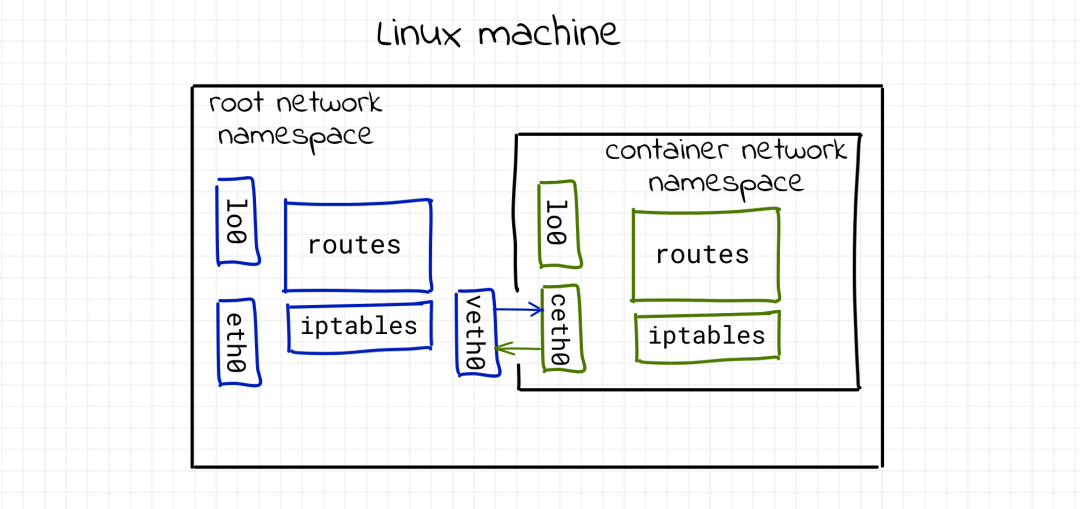
If we can't communicate with a proprietary network stack, it seems useless. Fortunately, Linux provides a useful tool - a virtual Ethernet device. As can be seen from man veth, "veth devices are virtual Ethernet devices. They can be used as tunnel s between network namespaces to create bridges to physical network devices in another namespace, but they can also be used as independent network devices."
Virtual Ethernet devices usually appear in pairs. Don't worry. Let's take a look at the script created first:
$ sudo ip link add veth0 type veth peer name ceth0
With this simple command, we can create a pair of interconnected virtual Ethernet devices. veth0 and ceth0 are selected by default.
$ ip link
1: lo: <LOOPBACK,UP,LOWER_UP> mtu 65536 qdisc noqueue state UNKNOWN mode DEFAULT group default qlen 1000
 link/loopback 00:00:00:00:00:00 brd 00:00:00:00:00:00
2: eth0: <BROADCAST,MULTICAST,UP,LOWER_UP> mtu 1500 qdisc fq_codel state UP mode DEFAULT group default qlen 1000
  link/ether 52:54:00:e3:27:77 brd ff:ff:ff:ff:ff:ff
5: ceth0@veth0: <BROADCAST,MULTICAST,M-DOWN> mtu 1500 qdisc noop state DOWN mode DEFAULT group default qlen 1000
  link/ether 66:2d:24:e3:49:3f brd ff:ff:ff:ff:ff:ff
6: veth0@ceth0: <BROADCAST,MULTICAST,M-DOWN> mtu 1500 qdisc noop state DOWN mode DEFAULT group default qlen 1000
 link/ether 96:e8:de:1d:22:e0 brd ff:ff:ff:ff:ff:ff
Both veth0 and ceth0 are created on the host's network stack (also known as the root network namespace). To connect the netns0 namespace to the root namespace, you need to leave one device in the root namespace and move the other to netns0:
$ sudo ip link set ceth0 netns netns0
    # Listing all devices, you can see that ceth0 has disappeared from the root stack
   $ ip link 1: lo: <LOOPBACK,UP,LOWER_UP> mtu 65536 qdisc noqueue state UNKNOWN mode DEFAULT group default qlen 1000
    link/loopback 00:00:00:00:00:00 brd 00:00:00:00:00:00
   2: eth0: <BROADCAST,MULTICAST,UP,LOWER_UP> mtu 1500 qdisc fq_codel state UP mode DEFAULT group default qlen 1000
   link/ether 52:54:00:e3:27:77 brd ff:ff:ff:ff:ff:ff
   6: veth0@if5: <BROADCAST,MULTICAST> mtu 1500 qdisc noop state DOWN mode DEFAULT group default qlen 1000
    link/ether 96:e8:de:1d:22:e0 brd ff:ff:ff:ff:ff:ff link-netns netns0
Once the device is enabled and the appropriate IP address is assigned, the packet generated on one of the devices will immediately appear in its paired device, connecting the two namespaces. Starting from the root namespace:
$ sudo ip link set veth0 up
$ sudo ip addr add 172.18.0.11/16 dev veth0
Then netns0:
$ sudo nsenter --net=/var/run/netns/netns0
$ ip link set lo up
$ ip link set ceth0 up
$ ip addr add 172.18.0.10/16 dev ceth0
$ ip link
1: lo: <LOOPBACK,UP,LOWER_UP> mtu 65536 qdisc noqueue state UNKNOWN mode DEFAULT group default qlen 1000
 link/loopback 00:00:00:00:00:00 brd 00:00:00:00:00:00
5: ceth0@if6: <BROADCAST,MULTICAST,UP,LOWER_UP> mtu 1500 qdisc noqueue state UP mode DEFAULT group default qlen 1000
 link/ether 66:2d:24:e3:49:3f brd ff:ff:ff:ff:ff:ff link-netnsid 0

Check connectivity:
# Ping veth0 of root in netns0
 $ ping -c 2 172.18.0.11
 PING 172.18.0.11 (172.18.0.11) 56(84) bytes of data.
 64 bytes from 172.18.0.11: icmp_seq=1 ttl=64 time=0.038 ms
 64 bytes from 172.18.0.11: icmp_seq=2 ttl=64 time=0.040 ms
 --- 172.18.0.11 ping statistics ---
 2 packets transmitted, 2 received, 0% packet loss, time 58ms
 rtt min/avg/max/mdev = 0.038/0.039/0.040/0.001 ms
     # Leave netns0
   $ exit
      # ping ceth0 in the root namespace
      $ ping -c 2 172.18.0.10
      PING 172.18.0.10 (172.18.0.10) 56(84) bytes of data.
      64 bytes from 172.18.0.10: icmp_seq=1 ttl=64 time=0.073 ms
      64 bytes from 172.18.0.10: icmp_seq=2 ttl=64 time=0.046 ms
      --- 172.18.0.10 ping statistics ---
      2 packets transmitted, 2 received, 0% packet loss, time 3ms
      rtt min/avg/max/mdev = 0.046/0.059/0.073/0.015 ms
At the same time, if you try to access other addresses from the netns0 namespace, you can also succeed:
# In the root namespace
   $ ip addr show dev eth0
   2: eth0: <BROADCAST,MULTICAST,UP,LOWER_UP> mtu 1500 qdisc fq_codel state UP group default qlen 1000
    link/ether 52:54:00:e3:27:77 brd ff:ff:ff:ff:ff:ff
    inet 10.0.2.15/24 brd 10.0.2.255 scope global dynamic noprefixroute eth0
  valid_lft 84057sec preferred_lft 84057sec
    inet6 fe80::5054:ff:fee3:2777/64 scope link
     valid_lft forever preferred_lft forever
    # Remember that the IP here is 10.0.2.15
    $ sudo nsenter --net=/var/run/netns/netns0
    # Attempt to ping eth0 of the host
    $ ping 10.0.2.15
    connect: Network is unreachable
    # Trying to connect to the Internet
    $ ping 8.8.8.8
    connect: Network is unreachable
This is also well understood. There is no route for such packets in the netns0 routing table. The only entry is how to reach 172.18.0.0/16 network:
# In netns0 namespace:
    $ ip route
    172.18.0.0/16 dev ceth0 proto kernel scope link src 172.18.0.10
Linux has several ways to establish routing tables. One is to extract the route directly from the network interface. Remember, after the namespace is created, the routing table in netns0 is empty. But then we added the ceth0 device and assigned the IP address 172.18.0.0/16. Because we don't use a simple IP address, but a combination of address and subnet mask, the network stack can extract routing information from it. Each network packet destined for 172.18.0.0/16 will pass through the ceth0 device. But other packets will be discarded. Similarly, the root namespace has a new route:
# In the root namespace:
    $ ip route
    # ...  Ignore irrelevant rows
    172.18.0.0/16 dev veth0 proto kernel scope link src 172.18.0.11
Here, you can answer the first question. We learned how to isolate, virtualize, and connect Linux network stacks.
Connect containers using virtual network switch
The driving force of containerization is efficient resource sharing. Therefore, it is not common to run only one container on a machine. Instead, the ultimate goal is to run as many isolated processes as possible on a shared environment. Therefore, what happens if multiple containers are placed on the same host according to the above veth scheme? Let's try adding a second container.
# From root namespace
    $ sudo ip netns add netns1
    $ sudo ip link add veth1 type veth peer name ceth1
    $ sudo ip link set ceth1 netns netns1
    $ sudo ip link set veth1 up
    $ sudo ip addr add 172.18.0.21/16 dev veth1
    $ sudo nsenter --net=/var/run/netns/netns1
    $ ip link set lo up
    $ ip link set ceth1 up
    $ ip addr add 172.18.0.20/16 dev ceth1
Check connectivity:
# Unable to connect root namespace from netns1!
    $ ping -c 2 172.18.0.21
    PING 172.18.0.21 (172.18.0.21) 56(84) bytes of data.
    From 172.18.0.20 icmp_seq=1 Destination Host Unreachable
    From 172.18.0.20 icmp_seq=2 Destination Host Unreachable
    --- 172.18.0.21 ping statistics ---
    2 packets transmitted, 0 received, +2 errors, 100% packet loss, time 55ms pipe 2
    # But routing exists!
    $ ip route
    172.18.0.0/16 dev ceth1 proto kernel scope link src 172.18.0.20
    # Leave ` netns1`
    $ exit
    # Unable to connect from root namespace ` netns1`
    $ ping -c 2 172.18.0.20
    PING 172.18.0.20 (172.18.0.20) 56(84) bytes of data.
    From 172.18.0.11 icmp_seq=1 Destination Host Unreachable
    From 172.18.0.11 icmp_seq=2 Destination Host Unreachable

--- 172.18.0.20 ping statistics ---
2 packets transmitted, 0 received, +2 errors, 100% packet loss, time 23ms pipe 2
    # Connect from netns0 ` veth1`
    $ sudo nsenter --net=/var/run/netns/netns0
    $ ping -c 2 172.18.0.21
    PING 172.18.0.21 (172.18.0.21) 56(84) bytes of data.
    64 bytes from 172.18.0.21: icmp_seq=1 ttl=64 time=0.037 ms
    64 bytes from 172.18.0.21: icmp_seq=2 ttl=64 time=0.046 ms
    --- 172.18.0.21 ping statistics ---
    2 packets transmitted, 2 received, 0% packet loss, time 33ms
    rtt min/avg/max/mdev = 0.037/0.041/0.046/0.007 ms
    # But still unable to connect to netns1
    $ ping -c 2 172.18.0.20
    PING 172.18.0.20 (172.18.0.20) 56(84) bytes of data.
    From 172.18.0.10 icmp_seq=1 Destination Host Unreachable
    From 172.18.0.10 icmp_seq=2 Destination Host Unreachable
    --- 172.18.0.20 ping statistics ---
    2 packets transmitted, 0 received, +2 errors, 100% packet loss, time 63ms pipe 2
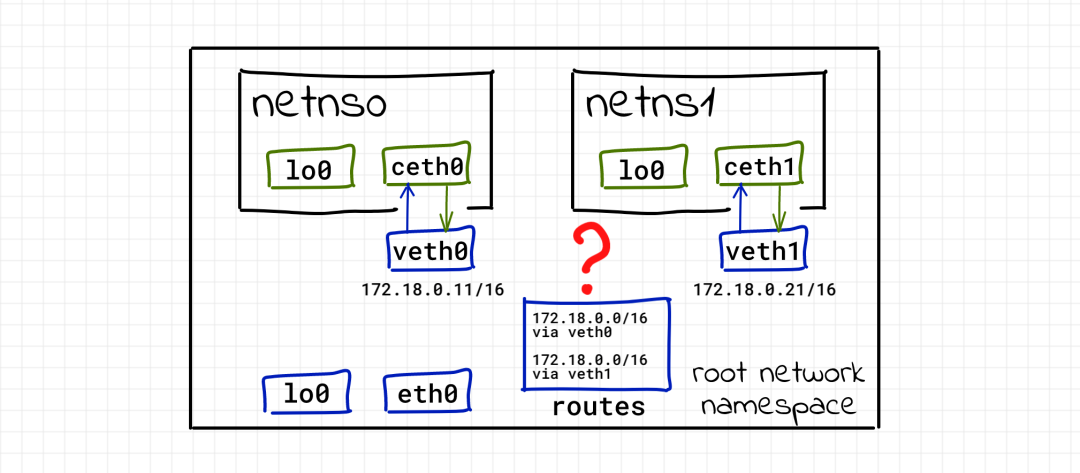
Dizzy! Something went wrong... Something went wrong with netns1. It cannot connect to root and cannot be accessed from the root namespace. However, because the two containers are in the same IP network segment 172.18.0.0/16, the veth1 of the host can be accessed from the netns0 container.
It took some time to find the reason, but it was obvious that there was a routing problem. First check the routing table of the root namespace:
$ ip route
    # ... Ignore irrelevant rows... #
    172.18.0.0/16 dev veth0 proto kernel scope link src 172.18.0.11
    172.18.0.0/16 dev veth1 proto kernel scope link src 172.18.0.21
After adding the second Veth pair, the network stack of root knows the new route 172.18.0.0/16 dev veth1 proto kernel scope link src 172.18.0.21, but the route of the network already exists before. When the second container tries to ping veth1, the first routing rule is selected, which makes the network unable to connect. If we delete the first route sudo ip route delete 172.18.0.0/16 dev veth0 proto kernel scope link src 172.18.0.11, and then recheck the connectivity, there should be no problem. netns1 can connect, but netns0 can't.
If we choose other network segments for netns1, we should be able to connect. However, multiple containers on the same IP network segment should be a reasonable use scenario. Therefore, we need to adjust the veth scheme.
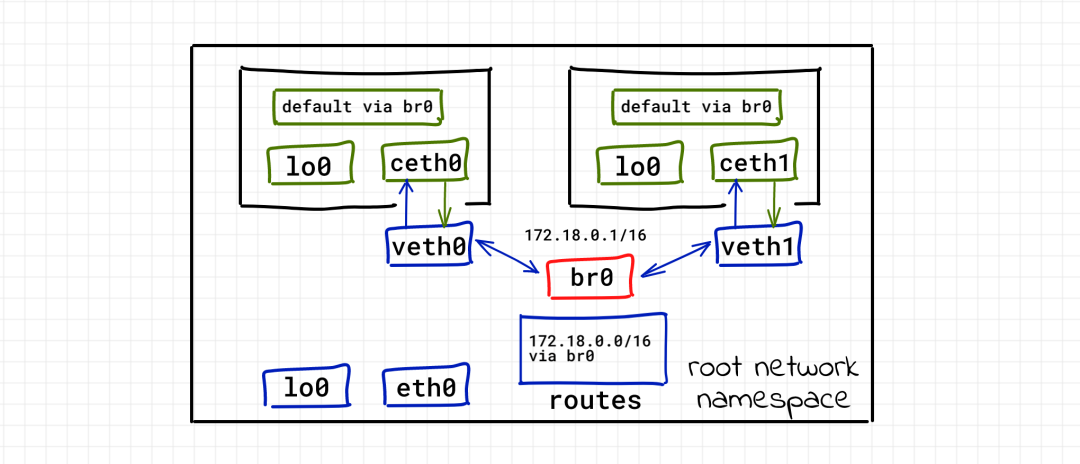
Don't forget the Linux bridge, another virtualization network technology! The function of Linux bridge is similar to network switch. It forwards network packets between interfaces connected to it. And because it is a switch, it completes these forwarding at the L2 layer.
Try this tool. But first, you need to clear the existing settings, because some of the previous configurations are no longer needed. Delete network namespace:
$ sudo ip netns delete netns0
$ sudo ip netns delete netns1
$ sudo ip link delete veth0
$ sudo ip link delete ceth0
$ sudo ip link delete veth1
$ sudo ip link delete ceth1
Quickly rebuild two containers. Note that we did not assign any IP addresses to the new veth0 and veth1 devices:
$ sudo ip netns add netns0
$ sudo ip link add veth0 type veth peer name ceth0
$ sudo ip link set veth0 up
$ sudo ip link set ceth0 netns netns0

$ sudo nsenter --net=/var/run/netns/netns0
$ ip link set lo up
$ ip link set ceth0 up
$ ip addr add 172.18.0.10/16 dev ceth0
$ exit

$ sudo ip netns add netns1
$ sudo ip link add veth1 type veth peer name ceth1
$ sudo ip link set veth1 up
$ sudo ip link set ceth1 netns netns1

$ sudo nsenter --net=/var/run/netns/netns1
$ ip link set lo up
$ ip link set ceth1 up
$ ip addr add 172.18.0.20/16 dev ceth1
$ exit
Make sure there are no new routes on the host:
$ ip route
default via 10.0.2.2 dev eth0 proto dhcp metric 100
10.0.2.0/24 dev eth0 proto kernel scope link src 10.0.2.15 metric 100
Finally, create the bridge interface:
$ sudo ip link add br0 type bridge
$ sudo ip link set br0 up
Connect veth0 and veth1 to the bridge:
$ sudo ip link set veth0 master br0
$ sudo ip link set veth1 master br0
Check the connectivity between containers:
$ sudo nsenter --net=/var/run/netns/netns0
$ ping -c 2 172.18.0.20
PING 172.18.0.20 (172.18.0.20) 56(84) bytes of data.
64 bytes from 172.18.0.20: icmp_seq=1 ttl=64 time=0.259 ms
64 bytes from 172.18.0.20: icmp_seq=2 ttl=64 time=0.051 ms
--- 172.18.0.20 ping statistics ---
2 packets transmitted, 2 received, 0% packet loss, time 2ms
rtt min/avg/max/mdev = 0.051/0.155/0.259/0.104 ms
$ sudo nsenter --net=/var/run/netns/netns1
$ ping -c 2 172.18.0.10
PING 172.18.0.10 (172.18.0.10) 56(84) bytes of data.
64 bytes from 172.18.0.10: icmp_seq=1 ttl=64 time=0.037 ms
64 bytes from 172.18.0.10: icmp_seq=2 ttl=64 time=0.089 ms
--- 172.18.0.10 ping statistics ---
2 packets transmitted, 2 received, 0% packet loss, time 36ms
rtt min/avg/max/mdev = 0.037/0.063/0.089/0.026 ms
Excellent! Well done. With this new scheme, we don't need to configure veth0 and veth1 at all. Only two IP addresses need to be assigned at the ceth0 and ceth1 endpoints. But because they are all connected to the same Ethernet (remember, they are connected to the virtual switch), they are connected at the L2 layer:
$ sudo nsenter --net=/var/run/netns/netns0
$ ip neigh
172.18.0.20 dev ceth0 lladdr 6e:9c:ae:02:60:de STALE
$ exit

$ sudo nsenter --net=/var/run/netns/netns1
$ ip neigh
172.18.0.10 dev ceth1 lladdr 66:f3:8c:75:09:29 STALE
$ exit
Great, we learned how to turn containers into neighbors so that they don't interfere with each other, but they can be connected.
Connecting to the outside world (IP routing and masquerading)
Communication between containers is possible. But can they communicate with the host, such as the root namespace?
$ sudo nsenter --net=/var/run/netns/netns0
$ ping 10.0.2.15 # eth0 address
connect: Network is unreachable
It is obvious here that netns0 has no route:
$ ip route
172.18.0.0/16 dev ceth0 proto kernel scope link src 172.18.0.10
root namespace cannot communicate with container:
# First, use exit to leave netns0:
    $ ping -c 2 172.18.0.10
    PING 172.18.0.10 (172.18.0.10) 56(84) bytes of data.
    From 213.51.1.123 icmp_seq=1 Destination Net Unreachable
    From 213.51.1.123 icmp_seq=2 Destination Net Unreachable
    --- 172.18.0.10 ping statistics ---
    2 packets transmitted, 0 received, +2 errors, 100% packet loss, time 3ms

$ ping -c 2 172.18.0.20
PING 172.18.0.20 (172.18.0.20) 56(84) bytes of data.
From 213.51.1.123 icmp_seq=1 Destination Net Unreachable
From 213.51.1.123 icmp_seq=2 Destination Net Unreachable
--- 172.18.0.20 ping statistics ---
2 packets transmitted, 0 received, +2 errors, 100% packet loss, time 3ms
To establish connectivity between root and container namespace, we need to assign IP address to the bridge network interface:
$ sudo ip addr add 172.18.0.1/16 dev br0
Once the IP address is assigned to the bridge network interface, there will be one more route in the host routing table:
$ ip route
    # ... Ignore irrelevant rows
    172.18.0.0/16 dev br0 proto kernel scope link src 172.18.0.1

$ ping -c 2 172.18.0.10
PING 172.18.0.10 (172.18.0.10) 56(84) bytes of data.
64 bytes from 172.18.0.10: icmp_seq=1 ttl=64 time=0.036 ms
64 bytes from 172.18.0.10: icmp_seq=2 ttl=64 time=0.049 ms

--- 172.18.0.10 ping statistics ---
2 packets transmitted, 2 received, 0% packet loss, time 11ms
rtt min/avg/max/mdev = 0.036/0.042/0.049/0.009 ms

$ ping -c 2 172.18.0.20
PING 172.18.0.20 (172.18.0.20) 56(84) bytes of data.
64 bytes from 172.18.0.20: icmp_seq=1 ttl=64 time=0.059 ms
64 bytes from 172.18.0.20: icmp_seq=2 ttl=64 time=0.056 ms

--- 172.18.0.20 ping statistics ---
2 packets transmitted, 2 received, 0% packet loss, time 4ms
rtt min/avg/max/mdev = 0.056/0.057/0.059/0.007 ms
Containers may also ping bridge interfaces, but they still cannot connect to the host's eth0. You need to add a default route for the container:
$ sudo nsenter --net=/var/run/netns/netns0
$ ip route add default via 172.18.0.1
$ ping -c 2 10.0.2.15
PING 10.0.2.15 (10.0.2.15) 56(84) bytes of data.
64 bytes from 10.0.2.15: icmp_seq=1 ttl=64 time=0.036 ms
64 bytes from 10.0.2.15: icmp_seq=2 ttl=64 time=0.053 ms
--- 10.0.2.15 ping statistics ---
2 packets transmitted, 2 received, 0% packet loss, time 14ms
rtt min/avg/max/mdev = 0.036/0.044/0.053/0.010 ms
    # The above configuration is also made for 'netns1'
This change basically turns the host into a route, and the bridge interface becomes the default gateway between containers.
Well, let's connect the container to the root namespace. Now, continue trying to connect them to the outside world. Network packet forwarding (for example, routing function) is disable d by default on Linux. We need to enable this function first:
# In the root namespace
    sudo bash -c 'echo 1 > /proc/sys/net/ipv4/ip_forward'
Check connectivity again:
$ sudo nsenter --net=/var/run/netns/netns0
$ ping 8.8.8.8
    # hung lived
Still not working. What's wrong? If the container can contract out, the target server cannot send the packet back to the container, because the IP address of the container is private, and the routing rules of that specific IP are known only to the local network. And many containers share the same private IP address 172.18.0.10. The solution to this problem is called network address translation (NAT). Before reaching the external network, the package sent by the container replaces the source IP address with the external network address of the host. The host also tracks all existing mappings and restores the IP address that was previously replaced before forwarding the packet back to the container. Sounds complicated, but there's good news! iptables module allows us to complete all this with only one command:
$ sudo iptables -t nat -A POSTROUTING -s 172.18.0.0/16 ! -o br0 -j MASQUERADE
The command is very simple. A new route of POSTROUTING chain is added to the nat table, which will replace all packets from 172.18.0.0/16 network, but not through the bridge interface.
Check connectivity:
$ sudo nsenter --net=/var/run/netns/netns0
$ ping -c 2 8.8.8.8 PING 8.8.8.8 (8.8.8.8) 56(84) bytes of data.
64 bytes from 8.8.8.8: icmp_seq=1 ttl=61 time=43.2 ms
64 bytes from 8.8.8.8: icmp_seq=2 ttl=61 time=36.8 ms
--- 8.8.8.8 ping statistics ---
2 packets transmitted, 2 received, 0% packet loss, time 2ms
rtt min/avg/max/mdev = 36.815/40.008/43.202/3.199 ms
You know the default policy we use here - allow all traffic, which is very dangerous in a real environment. The default iptables policy of the host is ACCEPT:
sudo iptables -S
-P INPUT ACCEPT
-P FORWARD ACCEPT
-P OUTPUT ACCEPT
Docker limits all traffic by default, and then only enables routing for known paths.
The following are the rules generated by Docker daemon when a single container exposes port 5005 on CentOS 8 machine:
$ sudo iptables -t filter --list-rules
-P INPUT ACCEPT
-P FORWARD DROP
-P OUTPUT ACCEPT
-N DOCKER
-N DOCKER-ISOLATION-STAGE-1
-N DOCKER-ISOLATION-STAGE-2
-N DOCKER-USER
-A FORWARD -j DOCKER-USER
-A FORWARD -j DOCKER-ISOLATION-STAGE-1
-A FORWARD -o docker0 -m conntrack --ctstate RELATED,ESTABLISHED -j ACCEPT
-A FORWARD -o docker0 -j DOCKER
-A FORWARD -i docker0 ! -o docker0 -j ACCEPT
-A FORWARD -i docker0 -o docker0 -j ACCEPT
-A DOCKER -d 172.17.0.2/32 ! -i docker0 -o docker0 -p tcp -m tcp --dport 5000 -j ACCEPT
-A DOCKER-ISOLATION-STAGE-1 -i docker0 ! -o docker0 -j DOCKER-ISOLATION-STAGE-2
-A DOCKER-ISOLATION-STAGE-1 -j RETURN
-A DOCKER-ISOLATION-STAGE-2 -o docker0 -j DROP
-A DOCKER-ISOLATION-STAGE-2 -j RETURN
-A DOCKER-USER -j RETURN

$ sudo iptables -t nat --list-rules
-P PREROUTING ACCEPT
-P INPUT ACCEPT
-P POSTROUTING ACCEPT
-P OUTPUT ACCEPT
-N DOCKER
-A PREROUTING -m addrtype --dst-type LOCAL -j DOCKER
-A POSTROUTING -s 172.17.0.0/16 ! -o docker0 -j MASQUERADE
-A POSTROUTING -s 172.17.0.2/32 -d 172.17.0.2/32 -p tcp -m tcp --dport 5000 -j MASQUERADE
-A OUTPUT ! -d 127.0.0.0/8 -m addrtype --dst-type LOCAL -j DOCKER
-A DOCKER -i docker0 -j RETURN
-A DOCKER ! -i docker0 -p tcp -m tcp --dport 5005 -j DNAT --to-destination 172.17.0.2:5000

$ sudo iptables -t mangle --list-rules
-P PREROUTING ACCEPT
-P INPUT ACCEPT
-P FORWARD ACCEPT
-P OUTPUT ACCEPT
 -P POSTROUTING ACCEPT

$ sudo iptables -t raw --list-rules
-P PREROUTING ACCEPT
-P OUTPUT ACCEPT
Make containers accessible to the outside world (Port Publishing)
As we all know, container ports can be published to some (or all) host interfaces. But what exactly does port publishing mean?
Suppose a server is running inside the container:
$ sudo nsenter --net=/var/run/netns/netns0
$ python3 -m http.server --bind 172.18.0.10 5000
If we try to send an HTTP request from the host to the server, everything works well (there is a link between the root namespace and all container interfaces, of course, the connection can be successful):
# From root namespace
    $ curl 172.18.0.10:5000
    <!DOCTYPE HTML PUBLIC "-//W3C//DTD HTML 4.01//EN"  "http://www.w3.org/TR/html4/strict.dtd">
    # ...  Ignore irrelevant rows
However, if you want to access this server from the outside, which IP should you use? The only IP we know is the external interface address eth0 of the host:
$ curl 10.0.2.15:5000
curl: (7) Failed to connect to 10.0.2.15 port 5000: Connection refused
Therefore, we need to find a way to forward all packets arriving at the host eth05000 port to the destination 172.18.0.10:5000. iptables help again!
# External flow
    sudo iptables -t nat -A PREROUTING -d 10.0.2.15 -p tcp -m tcp --dport 5000 -j DNAT --to-destination 172.18.0.10:5000
    # Local traffic (because it does not pass through the preceding chain)
    sudo iptables -t nat -A OUTPUT -d 10.0.2.15 -p tcp -m tcp --dport 5000 -j DNAT --to-destination 172.18.0.10:5000
In addition, iptables needs to be able to intercept traffic on the bridge network:
sudo modprobe br_netfilter
Test:
curl 10.0.2.15:5000
<!DOCTYPE HTML PUBLIC "-//W3C//DTD HTML 4.01//EN"  "http://www.w3.org/TR/html4/strict.dtd">
      # ...  Ignore irrelevant rows
Understand Docker network driver
How can we use this knowledge? For example, you can try to understand the Docker network model [1].
Start in – network host mode. Try to compare the output of the command ip link and sudo docker run -it --rm --network host alpine ip link. They are almost the same! In the host mode, Docker simply does not use network namespace isolation. The container works in the root network namespace and shares the network stack with the host.
The next mode is – network none. The output of sudo docker run -it --rm --network host alpine ip link has only one loopback network interface. This is very similar to the network namespace created before without adding veth devices.
The last is the – network bridge (default) mode. This is the pattern we tried to create earlier. You can try the ip and iptables commands to observe the network stack from the perspective of host and container respectively.
rootless container and network
A good feature of podman container manager is its focus on rootless containers. However, you may notice that this article uses a lot of sudo commands. Note: the network cannot be configured without root permission. Podman's scheme [2] on the root network is very similar to Docker. However, on the rootless container, podman uses the slirp4netns[3] project:
Starting with Linux 3.8, non privileged users can create users_ Create network while creating namespaces (7)_ namespaces(7). However, the non privileged network namespace is not very useful, because creating veth(4) between the host and the network namespace still requires root permission
slirp4netns can connect the network namespace to the Internet in a completely non privileged way, and connect to the user state TCP/IP stack (slirp) through a TAP device in the network namespace.
The rootless network is very limited: "technically, the container itself does not have an IP address, because it does not have root permission, so it cannot realize the association of network devices. In addition, Ping from the rootless container will not work because it lacks CAP_NET_RAW security capability, which is necessary for the ping command." But it's still better than no connection at all.
conclusion
The scheme of organizing container network introduced in this paper is only one of the possible schemes (probably the most widely used one). There are many other ways to implement by official or third-party plug-ins, but all these schemes rely heavily on Linux network virtualization technology [4]. Therefore, containerization can be regarded as a virtualization technology.