What is Podman?
podman (Pod Manager) is a container management tool launched by RedHat company. It is positioned as a substitute for docker, which is similar to the experience of docker.
Official website address: https://podman.io/
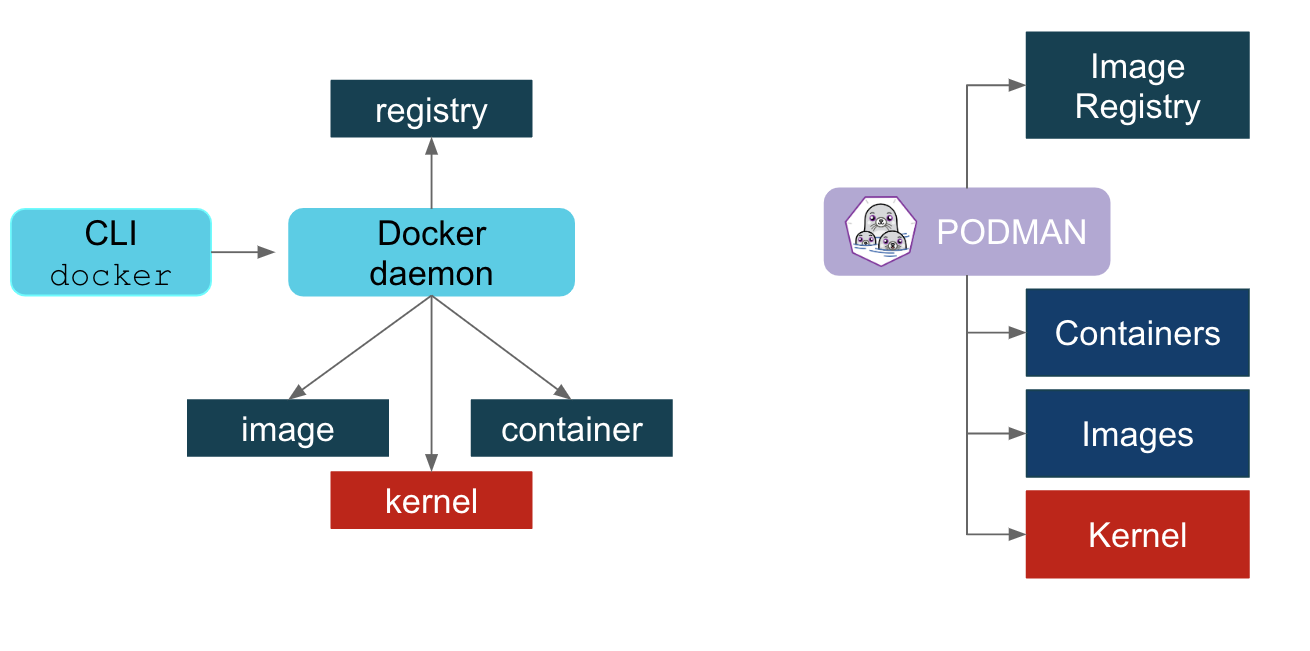
Podman is an open source container runtime project that can be used on most Linux platforms. Podman provides functions very similar to Docker. As mentioned earlier, it does not need to run any daemons on your system, and it can also run without root privileges. Podman provides a command line interface (CLI) that anyone who has used the Docker container engine can get started quickly. Podman is relatively simple and crude. Instead of using Daemon, it starts the container directly through OCI runtime (runc by default), so the process of the container is a child process of podman. It is more like the fork/exec model of Linux;
fork/exec Model advantages:
1.Who is the parent process of a container process(That is, who started it at a glance)
2.utilize cgroup yes podman Restrictions are used podman All containers created are restricted;
3.Can be podman Command put systemd Container processes in unit files can be accessed through podman Return notification(SD_NOTIFY)Indicates that the service is ready to receive tasks
Podman can manage and run any container and container image conforming to OCI (Open Container Initiative) specification. Podman provides a Docker compatible command line front end to manage Docker images.
Most users can simply alias Podman as Docker (alias Docker = Podman), without any problem. Similar to other common container engines (Docker, CRI-O, containerd), Podman relies on OCI compliant container runtimes (runc, cron, runv, etc.) to interact with the operating system and create running containers. This makes running containers created by Podman almost indistinguishable from containers created by any other generic container engine.
What are the main differences between Podman and Docker?
- When docker implements CRI, it needs a daemon, and then it needs to run as root, which also brings security risks.
- podman does not need a daemon, nor does it need to be run by the root user. In terms of logical architecture, it is more reasonable than docker.
- In the operating system of docker, multiple daemon s are required to call RunC, the implementation of OCI.
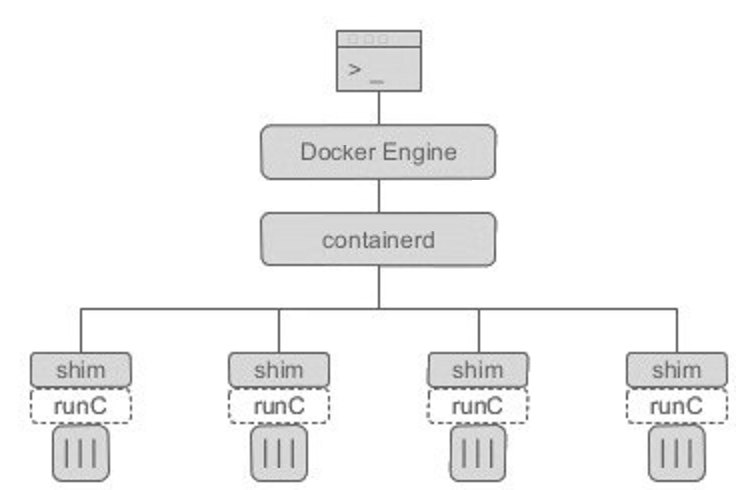
- In the container managed link, Docker Engine is implemented as docked daemon. It needs to run as root in linux. dockerd calls containerd, containerd calls containerd shim, and then runC can be called. As the name suggests, shim functions as a "shim" to prevent the parent process from exiting and affecting the operation of the container.
- podman directly calls OCI runtime (runC) and uses common as the management tool of the container process, but does not need a daemon running as root, such as dockerd.
- In the podman system, there is a daemon called common. Its running path is usually / usr/libexec/podman/conmon. It is the parent process of each container process. Each container has one. The parent of common is usually process 1. Common in podman is actually equivalent to containerd shim in docker system.
The following figure is commonly used to describe the difference between podman and docker:
What the figure shows is that podman does not need a daemon, while dorker needs a daemon. In the diagram, dorcker's containerd ship and podman's common are grouped in the Container layer.
Podman VS Docker
(1) Model comparison
Podman: fork/exec Model
Docker: C/S Model
(2) Startup mode:
The former is direct OCI containner runtime(runc)Interact to create container of
 The latter passed API Follow Docker Engine(engine)Only when requested OCI container runtime(runc)To start a container
(3) Daemon
 The former container does not support–restart Policies, however, can be written systemd Service to complete self start
 The latter is due to docker daemon,therefore docker Started container support–restart strategy
(4) Permission comparison
 The former can be non root User created container
 The latter must be used root User to create container
What is the difference between the use of podman and docker?
The positioning of podman is also compatible with docker, so it should be used as close to docker as possible. In terms of use, it can be divided into two aspects: one is the perspective of the system builder, and the other is the perspective of the user.
- In terms of system builder, the default software of podman is not different from docker, but in process model and process relationship. If you are used to the debugging method of several associated processes of docker, you need to adapt in podman. You can view the tree structure of the process through the pstree command. Overall, podman is simpler than docker. Since podman has one layer less daemon than docker, the restart mechanism is different.
- In terms of users, podman is basically compatible with docker commands, including container runtime (run/start/kill/ps/inspect), local images (images/rmi/build), image warehouse (login/pull/push), etc. Therefore, podman's command-line tools are similar to docker, such as building images, starting and stopping containers, etc. It can even be replaced by alias docker=podman. Therefore, even if you use podman, you can still use docker IO is the image repository, which is also the most critical part of compatibility.
Compared with docker, podman also lacks some functions. For example, it does not support windows and docker compoese choreography tool. Obviously, in Kubernetes or OpenShift systems, these are not important.
The following figure shows the secondary commands of docker and podman, which are quite close.
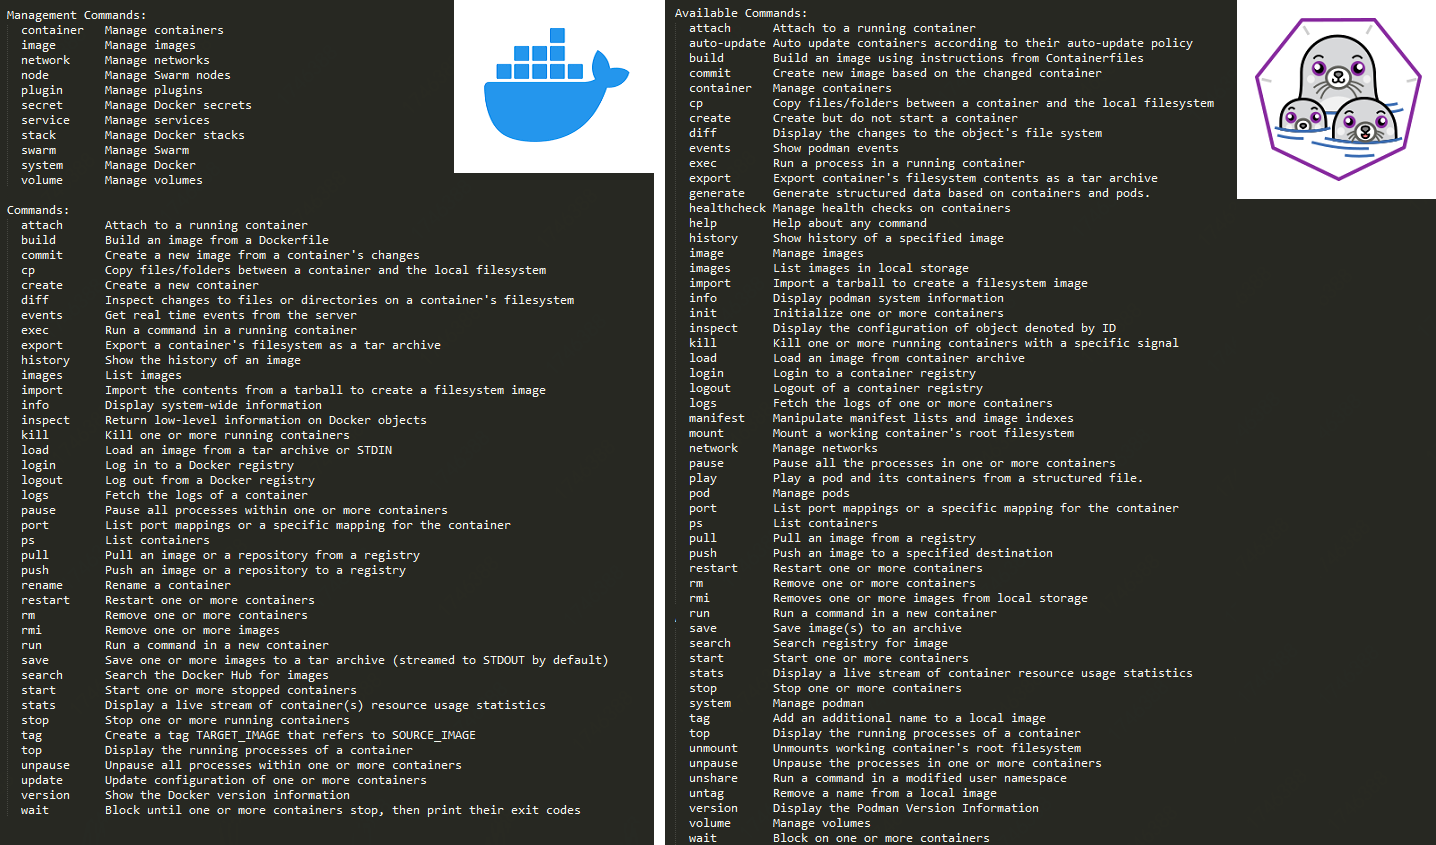
Common commands of podman
Container related commands
podman run           Create and start the container
podman start         Start container
podman ps            View container
podman stop          Terminate container
podman restart       Restart container
podman attach        Enter container
podman exec          Enter container
podman export        Export container
podman import        Import container snapshot
podman rm            Delete container
podman logs          view log
Mirror operation related commands
podman search                Retrieve image
podman pull                  Get image
podman images                List mirrors
podman image Is              List mirrors
podman rmi                   delete mirror
podman image rm              delete mirror
podman save                  Export mirror
podman load                  Import mirror
podmanfile                   Custom image (three)
 podman build             Build mirror
    podman run               Run mirror
    podmanfile               Common instructions (four)
     COPY                 Copy file
        ADD                  Advanced replication
        CMD                  Container start command
        ENV                  environment variable
        EXPOSE               Exposed port
Deployment related commands
//Install podman
[root@localhost ~]# yum -y install podman
Question 1:
user namespaces are not enabled in /proc/sys/user/max_user_namespaces
terms of settlement:
# centos 7 closes the user namespace by default and needs to be opened manually
echo 10000 > /proc/sys/user/max_user_namespaces
grubby --args="user_namespace.enable=1" --update-kernel="$(grubby --default-kernel)"
echo "user.max_user_namespaces=10000" >> /etc/sysctl.conf
Question 2:
Error: failed to mount overlay for metacopy check with "nodev,metacopy=on" options: invalid argument
terms of settlement:
vi /etc/containers/storage.conf
# Some features of podman are not supported in the old kernel configuration, and mountopt needs to be commented out
#mountopt = "nodev,metacopy=on"
Question 3:
ERRO[0000] cannot find UID/GID for user xxxx: No subuid ranges found for user "xxx" in /etc/subuid - check rootless mode in man pages.
terms of settlement:
Podman can also be used as non-root user. When podman runs in rootless mode, a user namespace is automatically created for the user, defined in /etc/subuid and /etc/subgid.

Containers created by a non-root user are not visible to other users and are not seen or managed by Podman running as root.

It is required to have multiple uids/gids set for an user. Be sure the user is present in the files /etc/subuid and /etc/subgid.

If you have a recent version of usermod, you can execute the following commands to add the ranges to the files

$ sudo usermod --add-subuids 10000-75535 USERNAME
$ sudo usermod --add-subgids 10000-75535 USERNAME
Or just add the content manually.

$ echo USERNAME:10000:65536 >> /etc/subuid
$ echo USERNAME:10000:65536 >> /etc/subgid
See the subuid(5) and subgid(5) man pages for more information.

Images are pulled under XDG_DATA_HOME when specified, otherwise in the home directory of the user under .local/share/containers/storage.

Currently the slirp4netns package is required to be installed to create a network device, otherwise rootless containers need to run in the network namespace of the host.
# xxx is the current user name
echo xxx:10000:65536 >> /etc/subuid
echo xxx:10000:65536 >> /etc/subgid
Modify the order of image pull addresses
vi /etc/containers/registries.conf
# Put docker IO to the front
unqualified-search-registries = ["docker.io", "registry.fedoraproject.org", "registry.access.redhat.com", "registry.centos.org"]
Podman accelerator
Version 7 configuration accelerator
//Warehouse configuration
[root@localhost ~]# vim /etc/containers/registries.conf
[registries.search]
#registries = ["registry.access.redhat.com", "registry.redhat.io", "docker.io"]  #This is a search. Search from these three places

registries = ["docker.io"]  #If only one is left, it will be found in only one source
[[docker.io]]
location="j3m2itm3.mirror.aliyuncs.com"
Version 8 configuration accelerator
#unqualified-search-registries = ["registry.fedoraproject.org", "registry.access.redhat.com", "registry.centos.org", "docker.io"]   #Comment it out directly
unqualified-search-registries = ["docker.io"]  #Add a docker io
[[registry]]
prefix = "docker.io"
location = "j3m2itm3.mirror.aliyuncs.com" (No need to add https://  (add address directly)
Use Podman
Using Podman is very simple. Most of the instructions of Podman and Docker are the same. Here are some common examples:
Run a container
(base) [root@argus xz]# podman run -d --name httpd docker.io/library/httpd
Trying to pull docker.io/library/httpd...
Getting image source signatures
Copying blob a2abf6c4d29d skipped: already exists
Copying blob dcc4698797c8 done
Copying blob d982c879c57e done
Copying blob 41c22baa66ec done
Copying blob 67283bbdd4a0 done
Copying config dabbfbe0c5 done
Writing manifest to image destination
Storing signatures
9191ed4a924fbc4a47db31545450aafecce53644db3d118862918d89264a0f64
// View mirror
(base) [root@argus xz]# podman images
REPOSITORY                             TAG      IMAGE ID       CREATED        SIZE
docker.io/library/nginx                latest   605c77e624dd   2 weeks ago    146 MB
docker.io/library/httpd                latest   dabbfbe0c57b   3 weeks ago    148 MB
docker.io/library/hello-world          latest   feb5d9fea6a5   3 months ago   19.9 kB
registry.fedoraproject.org/f29/httpd   latest   25c76f9dcdb5   2 years ago    482 MB
Lists the containers that are running
(base) [root@argus xz]# podman ps
CONTAINER ID  IMAGE                                        COMMAND               CREATED        STATUS            PORTS                   NAMES
9191ed4a924f  docker.io/library/httpd:latest               httpd-foreground      2 minutes ago  Up 2 minutes ago                          httpd
d5a790a01a39  registry.fedoraproject.org/f29/httpd:latest  /usr/bin/run-http...  8 minutes ago  Up 8 minutes ago  0.0.0.0:8080->8080/tcp  upbeat_merkle
Note: if you add - a to the ps command, Podman will display all containers.
Check running containers
You can "check" the metadata of a running container and details about itself. We can even use the inspect subcommand to view the IP address assigned to the container. Because the container is running in rootless mode, no IP address is assigned and the value will be listed as "None" in the output of the check.
(base) [root@argus xz]# podman inspect -l | grep IPAdd.*\":
            "SecondaryIPAddresses": null,
            "IPAddress": "10.88.0.4",
(base) [root@argus xz]# curl 10.88.0.4
<html><body><h1>It works!</h1></body></html>
Note: - l is a convenient parameter for the latest container. You can also use the ID of the container instead of - l.
View the log of a running container
Option -- latest # recent
(base) [root@argus xz]# podman logs --latest
AH00558: httpd: Could not reliably determine the server's fully qualified domain name, using 10.88.0.4. Set the 'ServerName' directive globally to suppress this message
AH00558: httpd: Could not reliably determine the server's fully qualified domain name, using 10.88.0.4. Set the 'ServerName' directive globally to suppress this message
[Thu Jan 13 11:59:14.737075 2022] [mpm_event:notice] [pid 1:tid 140335199481152] AH00489: Apache/2.4.52 (Unix) configured -- resuming normal operations
[Thu Jan 13 11:59:14.737154 2022] [core:notice] [pid 1:tid 140335199481152] AH00094: Command line: 'httpd -D FOREGROUND'
10.88.0.1 - - [13/Jan/2022:12:04:11 +0000] "GET / HTTP/1.1" 200 45
View the process resource usage in a running container
You can use top to observe the · nginx pid in the container
Syntax: podman top <container_id>
(base) [root@argus xz]# podman top httpd
USER       PID   PPID   %CPU    ELAPSED            TTY   TIME   COMMAND
root       1     0      0.000   11m27.812353266s   ?     0s     httpd -DFOREGROUND
www-data   8     1      0.000   11m27.812565845s   ?     0s     httpd -DFOREGROUND
www-data   9     1      0.000   11m27.812623283s   ?     0s     httpd -DFOREGROUND
www-data   10    1      0.000   11m27.812678987s   ?     0s     httpd -DFOREGROUND
Stop a running container
(base) [root@argus xinzhe]# podman stop --latest
9191ed4a924fbc4a47db31545450aafecce53644db3d118862918d89264a0f64
(base) [root@argus xz]# podman ps
CONTAINER ID  IMAGE                                        COMMAND               CREATED         STATUS             PORTS                   NAMES
d5a790a01a39  registry.fedoraproject.org/f29/httpd:latest  /usr/bin/run-http...  18 minutes ago  Up 18 minutes ago  0.0.0.0:8080->8080/tcp  upbeat_merkle
Delete a container
(base) [root@argus xz]# podman rm --latest
9191ed4a924fbc4a47db31545450aafecce53644db3d118862918d89264a0f64
(base) [root@argus xz]# podman ps -a
CONTAINER ID  IMAGE                                        COMMAND               CREATED         STATUS                     PORTS                   NAMES
d5a790a01a39  registry.fedoraproject.org/f29/httpd:latest  /usr/bin/run-http...  19 minutes ago  Up 19 minutes ago          0.0.0.0:8080->8080/tcp  upbeat_merkle
5289492b6307  docker.io/library/hello-world:latest         /hello                32 minutes ago  Exited (0) 32 minutes ago                          angry_rubin
These features are basically the same as Docker. Besides being compatible with these features, Podman also supports some new features.
Upload image
For example, if we want to be in docker Share our new Nginx container image on Io. You can:
[root@localhost nginx]# tree
.
├── Dockerfile
└── files
    └── nginx-1.20.1.tar.gz

[root@localhost nginx]# cat Dockerfile
FROM docker.io/library/centos

ENV PATH /usr/local/nginx/sbin:$PATH
ADD files/nginx-1.20.1.tar.gz /usr/src
RUN useradd -r -M -s /sbin/nologin nginx && \
    yum -y install pcre-devel openssl openssl-devel gd-devel gcc gcc-c++ make && \
    mkdir -p /var/log/nginx && \
    cd /usr/src/nginx-1.20.1 && \
    ./configure \
    --prefix=/usr/local/nginx \
    --user=nginx \
    --group=nginx \
    --with-debug \
    --with-http_ssl_module \
    --with-http_realip_module \
    --with-http_image_filter_module \
    --with-http_gunzip_module \
    --with-http_gzip_static_module \
    --with-http_stub_status_module \
    --http-log-path=/var/log/nginx/access.log \
    --error-log-path=/var/log/nginx/error.log && \
  make && make install

CMD ["nginx","-g","daemon off"]
[root@localhost nginx]# podman build -t nginx .

// Modify image name
 [root@localhost ~]# podman tag docker.io/library/nginx:latest docker.io/123456/test:latest

// Log in and upload the image
[root@localhost ~]# podman login docker.io / / you need to tell them to log in to the docker warehouse
[root@localhost ~]# podman login docker.io
Username: 123456  #account
Password: ********  #password
Login Succeeded!

[root@localhost nginx]# podman push docker.io/123456/test:latest / / upload image
Getting image source signatures
Copying blob 38c40d6c2c85 done
Copying blob fee76a531659 done
Copying blob c2adabaecedb done
Copying config 7f3589c0b8 done
Writing manifest to image destination
Copying config 7f3589c0b8 done
Writing manifest to image destination
Storing signatures


//Please note that we have pushed four layers to our registry, which can now be shared by others. Quick browse:
[root@localhost ~]# podman inspect 123456/test:nginx
//Output:
[
    {
        "Id": "7f3589c0b8849a9e1ff52ceb0fcea2390e2731db9d1a7358c2f5fad216a48263",
        "Digest": "sha256:7822b5ba4c2eaabdd0ff3812277cfafa8a25527d1e234be028ed381a43ad5498",
        "RepoTags": [
            "docker.io/1314444/test:nginx",
  ......
In summary, Podman makes it easy to find, run, build, and share containers.
Configure alias
If you are used to using the Docker command, you can directly configure an alias for Podman to achieve seamless transfer. You just need to be here Add the following line under bashrc:
[root@localhost ~]# echo "alias docker=podman" >> .bashrc
source .bashrc
[root@localhost ~]# alias
alias cp='cp -i'
alias docker='podman'
.......
User operation
Before allowing users without root privileges to run Podman, the administrator must install or build Podman and complete the following configuration
The cgroup V2Linux kernel function allows users to limit the resources available to ordinary user containers. If the Linux distribution running Podman is enabled using cgroupV2, the default OCI runtime may need to be changed. Some older versions of runc are not applicable to cgroupV2 and must be switched to the standby OCI runtime crun.
[root@localhost ~]# Yum - y install crun / / centos8 comes with the system

[root@localhost ~]# vi /usr/share/containers/containers.conf
    446 # Default OCI runtime
    447 #
    448 runtime = "crun"      //Uncomment and change runc to crun

[root@localhost ~]# podman run -d --name web -p 80:80 docker.io/library/nginx
c8664d2e43c872e1e5219f82d41f63048ed3a5ed4fb6259c225a14d6c243677f

[root@localhost ~]# podman inspect web | grep crun
        "OCIRuntime": "crun",
            "crun",
Install slirp4netns and fuse overlay FS
When using Podman in an ordinary user environment, it is recommended to use fuse overlay FS instead of VFS file system. At least version 0.7.6 is required. Now the new version is by default.
[root@localhost ~]# yum -y install slirp4netns

[root@localhost ~]# yum -y install fuse-overlayfs
[root@localhost ~]# vi /etc/containers/storage.conf
77 mount_program = "/usr/bin/fuse-overlayfs"     //note off
/Configuration of / etc/subuid and / etc/subgid
Podman requires the user running it to list a series of UID s in the / etc/subuid and / etc/subgid files, which are provided by the shadow utils or newuid package
[root@localhost ~]# yum -y install shadow-utils
# It can be viewed in / etc/subuid and / etc/subgid. The value of each user must be unique without any overlap.
[root@localhost ~]# useradd zz
[root@localhost ~]# cat /etc/subuid
zz:100000:65536
[root@localhost ~]# cat /etc/subgid
zz:100000:65536

// Start non privileged ping
[root@localhost ~]# sysctl -w "net.ipv4.ping_group_range=0 200000" / > 100000 indicates that tom can operate podman
net.ipv4.ping_group_range = 0 200000
The format of this file is USERNAME: UID: RANGE
- /etc/passwd or the user name getpwent listed in the output.
- The initial UID assigned to the user.
- The size of the UID range assigned to the user.
The usermod program can be used to assign UID s and GID S to users instead of directly updating files.
[root@localhost ~]# usermod --add-subuids 200000-201000 --add-subgids 200000-201000 hh
grep hh /etc/subuid /etc/subgid
/etc/subuid:hh:200000:1001
/etc/subgid:hh:200000:1001
User profile
The three main configuration files are container conf,storage.conf and registers conf. Users can modify these files as needed.
container.conf
// User profile
[root@localhost ~]# cat /usr/share/containers/containers.conf
[root@localhost ~]# cat /etc/containers/containers.conf
[root@localhost ~]# cat ~/.config/containers/containers.conf / / highest priority
If they exist in this order. Each file can overwrite the previous file for a specific field.
Configure storage Conf file
1. /etc/containers/storage.conf
2. $HOME/.config/containers/storage.conf
In ordinary users, / etc / containers / storage Some fields of conf will be ignored
[root@localhost ~]#  vi /etc/containers/storage.conf
[storage]

# Default Storage Driver, Must be set for proper operation.
driver = "overlay"  #Change here to overlay
.......
mount_program = "/usr/bin/fuse-overlayfs"  #note off

[root@localhost ~]# sysctl user.max_user_namespaces=15000  #If the version is below 8, you need to do the following:
In ordinary users, these fields default
graphroot="$HOME/.local/share/containers/storage"
runroot="$XDG_RUNTIME_DIR/containers"
registries.conf
The configuration is read in this order. These files are not created by default. You can copy the file / etc/containers from / usr/share/containers or modify it.
/etc/containers/registries.conf
/etc/containers/registries.d/*
HOME/.config/containers/registries.conf
Authorization document
The password of docker account is written in this file and displayed in encrypted form
[root@localhost ~]# podman login
Username: 123456
Password:
Login Succeeded!
[root@localhost ~]# cat /run/user/0/containers/auth.json
{
        "auths": {
                "registry.fedoraproject.org": {
                        "auth": "MTMxNDQ0NDpIMjAxNy0xOA=="
                }
        }
}
Ordinary users cannot see the image of the root user
//root user
[root@localhost ~]# podman images
REPOSITORY                  TAG      IMAGE ID       CREATED       SIZE
docker.io/library/httpd     latest   ea28e1b82f31   11 days ago   146 MB

//Ordinary users
[root@localhost ~]# su - zz
[zz@localhost ~]$ podman images
REPOSITORY  TAG         IMAGE ID    CREATED     SIZE
volume
- If the container runs with the root user, the user in the root container is actually the user on the host.
- The / sub GID is the first uid in the user's / sub GID map.
- If an ordinary user is mounted from the host directory to the container and creates a file in the directory as root user, you will see that it is actually owned by your user on the host.
Use volume
[root@localhost ~]# su - zz
[zz@localhost ~]$ pwd
/home/zz
[zz@localhost ~]$ mkdir /home/zz/data

[zz@localhost ~]$ podman run -it -v "$(pwd)"/data:/data docker.io/library/busybox /bin/sh
Trying to pull docker.io/library/busybox:latest...
Getting image source signatures
Copying blob 3cb635b06aa2 done
Copying config ffe9d497c3 done
Writing manifest to image destination
Storing signatures
/ # ls
bin   data  dev   etc   home  proc  root  run   sys   tmp   usr   var
/ # cd data/
/data # ls
/data # touch 123
/data # ls -l
total 0
-rw-r--r--    1 root     root             0 Dec 13 00:17 123
View on host
[zz@localhost ~]$ ll data/
Total consumption 0
-rw-r--r-- 1 zz zz 0 12 June 13 00:17 123

//write file
[zz@localhost ~]$ echo "hell world" >> 123
[zz@localhost ~]$ cat 123
hell world
View in container
/data # cat 123
hell world

//We can find that the owner and group of files in the container belong to root, so how can we make them belong to tom user? Here's the answer
/data # ls -l
total 4
-rw-rw-r--    1 root     root            12 Dec 13 00:20 123

//Just add a -- userns = keep ID when running the container.
[zz@localhost ~]$ podman run -it --name test -v "$(pwd)"/data:/data --userns=keep-id docker.io/library/busybox /bin/sh
~ $ cd data/
/data $ ls -l
total 4
-rw-r--r--    1 zz       zz              11 Dec 13 00:21 123
"permission denied" error will be reported when using ordinary users to map container ports
[zz@localhost ~]$ podman run  -d -p 80:80 httpd
Error: rootlessport cannot expose privileged port 80, you can add 'net.ipv4.ip_unprivileged_port_start=80' to /etc/sysctl.conf (currently 1024), or choose a larger port number (>= 1024): listen tcp 0.0.0.0:80: bind: permission denied
Ordinary users can map ports with > = 1024
[zz@localhost ~]$ podman run  -d -p 1024:80 httpd
58613a6bdc70d4d4f9f624583f795a62a610596d166f0873bdff8fb26aa15092
[zz@localhost ~]$ ss -anlt
State       Recv-Q      Send-Q           Local Address:Port           Peer Address:Port      Process
LISTEN      0           128                    0.0.0.0:22                  0.0.0.0:*
LISTEN      0           128                          *:1024                      *:*
LISTEN      0           128                       [::]:22                     [::]:*
Configure echo 'net ipv4. ip_ unprivileged_ port_ start=80’ >> /etc/sysctl. After conf, ports greater than or equal to 80 can be mapped
[root@localhost ~]# echo  'net.ipv4.ip_unprivileged_port_start=80'  >> /etc/sysctl.conf
[root@localhost ~]# sysctl -p
net.ipv4.ip_unprivileged_port_start = 80

[zz@localhost ~]$ podman run -d -p 80:80 httpd
1215455a0c300d78e7bf6afaefc9873f818c6b0f26affeee4e2bc17954e72d8e
[zz@localhost ~]$ ss -anlt
State       Recv-Q      Send-Q           Local Address:Port           Peer Address:Port      Process
LISTEN      0           128                    0.0.0.0:22                  0.0.0.0:*
LISTEN      0           128                          *:1024                      *:*
LISTEN      0           128                          *:80                        *:*
LISTEN      0           128                       [::]:22                     [::]:*
What else is there about podman?
podman is a part of github's Containers project, which also includes several related projects, all of which are composed of go language.
The following are the icons of podman, buildah and skopeo.
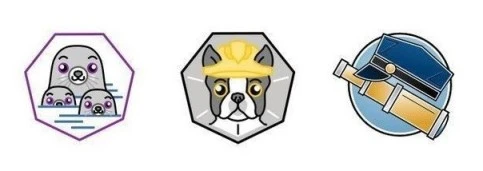
podman, buildah and skopeo form a complete container tool system:
- The target of podman project is the substitution of docker command. The official description is A tool for managing OCI containers and pods
- The buildah project implements the scripted execution of dockerfile. The official description is a tool that facilities building OCI images
- The skopeo project is responsible for image related work, such as checking, copying and signing. The official description is work with remote images registers - retrieving information, images and signing content
Buildah completes the operation of the image. Similar to docker build, you can also push and other operations; Skopeo completes operations on the image warehouse, including cp, inspect, delete, etc. Their functions are relatively pure, and they are complementary to podman functions. In Centos 8, docker is no longer applicable as the default container tool. Instead, podman, buildah and skopeo are used.
reference material
- https://xie.infoq.cn/article/a7254c5d64fcb3be8d6822415
- https://cloud.tencent.com/developer/article/1728772
- https://www.jianshu.com/p/7b1be93ef3d7
- https://juejin.cn/post/6990279582255579150
- https://blog.csdn.net/u012811805/article/details/122402648