Chapter 1 HTML tags and document structure
Each web page initially uses HTML to mark the content. The purpose of this move is to give the meaning of the web page. The object of operation is the user agent, that is, let your user agent read the content you write in the document.
The so-called user agent includes browser, screen reader, Web crawler, etc., which is a relay between you and the Web page
1.1 HTML markup Basics
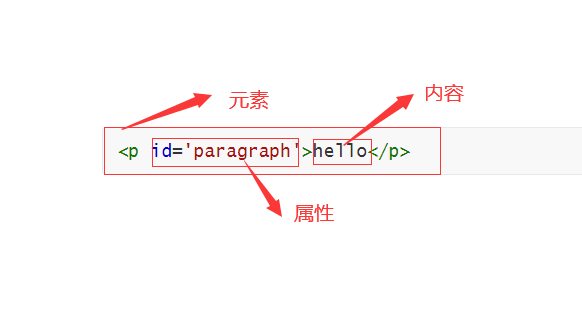
For each element containing content, there are two marking methods: closed label and non closed label according to whether the content it contains is text.
- HTML element: everything from the start tag to the end tag

1.1.1 closed labels for text
<Tag name attribute value_1='' Attribute value_2=''>Text content</Tag name>
-
Title, paragraph and other text elements require closed labels
-
Only text content is displayed in the browser
-
HTML has 6 levels of titles, counting from 1
1.1.2 self closing labels shall be used for references
<Tag name attribute_1='' />
- Non textual content is displayed through self closing and labels
Self closing tag and closed tag: the closed tag contains the content to be displayed. The self closing tag and tag provide the browser with a reference to the content to be displayed. When the browser loads the HTML page, it will send a request to the server to obtain the content of self closing tag and tag reference
<img src='./hello.png' alt='Picture' />
<!--alt The property value is the explicit content when the picture fails to load, which can be used by the screen reader-->
Extension: XHTML and XMLHTTPRequest
- XHTML: a more rigorous and purer version of HTML. The tag must be closed
- XMLHttpRequest: an object used to exchange data with the server in the background
1.1.3 properties
Provide the browser with additional information about the tag. Attributes can be added to each HTML tag
1.1.4 headings and paragraphs
Level 6 title with paragraph label < p >
1.1.5 composite elements
Lists, tables, forms, etc. all belong to composite elements. The so-called composite elements are composed of multiple tags
Such as < li > < ol >
1.1.6 nested labels
For example:
<ol>
	<li>1</li>
    <li>2</li>
    <li>3</li>
</ol>
<li>Is a sub tag of < ol >
1.2 HTML document analysis
1.2.1 HTML template
<!DOCTYPE html> <!--Declare the document as HTML file-->
<html><!--Root level tag, which has only two direct sub tags<head><body>-->
    <head>
        <meta charset="utf-8" /><!--Help the browser understand the information of the page-->
        <title>HTML Template</title><!--Great weight, try to be concise-->
    </head>
    <body><!---The internal elements are arranged from top to bottom in the page->
        <!--Web content-->
    </body>
</html>

<!--link-->
<a href="www.baidu.com">This is a link</a>
<!--picture-->
<img src="image.jpg" alt="Picture here" />
When no CSS style is specified, the browser will arrange the elements containing content one by one from top to bottom in the page, starting from the upper left corner of the page. The style is controlled by the browser's built-in CSS style sheet.
In addition, the arrangement style is also related to block level elements and inline elements. For example, links and pictures are in-line elements. They will be displayed side by side instead of occupying one line each
1.2.2 block level elements and inline elements
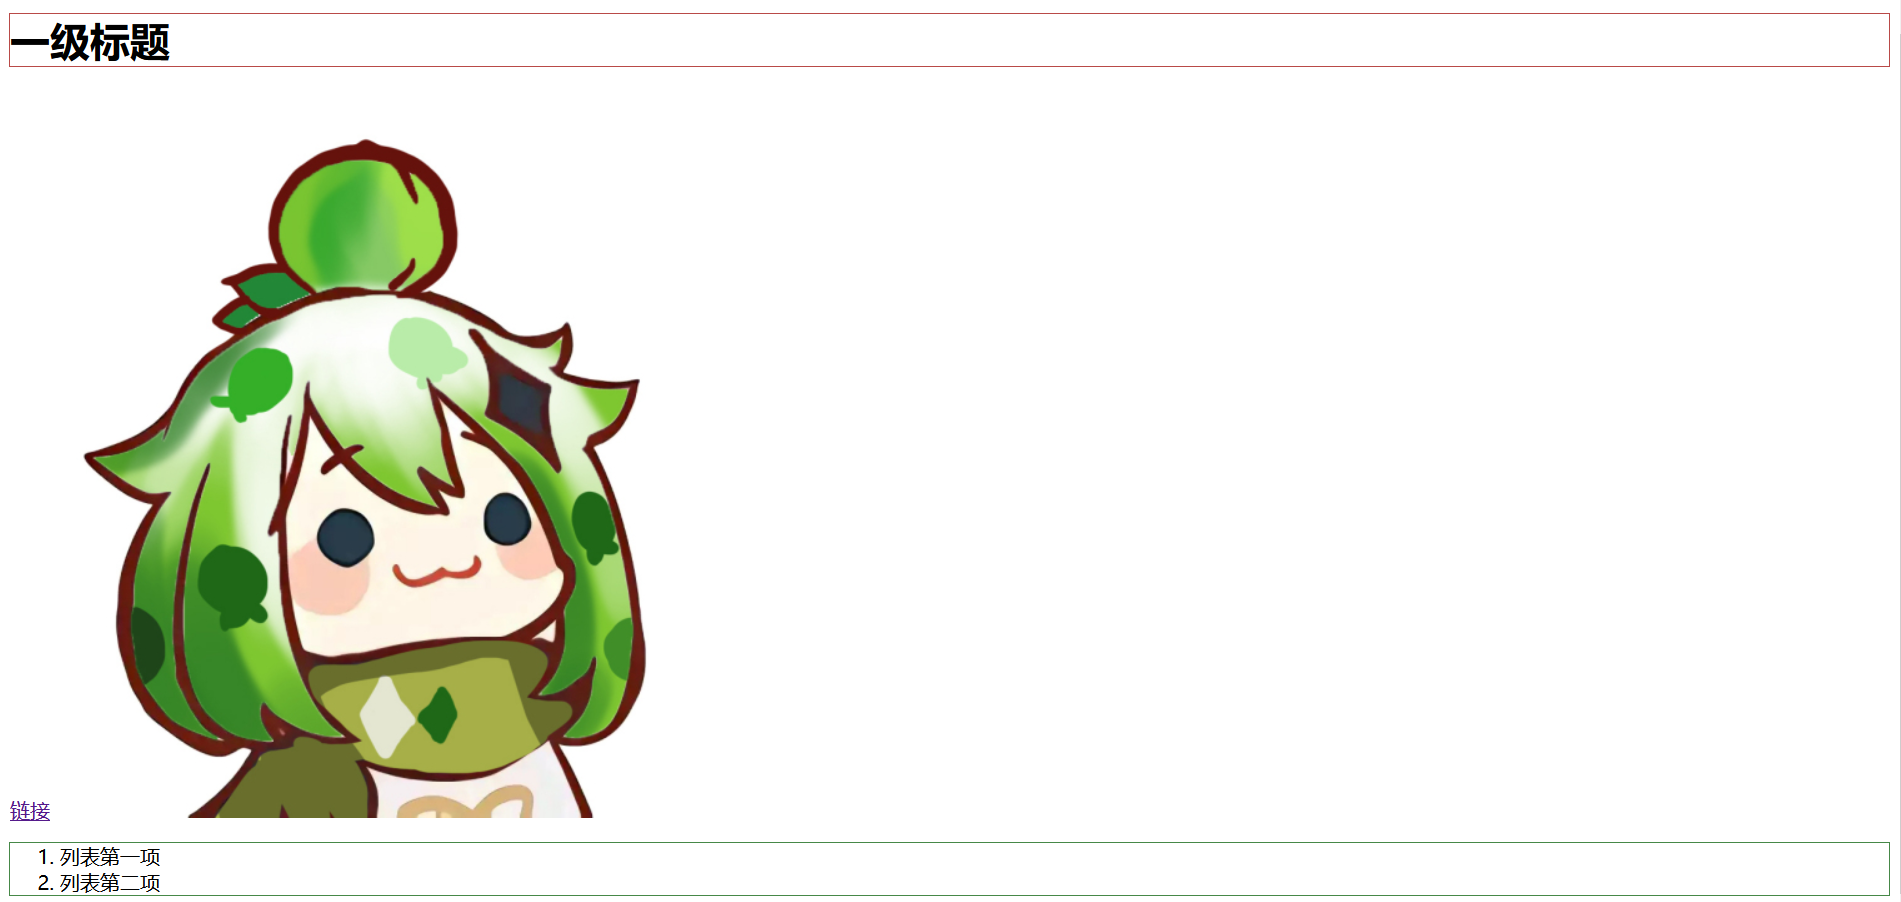
The effect of document flow:
Source code:
<!DOCTYPE html>
<hmtl>
    <head>
        <meta charset="utf-8">
        <title>Sample template</title>
    </head>
    <body>
        <h1>Primary title</h1>
        <a href="www.baidu.com">link</a>
        <img src="./pic/greenpaimeng.jpg" alt="Picture loading failed" />
        <ol>
            <li>First item in the list</li>
            <li>Second item in the list</li>
        </ol>
    </body>
</hmtl>
effect:

The above figure shows the effect of the so-called document flow., That is, HTML elements will flow from the top of the page to the bottom of the page according to the order in which they appear in the tag.
- Block level elements, such as paragraphs and headings, are stacked on top of each other and arranged down the page, with each element occupying one line
- In line elements: such as links and pictures, they will be juxtaposed with each other and will wrap only when there is insufficient space
Before using an HTML element, you need to specify whether the element is a block level element or an inline element.
Using extended Web Developer, selecting outline – > Outline block level elements will mark the block level elements with a rectangle, which is the block level element box

The block level element box expands to the same width as the parent element
In the above figure, the parent element of all block level elements is < body >, < body > is the same width as the browser page by default. Therefore, the element box of its child element < ol > is also the same width as the browser.
The box of inline elements will shrink and wrap its contents as tightly as possible
1.2.3 nested elements
Tags are nested in tags, but boxes are nested on the screen
Nested example 1
Reference tag < blockqoute >
<blockquote>
“
blablabla
”
<cite>
Lu Xun//Use cite to include the author's name
</cite>//Inline element
</blockquote>//Default indent level

Nested instance 2
<p>
    Paimeng is so <strong>qute</strong> !! <em>blabla</em> <addr title="Ah, I'm dead">AWSL</addr>
</p>
<!--
<strong> emphasize
<em> Italics
<addr> Abbreviation
-->

1.3 document object model
DOM
<addr title="Document object model">DOM</addr>
DOM is to observe the elements in the page and the attributes of each element from the perspective of the browser, so as to obtain the family tree of these elements, determine the relationship between the elements, and reference the specific position in the DOM in CSS. You can select the corresponding HTML element and modify its style attributes.
Parent element: direct ancestor element
Child elements: direct descendant elements
Sibling element: same as parent element
Descendant element, ancestor element
Build DOM through HTML and modify DOM style through CSS