preface
This article introduces the use of Css combined with HTML. It is a reference for back-end learners, not a front-end professional article.
catalogue
1, Basic concept and usage of CSS
IV. case practice of registration page
1, Basic concept and usage of CSS
1.1 basic concept of css
Cascading Style Sheets
Cascade: multiple styles can act on the same html element and take effect at the same time
1.2. Benefits of using Css:
1. Powerful
2. Separating content presentation from style control
* reduce coupling. decoupling
* make division of labor and cooperation easier
* improve development efficiency
1.3. Use of css
Combination of css and HTML
1. Inline style:
Use the style attribute within the tag to specify the css code
For example: < div style = "color: red;" > hello css</div>
2. Internal style
* in the head tag, define the style tag. The tag body content of the style tag is the css code
* such as:
<style>
div{
color:blue;
}
</style>
<div>hello css</div>
3. External style
1. Define css resource files.
2. In the head tag, define the link tag to introduce external resource files
For example:
* a.css file:
div{
color:green;
}
<link rel="stylesheet" href="css/a.css">
<div>hello css</div>
<div>hello css</div>
Code demonstration
<!--
*@packageName
*@className css Inline mode 1
*@author wang
*@date 2022/1/24 14:14
*@Description
-->
<!DOCTYPE html>
<html lang="en">
<head>
    <meta charset="UTF-8">
    <title>CSS And HTML Combination of inline mode</title>
</head>
<body>
<!--Test inline mode, through style attribute-->
<div style="color: gold">hello css</div>
</body>
</html>


<!--
*@packageName
*@className Css Internal mode combination
*@author wang
*@date 2022/1/24 14:17
*@Description
-->
<!DOCTYPE html>
<html lang="en">
<head>
    <meta charset="UTF-8">
    <title>Internal mode combination</title>

<!--    This method can only specify this file and cannot apply all files-->
    <style>
        div{
            color: gold;
        }
    </style>
</head>
<body>
<!--Test internal mode combination head Use in label style label-->
<div>Ha ha ha ha ha ha ha Css</div>

</body>
</html>


<!--
*@packageName
*@className Css External style mode
*@author wang
*@date 2022/1/24 14:19
*@Description
-->
<!DOCTYPE html>
<html lang="en">
<head>
    <meta charset="UTF-8">
    <title>Css External style</title>
<!--    stay head Introduced in label css resource file-->
    <link rel="stylesheet" href="css/test.css">
</head>
<body>
<!--First, it should be written css resource file-->
<div>hello world</div>

</body>
</html>
css file
div{
    color: greenyellow;
}
be careful:
* 1, 2 and 3 ways of css have an increasing scope of action
* 1 method is not commonly used, and it is commonly used in the later stage 2,3
* three formats can be written as:
<style>
@import "css/a.css";
</style>
2, Selector
2.1 selector definition
Filter elements with similar characteristics
2.2 classification
Base selector
1. id selector: select the element of the specific id attribute value It is recommended that the id value be unique in an html page
* syntax: #id attribute value {}
2. Element selector: select an element with the same label name
* syntax: label name {}
* Note: id selector takes precedence over element selector
3. Class selector: select elements with the same class attribute value.
* syntax: class attribute value {}
* Note: class selectors take precedence over element selectors
Extension selector
1. Select all elements:
* syntax: * {}
2. Union selector:
* selector 1, selector 2{}
3. Sub selector: filter selector 2 element under selector 1 element
* syntax: selector 1 selector 2{}
4. Parent selector: parent element selector 1 of filter selector 2
* syntax: selector 1 > selector 2{}
5. Attribute selector: select the element name with attribute name = attribute value
* syntax: element name [attribute name = "attribute value"] {}
6. Pseudo class selector: select the state that some elements have
* syntax: element: status {}
* for example: < a >
* status:
* link: initialization status
* visited: accessed status
* active: accessing status
* hover: mouse hover
Partial selector code demonstration
<!--
*@packageName
*@className Base selector
*@author wang
*@date 2022/1/24 14:40
*@Description
-->
<!DOCTYPE html>
<html lang="en">
<head>
    <meta charset="UTF-8">
    <title>Base selector</title>
    <style>
        /*ID selector*/
        #div1{
            color: greenyellow;
        }

        /*element selector */
        div{
            color: coral;
        }

        /*Class selector */

        .h{
            color: red;
        }


        /*attribute selectors */
        input[type='text'] {
            border: 5px solid;
        }

/*Pseudo class selector*/
/*        Status of initialization*/
        a:link{
           color: cyan;
        }
        /*Mouse hover*/
        a:hover{
            color: seagreen;
        }
        /*Accessing status*/
        a:active{
            color:blue;
        }
        /*Accessed status*/
        a:visited{
            color: red;
        }

    </style>
</head>
<>

<!--Test base selector ID selector-->
    <div id="div1">hello world</div>
    <div>hello world2</div>

<hr>
<!--Test element selector-->
<div>hello world</div>
<div>hello world2</div>

<!--Test class selector-->
<div class="h"> hello world</div>
<div>hello world2</div>

<!--Test attribute selector-->
<input type="text">


<!--Test pseudo class selector-->
    <a href="#">
        Click here
    </a>

</body>
</html>
3, Attributes
1. Font, text
* font size: font size
* color: text color
* text align: how to align it
* line height: line height
2. background
* background:
3. frame
* border: set the border to conform to the attribute
4. size
* width: width
* height: height
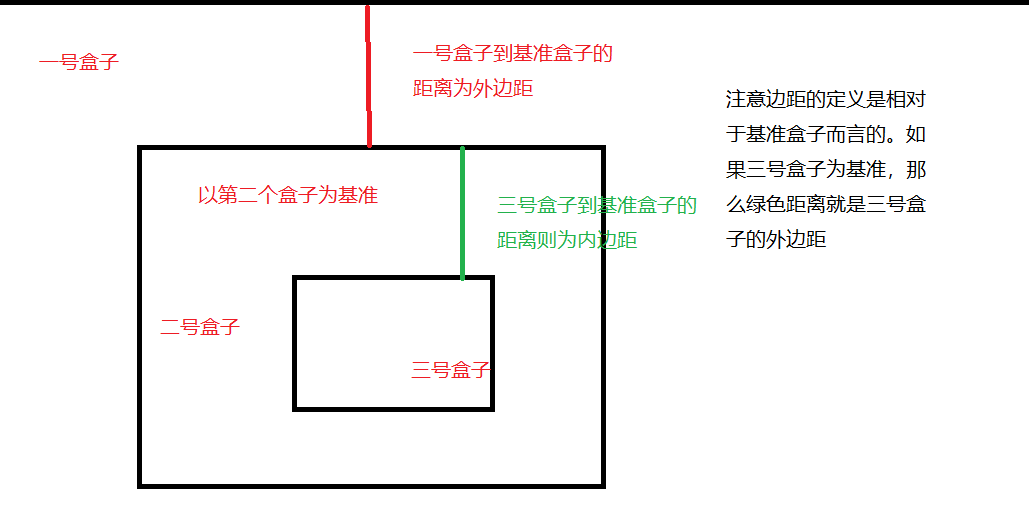
5. Box models: controlling layout
* margin: outer margin
* padding: inner margin
* by default, the inner margin affects the size of the entire box
* box-sizing: border-box; Set the properties of the box so that width and height are the final size of the box
* float: float
* left
* right
Margin diagram
IV. case practice of registration page
Case effect
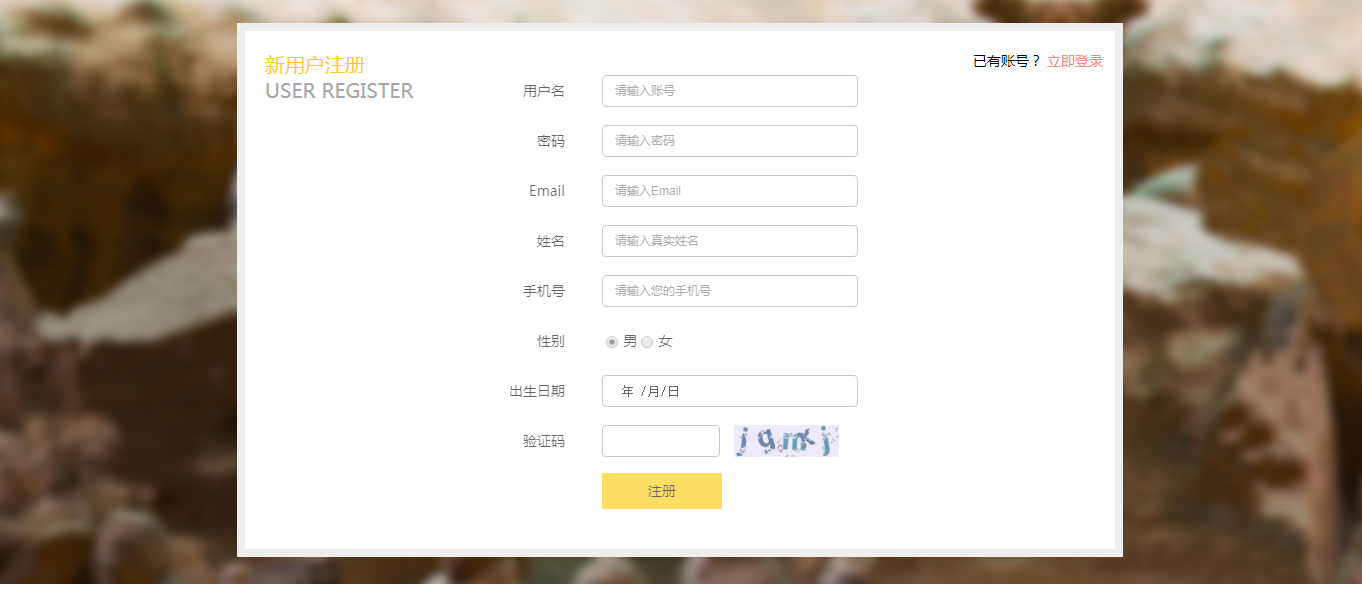
Code demonstration
<!--
*@packageName
*@className Registration page Css
*@author wang
*@date 2022/1/24 18:54
*@Description
-->
<!DOCTYPE html>
<html lang="en">
<head>
    <meta charset="UTF-8">
    <title>Registration page Css</title>

    <style>
        /*Set the background for the page*/
        body{
            background: url(img/register_bg.png) no-repeat center;
            padding-top: 50px;
        }

        /*The whole layout setting, a big box of three boxes*/
        .rg_layout{
            width: 900px;
            height: 500px;
            /*Color and width of boundary line*/
            border: 8px solid #EEEEEE;
            background-color: white;
            /*Center div horizontally*/
            margin: auto;
        }

        /*Left box related settings*/
        .rg_left{
            /*border: 1px red solid;*/
            float: left;
            margin: 15px;
        }

        /*Left Chinese setting*/
        .p-left1{
            font-size: 20px;
            color: #ffd026;
        }
        /*Left English setting*/
        .p-left2{
            font-size: 20px;
            color: #a6a6a6;
        }
/*Middle box setting*/
        .rg_center{
            margin-top: 55px;
            /*border: 1px red solid;*/
            float: left;
        }

        /*Right box setting*/
        .rg_right{
            /*border: 1px red solid;*/
            float: right;
            margin: 15px;
        }

        /*Text size on the right*/
        .p-right{
            font-size: 15px;
        }
        /*Immediate login color on the right*/
        .p-right2{
            color: pink;
        }

        /*Text effect of the left half of the middle box*/
        .td-left{
            width: 100px;
            height: 45px;
            text-align: right;
            color: grey;
        }

        /*Text effect of the right half of the middle box*/
        .td-right{
            padding-left: 50px;

        }
        /*Border effect of the right half*/
        #username,#password,#email,#firstName,#phone,#birth{
            width: 220px;
            height: 25px;
            padding-left: 15px;
            color: grey;
            border: 1px solid #a6a6a6;
            /*Border rounded rectangle*/
            border-radius: 5px;
        }
        /*Verification code border*/
        #checkCode{
            width: 110px;
        }

        /*Verification code picture effect*/
        #img-check{
            height: 25px;
            vertical-align: middle;
        }

        /*Register button effect*/
        #button-sub{
            width: 150px;
            height: 40px;
            background-color: #ffd026;
            border: 1px solid #ffd026;
        }


    </style>
</head>
<body>
<div class="rg_layout">

    <div class="rg_left">
        <p class="p-left1">New user registration</p>
        <p class="p-left2">USER REGISTER</p>
    </div>

    <div class="rg_center">

        <!--Define a form and don't forget properties-->
        <form action="#" method="post">
            <!--    Define a table and don't forget the attributes-->

            <table >
                <!--        user name-->
                <tr>
                    <td class="td-left">
                        <label for="username">user name</label>
                    </td>
                    <td class="td-right">
                        <input type="text" name="username" placeholder="Please enter the account number" id="username">
                    </td>
                </tr>

                <!--        password-->
                <tr>
                    <td class="td-left">
                        <label for="password">password</label>
                    </td>
                    <td class="td-right">
                        <input type="password" name="password" placeholder="Please input a password" id="password">
                    </td>
                </tr>

                <!--        email-->
                <tr>
                    <td class="td-left">
                        <label for="email">Email</label>
                    </td>
                    <td class="td-right">
                        <input type="email" name="email" placeholder="Please enter email" id="email">
                    </td>
                </tr>

                <!--        full name-->

                <tr>
                    <td class="td-left">
                        <label for="firstName">full name</label>
                    </td>
                    <td class="td-right">
                        <input type="text" name="name" placeholder="Please enter your real name" id="firstName">
                    </td>
                </tr>

                <!--        cell-phone number-->
                <tr>
                    <td class="td-left">
                        <label for="phone">cell-phone number</label>
                    </td>
                    <td class="td-right">
                        <input type="text" name="phone" placeholder="Please enter your mobile number" id="phone">
                    </td>
                </tr>

                <!--        Gender-->
                <tr>
                    <td class="td-left">
                        <label>Gender</label>
                    </td>
                    <td class="td-right">
                        <input type="radio" name="gender" value="male"> male
                        <input type="radio" name="gender" value="female"> female
                    </td>
                </tr>
                <!--            date of birth-->
                <tr>
                    <td class="td-left">
                        <label for="birth">date of birth</label>
                    </td>
                    <td  class="td-right">
                         <input type="date" name="birthDate" id="birth">
                    </td>
                </tr>

                <!--        Verification Code-->
                <tr>
                    <td class="td-left">
                        <label for="checkCode">Verification Code</label>
                    </td>
                    <td class="td-right">
                        <input type="text" name="checkCode" id="checkCode">
                        <img src="img/verify_code.jpg" id="img-check">
                    </td>
                </tr>
                <!--            Register button-->
                <tr>
                    <td colspan="2" align="center">
                        <input type="submit" name="button" value="register" id="button-sub">
                    </td>
                </tr>

            </table>

        </form>
    </div>

    <div class="rg_right">

        <p class="p-right">Existing users?<a class="p-right2" href="#"> log in now</a></p>
    </div>
</div>
</body>
</html>