Customize the ViewGroup, write your own View inherited from the ViewGroup, and then rewrite its onMeasure and onLayout methods.
The onMeasure measurement phase consists of three steps
- Loop call the measure method of the child view, measure the width of the child view and save it
- Determine your own width and height by the width of the child view
- setMeasuredDimension() method to save your width and height
To calculate the size of the child view, it is necessary to determine the measurement mode and size of the parent view and the Layout Params of the child view.
Three Measurement Modes of View
EXACTLY: Precision measurement modes, such as match parent and write-dead dp values in xml. If the parent view is in this mode, then the child veiw must not exceed this fixed value when measuring and return the size in MeasureSpec.
AT_MOST: Maximum measurement mode, for example, we use wrap_content in xml. If the parent view is this mode, theoretically the size of the parent view can be infinite, but we do not know what this value is, we temporarily return the current size of the parent view, which is also the size in MeasureSpec.
UNSPECIFIED: Unlimited measurement mode, without any restrictions, generally not used.
The onLayout() layout phase consists of two steps
- According to the measurement results in onMeasure, find out the values of the four positions on the left, upper, right and lower of the child view.
- Call the layout method of the child view, pass in the four values calculated above, and complete the layout.
Let's start with a custom flow layout
First define a class FlowLayout that inherits from ViewGroup, and then start implementing its onMeasure method
protected void onMeasure(int widthMeasureSpec, int heightMeasureSpec) {
        //Get the measurement mode and size of its own width
        int widthSize = MeasureSpec.getSize(widthMeasureSpec);

        //Record the median width of each child view of the current row combined
        int currentWidth = 0;
        //If there are multiple lines, record the width of the widest line
        int measureWidth = 0;
        //The height of each row added up in the record subview
        int currentHeight = 0;

        //Traversal measures each sub-view
        int childCount = getChildCount();
        for (int i = 0; i < childCount; i++) {
            View chileView = getChildAt(i);
            //Measure the width and height of sub-view
            measureChild(chileView,widthMeasureSpec,heightMeasureSpec);
            //Obtain the measurement data of sub-view
            MarginLayoutParams layoutParams = (MarginLayoutParams)chileView.getLayoutParams();
            //The final actual width of the child view needs to be added with its margin value
            int childWidth = chileView.getMeasuredWidth()+ layoutParams.leftMargin+layoutParams.rightMargin;
            int childHeight = chileView.getMeasuredHeight()+layoutParams.topMargin+layoutParams.bottomMargin;

            //If the width of the child view of the current row is less than the available width of the parent view
            if(currentWidth<widthSize){
                currentWidth = currentWidth+childWidth;
                currentHeight = Math.max(currentHeight,childHeight);
            }else {
                measureWidth = Math.max(currentWidth,childWidth);
                currentWidth = childWidth;
                currentHeight = currentHeight+childHeight;
            }
        }
        //Keep your breadth and height
        setMeasuredDimension(resolveSize(measureWidth,widthMeasureSpec),resolveSize(currentHeight,heightMeasureSpec));
    }
Loop through the sub-view, and measure the width and height of the sub-view by calling the measureChild method provided by the system.
Calculate your own width and height while calculating the width and height of operator view
For a wide, streaming layout, we know that when the width of the child view adds up to the available width of the parent view, we need to wrap lines, so the width of the child view adds up for each line may be different. We need to find a maximum value to be used as the width of our custom view group, which is measureWidth in the code above.
For height, define a current Height to record the current height, and when the line is changed, its size is added to the height of the child view.
Finally, we save our width and height by setMeasured Dimension method. Its width and height should also be determined according to its own measurement mode. resolveSize is a very useful tool provided by the system to return the final results according to the measurement mode. It can be passed into the measurement mode of the width and width we expect, which can save us from judging the return value according to the measurement mode.
  public static int resolveSize(int size, int measureSpec) {
        return resolveSizeAndState(size, measureSpec, 0) & MEASURED_SIZE_MASK;
    }
  public static int resolveSizeAndState(int size, int measureSpec, int childMeasuredState) {
        final int specMode = MeasureSpec.getMode(measureSpec);
        final int specSize = MeasureSpec.getSize(measureSpec);
        final int result;
        switch (specMode) {
            //If it's the maximum mode
            case MeasureSpec.AT_MOST:
                //If the specSize value in MeasureSpec is less than the expected value we passed in
                //That can't exceed specSize, either. Return specSize and give it a too small tag.
                if (specSize < size) {
                    result = specSize | MEASURED_STATE_TOO_SMALL;
                } else {
                //Instead, return directly to our expectations.
                    result = size;
                }
                break;
            //If in precise mode, return the value in MeasureSpec directly
            case MeasureSpec.EXACTLY:
                result = specSize;
                break;
            case MeasureSpec.UNSPECIFIED:
            default:
                result = size;
        }
        return result | (childMeasuredState & MEASURED_STATE_MASK);
    }
Then start laying out
protected void onLayout(boolean b, int i, int i1, int i2, int i3) {
        //Availability Width of Self
        int width = getWidth()-getPaddingLeft()-getPaddingRight();
        //The total width of the current row subview
        int currentWidth = 0;
        //Current height
        int currentHeight = 0;

        //According to the values measured in the onMeasure above, traverse the layout sub-view, calculate the values of the sub-view from the top left to the bottom right, and call its layout method.
        int childCount = getChildCount();
        for (int j = 0; j < childCount; j++) {
            View chileView = getChildAt(j);
            //Obtain the measurement data of sub-view
            MarginLayoutParams layoutParams = (MarginLayoutParams)chileView.getLayoutParams();
            //The final actual width of the child view needs to be added with its margin value
            int childWidth = chileView.getMeasuredWidth()+ layoutParams.leftMargin+layoutParams.rightMargin;
            int childHeight = chileView.getMeasuredHeight()+layoutParams.topMargin+layoutParams.bottomMargin;
            //If the current width plus the width of the next child view is less than the available width of the parent view, add the width of the child view
            //Conversely, the current width is reset to the width of the next child view
            if(currentWidth+childWidth<width){
                currentWidth = currentWidth+childWidth;
            }else {
                currentWidth = childWidth;
                currentHeight = currentHeight + childHeight;
            }
            //Calculate the position of the child view in the upper left and lower right
            int childL = currentWidth - childWidth+layoutParams.leftMargin+layoutParams.rightMargin;
            int childT = currentHeight+layoutParams.topMargin+layoutParams.bottomMargin;
            int childR = childL+chileView.getMeasuredWidth();
            int childB = childT + chileView.getMeasuredHeight();
            //layout
            chileView.layout(childL,childT,childR,childB);

        }
    }
The annotations are clear enough to figure out the top left and bottom right values of each view, and then call the layout method of the child view for layout.
OK is done with a simple streaming layout
You can add data to the layout file or code when you use it.
Add in xml
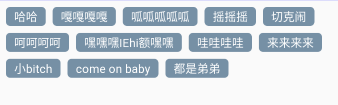
<com.chs.androiddailytext.netease.FlowLayout
        android:id="@+id/flow_layout"
        android:layout_width="wrap_content"
        android:layout_height="wrap_content">

                <TextView
                    style="@style/text_flow"
                    android:text="Ha-ha" />

                <TextView
                    style="@style/text_flow"
                    android:text="Quack quack" />

                <TextView
                    style="@style/text_flow"
                    android:text="Quack quack quack quack quack quack quack quack quack quack quack quack quack quack quack quack quack quack quack quack quack quack quack quack quack quack quack quack qua" />

                <TextView
                    style="@style/text_flow"
                    android:text="shake shake shake" />

                <TextView
                    style="@style/text_flow"
                    android:text="Check it out" />

                <TextView
                    style="@style/text_flow"
                    android:text="Ha ha ha ha" />

                <TextView
                    style="@style/text_flow"
                    android:text="Hey hey hey IEhi Forehead hey hey" />
                <TextView
                    style="@style/text_flow"
                    android:text="WOW!" />
                <TextView
                    style="@style/text_flow"
                    android:text="Come and go" />
                <TextView
                    style="@style/text_flow"
                    android:text="Small bitch" />
                <TextView
                    style="@style/text_flow"
                    android:text="come on baby" />
                <TextView
                    style="@style/text_flow"
                    android:text="They are all brothers." />

    </com.chs.androiddailytext.netease.FlowLayout>
Add in the code
 var datas = mutableListOf<String>()
        datas.add("scratch card")
        datas.add("Particle effect")
        datas.add("splash")
        datas.add("QQ Red dot drag and drop")
        datas.add("PathMeasure")
        datas.add("Screen adaptation")
        datas.add("Bangs fit")
        datas.add("Bangs fit")
        datas.add("FlowLayout")
        datas.add("FlowLayout")

        for (str in datas){
            val textview = TextView(this)
            val lp = ViewGroup.MarginLayoutParams(
                    ViewGroup.LayoutParams.WRAP_CONTENT,
                    ViewGroup.LayoutParams.WRAP_CONTENT)
            lp.setMargins(15,15,15,15)
            textview.layoutParams = lp
            textview.text = str
            textview.textSize = 20f
            textview.background = ContextCompat.getDrawable(this,R.drawable.text_bg)

            flow_layout.addView(textview)
        }
Final effect:
The source code is located here.
Reference resources https://blog.csdn.net/lmj623565791/article/details/38352503