Spring
**IOC * * (reverse of control)
**AOP **(Aspect Oriented Programming)
1.Spring architecture:
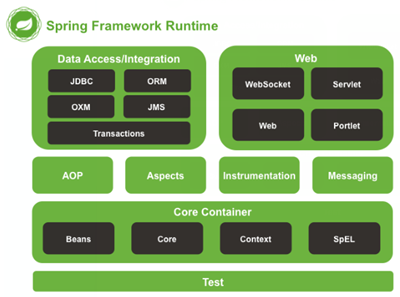
2. Development steps of spring program:
① Import the coordinates of the basic package developed by Spring
<dependency>
   <groupId>org.springframework</groupId>
   <artifactId>spring-context</artifactId>
   <version>5.0.5.RELEASE</version>
</dependency>
② Write Dao interface and implementation class
③ Create Spring core configuration file
<?xml version="1.0" encoding="UTF-8"?>
<beans xmlns="http://www.springframework.org/schema/beans"
       xmlns:xsi="http://www.w3.org/2001/XMLSchema-instance"
       xsi:schemaLocation=
       "http://www.springframework.org/schema/beans 				        	 http://www.springframework.org/schema/beans/spring-beans.xsd">
④ Configure UserDaoImpl in the Spring configuration file
⑤ Use Spring's API to get Bean instances
3.Spring configuration file
3.1 Spring tag configuration scope:
Singleton default, singleton
Multiple cases of prototype
In the request web project, Spring creates a Bean object and stores the object in the request domain
In the session WEB project, Spring creates a Bean object and stores the object in the session domain
In the global session WEB project, it is applied in the Portlet environment. If there is no Portlet environment, the global session is equivalent to the session
3.2 Bean lifecycle configuration
Init method: Specifies the name of the initialization method in the class
Destroy method: Specifies the name of the destroy method in the class
3.3 three methods of bean instantiation
1) Instantiate using the parameterless construction method
It will create class objects according to the default parameterless constructor. If there is no default parameterless constructor in the bean, the creation will fail
<bean id="userDao" class="com.itheima.dao.impl.UserDaoImpl"/>
2) Factory static method instantiation
The static method of the factory returns the Bean instance
public class StaticFactoryBean {
    public static UserDao createUserDao(){
    return new UserDaoImpl();
    }
}
<bean id="userDao" class="com.itheima.factory.StaticFactoryBean"
      factory-method="createUserDao" />
3) Factory instance method instantiation
The non static method of the factory returns a Bean instance
public class DynamicFactoryBean {
	public UserDao createUserDao(){
		return new UserDaoImpl();
	}
}
<bean id="factoryBean" class="com.itheima.factory.DynamicFactoryBean"/>
<bean id="userDao" factory-bean="factoryBean" factory-method="createUserDao"/>
3.4 Bean dependency injection
Obtain the Bean from the Spring container for operation
ApplicationContext applicationContext = new ClassPathXmlApplicationContext("Spring Profile name");
applicationContext.getBean("userService");
When the data type of the parameter is a string, it means that the Bean instance is obtained from the container according to the Bean id. the return is Object and needs to be forced.
When the data type of the parameter is Class, it means that Bean instances are matched from the container according to the type. When there are multiple beans of the same type in the container, this method will report an error
3.5 dependency injection method of bean
① Construction method
<bean id="userDao" class="com.itheima.dao.impl.UserDaoImpl"/>
<bean id="userService" class="com.itheima.service.impl.UserServiceImpl">    <constructor-arg name="userDao" ref="userDao"></constructor-arg>
</bean>
② set method
Class must have a corresponding set method
Configure the Spring container to call the set method for injection
<bean id="userDao" class="com.itheima.dao.impl.UserDaoImpl"/>
<bean id="userService" class="com.itheima.service.impl.UserServiceImpl">
	<property name="userDao" ref="userDao"/>
</bean>
set method: P namespace injection
The essence of P namespace injection is also set method injection, but it is more convenient than the above set method injection, which is mainly reflected in the configuration file, as follows:
First, you need to introduce the P namespace:
xmlns:p="http://www.springframework.org/schema/p"
Secondly, the injection method needs to be modified
<bean id="userService" class="com.itheima.service.impl.UserServiceImpl" p:userDao-ref="userDao"/>
3.6 data types of bean dependency injection
Three data types of injected data
-
Common data type
value attribute
-
Reference data type
ref attribute
-
Collection data type
List type:
 <list>
     <value>aaa</value>
     <value>bbb</value>
     <value>ccc</value>
 </list>
List type:
<list>
 	<!--Or bean Fully qualified name of-->
    <bean class="com.itheima.domain.User"/>
    <!--Or it is a configured object reference-->
    <ref bean="u1"/>
</list>
Map < string, user > type:
<map>
    <entry key="user1" value-ref="u1"/>
    <entry key="user2" value-ref="u2"/>
</map>
Collection data type Properties
<props>
    <prop key="p1">aaa</prop>
</props>
3.7 introduction of other configuration files (sub module development)
<import resource="applicationContext-xxx.xml"/>
4. spring related API s
4.1 inheritance system of ApplicationContext
applicationContext: interface type, which represents the application context. Bean objects in the Spring container can be obtained through its instance
4.2 implementation class of ApplicationContext
1)ClassPathXmlApplicationContext
It loads the configuration file from the root path of the class. This is recommended
2)FileSystemXmlApplicationContext
It loads the configuration file from the disk path. The configuration file can be anywhere on the disk.
3)AnnotationConfigApplicationContext
When configuring container objects with annotations, you need to use this class to create a spring container. It is used to read annotations.
5. Annotation development of spring
The Spring container loads the properties file
<context:property-placeholder location="xx.properties"/>
<property name="" value="${key}"/>
1.Spring original annotation
| annotation | explain |
|---|---|
| @Component | Used on classes to instantiate beans |
| @Controller | Use to instantiate beans on web tier classes |
| @Service | Used on the service layer class to instantiate beans |
| @Repository | Used on dao layer classes to instantiate beans |
| @Autowired | Use on field for type dependent injection |
| @Qualifier | Used in conjunction with @ Autowired for dependency injection by name |
| @Resource | Equivalent to @ Autowired+@Qualifier, injected by name |
| @Value | Inject common attributes |
| @Scope | Label the scope of the Bean |
| @PostConstruct | Use to label the method, which is the initialization method of the Bean |
| @PreDestroy | Use to mark the method as the Bean's destruction method |
1. @ Autowired is injected by byType. Using this annotation requires that the interface can only have one implementation class.
2. @ Resource can be injected by byName and byType. By default, it is matched by byName first. If it cannot be matched, it is matched by byType again.
3. The @ Qualifier annotation can be injected by name, but note that it is the class name
You also need to replace the configuration with annotations:
Configuration of non custom beans:
Load the configuration of the properties file: Context: Property placeholder
Configuration of component scan: Context: component scan
Import other files:
New note:
The first three are configured on the configuration class
| annotation | explain |
|---|---|
| @Configuration | Used to specify that the current class is a Spring configuration class from which annotations will be loaded when creating a container |
| @ComponentScan | Used to specify the packages that Spring will scan when initializing the container. The function is the same as < context: component scan base package = "com.itheima" / > in the xml configuration file of Spring |
| @Import | Used to import other configuration classes |
| @Bean | On a method, annotations store the return value of the method in the Spring container |
| @PropertySource | For loading Configuration in the properties file |
6. Spring integrates Junit
Each test method has code to load the configuration file and get the bean from the configuration file
Solution ideas
• let Spring JUnit be responsible for creating the Spring container, but you need to tell it the name of the configuration file
• inject the Bean that needs to be tested directly into the test class
Integration steps:
① Import the coordinates of spring integration Junit
<!--It should be noted here that, spring5 And above version requirements junit The version of must be 4.12 And above-->
<dependency>
    <groupId>org.springframework</groupId>
    <artifactId>spring-test</artifactId>
    <version>5.0.2.RELEASE</version>
</dependency>

<dependency>
    <groupId>junit</groupId>
    <artifactId>junit</artifactId>
    <version>4.12</version>
    <scope>test</scope>
</dependency>
② Replace the original runtime with the @ Runwith annotation
@RunWith(SpringJUnit4ClassRunner.**class**)
 public class SpringJunitTest {
 }
③ Use @ ContextConfiguration to specify a profile or configuration class
@RunWith(SpringJUnit4ClassRunner.class)
//Load spring core configuration file
//@ContextConfiguration(value = {"classpath:applicationContext.xml"})
//Load spring core configuration class
@ContextConfiguration(classes = {SpringConfiguration.class})
public class SpringJunitTest {}
④ Inject the object to be tested with @ Autowired
⑤ Create a test method to test
7. AOP configuration
Dynamic agent
Common dynamic agent technology
JDK agent: dynamic agent technology based on interface
cglib proxy: dynamic proxy technology based on parent class
[external chain picture transfer failed. The source station may have anti-theft chain mechanism. It is recommended to save the picture and upload it directly (img-e8u6X1Ew-1628212818066)(G:\PMY \ professional data \ SSM - employment section (2.1)]-Spring\day03_ AOP introduction \ notes \ img \ picture 1 png)
Dynamic agent of JDK
① Target class interface
public interface TargetInterface {
   public void method();
}
② Target class
public class Target implements TargetInterface {
    @Override
    public void method() {
        System.out.println("Target running....");
    }
}
③ Dynamic proxy code
Target target = new Target(); //Create target object
//Create proxy object
TargetInterface proxy = (TargetInterface) Proxy.newProxyInstance(target.getClass()
.getClassLoader(),target.getClass().getInterfaces(),new InvocationHandler() {
            @Override
            public Object invoke(Object proxy, Method method, Object[] args)
            throws Throwable {
                System.out.println("Pre enhancement code...");
                Object invoke = method.invoke(target, args);
                System.out.println("Post enhancement code...");
                return invoke;
            }
        }
);
④ Call the method test of the proxy object
// When calling any method of the interface, the code of the proxy object is modified out of order
proxy.method();
Dynamic proxy for cglib
① Target class
public class Target {
  public void method() {
      System.out.println("Target running....");
  }
}
② Dynamic proxy code
Target target = new Target(); //Create target object
Enhancer enhancer = new Enhancer();   //Create intensifier
enhancer.setSuperclass(Target.class); //Set parent class
enhancer.setCallback(new MethodInterceptor() { //Set callback
    @Override
    public Object intercept(Object o, Method method, Object[] objects,
    MethodProxy methodProxy) throws Throwable {
        System.out.println("Pre code enhancement....");
        Object invoke = method.invoke(target, objects);
        System.out.println("Post code enhancement....");
        return invoke;
    }
});
Target proxy = (Target) enhancer.create(); //Create proxy object
③ Call the method test of the proxy object
//When calling any method of the interface, the code of the proxy object is modified out of order
proxy.method();
1. AOP related concepts
-
Target: the target object of the proxy
-
Proxy: after a class is enhanced by AOP weaving, a resulting proxy class is generated
-
Joinpoint s: the so-called join points refer to those intercepted points. In spring, these points refer to methods, because spring only supports method type join points
-
Pointcut: the so-called pointcut refers to the definition of which joinpoints we want to intercept
-
Advice (notification / enhancement): the so-called notification means that what needs to be done after intercepting the Joinpoint is notification
-
Aspect: a combination of pointcuts and notifications (Introductions)
-
Weaving: refers to the process of applying enhancements to the target object to create a new proxy object. spring uses dynamic proxy weaving, while AspectJ uses compile time weaving and class load time weaving
Content of AOP technology implementation
The Spring framework monitors the execution of pointcut methods. Once it is monitored that the pointcut method is running, the proxy mechanism is used to dynamically create the proxy object of the target object. According to the notification category, the corresponding function of the notification is woven into the corresponding position of the proxy object to complete the complete code logic operation.
Which proxy method does the underlying AOP use
In spring, the framework will decide which dynamic proxy method to adopt according to whether the target class implements the interface.
2. AOP development based on XML
Steps:
① Import AOP related coordinates
<!--Import spring of context Coordinates, context rely on aop-->
<dependency>
  <groupId>org.springframework</groupId>
  <artifactId>spring-context</artifactId>
  <version>5.0.5.RELEASE</version>
</dependency>
<!-- aspectj Weaving in -->
<dependency>
  <groupId>org.aspectj</groupId>
  <artifactId>aspectjweaver</artifactId>
  <version>1.8.13</version>
</dependency>
② Create target interface and target class (with internal tangent point)
public interface TargetInterface {
    public void method();
}

public class Target implements TargetInterface {
    @Override
    public void method() {
        System.out.println("Target running....");
    }
}
③ Create facet class (with enhancement method inside)
public class MyAspect {
    //Pre enhancement method
    public void before(){
        System.out.println("Pre code enhancement.....");
    }
}
④ Leave the object creation rights of the target class and the aspect class to spring
<!--Configure target class-->
<bean id="target" class="com.itheima.aop.Target"></bean>
<!--Configure facet class-->
<bean id="myAspect" class="com.itheima.aop.MyAspect"></bean>
⑤ In ApplicationContext Configuring weaving relationships in XML
Import aop namespace
<beans xmlns="http://www.springframework.org/schema/beans"
       xmlns:xsi="http://www.w3.org/2001/XMLSchema-instance"
       xmlns:context="http://www.springframework.org/schema/context"
       xmlns:aop="http://www.springframework.org/schema/aop"
       xsi:schemaLocation="
        http://www.springframework.org/schema/context
        http://www.springframework.org/schema/context/spring-context.xsd
        http://www.springframework.org/schema/aop
        http://www.springframework.org/schema/aop/spring-aop.xsd
        http://www.springframework.org/schema/beans
        http://www.springframework.org/schema/beans/spring-beans.xsd">
⑤ In ApplicationContext Configuring weaving relationships in XML
Configure pointcut expressions and pre enhanced weaving relationships
<aop:config>
    <!--quote myAspect of Bean Is a tangent object-->
    <aop:aspect ref="myAspect">
        <!--to configure Target of method Method to execute myAspect of before Method pre enhancement-->
        <aop:before method="before" pointcut="execution(public void com.itheima.aop.Target.method())"></aop:before>
    </aop:aspect>
</aop:config>
⑥ Test code
@RunWith(SpringJUnit4ClassRunner.class)
@ContextConfiguration("classpath:applicationContext.xml")
public class AopTest {
    @Autowired
    private TargetInterface target;
    @Test
    public void test1(){
        target.method();
    }
}
2.1 detailed explanation of XML configuration AOP
1) Expression syntax:
execution([Modifier ] Return value type package name.Class name.Method name(parameter))
-
The access modifier can be omitted
-
The returned value type, package name, class name and method name can be represented by an asterisk *
-
A point between the package name and the class name Represents the classes under the current package. Two points... Represent the classes under the current package and its sub packages
-
The parameter list can use two points... To represent any number and any type of parameter list
2) Type of notification
Configuration syntax for notifications:
<aop:Notification type method="Method name in facet class pointcut="Tangent expression"></aop:Notification type>
3) Extraction of tangent expression
When multiple enhanced pointcut expressions are the same, the pointcut expression can be extracted. In the enhancement, the pointcut ref attribute is used instead of the pointcut attribute to reference the extracted pointcut expression.
<aop:config>
    <!--quote myAspect of Bean Is a tangent object-->
    <aop:aspect ref="myAspect">
        <aop:pointcut id="myPointcut" expression="execution(* com.itheima.aop.*.*(..))"/>
        <aop:before method="before" pointcut-ref="myPointcut"></aop:before>
    </aop:aspect>
</aop:config>
2.2 key points of knowledge
- aop weaving configuration
<aop:config>
    <aop:aspect ref="Cut class>
        <aop:before method="Notification method name pointcut="Tangent expression">					</aop:before>
</aop:config>
- Notification types: pre notification, post notification, surround notification, exception throw notification, and final notification
- How to write tangent point expression:
execution([Modifier ] Return value type package name.Class name.Method name(parameter))
3. Annotation based AOP development
3.1 annotation configuration steps
① Create target interface and target class (with internal tangent point)
② Create facet class (with enhancement method inside)
③ Leave the object creation rights of the target class and the aspect class to spring
@Component("target")
public class Target implements TargetInterface {
    @Override
    public void method() {
        System.out.println("Target running....");
    }
}
@Component("myAspect")
public class MyAspect {
    public void before(){
        System.out.println("Pre code enhancement.....");
    }
}
④ Using annotations to configure weaving relationships in facet classes
@Component("myAspect")
@Aspect
public class MyAspect {
    @Before("execution(* com.itheima.aop.*.*(..))")
    public void before(){
        System.out.println("Pre code enhancement.....");
    }
}
⑤ Turn on the automatic agent for component scanning and AOP in the configuration file
<!--Component scan-->
<context:component-scan base-package="com.itheima.aop"/>

<!--aop Automatic proxy for-->
<aop:aspectj-autoproxy></aop:aspectj-autoproxy>
⑥ Test code
@RunWith(SpringJUnit4ClassRunner.class)
@ContextConfiguration("classpath:applicationContext.xml")
public class AopTest {
    @Autowired
    private TargetInterface target;
    @Test
    public void test1(){
        target.method();
    }
}
3.2 annotation configuration AOP details
1) Type of annotation notification
Configuration syntax of notification: @ notification annotation ("pointcut expression")
[the external chain picture transfer fails, and the source station may have an anti-theft chain mechanism. It is recommended to save the picture and upload it directly (img-xA0CPAja-1628212818070)(G:\PMY \ professional data \ SSM - employment class (2.1)]-Spring\day03_ AOP introduction \ notes \ img \ picture 7 png)
2) Extraction of tangent expression
Same as xml configuration
Like aop, we can extract Pointcut expressions. The extraction method is to define a method in the cut plane, define the cut point expression on the method with the @ Pointcut annotation, and then refer to it in the enhanced annotation. The details are as follows:
@@Component("myAspect")
@Aspect
public class MyAspect {
    @Before("MyAspect.myPoint()")
    public void before(){
        System.out.println("Pre code enhancement.....");
    }
    @Pointcut("execution(* com.itheima.aop.*.*(..))")
    public void myPoint(){}
}
3.3 key points of knowledge
- Annotate aop development steps
① Dimension facet classes with @ Aspect
② Annotate notification method with @ notification annotation
③ Configure aop auto proxy in the configuration file: AspectJ AutoProxy/
- Notification annotation type
4. Declarative transactions
1. Programming transaction control related objects
1.1 PlatformTransactionManager
The PlatformTransactionManager interface is the transaction manager of spring, which provides our common methods of operating transactions.
[external chain picture transfer failed. The source station may have anti-theft chain mechanism. It is recommended to save the picture and upload it directly (img-xBssHLjq-1628212818072)(G:\PMY \ professional data \ SSM - employment class (2.1)]-Spring\day04_ JdbcTemplate basic usage \ notes \ img \ 2 png)
be careful:
PlatformTransactionManager is an interface type, and different Dao layer technologies have different implementation classes. For example, when Dao layer technology is JDBC or mybatis: org springframework. jdbc. datasource. DataSourceTransactionManager
When Dao layer technology is Hibernate: org springframework. orm. hibernate5. HibernateTransactionManager
1.2 TransactionDefinition
TransactionDefinition is the transaction definition information object, which contains the following methods:
[external chain picture transfer failed. The source station may have anti-theft chain mechanism. It is recommended to save the picture and upload it directly (img-QWm8Sf5J-1628212818072)(G:\PMY \ professional data \ SSM - employment section (2.1)]-Spring\day04_ JdbcTemplate basic usage \ notes \ img \ 3 png)
1. Transaction isolation level
Setting the isolation level can solve the problems caused by transaction concurrency, such as dirty read, non repeatable read and virtual read.
-
ISOLATION_DEFAULT
-
ISOLATION_READ_UNCOMMITTED
-
ISOLATION_READ_COMMITTED
-
ISOLATION_REPEATABLE_READ
-
ISOLATION_SERIALIZABLE
2. Business communication
-
REQUIRED: if there is no transaction currently, create a new transaction. If there is already a transaction, join it. General selection (default)
-
SUPPORTS: SUPPORTS the current transaction. If there is no transaction, it will be executed in a non transactional manner (no transaction)
-
MANDATORY: use the current transaction. If there is no transaction, an exception will be thrown
-
REQUERS_NEW: create a new transaction. If it is currently in a transaction, suspend the current transaction.
-
NOT_SUPPORTED: perform operations in a non transactional manner. If there is a transaction, suspend the current transaction
-
NEVER: runs in a non transactional manner. If there is a transaction, an exception will be thrown
-
NESTED: if a transaction currently exists, it is executed within a NESTED transaction. If there is no current transaction, perform an operation similar to REQUIRED
-
Timeout: the default value is - 1. There is no timeout limit. If yes, set in seconds
-
Read only: it is recommended to set it as read-only when querying
1.3 TransactionStatus
The TransactionStatus interface provides the specific running status of transactions. The methods are described below.
[external chain picture transfer failed. The source station may have anti-theft chain mechanism. It is recommended to save the picture and upload it directly (img-hP19zQoC-1628212818073)(G:\PMY \ professional data \ SSM - employment section (2.1)]-Spring\day04_ JdbcTemplate basic usage \ notes \ img \ 4 png)
1.4 key points of knowledge
Three objects of programming transaction control
-
PlatformTransactionManager
-
TransactionDefinition
-
TransactionStatus
2. Declarative transaction control based on XML
2.2 implementation of declarative transaction control
The underlying declarative transaction is AOP
Declarative transaction control matters:
-
Who is the cut point?
-
Who is the notice?
-
Configure section?
① Introducing tx namespace
<beans xmlns="http://www.springframework.org/schema/beans"
       xmlns:xsi="http://www.w3.org/2001/XMLSchema-instance"
       xmlns:context="http://www.springframework.org/schema/context"
       xmlns:aop="http://www.springframework.org/schema/aop"
       xmlns:tx="http://www.springframework.org/schema/tx"
       xsi:schemaLocation="
        http://www.springframework.org/schema/context
        http://www.springframework.org/schema/context/spring-context.xsd
        http://www.springframework.org/schema/aop
        http://www.springframework.org/schema/aop/spring-aop.xsd
        http://www.springframework.org/schema/tx
        http://www.springframework.org/schema/tx/spring-tx.xsd
        http://www.springframework.org/schema/beans
        http://www.springframework.org/schema/beans/spring-beans.xsd">
② Configure transaction enhancements
<!--Platform transaction manager-->
<bean id="transactionManager" class="org.springframework.jdbc.datasource.DataSourceTransactionManager">
    <property name="dataSource" ref="dataSource"></property>
</bean>

<!--Transaction enhanced configuration-->
<tx:advice id="txAdvice" transaction-manager="transactionManager">
    <tx:attributes>
        <tx:method name="*"/>
    </tx:attributes>
</tx:advice>
③ Configure transaction AOP weaving
<!--Transactional aop enhance-->
<aop:config>
    <aop:pointcut id="myPointcut" expression="execution(* com.itheima.service.impl.*.*(..))"/>
    <aop:advisor advice-ref="txAdvice" pointcut-ref="myPointcut"></aop:advisor>
</aop:config>
④ Test transaction control transfer business code
@Override
public void transfer(String outMan, String inMan, double money) {
    accountDao.out(outMan,money);
    int i = 1/0;
    accountDao.in(inMan,money);
}
2.3 configuration of transaction parameters of pointcut method
<!--Transaction enhanced configuration-->
<tx:advice id="txAdvice" transaction-manager="transactionManager">
    <tx:attributes>
        <tx:method name="*"/>
    </tx:attributes>
</tx:advice>
Where tx:method represents the configuration of transaction parameters of pointcut method, for example:
<tx:method name="transfer" isolation="REPEATABLE_READ" propagation="REQUIRED" timeout="-1" read-only="false"/>
-
Name: tangent point method name
-
Isolation: isolation level of transaction
-
Propagation: propagation behavior of transactions
-
Timeout: timeout
-
Read only: read only
2.4 key points of knowledge
Configuration points of declarative transaction control
-
Platform transaction manager configuration
-
Configuration of transaction notifications
-
Configuration of transaction aop weaving
3. Annotation based declarative transaction control
3.1 configuring declarative transaction control using annotations
- Write AccoutDao
@Repository("accountDao")
public class AccountDaoImpl implements AccountDao {
    @Autowired
    private JdbcTemplate jdbcTemplate;
    public void out(String outMan, double money) {
        jdbcTemplate.update("update account set money=money-? where name=?",money,outMan);
    }
    public void in(String inMan, double money) {
        jdbcTemplate.update("update account set money=money+? where name=?",money,inMan);
    }
}
- Write AccoutService
@Service("accountService")
@Transactional
public class AccountServiceImpl implements AccountService {
    @Autowired
    private AccountDao accountDao;
    @Transactional(isolation = Isolation.READ_COMMITTED,propagation = Propagation.REQUIRED)
    public void transfer(String outMan, String inMan, double money) {
        accountDao.out(outMan,money);
        int i = 1/0;
        accountDao.in(inMan,money);
    }
}
- Write ApplicationContext XML configuration file
<!—Omitted before datsSource,jdbcTemplate,Configuration of platform transaction manager-->
<!--Component scan-->
<context:component-scan base-package="com.itheima"/>
<!--Annotation driven transactions-->
<tx:annotation-driven/>
3.2 annotation configuration declarative transaction control resolution
① Use @ Transactional to modify classes or methods that need transaction control. The attributes available for annotation are the same as xml configuration methods, such as isolation level, propagation behavior, etc.
② If annotations are used on a class, all methods under the class are configured with the same set of annotation parameters.
③ In terms of methods, different methods can adopt different transaction parameter configurations.
④ Annotation driven to enable transaction in Xml configuration file < TX: annotation driven / >
3.3 key points of knowledge
Configuration points of annotated declarative transaction control
-
Platform transaction manager configuration (xml mode)
-
Configuration of transaction notification (@ Transactional annotation configuration)
-
Transaction annotation driven configuration TX: annotation driven/
SpringMVC
1. Integration of spring and Web Environment
1.1 ApplicationContext application context acquisition method
The application context object is obtained through the new ClasspathXmlApplicationContext(spring configuration file), but each time a Bean is obtained from the container, the new ClasspathXmlApplicationContext(spring configuration file) must be written. This disadvantage is that the configuration file is loaded multiple times and the application context object is created multiple times.
In the Web project, you can use the ServletContextListener to listen to the start of the Web application. When the Web application starts, we can load the Spring configuration file, create the application context object ApplicationContext, and store it in the largest domain servletContext domain, so that the application context ApplicationContext object can be obtained from the domain at any location.
1.2 Spring provides tools for obtaining application context
The above analysis does not need to be implemented manually. Spring provides a listener, ContextLoaderListener, which encapsulates the above functions. The listener internally loads the spring configuration file, creates the application context object, and stores it in the ServletContext domain. It provides a client tool WebApplicationContextUtils for users to obtain the application context object.
So there are only two things we need to do:
① On the web Configure ContextLoaderListener listener in XML (import spring web coordinates)
② Get the application context object ApplicationContext using WebApplicationContextUtils
1.3 coordinates of importing Spring integrated web
<dependency>
    <groupId>org.springframework</groupId>
    <artifactId>spring-web</artifactId>
    <version>5.0.5.RELEASE</version>
</dependency>
1.4 configuring the ContextLoaderListener listener
<!--Global parameters-->
<context-param>
    <param-name>contextConfigLocation</param-name>
    <param-value>classpath:applicationContext.xml</param-value>
</context-param>
<!--Spring Monitor for-->
<listener>
	<listener-class>
       org.springframework.web.context.ContextLoaderListener
   </listener-class>
 </listener>
1.5 obtaining application context objects through tools
ApplicationContext applicationContext =
    WebApplicationContextUtils.getWebApplicationContext(servletContext);
    Object obj = applicationContext.getBean("id");
Key points of knowledge
Steps to integrate the Spring web Environment
① configure the ContextLoaderListener listener
② use WebApplicationContextUtils to obtain the application context
2. Introduction to spring MVC
2.1 Spring development steps
Requirements: the client initiates the request, the server receives the request, executes logic and jumps the view.
Development steps
① Import the coordinates of Spring and Spring MVC, and import the coordinates of Servlet and Jsp
② On the web XML to configure the core controller of spring MVC
<servlet>
    <servlet-name>DispatcherServlet</servlet-name>
    <servlet-class>
        org.springframework.web.servlet.DispatcherServlet
    </servlet-class>
    <init-param>
        <!--springmvc Configuration file for-->
        <param-name>contextConfigLocation</param-name>
        <param-value>classpath:spring-mvc.xml</param-value>
    </init-param>
    	<!--Start when server is started-->
	<load-on-startup>1</load-on-startup>
</servlet>
<servlet-mapping>
    <servlet-name>DispatcherServlet</servlet-name>
    <url-pattern>/</url-pattern>
</servlet-mapping>
③ Create Controller and business method
public class QuickController {
	public String quickMethod(){
		System.out.println("quickMethod running.....");
		return "index";
	}
}
③ Create view page index jsp
④ Configuration annotation
@Controller
public class QuickController {
	@RequestMapping("/quick")
	public String quickMethod(){
		System.out.println("quickMethod running.....");
			return "index";
	}
}
⑤ Create spring MVC xml
<beans xmlns="http://www.springframework.org/schema/beans"
    xmlns:mvc="http://www.springframework.org/schema/mvc"
    xmlns:context="http://www.springframework.org/schema/context"
    xmlns:xsi="http://www.w3.org/2001/XMLSchema-instance"
    xsi:schemaLocation="http://www.springframework.org/schema/beans
    http://www.springframework.org/schema/beans/spring-beans.xsd
    http://www.springframework.org/schema/mvc
    http://www.springframework.org/schema/mvc/spring-mvc.xsd
    http://www.springframework.org/schema/context
    http://www.springframework.org/schema/context/spring-context.xsd">
    <!--Configure annotation scanning-->
    <context:component-scan base-package="com.itheima"/>
</beans>
⑥ Access test address
2.2 spring MVC process diagram
step
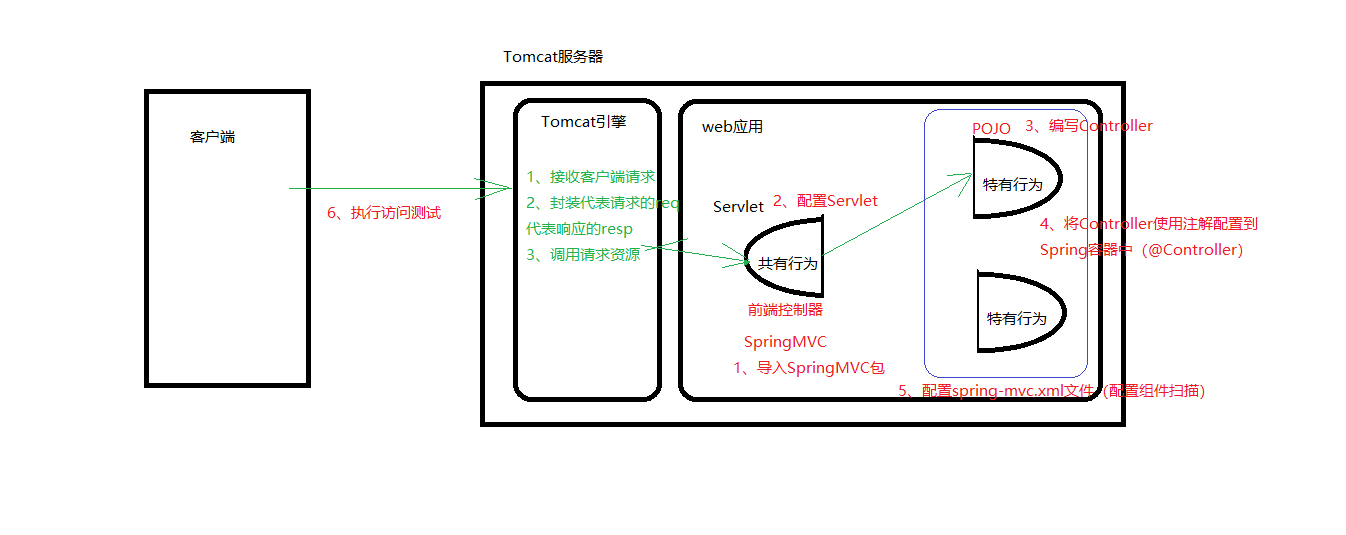
Access process from code perspective
Insert picture description here
2.3 key points of knowledge
Development steps of spring MVC
① Import spring MVC related coordinates
② Configuring the spring MVC core controller DispathcerServlet
③ Create Controller classes and view pages
④ Use the annotation to configure the mapping address of the business method in the Controller class
⑤ Configure spring MVC core file spring MVC xml
⑥ Client initiated request test
3. Component parsing of spring MVC
3.1 execution process of spring MVC
[the external chain image transfer fails. The source station may have an anti-theft chain mechanism. It is recommended to save the image and upload it directly (img-gfglzbyj-1628212818075) (C: \ users \ pmy \ appdata \ roaming \ typora \ typora user images \ image-20210427105735495. PNG)]
① The user sends a request to the front-end controller DispatcherServlet.
② The dispatcher servlet receives a request to call the handler mapping processor mapper.
③ The processor mapper finds the specific processor (which can be found according to the xml configuration and annotation), generates the processor object and the processor interceptor (if any) and returns it to the dispatcher servlet.
④ Dispatcher servlet calls HandlerAdapter processor adapter.
⑤ The HandlerAdapter invokes a specific processor (Controller, also known as back-end Controller) through adaptation.
⑥ The Controller returns ModelAndView after execution.
⑦ The HandlerAdapter returns the controller execution result ModelAndView to the dispatcher servlet.
⑧ The dispatcher servlet passes the ModelAndView to the viewrestrover view parser.
⑨ The viewrestrover returns the specific View after parsing.
⑩ DispatcherServlet renders the View according to the View (that is, fills the View with model data). DispatcherServlet responds to the user.
3.2 spring MVC component parsing
- Front end controller: dispatcher Servlet
When the user's request reaches the front-end controller, it is equivalent to C in MVC mode. Dispatcher servlet is the center of the whole process control. It calls other components to process the user's request. The existence of dispatcher servlet reduces the coupling between components.
- Processor mapper: HandlerMapping
HandlerMapping is responsible for finding the Handler, that is, the processor, according to the user's request. Spring MVC provides different mappers to implement different mapping methods, such as configuration file mode, implementation interface mode, annotation mode, etc.
- Processor adapter: HandlerAdapter
The processor is executed through the HandlerAdapter, which is an application of the adapter mode. More types of processors can be executed through the extension adapter.
- Processor: Handler
It is the specific business controller to be written in our development. The dispatcher servlet forwards the user request to the Handler. The Handler handles specific user requests.
- View Resolver: View Resolver
The View Resolver is responsible for generating the processing results into the View view. The View Resolver first resolves the logical View name into the physical View name, that is, the specific page address, and then generates the View object. Finally, it renders the View and displays the processing results to the user through the page.
- Views: View
Spring MVC framework provides support for many View types, including jstlView, freemarkerView, pdfView, etc. The most common View is jsp. Generally, the model data needs to be displayed to users through pages through page label or page template technology. Programmers need to develop specific pages according to business requirements
3.3 spring MVC annotation parsing
@RequestMapping
Function: used to establish the correspondence between the request URL and the request processing method
Location:
Class, request the first level access directory of the URL. If it is not written here, it is equivalent to the root directory of the application
Method, the second level access directory of the request URL and the first level directory marked with @ RequestMapping on the class form an access virtual path
Properties:
value: used to specify the URL of the request. It works the same way as the path attribute
Method: used to specify the method of the request
params: used to specify conditions that restrict request parameters. It supports simple expressions. key and value as like as two peas for the requested parameters must be exactly the same as those configured.
For example:
params = {"accountName"}, indicating that the request parameter must have accountName
params = {"moeny!100"}, indicating that money in the request parameter cannot be 100
1.mvc namespace introduction
Namespace: xmlns:context="http://www.springframework.org/schema/context"
        xmlns:mvc="http://www.springframework.org/schema/mvc"
Constraint address: http://www.springframework.org/schema/context
        http://www.springframework.org/schema/context/spring-context.xsd
        http://www.springframework.org/schema/mvc
        http://www.springframework.org/schema/mvc/spring-mvc.xsd
Component scan
Spring MVC is based on the spring container, so during spring MVC operation, you need to store the controller in the spring container. If you use the @ controller annotation, you need to use < context: component scan base package = "com. Itheima. Controller" / > to scan the components.
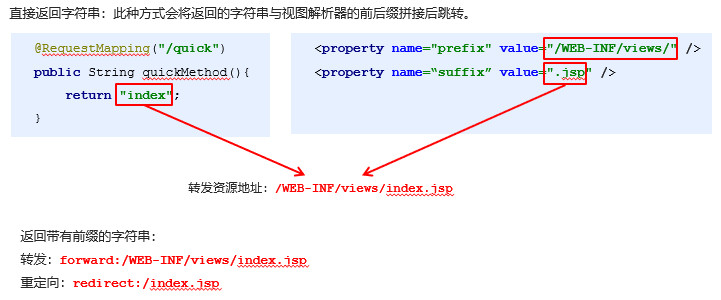
3.4 XML configuration parsing of spring MVC
Spring MVC has a default component configuration, and the default components are dispatcherservlet Properties configuration file, which is located at org / springframework / Web / servlet / dispatcherservlet Properties, the default view parser is configured in this file, as follows:
org.springframework.web.servlet.ViewResolver=org.springframework.web.servlet.view.InternalResourceViewResolver
By browsing the source code of the parser, you can see the default settings of the parser, as follows:
REDIRECT_URL_PREFIX = "redirect:"  --Redirect prefix
FORWARD_URL_PREFIX = "forward:"    --Forwarding prefix (default)
prefix = "";     --View name prefix
suffix = "";     --View name suffix
- view resolver
We can modify the pre suffix of the view by attribute injection
<!--Configure internal resource view parser-->
<bean class="org.springframework.web.servlet.view.InternalResourceViewResolver">
  <property name="prefix" value="/WEB-INF/views/"></property>
  <property name="suffix" value=".jsp"></property>
</bean>
3.5 key points of knowledge
Related components of spring MVC
Front end controller: dispatcher Servlet
Processor mapper: HandlerMapping
Processor adapter: HandlerAdapter
Processor: Handler
View Resolver: View Resolver
Views: View
Annotation and configuration of spring MVC
Request mapping annotation: @ RequestMapping
View parser configuration:
REDIRECT_URL_PREFIX = "redirect:"
FORWARD_URL_PREFIX = "forward:"
prefix = "";
suffix = "";
4. Data response of spring MVC
01 - data response of spring MVC - data response mode (understanding)
- Page Jump
Returns a string directly
Return via ModelAndView object
2) Write back data
Returns a string directly
Returns an object or collection
02 - data response of spring MVC - page Jump - return string form (application)
03 - data response of spring MVC - page Jump - return ModelAndView form 1 (application)
In the Controller, the method returns the ModelAndView object and sets the view name
@RequestMapping(value="/quick2")
    public ModelAndView save2(){
        /*
            Model:Model action encapsulates data
            View: View function: display data
         */
        ModelAndView modelAndView = new ModelAndView();
        //Set model data
        modelAndView.addObject("username","itcast");
        //Set view name
        modelAndView.setViewName("success");

        return modelAndView;
    }
04 - data response of spring MVC - page Jump - return ModelAndView form 2 (application)
n directly declare ModelAndView on the method parameter in the Controller. You do not need to create it yourself in the method. You can directly use the object in the method to set the view, and you can also jump to the page
 @RequestMapping(value="/quick3")
    public ModelAndView save3(ModelAndView modelAndView){
        modelAndView.addObject("username","itheima");
        modelAndView.setViewName("success");
        return modelAndView;
    }
@RequestMapping(value="/quick4")
    public String save4(Model model){
        model.addAttribute("username","Erudite Valley");
        return "success";
    }
05 - data response of spring MVC - page Jump - return to modelandview3 (application)
You can directly use the native httpservertrequest object on the formal parameters of the Controller method, just declare it
@RequestMapping(value="/quick5")
    public String save5(HttpServletRequest request){
        request.setAttribute("username","Kuding fish");
        return "success";
    }
06 - data response of spring MVC - write back data - write back string directly (application)
The response object injected through the spring MVC framework uses response getWriter(). Print ("hello world") writes back data. At this time, view jump is not required, and the return value of the business method is void
Return the string to be written back directly, but at this time, you need to inform the spring MVC framework through the @ ResponseBody annotation that the string returned by the method is not a jump, but directly returned in the http response body
@RequestMapping(value="/quick7")
    @ResponseBody  //Tell the spring MVC framework to respond directly to data without view jump
    public String save7() throws IOException {
        return "hello itheima";
    }

    @RequestMapping(value="/quick6")
    public void save6(HttpServletResponse response) throws IOException {
        response.getWriter().print("hello itcast");
    }
07 - data response of spring MVC - write back data - write back json format string directly (application)
@RequestMapping(value="/quick8")
    @ResponseBody
    public String save8() throws IOException {
        return "{\"username\":\"zhangsan\",\"age\":18}";
    }
It is troublesome to manually splice json format strings. Complex java objects are often converted into json format strings in development. We can use jackson, the json conversion tool learned in the web stage, to convert json format strings and return character strings
@RequestMapping(value="/quick9")
    @ResponseBody
    public String save9() throws IOException {
        User user = new User();
        user.setUsername("lisi");
        user.setAge(30);
        //Use the json conversion tool to convert the object into a json format string and return it
        ObjectMapper objectMapper = new ObjectMapper();
        String json = objectMapper.writeValueAsString(user);

        return json;
    }
08 - data response of spring MVC - write back data - return object or collection (application)
Spring MVC helps us to convert and write back json strings to objects or collections, configure message conversion parameters for the processor adapter, and specify the use of jackson to convert objects or collections. Therefore, spring MVC XML is configured as follows:
<bean class="org.springframework.web.servlet.mvc.method.annotation.RequestMappingHandlerAdapter">
        <property name="messageConverters">
            <list>
                <bean class="org.springframework.http.converter.json.MappingJackson2HttpMessageConverter"/>
            </list>
        </property>
    </bean>
@RequestMapping(value="/quick10")
    @ResponseBody
    //Spring MVC is expected to automatically convert users to json formatted strings
    public User save10() throws IOException {
        User user = new User();
        user.setUsername("lisi2");
        user.setAge(32);
        return user;
    }
09 - data response of spring MVC - write back data - return object or collection 2 (application)
Adding @ ResponseBody to the method can return a string in json format, but this configuration is troublesome and there are many configured codes. Therefore, we can use mvc annotation driven instead of the above configuration
<mvc:annotation-driven/>
Among the components of spring MVC, processor mapper, processor adapter and view parser are called the three components of spring MVC.
Use < MVC: annotation driven / > to automatically load RequestMapping, HandlerMapping (processing mapper) and RequestMappingHandlerAdapter (processing adapter). You can use < MVC: annotation driven / > to replace the configuration of annotation processor and adapter in Spring-xml.xml configuration file.
Use < MVC: annotation driven / >
By default, the bottom layer will integrate jackson to convert json format strings of objects or collections
10 - data response of spring MVC - Summary of knowledge points (understanding, memory)
1) Page Jump
Returns a string directly
Return via ModelAndView object
2) Write back data
Returns a string directly
The HttpServletResponse object writes back data directly, the HttpServletRequest object brings back data, the Model object brings back data, or @ ResponseBody writes back string data
Returns an object or collection
@ResponseBody+<mvc:annotation-driven/>
5. Spring MVC request
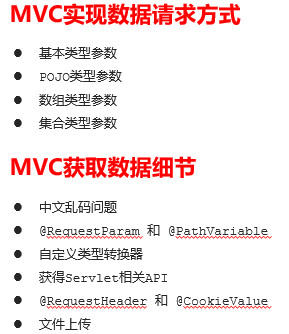
11 - spring MVC request - get request parameters - request parameter type (understand)
The format of client request parameters is: name = value & name = value
In order to obtain the requested parameters, the server sometimes needs to encapsulate the data. Spring MVC can receive the following types of parameters
Basic type parameters
POJO type parameters
Array type parameter
Set type parameter
12 - Request of spring MVC - get request parameters - get basic type parameters (application)
The parameter name of the business method in the Controller should be consistent with the name of the request parameter, and the parameter value will be mapped and matched automatically. And can automatically do type conversion;
Automatic type conversion refers to the conversion from String to other types
http://localhost:8080/itheima_springmvc1/quick9?username=zhangsan&age=12
@RequestMapping(value="/quick11")
    @ResponseBody
    public void save11(String username,int age) throws IOException {
        System.out.println(username);
        System.out.println(age);
    }
13 - Request of spring MVC - get request parameters - get POJO type parameters (application)
The property name of the POJO parameter of the business method in the Controller is consistent with the name of the request parameter, and the parameter value will be mapped and matched automatically.
package com.itheima.domain;

public class User {

    private String username;
    private int age;

    public String getUsername() {
        return username;
    }

    public void setUsername(String username) {
        this.username = username;
    }

    public int getAge() {
        return age;
    }

    public void setAge(int age) {
        this.age = age;
    }

    @Override
    public String toString() {
        return "User{" +
                "username='" + username + '\'' +
                ", age=" + age +
                '}';
    }
}
@RequestMapping(value="/quick12")
    @ResponseBody
    public void save12(User user) throws IOException {
        System.out.println(user);
    }
14 - Request of spring MVC - get request parameters - get array type parameters (application)
The name of the business method array in the Controller is consistent with the name of the request parameter, and the parameter value will be mapped and matched automatically.
@RequestMapping(value="/quick13")
    @ResponseBody
    public void save13(String[] strs) throws IOException {
        System.out.println(Arrays.asList(strs));
    }
15 - Request of spring MVC - get request parameters - get collection type parameter 1 (application)
When obtaining set parameters, the set parameters should be wrapped in a POJO.
<form action="${pageContext.request.contextPath}/user/quick14" method="post">
        <%--Indicates that it is the first User Object username age--%>
        <input type="text" name="userList[0].username"><br/>
        <input type="text" name="userList[0].age"><br/>
        <input type="text" name="userList[1].username"><br/>
        <input type="text" name="userList[1].age"><br/>
        <input type="submit" value="Submit">
    </form>
package com.itheima.domain;

import java.util.List;

public class VO {

    private List<User> userList;

    public List<User> getUserList() {
        return userList;
    }

    public void setUserList(List<User> userList) {
        this.userList = userList;
    }

    @Override
    public String toString() {
        return "VO{" +
                "userList=" + userList +
                '}';
    }
}
@RequestMapping(value="/quick14")
    @ResponseBody
    public void save14(VO vo) throws IOException {
        System.out.println(vo);
    }
16 - Request of spring MVC - get request parameters - get collection type parameter 2 (application)
When submitting with ajax, you can specify the contentType as json, and then use * * @ RequestBody * * at the method parameter position to directly receive the collection data without POJO wrapping
<script src="${pageContext.request.contextPath}/js/jquery-3.3.1.js"></script>
    <script>
        var userList = new Array();
        userList.push({username:"zhangsan",age:18});
        userList.push({username:"lisi",age:28});

        $.ajax({
            type:"POST",
            url:"${pageContext.request.contextPath}/user/quick15",
            data:JSON.stringify(userList),
            contentType:"application/json;charset=utf-8"
        });

    </script>
@RequestMapping(value="/quick15")
    @ResponseBody
    public void save15(@RequestBody List<User> userList) throws IOException {
        System.out.println(userList);
    }
17 - spring MVC request - get request parameters - enable static resource access (application)
When static resources need to be loaded, such as jquery files, it is found that they are not loaded into jquery files through the Google developer tool. The reason is that the URL pattern of the DispatcherServlet, the front-end controller of spring MVC, is configured as /, which means that all resources are filtered. We can specify the release of static resources in the following two ways:
• in spring MVC Specify the released resources in the XML configuration file
<mvc:resources mapping="/js/**"location="/js/"/>
• use the < MVC: default servlet handler / > tag
<!--Access to development resources-->
    <!--<mvc:resources mapping="/js/**" location="/js/"/>
    <mvc:resources mapping="/img/**" location="/img/"/>-->

    <mvc:default-servlet-handler/>
18 - Request of spring MVC - obtain request parameters - configure global garbled filter (application)
When post requests, the data will be garbled. We can set a filter to filter the encoding.
<!--Configuring global filtering filter-->
    <filter>
        <filter-name>CharacterEncodingFilter</filter-name>
        <filter-class>
           org.springframework.web.filter.CharacterEncodingFilter
        </filter-class>
        <init-param>
            <param-name>encoding</param-name>
            <param-value>UTF-8</param-value>
        </init-param>
    </filter>
    <filter-mapping>
        <filter-name>CharacterEncodingFilter</filter-name>
        <url-pattern>/*</url-pattern>
    </filter-mapping>
19 - Request of spring MVC - get request parameters - parameter binding annotation @ requestparam (application)
When the requested parameter name is inconsistent with the business method parameter name of the Controller, the binding displayed through the @ RequestParam annotation is required
<form action="${pageContext.request.contextPath}/quick16" method="post">
    <input type="text" name="name"><br>
    <input type="submit" value="Submit"><br>
</form>
@RequestMapping(value="/quick16")
    @ResponseBody
    public void save16(@RequestParam(value="name",required = false,defaultValue = "itcast") String username) throws IOException {
        System.out.println(username);
    }
20 - spring MVC request - get request parameters - get Restful style parameters (application)
Restful is a software architecture style and design style, not a standard, but provides a set of design principles and constraints. It is mainly used for interactive software between client and server. The software designed based on this style can be more concise, more hierarchical, and easier to implement cache mechanism.
Restful style requests use "url + request method" to indicate the purpose of a request. The four verbs in the HTTP protocol indicating the operation method are as follows:
GET: used to GET resources
POST: used to create a new resource
PUT: used to update resources
DELETE: used to DELETE resources
For example:
/user/1 GET: get the user with id = 1
/user/1 DELETE: delete the user with id = 1
/user/1 PUT: update user with id = 1
/user POST: new user
1 in the above url address / user/1 is the request parameter to be obtained. Placeholders can be used for parameter binding in spring MVC. The address / user/1 can be written as / user/{id}, and the placeholder {id} corresponds to the value of 1. In the business method, we can use the @ PathVariable annotation to match and obtain placeholders.
http://localhost:8080/itheima_springmvc1/quick17/zhangsan
@RequestMapping(value="/quick17/{name}")
@ResponseBody
 public void save17(@PathVariable(value="name") String username) throws IOException {
        System.out.println(username);
 }
21 - spring MVC request - get request parameters - custom type converter (application)
Spring MVC provides some common type converters by default, such as converting the string submitted by the client to int for parameter setting.
However, not all data types are provided with converters. If not, custom converters are required. For example, custom converters are required for date type data.
It also needs to be in spring MVC Configure it in XML
public class DateConverter implements Converter<String, Date> {
    public Date convert(String dateStr) {
        //Returns a date string converted to a date object
        SimpleDateFormat format = new SimpleDateFormat("yyyy-MM-dd");
        Date date = null;
        try {
            date = format.parse(dateStr);
        } catch (ParseException e) {
            e.printStackTrace();
        }
        return date;
    }
}
@RequestMapping(value="/quick18")
    @ResponseBody
    public void save18(Date date) throws IOException {
        System.out.println(date);
    }
<mvc:annotation-driven conversion-service="conversionService"/>
22 - spring MVC request - get request parameters - get Servlet related API (application)
Spring MVC supports using the original servlet API object as the parameter of the controller method for injection. The common objects are as follows:
HttpServletRequest
HttpServletResponse
HttpSession
@RequestMapping(value="/quick19")
    @ResponseBody
    public void save19(HttpServletRequest request, HttpServletResponse response, HttpSession session) throws IOException {
        System.out.println(request);
        System.out.println(response);
        System.out.println(session);
    }
23 - Request of spring MVC - get request parameters - get request header information (application)
Using @ RequestHeader, you can obtain the request header information, which is equivalent to the request learned in the web stage getHeader(name)
@The attributes of the RequestHeader annotation are as follows:
value: the name of the request header
required: whether this request header must be carried
@RequestMapping(value="/quick20")
    @ResponseBody
    public void save20(@RequestHeader(value = "User-Agent",required = false) String user_agent) throws IOException {
        System.out.println(user_agent);
    }
Use @ Cookie value to get the value of the specified Cookie
@The properties of the CookieValue annotation are as follows:
value: Specifies the name of the cookie
required: do you have to carry this cookie
 @RequestMapping(value="/quick21")
    @ResponseBody
    public void save21(@CookieValue(value = "JSESSIONID") String jsessionId) throws IOException {
        System.out.println(jsessionId);
    }
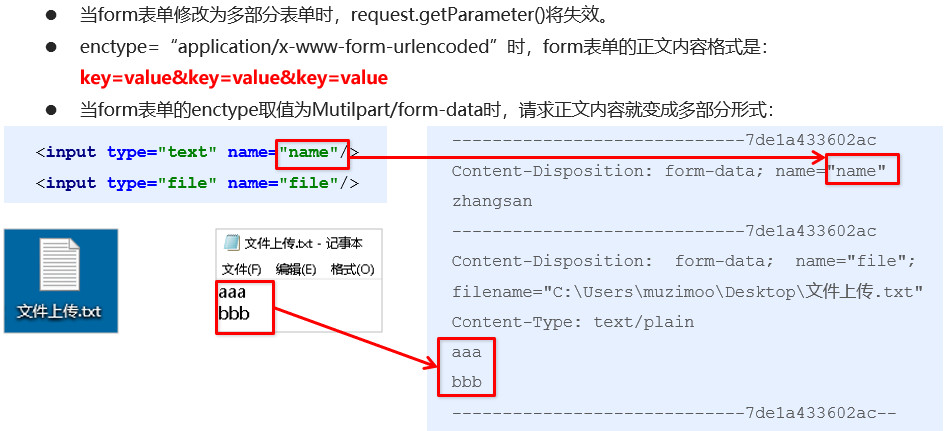
6. File upload of spring MVC
1-spring MVC file upload
<form action="${pageContext.request.contextPath}/user/quick22" method="post" enctype="multipart/form-data">
        name<input type="text" name="username"><br/>
        File 1<input type="file" name="uploadFile"><br/>
        <input type="submit" value="Submit">
    </form>
2 - principle of file upload
3 - code implementation of single file upload 1
Add dependency
<dependency>
      <groupId>commons-fileupload</groupId>
      <artifactId>commons-fileupload</artifactId>
      <version>1.3.1</version>
    </dependency>
    <dependency>
      <groupId>commons-io</groupId>
      <artifactId>commons-io</artifactId>
      <version>2.3</version>
    </dependency>
Configure multimedia parser
<!--Profile upload parser-->
    <bean id="multipartResolver" class="org.springframework.web.multipart.commons.CommonsMultipartResolver">
        <property name="defaultEncoding" value="UTF-8"/>
        <property name="maxUploadSize" value="500000"/>
    </bean>
Background program
@RequestMapping(value="/quick22")
    @ResponseBody
    public void save22(String username, MultipartFile uploadFile) throws IOException {
        System.out.println(username);
       	System.out.println(uploadFile);
    }
4 - code implementation of single file upload 2
Complete file upload
@RequestMapping(value="/quick22")
    @ResponseBody
    public void save22(String username, MultipartFile uploadFile) throws IOException {
        System.out.println(username);
        //Get the name of the uploaded file
        String originalFilename = uploadFile.getOriginalFilename();
        uploadFile.transferTo(new File("C:\\upload\\"+originalFilename));
    }
5 - code implementation of multi file upload
To upload multiple files, you only need to change the page to multiple file upload items and change the method parameter MultipartFile type to MultipartFile []
<form action="${pageContext.request.contextPath}/user/quick23" method="post" enctype="multipart/form-data">
        name<input type="text" name="username"><br/>
        File 1<input type="file" name="uploadFile"><br/>
        Document 2<input type="file" name="uploadFile"><br/>
        <input type="submit" value="Submit">
    </form>
@RequestMapping(value="/quick23")
    @ResponseBody
    public void save23(String username, MultipartFile[] uploadFile) throws IOException {
        System.out.println(username);
        for (MultipartFile multipartFile : uploadFile) {
            String originalFilename = multipartFile.getOriginalFilename();
            multipartFile.transferTo(new File("C:\\upload\\"+originalFilename));
        }
    }
6 - spring MVC request - key points of knowledge (understanding, memory)
7. Interceptor of spring MVC
01 - function of interceptor
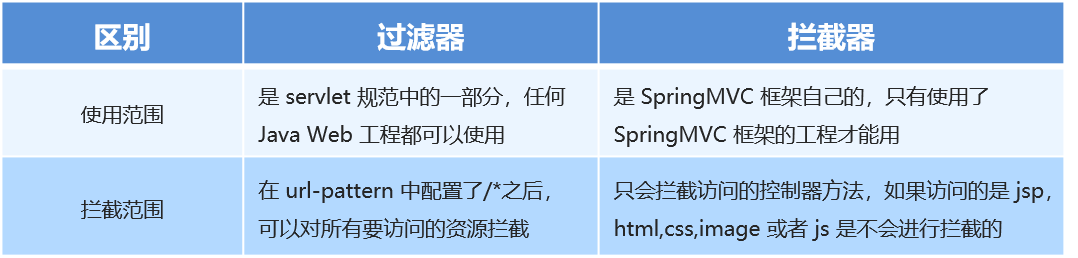
The interceptor of Spring MVC is similar to the Filter in Servlet development, which is used to preprocess and post process the processor.
The interceptors are connected into a chain in a certain order. This chain is called InterceptorChain. When accessing the intercepted methods or fields, the interceptors in the interceptor chain will be called in the order previously defined. Interceptors are also the concrete implementation of AOP ideas.
Difference between 02 interceptor and filter
The difference between interceptor and filter is shown in the figure:
03 - quick start
The custom interceptor is very simple. There are only three steps:
① Create an interceptor class to implement the HandlerInterceptor interface
② Configure interceptor
③ Test the interception effect of the interceptor
Write Interceptor:
public class MyInterceptor1 implements HandlerInterceptor {
    //Execute before the target method executes
    public boolean preHandle(HttpServletRequest request, HttpServletResponse response, Object handler) throws ServletException, IOException {
        System.out.println("preHandle.....");
}
    //Execute after the target method executes and before the view object returns
    public void postHandle(HttpServletRequest request, HttpServletResponse response, Object handler, ModelAndView modelAndView) {
System.out.println("postHandle...");
    }
    //Execute after all processes are executed
    public void afterCompletion(HttpServletRequest request, HttpServletResponse response, Object handler, Exception ex) {
        System.out.println("afterCompletion....");
    }
}
Configuration: configure in the configuration file of spring MVC
<!--Configuring Interceptors -->
    <mvc:interceptors>
        <mvc:interceptor>
            <!--Which resources are intercepted-->
            <mvc:mapping path="/**"/>
            <bean class="com.itheima.interceptor.MyInterceptor1"/>
        </mvc:interceptor>
    </mvc:interceptors>
Write test program:
Write the controller, send a request to the controller and jump to the page
@Controller
public class TargetController {
    @RequestMapping("/target")
    public ModelAndView show(){
        System.out.println("Target resource execution......");
        ModelAndView modelAndView = new ModelAndView();
        modelAndView.addObject("name","itcast");
        modelAndView.setViewName("index");
        return modelAndView;
    }
}
page
04 - Introduction
Under what circumstances will the interceptor execute the target resource after preprocessing, under what circumstances will the interceptor not execute the target resource, and what is the execution order of the interceptor when there are multiple interceptors?
Conclusion:
When the preHandle method of the interceptor returns true, the target resource will be executed. If false, the target resource will not be executed
In the case of multiple interceptors, the configuration before is executed first, and the configuration after is executed
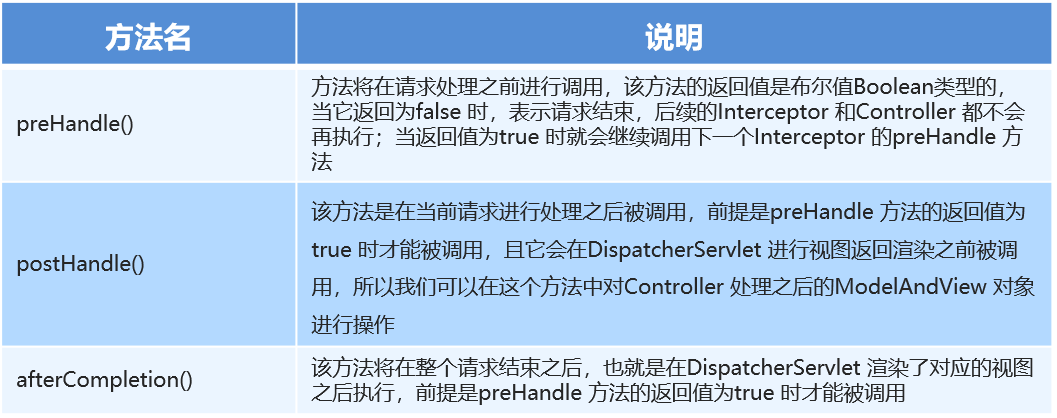
The execution order of methods in the interceptor is: preHandler ------ target resource ----- posthandle ----- aftercompletion
05 - knowledge summary
The method in the interceptor is described below
8. Spring MVC exception handling mechanism
1.1 ideas for exception handling
There are two types of exceptions in the system: expected exception and runtime exception RuntimeException. The former obtains exception information by capturing exceptions, and the latter mainly reduces the occurrence of runtime exceptions by standardizing code development and testing.
Dao, Service and Controller of the system are thrown upward through throws Exception. Finally, the spring MVC front-end Controller sends it to the exception handler for exception handling, as shown in the following figure:
1.2 two methods of exception handling
① Use the simple exception handler SimpleMappingExceptionResolver provided by Spring MVC
② Implement the exception handling interface of Spring, HandlerExceptionResolver, and customize its own exception handler
1.3 simple exception handler SimpleMappingExceptionResolver
Spring MVC has defined this type converter. When using it, you can map and configure the corresponding exceptions and views according to the project situation
<!--Configure simple mapping exception handler-->
    <bean class="org.springframework.web.servlet.handler.SimpleMappingExceptionResolver">
    <property name="defaultErrorView" value="error"/>   Default error view
    <property name="exceptionMappings">
        <map>		Exception type		                             Error view
            <entry key="com.itheima.exception.MyException" 									value="error"/>
            <entry key="java.lang.ClassCastException" value="error"/>
        </map>
    </property>
</bean>
1.4 custom exception handling steps
① Create an exception handler class to implement HandlerExceptionResolver
public class MyExceptionResolver implements HandlerExceptionResolver {
@Override
public ModelAndView resolveException(HttpServletRequest request,
    HttpServletResponse response, Object handler, Exception ex) {
    //Code implementation for handling exceptions
    //Create ModelAndView object
    ModelAndView modelAndView = new ModelAndView();
    modelAndView.setViewName("exceptionPage");
    return modelAndView;
    }
}
② Configure exception handler
<bean id="exceptionResolver"
      class="com.itheima.exception.MyExceptionResolver"/>
③ Write exception page
<%@ page contentType="text/html;charset=UTF-8" language="java" %>
<html>
<head>
	<title>Title</title>
</head>
<body>
	This is a final exception display page
</body>
</html>
④ Test abnormal jump
@RequestMapping("/quick22")
@ResponseBody
public void quickMethod22() throws IOException, ParseException {
    SimpleDateFormat simpleDateFormat = new SimpleDateFormat("yyyy-MM-dd");
    simpleDateFormat.parse("abcde");
}
1.5 key points of knowledge
Exception handling method
Configure simple exception handler SimpleMappingExceptionResolver

Custom exception handler
Custom exception handling steps
①Create exception handler class implementation HandlerExceptionResolver

②Configure exception handler

③Write exception page

④Test abnormal jump
Question:
- The difference between / and / *, / * * in urlpattern
Mybatis
MyBatis development steps:
1) Import the coordinates of MyBatis and other related coordinates
<!--mybatis coordinate-->
<dependency>
    <groupId>org.mybatis</groupId>
    <artifactId>mybatis</artifactId>
    <version>3.4.5</version>
</dependency>
<!--mysql Driving coordinates-->
<dependency>
    <groupId>mysql</groupId>
    <artifactId>mysql-connector-java</artifactId>
    <version>5.1.6</version>
    <scope>runtime</scope>
</dependency>
<!--Unit test coordinates-->
<dependency>
    <groupId>junit</groupId>
    <artifactId>junit</artifactId>
    <version>4.12</version>
    <scope>test</scope>
</dependency>
<!--Log coordinates-->
<dependency>
    <groupId>log4j</groupId>
    <artifactId>log4j</artifactId>
    <version>1.2.12</version>
</dependency>
-
Create user data table
-
Write User entity
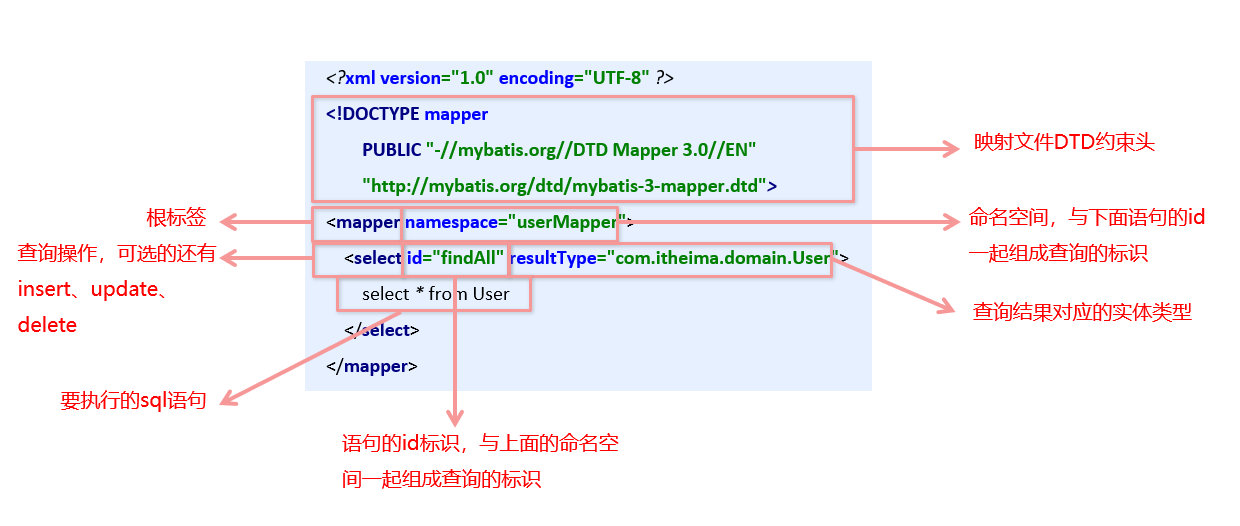
4) Write UserMapper mapping file
<?xml version="1.0" encoding="UTF-8" ?>
<!DOCTYPE mapper
	PUBLIC "-//mybatis.org//DTD Mapper 3.0//EN"
	"http://mybatis.org/dtd/mybatis-3-mapper.dtd">
<mapper namespace="userMapper">
	<select id="findAll" resultType="com.itheima.domain.User">
		select * from User
	</select>
</mapper>
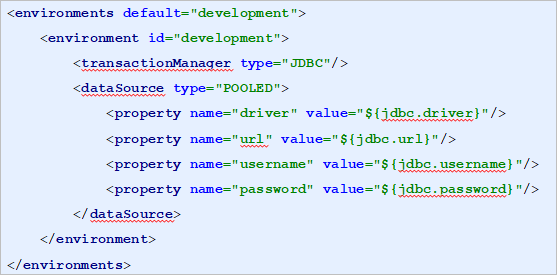
- Write MyBatis core document
<!DOCTYPE configuration PUBLIC "-//mybatis.org//DTD Config 3.0//EN" "http://mybatis.org/dtd/mybatis-3-config.dtd">
<configuration>
	<environments default="development">
		<environment id="development">
			<transactionManager type="JDBC"/>
			<dataSource type="POOLED">
				<property name="driver" value="com.mysql.jdbc.Driver"/>
				<property name="url" value="jdbc:mysql:///test"/>
				<property name="username" value="root"/>
				<property name="password" value="root"/>
			</dataSource>
		</environment>
	</environments>

	<mappers>
		<mapper resource="com/itheima/mapper/UserMapper.xml"/>
	</mappers>
</configuration>
6) Test code
//Load core profile
InputStream resourceAsStream = Resources.getResourceAsStream("SqlMapConfig.xml");
//Get sqlSession factory object
SqlSessionFactory sqlSessionFactory = new
                           SqlSessionFactoryBuilder().build(resourceAsStream);
//Get sqlSession object
SqlSession sqlSession = sqlSessionFactory.openSession();
//Execute sql statement
List<User> userList = sqlSession.selectList("userMapper.findAll");
//Print results
System.out.println(userList);
//Release resources
sqlSession.close();
1. Overview of mybatis mapping file
2. Addition, deletion, modification and query of mybatis
1) Write UserMapper mapping file
<mapper namespace="userMapper">
	<insert id="add" parameterType="com.itheima.domain.User">
		insert into user values(#{id},#{username},#{password})
	</insert>
</mapper>
2) Write code to insert the User entity
//Load the configuration file for Mybatis
InputStream resourceAsStream = Resources.getResourceAsStream("SqlMapConfig.xml");

SqlSessionFactory sqlSessionFactory = new                       SqlSessionFactoryBuilder().build(resourceAsStream);

//If true is passed in, the transaction will be submitted automatically
SqlSession sqlSession = sqlSessionFactory.openSession();

int insert = sqlSession.insert("userMapper.add", user);
System.out.println(insert);
//Commit transaction
sqlSession.commit();
sqlSession.close();
3) Operation precautions
• insert statements use the insert tag
• use the parameterType attribute in the mapping file to specify the type of data to insert
• use #{entity attribute name} in Sql statement to refer to attribute value in entity
• the API used for the insert operation is sqlsession Insert ("namespace. id", entity object);
• the insert operation involves changes in database data, so the commit transaction displayed by the sqlSession object should be used, that is, sqlSession commit()
Add, delete, modify, and query mapping and configuration API:
Query data: List<User> userList = sqlSession.selectList("userMapper.findAll");
    <select id="findAll" resultType="com.itheima.domain.User">
        select * from User
    </select>
Add data: sqlSession.insert("userMapper.add", user);
    <insert id="add" parameterType="com.itheima.domain.User">
        insert into user values(#{id},#{username},#{password})
    </insert>
Modify data: sqlSession.update("userMapper.update", user);
    <update id="update" parameterType="com.itheima.domain.User">
        update user set username=#{username},password=#{password} where id=#{id}
    </update>
Delete data: sqlSession.delete("userMapper.delete",3);
    <delete id="delete" parameterType="java.lang.Integer">
        delete from user where id=#{id}
    </delete>
3. Overview of mybatis core profile
3.1 MyBatis core profile hierarchy
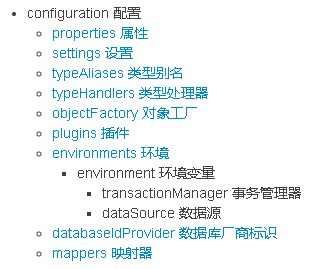
3.2 MyBatis common configuration analysis
1)environments tab
The configuration of database environment supports multi environment configuration
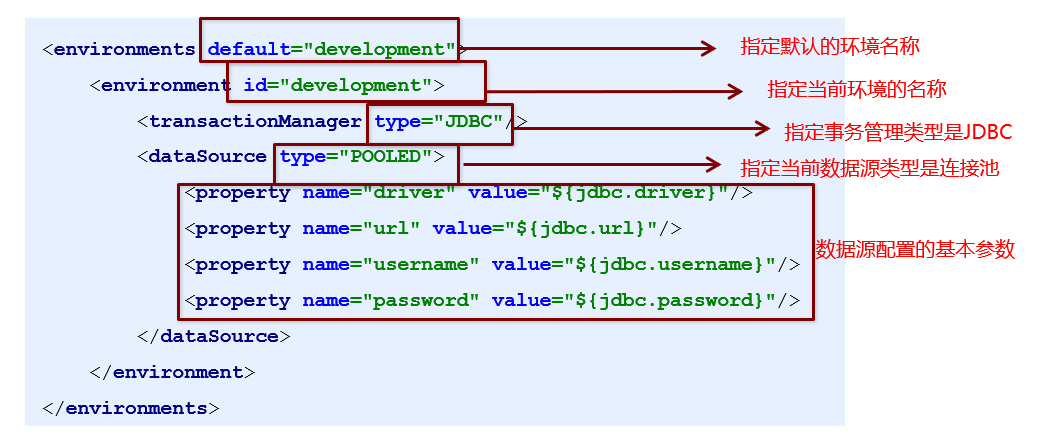
There are two types of transaction manager:
• JDBC: this configuration directly uses the commit and rollback settings of JDBC. It depends on the connection from the data source to manage the transaction scope.
• MANAGED: this configuration does little. It never commits or rolls back a connection, but lets the container manage the whole life cycle of the transaction (such as the context of JEE application server). By default, it will close the connection. However, some containers do not want this. Therefore, it is necessary to set the closeConnection property to false to prevent its default closing behavior.
There are three types of data sources:
• UNPOOLED: the implementation of this data source only opens and closes the connection every time it is requested.
• POOLED: the implementation of this data source uses the concept of "pool" to organize JDBC connection objects.
• JNDI: this data source is implemented to be used in containers such as EJB or application server. The container can configure the data source centrally or externally, and then place a reference to the JNDI context.
2)mapper tag
The tag is used to load mapping. The loading methods are as follows:
• use resource references relative to Classpaths, for example:
• use a fully qualified resource locator (URL), for example:
• use the mapper interface to implement the fully qualified class name of the class, for example:
• register all mapper interface implementations in the package as mappers, for example:
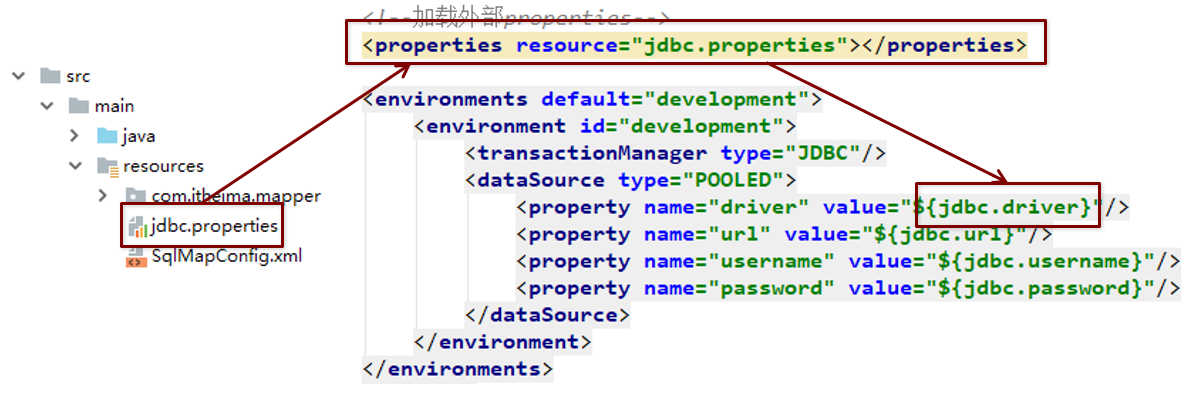
3)Properties tag
In actual development, it is customary to extract the configuration information of the data source separately into a properties file, which can load additional configured properties files
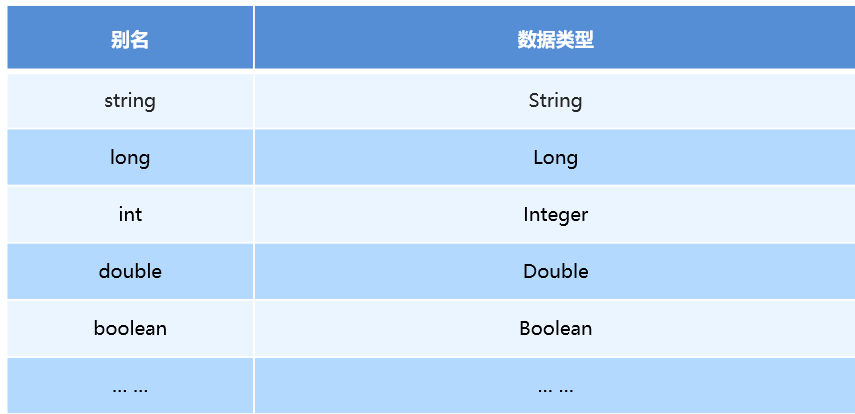
4)typeAliases label
A type alias is a short name for a Java type. The original type name is configured as follows

Configure typeAliases as com itheima. domain. User defines the alias as user

The above is our custom alias. The mybatis framework has set some common types of aliases for us
3.3 knowledge summary
Core profile common configuration:
Properties tag: this tag can load external properties files
<properties resource="jdbc.properties"></properties>
typeAliases label: set type aliases
<typeAlias type="com.itheima.domain.User" alias="user"></typeAlias>
mappers tab: load mapping configuration
<mapper resource="com/itheima/mapper/UserMapping.xml"></mapper>
environments tab: data source environment configuration tab
4.MyBatis API
4.1 SqlSession factory builder
Common API: SqlSessionFactory build(InputStream inputStream)
Build a SqlSessionFactory object by loading the input stream of the core file of mybatis
String resource = "org/mybatis/builder/mybatis-config.xml";
InputStream inputStream = Resources.getResourceAsStream(resource);
SqlSessionFactoryBuilder builder = new SqlSessionFactoryBuilder();
SqlSessionFactory factory = builder.build(inputStream);
Among them, the Resources tool class, which is located at org apache. ibatis. IO package. The Resources class helps you load resource files from the classpath, the file system, or a web URL.
4.2 SqlSession factory object SqlSessionFactory
SqlSessionFactory has multiple methods to create SqlSession instances. There are two commonly used:

4.3 SqlSession session object
SqlSession instance is a very powerful class in MyBatis. Here you will see all the methods for executing statements, committing or rolling back transactions, and obtaining mapper instances.
The main methods of executing statements are:
<T> T selectOne(String statement, Object parameter)
<E> List<E> selectList(String statement, Object parameter)
int insert(String statement, Object parameter)
int update(String statement, Object parameter)
int delete(String statement, Object parameter)
The main methods of operating transactions are:
void commit()
void rollback()
5. Dao layer implementation of mybatis
5.1 traditional development methods
5.1. 1 write UserDao interface
public interface UserDao {
    List<User> findAll() throws IOException;
}
5.1. 2. Write UserDaoImpl implementation
public class UserDaoImpl implements UserDao {
    public List<User> findAll() throws IOException {
        InputStream resourceAsStream =
                    Resources.getResourceAsStream("SqlMapConfig.xml");
        SqlSessionFactory sqlSessionFactory = new
                    SqlSessionFactoryBuilder().build(resourceAsStream);
        SqlSession sqlSession = sqlSessionFactory.openSession();
        List<User> userList = sqlSession.selectList("userMapper.findAll");
        sqlSession.close();
        return userList;
    }
}
5.1. 3 traditional test methods
@Test
public void testTraditionDao() throws IOException {
    UserDao userDao = new UserDaoImpl();
    List<User> all = userDao.findAll();
    System.out.println(all);
}
5.2 agent development mode
5.2. 1. Introduction to agent development method
The agent development method of Mybatis is adopted to realize the development of DAO layer, which is the mainstream of entering the enterprise later.
Mapper interface development method only requires programmers to write mapper interface (equivalent to Dao interface). Mybatis framework creates the dynamic proxy object of the interface according to the interface definition. The method body of the proxy object is the same as that of the Dao interface above.
Mapper interface development needs to follow the following specifications:
1) Mapper. The namespace in the XML file is the same as the fully qualified name of the mapper interface
2) Mapper interface method name and mapper The id of each statement defined in the XML is the same
3) Mapper interface method input parameter type and mapper The parameterType of each sql defined in XML is the same
4) Mapper interface method output parameter type and mapper The resultType of each sql defined in XML is the same
5.2. 2. Write UserMapper interface
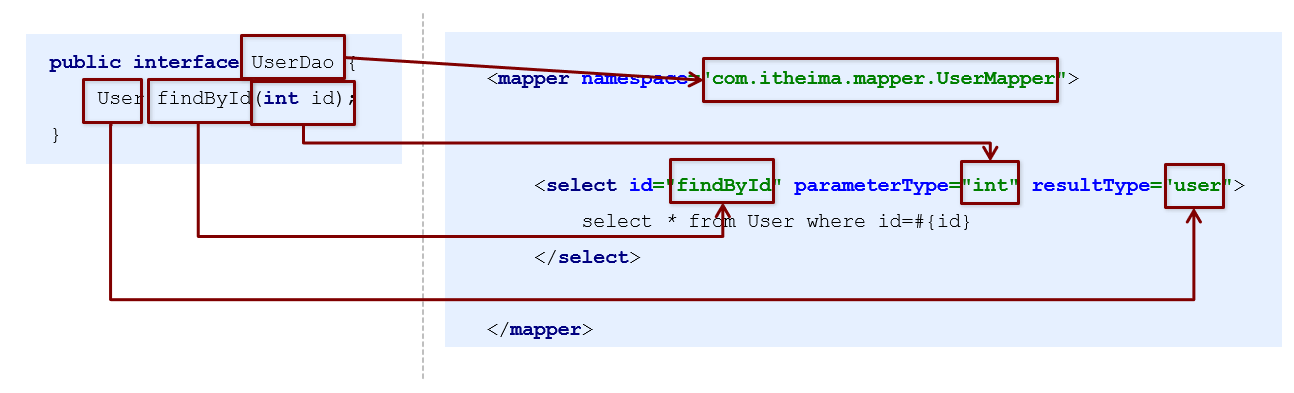
5.2. 3 test agent mode
@Test
public void testProxyDao() throws IOException {
    InputStream resourceAsStream = Resources.getResourceAsStream("SqlMapConfig.xml");
    SqlSessionFactory sqlSessionFactory = new SqlSessionFactoryBuilder().build(resourceAsStream);
    SqlSession sqlSession = sqlSessionFactory.openSession();
    //Get the implementation class of UserMapper interface generated by MyBatis framework
  UserMapper userMapper = sqlSession.getMapper(UserMapper.class);
    User user = userMapper.findById(1);
    System.out.println(user);
    sqlSession.close();
}
5.3 knowledge summary
There are two ways to implement the Dao layer of MyBatis:
Manual implementation of Dao: traditional development method
Dao is implemented by proxy:
**UserMapper userMapper = sqlSession.getMapper(UserMapper.class);**
6.MyBatis mapping file depth
6.1 dynamic sql statement
6.1. 1 overview of dynamic sql statements
In the mapping file of Mybatis, our SQL is relatively simple. Sometimes when the business logic is complex, our SQL changes dynamically. At this time, our SQL can not meet the requirements in the previous study.
Refer to the official documents described below:

6.1. 2 dynamic SQL < if >
We use different SQL statements to query according to different values of entity classes. For example, if the id is not empty, you can query according to the id. if the username is different, you should add the user name as a condition. This situation is often encountered in our multi condition combined query.
<select id="findByCondition" parameterType="user" resultType="user">
    select * from User
    <where>
        <if test="id!=0">
            and id=#{id}
        </if>
        <if test="username!=null">
            and username=#{username}
        </if>
    </where>
</select>
When both query condition id and username exist, the sql statement printed on the console is as follows:
     ... ... ...
     //Get the implementation class of UserMapper interface generated by MyBatis framework
  UserMapper userMapper = sqlSession.getMapper(UserMapper.class);
    User condition = new User();
    condition.setId(1);
    condition.setUsername("lucy");
    User user = userMapper.findByCondition(condition);
    ... ... ...

When only id exists in the query condition, the sql statement printed on the console is as follows:
 ... ... ...
 //Get the implementation class of UserMapper interface generated by MyBatis framework
UserMapper userMapper = sqlSession.getMapper(UserMapper.class);
User condition = new User();
condition.setId(1);
User user = userMapper.findByCondition(condition);
... ... ...

6.1. 3 < foreach > of dynamic SQL
Perform sql splicing operations circularly, for example: SELECT * FROM USER WHERE id IN (1,2,5).
<select id="findByIds" parameterType="list" resultType="user">
   select * from User
   <where>
       <foreach collection="array" open="id in(" close=")" item="id" separator=",">
           #{id}
       </foreach>
   </where>
</select>
The test code fragment is as follows:
 ... ... ...
 //Get the implementation class of UserMapper interface generated by MyBatis framework
UserMapper userMapper = sqlSession.getMapper(UserMapper.class);
int[] ids = new int[]{2,5};
List<User> userList = userMapper.findByIds(ids);
System.out.println(userList);
... ... ...

The attribute meaning of foreach tag is as follows:
Tag is used to traverse the collection. Its properties are:
• collection: represents the collection elements to be traversed. Be careful not to write #{}
• open: represents the beginning of a statement
• close: represents the end part
• item: represents the variable name generated by traversing each element of the collection
• sperator: represents the separator
6.2 SQL fragment extraction
Duplicate sql can be extracted from sql and referenced with include when used, so as to achieve the purpose of sql reuse
<!--extract sql Fragment simplification-->
<sql id="selectUser" select * from User</sql>
<select id="findById" parameterType="int" resultType="user">
    <include refid="selectUser"></include> where id=#{id}
</select>
<select id="findByIds" parameterType="list" resultType="user">
    <include refid="selectUser"></include>
    <where>
        <foreach collection="array" open="id in(" close=")" item="id" separator=",">
            #{id}
        </foreach>
    </where>
</select>
6.3 knowledge summary
MyBatis mapping file configuration:
: query
: Insert
: modify
: delete
: where condition
: if judgment
: cycle
: sql fragment extraction
7. MyBatis core configuration file
7.1 typeHandlers label
Whether MyBatis sets a parameter in the PreparedStatement or takes a value from the result set, it will use the type processor to convert the obtained value into Java type in an appropriate way. The following table describes some default type processors (interceptions).
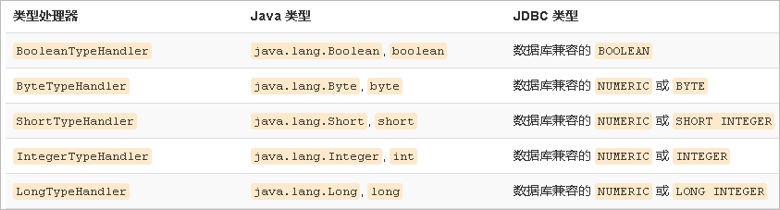
You can override the type processor or create your own type processor to handle unsupported or nonstandard types. The specific approach is to realize org. Org apache. ibatis. type. Typehandler interface, or inherit a convenient class org apache. ibatis. type. Basetypehandler, which can then be optionally mapped to a JDBC type. For example, requirements: for a Date data type in Java, when I want to save it to the database, I want to save it as a millisecond since 1970, and when I take it out, it will be converted into a Java Date, that is, the conversion between the Java Date and the varchar millisecond value of the database.
Development steps:
① Defines the transformation class and inherits the class BaseTypeHandler
② It covers four unimplemented methods, among which setNonNullParameter is the callback method for java program to set data to the database, and getNullableResult is the method for converting mysql string Type into java Type during query
③ Register in the MyBatis core configuration file
Test whether the conversion is correct
public class MyDateTypeHandler extends BaseTypeHandler<Date> {
    public void setNonNullParameter(PreparedStatement preparedStatement, int i, Date date, JdbcType type) {
        preparedStatement.setString(i,date.getTime()+"");
    }
    public Date getNullableResult(ResultSet resultSet, String s) throws SQLException {
        return new Date(resultSet.getLong(s));
    }
    public Date getNullableResult(ResultSet resultSet, int i) throws SQLException {
        return new Date(resultSet.getLong(i));
    }
    public Date getNullableResult(CallableStatement callableStatement, int i) throws SQLException {
        return callableStatement.getDate(i);
    }
}
<!--Register type custom converter-->
<typeHandlers>
    <typeHandler handler="com.itheima.typeHandlers.MyDateTypeHandler">                 </typeHandler>
</typeHandlers>
Test add operation:
user.setBirthday(new Date());
userMapper.add2(user);
Database data:
Test query operation:

7.2 plugins tab
MyBatis can use third-party plug-ins to extend its functions. The paging assistant PageHelper encapsulates the complex operations of paging, and can obtain paging related data in a simple way
Development steps:
① Import the coordinates of the generic PageHelper
② Configure the PageHelper plug-in in the mybatis core configuration file
③ Test paging data acquisition
① Import common PageHelper coordinates
<!-- Paging assistant -->
<dependency>
    <groupId>com.github.pagehelper</groupId>
    <artifactId>pagehelper</artifactId>
    <version>3.7.5</version>
</dependency>
<dependency>
    <groupId>com.github.jsqlparser</groupId>
    <artifactId>jsqlparser</artifactId>
    <version>0.9.1</version>
</dependency>
② Configure the PageHelper plug-in in the mybatis core configuration file
<!-- Note: the plug-in of paging assistant is configured in the general library mapper before -->
<plugin interceptor="com.github.pagehelper.PageHelper">
    <!-- Designated dialect -->
    <property name="dialect" value="mysql"/>
</plugin>
③ Test paging code implementation
@Test
public void testPageHelper(){
    //Set paging parameters
    PageHelper.startPage(1,2);

    List<User> select = userMapper2.select(null);
    for(User user : select){
        System.out.println(user);
    }
}
Get other parameters related to paging
//Other paged data
PageInfo<User> pageInfo = new PageInfo<User>(select);
System.out.println("Total number of pieces:"+pageInfo.getTotal());
System.out.println("Total pages:"+pageInfo.getPages());
System.out.println("Current page:"+pageInfo.getPageNum());
System.out.println("Display length per page:"+pageInfo.getPageSize());
System.out.println("First page:"+pageInfo.isIsFirstPage());
System.out.println("Last page:"+pageInfo.isIsLastPage());
7.3 knowledge summary
MyBatis core profile common Tags:
1. Properties tag: this tag can load external properties files
2. typeAliases label: set type aliases
3. environments tab: data source environment configuration tab
4. typeHandlers tab: configure custom type processors
5. plugins tag: configure MyBatis plug-in
8. Multi table operation of mybatis
one-on-one
 <resultMap id="orderMap" type="com.itheima.domain.Order">
     <result property="id" column="id"></result>
     <result property="ordertime" column="ordertime"></result>
     <result property="total" column="total"></result>

     <association property="user" javaType="com.itheima.domain.User">
         <result column="uid" property="user.id"></result>
         <result column="username" property="user.username"></result>
         <result column="password" property="user.password"></result>
         <result column="birthday" property="user.birthday"></result>
     </association>
</resultMap>

<select id="findAll" resultMap="orderMap">
    select * from orders o,user u where o.uid=u.id
</select>
One to many
<resultMap id="userMap" type="com.itheima.domain.User">
    <result column="id" property="id"></result>
    <result column="username" property="username"></result>
    <result column="password" property="password"></result>
    <result column="birthday" property="birthday"></result>

    <collection property="orderList" ofType="com.itheima.domain.Order">             	  <result column="oid" property="id"></result>
        <result column="ordertime" property="ordertime"></result>
        <result column="total" property="total"></result>
    </collection>
</resultMap>
<select id="findAll" resultMap="userMap">
    select *,o.id oid from user u left join orders o on u.id=o.uid
</select>
Many to many
Like one to many, it's just the difference between sql statements
Knowledge summary:
One to one configuration: use + for configuration
One to many configuration: use + for configuration
Many to many configuration: use + for configuration
9.Mybatis annotation development
1. Common notes:
@Insert: add
@Update: implement updates
@Delete: enables deletion
@Select: implement query
@Result: implement result set encapsulation
@Results: can be used with @ Result to encapsulate multiple Result sets
@One: implement one-to-one result set encapsulation
@Many: implement one to many result set encapsulation
Modify the core configuration file of MyBatis. We use the mapping file instead of annotation, so we only need to load the Mapper interface with annotation
< mappers >
   <!-- Scan classes that use annotations -->
   <mapper class="com.itheima.mapper.UserMapper"></mapper>
</mappers>
< mappers >
   <!-- Scan the package of the class using the annotation -->
   <mapper name="com.itheima.mapper"></mapper>
</mappers>
Notes:
| annotation | explain |
|---|---|
| @Results | Instead of the tag, you can use either a single @ Result annotation or a @ Result set in this annotation. Use format: @ Results ({@ Result(), @ Result()}) or @ Results (@ Result()) |
| @Resut | Instead of the tag and the attribute in the tag @ Result, introduction: column: column name of the database property: attribute name to be assembled One: @ One annotation to be used (@ Result (one=@One) ()) Many: @ Many annotation to be used (@ Result (many=@many) ()) |
| @One (one to one) | Instead of the tag, it is the key of multi table query. It is used in the annotation to specify that the sub query returns a single object@ Description of One annotation property: Select: Specifies the sqlmapper used for multi table query. Format: @ Result(column="",property="",one=@One(select = "")) |
| @Many (many to one) | Instead of tag, it is the key of multi table query. It is used to specify the set of returned objects of sub query in annotation. Use format: @ Result(property="",column="",many=@Many(select = "")) |
one-on-one:
//Query the order and query the user to which the order belongs
@Select("select * from orders")
@Results({
        @Result(column = "id",property = "id"),
        @Result(column = "ordertime",property = "ordertime"),
        @Result(column = "total",property = "total"),
        @Result(column = "oid",property = "id"),
        @Result(
             property = "user",             //Attribute name
                javaType = User.class,      //Attribute type
                column = "id",              //Query according to the query result set
                one =@One(select = "com.pmy.mapper.UserMapper.findById")
        ),
})
List<Order> findAll();
One to many:
//Query the user and the order to which he belongs
@Select("select *from user")
@Results({
        @Result(id = true,column = "id",property = "id"),
        @Result(column = "username",property = "username"),
        @Result(column = "password",property = "password"),
        @Result(column = "birthday",property = "birthday"),
        @Result(
                column = "id",
                javaType = List.class,
                many = @Many(select = "com.pmy.mapper.OrderMapper.findById")
        )
})
List<User> findUserAndOrderAll();
Many to many:
//Query users and their roles
@Select("select * from user")
@Results({
        @Result(id = true,column = "id",property = "id"),
        @Result(column = "username",property = "username"),
        @Result(column = "password",property = "password"),
        @Result(column = "birthday",property = "birthday"),
        @Result(
                property = "roleList",
                javaType = List.class,
                column = "id",
                many = @Many(select = "com.pmy.mapper.RoleMapper.findByUid")
        )
})
List<User> findUserAndRoleAll();
SpringBoot
SpringBoot
1. Environment construction:
-
New maven project
-
Import dependency:
<!--be-all springboot All projects must be inherited spring-boot-starter-parent--> <parent> <groupId>org.springframework.boot</groupId> <artifactId>spring-boot-starter-parent</artifactId> <version>2.3.9.RELEASE</version> </parent> <dependencies> <!--web A starting dependency of function--> <dependency> <groupId>org.springframework.boot</groupId> <artifactId>spring-boot-starter-web</artifactId> </dependency> </dependencies> -
Create a SpringBoot boot class
//Indicates that the current class is the boot class of Spring Boot @SpringBootApplication public class MySpringBootApplication { public static void main(String[] args) { //The run method represents the boot class parameters of running SpringBoot, that is, the bytecode object of the SpringBoot boot class //That is, the bytecode object of the class annotated with the @ SpringBootApplication annotation SpringApplication.run(MySpringBootApplication.class); } } -
Write controller layer code
2. Hot deployment of springboot
-
Add configuration for hot deployment
<!--Hot deployment configuration--> <dependency> <groupId>org.springframework.boot</groupId> <artifactId>spring-boot-devtools</artifactId> </dependency> -
Set IDEA to enable hot deployment
2.1 settings complier - check BUild project automatically
2.2 Shift+Ctrl+Alt + / select Registry
[the external chain image transfer fails. The source station may have an anti-theft chain mechanism. It is recommended to save the image and upload it directly (img-jrhwo0bh-1628212818098) (C: \ users \ pmy \ appdata \ roaming \ typora \ typora user images \ image-20210505173019564. PNG)]
//Indicates that the return value of all my methods below is data
@RestController
3.SpringBoot principle
4. IEAD quickly create SpringBoot project
- When creating a new model, the URL should be faster when Alibaba cloud is selected
[the external chain image transfer fails. The source station may have an anti-theft chain mechanism. It is recommended to save the image and upload it directly (img-ykagmfx9-1628212818099) (C: \ users \ pmy \ appdata \ roaming \ typora \ typora user images \ image-20210428105706465. PNG)]
-
Set project information
[the external chain image transfer fails. The source station may have an anti-theft chain mechanism. It is recommended to save the image and upload it directly (img-fycqdvnv-1628212818100) (C: \ users \ pmy \ appdata \ roaming \ typora \ user images \ image-20210428105815076. PNG)]
-
Set project dependencies
[the external chain image transfer fails. The source station may have an anti-theft chain mechanism. It is recommended to save the image and upload it directly (img-4klogiqh-1628212818100) (C: \ users \ pmy \ appdata \ roaming \ typora \ typera user images \ image-20210428105834087. PNG)]
5. yml configuration
Configuration file loading order:
yml----->yaml----->properties
yml configuration
The object configuration is similar to Json, and the hierarchical relationship is similar to Python
#Configuration of common data
name: zhangsan

#Object configuration
person:
  username: pmy
  password: 123
  age: 20

#Row class object configuration
student: {username: pmy,password: 13,age: 21}

#Array or collection (normal string)
city:
  - beijing
  - tianjin
  - congqing
  - Shanghai
#Array inline mode:
city1: [beijing,tianjing,changde]

#Objects in array
student1:
  - name: tom
    age: 18
    gender: 0
  - name: pmy
    age: 20
    gender: 1
#Objects in array
student2: [{name: pmy,age: 123},{name: pmy,age: 20}]

#
map to configure
map:
  key1: v1
  key2: v2
6. Mapping of configuration files and attributes
5.1 use @ Value annotation mapping for common attributes
Here are multiple annotations, and prefix is the prefix
@ConfigurationProperties(prefix = "person")
However, the attribute to be mapped must have set and get methods
7. SpringBoot integration
Mybatis
-
Add start dependency for Mybatis
-
Add database driven coordinates
-
Add database connection information
<!--Import mybatis What is your starting dependence mybaits Provided--> <dependency> <groupId>org.mybatis.spring.boot</groupId> <artifactId>mybatis-spring-boot-starter</artifactId> <version>1.1.1</version> </dependency> <!--Mysql drive--> <dependency> <groupId>mysql</groupId> <artifactId>mysql-connector-java</artifactId> </dependency> -
Create table, entity Bean
-
When creating mapper, either add @ mapper annotation or @ MapperScan("com.pmy.mapper") annotation package scanning on the entry class
-
Boundary Controller class test
#application. The properties file will exist after a new SpringBoot project is created
#Database connection information
spring.datasource.url=jdbc:mysql:///ssm?serverTimezone=GMT%2B8
spring.datasource.driver-class-name=com.mysql.jdbc.Driver
spring.datasource.username=root
spring.datasource.password=pmy0607+

#If the configuration is an xml file, add the following configuration
#Information for configuring mybatis
#spring inherits the mybatis environment
#pojo alias scan package
mybatis.type-aliases-package=com.pmy.domain
#Load Mybatis mapping file
mybatis.mapper-locations=classpath:mapper/*Mapper.xml
Junit
-
Add Junit's start dependency
The SpringBoot project imports this dependency by default
<!--Junit Start dependence--> <dependency> <groupId>org.springframework.boot</groupId> <artifactId>spring-boot-starter-test</artifactId> </dependency> -
test
The next two annotations need to be added to the test class
@RunWith(SpringRunner.class)//Bytecode object of entry class @ SpringBootTest(classes =SpringbootMybatisApplication.class)
Radis
-
Add start dependency for Radis
<!--Configuration use redis starter--> <dependency> <groupId>org.springframework.boot</groupId> <artifactId>spring-boot-starter-data-redis</artifactId> </dependency> -
Configure the connection information for Radis
#Redisspring.redis.host=localhostspring.redis.port=6379
-
test
import java.util.List;

@RunWith(SpringRunner.class)
@SpringBootTest(classes = SpringbootMybatisApplication.class)
public class RedisTest {
    @Autowired
    private UserMapper mapper;
    @Autowired
    private RedisTemplate<String,String> redisTemplate ;
    @Test
    public void test() throws JsonProcessingException {
        // 1 first get the data json string from radis
        String personListJson = redisTemplate.boundValueOps("user.findAll").get();
        // 2. Judge whether there is data in radis
        if (null == personListJson){
            // 2.1 if there is no cache, query the data from the database
            List<Person> all = mapper.findAll();

            // 2.2 save to radis
            personListJson = new ObjectMapper().writeValueAsString(all);
            redisTemplate.boundValueOps("user.findAll").set(personListJson);
            System.out.println("Get data from database");
        }else{
            System.out.println("Get data from cache");
        }

        // 3 output data
        System.out.println(personListJson);
    }
}
city1: [beijing,tianjing,changde]
#Objects in array
student1:
- name: tom
age: 18
gender: 0 - name: pmy
age: 20
gender: 1
#Objects in array
student2: [{name: pmy,age: 123},{name: pmy,age: 20}]
map configuration
map:
key1: v1
key2: v2
## 6. Mapping of configuration files and attributes
5.1 Common attribute usage@Value Annotation mapping
Here are several notes, prefix Is a prefix
@ConfigurationProperties(prefix = "person")
However, the attribute to be mapped must have set,get method
## 7. SpringBoot integration
### Mybatis
1. add to Mybatis Start dependence
2. Add database driven coordinates
3. Add database connection information
```xml
<!--Import mybatis What is your starting dependence mybaits Provided-->
<dependency>
<groupId>org.mybatis.spring.boot</groupId>
<artifactId>mybatis-spring-boot-starter</artifactId>
<version>1.1.1</version>
</dependency>
<!--Mysql drive-->
<dependency>
<groupId>mysql</groupId>
<artifactId>mysql-connector-java</artifactId>
</dependency>
-
Create table, entity Bean
-
When creating mapper, either add @ mapper annotation or @ MapperScan("com.pmy.mapper") annotation package scanning on the entry class
-
Boundary Controller class test
#application. The properties file will exist after a new SpringBoot project is created
#Database connection information
spring.datasource.url=jdbc:mysql:///ssm?serverTimezone=GMT%2B8
spring.datasource.driver-class-name=com.mysql.jdbc.Driver
spring.datasource.username=root
spring.datasource.password=pmy0607+

#If the configuration is an xml file, add the following configuration
#Information for configuring mybatis
#spring inherits the mybatis environment
#pojo alias scan package
mybatis.type-aliases-package=com.pmy.domain
#Load Mybatis mapping file
mybatis.mapper-locations=classpath:mapper/*Mapper.xml
Junit
-
Add Junit's start dependency
The SpringBoot project imports this dependency by default
<!--Junit Start dependence--> <dependency> <groupId>org.springframework.boot</groupId> <artifactId>spring-boot-starter-test</artifactId> </dependency> -
test
The next two annotations need to be added to the test class
@RunWith(SpringRunner.class)//Bytecode object of entry class @ SpringBootTest(classes =SpringbootMybatisApplication.class)
Radis
-
Add start dependency for Radis
<!--Configuration use redis starter--> <dependency> <groupId>org.springframework.boot</groupId> <artifactId>spring-boot-starter-data-redis</artifactId> </dependency> -
Configure the connection information for Radis
#Redisspring.redis.host=localhostspring.redis.port=6379
-
test
import java.util.List;

@RunWith(SpringRunner.class)
@SpringBootTest(classes = SpringbootMybatisApplication.class)
public class RedisTest {
    @Autowired
    private UserMapper mapper;
    @Autowired
    private RedisTemplate<String,String> redisTemplate ;
    @Test
    public void test() throws JsonProcessingException {
        // 1 first get the data json string from radis
        String personListJson = redisTemplate.boundValueOps("user.findAll").get();
        // 2. Judge whether there is data in radis
        if (null == personListJson){
            // 2.1 if there is no cache, query the data from the database
            List<Person> all = mapper.findAll();

            // 2.2 save to radis
            personListJson = new ObjectMapper().writeValueAsString(all);
            redisTemplate.boundValueOps("user.findAll").set(personListJson);
            System.out.println("Get data from database");
        }else{
            System.out.println("Get data from cache");
        }

        // 3 output data
        System.out.println(personListJson);
    }
}