1. Knowledge reserve
yolo series theory learning
pytorch version yolov4 tiny practice
Practical video explanation
After learning the above contents, you should be able to master yolov4-tiny model structure and data processing method
2. Hand tear caffe model
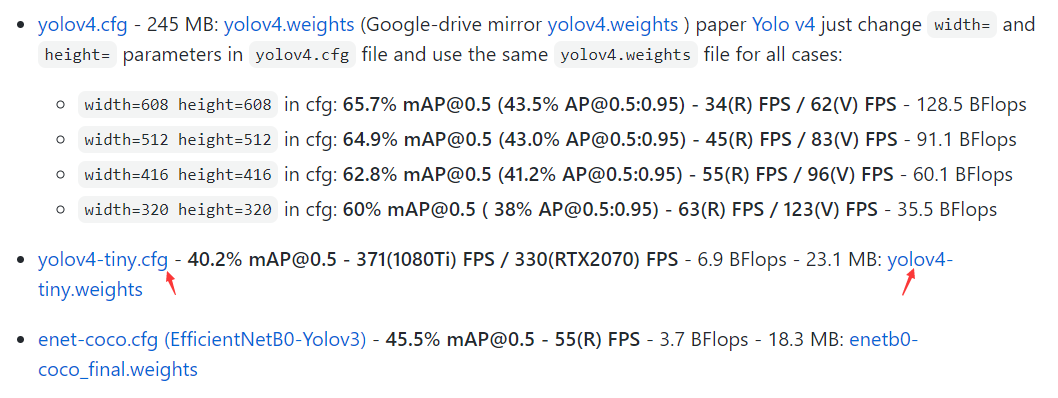
1,Download yolov4 tiny model and weight based on darknet framework
Find yolov4 tiny CFG and yolov4 tiny Weight and download
2,Download the code of transforming caffe from darknet
3,Download the code for running caffe reasoning
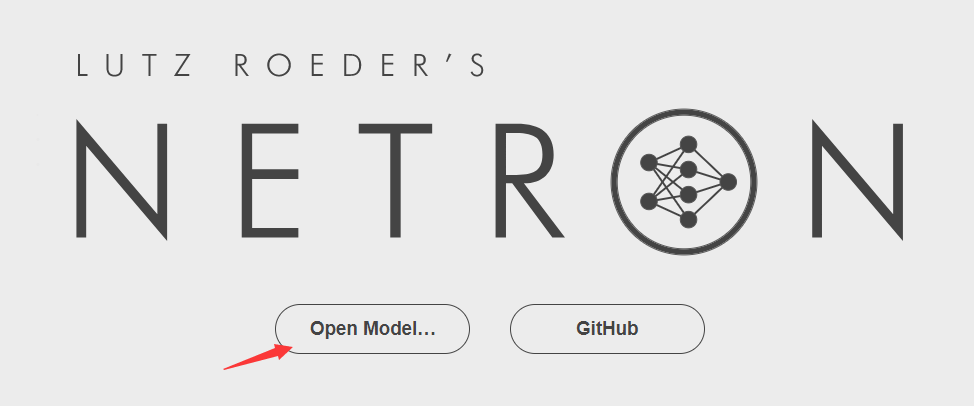
4. Open Model visualization , put yolov4 tiny Put CFG in and you can see the whole model structure.
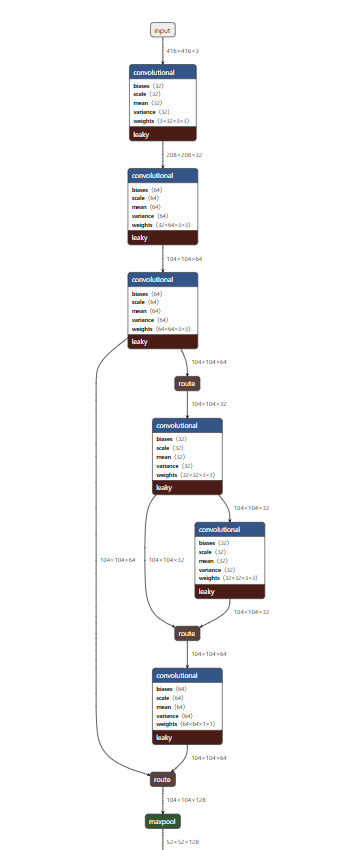
5. The new text document is named yolov4 tiny Protoxt builds the caffe version step by step according to the visual model, that is, 38 layers, not much.
- Input part
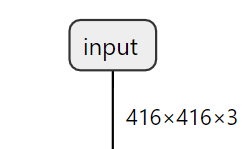
name: "yolov4-tiny"
input: "data"
input_dim: 1
input_dim: 3
input_dim: 416
input_dim: 416
- Convolution layer
Here, the cafe code only needs to modify the parameters of the revolution layer according to the parameters of the visual model. The following three layers of code remain unchanged, num_output corresponds to filters, kernel_ Size corresponds to size, and stripe corresponds to stripe. Note that pad=(kernel_size-1)/2 does not correspond.
Parameters of BatchNorm layer_ global_ Stats is set to false during training and only normalizes batch. It is true during reasoning. It normalizes the global data. We do not train, so it is true.
bottom is the input layer, top is the output layer, name is the name of this layer, and type is the type of this layer.
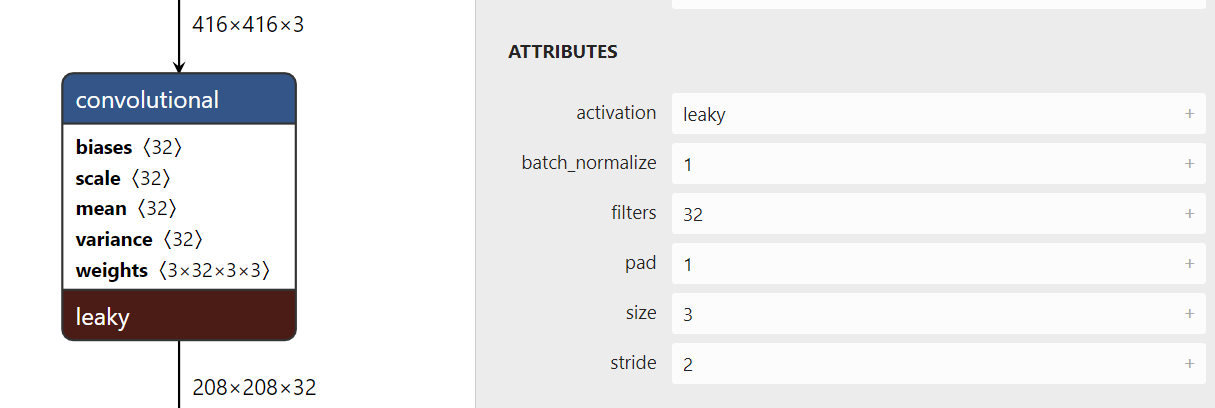
layer {
    bottom: "data"
    top: "layer1-conv"
    name: "layer1-conv"
    type: "Convolution"
    convolution_param {
        num_output: 32
        kernel_size: 3
        pad: 1
        stride: 2
        bias_term: false
    }
}
layer {
    bottom: "layer1-conv"
    top: "layer1-conv"
    name: "layer1-bn"
    type: "BatchNorm"
    batch_norm_param {
        use_global_stats: true
    }
}
layer {
    bottom: "layer1-conv"
    top: "layer1-conv"
    name: "layer1-scale"
    type: "Scale"
    scale_param {
        bias_term: true
    }
}
layer {
    bottom: "layer1-conv"
    top: "layer1-conv"
    name: "layer1-act"
    type: "ReLU"
    relu_param {
        negative_slope: 0.1
    }
}
- There is a time bias under the revolution layer and the BatchNorm layer_ Term is false, because the offset will be subtracted and eliminated by bn. It will be set to true when it is not with bn layer. For example, the previous convolution layer of yolo layer has only revolution layer, and there are no other three layers such as bn
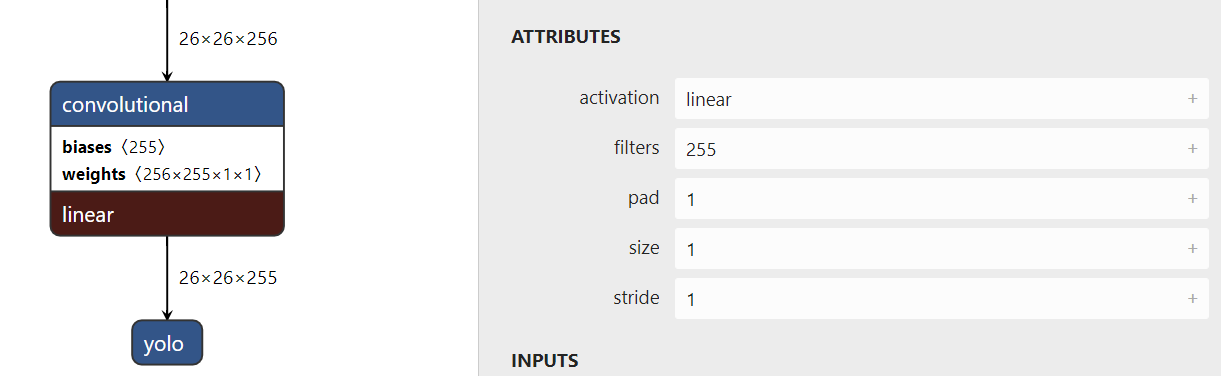
layer {
    bottom: "layer36-conv"
    top: "layer37-conv"
    name: "layer37-conv"
    type: "Convolution"
    convolution_param {
        num_output: 255
        kernel_size: 1
        pad: 0
        stride: 1
        bias_term: true
    }
}
- route layer
The route layer is divided into two types, one is to halve the channel to correspond to the slice layer of the cafe, and the other is to splice the channel to correspond to the concat layer of the cafe.
Slice layer, cut the data in half along the channel and take the second one. Very simple. There are no parameters. The default is to splice the channel and slice_point is where you cut it down. Note that the unuse layer is not used later, so the model will consider it as the output layer, resulting in the final output of 2 true output layers + 3 unuse layers.

layer {
    bottom: "layer3-conv"
    top: "layer4-unuse"
    top: "layer4-route"
    name: "layer4-route"
    type: "Slice"
    slice_param {
        slice_point: 32
  }
}
- concat layer is very simple and has no parameters. It is spliced channel s by default
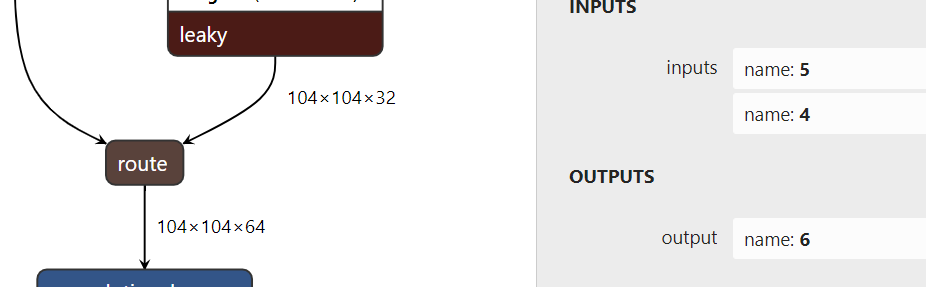
layer {
    bottom: "layer6-conv"
    bottom: "layer5-conv"
    top: "layer7-route"
    name: "layer7-route"
    type: "Concat"
}
- maxpool layer is also very simple. Originally it had a round_ The mode parameter can be set to FLLOR or CEIL mode, but this setting is not supported when caffe turns to nnie, so it is not set, and there is little difference in visual inspection.

layer {
    bottom: "layer9-route"
    top: "layer10-maxpool"
    name: "layer10-maxpool"
    type: "Pooling"
    pooling_param {
        pool: MAX
        kernel_size: 2
        stride: 2
    }
}
- upsample layer
It's also very simple. There is no caffe in this layer. You need to write by hand. You can add it to your own caffe environment with what others have written. Later, we will talk about how to add it.
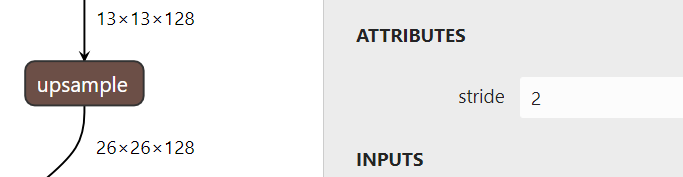
layer {
    bottom: "layer33-conv"
    top: "layer34-upsample"
    name: "layer34-upsample"
    type: "Upsample"
    upsample_param {
        scale: 2
    }
}
In this way, the caffe model is written down layer by layer according to the visual model. layer31 and layer38 are yolo output layers, which are not defined here. Data processing will be done later.
3. caffe plus custom layer
- caffe environment is built by itself, which is very troublesome
Finally, the success of make all and make pytorch means success
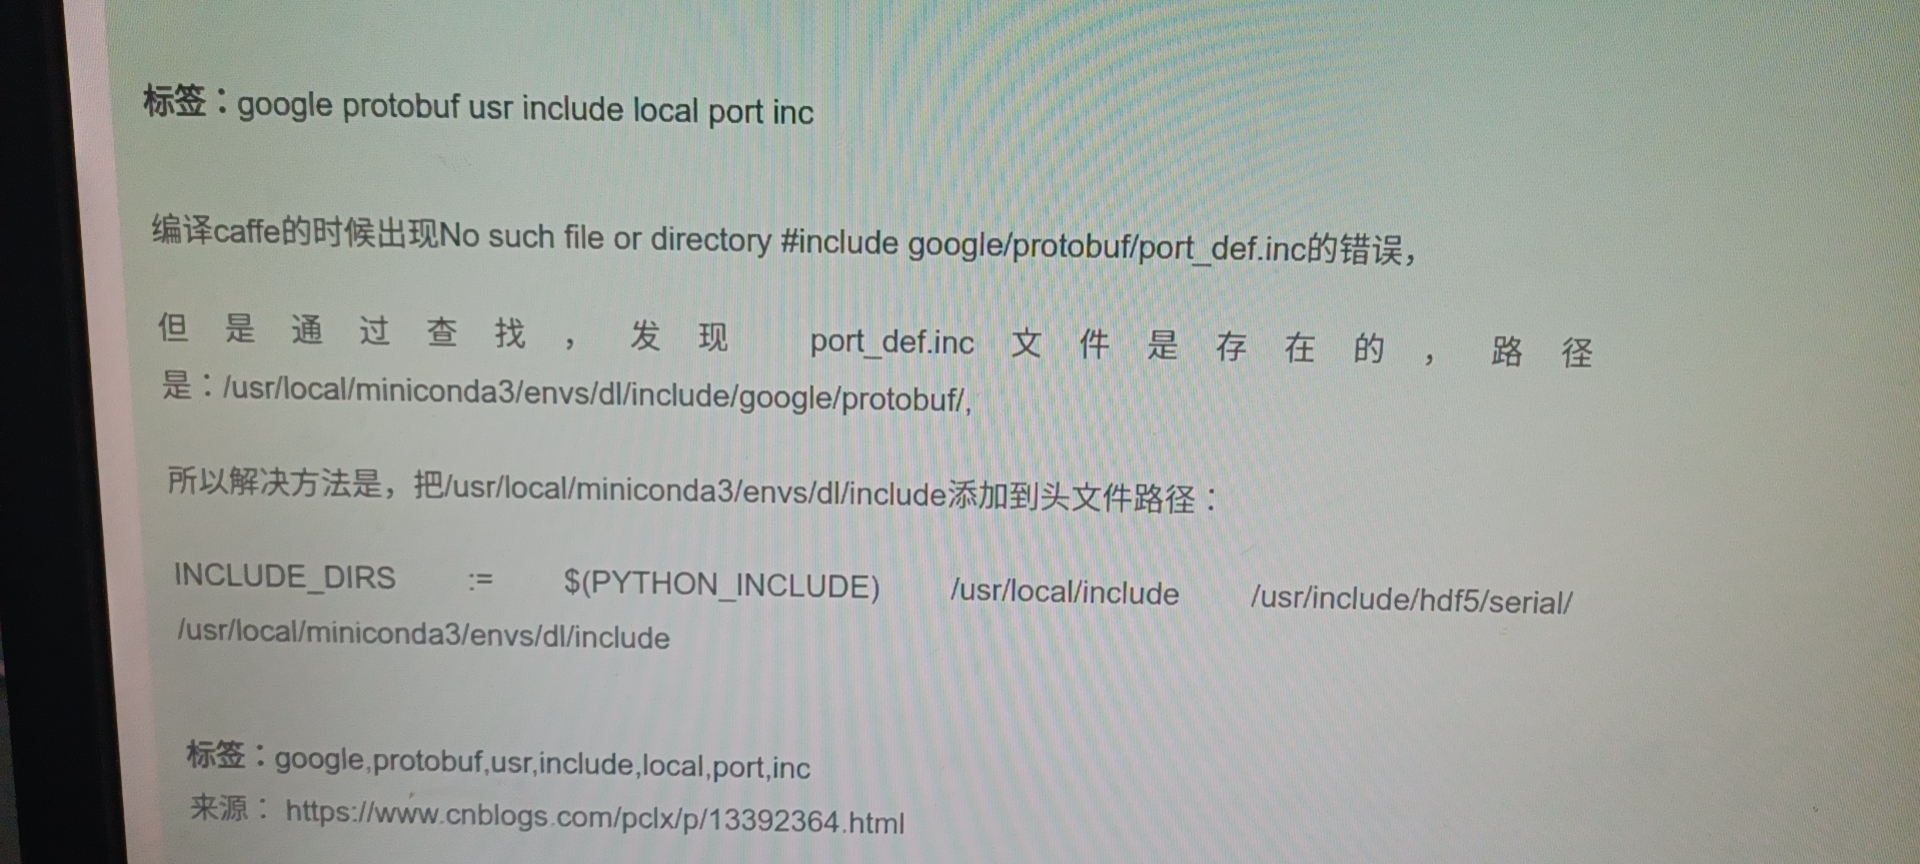
Here is a record of the pit of Protocol I encountered. I used anaconda, and the system prompts that I can't find this file
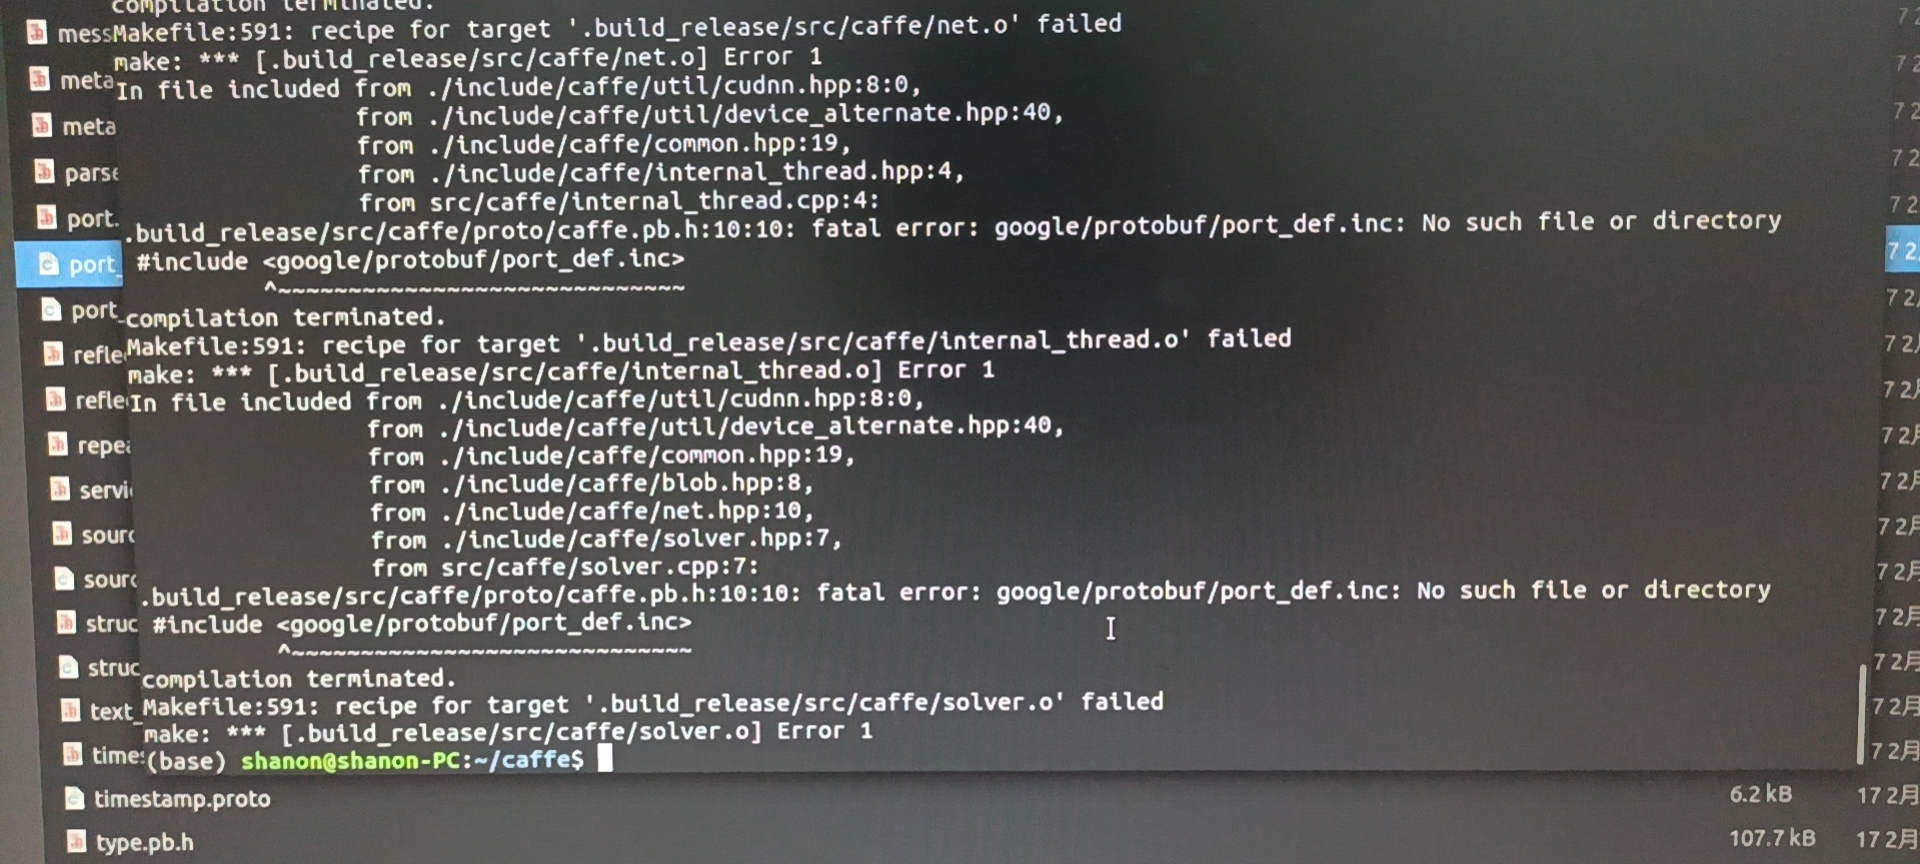
You can actually find it in anaconda
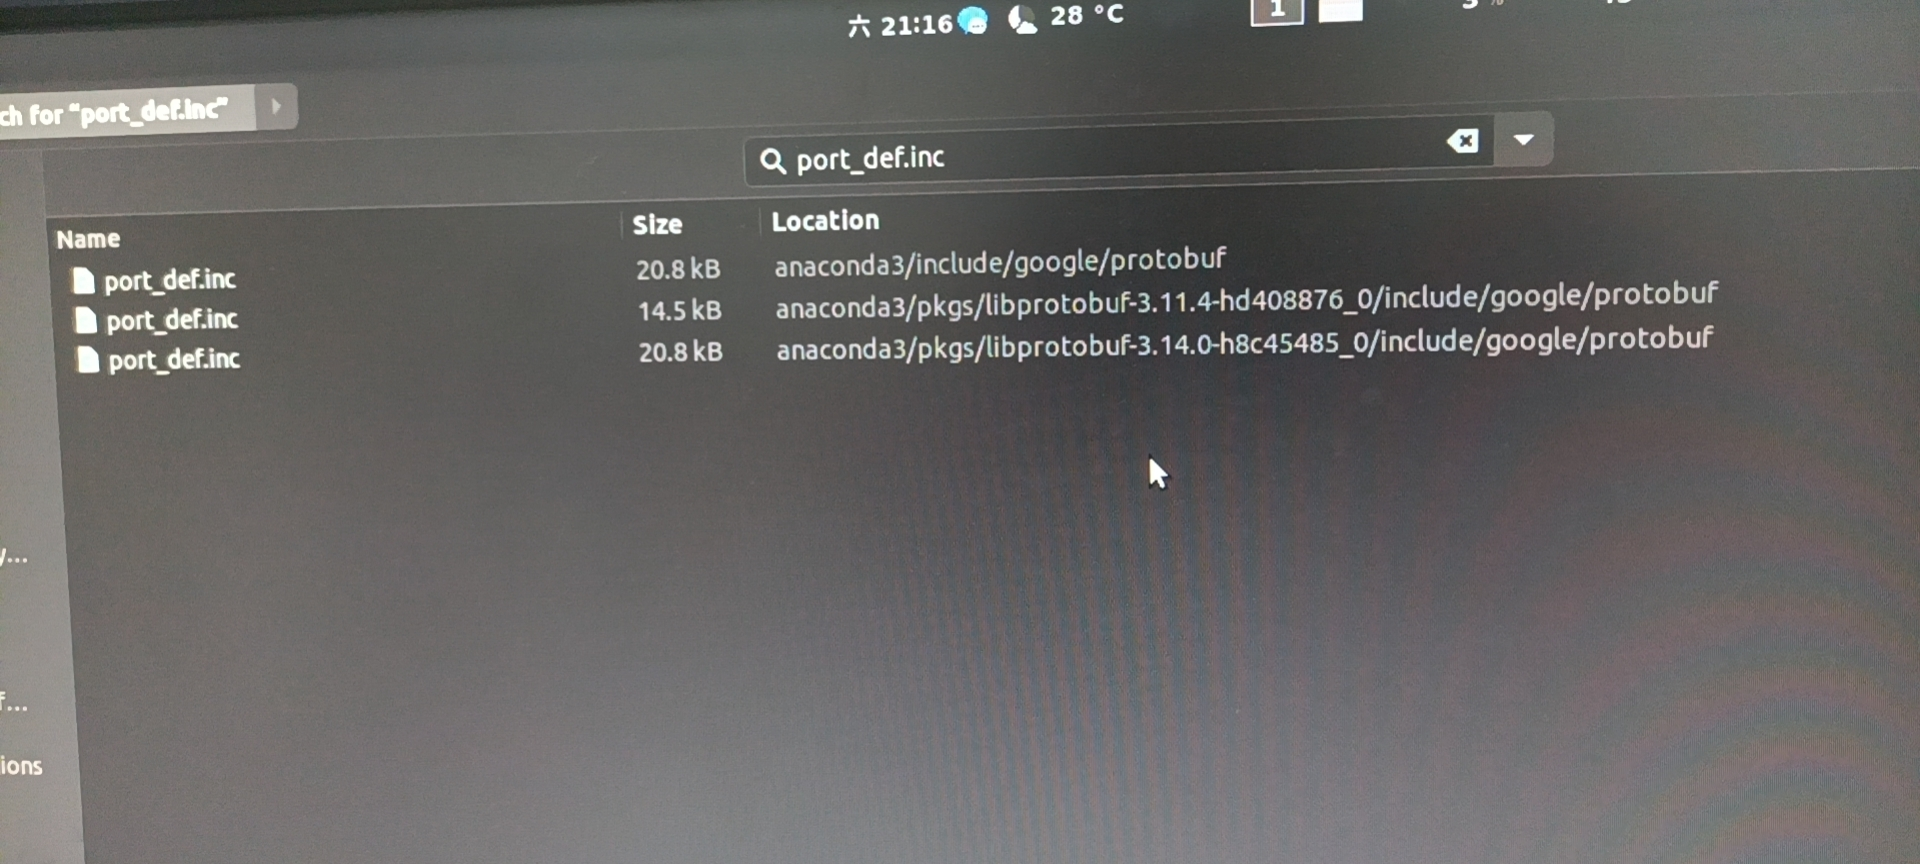
After tossing for a long time, I finally found that the anaconda path was added to the include of the makefile_ Just in dirs
- Add a custom Upsample layer from https://github.com/ChenYingpeng/darknet2caffe , downloaded above
Copy caffe_layers/upsample_layer/upsample_layer.hpp into include/caffe/layers/.
Copy caffe_layers/upsample_layer/upsample_layer.cpp upsample_layer.cu into src/caffe/layers/.
Add below code into src/caffe/proto/caffe.proto.
message LayerParameter {
optional TileParameter tile_param = 138;
optional VideoDataParameter video_data_param = 207;
optional WindowDataParameter window_data_param = 129;
++optional UpsampleParameter upsample_param = 149; //added by chen for Yolov3, make sure this id 149 not the same as before.
}
// added by chen for YoloV3
++message UpsampleParameter{
++ optional int32 scale = 1 [default = 1];
++}
- Then recompile caffe
4. Weight conversion
- Put the Darknet model under darknet2caffe/cfg and the Darknet weight under darknet2caffe/weights,
- Write your own yolov4 tiny Put prototxt under the darknet2caffe/prototxt folder and open darknet2caffe Py, modify as follows, comment out the two lines of code that generate prototext, because we wrote it ourselves. We don't need to convert this code because all route s in the code are converted to concat, and we also need to convert it to slice.
def darknet2caffe(cfgfile, weightfile, protofile, caffemodel):
    #net_info = cfg2prototxt(cfgfile)
    #save_prototxt(net_info , protofile, region=False)

    net = caffe.Net(protofile, caffe.TEST)
    params = net.params
- Run weight conversion
python cfg/yolov4-tiny.cfg weights/yolov4-tiny.weights prototxt/yolov4-tiny.prototxt caffemodel/yolov4-tiny.caffemodel
- Generate yolov4 tiny after running Caffemodel: if the shape is wrong, check your prototext model to see what is wrong. In yolov4 tiny, only the convolution layer has the weight
5. Reasoning
- come from https://github.com/ChenYingpeng/caffe-yolov3 , downloaded above
- Open caffe-yolov3 / cmakelists Txt, add your own path
# build C/C++ interface
include_directories(${PROJECT_INCLUDE_DIR} ${GIE_PATH}/include)
include_directories(${PROJECT_INCLUDE_DIR}
	/home/chen/caffe/include
	/home/chen/caffe/build/include
	#Change to your own cafe path, and add your own anaconda/include path if there is a problem with the compilation
)
cuda_add_library(yolov3-plugin SHARED ${inferenceSources})
target_link_libraries(yolov3-plugin
	/home/chen/caffe/build/lib/libcaffe.so
	/usr/lib/x86_64-linux-gnu/libglog.so
	/usr/lib/x86_64-linux-gnu/libgflags.so.2
    	/usr/lib/x86_64-linux-gnu/libboost_system.so
	/usr/lib/x86_64-linux-gnu/libGLEW.so.1.13
	#Change to the path you can find in your computer, some so. The numbers are different. Some are installed without installation
)
- Set darknet2caffe / caffemodel / yolov4 tiny Copy caffemodel to caffe-yolov3/caffemodel and write yolov4 tiny Put prototxt in caffe-yolov3/prototxt
- Open cafe-yolov3 / SRC / detector CPP is modified as follows, because we output five layers, three of which are useless. I thought 34 in 01234 was useful, but it was found to be 23. You can judge which is the output layer by printing the size of the output layer in these lines of comments. If the input is 416X416, the output should be 13X13 and 26X26.
// forward
m_net->Forward();
for(int i =2;i<m_net->(num_outputs()-1);++i){
    m_blobs.push_back(m_net->output_blobs()[i]);
    //LOG(INFO) << "w" << m_net->output_blobs()[i]->width();
    //LOG(INFO) << "h" << m_net->output_blobs()[i]->height();
    //LOG(INFO) << "c" << m_net->output_blobs()[i]->channel();
}
- compile
cd caffe-yolov3

mkdir build

cd build

cmake ..

make -j6
- reasoning
./x86_64/bin/demo ../prototxt/yolov4-tiny.prototxt ../caffemodel/yolov4-tiny.caffemodel ../images/dog.jpg
- When it's done, the identification box will be a little floating, but it's recognized. If you change the size of the input picture, just change 416 directly at the beginning of the prototxtx file