review
Implementation steps of developing spring MVC with annotations:
- Create a new web project
- Import related jar packages
- Write web XML, register DispatcherServlet
- Write spring MVC configuration file
- The next step is to create the corresponding control class, controller
- Finally, improve the correspondence between the front-end view and the controller
- Test run and debugging
1, Data processing example
1. After creating a normal Maven project, add a web framework
2. Configure web XML configuration file, changed to the latest version 4.0
<?xml version="1.0" encoding="UTF-8"?>
<web-app xmlns="http://xmlns.jcp.org/xml/ns/javaee"
        xmlns:xsi="http://www.w3.org/2001/XMLSchema-instance"
        xsi:schemaLocation="http://xmlns.jcp.org/xml/ns/javaee http://xmlns.jcp.org/xml/ns/javaee/web-app_4_0.xsd"
        version="4.0">
</web-app>
3. On the web XML configuration register DispatcherServlet
<!--1.register DispatcherServlet-->
   <servlet>
       <servlet-name>springmvc</servlet-name>
       <servlet-class>org.springframework.web.servlet.DispatcherServlet</servlet-class>
       <!--Associate a springmvc Configuration file for:[servlet-name]-servlet.xml-->
       <init-param>
           <param-name>contextConfigLocation</param-name>
           <param-value>classpath:springmvc-servlet.xml</param-value>
       </init-param>
       <!--Startup level-1-->
       <load-on-startup>1</load-on-startup>
   </servlet>

   <!--/ Match all requests; (excluding.jsp)-->
   <!--/* Match all requests; (including.jsp)-->
   <servlet-mapping>
       <servlet-name>springmvc</servlet-name>
       <url-pattern>/</url-pattern>
   </servlet-mapping>
4. Configure spring MVC servlet XML configuration file, name: springmvc servlet XML, indicating that the name requirements here are in accordance with the official.
<?xml version="1.0" encoding="UTF-8"?>
<beans xmlns="http://www.springframework.org/schema/beans"
      xmlns:xsi="http://www.w3.org/2001/XMLSchema-instance"
      xmlns:context="http://www.springframework.org/schema/context"
      xmlns:mvc="http://www.springframework.org/schema/mvc"
      xsi:schemaLocation="http://www.springframework.org/schema/beans
       http://www.springframework.org/schema/beans/spring-beans.xsd
       http://www.springframework.org/schema/context
       https://www.springframework.org/schema/context/spring-context.xsd
       http://www.springframework.org/schema/mvc
       https://www.springframework.org/schema/mvc/spring-mvc.xsd">

   <!-- Automatically scan the package to make the comments under the specified package effective,from IOC Unified container management -->
   <context:component-scan base-package="com.kuang.controller"/>
   <!-- Give Way Spring MVC Do not process static resources -->
   <mvc:default-servlet-handler />
   <!--
   support mvc Annotation driven
       stay spring Generally used in@RequestMapping Annotation to complete the mapping relationship
       To make@RequestMapping Note effective
       Must register with context DefaultAnnotationHandlerMapping
       And one AnnotationMethodHandlerAdapter example
       These two instances are handled at the class level and method level respectively.
       and annotation-driven Configuration helps us automatically complete the injection of the above two instances.
    -->
   <mvc:annotation-driven />

   <!-- view resolver  -->
   <bean class="org.springframework.web.servlet.view.InternalResourceViewResolver"
         id="internalResourceViewResolver">
       <!-- prefix -->
       <property name="prefix" value="/WEB-INF/jsp/" />
       <!-- suffix -->
       <property name="suffix" value=".jsp" />
   </bean>

</beans>
5. Because the package was scanned, the Controller was forced to be created
Test 1: get the name in the form
package com.shan.controller;

import org.springframework.stereotype.Controller;
import org.springframework.ui.Model;
import org.springframework.web.bind.annotation.RequestMapping;

@Controller
public class EncodingController {

    @RequestMapping("/e/t")
    public String test(Model model, String name){
        System.out.println(name);
        model.addAttribute("msg",name); //Get the value of the form submission
        return "test"; //Jump to the test page and display the entered value
    }

}
Create a front-end form
<%@ page contentType="text/html;charset=UTF-8" language="java" %>
<html>
<head>
    <title>form</title>
</head>
<body>
<form action="/e/t" method="post">
    <input type="text" name="name">
    <input type="submit">
</form>
</body>
</html>
Test 2: get an object information
package com.shan.controller;

import com.shan.pojo.User;
import org.springframework.stereotype.Controller;
import org.springframework.ui.Model;
import org.springframework.web.bind.annotation.RequestMapping;
import org.springframework.web.bind.annotation.RequestParam;

@Controller
@RequestMapping("/user")
public class UserController {
    @RequestMapping("/t1")
    public String test1(@RequestParam("name") String name, Model model){
        //1. Receive front-end parameters
        System.out.println("Parameters received by the front end"+name);
        //2. Pass the returned result to the front end, Model
        model.addAttribute("msg","Parameters received by the front end"+name);
        //3. View jump
        return "test";

    }

    @RequestMapping("/t2")
    public String test2(User user, Model model){
        //1. Receive the front-end parameters and judge the name of the parameters. It is assumed that the name is directly on the method and can be used directly;
        //  Suppose a User object is passed, which matches the field name of the User object. If the name is the same, it is ok, otherwise it cannot be matched
        System.out.println("Parameters received by the front end"+user);
        //2. Pass the returned result to the front end, Model or modemap (it has more functions)
        model.addAttribute("msg","Parameters received by the front end"+user);
        //3. View jump
        return "test";
    }

}
Entity class required
package com.shan.pojo;

import lombok.AllArgsConstructor;
import lombok.Data;
import lombok.NoArgsConstructor;

@Data @AllArgsConstructor @NoArgsConstructor
public class User {

    private int id;
    private String name;
    private int age;

}
Instead of creating a form, we directly use the request with parameters
http://localhost:8080/user/t2id=1&name=%E5%B0%8F%E9%BB%91%E7%A5%9E&age=18

6. Create a view layer and get the front view
<%@ page contentType="text/html;charset=UTF-8" language="java" %>
<html>
<head>
    <title>test</title>
</head>
<body>
${msg}
</body>
</html>
7. Configure Tomcat to run
Remember to import the dependent package into tomcat, otherwise there will be an error that the dependent package cannot be found!!!
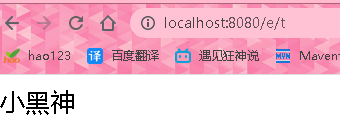
Test 1 Results:

Test 2 Results:

Background output:
Second jump example
I won't write if the steps are repeated, and you will also be visually tired!
Create a controller to achieve different jumps!
package com.shan.controller;

import org.springframework.stereotype.Controller;
import org.springframework.ui.Model;
import org.springframework.web.bind.annotation.RequestMapping;

@Controller
public class ModelTest {
    //Without a Model view, the parser needs a fully qualified name
    //If there is a view controller, the default is forwarding, and redirection needs to be prefixed with redirect:
    @RequestMapping("/m/t1")
    public String test1(Model model){
        model.addAttribute("msg","ModelTest1");
        //The default is forward
        return "test";
    }
    @RequestMapping("/m/t2")
    public String test2(){
       //Redirect plus redirect:
        return "redirect:/index.jsp";
    }

}
The first request is to comment out the view controller. We have created a new Model to carry the view and data and display them on the front end
The second request is made by the view controller and redirected to the index page. The default is direct forwarding. redirect needs to be added:
3, Summary
Please use 80% of the time to lay a solid foundation, and the remaining 18% of the time to study the framework and 2% of the time to learn some English. The official document of the framework is always the best tutorial.
The author has something to say
It's not easy to create a blog. I hope to see the readers here move your little hand and point out a praise. If you like a little partner, you can click three times. The author is here to thank you.