Introduction: This article will talk about an important problem in Vue, that is, how to share data between components? As we said before, each component is independent of each other and can be used by importing components and registering components. How can we transfer data between components?
1. Relationship between components
The relationships often seen in development are divided into the following types:
- Parent child component (parent-child relationship)
- Sibling component (sibling relationship)
You can see the diagram
A-B A-C parent-child relationship
B-C brotherhood
2. Data sharing between parent and child components
- Parent - > child shared data
- Child - > parent shared data
2.1 parent components share data with child components
User defined properties are required for parent components to share data with child components. The example code is as follows
Parent component
//Pass the message attribute of the parent component to the msg custom attribute of the child component Left
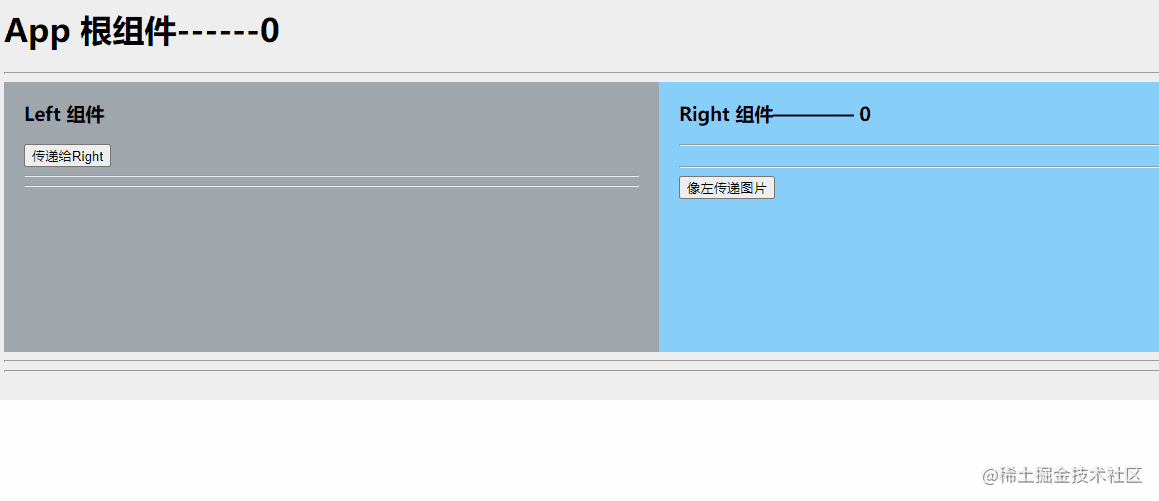
<Left :msg="message" :user="userinfo" :Fatherson="fatherson"></Left>
data(){
return {
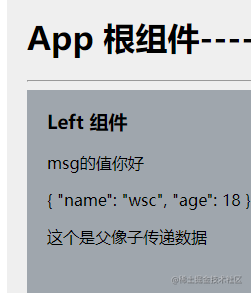
message:'Hello',
userinfo:{
name:'wsc',
age:18
},
}
Subcomponents
<template>
<div class="left-container">
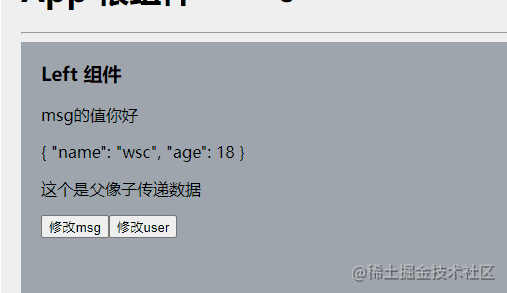
<h3>Left assembly</h3>
<p>msg Value of{{msg}}</p>
<P>{{user}}</P>
<p>{{Fatherson}}</p>
</div>
</template>
//Custom properties
props:['msg','user','Fatherson'],
You can see that our external App is the parent component and Left is the child component
Note: do not modify props in subcomponents
Code example:
 <button @click="msg='abc'">modify msg</button>
 <button @click="user.name = 'asd'">modify user</button>
Click Modify msg to report an error

Click the user button
2.2 data transfer from child component to parent component
Custom events are used to pass values from child to parent
On app Importing a component from a Vue component
You should know the three steps of importing components
 Step 3
//Use labels in the structure to use
<###><###>


First step
<script>
    Import components
    import ### from 'component path'

    export default {

    //The second step is to register the component name, which is the name you take when importing
     components:{

        ###
  },
    }
</script>
After the component is imported, we define the data node in the sub component
Substructure code
<template>
<div class="right-container">
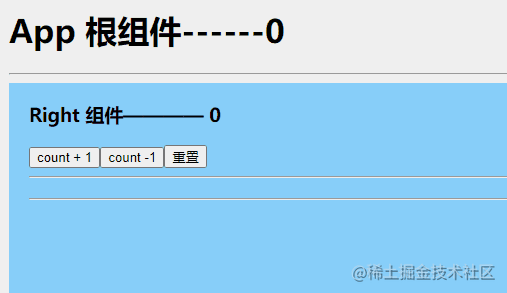
<h3>Right Components———— {{count}}</h3>
<button @click="add">count + 1</button>
<button @click="delet">count -1</button>
<button @click="resetCount">Reset</button>
</div>
</template>
Sub data code
export default {
  data() {
    return {
      // Sub component's own data
      // In the future, I want to transfer the data of count to the parent component
      count:0,
          }
         },

       methods:{
       //Only + 1 and - 1 are defined


       add(){
      // Increase the count of sub components by 1

      if( this.count<5) {
          this.count +=1;
      }else{
        return alert('The maximum limit has been reached')
      }

      // Pass the self increment result to the parent component
       // Use $emit to trigger custom events
       'father Is the name defined in the component'
      this.$emit('father',this.count)
    },
       }
      }
app. The Vue parent component receives the value passed by the child component
app.vue dom structure
 <div>
 <h1 ref="myh1">App Root component------{{countFromson}}</h1>

 // @father is the name defined in the subcomponent
 //son is the event of the parent component
 <Right ref="commright" @father="son" ></Right>
 </div>
export default {
  data() {
      return:{
      // Define data to receive the data passed by the sub component
    countFromson:0,
      }
  },
  methods:{
      //val is the passed parameter
      son(val){
      this.countFromson = val;

    },

  }

  }
Summary:
- Use custom attributes from parent to child, props
- Child to parent is a custom event $emit
2.3 data sharing between sibling components
In Vue 2 The data sharing scheme of brother components in version x is EventBus
Steps for using EventBus
- Create eventbus JS module and share an instance object of Vue outward
- At the data sender, call bus$ The emit ('event name ', data to be sent) method triggers a custom event
- At the data receiver, call bus$ The on ('event name ', event handler) method registers a user-defined event
First, define two components to specify who is the sender of data and who is the receiver of data

Assuming that the Left component is the sender of data, define a value to be passed to Right
// Import eventBus
import bus from '@/components/eventBus.js'
export default {

  data() {
    return {
        title:'This is Xiang Right Values passed by sibling components',
        }
       },
    methods: {
    leftfrom(){
    //Send data through eventBus
    bus.$emit('share',this.title)
    }
  },
      }
Right component
// Import eventBus
import bus from '@/components/eventBus.js'
export default {

  data() {
    return {
    //Define a null value to receive the value passed by the Left component
          lefttitle:'',
        }
       },
   //Load data in lifecycle definition
  created() {
  //  Binding custom events for bus
   bus.$on('share',(val)=>{
    //  console.log('the event in the Right component is triggered ', val);
    this.lefttitle = val
   })

  }

      }
Define an eventbus JS module
import Vue from 'vue'

//Share a Vue instance object outward
export default new Vue()