What is MyCat?
Look at the introduction on the official website.
- A Completely Open Source Large Database Cluster for Enterprise Application Development
- Enhanced database supporting transactions, ACID, and MySQL alternatives
- An enterprise-level database that can be considered a MySQL cluster to replace the expensive Oracle cluster
- A New Type of SQL Server Integrating Memory Caching Technology, NoSQL Technology and HDFS Big Data
- A New Generation of Enterprise-Level Database Products Combining Traditional Database and New Distributed Data Warehouse
- A Novel Product of Database Middleware
Main characteristics:
- Support for SQL92 standard
- Common SQL syntax supporting DB such as MySQL, Oracle, DB2, SQL Server, PostgreSQL
- Comply with Mysql native protocol, cross-language, cross-platform, cross-database general middleware agent.
- Automatic fault switching based on heartbeat supports separation of read and write, MySQL master and slave, and galera cluster cluster.
- Support Galera for MySQL Cluster, Percona Cluster or MariaDB cluster
- Based on Nio implementation, threads are managed effectively to solve the problem of high concurrency.
- Support multi-slice automatic routing and aggregation of data, support aggregation functions such as sum,count,max, support cross-database paging.
- It supports arbitrary join within a single library, table join across two libraries, and even multi-table join based on caltlet.
- It supports the fragmentation strategy of global table and ER relation, and achieves efficient multi-table join query.
- Support multi-tenant scheme.
- Support distributed transactions (weak xa).
- Support XA distributed transactions (1.6.5).
- Support global serial number to solve the problem of primary key generation in distributed environment.
- Fragmentation rules are rich, plug-in development, easy to expand.
- Powerful web, command line monitoring.
- Support front-end as a general agent for MySQL, back-end JDBC support Oracle, DB2, SQL Server, mongodb, Jushan.
- Support password encryption
- Support service degradation
- Support IP whitelist
- Supporting SQL blacklist and SQL injection attack interception
- Supporting prepare d precompiled instructions (1.6)
- Support for Direct Memory Aggregate Computing (1.6)
- native protocol supporting PostgreSQL (1.6)
- Support mysql and oracle stored procedures, out parameters, multiple result sets return (1.6)
- Support zookeeper coordination master-slave switching, zk sequence, configuration zk (1.6)
- Support for in-library sub-tables (1.6)
- Cluster based on ZooKeeper management, online upgrade, expansion, intelligent optimization, large data processing (2.0 development version)
Download and install:
Download to the official website according to the system type: http://mycat.io/
Unzip the downloaded file in the following directory:

Brief description of each catalog:
bin: Start directory
catlet: Extended Functions
conf: Configuration file directory
server.xml: A configuration file for Mycat server parameter adjustment and user authorization
schema.xml: Configuration files for logical library definitions and tables as well as fragmentation definitions
rule.xml: It is a configuration file of fragmentation rules. Some specific parameters of fragmentation rules are stored as files separately. In this directory, the modification of configuration files needs to restart MyCAT.
Log4j.xml: Logs are stored in logs/log, one file per day. Logs are configured in conf/log4j.xml. According to your needs, you can adjust the output level to debug. Under debug level, more information will be output to facilitate problem detection.
autopartition-long.txt,partition-hash-int.txt,sequence_conf.properties, sequence_db_conf.properties fragmentation-related id fragmentation rule configuration file
lib: jar package directory
logs: log directory
Enter the bin directory, open the DOS window as an administrator, and execute the commands separately:
mycat install
mycat start
So you can start mycat.
Core configuration
server.xml: Setting accounts, parameters, etc.
schema.xml: Configuration of physical databases and database tables
rule.xml: Fragmentation rules
Detailed description of configuration is available for reference. https://www.cnblogs.com/joylee/p/7513038.html Or the official website http://www.mycat.io/document/mycat-definitive-guide.pdf
Example
For the first time, the easiest way to understand mycat is to start with examples. For example, this example combines mysql to complete the database and tables of data, and to expand horizontally.
First of all, we need to prepare several mysql servers. Through the construction of docker, how can we refer to the internet? The general steps are as follows:
1. Download mysql image: docker pull mysql
2. Start container: docker run-di-p 32768:3306 -- name mysql1-e MYSQL_ROOT_PASSWORD=123456 mysql, input container id
3. Enter the container through the container id, docker exec-it<id>/bin/bash
4. Enter mysql: mysql-u root-p-> 123456
5. Add remote connection user and password: GRANT ALL PRIVILEGES ON*. * TO'root'@%' IDENTIFIED BY'123456';
6. Authority: flush privileges;
If there is no accident, you can connect, because I installed docker through the local virtual machine, default port 192.168.99.100. Now start three containers based on the downloaded image and modify different ports.
Connect the above three databases through client tools, and build tables:
Create a database: TESTDB
Establishment of table:
CREATE TABLE `employee` (
`id` int(11) NOT NULL,
`name` varchar(56) DEFAULT NULL,
PRIMARY KEY (`id`)
) ENGINE=InnoDB DEFAULT CHARSET=utf8;
1. Modify the server.xml configuration file
<user name="root" defaultAccount="true">
<property name="password">123456</property><!-- Use this name when connecting, for example jdbc:mysql://localhost:8066/TESTDB -->
<property name="schemas">TESTDB</property>
</user>
2. Modify schema.xml
<schema name="TESTDB" checkSQLschema="true" sqlMaxLimit="100">
<table name="employee" primaryKey="ID" dataNode="dn1,dn2,dn3" rule="mod-long" />
</schema>
<!-- name Node name, corresponding to; dataHost: Real database configuration; database: Database table configuration -->
<dataNode name="dn1" dataHost="host1" database="TESTDB" />
<dataNode name="dn2" dataHost="host2" database="TESTDB" />
<dataNode name="dn3" dataHost="host3" database="TESTDB" /><dataHost name="host1" maxCon="1000" minCon="10" balance="0" writeType="0" dbType="mysql" dbDriver="native" switchType="1" slaveThreshold="100">
<heartbeat>select 1</heartbeat>
<writeHost host="hostS1" url="192.168.99.100:32768" user="root" password="123456" />
</dataHost>
<dataHost name="host2" maxCon="1000" minCon="10" balance="0" writeType="0" dbType="mysql" dbDriver="native" switchType="1" slaveThreshold="100">
<heartbeat>select 1</heartbeat>
<writeHost host="hostS2" url="192.168.99.100:32769" user="root" password="123456" />
</dataHost>
<dataHost name="host3" maxCon="1000" minCon="10" balance="0" writeType="0" dbType="mysql" dbDriver="native" switchType="1" slaveThreshold="100">
<heartbeat>select 1</heartbeat>
<writeHost host="hostS3" url="192.168.99.100:39770" user="root" password="123456" />
</dataHost>
3. Modify rule.xml
rule="mod-long" is configured in <table> above. It has a relevant description in rule.xml. Modify the following parameters to correspond to the number of dataNode s above.
<function name="mod-long" class="io.mycat.route.function.PartitionByMod">
<!-- how many data nodes -->
<property name="count">3</property>
</function>
This completes the configuration of mycat. Because of the modification of the configuration, we restart MYCAT and enter bin, mycat restart.
test
Since mybatis-plus+springboot projects were used before, all of them used this:
application-mycat.properties:
mybatis-plus.mapper-locations=classpath*:com/sucl/sbmp/*/mapper/**Mapper.xml
mybatis-plus.type-aliases-package=com.sucl.sbmp.*.entity
mybatis-plus.global-config.refresh=true
#mybatis-plus.global-config.db-config.db-type=mysql
mybatis-plus.configuration.map-underscore-to-camel-case=true
mybatis-plus.configuration.cache-enabled=false


mp.datasource.driver-class-name=com.mysql.jdbc.Driver
mp.datasource.url=jdbc:mysql://localhost:8066/TESTDB?useUnicode=true&useSSL=false&characterEncoding=utf8
mp.datasource.username=root
mp.datasource.password=123456
mp.datasource.validation-query=select '1'
mp.datasource.testOnBorrow=true
Entities:
@Data
public class Employee {

    @TableId(type = IdType.INPUT)
    private long id;

    @TableField(value = "name")
    private String name;
}
mapper:
public interface EmployeeMapper extends BaseMapper<Employee> {

}
service:
@Service
@Transactional
public class EmployeeServiceImpl extends ServiceImpl<EmployeeMapper,Employee> implements EmployeeService {

}
Test:
@ActiveProfiles("mycat")
@RunWith(SpringRunner.class)
@SpringBootTest
public class SbmpTest {
    @Autowired
    private EmployeeService employeeService;

    @Transactional
    @Rollback(false)
    @Test
    public void save(){
        List<Employee> employees = new ArrayList<>();
        for(int i=0;i<100;i++){
            Employee employee = new Employee();
            employee.setId(i);
            employee.setName("name"+i);
            employees.add(employee);
        }
        employeeService.saveBatch(employees);
    }

    @Test
    public void get(){
        List<Employee> employees = employeeService.list(null);
        employees.stream().forEach(System.out::println);
    }

}
Two methods are executed to insert data into three databases according to id:
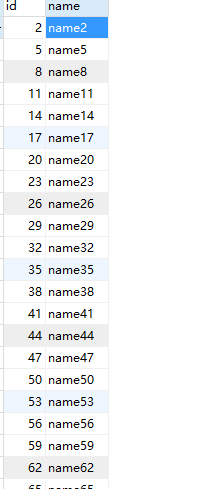
When querying, you can view all the data in the three tables.