[1] The first maven we want to create is a webapp project, not a regular java project
[2] pom's import jar package doesn't waste words here
[3] We need to know where SpringMVC is in the triple architecture, so let's take a look at a diagram
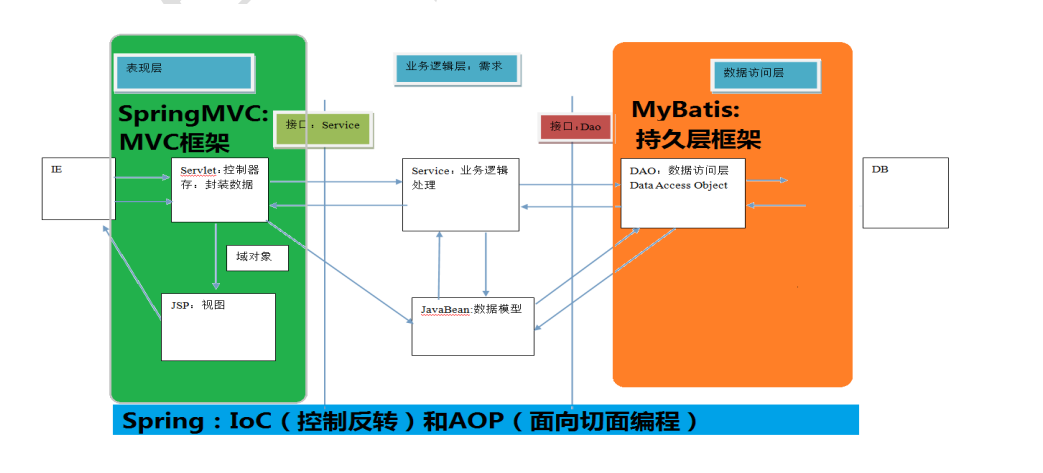
You can see our SpringMVC, which is really the framework for the presentation layer, the business layer using Spring, and the persistence layer using Mybatis
Spring MVC is in the same position as the Servlet we used to interact with data on pages when we weren't learning Spring.
[4] Let's start by learning how Controller layers relate (interact) with pages in Spring MVC.
Step one. We need to use the Controller annotation in Spring to store this class in bean memory
@Controller(value = "HelloController")
@RequestMapping(path = "/user" )
public class HelloController {
    //Request mapping comment, to customize the request path, which establishes the correspondence between the request URL and the processing method of the request
    @RequestMapping(path = "/hello")
    public String sayHello(){
        System.out.println("hello StringMVC");
    //SpringMvc default rule, what is returned, will be returned to the corresponding JSP file of the same name, here is returned to success.jsp, need view parser
        return "success";
    }
Step 2. We need to write the @RequestMapping comment, which is free to write a path we like, remember the slash/don't forget, and also write a way to position the front page
Step 3. We need to create an xml configuration file under the resource file
Be used for Spring Of IOC annotation
<context:component-scan base-package="cn.itcast"></context:component-scan>

For opening SpringMVC Note support, if not added, RequestMapping No need
<mvc:annotation-driven ></mvc:annotation-driven>
Step 4. One of the underlying rules we need to name SpringMVC is the code in the Controller layer above. We can see that the return value of our method is String type and the return value is success. SpringMVC will automatically find the JSP page we need to jump to in the future based on the returned String. The JSP name must be the same as the String we returned, that is, When we return to success, we need to have a success.jsp. Otherwise Spring can't find it.
Step 5. Once you understand Spring's underlying rules, you need a view resolver object, which you can write in xml instead of writing a class class yourself
Preix means prefix in Chinese, which means we need to give SpringMVC a prefix (that is, the jsp file name)
Suffix means suffix, so here we'll just fill in.jsp
<!--Configure View Parser Object,Help jump to the specified page-->
<bean id="internalResourceViewResolver" class="org.springframework.web.servlet.view.InternalResourceViewResolver" >
<!--prefix-->
<property name="prefix" value="/WEB-INF/page/"></property>
<!--File Suffix Name-->
<property name="suffix" value=".jsp"></property>
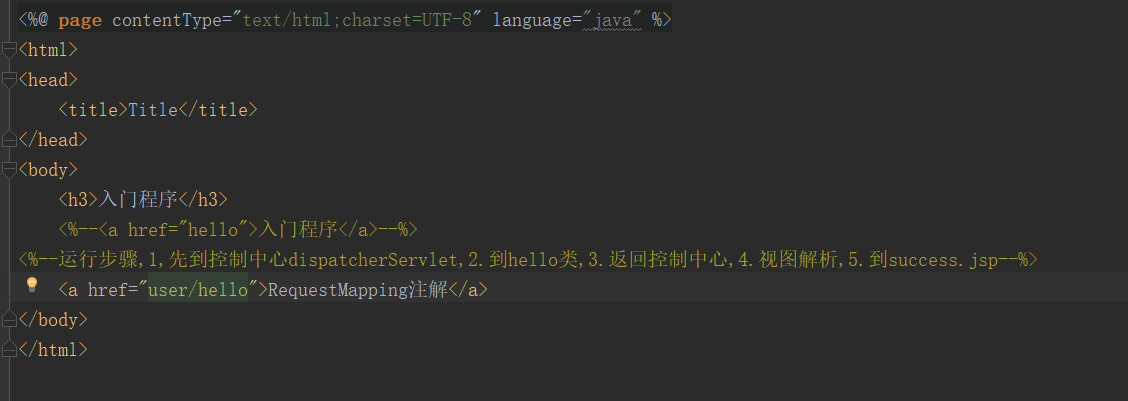
</bean>Step 6. We can access the methods in our controller layer on the front-end page
This is accessed first with the href attribute in the a hyperlink tag. If you look carefully at the previous code, you can see that the href relative path here is the value in our RequestMapping
[5] After learning the interaction, we will interact in the advanced version, how to get the parameters passed from the front-end, the students with good memory, may remember that they had request.getParameter and getParameterMapper to get the front-end data before, now using SpringMVC can simplify a little (personal feel less concise, a total of 2 sentences)
1) Learn how to get individual data
You can see that we have to write param/testParam in the jsp file in the future. We have two parameters in our method, which we get from the front end.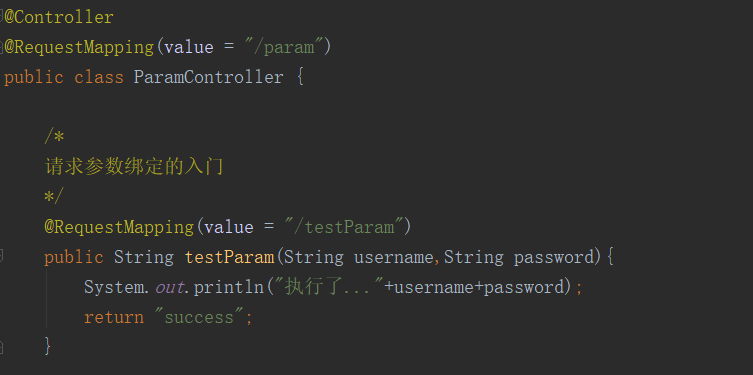
Get parameters from front end
<a href="param/testParam?username=hehe&password=123">
Process: When we click the tag from the web page, the jsp page goes to param/testParam, the controller layer, then the controller layer goes to the xml file we write, the xml file is processed, the controller returns to the success, the xml file is processed in the xml file, and the xml file is jumped to the jsp we need.
In this process, SpringMVC automatically places the parameters we passed in on the corresponding variables, which gives us the purpose of getting the front-end parameters
2) Second, let's learn how to encapsulate the parameters in the user by
Use the BeanUtils tool class to help us transfer data from parameterMap to the User object
Map<String, String[]> parameterMap = request.getParameterMap();
User user=new User();
BeanUtils.populate(user,parameterMap);
Spring is certainly a simplified result
Write down the objects we want to get in the controller layer first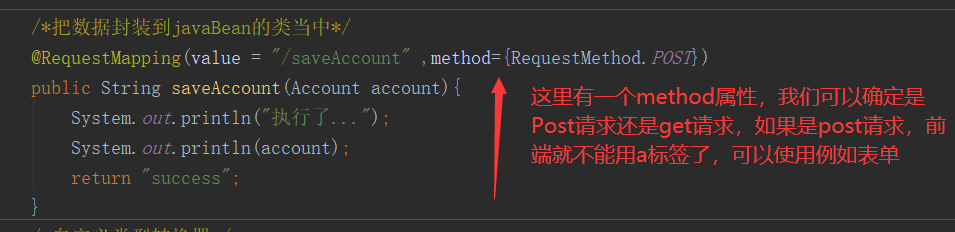
Then the name attribute in the input on the front-end form needs to be the same as the parameter in our Account (object class)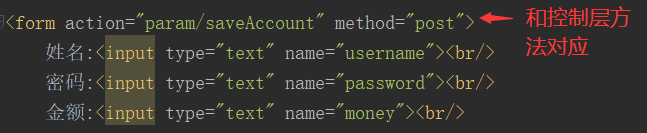
This way SpringMVC will automatically encapsulate the Account without us (it's still convenient)
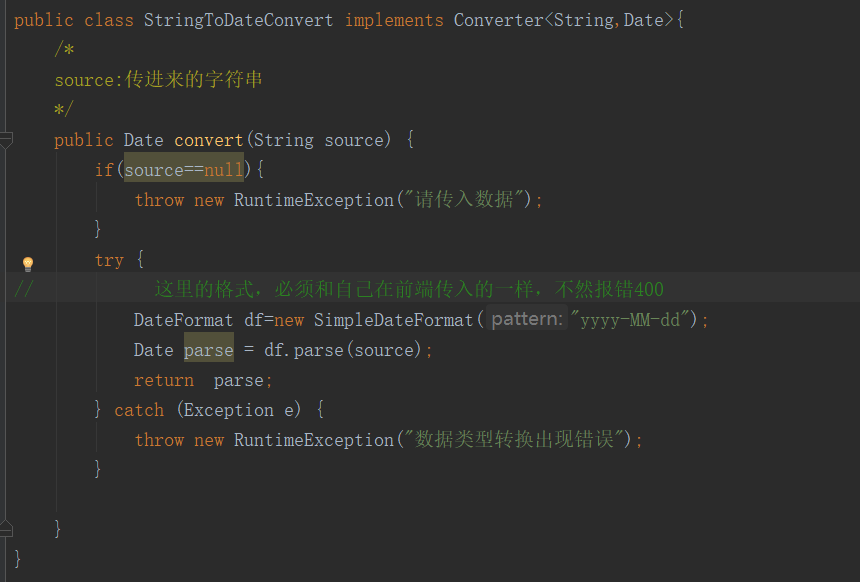
3) However, SpringMVC is not automatically convertible to any type. String, int, and basic types above can be automatically converted to parameters in our Account. For example, Date date class, we can't blindly string parameters. SpringMVC only knows dates like 2021/02/12. If we pass in 2021-09-21, it will fail.
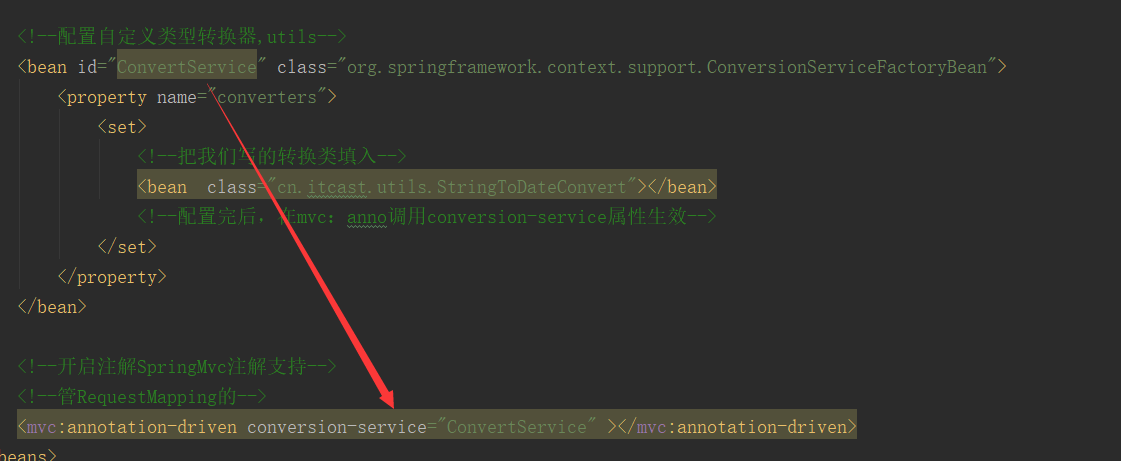
So we need to write our own conversion type, so here we're going to use the Convert interface
And you need to configure custom converters in the xml file
This way, when we submit the form again, it will follow our custom date format.
4) When you come here, you will certainly ask, is there no original request or response, of course,
You don't need any parameters from the front end to get them here
  /*servlet Native API Test
      Get request and response*/
    @RequestMapping(value = "/testServlet" )
    public String testServlet(HttpServletRequest request, HttpServletResponse response){
        System.out.println("Executed");
        System.out.println(request);
        HttpSession session = request.getSession();
        System.out.println(session);
        ServletContext servletContext = session.getServletContext();
        System.out.println(servletContext);
        System.out.println(response);
        return "success";