Python face recognition library_ Recognition tutorial
face_recognition is known as the simplest open source face recognition library in the world, which can recognize and operate faces through Python or command line. face_recognition provides very complete technical documents and application examples. Beginners of face recognition recommend studying the library. face_ The official code warehouse of recognition is: face_recognition . face_recognition also has its own official Chinese document. For details of this document, see: face_ Chinese instructions for recognition.
All the code and most of the test images in this article come from face_ examples folder of the official code warehouse of recognition. For practical use, please refer to the function interface description in the official document face_recognition function interface.
face_ The face recognition model in recognition comes from the open source machine learning library Dlib. The official code warehouse of Dlib is shown in: dlib . Most models are tested with Labeled Faces in the Wild face dataset, and the accuracy is as high as 99.38%. However, the recognition accuracy of children and Asian faces needs to be improved. Labeled Faces in the Wild is a face dataset produced by the University of Massachusetts Amherst, which contains more than 13000 face images collected from the network. This data set is a very small face data set.
Generally speaking, the face recognition model of this project is based on adults, and the effect may be average on children. face_ Generally, it's better to learn code and use or study source code, which is still a certain distance from engineering application.
For all codes in this article, see:
github: Python-Study-Notes
1 face_recognition installation and related knowledge
face_recognition supports linux, mac and windows systems. It is recommended to use face for linux systems_ recognition. Install face_ The python Library of dlib needs to be installed before the recognition library. See the installation instructions for the python Library of dlib: [common tools] dlib compilation and call Guide The fourth section of. Note that the installation of dlib Library under windows is not so easy. Check the documentation more.
When dlib is installed, enter the following command to install face_recognition.
pip install face_recognition
The general process of face recognition generally includes three steps: face detection, face alignment and face recognition:
- 1 face detection and location: face detection is to find the specific location of the face in the picture and output the bounding rectangle containing the location of the face. Some detection algorithms can output the corresponding key points of the face at the same time.
- 2 face alignment: the so-called face alignment is that sometimes the angle of the face is not correct. According to the key point detection results, align the face to a preset fixed position (usually the front face) through image transformation or other methods. In this way, the eyes and nose of different faces are placed in the same position, which greatly improves the recognition accuracy.
- 3 face recognition: face recognition has many application directions, but the purpose is to identify the person corresponding to the current face.
The simple general flow diagram of face recognition is shown in the figure below. In face_ All codes in recognition involve these steps; However, face alignment is a direct call to dlib code, and there is no example.

Of course, in mature commercial engineering applications, there are not only these three parts, such as face quality judgment and in vivo detection, but general projects include these three steps. For more information about face recognition, see: https://www.cnblogs.com/xiaoyh/p/11874270.html
2 face detection / location
This part mainly detects and locates the face, and outputs the corresponding rectangular box of the face. Mainly used face_ The built-in functions of recognition include:
-
face_recognition.api.face_locations(img, number_of_times_to_upsample=1, model='hog')
- Purpose: face detection, return the array of face bounding boxes in the image
- img: input image, numpy array
- number_of_times_to_upsample: upsample the image to find a smaller face. The default value is 1
- Model: detection model. The default is hog machine learning model. In addition, cnn can be set to select convolutional neural network model to improve detection accuracy
- Return: a list array containing multiple face bounding boxes. The bounding box data is represented in the order of faces (top, right, bottom, left)
-
face_recognition.api.load_image_file(file, mode='RGB')
- Purpose: load image
- file: image pathname
- mode: image color type. Set RGB to return RGB image and 'L' to return grayscale image
- Return: numpy array
2.1 face detection based on machine learning
From examples/find_faces_in_picture.py
%matplotlib inline
import matplotlib.pyplot as plt
from PIL import Image
import face_recognition

# Load pictures through PIL
image = face_recognition.load_image_file("test_img/obama.jpg")
# Face recognition based on hog machine learning model cannot be accelerated by gpu
face_locations = face_recognition.face_locations(image)

# Find some faces
print("I found {} face(s) in this photograph.".format(len(face_locations)))

for face_location in face_locations:

    # Print face information
    top, right, bottom, left = face_location
    print("A face is located at pixel location Top: {}, Left: {}, Bottom: {}, Right: {}".format(top, left, bottom, right))

    # Face extraction
    face_image = image[top:bottom, left:right]
    pil_image = Image.fromarray(face_image)
    # jupyter drawing
    # pil_image.show()
    plt.imshow(pil_image)
    plt.axis('off')
    plt.show()
I found 1 face(s) in this photograph.
A face is located at pixel location Top: 142, Left: 349, Bottom: 409, Right: 617

2.2 face detection based on convolutional neural network
From examples/find_faces_in_picture_cnn.py
%matplotlib inline
import matplotlib.pyplot as plt
from PIL import Image
import face_recognition

# Load pictures through PIL
image = face_recognition.load_image_file("test_img/obama.jpg")

# Face recognition based on cnn, whether to use gpu to see the installation environment
face_locations = face_recognition.face_locations(image, number_of_times_to_upsample=0, model="cnn")

print("I found {} face(s) in this photograph.".format(len(face_locations)))

for face_location in face_locations:

    # Print face information
    top, right, bottom, left = face_location
    print("A face is located at pixel location Top: {}, Left: {}, Bottom: {}, Right: {}".format(top, left, bottom, right))

    # Face extraction
    face_image = image[top:bottom, left:right]
    pil_image = Image.fromarray(face_image)
    # jupyter drawing
    # pil_image.show()
    plt.imshow(pil_image)
    plt.axis('off')
    plt.show()
I found 1 face(s) in this photograph.
A face is located at pixel location Top: 154, Left: 375, Bottom: 390, Right: 611

2.3 face mosaic
From examples/blur_faces_on_webcam.py
%matplotlib inline
import matplotlib.pyplot as plt
import face_recognition
import cv2

frame = cv2.imread("test_img/obama.jpg")

# Reduce the image to speed up
small_frame = cv2.resize(frame, (0, 0), fx=0.25, fy=0.25)

# Find face
face_locations = face_recognition.face_locations(small_frame, model="cnn")

for top, right, bottom, left in face_locations:
    # Extract the bounding box at the scale of the original drawing
    top *= 4
    right *= 4
    bottom *= 4
    left *= 4

# Face extraction
face_image = frame[top:bottom, left:right]

# Gaussian blurred face
face_image = cv2.GaussianBlur(face_image, (99, 99), 30)

# Original face replacement
frame[top:bottom, left:right] = face_image

# Display image
img = frame[:,:,::-1]
plt.axis('off')
plt.imshow(img)
<matplotlib.image.AxesImage at 0x2139a75cdf0>

3 face key point recognition
This part mainly recognizes the key points of face and outputs the position of face features. Mainly used face_ The built-in functions of recognition include:
- face_recognition.api.face_landmarks(face_image, face_locations=None, model='large')
- Purpose: face key point recognition, return the dictionary of image face feature location
- face_image: input image, numpy array
- face_locations: list of locations to identify (optional)
- Model: the recognition model used. The default value is large, indicating a large model. Small represents a small model, but only five feature points are returned
- Return: dictionary list of feature locations (eyes, nose, etc.)
3.1 extracting face key points in image
From examples/find_facial_features_in_picture.py
%matplotlib inline
import matplotlib.pyplot as plt
from PIL import Image, ImageDraw
import face_recognition

# Load pictures through PIL
image = face_recognition.load_image_file("test_img/two_people.jpg")

# Find all facial features of all faces in the image and return to the dictionary
face_landmarks_list = face_recognition.face_landmarks(image)

# Number of faces found
print("I found {} face(s) in this photograph.".format(len(face_landmarks_list)))

# Create an image showing the results
pil_image = Image.fromarray(image)
d = ImageDraw.Draw(pil_image)

# Draw keys
for face_landmarks in face_landmarks_list:

    # Print the location of each facial feature in this image
    # for facial_feature in face_landmarks.keys():
       # print("The {} in this face has the following points: {}".format(facial_feature, face_landmarks[facial_feature]))

    # Outline each facial feature in the image with a line
    for facial_feature in face_landmarks.keys():
        d.line(face_landmarks[facial_feature], width=5)


# jupyter drawing
# pil_image.show()
plt.imshow(pil_image)
plt.axis('off')
plt.show()
I found 2 face(s) in this photograph.

3.2 face coloring
From examples/digital_makeup.py
%matplotlib inline
import matplotlib.pyplot as plt
from PIL import Image, ImageDraw
import face_recognition

# Load pictures through PIL
image = face_recognition.load_image_file("test_img/two_people.jpg")

# Find all facial features of all faces in the image and return to the dictionary
face_landmarks_list = face_recognition.face_landmarks(image)

pil_image = Image.fromarray(image)

# mapping
for face_landmarks in face_landmarks_list:
    d = ImageDraw.Draw(pil_image, 'RGBA')

    # Eyebrow coloring
    d.polygon(face_landmarks['left_eyebrow'], fill=(68, 54, 39, 128))
    d.polygon(face_landmarks['right_eyebrow'], fill=(68, 54, 39, 128))
    d.line(face_landmarks['left_eyebrow'], fill=(68, 54, 39, 150), width=5)
    d.line(face_landmarks['right_eyebrow'], fill=(68, 54, 39, 150), width=5)

    # Lip coloring
    d.polygon(face_landmarks['top_lip'], fill=(150, 0, 0, 128))
    d.polygon(face_landmarks['bottom_lip'], fill=(150, 0, 0, 128))
    d.line(face_landmarks['top_lip'], fill=(150, 0, 0, 64), width=8)
    d.line(face_landmarks['bottom_lip'], fill=(150, 0, 0, 64), width=8)

    # Eye coloring
    d.polygon(face_landmarks['left_eye'], fill=(255, 255, 255, 30))
    d.polygon(face_landmarks['right_eye'], fill=(255, 255, 255, 30))

    # Eyeliner coloring
    d.line(face_landmarks['left_eye'] + [face_landmarks['left_eye'][0]], fill=(0, 0, 0, 110), width=6)
    d.line(face_landmarks['right_eye'] + [face_landmarks['right_eye'][0]], fill=(0, 0, 0, 110), width=6)

# jupyter drawing
# pil_image.show()
plt.imshow(pil_image)
plt.axis('off')
plt.show()

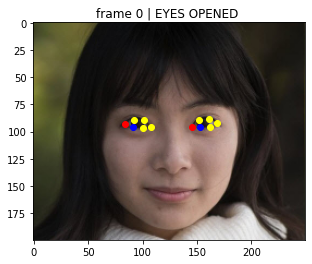
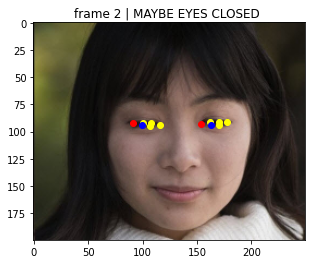
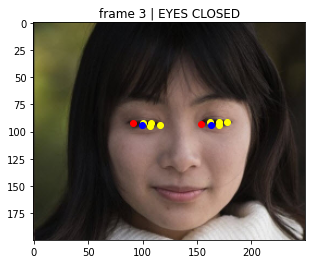
3.3 recognition of human eye opening and closing state
From examples / blink_detection.py
This part of the code is used to calculate the aspect ratio of the human eye according to the key point data of the human eye. When the human eye is open, the vertical and horizontal are relatively high, and when the human eye is closed, the vertical and horizontal are relatively small. If the number of eyes closed exceeds the set threshold, the output human eye is in the closed state.
import matplotlib.pylab as plt
import face_recognition
import cv2
from scipy.spatial import distance as dist

# This is a demonstration of detecting eye state
# The number of times the human eye is closed exceeds the set threshold EYES_CLOSED_SECONDS, judge that the human eye is closed
EYES_CLOSED_SECONDS = 2


def main():
    # Number of eye closures
    closed_count = 0
    # Read two images to imitate people's eyes
    img_eye_opened = cv2.imread('test_img/eye_opened.jpg')
    img_eye_closed = cv2.imread('test_img/eye_closed.jpg')
    # Set the image input sequence. The first one opens the eyes, the middle three closes the eyes, and the last one opens the eyes
    frame_inputs = [img_eye_opened] + [img_eye_closed] * 3 + [img_eye_opened] * 1

    for frame_num, frame in enumerate(frame_inputs):
        # Zoom out picture
        small_frame = cv2.resize(frame, (0, 0), fx=0.5, fy=0.5)
        # bgr channel becomes rgb channel
        rgb_small_frame = small_frame[:, :, ::-1]
        # Face key point detection
        face_landmarks_list = face_recognition.face_landmarks(rgb_small_frame)
        # No key detected
        if len(face_landmarks_list) < 1:
            continue

        # Obtain the position of human eye feature points
        for face_landmark in face_landmarks_list:
            # Each eye has six key points, which are arranged clockwise on the leftmost side of the eye
            left_eye = face_landmark['left_eye']
            right_eye = face_landmark['right_eye']

            # Calculate the aspect ratio ear of the eye. Ear doesn't mean ear here
            ear_left = get_ear(left_eye)
            ear_right = get_ear(right_eye)
            # Judge whether the eyes are closed
            # If the aspect ratio of two eyes is less than 0.2, the eyes are considered closed
            closed = ear_left < 0.2 and ear_right < 0.2
            # Set the closing times of eye detection
            if closed:
                closed_count += 1
            else:
                closed_count = 0
            # If the eyes are closed more than EYES_CLOSED_SECONDS, output eyes closed
            if closed_count > EYES_CLOSED_SECONDS:
                eye_status = "frame {} | EYES CLOSED".format(frame_num)
            elif closed_count > 0:
                eye_status = "frame {} | MAYBE EYES CLOSED ".format(frame_num)
            else:
                eye_status = "frame {} | EYES OPENED ".format(frame_num)
            print(eye_status)

            plt.imshow(rgb_small_frame)
            # The color of the first key point of the left and right eye contour is red, the color of the last key point is blue, and the other key points are yellow
            color = ['red'] + ['yellow'] * int(len(left_eye) - 2) + ['blue']
            # Draw eye keys in order
            for index in range(len(left_eye)):
                leye = left_eye[index]
                reye = right_eye[index]
                plt.plot(leye[0], leye[1], 'bo', color=color[index])
                plt.plot(reye[0], reye[1], 'bo', color=color[index])
                plt.title(eye_status)

            plt.show()

# Calculate the aspect ratio of human eyes
def get_ear(eye):
    # Calculate the distance between the upper and lower keys in the vertical direction of the eye contour
    A = dist.euclidean(eye[1], eye[5])
    B = dist.euclidean(eye[2], eye[4])

    # Calculate the horizontal distance of the key point
    C = dist.euclidean(eye[0], eye[3])

    # Calculate the aspect ratio of the eye
    ear = (A + B) / (2.0 * C)

    # Returns the aspect ratio of the eye
    return ear


if __name__ == "__main__":
    main()
frame 0 | EYES OPENED
frame 1 | MAYBE EYES CLOSED

frame 2 | MAYBE EYES CLOSED
frame 3 | EYES CLOSED
frame 4 | EYES OPENED

4 face recognition
This part is mainly for face recognition and provides a variety of practical task cases. Mainly used face_ The built-in functions of recognition include:
-
face_recognition.api.face_encodings(face_image, known_face_locations=None, num_jitters=1, model='small')
- Purpose: return 128 dimensional face features of each face in the image
- face_image: input image, numpy array
- known_face_locations: the bounding box of each face (optional), which can greatly improve the recognition speed
- num_jitters: the number of times to resample faces when calculating face features. Higher, more accurate, but slower, i.e. set to 100 times slower
- Model: the recognition model used. The default value is small, indicating a small model. Only five feature points are returned; Can be set to large
- Return: list containing facial features
-
face_recognition.api.compare_faces(known_face_encodings, face_encoding_to_check, tolerance=0.6)
- Purpose: compare face features with candidate face features to see if they match.
- known_face_encodings: list of known facial features
- face_encoding_to_check: a single face feature compared with the list of known face features
- Tolerance: the smaller the face distance is, the closer the face is. When the face distance is less than tolerance, it means the same person; 0.6 is the default value and the best value considered by the author (different from the actual value)
- Return: a list containing True or False to indicate whether it is the same face
-
face_recognition.api.face_distance(face_encodings, face_to_compare)
- Purpose: give a list of human face features, compare them with known face features, and obtain the Euclidean distance between face feature vectors. The smaller the distance, the more similar the face hole is.
- face_encodings: list of known facial features
- face_to_compare: list of unknown facial features
- Return: numpy array representing distance, and face_encodings are sorted in the same way
4.1 face comparison
From examples/recognize_faces_in_pictures.py
This part of the code is to input two known face images and one unknown face image to see which image of the unknown face image and the known face represents the same person.
%matplotlib inline
import matplotlib.pyplot as plt
from PIL import Image, ImageDraw
import face_recognition

# Load pictures through PIL
biden_image = face_recognition.load_image_file("test_img/biden.jpg")
obama_image = face_recognition.load_image_file("test_img/obama.jpg")
unknown_image = face_recognition.load_image_file("test_img/obama2.jpg")

plt.imshow(biden_image)
plt.title('biden')
plt.axis('off')
plt.show()
plt.imshow(obama_image)
plt.title('obama')
plt.axis('off')
plt.show()
plt.imshow(unknown_image)
plt.title('unknown')
plt.axis('off')
plt.show()

# Obtain the face feature of each face in the input image file, and the face feature dimension is 128
# Since there may be multiple faces in the input image, it returns a list of features.
# By default, the input image has only one face and only cares about the first feature in each image, so set the feature acquisition index to 0
# It is recommended to take a step-by-step look at the operation mechanism of this function
try:
    biden_face_encoding = face_recognition.face_encodings(biden_image)[0]
    obama_face_encoding = face_recognition.face_encodings(obama_image)[0]
    unknown_face_encoding = face_recognition.face_encodings(unknown_image)[0]
except IndexError:
    # No face found
    print("I wasn't able to locate any faces in at least one of the images. Check the image files. Aborting...")
    quit()

# The list of known faces is Biden's face features and Obama's face features in order
known_faces = [
    biden_face_encoding,
    obama_face_encoding
]

# If the unknown face matches someone in the known face array, the matching result is true
# This function calls face_distance facial feature distance calculation function can be debugged in one step to see the source code
results = face_recognition.compare_faces(known_faces, unknown_face_encoding)

# Match the first person
print("Is the unknown face a picture of Biden? {}".format(results[0]))
# Match with the second person
print("Is the unknown face a picture of Obama? {}".format(results[1]))
# Have you ever seen this face
print("Is the unknown face a new person that we've never seen before? {}".format(not True in results))


Is the unknown face a picture of Biden? False
Is the unknown face a picture of Obama? True
Is the unknown face a new person that we've never seen before? False
4.2 after face recognition, draw a frame on the original image and mark the name
From examples/identify_and_draw_boxes_on_faces.py
This part of the code is to input two known face images and one unknown face image, then carry out face recognition and mark each face identity information in the unknown face image
%matplotlib inline
import matplotlib.pyplot as plt
import face_recognition
from PIL import Image, ImageDraw
import numpy as np

# Load the first sample image and extract features
obama_image = face_recognition.load_image_file("test_img/obama.jpg")
obama_face_encoding = face_recognition.face_encodings(obama_image)[0]

# Load the second sample image and extract features
biden_image = face_recognition.load_image_file("test_img/biden.jpg")
biden_face_encoding = face_recognition.face_encodings(biden_image)[0]

# Create data of known face features and their names
known_face_encodings = [
    obama_face_encoding,
    biden_face_encoding
]
known_face_names = [
    "Barack Obama",
    "Joe Biden"
]

# Load unknown face image
unknown_image = face_recognition.load_image_file("test_img/two_people.jpg")

# Face detection
face_locations = face_recognition.face_locations(unknown_image)
# Face feature extraction
face_encodings = face_recognition.face_encodings(unknown_image, face_locations)

# View input image
plt.imshow(biden_image)
plt.title('biden')
plt.axis('off')
plt.show()
plt.imshow(obama_image)
plt.title('obama')
plt.axis('off')
plt.show()
plt.imshow(unknown_image)
plt.title('unknown')
plt.axis('off')
plt.show()

# mapping
pil_image = Image.fromarray(unknown_image)
draw = ImageDraw.Draw(pil_image)

# Processing of each face in unknown face images
for (top, right, bottom, left), face_encoding in zip(face_locations, face_encodings):
    # Determine which face matches
    matches = face_recognition.compare_faces(known_face_encodings, face_encoding)

    name = "Unknown"

    # Result matching method 1
    # Multiple faces are matched successfully, and only the first face is the result
    # if True in matches:
    #     first_match_index = matches.index(True)
    #     name = known_face_names[first_match_index]

    # Result matching method 2
    # A better result matching method uses the known face with the smallest distance from the new face as the result
    # Calculate the distance between the known face and the unknown face feature vector. The smaller the distance, the greater the possibility that the two faces are the same person
    face_distances = face_recognition.face_distance(known_face_encodings, face_encoding)
    # Extract the known face number with the smallest distance from the unknown face
    best_match_index = np.argmin(face_distances)
    # Extract the matched known face name
    if matches[best_match_index]:
        name = known_face_names[best_match_index]

    # Draw bounding box for face
    draw.rectangle(((left, top), (right, bottom)), outline=(0, 0, 255))

    # Draw the name of the person whose face belongs below the face bounding box
    text_width, text_height = draw.textsize(name)
    draw.rectangle(((left, bottom - text_height - 10), (right, bottom)), fill=(0, 0, 255), outline=(0, 0, 255))
    draw.text((left + 6, bottom - text_height - 5), name, fill=(255, 255, 255, 255))

del draw

# jupyter drawing
# pil_image.show()
plt.imshow(pil_image)
plt.axis('off')
plt.show()

# Save identification results
# pil_image.save("image_with_boxes.jpg")


4.3 face comparison with different accuracy
From examples/face_distance.py
The function of this part of the code is similar to that of 4.1. The difference is to judge whether two faces represent the same person according to the distance of face feature vector and different distance thresholds
import face_recognition

# Load image
known_obama_image = face_recognition.load_image_file("test_img/obama.jpg")
known_biden_image = face_recognition.load_image_file("test_img/biden.jpg")

# Obtain face image features
obama_face_encoding = face_recognition.face_encodings(known_obama_image)[0]
biden_face_encoding = face_recognition.face_encodings(known_biden_image)[0]

known_encodings = [
    obama_face_encoding,
    biden_face_encoding
]

# Load unknown face image
image_to_test = face_recognition.load_image_file("test_img/obama2.jpg")
image_to_test_encoding = face_recognition.face_encodings(image_to_test)[0]

# Calculate the distance between an unknown face and a known face
face_distances = face_recognition.face_distance(known_encodings, image_to_test_encoding)

# View face matching results under different distance thresholds
for i, face_distance in enumerate(face_distances):
    # Print distance
    print("The test image has a distance of {:.2} from known image #{}".format(face_distance, i))
    # When the threshold is 0.6, does it match
    print("- With a normal cutoff of 0.6, would the test image match the known image? {}".format(face_distance < 0.6))
    # When the threshold is 0.5 more stringent, is it matched
    print("- With a very strict cutoff of 0.5, would the test image match the known image? {}".format(
        face_distance < 0.5))
    print()
The test image has a distance of 0.35 from known image #0
- With a normal cutoff of 0.6, would the test image match the known image? True
- With a very strict cutoff of 0.5, would the test image match the known image? True

The test image has a distance of 0.82 from known image #1
- With a normal cutoff of 0.6, would the test image match the known image? False
- With a very strict cutoff of 0.5, would the test image match the known image? False
4.4 face recognition based on K-nearest neighbor KNN classification algorithm
From examples/face_recognition_knn.py
This part of the code is the same as the previous part of the code, except that after extracting the face features, the KNN nearest neighbor algorithm is used for classification, rather than judging by distance.
%matplotlib inline
"""
use k-Nearest neighbor( KNN)Example of face recognition based on Algorithm
"""

from matplotlib import pyplot as plt
import math
from sklearn import neighbors
import os
import os.path
import pickle
from PIL import Image, ImageDraw
import face_recognition
from face_recognition.face_recognition_cli import image_files_in_folder

ALLOWED_EXTENSIONS = {'png', 'jpg', 'jpeg'}


def train(train_dir, model_save_path=None, n_neighbors=None, knn_algo='ball_tree', verbose=False):
    """
    train k Nearest neighbor classifier for face recognition.
    :param train_dir: A directory containing each known person and their faces.
     Structure:
        <train_dir>/
        ├── <person1>/
        │   ├── <somename1>.jpeg
        │   ├── <somename2>.jpeg
        │   ├── ...
        ├── <person2>/
        │   ├── <somename1>.jpeg
        │   └── <somename2>.jpeg
        └── ...
    :param model_save_path: (Optional) Model save directory
    :param n_neighbors: (Optional) The number of neighbors to be weighted in the classification. If it is not specified, it is automatically selected, that is k-NN of k Select the nearest value k Point
    :param knn_algo: (Optional) knn Underlying search algorithm
    :param verbose: Print training information
    :return: Return to the trained model
    """
    X = []
    y = []

    # Read personnel path
    for class_dir in os.listdir(train_dir):
        if not os.path.isdir(os.path.join(train_dir, class_dir)):
            continue

        # Read the face image of the current person
        for img_path in image_files_in_folder(os.path.join(train_dir, class_dir)):
            # Load picture
            image = face_recognition.load_image_file(img_path)
            # Face detection
            face_bounding_boxes = face_recognition.face_locations(image)

            if len(face_bounding_boxes) != 1:
                # No one will skip the current picture
                if verbose:
                    print("Image {} not suitable for training: {}".format(img_path, "Didn't find a face" if len(
                        face_bounding_boxes) < 1 else "Found more than one face"))
            else:
                # Save face features and categories
                X.append(face_recognition.face_encodings(image, known_face_locations=face_bounding_boxes)[0])
                y.append(class_dir)

    # Custom setting n_neighbors
    if n_neighbors is None:
        n_neighbors = int(round(math.sqrt(len(X))))
        if verbose:
            print("Chose n_neighbors automatically:", n_neighbors)

    # Training KNN classifier
    knn_clf = neighbors.KNeighborsClassifier(n_neighbors=n_neighbors, algorithm=knn_algo, weights='distance')
    knn_clf.fit(X, y)

    # Save classifier
    if model_save_path is not None:
        with open(model_save_path, 'wb') as f:
            pickle.dump(knn_clf, f)

    return knn_clf


def predict(X_img_path, knn_clf=None, model_path=None, distance_threshold=0.6):
    """
    Use trained KNN The classifier recognizes the face in a given image
    :param X_img_path: input image
    :param knn_clf: (Optional) knn Models, and model_path One must be available
    :param model_path: (Optional) knn Model path, and knn_clf One must be available
    :param distance_threshold: (Optional) Distance threshold of face classification. The higher the threshold, the easier it is to make false positives.
    :return: Person name corresponding to face and its bounding box
    """
    if not os.path.isfile(X_img_path) or os.path.splitext(X_img_path)[1][1:] not in ALLOWED_EXTENSIONS:
        raise Exception("Invalid image path: {}".format(X_img_path))

    if knn_clf is None and model_path is None:
        raise Exception("Must supply knn classifier either thourgh knn_clf or model_path")

    # Loading model
    if knn_clf is None:
        with open(model_path, 'rb') as f:
            knn_clf = pickle.load(f)

    # Reading pictures and face detection
    X_img = face_recognition.load_image_file(X_img_path)
    X_face_locations = face_recognition.face_locations(X_img)

    # If no face is detected, an empty list is returned
    if len(X_face_locations) == 0:
        return []

    # Face feature extraction
    faces_encodings = face_recognition.face_encodings(X_img, known_face_locations=X_face_locations)

    # Classification using K-nearest neighbor
    closest_distances = knn_clf.kneighbors(faces_encodings, n_neighbors=1)
    are_matches = [closest_distances[0][i][0] <= distance_threshold for i in range(len(X_face_locations))]

    # Return forecast results
    return [(pred, loc) if rec else ("unknown", loc) for pred, loc, rec in
            zip(knn_clf.predict(faces_encodings), X_face_locations, are_matches)]


def show_prediction_labels_on_image(img_path, predictions):
    """
    Visualization of prediction results
    :param img_path: Prediction image
    :param predictions: Prediction results
    :return:
    """
    pil_image = Image.open(img_path).convert("RGB")
    draw = ImageDraw.Draw(pil_image)

    for name, (top, right, bottom, left) in predictions:
        # Picture frame
        draw.rectangle(((left, top), (right, bottom)), outline=(0, 0, 255))

        # uft-8 code is required to set the name
        name = name.encode("UTF-8")

        # Mark person's name
        text_width, text_height = draw.textsize(name)
        draw.rectangle(((left, bottom - text_height - 10), (right, bottom)), fill=(0, 0, 255), outline=(0, 0, 255))
        draw.text((left + 6, bottom - text_height - 5), name, fill=(255, 255, 255, 255))

    del draw

    # jupyter drawing
    # pil_image.show()
    plt.imshow(pil_image)
    plt.axis('off')
    plt.show()


if __name__ == "__main__":
    # Training picture download address: https://github.com/ageitgey/face_recognition/tree/master/examples/knn_examples
    # STEP 1 training KNN classifier
    print("Training KNN classifier...")
    classifier = train("./test_img/knn_examples/train", model_save_path="trained_knn_model.clf", n_neighbors=2)
    print("Training complete!")

    # STEP 2 uses the trained KNN classifier to recognize the tested face image
    for image_file in os.listdir("./test_img/knn_examples/test"):
        # Face image path to be tested
        full_file_path = os.path.join("./test_img/knn_examples/test", image_file)

        print("Looking for faces in {}".format(image_file))

        # The trained classifier model is used to find everyone in the image
        predictions = predict(full_file_path, model_path="trained_knn_model.clf")

        # Print results
        for name, (top, right, bottom, left) in predictions:
            print("- Found {} at ({}, {})".format(name, left, top))

        # Show results
        show_prediction_labels_on_image(os.path.join("./test_img/knn_examples/test", image_file), predictions)
Training KNN classifier...
Training complete!
Looking for faces in alex_lacamoire1.jpg
- Found alex_lacamoire at (633, 206)
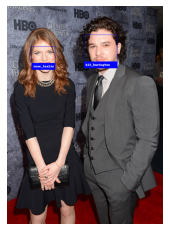
Looking for faces in johnsnow_test1.jpg
- Found kit_harington at (262, 180)

Looking for faces in kit_with_rose.jpg
- Found rose_leslie at (79, 130)
- Found kit_harington at (247, 92)
Looking for faces in obama1.jpg
- Found obama at (546, 204)

Looking for faces in obama_and_biden.jpg
- Found biden at (737, 449)
- Found obama at (1133, 390)
- Found unknown at (1594, 1062)

4.5 benchmark performance test
From examples / benchmark py
This part of the code implements a very simple benchmark, which can let you understand the speed of each step of face recognition running on your system
import timeit

# This is a very simple benchmark that allows you to understand the speed of each step of face recognition running on your system. Note that face detection becomes very slow at large image sizes
TEST_IMAGES = [
    "test_img/obama-240p.jpg",
    "test_img/obama-480p.jpg",
    "test_img/obama-720p.jpg",
    "test_img/obama-1080p.jpg"
]


# Test function
def run_test(setup, test, iterations_per_test=2, tests_to_run=3):
    """
    :param setup: Data loading function
    :param test: Data test function
    :param iterations_per_test: Number of tests
    :param tests_to_run: How many times does each round of test call the function
    :return: execution_time Single function reasoning time, fps Number of processes per second
    """
    fastest_execution = min(timeit.Timer(test, setup=setup).repeat(tests_to_run, iterations_per_test))
    execution_time = fastest_execution / iterations_per_test
    fps = 1.0 / execution_time
    return execution_time, fps


# The following sets different test function codes
# The data loading code starts with setup and the function test code starts with test
setup_locate_faces = """
import face_recognition

image = face_recognition.load_image_file("{}")
"""

test_locate_faces = """
face_locations = face_recognition.face_locations(image)
"""

setup_face_landmarks = """
import face_recognition

image = face_recognition.load_image_file("{}")
face_locations = face_recognition.face_locations(image)
"""

test_face_landmarks = """
landmarks = face_recognition.face_landmarks(image, face_locations=face_locations)[0]
"""

setup_encode_face = """
import face_recognition

image = face_recognition.load_image_file("{}")
face_locations = face_recognition.face_locations(image)
"""

test_encode_face = """
encoding = face_recognition.face_encodings(image, known_face_locations=face_locations)[0]
"""

setup_end_to_end = """
import face_recognition

image = face_recognition.load_image_file("{}")
"""

test_end_to_end = """
encoding = face_recognition.face_encodings(image)[0]
"""

# All benchmarks use only one CPU core
print("Benchmarks (Note: All benchmarks are only using a single CPU core)")
print()

for image in TEST_IMAGES:
    size = image.split("-")[1].split(".")[0]
    print("Timings at {}:".format(size))

    # Test face detection
    print(" - Face locations: {:.4f}s ({:.2f} fps)".format(
        *run_test(setup_locate_faces.format(image), test_locate_faces)))
    print(" - Face landmarks: {:.4f}s ({:.2f} fps)".format(
        *run_test(setup_face_landmarks.format(image), test_face_landmarks)))
    print(" - Encode face (inc. landmarks): {:.4f}s ({:.2f} fps)".format(
        *run_test(setup_encode_face.format(image), test_encode_face)))
    print(" - End-to-end: {:.4f}s ({:.2f} fps)".format(*run_test(setup_end_to_end.format(image), test_end_to_end)))
    print()
Benchmarks (Note: All benchmarks are only using a single CPU core)

Timings at 240p:
 - Face locations: 0.0819s (12.21 fps)
 - Face landmarks: 0.0029s (344.69 fps)
 - Encode face (inc. landmarks): 0.4879s (2.05 fps)
 - End-to-end: 0.5978s (1.67 fps)

Timings at 480p:
 - Face locations: 0.3257s (3.07 fps)
 - Face landmarks: 0.0028s (362.23 fps)
 - Encode face (inc. landmarks): 0.4959s (2.02 fps)
 - End-to-end: 0.8203s (1.22 fps)

Timings at 720p:
 - Face locations: 0.7046s (1.42 fps)
 - Face landmarks: 0.0028s (355.30 fps)
 - Encode face (inc. landmarks): 0.4993s (2.00 fps)
 - End-to-end: 1.1888s (0.84 fps)

Timings at 1080p:
 - Face locations: 1.5179s (0.66 fps)
 - Face landmarks: 0.0030s (334.93 fps)
 - Encode face (inc. landmarks): 0.4838s (2.07 fps)
 - End-to-end: 1.9404s (0.52 fps)
4.6 multithreaded face recognition
From facerec_from_webcam_multiprocessing.py
This part of the code realizes multi-threaded reading video for face recognition. It is very simple, but it is not written in this way. Just look at the code.
import face_recognition
import cv2
from multiprocessing import Process, Manager, cpu_count, set_start_method
import time
import numpy
import threading
import platform


# Multithreaded face recognition
# Get the id of the next thread
def next_id(current_id, worker_num):
    if current_id == worker_num:
        return 1
    else:
        return current_id + 1


# Gets the id of the previous thread
def prev_id(current_id, worker_num):
    if current_id == 1:
        return worker_num
    else:
        return current_id - 1


# Graph reading thread
def capture(read_frame_list, Global, worker_num):
    # Read video
    video_capture = cv2.VideoCapture('./test_img/short_hamilton_clip.mp4')
    print("Width: %d, Height: %d, FPS: %d" % (video_capture.get(3), video_capture.get(4), video_capture.get(5)))

    while not Global.is_exit:
        # Judge whether to read the image, and ensure that the thread currently caching the image and the next thread processing the image are not the same thread, so as to ensure that the image is cached before the processing thread starts
        if Global.buff_num != next_id(Global.read_num, worker_num):
            # Read an image
            ret, frame = video_capture.read()
            read_frame_list[Global.buff_num] = frame # Save the image to be processed by the corresponding image processing thread
            Global.buff_num = next_id(Global.buff_num, worker_num) # The next image processing thread to cache the image
        else:
            time.sleep(0.01)

    # Release video
    video_capture.release()


# Image processing thread
def process(worker_id, read_frame_list, write_frame_list, Global, worker_num):
    known_face_encodings = Global.known_face_encodings
    known_face_names = Global.known_face_names
    while not Global.is_exit:

        # Wait to read the image. When the thread is the thread that needs to process the image, start processing the image and ensure that the image has been cached
        while Global.read_num != worker_id or Global.read_num != prev_id(Global.buff_num, worker_num):
            # Determine whether to exit
            if Global.is_exit:
                break

            time.sleep(0.01)

        # Delayed read guarantee calculation
        time.sleep(Global.frame_delay)

        # Read an image
        frame_process = read_frame_list[worker_id]

        # Set the next thread to read video
        Global.read_num = next_id(Global.read_num, worker_num)

        # Switching channel
        rgb_frame = frame_process[:, :, ::-1]

        # Face recognition
        face_locations = face_recognition.face_locations(rgb_frame)
        face_encodings = face_recognition.face_encodings(rgb_frame, face_locations)

        # Face drawing
        for (top, right, bottom, left), face_encoding in zip(face_locations, face_encodings):
            # Does it match a known face
            matches = face_recognition.compare_faces(known_face_encodings, face_encoding)

            name = "Unknown"

            # If there is a matching face, replace it with the name that matches the face
            if True in matches:
                first_match_index = matches.index(True)
                name = known_face_names[first_match_index]

            # Draw bounding box
            cv2.rectangle(frame_process, (left, top), (right, bottom), (0, 0, 255), 2)

            # Draw face Tags
            cv2.rectangle(frame_process, (left, bottom - 35), (right, bottom), (0, 0, 255), cv2.FILLED)
            font = cv2.FONT_HERSHEY_DUPLEX
            cv2.putText(frame_process, name, (left + 6, bottom - 6), font, 1.0, (255, 255, 255), 1)

        # Whether the current thread allows saving images
        while Global.write_num != worker_id:
            time.sleep(0.01)

        # Save results
        write_frame_list[worker_id] = frame_process

        # Next image processing thread to save image
        Global.write_num = next_id(Global.write_num, worker_num)


if __name__ == '__main__':

    # Macos settings
    if platform.system() == 'Darwin':
        set_start_method('forkserver')

    # global variable
    Global = Manager().Namespace()
    Global.buff_num = 1 # Image processing thread caching image
    Global.read_num = 1 # Image thread processing image
    Global.write_num = 1 # Image processing thread saving results
    Global.frame_delay = 0 # delay time
    Global.is_exit = False # Exit
    read_frame_list = Manager().dict()
    write_frame_list = Manager().dict()

    # Number of processing threads
    if cpu_count() > 2:
        # Minus 1 is to set aside a thread to read the video
        worker_num = cpu_count() - 1
    else:
        worker_num = 2

    # List of child threads
    p = []

    # Create a thread to capture frames (if a child thread is used, it will crash on the Mac)
    # Thread 0 is a graph reading thread
    p.append(threading.Thread(target=capture, args=(read_frame_list, Global, worker_num,)))
    p[0].start()

    # Read existing image
    obama_image = face_recognition.load_image_file("./test_img/obama.jpg")
    obama_face_encoding = face_recognition.face_encodings(obama_image)[0]
    biden_image = face_recognition.load_image_file("./test_img/lin-manuel-miranda.png")
    biden_face_encoding = face_recognition.face_encodings(biden_image)[0]

    # Create existing data information
    Global.known_face_encodings = [
        obama_face_encoding,
        biden_face_encoding
    ]
    Global.known_face_names = [
        "Barack Obama",
        "lin-manuel-miranda."
    ]

    # Create image processing sub thread
    for worker_id in range(1, worker_num + 1):
        p.append(Process(target=process, args=(worker_id, read_frame_list, write_frame_list, Global, worker_num,)))
        p[worker_id].start()

    # Start video reading
    last_num = 1 # Processed image serial number
    fps_list = []
    tmp_time = time.time()
    while not Global.is_exit:
        while Global.write_num != last_num:
            last_num = int(Global.write_num)

            # Calculate FPS
            delay = time.time() - tmp_time
            tmp_time = time.time()
            fps_list.append(delay)
            if len(fps_list) > 5 * worker_num:
                fps_list.pop(0)
            fps = len(fps_list) / numpy.sum(fps_list)
            print("fps: %.2f" % fps)

            # Dynamically adjust the detection performance according to the delay
            if fps < 6:
                Global.frame_delay = (1 / fps) * 0.75
            elif fps < 20:
                Global.frame_delay = (1 / fps) * 0.5
            elif fps < 30:
                Global.frame_delay = (1 / fps) * 0.25
            else:
                Global.frame_delay = 0

            # Show results
            cv2.imshow('Video', write_frame_list[prev_id(Global.write_num, worker_num)])

        # sign out
        if cv2.waitKey(1) & 0xFF == ord('q'):
            Global.is_exit = True
            break

        time.sleep(0.01)