Introduction to CNI
The configuration of container network is a complex process. In order to meet various needs, container network solutions are also diverse, such as flannel, calico, Kube ovn, weave and so on. At the same time, the container platform / runtime is also diverse, such as Kubernetes, Openshift, rkt, etc. It will be a huge and repetitive project if each container platform should be connected and adapted to each network solution one by one. Of course, smart programmers won't allow this to happen. To solve this problem, we need an abstract interface layer to decouple the container network configuration scheme from the container platform scheme.
CNI (Container Network Interface) is such an interface layer. It defines a set of interface standards and provides specification documents and some standard implementations. The container platform that uses CNI specification to set up container network does not need to pay attention to the details of network setting, but only needs to call CNI interface according to CNI specification to realize network setting.
CNI was originally created by CoreOS for rkt container engine. With the continuous development, it has become a de facto standard. At present, most container platforms adopt CNI standards (rkt, Kubernetes, OpenShift, etc.). This content is based on the latest release version v0.4.0 of CNI.
It is worth noting that Docker did not adopt CNI standard, but synchronously developed CNM (Container Networking Model) standard at the beginning of CNI creation. However, CNM model has not been widely used due to technical and non-technical reasons.
How does CNI work
CNI interfaces do not refer to HTTP and gRPC interfaces. CNI interfaces refer to calls to executable programs (exec). These executable programs are called CNI plug-ins. Take K8S as an example. The default CNI plug-in path of K8S node is / opt/cni/bin. Check the directory on K8S node to see the available CNI plug-ins:
$ ls /opt/cni/bin/
bandwidth  bridge  dhcp  firewall  flannel  host-device  host-local  ipvlan  loopback  macvlan  portmap  ptp  sbr  static  tuning  vlan
The working process of CNI is roughly shown in the figure below:
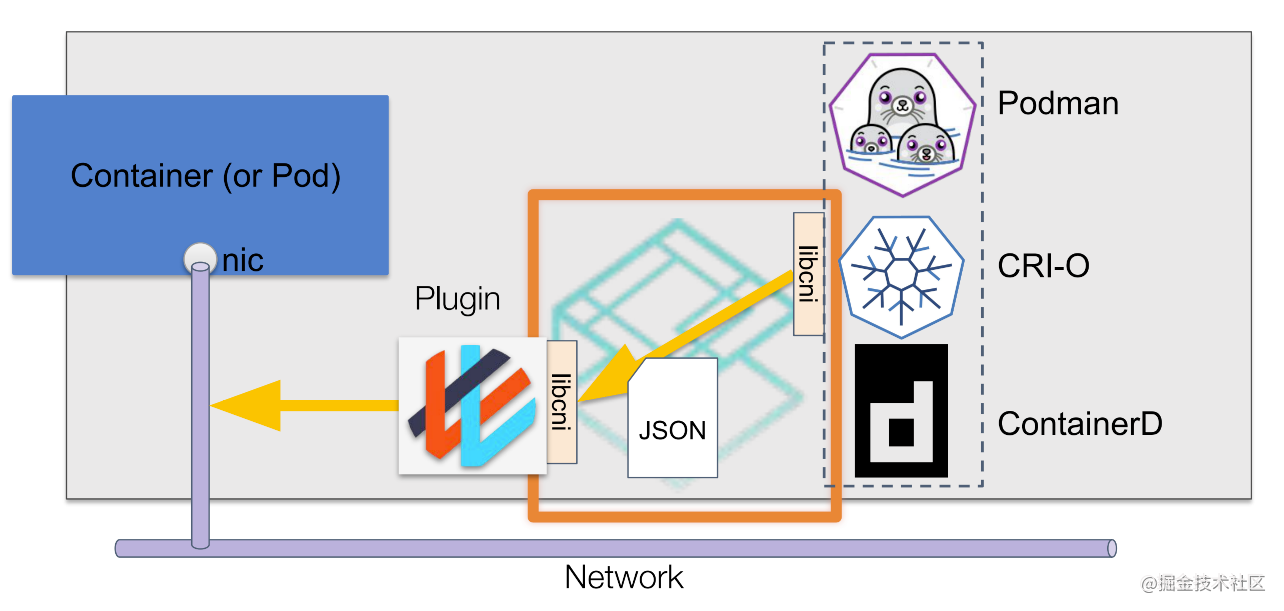
CNI describes the network configuration through the configuration file in JSON format. When the container network needs to be set, the container runtime is responsible for executing the CNI plug-in, The configuration file information is transmitted through the standard input (stdin) of the CNI plug-in, and the execution results of the plug-in are received through the standard output (stdout).
For an intuitive example, if we want to call the bridge plug-in to connect the container to the host bridge, the called command looks like this:
# CNI_COMMAND=ADD means create as the name suggests.
# XXX=XXX other parameters are defined below.
# < config. JSON represents passing a configuration file from standard input
CNI_COMMAND=ADD XXX=XXX ./bridge < config.json
Plug in parameters
The container runtime passes parameters to the plug-in by setting environment variables and the configuration file passed in from standard input.
environment variable
- CNI_COMMAND: defines the desired operation, which can be ADD, DEL, CHECK or VERSION.
- CNI_CONTAINERID: container ID, the unique identifier of the container managed by the container runtime.
- CNI_NETNS: path to the container network namespace. (such as / run/netns/[nsname]).
- CNI_IFNAME: the name of the network interface to be created, such as eth0.
- CNI_ARGS: additional parameters passed in during runtime call. The format is semicolon separated key value pairs, such as FOO=BAR;ABC=123
- CNI_ Path: the path to the CNI plug-in executable, for example, / opt/cni/bin.
configuration file
File example:
{
  "cniVersion": "0.4.0", // Indicates the version of the CNI standard that you want the plug-in to follow.
  "name": "dbnet",  // Represents the network name. This name does not refer to the network interface name, but is a representation for CNI management. It should be globally unique on the current host (or other administrative domain).
  "type": "bridge", // Plug in type
  "bridge": "cni0", // Parameters of the bridge plug-in, specifying the bridge name.
  "ipam": { // IP Allocation Management to manage IP address allocation.
    "type": "host-local", // Type of ipam plug-in.
    // ipam defined parameters
    "subnet": "10.1.0.0/16",
    "gateway": "10.1.0.1"
  }
}
Public definition part
The configuration file is divided into a common part and a plug-in definition part. The common part is defined in CNI project using the structure NetworkConfig:
type NetworkConfig struct {
   Network *types.NetConf
   Bytes   []byte
}
...
// NetConf describes a network.
type NetConf struct {
   CNIVersion string `json:"cniVersion,omitempty"`

   Name         string          `json:"name,omitempty"`
   Type         string          `json:"type,omitempty"`
   Capabilities map[string]bool `json:"capabilities,omitempty"`
   IPAM         IPAM            `json:"ipam,omitempty"`
   DNS          DNS             `json:"dns"`

   RawPrevResult map[string]interface{} `json:"prevResult,omitempty"`
   PrevResult    Result                 `json:"-"`
}
- cniVersion indicates the version of the CNI standard that you want the plug-in to follow.
- Name indicates the network name. This name does not refer to the network interface name, but is a representation for CNI management. It should be globally unique on the current host (or other administrative domain).
- type indicates the name of the plug-in, that is, the name of the executable file corresponding to the plug-in.
- Bridge this parameter is a parameter of the bridge plug-in and specifies the name of the host bridge.
- ipam indicates the configuration of the IP address allocation plug-in, ipam Type indicates the plug-in type of ipam.
For more detailed information, please refer to Official documents.
Plug in definition section
As mentioned above, the configuration file is finally passed to specific CNI plug-ins, so the plug-in definition part is the "complete body" of the configuration file. The common part definition is just to facilitate each plug-in to embed it into its own configuration file definition structure. Take the bridge plug-in as an example:
type NetConf struct {
	types.NetConf // < -- embed public parts
        // The bottom is the plug-in definition
	BrName       string `json:"bridge"`
	IsGW         bool   `json:"isGateway"`
	IsDefaultGW  bool   `json:"isDefaultGateway"`
	ForceAddress bool   `json:"forceAddress"`
	IPMasq       bool   `json:"ipMasq"`
	MTU          int    `json:"mtu"`
	HairpinMode  bool   `json:"hairpinMode"`
	PromiscMode  bool   `json:"promiscMode"`
	Vlan         int    `json:"vlan"`

	Args struct {
		Cni BridgeArgs `json:"cni,omitempty"`
	} `json:"args,omitempty"`
	RuntimeConfig struct {
		Mac string `json:"mac,omitempty"`
	} `json:"runtimeConfig,omitempty"`

	mac string
}
Refer to the configuration file documents of each plug-in Official documents.
Plug in operation type
There are only four operation types of CNI plug-ins: ADD, DEL, CHECK and VERSION. The plug-in caller passes the environment variable CNI_COMMAND to specify the action to be performed.
ADD
The ADD operation is responsible for adding containers to the network or making changes to existing network settings. Specifically, the ADD operation either:
- Create a network interface for the network namespace where the container is located, or
- Modify the specified network interface in the network namespace where the container is located
For example, the container network interface is connected to the network bridge of the host through ADD.
The network interface name is determined by CNI_IFNAME is specified, and the network namespace is specified by CNI_NETNS specifies.
DEL
DEL operation is responsible for deleting the container from the network or canceling the corresponding modification. It can be understood as the reverse operation of ADD. Specifically, the DEL operation either:
- Delete a network interface for the network namespace where the container is located, or
- Undo the modification of the ADD operation
For example, delete the container network interface from the host bridge through DEL.
The network interface name is determined by CNI_IFNAME is specified, and the network namespace is specified by CNI_NETNS specifies.
CHECK
The CHECK operation is v0 4.0 added type, used to CHECK whether the network settings meet the expectations. When the container is running, you can CHECK whether there is an error in the network settings through CHECK. When CHECK returns an error (a non-0 status code is returned), you can select Kill to drop the container and restart to obtain a correct network configuration.
VERSION
The VERSION operation is used to view the VERSION information supported by the plug-in.
$ CNI_COMMAND=VERSION /opt/cni/bin/bridge
{"cniVersion":"0.4.0","supportedVersions":["0.1.0","0.2.0","0.3.0","0.3.1","0.4.0"]}
call chaining
The responsibilities of a single CNI plug-in are single. For example, the bridge plug-in is responsible for the configuration of the network bridge, the firewall plug-in is responsible for the configuration of the firewall, and the portmap plug-in is responsible for the configuration of the port mapping. Therefore, when the network setting is complex, it usually needs to call multiple plug-ins to complete it. CNI supports the chain call of plug-ins. Multiple plug-ins can be combined and called in order. For example, first call the bridge plug-in to set the container IP, connect the container network card with the host network bridge, and then call the portmap plug-in to map the container port. When the container is running, you can set the plugins array in the configuration file to achieve the purpose of chain call:
{
  "cniVersion": "0.4.0",
  "name": "dbnet",
  "plugins": [
    {
      "type": "bridge",
      // type (plugin) specific
      "bridge": "cni0"
      },
      "ipam": {
        "type": "host-local",
        // ipam specific
        "subnet": "10.1.0.0/16",
        "gateway": "10.1.0.1"
      }
    },
    {
      "type": "tuning",
      "sysctl": {
        "net.core.somaxconn": "500"
      }
    }
  ]
}
Careful readers will find that the plugins field does not appear in the configuration file structure described above. Indeed, CNI uses another structure, NetworkConfigList, to store the configuration of chain calls:
type NetworkConfigList struct {
   Name         string
   CNIVersion   string
   DisableCheck bool
   Plugins      []*NetworkConfig
   Bytes        []byte
}
But the CNI plug-in does not recognize this configuration type. In fact, when calling the CNI plug-in, you need to convert the NetworkConfigList into the configuration file format of the corresponding plug-in, and then pass it to the CNI plug-in through standard input (stdin). For example, in the above example, you will actually call the bridge plug-in using the following configuration file first:
{
  "cniVersion": "0.4.0",
  "name": "dbnet",
  "type": "bridge",
  "bridge": "cni0",
  "ipam": {
    "type": "host-local",
    "subnet": "10.1.0.0/16",
    "gateway": "10.1.0.1"
  }
}
Then use the following configuration file to call the tuning plug-in:
{
  "cniVersion": "0.4.0",
  "name": "dbnet",
  "type": "tuning",
  "sysctl": {
    "net.core.somaxconn": "500"
  },
  "prevResult": { // Return result of calling bridge plug-in
     ...
  }
}
It should be noted that when the plug-in makes a chain call, it not only needs to convert the format of NetworkConfigList, Moreover, it is a tedious and repetitive task to add the return result of the previous plug-in to the configuration file (through the prevResult field). Fortunately, libcni has been encapsulated for us. The container runtime does not need to care about how to convert the configuration file and how to fill in the return result of the previous plug-in. It only needs to call the relevant methods of libcni.
Example
Next, we will demonstrate how to use the CNI plug-in to set up a network for the Docker container.
Download CNI plug-in
For convenience, we download the executable directly:
wget https://github.com/containernetworking/plugins/releases/download/v0.9.1/cni-plugins-linux-amd64-v0.9.1.tgz
mkdir -p  ~/cni/bin
tar zxvf cni-plugins-linux-amd64-v0.9.1.tgz -C ./cni/bin
chmod +x ~/cni/bin/*
ls ~/cni/bin/
bandwidth  bridge  dhcp  firewall  flannel  host-device  host-local  ipvlan  loopback  macvlan  portmap  ptp  sbr  static  tuning  vlan  vrfz
If you are experimenting on the K8S node, you usually have CNI plug-ins on the node, so you don't need to download them, but you should pay attention to the subsequent CNI plug-ins_ The path # is changed to / opt/cni/bin.
Example 1 -- calling a single plug-in
In example 1, we will directly call the CNI plug-in, set the eth0 interface for the container, assign an IP address to it, and access the host bridge mynet0.
It is the same as the default network mode used by docker, except that we replaced docker0 with mynet0.
Start container
Although Docker does not use CNI specification, you can specify -- net=none to make Docker not set container network. Take nginx image as an example:
contid=$(docker run -d --net=none --name nginx nginx) # Container ID
pid=$(docker inspect -f '{{ .State.Pid }}' $contid) # Container process ID
netnspath=/proc/$pid/ns/net # Namespace path
While starting the container, we need to record the container ID and namespace path to facilitate subsequent transmission to CNI plug-ins. After the container is started, you can see that the container has no other network settings except lo network card:
nsenter -t $pid -n ip a
1: lo: <LOOPBACK,UP,LOWER_UP> mtu 65536 qdisc noqueue state UNKNOWN group default qlen 1000
    link/loopback 00:00:00:00:00:00 brd 00:00:00:00:00:00
    inet 127.0.0.1/8 scope host lo
       valid_lft forever preferred_lft forever
nsenter is short for namespace enter. As the name suggests, it is a tool that executes commands in a namespace- t represents the process ID and - n represents entering the network namespace of the corresponding process.
Add container network interface and connect host bridge
Next, we use the bridge plug-in to create a network interface for the container and connect to the host bridge. Create bridge JSON configuration file, as follows:
{
    "cniVersion": "0.4.0",
    "name": "mynet",
    "type": "bridge",
    "bridge": "mynet0",
    "isDefaultGateway": true,
    "forceAddress": false,
    "ipMasq": true,
    "hairpinMode": true,
    "ipam": {
        "type": "host-local",
        "subnet": "10.10.0.0/16"
    }
}
Call the bridge plug-in ADD operation:
CNI_COMMAND=ADD CNI_CONTAINERID=$contid CNI_NETNS=$netnspath CNI_IFNAME=eth0 CNI_PATH=~/cni/bin ~/cni/bin/bridge < bridge.json
If the call is successful, a similar return value will be output:
{
    "cniVersion": "0.4.0",
    "interfaces": [
        ....
    ],
    "ips": [
        {
            "version": "4",
            "interface": 2,
            "address": "10.10.0.2/16", //IP address assigned to the container
            "gateway": "10.10.0.1"
        }
    ],
    "routes": [
        .....
    ],
    "dns": {}
}
Review the container network settings again:
nsenter -t $pid -n ip a
1: lo: <LOOPBACK,UP,LOWER_UP> mtu 65536 qdisc noqueue state UNKNOWN group default qlen 1000
    link/loopback 00:00:00:00:00:00 brd 00:00:00:00:00:00
    inet 127.0.0.1/8 scope host lo
       valid_lft forever preferred_lft forever
5: eth0@if40: <BROADCAST,MULTICAST,UP,LOWER_UP> mtu 1500 qdisc noqueue state UP group default
    link/ether c2:8f:ea:1b:7f:85 brd ff:ff:ff:ff:ff:ff link-netnsid 0
    inet 10.10.0.2/16 brd 10.10.255.255 scope global eth0
       valid_lft forever preferred_lft forever
You can see that the eth0 network interface has been added to the container, and the IP address has been assigned to it under the subnet set by the ipam plug-in. The ipam plug-in of host local type will save the allocated IP information to a file to avoid IP conflicts. The default saving path is / var/lib/cni/network/$NETWORK_NAME:
ls /var/lib/cni/networks/mynet/
10.10.0.2  last_reserved_ip.0  lock
Access authentication from host
Since mynet0 is the bridge we added and no route has been set, we need to add a route for the network segment where the container is located before verification:
ip route add 10.10.0.0/16 dev mynet0 src 10.10.0.1 # Add route
curl -I 10.10.0.2 # Replace the IP address with the IP address actually assigned to the container
HTTP/1.1 200 OK
....
Delete container network interface
The deleted call input parameter is the same as the added input parameter, except CNI_ To replace the command with DEL:
CNI_COMMAND=DEL CNI_CONTAINERID=$contid CNI_NETNS=$netnspath CNI_IFNAME=eth0 CNI_PATH=~/cni/bin ~/cni/bin/bridge < bridge.json
Note that the above delete command does not clean up the mynet0 bridge of the host. If you want to delete the host bridge, you can execute the ip link delete mynet0 type bridge command to delete it.
Example 2 - chained call
In example 2, we will use the portmap plug-in to add port mapping to the container based on example 1.
Using the cnitool tool
In the previous introduction, we know that in the chain call process, the caller needs to transform the configuration file and insert the return result of the last plug-in into the configuration file of this plug-in. This is a tedious task, and libcni has encapsulated these processes. In example 2, we will use the libcni based command-line tool cnitool to simplify these operations.
Example 2 will reuse the containers in example 1, so when you start example 2, make sure that the network interface in example 1 has been deleted.
Install cnitool through source code compilation or go install:
go install github.com/containernetworking/cni/cnitool@latest
configuration file
libcni will read For the configuration file with the suffix conf list, we create a portmap in the current directory conflist:
{
  "cniVersion": "0.4.0",
  "name": "portmap",
  "plugins": [
    {
      "type": "bridge",
      "bridge": "mynet0",
      "isDefaultGateway": true,
      "forceAddress": false,
      "ipMasq": true,
      "hairpinMode": true,
      "ipam": {
        "type": "host-local",
        "subnet": "10.10.0.0/16",
        "gateway": "10.10.0.1"
      }
    },
    {
      "type": "portmap",
      "runtimeConfig": {
        "portMappings": [
          {"hostPort": 8080, "containerPort": 80, "protocol": "tcp"}
        ]
      }
    }
  ]
}
Two CNI plug-ins, bridge and portmap, are defined from the above configuration file. According to the above configuration file, cnitool will first add a network interface for the container and connect it to the host mynet0 bridge (just like example 1), and then call the portmap plug-in to map port 80 of the container to port 8080 of the host, just like docker run -p 8080:80 xxx.
Set up container network
To use cnitool, we also need to set two environment variables:
- NETCONFPATH: Specifies the path where the configuration file (*. Conf list) is located. The default path is / etc/cni/net.d
- CNI_PATH: Specifies the storage path of CNI plug-ins.
Use the cnitool add command to set up the network for the container:
CNI_PATH=~/cni/bin NETCONFPATH=. cnitool add portmap $netnspath
After setting successfully, you can access the nginx service of the container by accessing the port 8080 of the host.
Delete network configuration
To delete a container network using the cnitool del command:
CNI_PATH=~/cni/bin NETCONFPATH=. cnitool del portmap $netnspath
Note that the above delete command does not clean up the mynet0 bridge of the host. If you want to delete the host bridge, you can execute the ip link delete mynet0 type bridge command to delete it.
summary
So far, we have basically understood the working principle of CNI. The working principle of CNI can be summarized as follows:
- Define network configuration through JSON configuration file;
- Configuring the container network by calling the executable program (CNI plug-in);
- Support the combined use of multiple plug-ins through chain call.
CNI not only defines the interface specification, but also provides some built-in standard implementations, as well as the "glue layer" such as libcni, which greatly reduces the access threshold between the container runtime and the network plug-in.