Deep understanding of POD (3)
1. YAML file
In the previous course, we used some YAML files to create related resources when installing kubernetes cluster, but many students are still very unfamiliar with YAML files. So let's take a brief look at how YAML files work, use YAML files to define a kubernetes pod, and then define a kubernetes deployment.
1.1 YAML Foundation
Its basic syntax rules are as follows:
- Case sensitive
- Use indentation to represent hierarchical relationships
- Tab key is not allowed when indenting, only spaces are allowed.
- The number of indented spaces is not important, as long as the elements of the same level are aligned to the left
- #Represents a comment. From this character to the end of the line, it will be ignored by the parser.
In our kubernetes, you only need two structure types:
- Lists
- Maps
In other words, you may encounter Maps of Lists and Lists of Maps, and so on. But don't worry, as long as you master these two structures, we won't discuss other more complex ones for the time being.
1.2 Maps
First, let's take a look at maps. We all know that Map is a dictionary, which is a key value pair of key:value. Maps can make it easier for us to write configuration information, such as:
---
apiVersion: v1
kind: Pod
The first line is the separator, which is optional. In a single file, three consecutive hyphens can be used to distinguish multiple files. Here we can see that we have two keys: kind and apiVersion. Their corresponding values are v1 and Pod respectively. If the above YAML file is converted to JSON format, you will understand it easily:
{
    "apiVersion": "v1",
    "kind": "pod"
}
We are creating a relatively complex YAML file and creating a KEY corresponding to a map instead of a string:
---
apiVersion: v1
kind: Pod
metadata:
  name: kube100-site
  labels:
    app: web
In the YAML file above, the value corresponding to the KEY of metadata is a Map, and the value of the KEY of nested labels is a Map. You can nest multiple layers according to your own situation.
We also mentioned the syntax rules of YAML files above. YAML processor knows the correlation between contents according to line indentation. For example, in our YAML file above, I used two spaces as indents. The number of spaces is not important, but you have to be consistent and require at least one space (what do you mean? Don't indent two spaces at a time and four spaces at a time).
We can see that name and labels are indented at the same level, so YAML processor knows that they belong to the same MAP, and app is the value of labels because app has a larger indent.
Note: never use the tab key in YAML files.
Similarly, we can convert the above YAML file into JSON file:
{
  "apiVersion": "v1",
  "kind": "Pod",
  "metadata": {
    "name": "kube100-site",
    "labels": {
      "app": "web"
    }
  }
}
Maybe you are more familiar with the above JSON files, but you have to admit that YAML files are more semantic?
1.3 Lists
Lists are lists. In other words, they are arrays. In YAML files, we can define them as follows:
args
  - Cat
  - Dog
  - Fish
You can have any number of items in the list. The definition of each item starts with a dash (-) and can be indented with a space directly with the parent element. The corresponding JSON format is as follows:
{
    "args": ["Cat", "Dog", "Fish"]
}
Of course, the sub item of list can also be Maps, and the sub item of Maps can also be list, as shown below:
---
apiVersion: v1
kind: Pod
metadata:
  name: kube100-site
  labels:
    app: web
spec:
  containers:
    - name: front-end
      image: nginx
      ports:
        - containerPort: 80
    - name: flaskapp-demo
      image: jcdemo/flaskapp
      ports:
        - containerPort: 5000
For example, in this YAML file, we define a List object called containers. Each sub item is composed of name, image and ports. Each port has a Map with a key of containerPort. Similarly, we can convert it into the following JSON format file:
{
    "apiVersion": "v1",
    "kind": "Pod",
    "metadata": {
        "name": "kube100-site",
        "labels": {
            "app": "web"
        }
    },
    "spec": {
        "containers": [{
            "name": "front-end",
            "image": "nginx",
            "ports": [{
                "containerPort": 80
            }]
        }, {
            "name": "flaskapp-demo",
            "image": "jcdemo/flaskapp",
            "ports": [{
                "containerPort": 5000
            }]
        }]
    }
}
Do you think the file in JSON format is obviously more complex than YAML file?
1.4 creating Pod using YAML
Now we have a general understanding of YAML files. I believe you should not be so ignorant as before? Let's use YAML file to create a Deployment.
1.4.1 create Pod
[root@master ~]# vim pod.yaml
[root@master ~]# cat pod.yaml
---
apiVersion: v1
kind: Pod
metadata:
  name: kube100-site
  labels:
    app: web
spec:
  containers:
    - name: front-end
      image: nginx
      ports:
        - containerPort: 80
    - name: flaskapp-demo
      image: jcdemo/flaskapp
      ports:
        - containerPort: 5000
This is an ordinary POD file defined above. Let's briefly analyze the contents of the file:
- apiVersion, where its value is v1. This version number needs to be changed according to the kubernetes version and resource type we installed. Remember that it is not written dead
- kind, here we create a Pod. Of course, according to your actual situation, the resource types here can be Deployment, Job, progress, Service, etc.
- metadata: contains some meta information of the Pod we defined, such as name, namespace, label and so on.
- spec: includes some parameters that Kubernetes needs to know, such as containers, storage, volumes, or other parameters, as well as attributes such as whether to restart the container in case of container failure. You can find the complete properties of Kubernetes Pod in the specific Kubernetes API.
Let's look at the definition of a typical container:
...spec:
  containers:
    - name: front-end
      image: nginx
      ports:
        - containerPort: 80
...
In this example, this is a simple minimum definition: a name (front end), an nginx based image, and a port (80) that the container will listen on. Among these, only the name is very necessary. You can also specify a more complex attribute, such as the command to run when the container is started, the parameters to be used, the working directory, or whether to pull a new copy of the image each time it is instantiated. Here are some optional settings properties for the container:
- name
- image
- command
- args
- workingDir
- ports
- env
- resources
- volumeMounts
- livenessProbe
- readinessProbe
- livecycle
- terminationMessagePath
- imagePullPolicy
- securityContext
- stdin
- stdinOnce
- tty
After understanding the definition of POD, we save the YAML file of POD created above as pod.yaml, and then use kubectl to create POD:
[root@master ~]# kubectl create -f pod.yaml
pod "kube100-site" created
Then we can use the kubectl command we are familiar with earlier to view the status of the POD:
[root@master ~]# kubectl get pods
NAME           READY     STATUS    RESTARTS   AGE
kube100-site   2/2       Running   0          1m
Here, our POD is created successfully. If you have any problems during the creation process, we can also use the kubectl description above for troubleshooting. Let's delete the POD created above:
$ kubectl delete -f pod.yaml
pod "kube100-site" deleted
1.4.2 create Deployment
Now we can create a real Deployment. In the above example, we simply create a POD instance, but if the POD fails, our service will hang up. Therefore, kubernetes provides a concept of Deployment, which allows kubernetes to manage a group of POD replicas, that is, replica sets, so as to ensure that a certain number of replicas are always available, The whole service will not hang up because one POD hangs up. We can define a Deployment as follows:
---
apiVersion: apps/v1
kind: Deployment
metadata:
  name: kube100-site
spec:
  replicas: 2
Note that the corresponding value of apiVersion here is apps/v1. Of course, kind should be specified as Deployment because this is what we need. Then we can specify some meta information, such as name or label. Finally, the most important thing is the spec configuration option. Here we define that two copies are required. Of course, there are many properties that can be set, such as the minimum number of seconds that a Pod must reach when it becomes ready without any error. We can find a complete list of parameters that can be specified in the Kubernetes v1beta1 API reference. Now let's define a complete Deployment YAML file:
[root@master ~]# vim deployment.yaml
[root@master ~]# cat deployment.yaml
---
apiVersion: apps/v1
kind: Deployment
metadata:
  name: kube100-site
spec:
  replicas: 2
  selector:
    matchLabels:
      app: web
  template:
    metadata:
      labels:
        app: web
    spec:
      containers:
        - name: front-end
          image: nginx
          ports:
            - containerPort: 80
        - name: flaskapp-demo
          image: jcdemo/flaskapp
          ports:
            - containerPort: 5000
Does it look very similar to pod.yaml above? Note that the template is actually the definition of POD objects. Save the above YAML file as deployment.yaml, and then create Deployment:
[root@master ~]# kubectl create -f deployment.yaml
deployment.apps "kube100-site" created
Similarly, to view its status, we can check the Deployment list:
[root@master ~]# kubectl get deployments
NAME           DESIRED   CURRENT   UP-TO-DATE   AVAILABLE   AGE
kube100-site   2         2         2            2           20s
We can see that all Pods are running normally.
Here we have completed the process of creating Kubernetes Deployment using YAML file. After understanding the basis of YAML file, it is actually very simple to define YAML file. The most important thing is to define YAML file according to the actual situation, so it is important to consult Kubernetes document.
2. Static Pod
Last class, we explained the use of YAML files and created a simple Pod manually. At the beginning of this class, we will learn more about our Pod. In the Kubernetes cluster, in addition to the common Pod we often use, there is a special Pod called Static Pod, which is what we call Static Pod. What is special about Static Pod?
The static pod is directly managed by the kubelet process on a specific node, not through the apiserver on the master node. It cannot be associated with our common controller Deployment or daemon set. It is monitored by the kubelet process. When the pod crashes, restart the pod, and kubelet cannot check their health. The static pod is always bound to a kubelet and always runs on the same node. Kubelet will automatically create a Mirror Pod (Mirror Pod) on the apiserver of Kubernetes for each static pod. Therefore, we can query the pod in the apiserver, but it cannot be controlled through the apiserver (for example, it cannot be deleted).
There are two ways to create a static Pod: configuration file and HTTP
2.1 configuration file
A configuration file is a standard JSON or YAML format pod definition file placed in a specific directory. Use kubelet -- pod manifest path = < The Directory > to start the kubelet process. Kubelet regularly scans the directory and creates or deletes static pods according to the YAML/JSON files that appear or disappear in the directory.
For example, we start an nginx service by using a static pod on node01. Log in to node01 node, and you can find the startup configuration file corresponding to kubelet through the following command
[root@node01 ~]# systemctl status kubelet | grep Active
   Active: active (running) since I 2021-02-15 04:36:35 CST; 2 days ago
The configuration file path is:
[root@node01 ~]# sed -n "3p" /etc/systemd/system/kubelet.service.d/10-kubeadm.conf
Environment="KUBELET_SYSTEM_PODS_ARGS=--pod-manifest-path=/etc/kubernetes/manifests --allow-privileged=true"
Open this file and we can see the following environment variable configuration: environment = "kubelet_system_pods_args = -- pod manifest path = / etc / kubernetes / manifests -- allow privileged = true"
Therefore, if we install the cluster environment through kubedm, the corresponding kubelet has configured the path of our static Pod file, that is / etc / kubernetes / manifest, so we only need to create a standard JSON or YAML file of Pod under this directory:
If the above -- pod manifest path parameter is not configured in your kubelet startup parameters, add this parameter and restart kubelet.
[root@node01 ~]# cat <<EOF >/etc/kubernetes/manifests/static-web.yaml
apiVersion: v1
kind: Pod
metadata:
  name: static-web
  labels:
    app: static
spec:
  containers:
    - name: web
      image: nginx
      ports:
        - name: web
          containerPort: 80
EOF
2.2 creating static Pods via HTTP
kubelet periodically downloads the file from the address specified by the – manifest url = parameter and translates it into a pod definition in JSON/YAML format. After that, the operation mode is the same as – pod manifest path =. kubelet will download the file again from time to time. When the file changes, it will correspondingly terminate or start the static pod.
2.3 action behavior of static pods
When kubelet is started, all pods defined in the directory specified by the -- pod manifest path = or -- manifest url = parameter will be automatically created, for example, static web in our example. (it may take some time to pull the nginx image and wait patiently...)
[root@node01 ~]# docker ps -a | head -2
CONTAINER ID        IMAGE                                                                                            COMMAND                  CREATED              STATUS                    PORTS               NAMES
35e480e819a1        nginx@sha256:10b8cc432d56da8b61b070f4c7d2543a9ed17c2b23010b43af434fd40e2ca4aa                    "/docker-entrypoin..."   15 seconds ago       Up 15 seconds                                 k8s_web_static-web-node01_default_70913446a862843697c1c446d325f177_0
Now we can see through kubectl tool that a new image Pod is created here:
[root@node01 ~]# kubectl get pods
NAME                READY     STATUS    RESTARTS   AGE
kube100-site        2/2       Running   0          24m
static-web-node01   1/1       Running   0          3m  #A new image Pod is created here
The label of the static pod will be passed to the image pod, which can be used for filtering or filtering. It should be noted that we cannot delete static pods through the API server (for example, through the API server) kubectl Command), kebelet does not delete it.
[root@node01 ~]# kubectl delete pod static-web-node01
pod "static-web-node01" deleted

[root@node01 ~]# kubectl get pods
NAME                READY     STATUS    RESTARTS   AGE
kube100-site        2/2       Running   0          26m
static-web-node01   1/1       Running   0          25s   #Automatic restart container
We tried to terminate the container manually, and we can see that kubelet will restart the container automatically soon.
[root@node01 ~]# docker ps -a | head -2
CONTAINER ID        IMAGE                                                                                            COMMAND                  CREATED              STATUS                    PORTS               NAMES
35e480e819a1        nginx@sha256:10b8cc432d56da8b61b070f4c7d2543a9ed17c2b23010b43af434fd40e2ca4aa                    "/docker-entrypoin..."   About a minute ago   Up About a minute                             k8s_web_static-web-node01_default_70913446a862843697c1c446d325f177_0
2.4 dynamic addition and deletion of static pods
The running kubelet periodically scans the changes of files in the configured directory (in our example, / etc/kubernetes/manifests). When files appear or disappear in this directory, pods are created or deleted.
[root@node01 ~]#  mv /etc/kubernetes/manifests/static-web.yaml /tmp
[root@node01 ~]#  sleep 20
[root@node01 ~]#  docker ps -a
// no nginx container is running

[root@node01 ~]#  mv /tmp/static-web.yaml  /etc/kubernetes/manifests
[root@node01 ~]#  sleep 20

[root@node01 ~]# docker ps -a | head -2
CONTAINER ID        IMAGE                                                                                            COMMAND                  CREATED             STATUS                    PORTS               NAMES
35e480e819a1        nginx@sha256:10b8cc432d56da8b61b070f4c7d2543a9ed17c2b23010b43af434fd40e2ca4aa                    "/docker-entrypoin..."   3 minutes ago       Up 3 minutes                                  k8s_web_static-web-node01_default_70913446a862843697c1c446d325f177_0
In fact, for the cluster we installed with kubedm, several important components on the master node run in the way of static Pod. Log in to the master node and check the / etc / kubernetes / manifest Directory:
[root@master ~]# ls /etc/kubernetes/manifests/
etcd.yaml  kube-apiserver.yaml  kube-controller-manager.yaml  kube-scheduler.yaml
Now you see, this method also makes it possible for us to container some components of the cluster, because these pods will not be controlled by apiserver. Otherwise, how can Kube apiserver control itself? What if you accidentally delete this Pod? Therefore, kubelet can only control it by itself, which is what we call static Pod.
3. Pod Hook
We know that Pod is the smallest unit in the Kubernetes cluster, and Pod is composed of container groups, so when discussing the life cycle of Pod, we can first discuss the life cycle of container.
In fact, Kubernetes provides a life cycle hook for our container, which is what we call Pod Hook. Pod Hook is initiated by kubelet. It runs before the process in the container starts or the process in the container terminates, which is included in the life cycle of the container. We can configure hook for all containers in the pod at the same time.
Kubernetes provides us with two hook functions:
- PostStart: this hook is executed immediately after the container is created. However, there is no guarantee that the hook will run before the container ENTRYPOINT, because no parameters are passed to the handler. It is mainly used for resource deployment, environment preparation, etc. However, it should be noted that if the hook takes too long to run or hang, the container will not reach the running state.
- PreStop: this hook is called immediately before the container terminates. It is blocked, which means it is synchronous, so it must be completed before the call to delete the container is issued. It is mainly used to gracefully close applications, notify other systems, etc. If the hook hangs during execution, the Pod phase will stay in the running state and will never reach the failed state.
If the PostStart or PreStop hook fails, it will kill the container. So we should make the hook function as light as possible. Of course, in some cases, it is reasonable to run the command for a long time, such as saving the state in advance before stopping the container.
In addition, we have two ways to implement the above hook function:
- Exec - used to execute a specific command, but note that the resources consumed by the command will be counted into the container.
- HTTP - performs an HTTP request on a specific endpoint on the container.
3.1 example 1 Environmental preparation
In the following example, an Nginx Pod is defined, in which the PostStart hook function is set, that is, after the container is created successfully, a sentence is written to the / usr/share/message file.
[root@node01 ~]# vim hook-demo1.yaml
[root@node01 ~]# cat hook-demo1.yaml
apiVersion: v1
kind: Pod
metadata:
  name: hook-demo1
spec:
  containers:
  - name: hook-demo1
    image: nginx
    lifecycle:
      postStart:
        exec:
          command: ["/bin/sh", "-c", "echo Hello from the postStart handler > /usr/share/message"]
#Verification results
[root@node01 ~]# kubectl create -f hook-demo1.yaml
pod "hook-demo1" created
[root@node01 ~]# kubectl get pods
NAME                            READY     STATUS    RESTARTS   AGE
hook-demo1                      1/1       Running   0          8s

[root@node01 ~]# kubectl exec hook-demo1 -it /bin/bash
root@hook-demo1:/# cat /usr/share/message
Hello from the postStart handler
3.2 example 2 deleting resource objects gracefully
When the user requests to delete the resource object containing pod (such as Deployment, etc.), K8S provides two kinds of information notifications in order to make the application close gracefully (that is, let the application close the software after completing the request being processed):
- Default: K8S informs node to execute the docker stop command. Docker will first send the system signal SIGTERM to the process with PID 1 in the container, and then wait for the application in the container to terminate execution. If the waiting time reaches the set timeout or the default timeout (30s), it will continue to send the system signal SIGKILL to forcibly kill the process.
- Using the pod life cycle (using the PreStop callback function), it executes before sending the termination signal.
By default, all graceful exit times are within 30 seconds. The kubectl delete command supports the -- grace period = < seconds > option, which allows users to override the default value with the value they specify. The value '0' represents the forced deletion of pod. In kubectl 1.5 and above, when performing the forced deletion, you must also specify -- force -- grace period = 0.
Forced deletion of a pod is to delete the pod immediately from the cluster status and etcd. When the pod is forcibly deleted, the API server will not wait for confirmation from the kubelet on the node where the pod is located: the pod has been terminated. In the API, pods will be deleted immediately. On the node, after pods is set up and terminated, there will be a small grace period before they are forcibly killed.
In the following example, an Nginx Pod is defined, in which the PreStop hook function is set, that is, the Nginx is gracefully closed before the container exits:
apiVersion: v1
kind: Pod
metadata:
  name: hook-demo2
spec:
  containers:
  - name: hook-demo2
    image: nginx
    lifecycle:
      preStop:
        exec:
          command: ["/usr/sbin/nginx","-s","quit"]
[root@node01 ~]# vim hook-demo2.yaml
[root@node01 ~]# cat hook-demo2.yaml
---
apiVersion: v1
kind: Pod
metadata:
  name: hook-demo2
  labels:
    app: hook
spec:
  containers:
  - name: hook-demo2
    image: nginx
    ports:
    - name: webport
      containerPort: 80
    volumeMounts:
    - name: message
      mountPath: /usr/share/
    lifecycle:
      preStop:
        exec:
          command: ['/bin/sh', '-c', 'echo Hello from the preStop Handler > /usr/share/message']
  volumes:
  - name: message
    hostPath:
      path: /tmp
[root@node01 ~]# kubectl create -f hook-demo2.yaml
pod "hook-demo2" created
[root@node01 ~]# kubectl get pods
NAME                            READY     STATUS    RESTARTS   AGE
hook-demo2                      1/1       Running   0          7s

[root@node01 ~]# kubectl delete pod hook-demo2
pod "hook-demo2" deleted
[root@node01 ~]# kubectl get pods    #Delete after a while
NAME                            READY     STATUS        RESTARTS   AGE
hook-demo2                      0/1       Terminating   0          55s

[root@node01 ~]# cat /tmp/message
Hello from the preStop Handler
In addition, the Hook call log does not expose an event to the Pod, so it can only be obtained through the describe command. If there is an error, you can see events such as FailedPostStartHook or failedprestopphook.
4. Health examination
In the last lesson, we learned the two hook functions of the container life cycle in Pod, PostStart and PreStop. PostStart is executed immediately after the container is created, and PreStop is executed before the container is terminated. In addition to the above two hook functions, there is another configuration that will affect the life cycle of the container, that is, the health check probe.
In the Kubernetes cluster, we can affect the life cycle of the container by configuring the survival probe and the readability probe.
- kubelet uses the liveness probe to determine whether your application is running. The popular point will be whether it is still alive. Generally speaking, if your program crashes, Kubernetes will immediately know that the program has been terminated, and then restart the program. The purpose of our liveness probe is to capture that the current application has not terminated or crashed. If these situations occur, restart the container in this state so that the application can continue to run in case of bug s.
- Kubelet uses the readiness probe to determine whether the container is ready to receive traffic. This probe is more popular, that is, whether it is ready and can start working now. Only when all the containers in the Pod are in the ready state, kubelet will recognize that the Pod is in the ready state, because there may be multiple containers under a Pod. Of course, if the Pod is not ready, we will remove it from our work queue (actually the service we need to focus on later), so that our traffic will not be routed to the Pod.
Like the previous hook function, our two probes support two configurations:
- exec: execute a command
- http: detects an http request
- tcpSocket: with this configuration, kubelet
Will attempt to open the container's socket on the specified port. If a connection can be established, the container is considered healthy, and if not, it is considered failed. It's actually checking the port
4.1 exec
OK, let's show you how to use the survival probe. First, we use exec to execute the command to detect the survival of the container, as follows:
[root@node01 ~]# vim liveness-exec.yaml
[root@node01 ~]# cat liveness-exec.yaml
apiVersion: v1
kind: Pod
metadata:
  name: liveness-exec
  labels:
    test: liveness
spec:
  containers:
  - name: liveness
    image: busybox
    args:
    - /bin/sh
    - -c
    - touch /tmp/healthy; sleep 30; rm -rf /tmp/healthy; sleep 600
    livenessProbe:
      exec:
        command:
        - cat
        - /tmp/healthy
      initialDelaySeconds: 5
      periodSeconds: 5
Here we need to use a new attribute: livenessProbe. Next, execute a command through exec. The periodSeconds attribute means that kubelet executes the survival probe every 5 seconds, that is, the above cat / TMP / health command every 5 seconds. If the command is executed successfully, it will return 0, Then kubelet will think that the current container is alive and monitored. If the returned value is non-zero, kubelet will kill the container and restart it. Another attribute, initialDelaySeconds, indicates that we have to wait for 5 seconds when the probe is executed for the first time, which can ensure that our container has enough time to start. You can imagine that if the waiting time for your first probe execution is too short, is it likely that the container has not started normally, so the surviving probe is likely to fail all the time, so it will restart endlessly, right? Therefore, a reasonable initialDelaySeconds is very important.
In addition, when the container is started, we execute the following commands:
bin/sh -c "touch /tmp/healthy; sleep 30; rm -rf /tmp/healthy; sleep 600"
This means that there is a / TMP / health file within the first 30 seconds of the container. Executing the cat / TMP / health command within these 30 seconds will return a successful return code. After 30 seconds, we delete this file. Now, whether cat / TMP / health will fail. At this time, the container will be restarted.
Let's create the Pod
[root@node01 ~]# kubectl apply -f liveness-exec.yaml
pod "liveness-exec" created

[root@node01 ~]#  kubectl get pods
NAME                            READY     STATUS    RESTARTS   AGE
liveness-exec                   1/1       Running   0          44s
Within 30 seconds, view the Event of the Pod:
[root@node01 ~]# kubectl describe pod liveness-exec
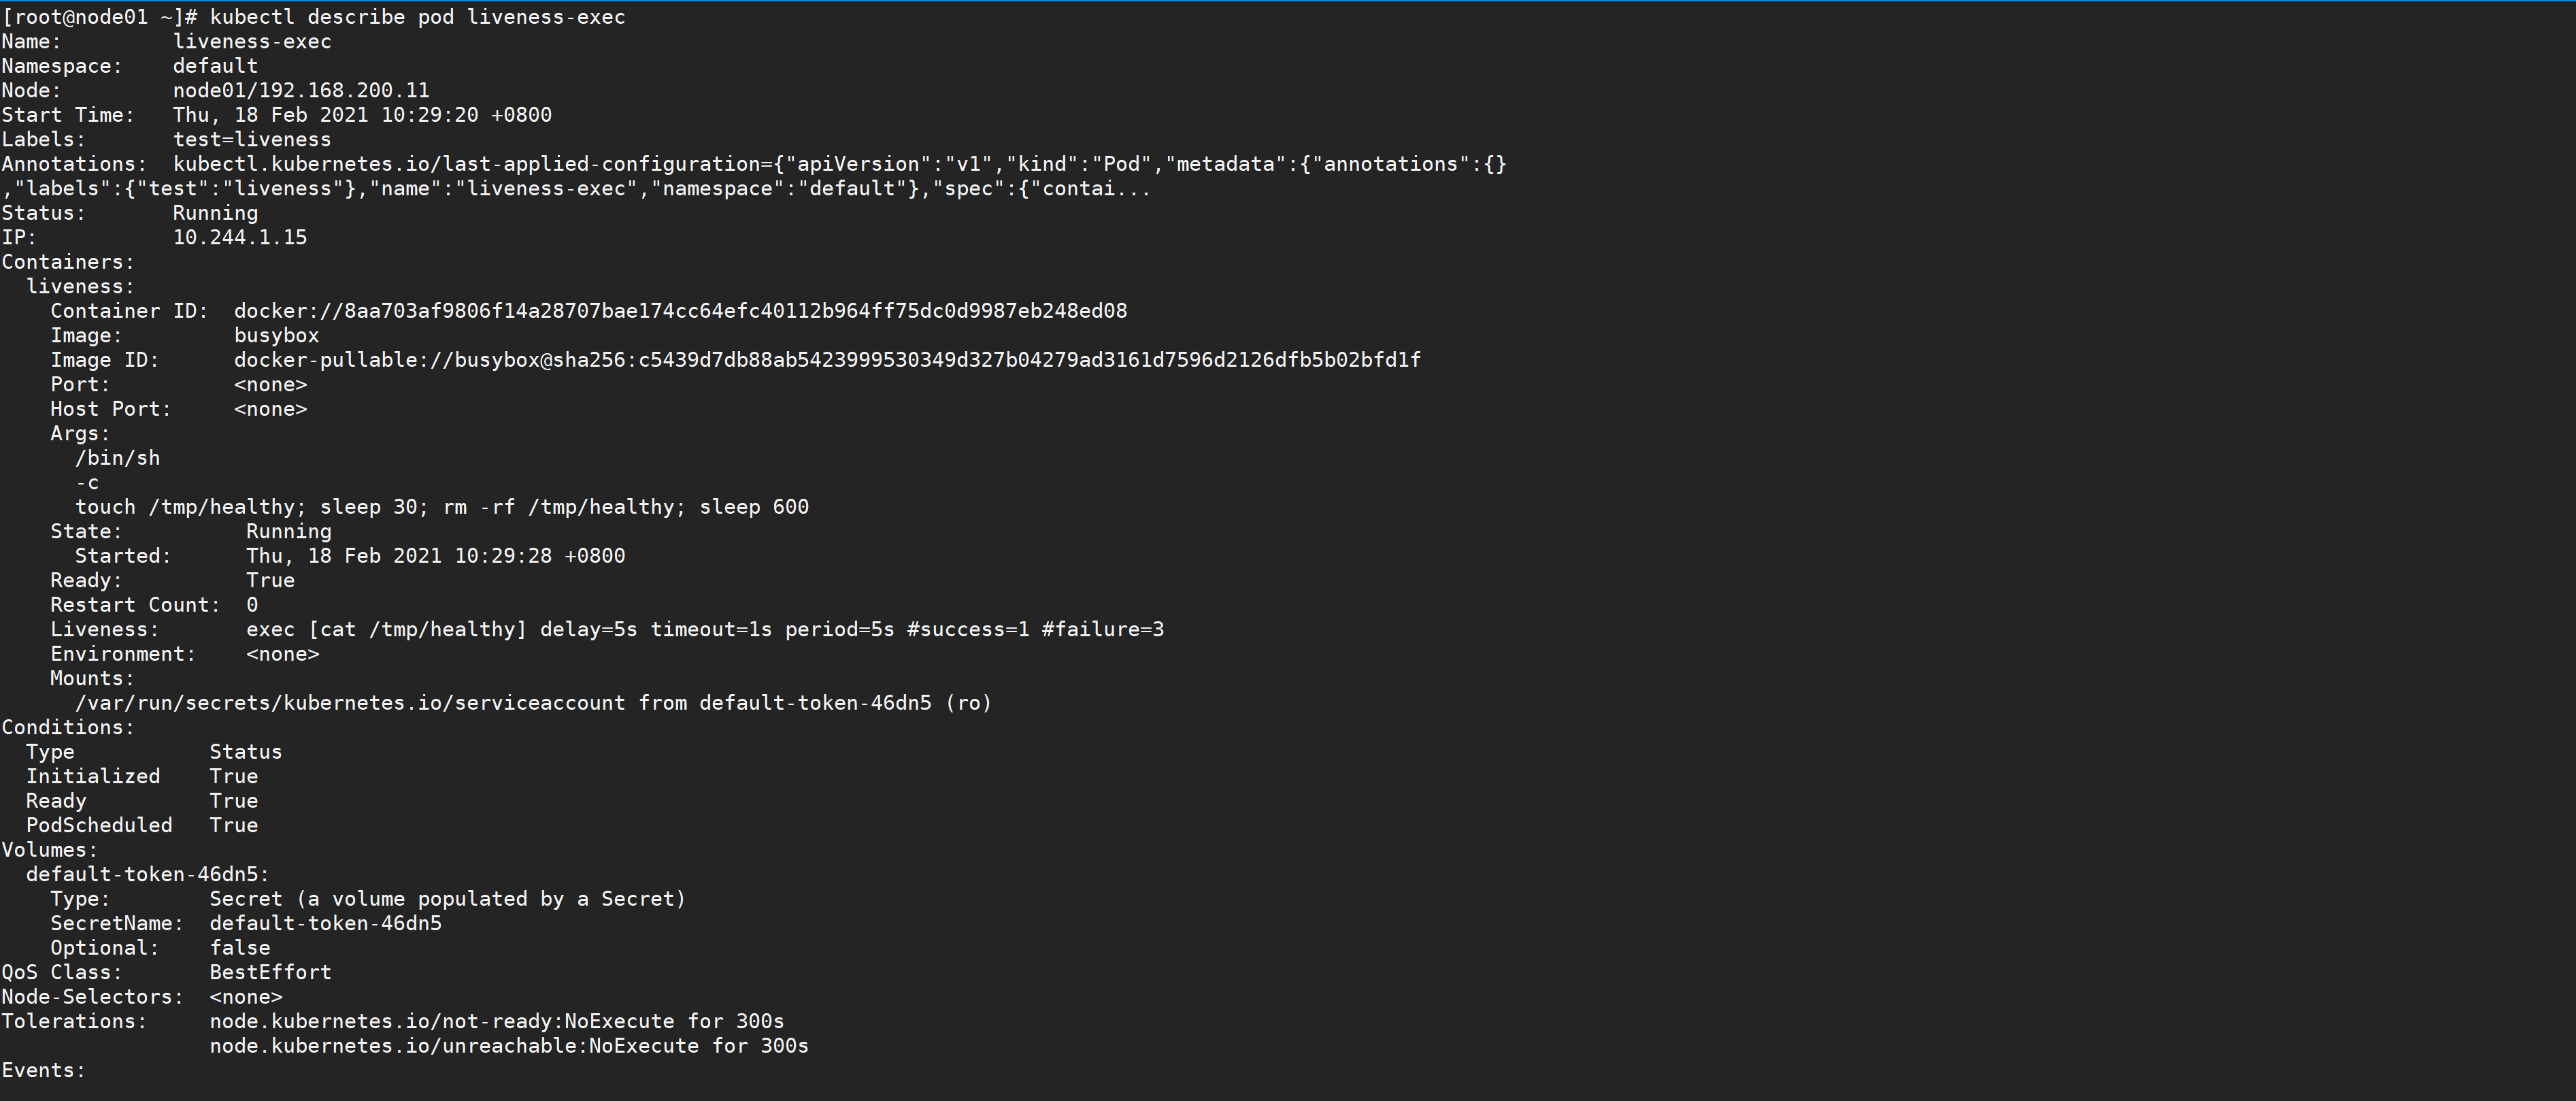

We can observe that the container starts normally. After a while, for example, 40s, check the Pod Event. At the bottom, a message shows that the liveness probe failed, and the container was deleted and recreated.
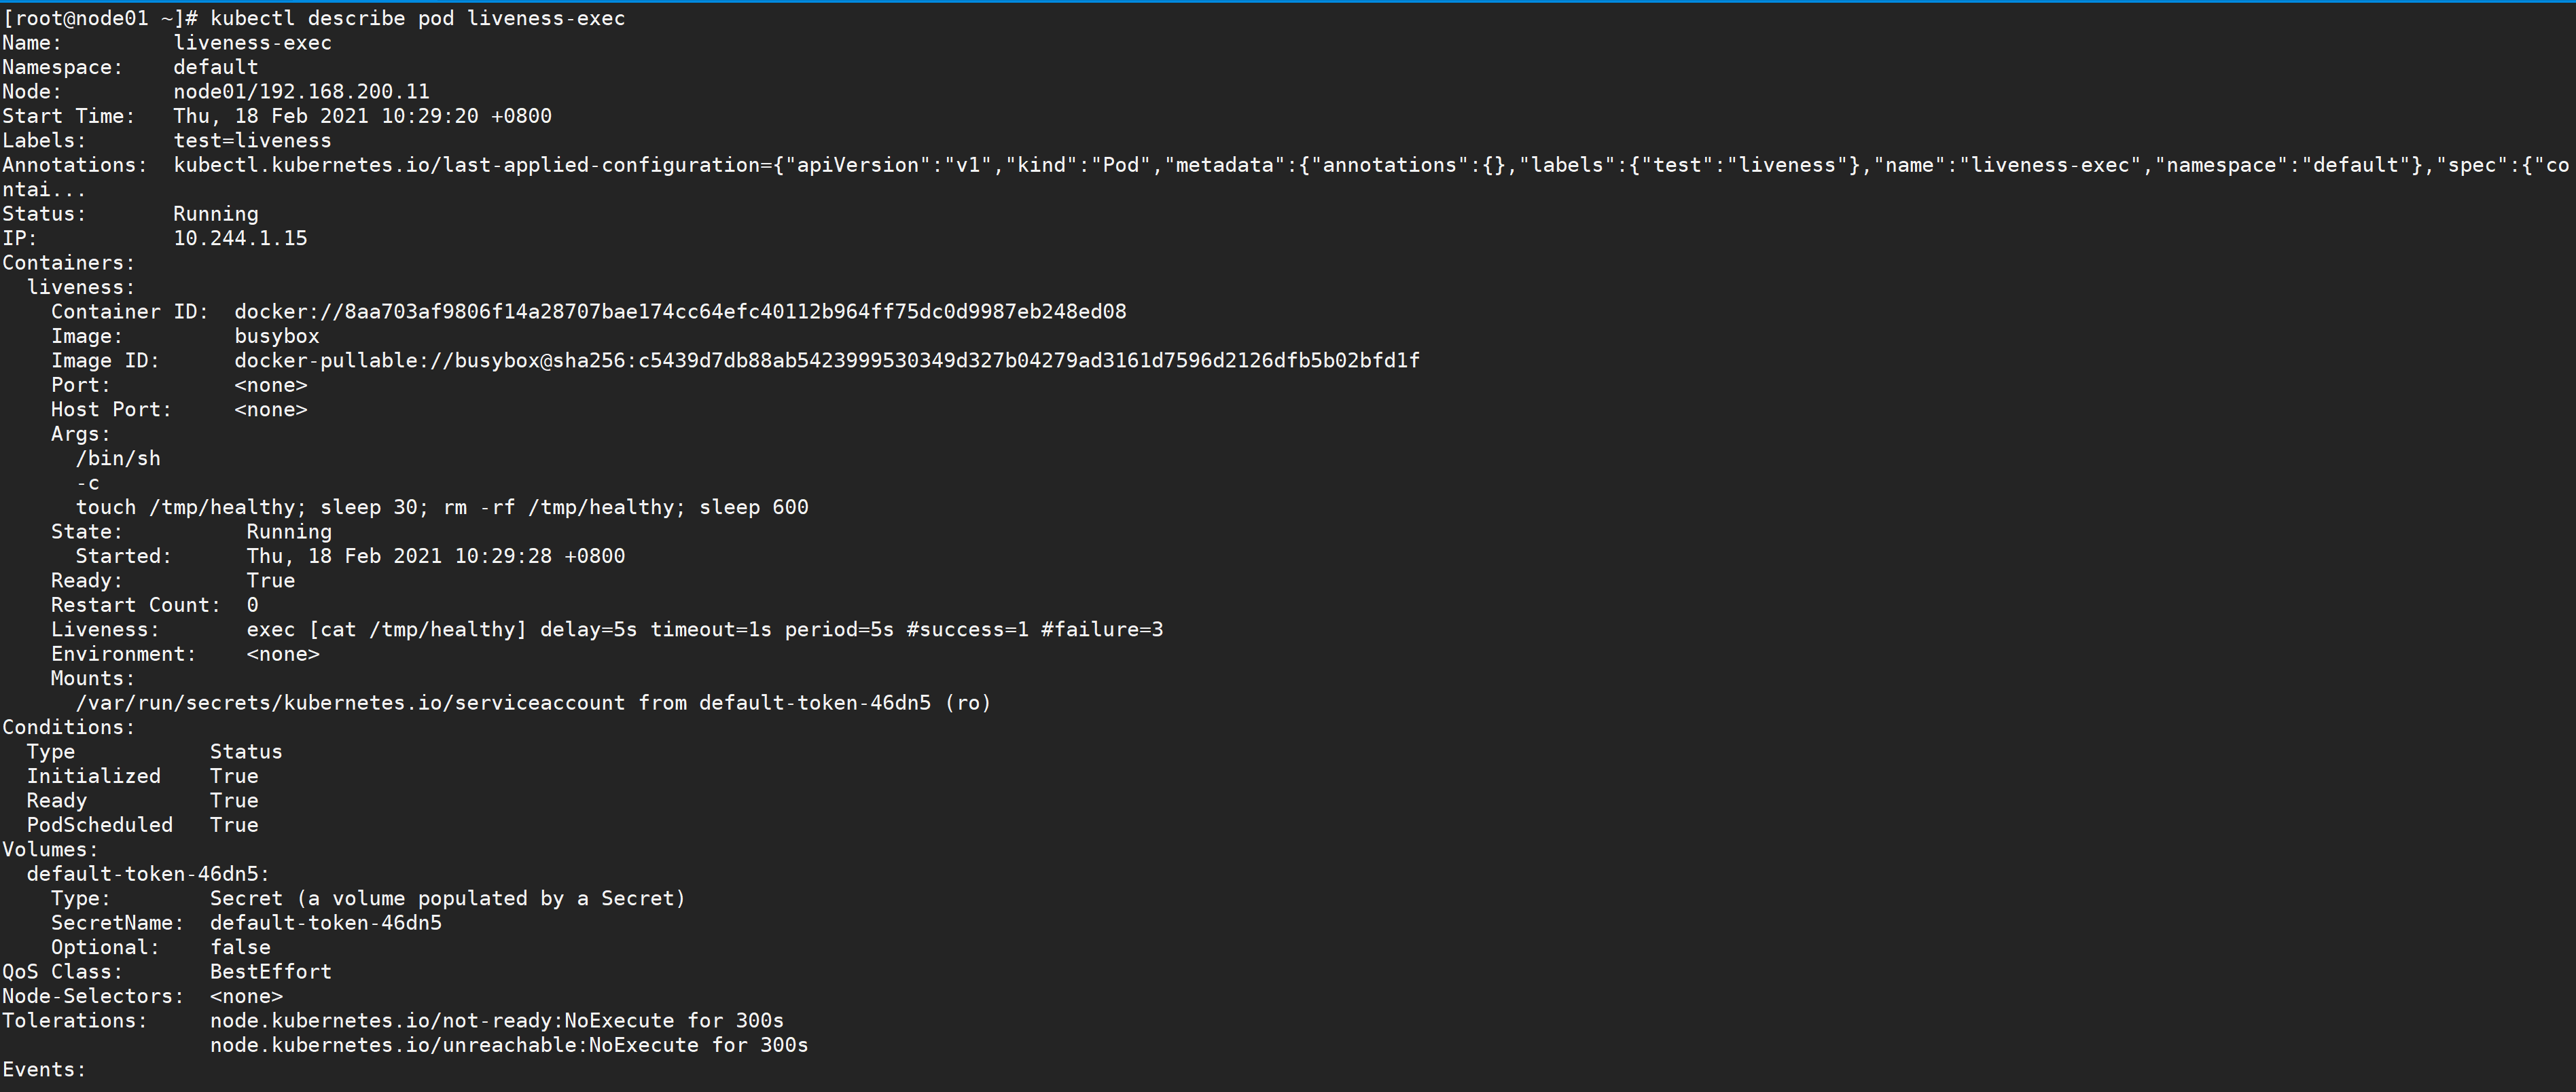

Then, through kubectl get pod liveness exec, you can see that the rest value is increased by 1.
[root@node01 ~]#  kubectl get pods
NAME                            READY     STATUS    RESTARTS   AGE
liveness-exec                   1/1       Running   1          1m
4.2 HTTP GET
Similarly, we can also use HTTP GET request to configure our survival probe. Here we use a liveness image to verify the demonstration,
[root@node01 ~]# vim liveness-http.yaml
[root@node01 ~]# cat liveness-http.yaml
apiVersion: v1
kind: Pod
metadata:
  labels:
    test: liveness
  name: liveness-http
spec:
  containers:
  - name: liveness
    image: cnych/liveness
    args:
    - /server
    livenessProbe:
      httpGet:
        path: /healthz
        port: 8080
        httpHeaders:
        - name: X-Custom-Header
          value: Awesome
      initialDelaySeconds: 3
      periodSeconds: 3
Similarly, according to the periodSeconds attribute, we can know that kubelet needs to execute the liveness probe every 3 seconds, which will send an HTTP GET request to port 8080 of the server in the container. If the handler of the / health path of the server returns a successful return code, kubelet will assume that the container is alive and healthy. If a failed return code is returned, kubelet will kill the container and restart it.. initialDelaySeconds specifies that kubelet needs to wait 3 seconds before performing the first probe.
Generally speaking, any return code greater than 200 and less than 400 will be regarded as a successful return code. Other return codes will be considered as failed return codes.
Let's take a look at the implementation of healthz above:
http.HandleFunc("/healthz", func(w http.ResponseWriter, r *http.Request) {
    duration := time.Now().Sub(started)
    if duration.Seconds() > 10 {
        w.WriteHeader(500)
        w.Write([]byte(fmt.Sprintf("error: %v", duration.Seconds())))
    } else {
        w.WriteHeader(200)
        w.Write([]byte("ok"))
    }
})
It roughly means that the status code 200 is returned in the first 10s, and the status of 500 is returned after 10s_ Code. So three seconds after the container starts, kubelet starts to perform a health check. The first health monitoring will succeed, because it is within 10s, but after 10 seconds, the health check will fail, because now an error status code is returned, so kubelet will kill and restart the container.
Similarly, let's create the Pod and test the effect
[root@node01 ~]# kubectl apply -f liveness-http.yaml
pod "liveness-http" created

[root@node01 ~]#  kubectl get pods
NAME                            READY     STATUS             RESTARTS   AGE
liveness-http                   1/1       Running            0          10s
After 10 seconds, check the event of Pod, confirm that the liveness probe fails and restart the container.
[root@node01 ~]# kubectl describe pod liveness-http
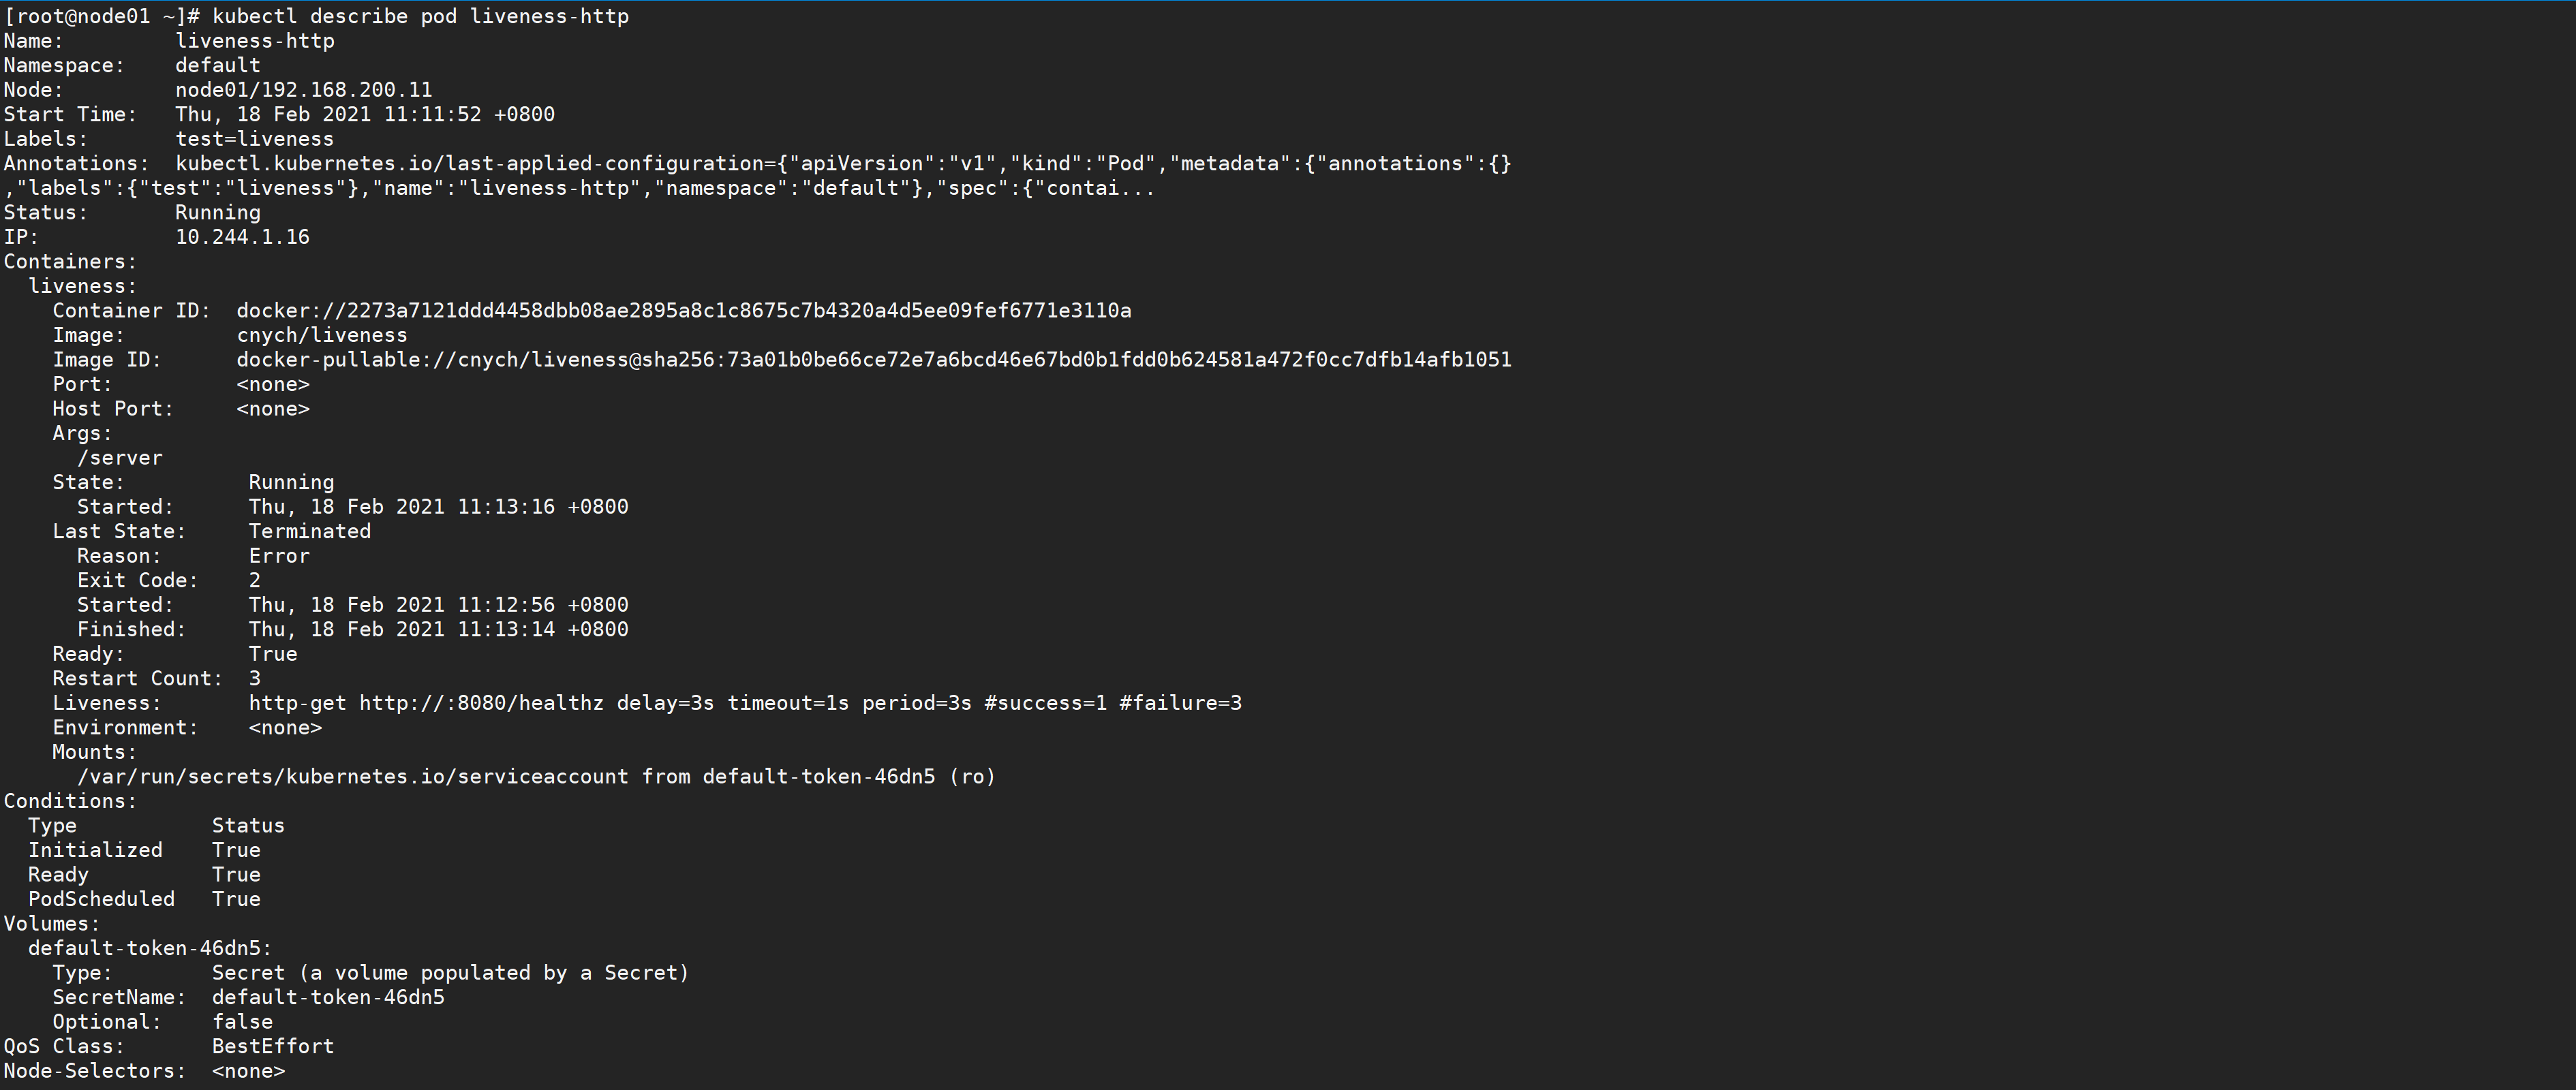

Then we configure the survival probe through the port. With this configuration, kubelet will try to open the socket of the container on the specified port. If a connection can be established, the container is considered healthy, and if not, it is considered failed.
[root@node01 ~]# cat liveness-readiness.yaml
apiVersion: v1
kind: Pod
metadata:
  name: goproxy
  labels:
    app: goproxy
spec:
  containers:
  - name: goproxy
    image: cnych/goproxy
    ports:
    - containerPort: 8080
    readinessProbe:
      tcpSocket:
        port: 8080
      initialDelaySeconds: 5
      periodSeconds: 10
    livenessProbe:
      tcpSocket:
        port: 8080
      initialDelaySeconds: 15
      periodSeconds: 20
We can see that the configuration of TCP check is very similar to that of HTTP check, except that httpGet is replaced by tcpSocket. Moreover, we used both readiness probe and liveness probe. Five seconds after the container starts, kubelet will send the first readability probe. The probe will be connected to the 8080 end of the container. If the connection is successful, the Pod will be marked as ready. Kubelet will then perform this check every 10 seconds.
In addition to the readiness probe, this configuration also includes the liveness probe. 15 seconds after the container starts, kubelet will run the first liveness probe. Like the readiness probe, this will attempt to connect to port 8080 of the container. If the liveness probe fails, the container will restart.
Sometimes, the application may be temporarily unable to provide external services. For example, the application may need to load a large amount of data or configuration files during startup. In this case, you don't want to kill the application or provide services. At this time, we can use the readiness probe to detect and mitigate these situations. The container in the Pod can report that it is not ready to handle the traffic sent by the Kubernetes service.
From the YAML file above, we can see that the configuration of the readiness probe is very similar to that of the liveness probe, which is basically the same. The only difference is to use readinessProbe instead of liveness probe. If both are used at the same time, it can ensure that the traffic will not reach the container that has not been prepared. After preparation, if the application has an error, the container will be restarted.
In addition, in addition to the initialDelaySeconds and periodSeconds attributes above, the probe can also be configured with the following parameters:
- timeoutSeconds: probe timeout, default 1 second, minimum 1 second.
- successThreshold: the minimum number of successful consecutive detections after a failed detection is considered successful. The default is 1, but it must be 1 if it is liveness. The minimum value is 1.
- failureThreshold: after the detection is successful, the minimum number of consecutive detection failures is recognized as failure. The default value is 3 and the minimum value is 1.
This is how to use the survival probe and the readability probe.
5. Initialize the container
In the last lesson, we learned how to use two probes for health inspection of containers: survival probe and readability probe. We said that these two probes can affect the life cycle of containers, including the two hook functions PostStart and PreStop of containers mentioned earlier. What we want to introduce to you today is Init Container.
Init containers are containers used for initialization. They can be one or more. If there are multiple containers, these containers will be executed in the defined order. The main container will not be started until all init containers are executed. We know that all containers in a Pod share data volumes and network namespaces, so the data generated in Init Container can be used by the main container.
Does it feel that Init Container is a little similar to the previous hook function, but does some work before the container is executed, right? From an intuitive point of view, the initialization container is indeed a bit like PreStart, but the hook function and our Init Container are in different stages. We can understand it through the following figure:
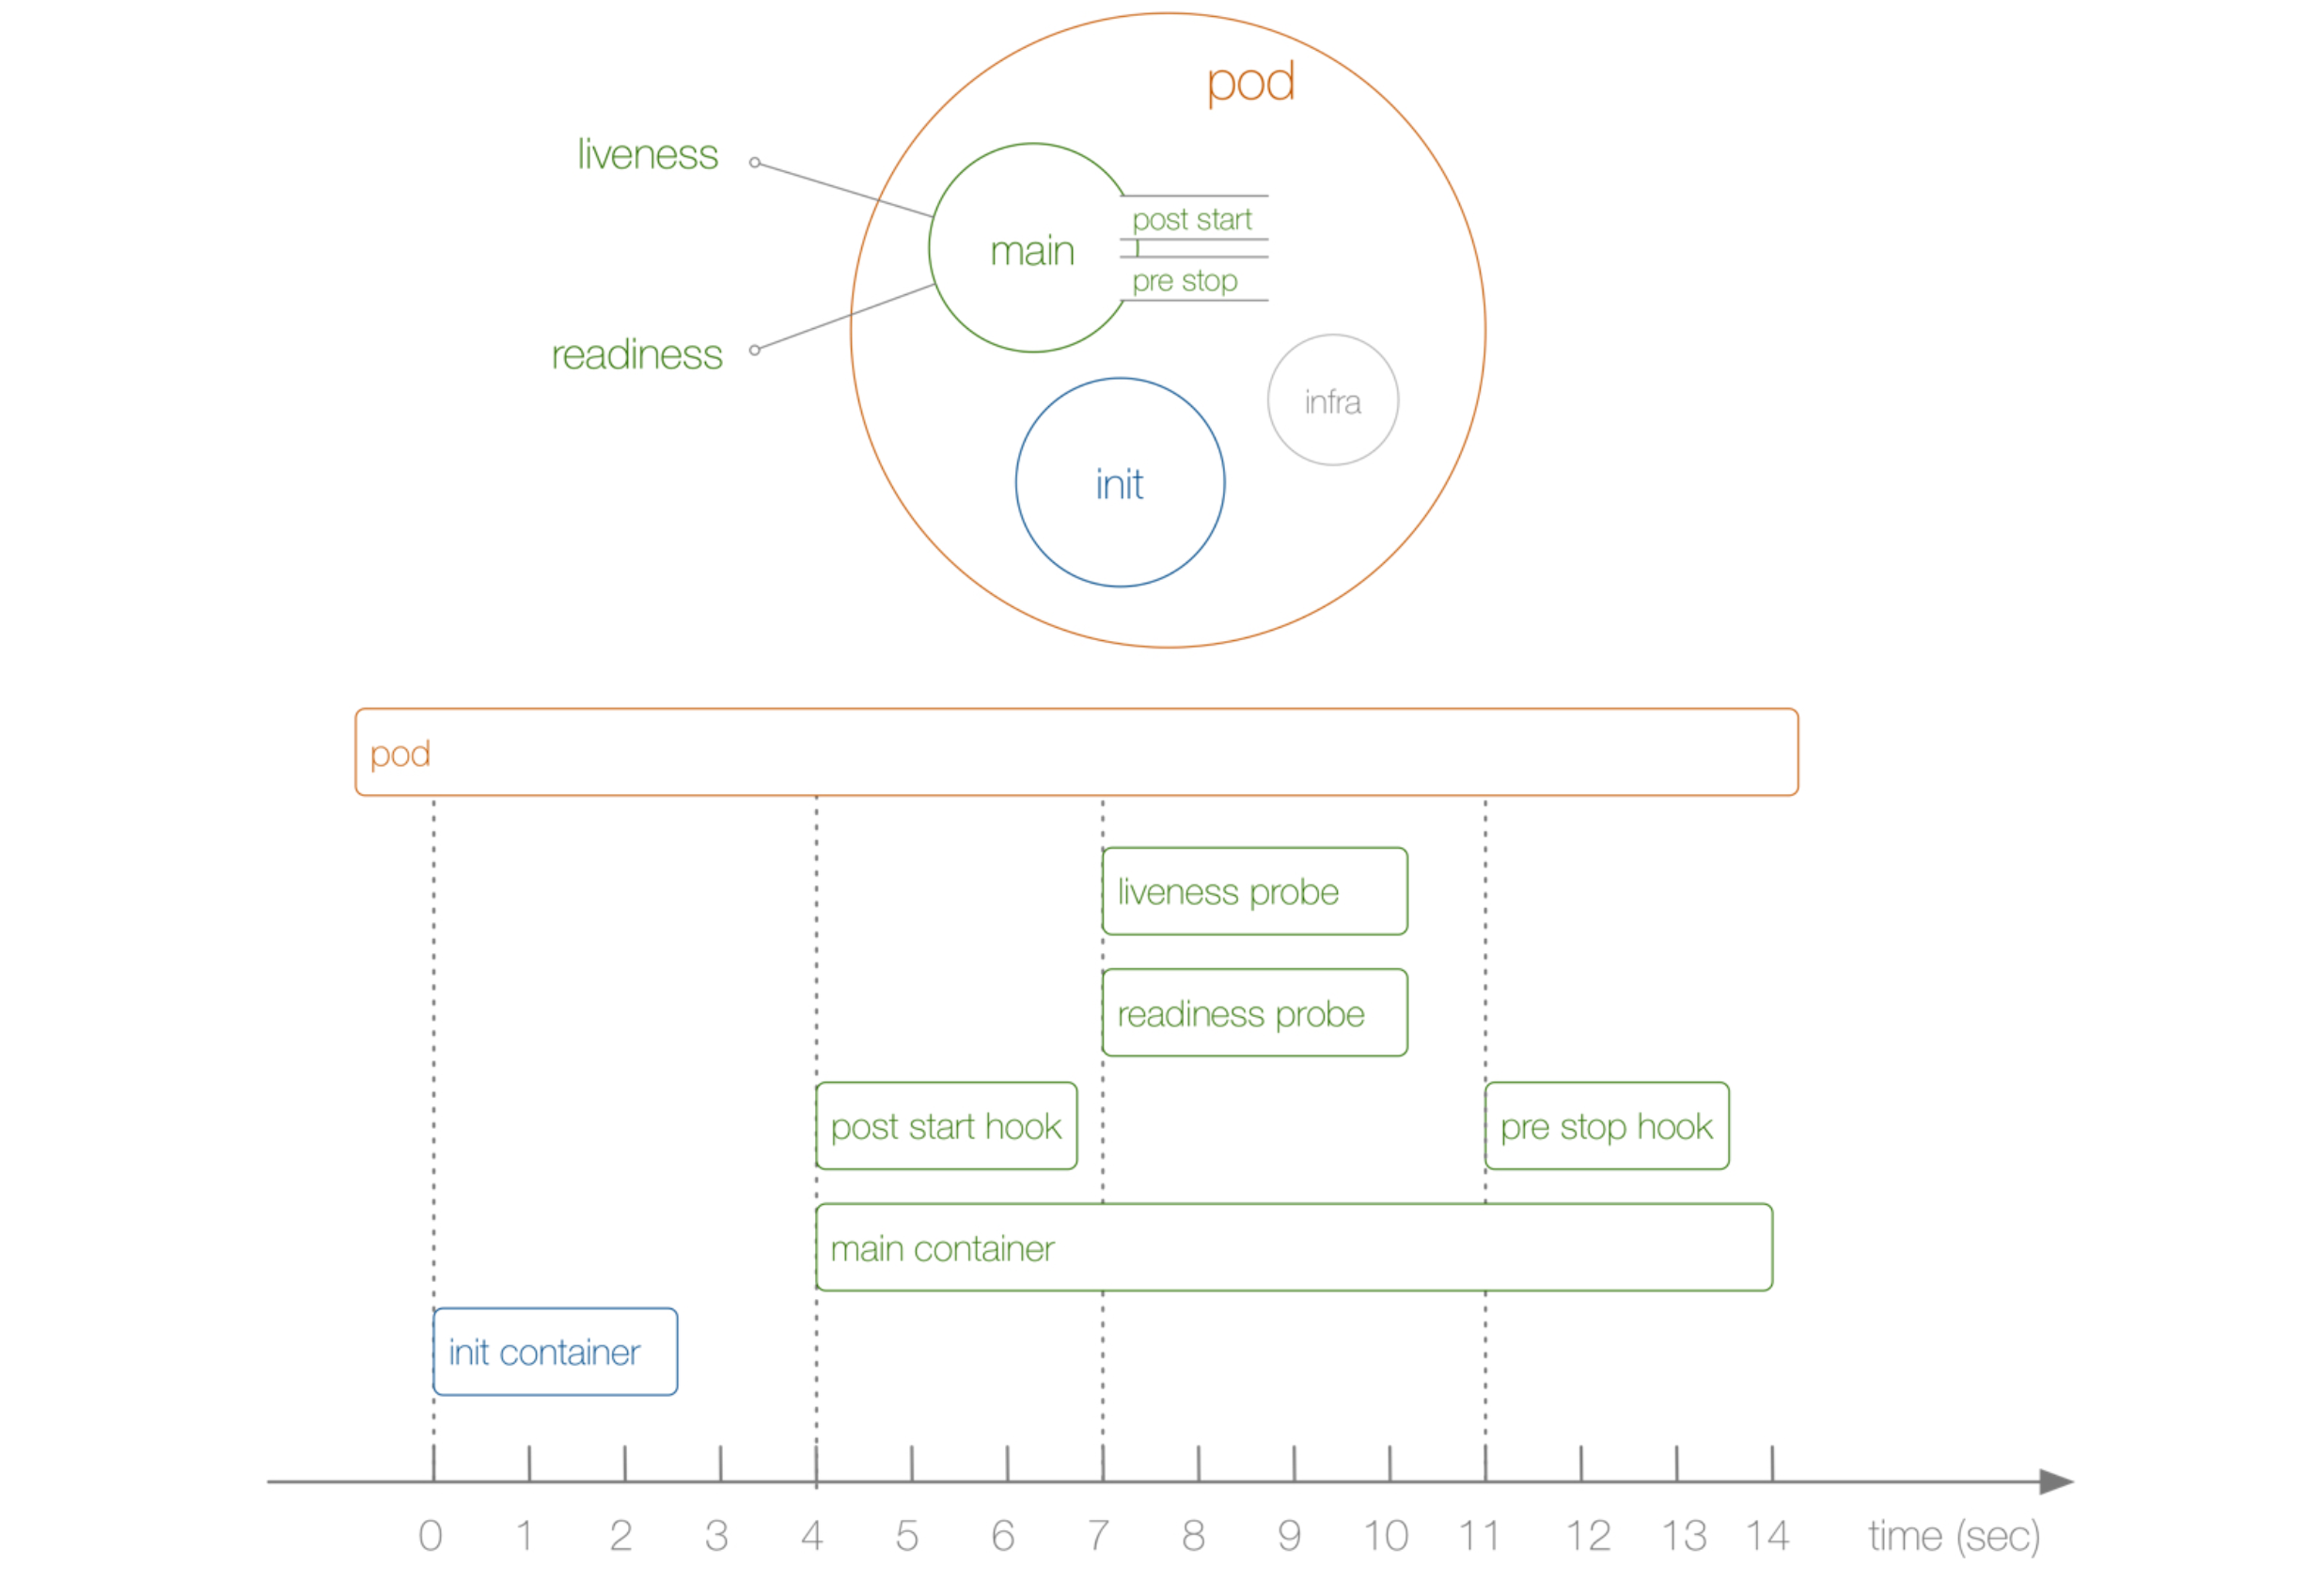
From the above figure, we can intuitively see that PostStart and PreStop, including liveness and readiness, belong to the life cycle of the main container, while Init Container is independent of the main container. Of course, they all belong to the life cycle of Pod. Now we should understand the differences between Init Container and hook function.
In addition, we can see that there is an infra container on the right of our Pod. What kind of container is this? We can view the Docker container corresponding to any Pod in the cluster environment. We can find that each Pod contains an image of pause-amd64, which is our infra image. We know that all containers under the Pod share the same network namespace, and this image is for this purpose, Therefore, each Pod will contain an image.
Many students can't start the Pod at first because the infra image is not pulled down. By default, the image needs to be pulled from the Google server, so it needs to be pulled to the node in advance.
We say Init Container is mainly used to initialize containers. What are its application scenarios?
- Wait for other modules Ready: this can be used to solve the dependency between services. For example, we have a Web service that depends on another database service, but we can't guarantee that the dependent database service has been started when we start the Web service, Therefore, Web service connection database exceptions may occur for a period of time. To solve this problem, we can use an InitContainer in the Pod of the Web service to check whether the database is Ready in the initialization container. After it is Ready, the initialization container will end and exit, and then our main container Web service will be started. At this time, there will be no problem connecting to the database.
- Initialization configuration: for example, detect all existing member nodes in the cluster, and prepare the cluster configuration information for the main container, so that the main container can join the cluster with this configuration information after it is up.
- Other scenarios: such as registering the pod to a central database, configuration center, etc.
Let's first show you how to use the initialization container in the scenario of service dependency, as shown in the following Pod definition method
[root@node01 ~]# vim init-pod.yaml
[root@node01 ~]# cat init-pod.yaml
apiVersion: v1
kind: Pod
metadata:
  name: init-pod
  labels:
    app: init
spec:
  containers:
  - name: init-container
    image: busybox
    command: ['sh', '-c', 'echo The app is running! && sleep 3600']
  initContainers:
  - name: init-myservice
    image: busybox
    command: ['sh', '-c', 'until nslookup myservice; do echo waiting for myservice; sleep 2; done;']
  - name: init-mydb
    image: busybox
    command: ['sh', '-c', 'until nslookup mydb; do echo waiting for mydb; sleep 2; done;']
We can first create the above Pod and then view the status of the next Pod
[root@node01 ~]# kubectl apply -f init-pod.yaml
pod "init-pod" created

[root@node01 ~]# kubectl get pods
NAME                            READY     STATUS     RESTARTS   AGE
init-pod                        0/1       Init:0/2   0          3s
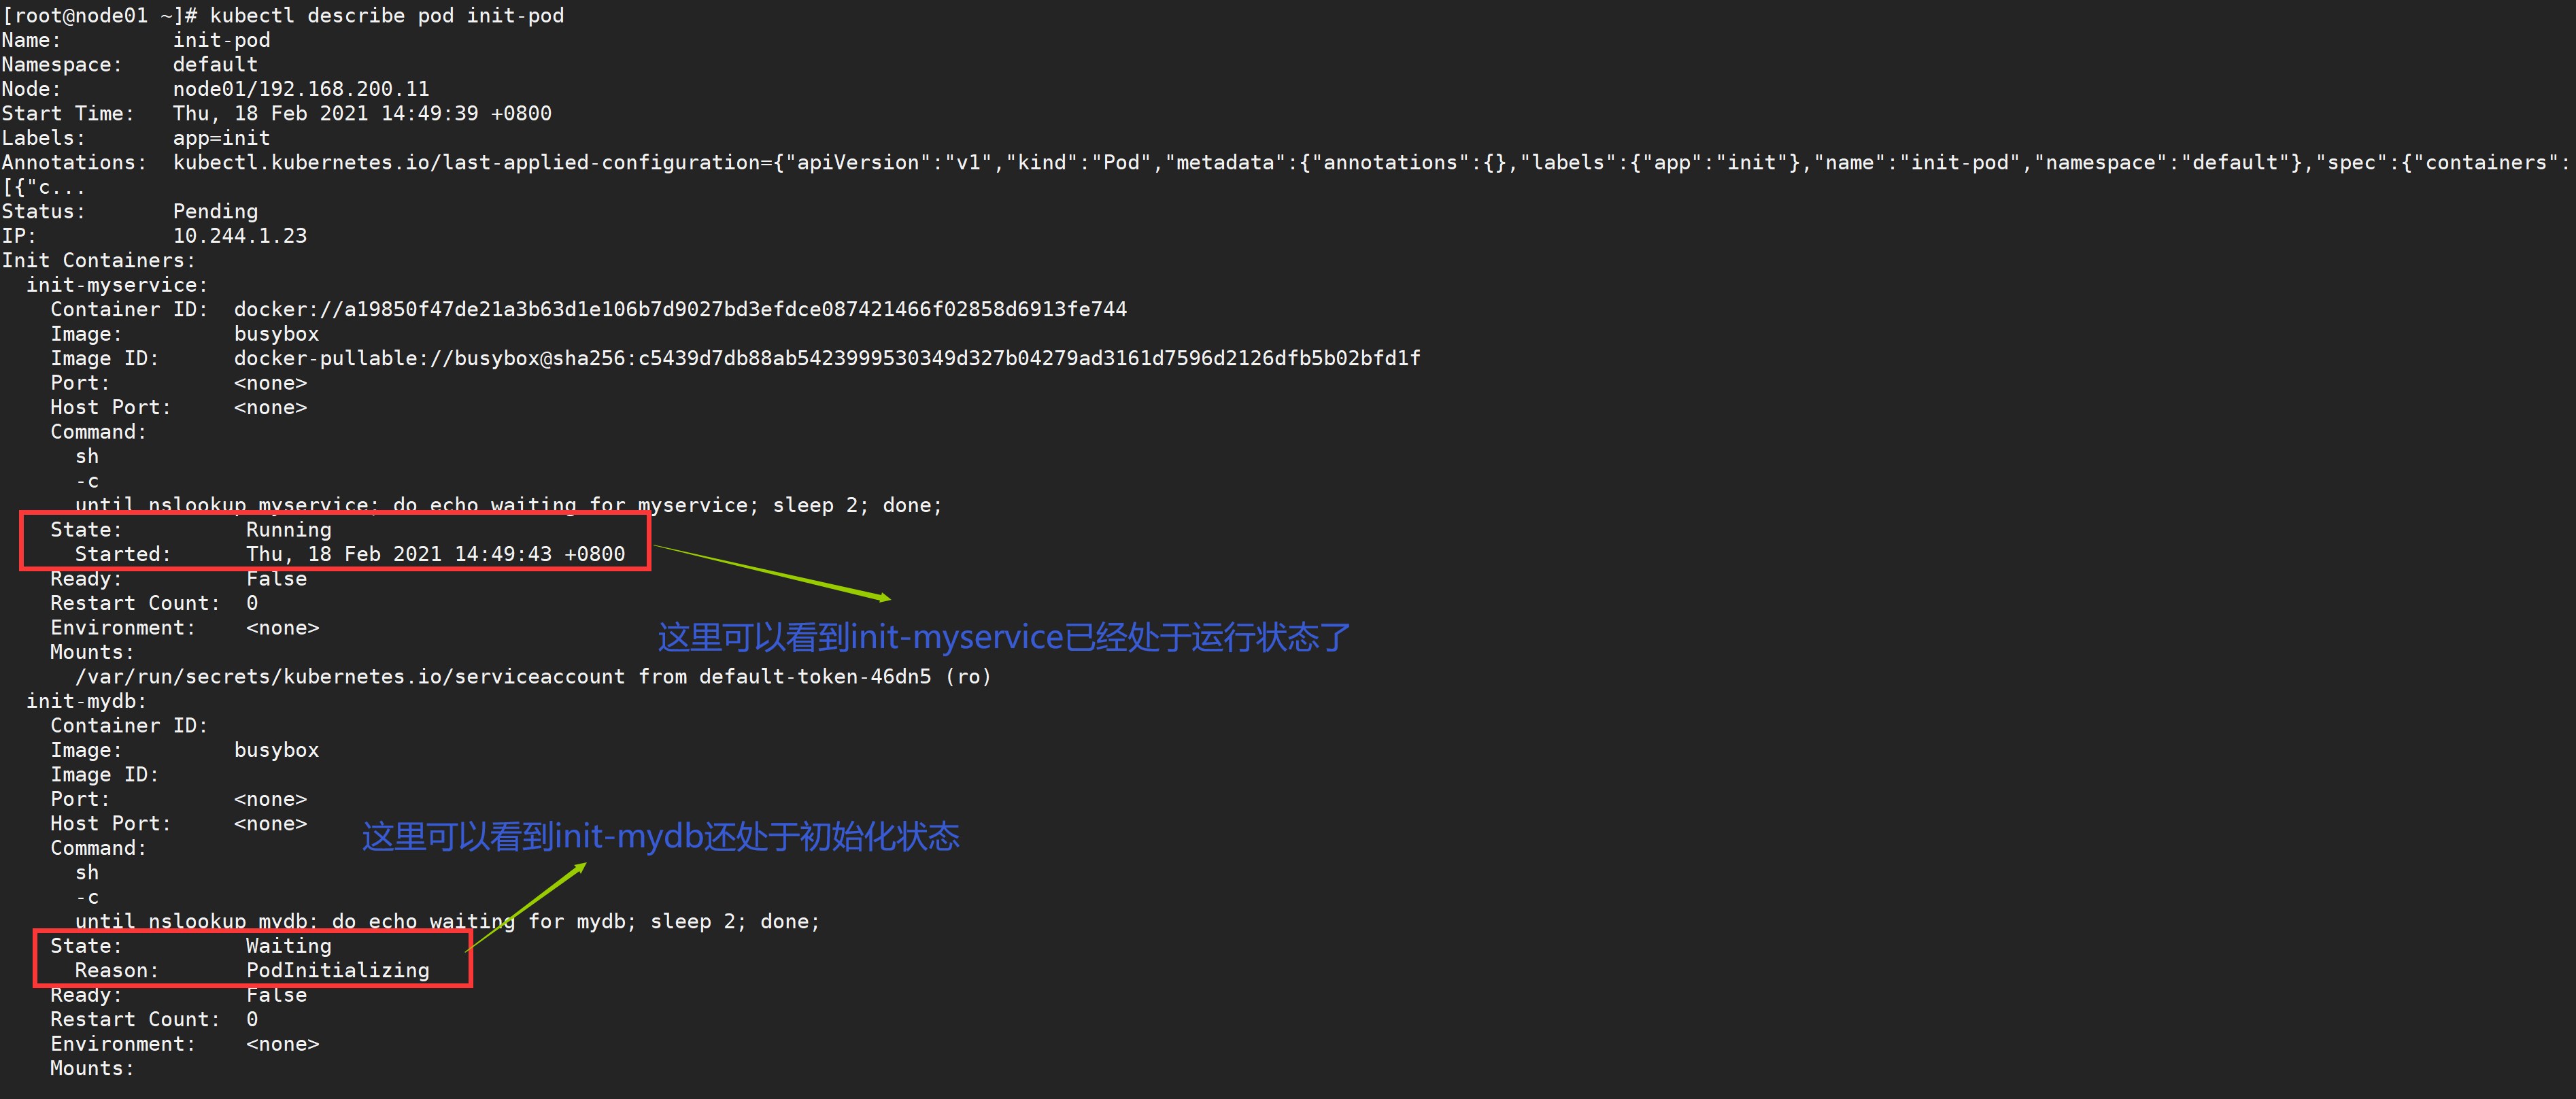
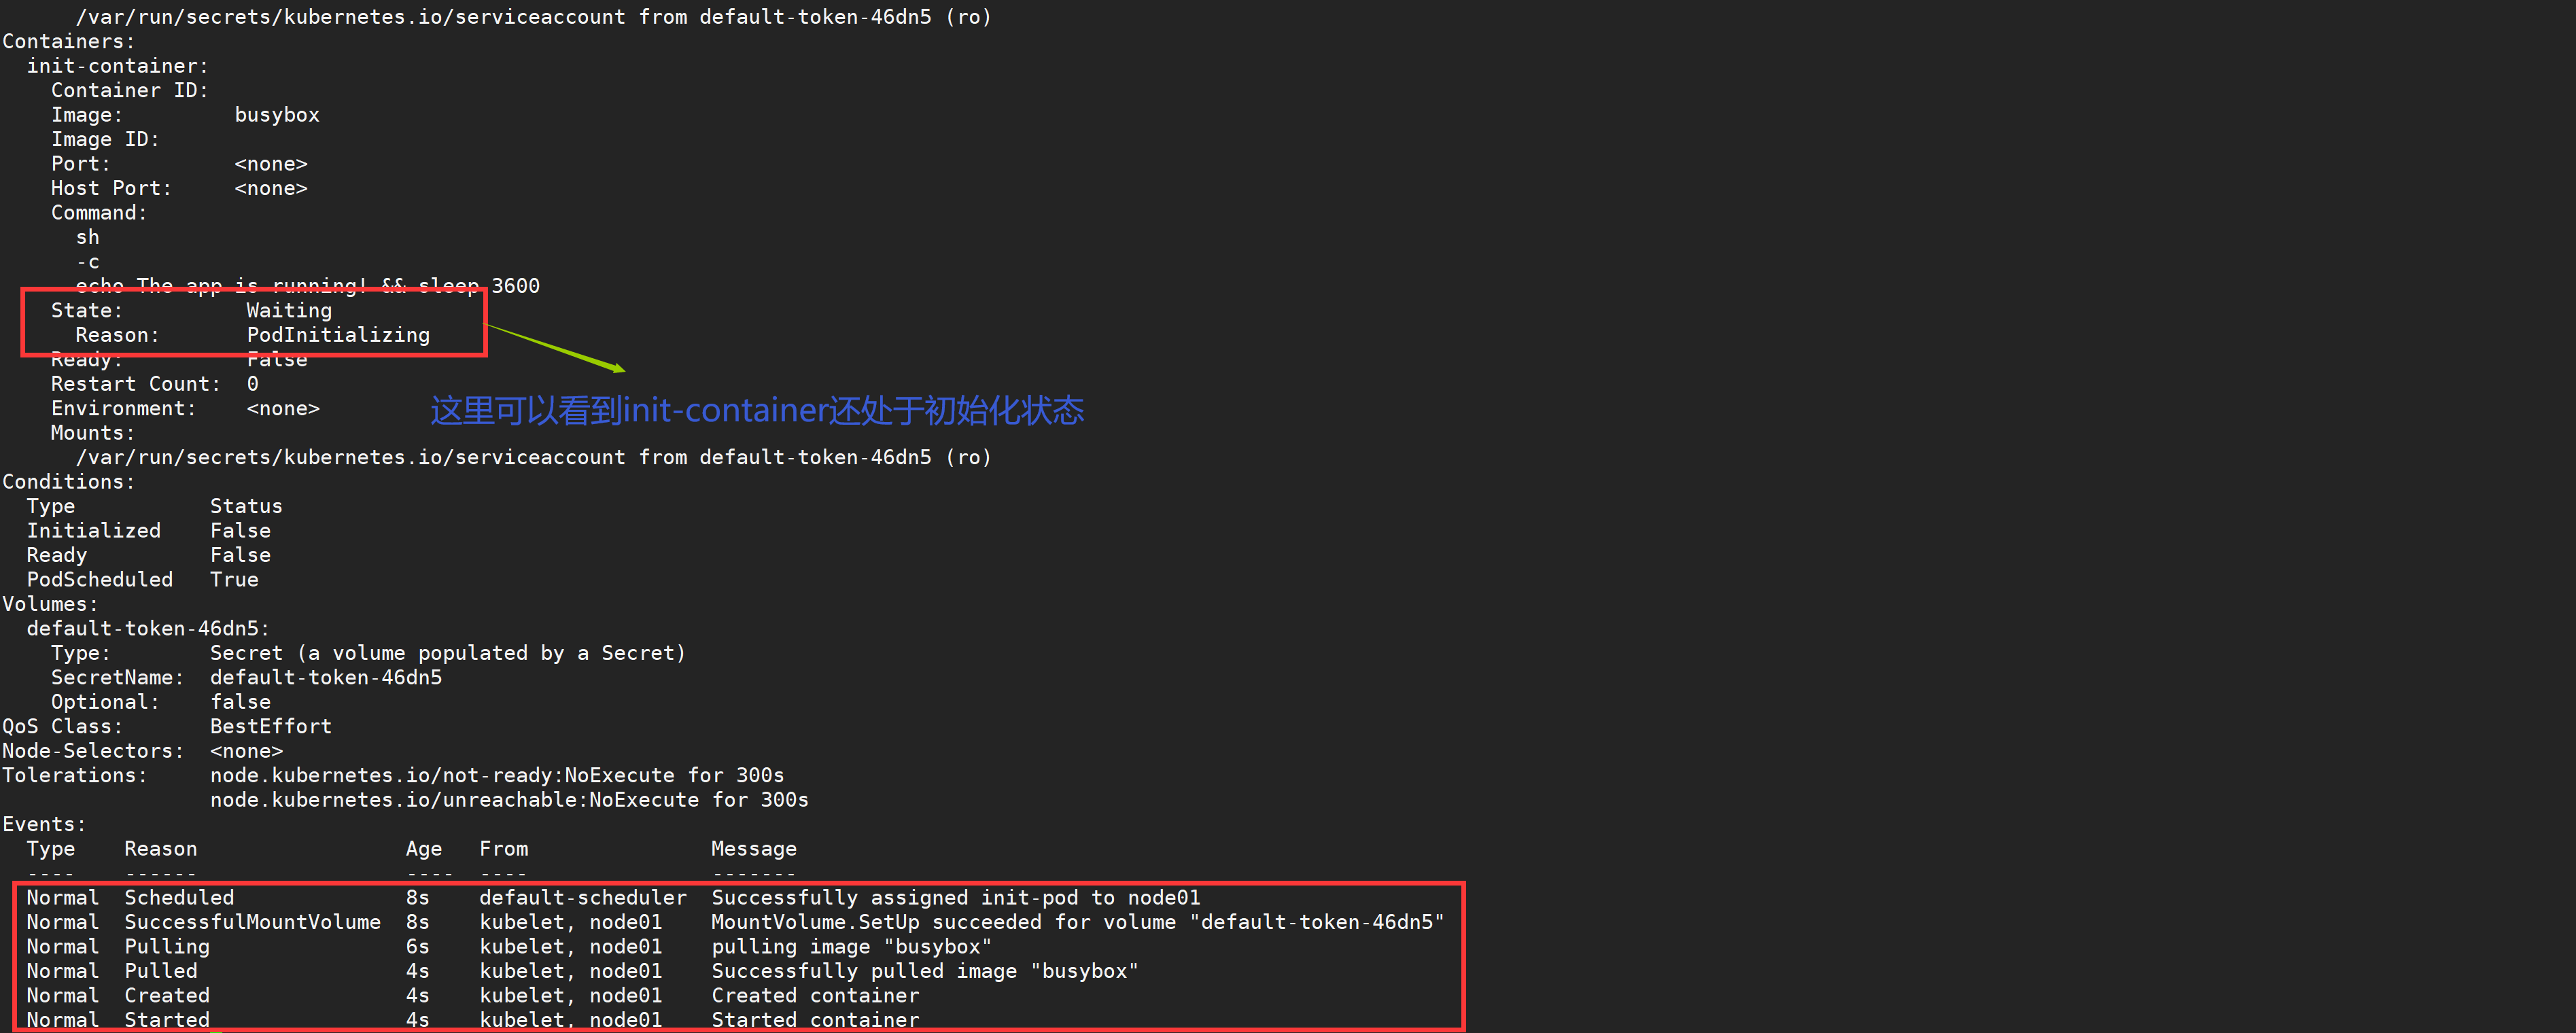
Then create the following Service and compare the status before and after.
YAML content corresponding to Service:
#myservice
[root@node01 ~]# vim myservice.yaml
[root@node01 ~]# cat myservice.yaml
---
kind: Service
apiVersion: v1
metadata:
  name: myservice
spec:
  ports:
  - protocol: TCP
    port: 80
    targetPort: 6376

[root@node01 ~]# kubectl apply -f myservice.yaml
service "myservice" unchanged
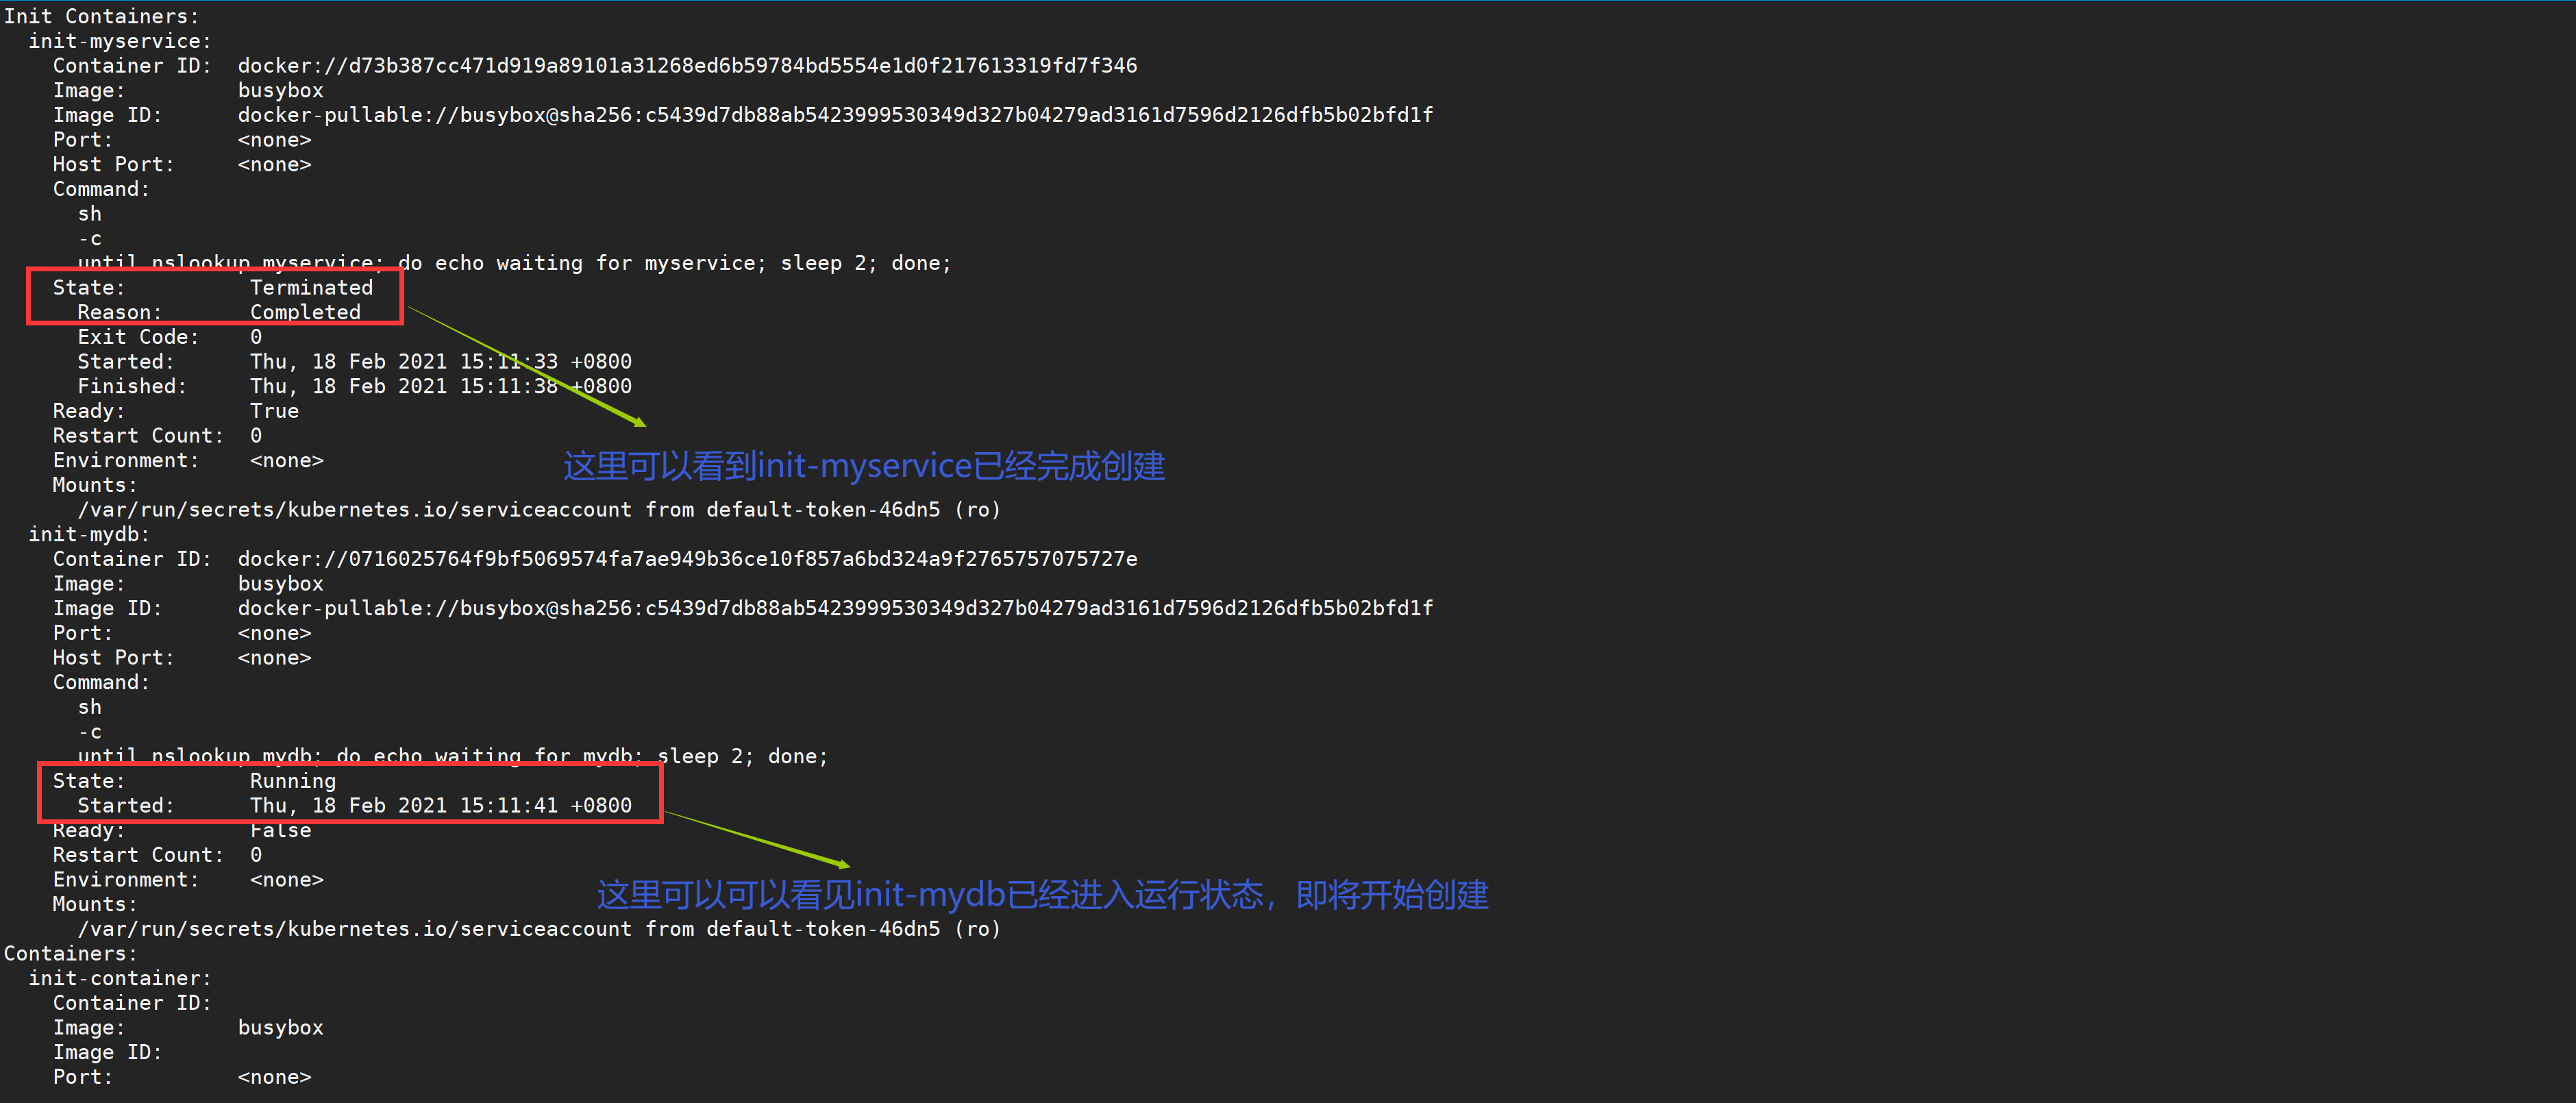
[root@node01 ~]# kubectl get pods         #Status completed one
NAME                            READY     STATUS     RESTARTS   AGE
init-pod                        0/1       Init:1/2   0          3m
View the status of the next Pod
#mydb
[root@node01 ~]# vim mydb.yaml
[root@node01 ~]# cat mydb.yaml
---
kind: Service
apiVersion: v1
metadata:
  name: mydb
spec:
  ports:
  - protocol: TCP
    port: 80
    targetPort: 6377

[root@node01 ~]# kubectl apply -f mydb.yaml
service "mydb" created
[root@node01 ~]# kubectl get pods         #You can see that the state is already running
NAME                            READY     STATUS    RESTARTS   AGE
init-pod                        1/1       Running   0          9m
View the status of the next Pod
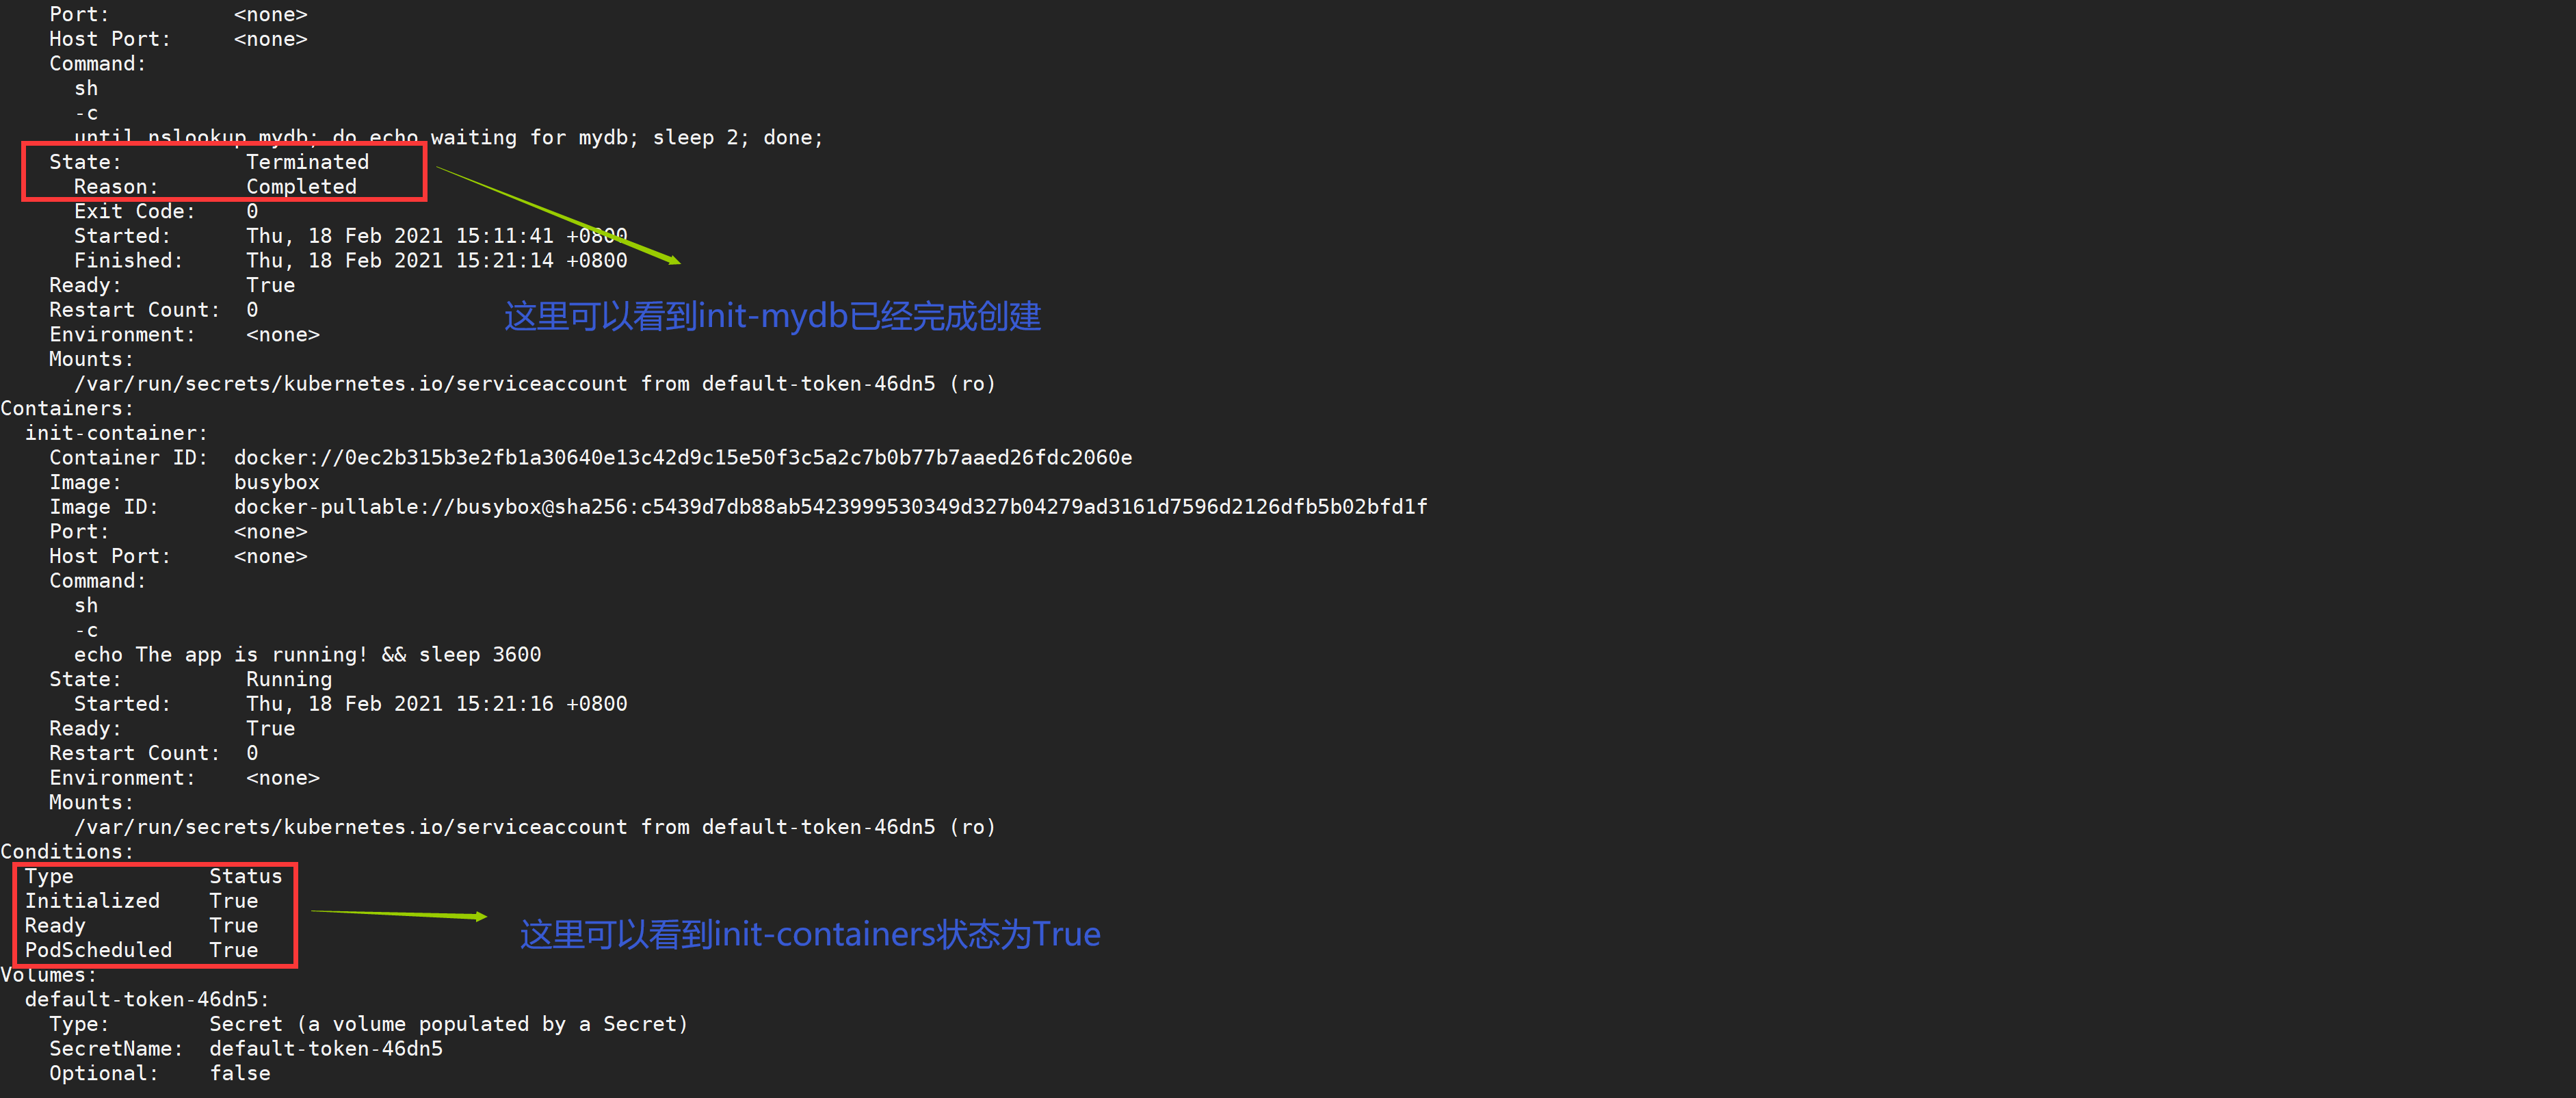
During the Pod startup, the initialization container will start after the network and data volume initialization in sequence. Each container must exit successfully before the next container starts. If the container fails to start due to runtime or exit failure, it will retry according to the policy specified in the restart policy of Pod. However, if the restart policy of Pod is set to Always, the restart policy policy will be used when the Init container fails.
Before all initialization containers fail, the Pod will not become Ready. The Pod being initialized is in Pending state, but the condition Initializing should be set to true.
Next, let's try to create a Pod for initialization and configuration:
[root@node01 ~]# vim init-demo.yaml
[root@node01 ~]# cat init-demo.yaml
apiVersion: v1
kind: Pod
metadata:
  name: init-demo
spec:
  containers:
  - name: nginx
    image: nginx
    ports:
    - containerPort: 80
    volumeMounts:
    - name: workdir
      mountPath: /usr/share/nginx/html
  initContainers:
  - name: install
    image: busybox
    command:
    - wget
    - "-O"
    - "/work-dir/index.html"
    - http://www.baidu.com
    volumeMounts:
    - name: workdir
      mountPath: "/work-dir"
  volumes:
  - name: workdir
    emptyDir: {}
We can see that volumes again appear here. spec.volumes refers to the volume in the Pod. spec.containers.volumeMounts is to mount the specified volume to the specified location of the container, which is equivalent to the -v host directory in docker: container directory. We used hostPath earlier. We used emptyDir {}, which is equivalent to a shared volume, Is a temporary directory whose life cycle is equal to that of a Pod.
After the initialization container is executed, an HTML file will be downloaded and mapped to emptyDir {}, and the main container is also mapped to emptyDir {} in spec.volumes, so the index.html file will be mapped in the / usr/share/nginx/html 'directory of the nginx container.
Let's create the Pod and verify whether the nginx container is running:
[root@node01 ~]# kubectl apply -f init-demo.yaml
pod "init-demo" created
The output shows that the nginx container is running:
[root@node01 ~]# kubectl get pod init-demo
NAME        READY     STATUS    RESTARTS   AGE
init-demo   1/1       Running   0          11s
Open a shell in the nginx container in the init demo container:
[root@node01 ~]# kubectl exec -it init-demo -- /bin/bash
In the Shell, directly view the contents of index.html:
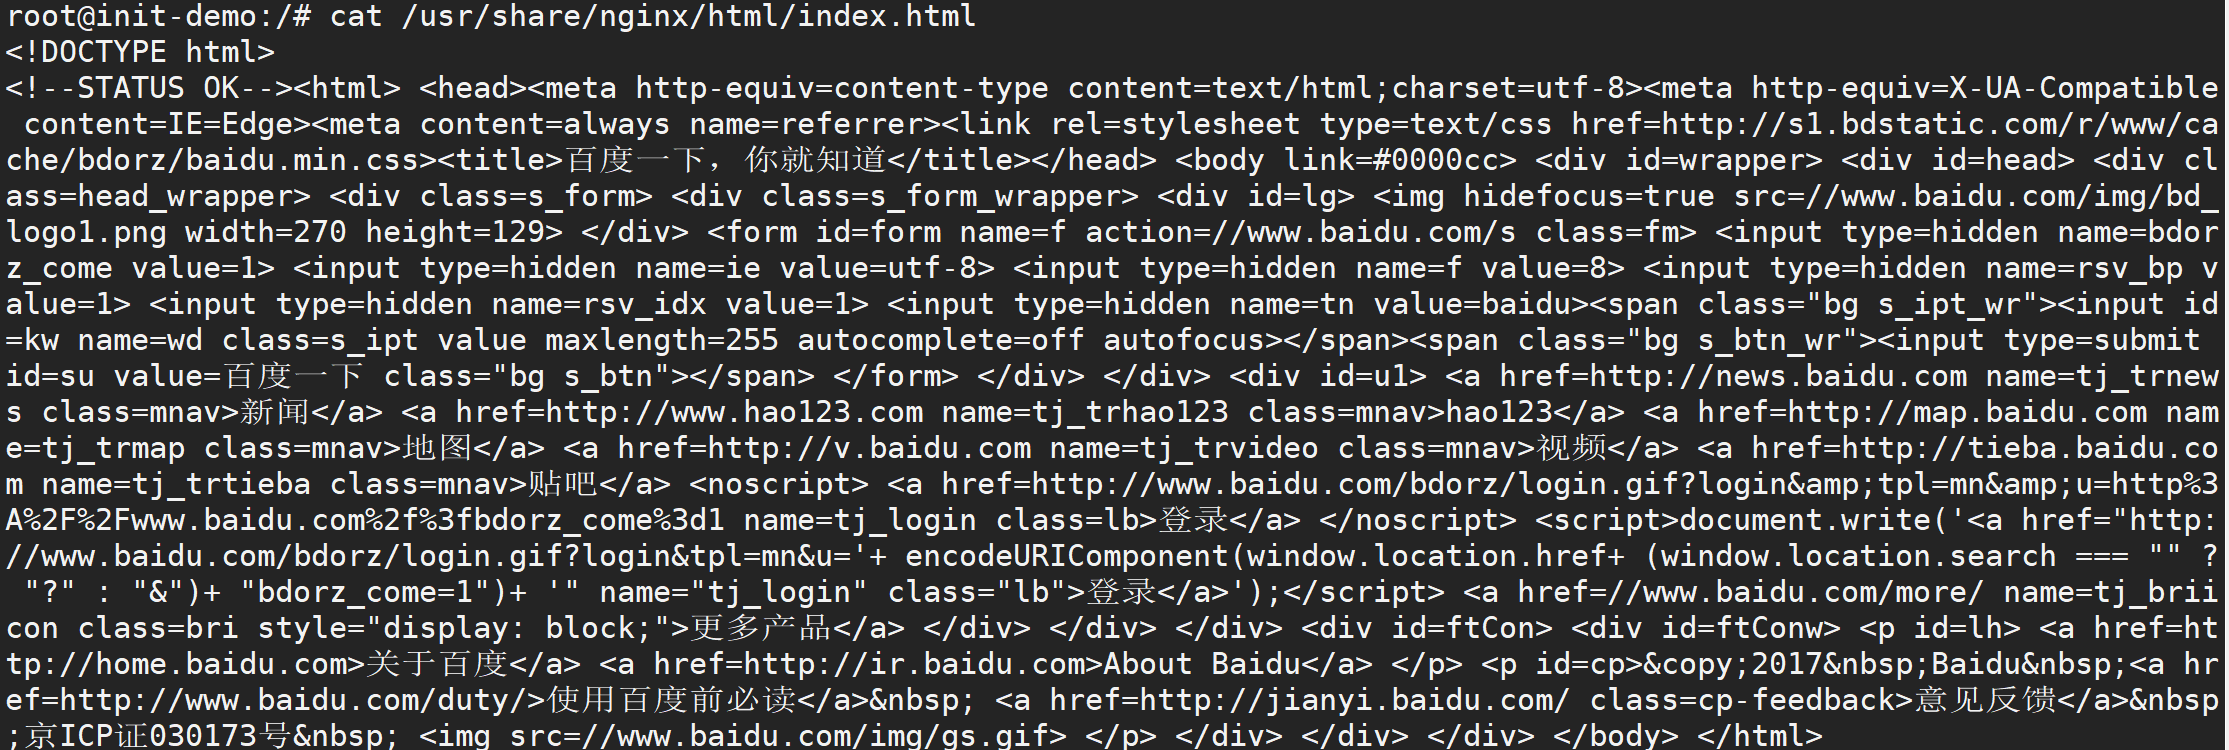
root@init-demo:/# cat /usr/share/nginx/html/index.html
If we see Baidu related information, it proves that the above initialization work is completed.
This is how we initialize the container. Here we have finished several main stages in the whole life cycle of the Pod. The first is the two hook functions of the container: PostStart and PreStop, as well as the two probes for container health inspection: the liveness probe and the readiness probe, and the Init Container in this lesson.