1. Set context menu
Listen for right-click events and block default events
var rightTemplate = [
    {label:'copy',accelerator: "ctrl+c"},
    {label:'paste',accelerator: "ctrl+v",}
]
var m = remote.Menu.buildFromTemplate(rightTemplate)

// Add right click event
window.addEventListener('contextmenu', function(e){
    e.preventDefault();
    m.popup({
        window: remote.getCurrentWindow()
    })
})
2. Open external browser via link
During the development process, if we need to open an external browser through a link, we can use the following methods, shell module
var {shell}  = require('electron')

var aHref = document.querySelector("#ahref")
aHref.onclick = function(e){
    e.preventDefault()
    var href = this.getAttribute("href")
    shell.openExternal(href)
}
3. BrowserView embedded web page
   var BrowserView = electron.BrowserView
    var view = new BrowserView()
    mainWindow.setBrowserView(view)
    view.setBounds({
        x:0,
        y:120,
        width:1000,
        height:680
    })
    view.webContents.loadURL("https://blog.csdn.net/qiuqiu1628480502/article/details/117998965")
4. Open outer chain in sub window
Use window open()
var mybtn = document.querySelector("#mybtn")
mybtn.onclick = function(e){
    window.open("https://www.baidu.com");
}
5. The child window passes information to the parent window
When we want to transfer information from the child window to the parent window, we can use the following methods.
5.1 popup_page.html (sub window)
window.opener.postMessage('I am the data passed by the child window ')
<body>
    <h2>I'm the child window that pops up</h2>
    <button id="popbtn">Pass information to parent window</button>
</body>
<script>
    var popbtn = document.getElementById("popbtn");
    popbtn.onclick = function(){
        window.opener.postMessage('I am the data passed by the sub window')
    }
</script>
5.2 demo3.html
<button id="mybtn">Open sub window</button>
<div id="mytext"></div>
<script src="./render/demo3.js"></script>
5.3 demo3.js (js of parent window)
In the parent window, we can use window to listen for message events and get the information transmitted by the child window from msg.
window.addEventListener("message", (msg) => {
    var mytext = document.getElementById("mytext")
    console.log(msg);
    mytext.innerHTML = JSON.stringify(msg.data);
})
6. Select file dialog box
Open the file selection dialog box, and you can use dialog Showopendialog () method. It has two parameters. One is to set basic properties, and the other is a callback function. If it is asynchronous, then can be used.
- Title: String (optional), the title of the dialog box
- defaultPath: String (optional), the default open path
- buttonLabel: String (optional). Confirm the custom label of the button. When it is empty, the default label will be used
- filters: file selection filter. After definition, file extensions can be filtered
- Properties: properties of open files, such as open files or open folders, or even hide files.
6.1 demo4.html
<body>
    <button id="mybtn">Open picture</button>
    <img id="dunpai" style="width:100%">
</body>
6.2 demo4.js
const { dialog } = require('electron').remote
    var openBtn = document.getElementById("mybtn");
    openBtn.onclick = function () {
        dialog.showOpenDialog({
            title: 'Please select a picture (I am a custom title)',
            // Default path
            defaultPath: 'dunpai.png',
            // Only files and other folders ending in png are displayed
            filters: [{ name: 'png', extensions: ['png'] }],
            // Set the "open" button in the pop-up box
            buttonLabel: 'Open the shield'
        }).then(result => {
            console.log(result) // canceled filePaths
            let img = document.getElementById("dunpai")
            img.setAttribute("src", result.filePaths[0]);
        }).catch(err => {
            console.log(err)
        })
    }
buttonLabel, title, defaultPath: after setting this value, the button of the file box will change, as shown in the following figure:

7. Save file dialog box
Use the fs module in node to write files.
7.1 module introduction
const { dialog } = require('electron').remote
const fs = require('fs')
7.2 demo4.js
<button id="saveBtn">Save file</button>

var saveBtn = document.getElementById("saveBtn");
    saveBtn.onclick = function(){
        dialog.showSaveDialog({
            title: 'Save file 123'
        }).then(result => {
            fs.writeFileSync(result.filePath, 'I'm a file');
            console.log(result)
        }).catch( err => {
            console.log(err);
   })
}
8. Message dialog box
Message dialog showMessageBox()
It has too many attributes. Here we only select some commonly used attributes to explain. If you use them in your work, you can first query the relevant API s on the official website, and then use them according to your needs.
- Type: String type, optional, icon style, including none, info, error, question and warning
- title: String type, the title of the pop-up box
- Messsage: string type. The content of message box must be selected. This must be written
- buttons: array type. I will explain it in detail in the case. It returns an index value (subscript)
8.1 dialog box
<button id="messageBtn">Pop up dialog box</button>
8.2 bullet frame
var messageBtn = document.getElementById("messageBtn")
messageBtn.onclick = function(){
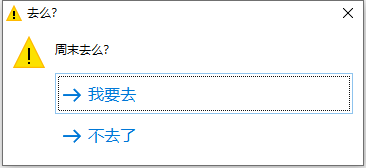
dialog.showMessageBox({
type: 'warning',
title: 'Are you going?',
message: 'Do you go on weekends?',
buttons: ['I want to go', 'i'm not coming']
}).then(result => {
console.log(result)
})
}
8.3 renderings
9. Disconnection reminder function
When the network is interrupted or restored, I hope to give users some prompt information,
9.1 page
<h2>Disconnection prompt</h2>
9.2 js code
<script>
    window.addEventListener('online', function(){
        alert("Network recovery")
    })
    window.addEventListener('offline', function(){
        alert('The network is down. Please try again later')
    })
</script>
10. Bottom message notification
11. Global registration shortcut
ctrl+e, open in window“ http://www.baidu.com ”
Using globalShortcut
var globalShortcut = electron.globalShortcut

globalShortcut.register('ctrl+e', ()=>{
	mainWindow.loadURL('https://www.baidu.com');
})
Logout shortcut
Cancel shortcut key in will quit
app.on('will-quit', function(){
    //Logoff global shortcut
    globalShortcut.unregister('ctrl+e')
    //Log off all
    globalShortcut.unregisterAll()
})
12. Use of cutting board function
Using the clipboard module in electron
12.1 page
<p>Activation code:<span id="code">12312321wqewqeq41231</span></p>
<button id="button">One click Copy</button>
12.2 cutting board writing
const {clipboard} = require('electron')
const code = document.getElementById("code")
const button = document.getElementById("button")
button.onclick = function(){
	clipboard.writeText(code.innerHTML)
}