Environmental preparation
Deployment environment
System version: CentOS Linux release 7.4.1708 (Core)
ceph version: ceph 12.2.13 (luminous)
Hardware configuration: 5 VMS, 1 core and 1G memory. Each node role machine should mount at least one free disk for osd
Server role
| host name | IP | role |
|---|---|---|
| admin | 192.168.100.162 | admin |
| node1 | 192.168.100.163 | mon ,mgr,osd |
| node2 | 192.168.100.164 | osd |
| node3 | 192.168.100.165 | osd |
| client | 192.168.100.166 |
Preparation
- Fixed IP
- Modify host names and resolve each other (all nodes, root user)
- Create user (all nodes, root user)
Do the following on all nodes:
1) Create user name: cephu, set password:
2) Modify the visudo file, otherwise it will prompt cephu to stop the errors in the sudoer list.useradd cephu passwd cephu
3) Switch to cephu user and add root permission for the userAdd in the / etc/sudoers file cephu ALL=(ALL) ALL
echo "cephu ALL=(root) NOPASSWD:ALL" | sudo tee /etc/sudoers.d/cephu sudo chmod 0440 /etc/sudoers.d/cephu
- Implement ssh password free login (admin node)
1) Generate secret key under cephu user
2) Copy the generated key to each Ceph node under cephu userssh-keygen
3) Under root user, add ~ /. ssh/config configuration file and make the following settingsssh-copy-id cephu@node1 ssh-copy-id cephu@node2 ssh-copy-id cephu@node3
ssh-keygen
cat .ssh/config Host node1 Hostname node1 User cephu Host node2 Hostname node2 User cephu Host node3 Hostname node3 User cephu
- Add download source, install CEPH deploy (admin node, root user)
1) Add ceph source
2) Update source, install CEPH deploycat /etc/yum.repos.d/ceph.repo [ceph-noarch] name=Ceph noarch packages baseurl=https://download.ceph.com/rpm-luminous/el7/noarch enabled=1 gpgcheck=1 type=rpm-md gpgkey=https://download.ceph.com/keys/release.asc
yum makecache sudo yum updatevim /etc/yum.conf keepcache=1
yum install ceph-deploy -y - Turn off selinux, firewall (all nodes)
- Install ntp (all nodes, time must be synchronized)
Select any machine as ntp time server, and other nodes as time server clients synchronize time with server. My admin is ntp time server
admin:yum install -y ntpvim /etc/ntp.conf //There are 4 lines. server The four lines server Line comment out, fill in the following two lines server 127.127.1.0 # local clock fudge 127.127.1.0 stratum 10
All other nodes:systemctl start ntpd systemctl status ntpd //Confirm to open NTP service
yum install -y ntpdate ntpdate admin
Deploy ceph cluster
It is not specially stated that all the following operations are performed under the admin node and cephu user
-
Create ceph operation directory
mkdir my-cluster //Remember that sudo is not available cd my-cluster //After that, all CEPH deploy command operations must be performed in this directory
-
Create clusters
ceph-deploy new node1 //Three files will be created successfully: ceph.conf, ceph.mon.keyring, and a log file //May report an error [cephu@master]$ ceph-deploy new node1 Traceback (most recent call last): File "/bin/ceph-deploy", line 18, in <module> from ceph_deploy.cli import main File "/usr/lib/python2.7/site-packages/ceph_deploy/cli.py", line 1, in <module> import pkg_resources ImportError: No module named pkg_resources //resolvent: wget https://files.pythonhosted.org/packages/5f/ad/1fde06877a8d7d5c9b60eff7de2d452f639916ae1d48f0b8f97bf97e570a/distribute-0.7.3.zip unzip distribute-0.7.3.zip cd distribution-0.7.3/ sudo python setup.py install
-
Install luminous (12.2.13)
Install ceph and ceph radosgw main package on node1, node2 and node3ceph-deploy install --release luminous node1 node2 node3 If the installation fails, install sudo Yum install CEPH ceph-radosgw - y manually Test whether the installation is completed: confirm that the installation version is 12.2.13 in node1 node2 node3 ceph --version
-
Initialize mon
ceph-deploy mon create-initial
-
Give each node the user name free permission to use the command
```bash ceph-deploy admin node1 node2 node3 ```
-
Install CEPH Mgr: only luminous, ready to use dashboard
ceph-deploy mgr create node1
-
Add osd
ceph-deploy osd create --data /dev/sdb node1 ceph-deploy osd create --data /dev/sdb node2 ceph-deploy osd create --data /dev/sdb node3
View cluster status
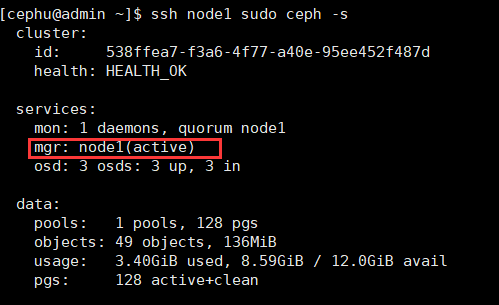
ssh node1 sudo ceph -s If "health" is displayed, three OSD UPS succeed, as shown in the following figure

Dashboard configuration, operating on node1
Note: install CEPH Mgr and CEPH mon on the same host. It is better to have only one CEPH Mgr
-
Create management domain key
sudo ceph auth get-or-create mgr.node1 mon 'allow profile mgr' osd 'allow *' mds 'allow *'
-
Open CEPH Mgr management domain
sudo ceph-mgr -i node1 -
View the status of ceph
sudo ceph status Confirm that the status of mgr is active, as shown in the figure below

-
Open the dashboard module
sudo ceph mgr module enable dashboard
-
Bind the ip address of the CEPH Mgr node that enables the dashboard module
sudo ceph config-key set mgr/dashboard/node1/server_addr 192.168.100.163
-
web login
Browser address bar input:
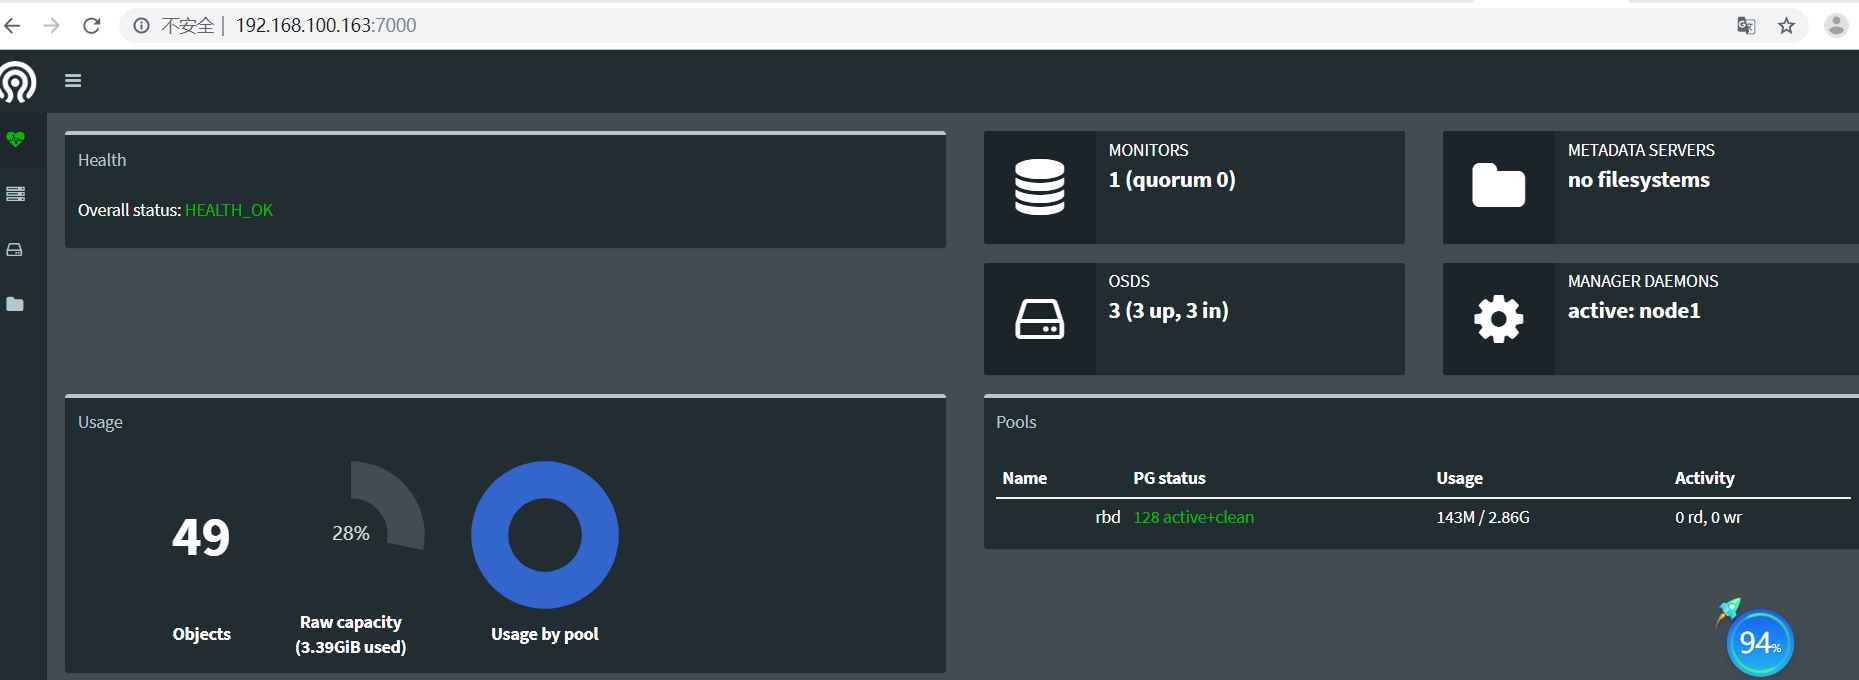
mgr address: 7000, as shown below
Configure the client to use rbd
Note: before creating a block device, you need to create a storage pool. The commands related to the storage pool need to be executed in the mon node
-
Create storage pool
sudo ceph osd pool create rbd 128 128 -
Initialize storage pool
sudo rbd pool init rbd -
Prepare client client
Another host is available. centos7 is used as the client. The host name is client, ip: 192.168.100.166. Modify the hosts file to realize interworking with the host name of the admin node.
1) Upgrade the client kernel to 4.x
Before the update, the kernel version wasuname -r 3.10.0-693.el7.x86_641.1) import key
rpm --import https://www.elrepo.org/RPM-GPG-KEY-elrepo.org
1.2) install the yum source of elrepo
rpm -Uvh http://www.elrepo.org/elrepo-release-7.0-2.el7.elrepo.noarch.rpm
1.3) install kernel
yum --enablerepo=elrepo-kernel install kernel-lt-devel kernel-lt 4.4.214 installed
2) View default startup order
awk -F\' '$1=="menuentry " {print $2}' /etc/grub2.cfg CentOS Linux (4.4.214-1.el7.elrepo.x86_64) 7 (Core) CentOS Linux (3.10.0-693.el7.x86_64) 7 (Core) CentOS Linux (0-rescue-ac28ee6c2ea4411f853295634d33bdd2) 7 (Core) The default boot order is from 0, and the new kernel is inserted from scratch (currently at 0, while 4.4.214 is at 1), so you need to select 0. grub2-set-default 0 Then restart to see if you want to use the new kernel version uname -r 4.4.214-1.el7.elrepo.x86_643) Remove old kernel
yum remove kernel
-
Install ceph for client
1) Create user name: cephu, set password:useradd cephu passwd cephu
2) Modify the visudo file, otherwise it will prompt cephu to stop the errors in the sudoer list.
Add in the / etc/sudoers file
cephu  ALL=(ALL) ALL
3) Switch to cephu user and add root permission for the user
echo "cephu ALL=(root) NOPASSWD:ALL" | sudo tee /etc/sudoers.d/cephu
sudo  chmod 0440 /etc/sudoers.d/cephu
4) Install Python setuptools
yum -y install python-setuptools5) Configure client firewall (direct shutdown)
sudo firewall-cmd --zone=public --add-service=ceph --permanent
sudo firewall-cmd --reload
6) Grant the client the user name free permission to use the command in the admin node
ceph-deploy admin client
7) Modify the read permission of the file under the client
sudo chmod +r /etc/ceph/ceph.client.admin.keyring
8) Modify the ceph configuration file under the client: this step is to solve the problem of mapping the image
sudo vi /etc/ceph/ceph.conf   stay global section Add below:
    rbd_default_features = 1
-
The client node creates the block device image: the unit is M, here are 4 G
```bash
rbd create foo --size 4096
```
-
client node mapping mirror to host
sudo rbd map foo --name client.admin
//Possible error:[cephu@client ~]$ sudo  rbd map foo --name client.admin

rbd: sysfs write failed
In some cases useful info is found in syslog - try "dmesg | tail".
rbd: map failed: (110) Connection timed out

//Solution:
[cephu@client ~]$ sudo ceph osd crush tunables hammer adjusted tunables profile to hammer

//Then re
	[cephu@client ~]$ sudo  rbd map docker_test --name client.admin
/dev/rbd0
//That is success
-
client node format block device
sudo mkfs.ext4 -m 0 /dev/rbd/rbd/foo -
client node mount block device
sudo mkdir /mnt/ceph-block-device
sudo mount /dev/rbd/rbd/foo /mnt/ceph-block-device
cd /mnt/ceph-block-device

After the client is restarted, the device needs to be remapped, or it may get stuck
 mgr address: 7000, just visit again

