preface
Recently, I was studying flash and wanted to make a simple example Demo and deploy it on the server.
Since port 80 of the server has been used to display personal blogs, this project will listen to other ports, which is set as 8001.
The server is Ubuntu 20.04 (virtual machine), IP address: 192.168.75.138
text
Project environment construction
1. First create a virtual environment, and then put the project file into the environment
Create directory / home / Flash_ Demo and enter the directory
sudo mkdir home/flask_demo
cd home/flask_demo
2. Install virtual environment
The command is as follows:
sudo pip install virtualenv
3. Generate folder env_ Flash, enter it
The command is as follows:
sudo virtualenv ENV_flask
cd ENV_flask
4. Activate virtual environment
The command is as follows:
source bin/activate

5. Install flash in the virtual environment
The command is as follows:
sudo pip install flask
6. Copy the Demo of flash project to / home / flash_ Demo/ENV_ Under flash
Xftp is used here, and other methods can also be used
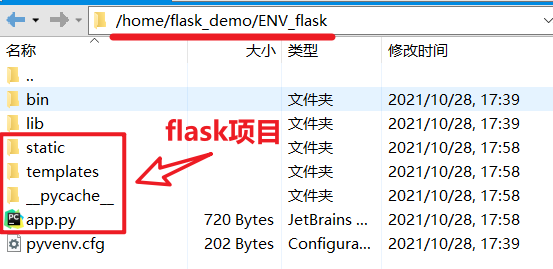
Last env_ The structure of the flash directory is as follows:
│  .gitignore
│  app.py
│  pyvenv.cfg
│
├─bin
│      ...
│
├─lib
│         ...
│
├─static
│  ├─css
│  │       ...
│  │
│  └─img
│          ...
│
├─templates
│      404.html
│      base.html
│      index.html
│
└─__pycache__
        ....
Note: if the file is not copied successfully, it may be the problem of directory permission, which needs to be modified
sudo chmod 777 -R /home/flask_demo/ENV_flask/
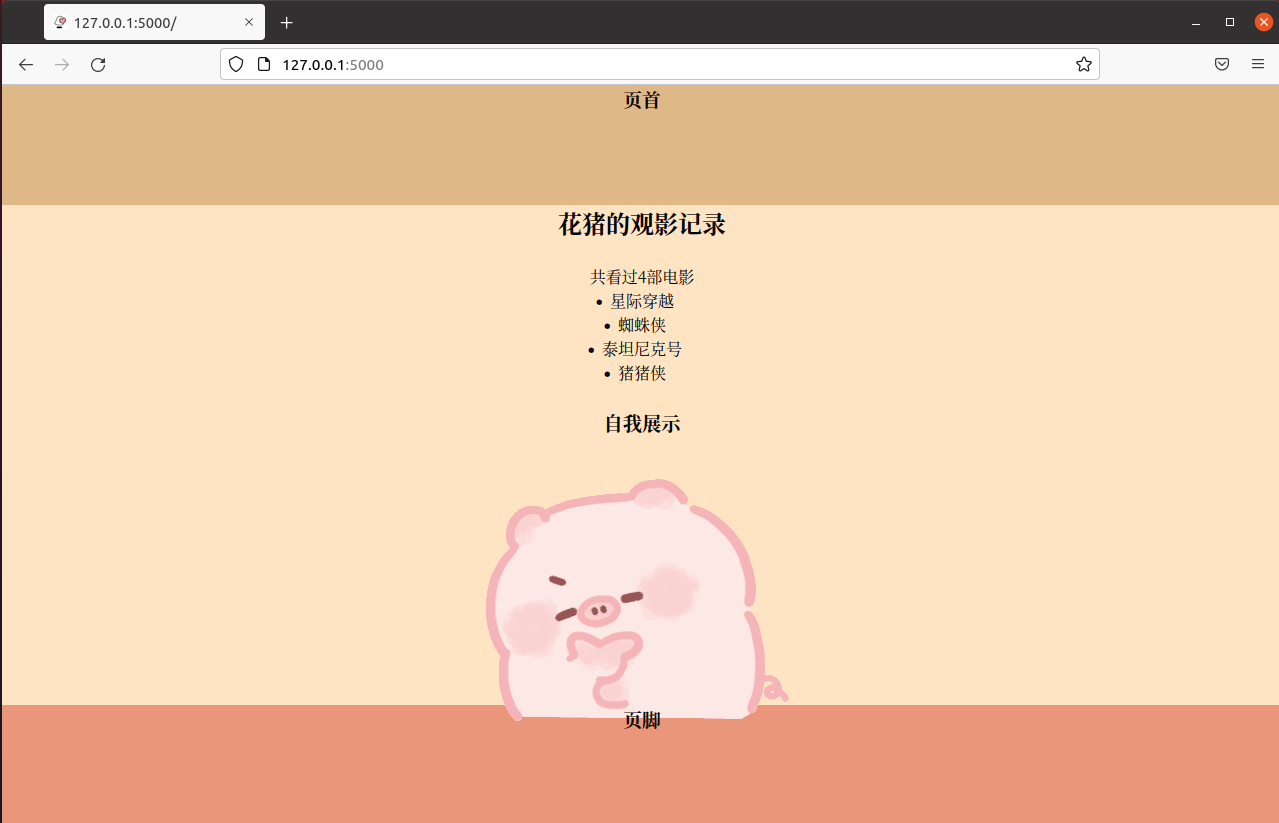
7. Test
Execute the command in this directory:
flask run
stay http://127.0.0.1:5000/ Access (the browser effect in the virtual machine is directly shown here)

uwsgi
1. Install uwsgi in the virtual environment
The command is as follows:
sudo pip install uwsgi
2. Write the configuration file flash of uwsgi in the virtual environment_ uwsgi. Ini, the file name can be arbitrary
The command is as follows:
vim flask_uwsgi.ini
Write the following:
[uwsgi]
master = true
wsgi-file = app.py
callable = app
http = :8001
processes = 4
threads = 2
buffer-size = 32768
preservation
Brief description:
- http=:8001: for this stage of testing
- callable = app: the app in should be consistent with the application variable name in flash's Demo
3. Test
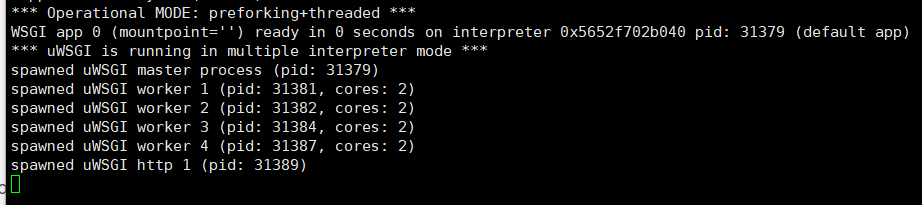
Type the following command in the terminal to start uwsgi service:
uwsgi --ini flask_uwsgi.ini

nohup uwsgi --ini flask_uwsgi.ini  #Using nohup, log free printing can be started
Visit port 8001 to see the flash Demo (it is still displayed directly in the browser of the virtual machine here)
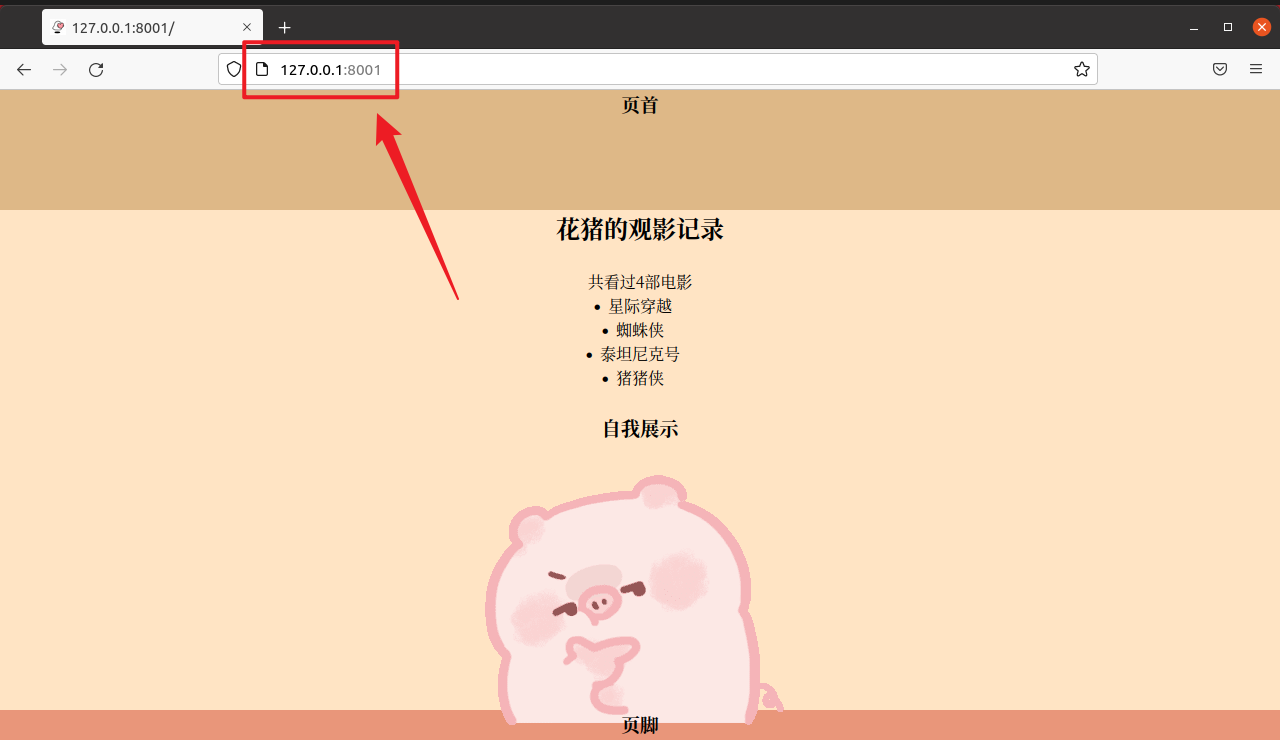
In this way, the purpose of taking over flash with uwsgi is completed
Nginx
Now use Nginx to proxy the Demo
1. First, you need to modify the flash created in the virtual environment in the previous step_ uwsgi. Ini configuration file
vim flask_uwsgi.ini
Modify HTTP =: 8001 entry
[uwsgi]
master = true
wsgi-file = app.py
callable = app
socket = 127.0.0.1:8001
processes = 4
threads = 2
buffer-size = 32768
In this way, the running uwsgi service can only be accessed through the local internal port 8001, but not through the browser using http. So we need to use nginx as http proxy.
2. Return to the root directory and install Nginx
The command is as follows:
cd /
sudo apt-get install nginx
3. Modify the configuration file of nginx / etc / nginx / sites available / default
Modify the server section
Because Hexo's service has been deployed before, you can add another service directly
...
server {
        # listen 80 default_server;
        # listen [::]:80 default_server ipv6only=on;
        listen 8001;  # Listening port, http, default 80

        # root /usr/share/nginx/html;
        root /home/flask_demo/ENV_flask;      # Flash project root path
        # index index.html index.htm;

        # Make site accessible from http://localhost/
        # server_name localhost;
        server_name 192.168.75.138;    # Public ip or domain name of resolved ip

        location / {
                # First attempt to serve request as file, then
                # as directory, then fall back to displaying a 404.
                # try_files $uri $uri/ =404;
                # Uncomment to enable naxsi on this location
                # include /etc/nginx/naxsi.rules

                include uwsgi_params;   # Use the uwsgi configuration parameter file built in nginx
                uwsgi_pass 127.0.0.1:8001;   # Forward request to this address port
                uwsgi_param UWSGI_SCRIPT main:app;   # Script name and application variable name of the call
        }
}
...
Therefore, the complete default configuration file is as follows:
##
# You should look at the following URL's in order to grasp a solid understanding
# of Nginx configuration files in order to fully unleash the power of Nginx.
# https://www.nginx.com/resources/wiki/start/
# https://www.nginx.com/resources/wiki/start/topics/tutorials/config_pitfalls/
# https://wiki.debian.org/Nginx/DirectoryStructure
#
# In most cases, administrators will remove this file from sites-enabled/ and
# leave it as reference inside of sites-available where it will continue to be
# updated by the nginx packaging team.
#
# This file will automatically load configuration files provided by othe
# applications, such as Drupal or Wordpress. These applications will be made
# available underneath a path with that package name, such as /drupal8.
#
# Please see /usr/share/doc/nginx-doc/examples/ for more detailed examples.
##

# Default server configuration
#

# Hexo
server {
    listen 80 default_server;
    listen [::]:80 default_server;

    # SSL configuration
    #
    # listen 443 ssl default_server;
    # listen [::]:443 ssl default_server;
    #
    # Note: You should disable gzip for SSL traffic.
    # See: https://bugs.debian.org/773332
    #
    # Read up on ssl_ciphers to ensure a secure configuration.
    # See: https://bugs.debian.org/765782
    #
    # Self signed certs generated by the ssl-cert package
    # Don't use them in a production server!
    #
    # include snippets/snakeoil.conf;

    root /var/www/hexo;

    # Add index.php to the list if you are using PHP
    index index.html index.htm index.nginx-debian.html;

    server_name _;

    location / {
        # First attempt to serve request as file, then
        # as directory, then fall back to displaying a 404.
        try_files $uri $uri/ =404;

    }

    # pass PHP scripts to FastCGI serve
    #
    #location ~ \.php$ {
    #    include snippets/fastcgi-php.conf;
    #
    #    # With php-fpm (or other unix sockets):
    #    fastcgi_pass unix:/var/run/php/php7.4-fpm.sock;
    #    # With php-cgi (or other tcp sockets):
    #    fastcgi_pass 127.0.0.1:9000;
    #}

    # deny access to .htaccess files, if Apache's document root
    # concurs with nginx's one
    #
    #location ~ /\.ht {
    #    deny all;
    #}
}

# Flash application
server {
        # listen 80 default_server;
        # listen [::]:80 default_server ipv6only=on;
        listen 8001;  # Listening port, http, default 80

        # root /usr/share/nginx/html;
        root /home/flask_demo/ENV_flask;      # Flash project root path
        # index index.html index.htm;

        # Make site accessible from http://localhost/
        # server_name localhost;
        server_name 192.168.75.138;    # Public ip or domain name of resolved ip

        location / {
                # First attempt to serve request as file, then
                # as directory, then fall back to displaying a 404.
                # try_files $uri $uri/ =404;
                # Uncomment to enable naxsi on this location
                # include /etc/nginx/naxsi.rules

                include uwsgi_params;   # Use the uwsgi configuration parameter file built in nginx
                uwsgi_pass 127.0.0.1:8001;   # Forward request to this address port
                uwsgi_param UWSGI_SCRIPT main:app;   # Script name and application variable name of the call
        }
}

# Virtual Host configuration for example.com
#
# You can move that to a different file under sites-available/ and symlink that
# to sites-enabled/ to enable it.
#
#server {
#    listen 80;
#    listen [::]:80;
#
#    server_name example.com;
#
#    root /var/www/example.com;
#    index index.html;
#
#    location / {
#        try_files $uri $uri/ =404;
#    }
#}
Save exit
4. Restart Nginx service
The command is as follows:
sudo service nginx restart
5. Finally, go back to the virtual environment (project root directory) and start the uwsgi service
The command is as follows:
cd home/flask_demo/ENV_flask/

uwsgi --ini flask_uwsgi.ini
6. Effect display
You can see the effect by visiting the server IP:8001 through the host browser

Possible problems
When starting uwsgi service, it is found that the port is occupied
probably another instance of uWSGI is running on the same address (:xxxx).

You can shut down the port with the following command:
sudo fuser -k Port/tcp
For example: shut down 8001 port: sudo fuser -k 8001/tcp
Just restart the uwsgi service
Postscript
If you want to deploy multiple services using Nginx, you can directly add the server entry in the default configuration file.
reference material: Installation and configuration of Ubuntu + nginx + uwsgi + Flash_ ReeseIMK blog - CSDN blog Simple construction of Flask+uwsgi+Nginx (Ubuntu)_ Yvette's blog - CSDN blog