Deploying K8s cluster using kubeadm on Ubuntu 20.04 LTS
1. Environmental Information
- MacBook Pro (13-inch, 2020, Four Thunderbolt 3 ports)
macOS Big Sur Version 11.5.2
2.3 GHz Quad-Core Intel Core i7
16 GB Memory - VirtualBox 6.1.22 r144080
- Ubuntu 20.04.2 LTS server
Although this experiment was conducted on Mac, it is still theoretically applicable on Windows hosts, mainly using virtual machine software VirtualBox to build Ubuntu 20.04.2 LTS server.
Finally, if you still find network problems, see if there is a conflict between the VirtualBox virtual network and the Pod network. I switched to Bridged Adapter here because of NAT conflict
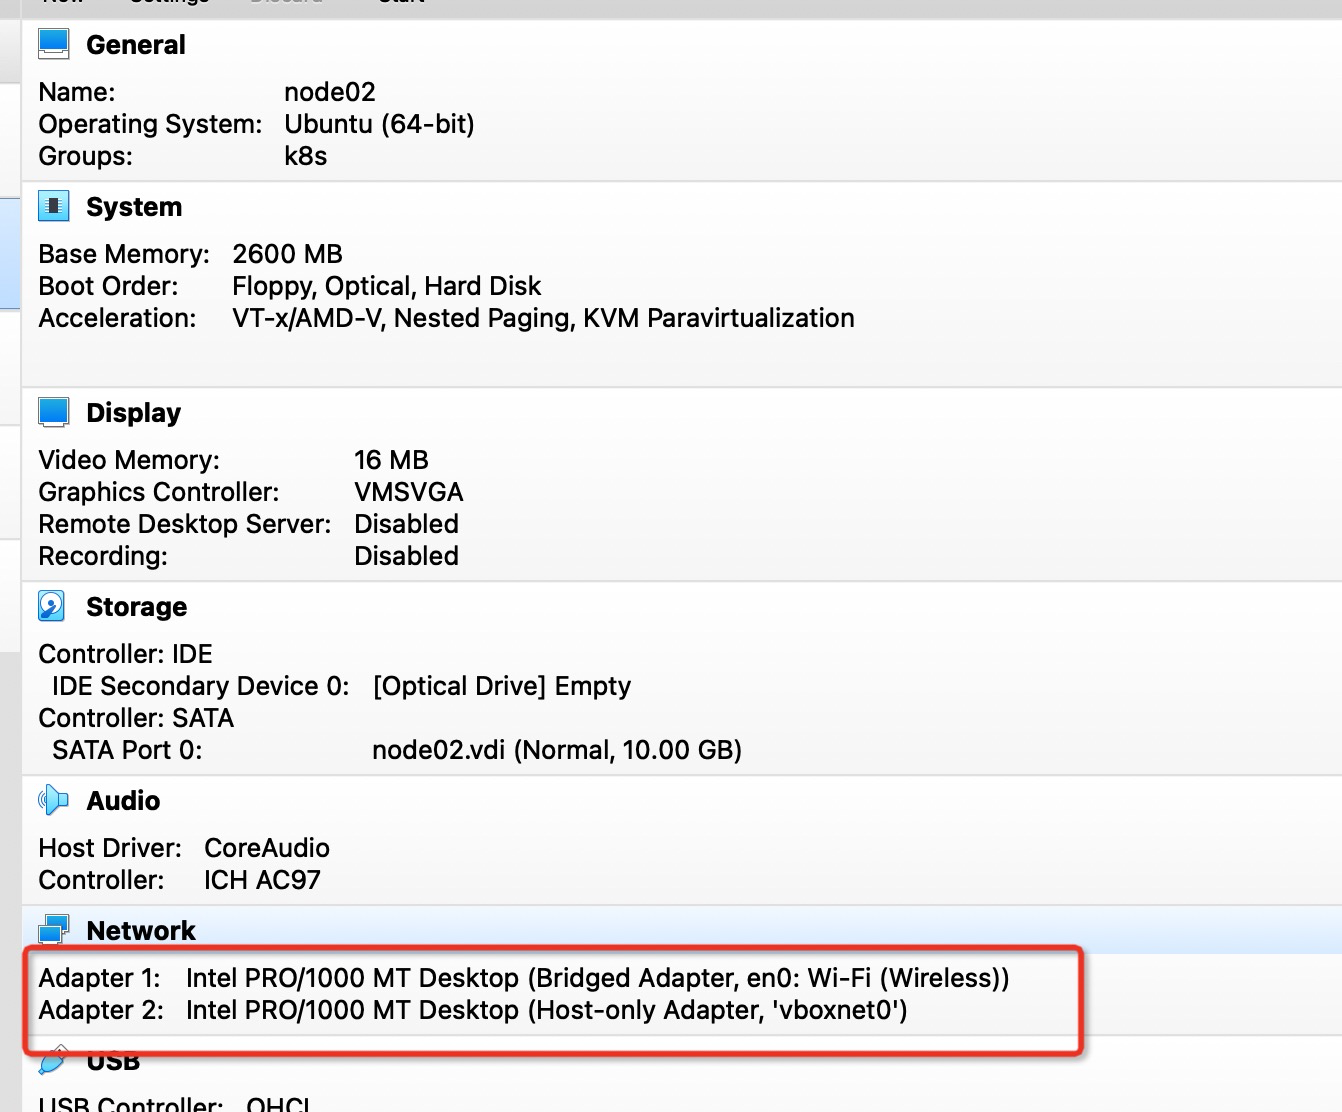
1.1 Virtual Machine Network Environment
Each virtual machine is configured with two network cards: Bridged Adapter and Host-Only Adapter
1.1.1Bridged Adapter
Access to the external network using dynamic IP
| Host Name | IP |
|---|---|
| master | 192.168.8.156/24 brd 192.168.8.255 scope global dynamic enp0s3 |
| node02 | 192.168.8.157/24 brd 192.168.8.255 scope global dynamic enp0s3 |
1.1.2 HostOnly
Network Card Configuration for Fixed IP
| Host Name | IP |
|---|---|
| master | 192.168.56.100 |
| node02 | 192.168.56.101 |
1.1.3 Configure Fixed IP
For example, configure node02 node IP:
sudo vim /etc/netplan/00-installer-config.yaml
# This is the network config written by 'subiquity'
network:
  ethernets:
    enp0s3:
      dhcp4: true
    enp0s8:
      addresses:
        - 192.168.56.101/24
      optional: true
  version: 2
sudo netplan apply
ssh connection disconnected after applying network configuration
More introduction to VirtualBox network mode
1.2 System Configuration
Disable swap
sudo swapoff -a
free -h
              total        used        free      shared  buff/cache   available
Mem:          2.4Gi       153Mi       1.8Gi       1.0Mi       416Mi       2.1Gi
Swap:            0B          0B          0B
Persist configuration, comment out swap line
sudo vim /etc/fstab
# /etc/fstab: static file system information.
#
# Use 'blkid' to print the universally unique identifier for a
# device; this may be used with UUID= as a more robust way to name devices
# that works even if disks are added and removed. See fstab(5).
#
# <file system> <mount point>   <type>  <options>       <dump>  <pass>
# / was on /dev/ubuntu-vg/ubuntu-lv during curtin installation
/dev/disk/by-id/dm-uuid-LVM-L3Gvl91St70eyL2oJuu2BRgb2xWwZbjp67q0YZ6Vhef7M1EeUSWxeRocIegvMdz5 / ext4 defaults 0 0
# /boot was on /dev/sda2 during curtin installation
/dev/disk/by-uuid/418da6e3-3c15-49d3-bbc2-4355999de12e /boot ext4 defaults 0 0
# k8s Close swap
#/swap.img	none	swap	sw	0	0
Modify Time Zone
The default time zone after system installation is UTC, which is eight hours behind current time
To use Beijing Time, you need to change the system time zone to CST
$ date
Tue Feb 22 06:57:53 UTC 2022
$ sudo timedatectl set-timezone Asia/Shanghai
$ date
Tue Feb 22 14:58:11 CST 2022
After adjusting the time zone, rsyslog needs to be restarted if you want the system log timestamp to take effect immediately
$ sudo systemctl restart rsyslog
Adjust Kernel Parameters
If the system does not load br_netfilter module, which needs to be loaded first.
By lsmod | grep br_netfilter to confirm that br_has been loaded Netfilter module.
The default is not loaded. You can install bridge-utils before loading through modprobe.
sudo apt-get install -y bridge-utils
sudo modprobe br_netfilter
lsmod | grep br_netfilter
br_netfilter           28672  0
bridge                176128  1 br_netfilter
At this point lsmod can see br_netfilter
On Ubuntu 20.04 Server, this value is 1. If your system is inconsistent, use the following command to modify it:
cat <<EOF | sudo tee /etc/sysctl.d/k8s.conf
net.bridge.bridge-nf-call-ip6tables = 1
net.bridge.bridge-nf-call-iptables = 1
EOF
sudo sysctl --system
2. Formal Installation
2.1 Docker
Install Docker
sudo apt install docker.io
Start Docker
sudo systemctl start docker
Start Docker
sudo systemctl enable docker
Docker installed this way is still newer
$ docker --version
Docker version 20.10.7, build 20.10.7-0ubuntu5~20.04.2
2.2 kubeadm kubectl kubectl
Since Google Source is not normally accessible in China, Ali Source is used instead.
# Configure Ali Source
sudo apt-get install -y ca-certificates curl software-properties-common apt-transport-https curl
curl -s https://mirrors.aliyun.com/kubernetes/apt/doc/apt-key.gpg | sudo apt-key add -
sudo tee /etc/apt/sources.list.d/kubernetes.list <<EOF
deb https://mirrors.aliyun.com/kubernetes/apt/ kubernetes-xenial main
EOF

# Install kubeadm kubectl kubectl after refreshing the software list
sudo apt-get update && sudo apt-get install -y kubelet kubeadm kubectl
# Lock Version
sudo apt-mark hold kubelet kubeadm kubectl
3. Building Clusters
3.1 Deploy the control-plane s node
Run etcd, API Server on control-plane node machine
sudo kubeadm init --config kubeadm-config.yaml
kubeadm-config.yaml:
apiVersion: kubeadm.k8s.io/v1beta3
bootstrapTokens:
- groups:
  - system:bootstrappers:kubeadm:default-node-token
  token: abcdef.0123456789abcdef
  ttl: 24h0m0s
  usages:
  - signing
  - authentication
kind: InitConfiguration
localAPIEndpoint:
  advertiseAddress: 192.168.56.100
  bindPort: 6443
nodeRegistration:
  criSocket: /var/run/dockershim.sock
  imagePullPolicy: IfNotPresent
  name: master
  taints: null
---
apiServer:
  timeoutForControlPlane: 4m0s
apiVersion: kubeadm.k8s.io/v1beta3
certificatesDir: /etc/kubernetes/pki
clusterName: kubernetes
controllerManager: {}
dns: {}
etcd:
  local:
    dataDir: /var/lib/etcd
imageRepository: registry.cn-hangzhou.aliyuncs.com/google_containers
kind: ClusterConfiguration
kubernetesVersion: 1.23.4
networking:
  dnsDomain: cluster.local
  serviceSubnet: 10.96.0.0/12
scheduler: {}
---
kind: KubeletConfiguration
apiVersion: kubelet.config.k8s.io/v1beta1
cgroupDriver: cgroupfs
- Specify the warehouse imageRepository, where the domestic mirror warehouse imageRepository: registry is used. Cn-hangzhou. Aliyuncs. Com/google_ Containers
- Specify the IP address advertiseAddress, advertiseAddress: 192.168.56.100
Default configurations can be printed via kubeadm config print init-defaults
Your Kubernetes control-plane has initialized successfully!

To start using your cluster, you need to run the following as a regular user:

  mkdir -p $HOME/.kube
  sudo cp -i /etc/kubernetes/admin.conf $HOME/.kube/config
  sudo chown $(id -u):$(id -g) $HOME/.kube/config

Alternatively, if you are the root user, you can run:

  export KUBECONFIG=/etc/kubernetes/admin.conf

You should now deploy a pod network to the cluster.
Run "kubectl apply -f [podnetwork].yaml" with one of the options listed at:
  https://kubernetes.io/docs/concepts/cluster-administration/addons/

Then you can join any number of worker nodes by running the following on each as root:

kubeadm join 192.168.56.100:6443 --token abcdef.0123456789abcdef \
	--discovery-token-ca-cert-hash sha256:0549bc0df13330f30b3684dc6896c47c2e668e3c4138cbd5f0ecfb909d1c16de
When kubeadm init is finished, it prompts you to do three things:
a. Configuring environment variables
b. Install network plug-ins
c. Join nodes in clusters
a. Configuring environment variables
  mkdir -p $HOME/.kube
  sudo cp -i /etc/kubernetes/admin.conf $HOME/.kube/config
  sudo chown $(id -u):$(id -g) $HOME/.kube/config
If you are a root user, you can execute the following commands:
export KUBECONFIG=/etc/kubernetes/admin.conf
b. Install network plug-ins
K8S has many network plugins, common ones are flannel, calico, etc. See more Installing Addons
Installing Calico requires only the following command to execute
kubectl apply -f https://docs.projectcalico.org/v3.21/manifests/calico.yaml
c. Join nodes in clusters
Not on control-plane s, on worker nodes
sudo kubeadm join 192.168.56.100:6443 --token abcdef.0123456789abcdef \
	--discovery-token-ca-cert-hash sha256:0549bc0df13330f30b3684dc6896c47c2e668e3c4138cbd5f0ecfb909d1c16de
If token expires, you can obtain it by following the command
kubeadm token create --print-join-command
More information on building control-plane nodes
- kubeadm reference guide
- Using kubeadm init with a configuration file
- Before executing kubeadm init again, you need to Close Cluster
- Of course, this is a relatively simple cluster. If you want to consider cluster availability, check Options for Highly Available Topology
3.2 Deploy worker nodes
Installing Docker, kubelet, kubeadm, kubectl is enough.
Then, execute the kubeadm join to join the cluster
3.3 Acceptance Cluster
Create a simple Nginx pod
kubectl apply -f https://k8s.io/examples/pods/simple-pod.yaml
View the IP of the pod:-o wide
$ kubectl get pods -o wide
NAME    READY   STATUS    RESTARTS   AGE     IP              NODE     NOMINATED NODE   READINESS GATES
nginx   1/1     Running   0          5m57s   172.16.140.65   node02   <none>           <none>
Accessing the Nginx service
curl 172.16.140.65:80
<!DOCTYPE html>
<html>
<head>
<title>Welcome to nginx!</title>
<style>
    body {
        width: 35em;
        margin: 0 auto;
        font-family: Tahoma, Verdana, Arial, sans-serif;
    }
</style>
</head>
<body>
<h1>Welcome to nginx!</h1>
<p>If you see this page, the nginx web server is successfully installed and
working. Further configuration is required.</p>

<p>For online documentation and support please refer to
<a href="http://nginx.org/">nginx.org</a>.<br/>
Commercial support is available at
<a href="http://nginx.com/">nginx.com</a>.</p>

<p><em>Thank you for using nginx.</em></p>
</body>
</html>
The Nginx Welcome Page represents a successful cluster