Last month, my teacher asked me to build Docker's OSM server. At that time, I stepped on the pit while recording. Finally, I got the deployment, so I blogged.
I. Install and configure Docker
This section describes the installation steps of docker in centOS 7 environment. The content is from http://www.runoob.com/docker/docker-tutorial.html For installation in other environments, you can also refer to this address.
If you have docker installed. You can skip this section.
Used in terminal
uname -r
To view your centOS kernel version, you need centOS 7 64 bits, kernel version 3.10 or more.
Remove the original Docker version
sudo yum remove docker \
                  docker-client \
                  docker-client-latest \
                  docker-common \
                  docker-latest \
                  docker-latest-logrotate \
                  docker-logrotate \
                  docker-selinux \
                  docker-engine-selinux \
                  docker-engine
Install some necessary tools:
sudo yum install -y yum-utils device-mapper-persistent-data lvm2
Add software source information:
sudo yum-config-manager --add-repo http://mirrors.aliyun.com/docker-ce/linux/centos/docker-ce.repo
Update the yum cache:
sudo yum makecache fast
Install Docker-ce:
sudo yum -y install docker-ce
Start Docker Background Service:
sudo systemctl start docker
Test run hello-world:
docker run hello-world
At this point, you should see "Hello from Docker".
At this point, the Docker installation is complete.
II. Building Mirror Image
This section is based on Ubuntu 18.04. Translated from https://switch2osm.org/manually-building-a-tile-server-18-04-lts/ Other versions can also be found at this address.
If you don't care about the process of image construction, you can skip this part and go to the third part and start using it directly.
- Download and open the docker image of Ubuntu 18.04
docker pull ubuntu:18.04  # Download the image. This step can be omitted. When creating the image, it will be downloaded automatically.
docker run –it –p 80:80 ubuntu:18.04  # Create containers using mirrors
- In the open container, start configuring
apt-get update
apt-get install -y sudo

// Installation Basic Dependence
sudo apt install -y libboost-all-dev git-core tar unzip wget bzip2 build-essential autoconf libtool libxml2-dev libgeos-dev libgeos++-dev libpq-dev libbz2-dev libproj-dev munin-node munin libprotobuf-c0-dev protobuf-c-compiler libfreetype6-dev libtiff5-dev libicu-dev libgdal-dev libcairo-dev libcairomm-1.0-dev apache2 apache2-dev libagg-dev liblua5.2-dev ttf-unifont lua5.1 liblua5.1-dev libgeotiff-epsg curl

// install postgresql and postgis (Installation process needs to select area)
sudo apt-get install -y postgresql postgresql-contrib postgis postgresql-10-postgis-2.4 postgresql-10-postgis-scripts

// open postgresql service
sudo service postgresql start

// Use username devsum To create a database, you can change it to another name
sudo -u postgres -i
createuser devsum  # If you ask if it is set to superuser, select Yes
createdb -E UTF8 -O devsum gis  # Create a library called gis

// Configure the database
psql
\c gis
CREATE EXTENSION postgis;
CREATE EXTENSION hstore;
ALTER TABLE geometry_columns OWNER TO devsum;
ALTER TABLE spatial_ref_sys OWNER TO devsum;
\q
exit

// Adding Accounts
sudo useradd -m devsum

// install osm2pgsql,Used to osm Data stored in database
mkdir /home/devsum/src
cd /home/devsum/src
git clone git://github.com/openstreetmap/osm2pgsql.git
cd osm2pgsql

// Install some builds osm2pgsql Necessary dependencies
sudo apt install -y make cmake g++ libboost-dev libboost-system-dev libboost-filesystem-dev libexpat1-dev zlib1g-dev libbz2-dev libpq-dev libgeos-dev libgeos++-dev libproj-dev lua5.2 liblua5.2-dev

// Build and install osm2pgsql
mkdir build && cd build
cmake ..
sudo make install

// install Mapnik
sudo apt-get install -y autoconf apache2-dev libtool libxml2-dev libbz2-dev libgeos-dev libgeos++-dev libproj-dev gdal-bin libmapnik-dev mapnik-utils python-mapnik

// install mod_tile and renderd
// Compile mod_tile source code
cd /home/devsum/src
git clone -b switch2osm git://github.com/SomeoneElseOSM/mod_tile.git
cd mod_tile
./autogen.sh
// Build and install
./configure
make
sudo make install
sudo make install-mod_tile
sudo ldconfig

// Configuration Style Sheet
cd /home/devsum/src
git clone git://github.com/gravitystorm/openstreetmap-carto.git
cd openstreetmap-carto
// install carto
sudo apt install -y npm nodejs
sudo npm install -g carto
carto -v  # inspect carto Version above 1.1.0


//take git Down to project conversion mapnik Readable documents
carto project.mml > mapnik.xml

// Download maps (select a small map data for testing)
mkdir /home/devsum/data
cd /home/devsum/data
wget http://download.geofabrik.de/asia/azerbaijan-latest.osm.pbf

// Import map data to database (need to be modified here)-c Value of parameters( node cache)When your machine memory is 1 G When recommended, set to less than 800)
sudo su devsum osm2pgsql -d gis --create --slim  -G --hstore --tag-transform-script /home/devsum/src/openstreetmap-carto/openstreetmap-carto.lua -C 2500 --number-processes 1 -S /home/devsum/src/openstreetmap-carto/openstreetmap-carto.style /home/devsum/data/azerbaijan-latest.osm.pbf
e
    exit  # Back to the root user
// download shapefile
cd /home/devsum/src/openstreetmap-carto/
scripts/get-shapefiles.py  # It will take a long time and may fail.// download font
sudo apt-get install -y fonts-noto-cjk fonts-noto-hinted fonts-noto-unhinted ttf-unifont
Note 1: If the download takes too long, you can download (https://pan.baidu.com/s/14SLism MSLlXm1Db_JOgIEQ extract code: mbci) and extract it into the container's / home/devsum/src/openstreetmap-carto/data directory. (Each compressed package file is decompressed into a folder)
- Configuring Web Server
3.1 Configure renderd
sudo nano /usr/local/etc/renderd.conf # Open renderd configuration file
Amend the following:
num_threads=4  # When the machine memory is about 2GB, it is changed to 2.
XML=/home/renderaccount/src/openstreetmap-carto/mapnik.xml  # Modify renderaccount to a selected user name, such as devsum
3.2 Configuring Apache
sudo mkdir /var/lib/mod_tile
sudo chown devsum /var/lib/mod_tile

sudo mkdir /var/run/renderd
sudo chown devsum /var/run/renderd
3.3 Configure mod_tile in Apache
sudo nano /etc/apache2/conf-available/mod_tile.conf  # Modify the document
LoadModule tile_module /usr/lib/apache2/modules/mod_tile.so  # Add this line
After saving and exiting, run:
sudo a2enconf mod_tile
3.4 Configure renderd in Apache
sudo nano /etc/apache2/sites-available/000-default.conf # Modify the document
Add the following between "Server Admin" and "Document Root":
LoadTileConfigFile /usr/local/etc/renderd.conf
ModTileRenderdSocketName /var/run/renderd/renderd.sock
# Timeout before giving up for a tile to be rendered
ModTileRequestTimeout 0
# Timeout before giving up for a tile to be rendered that is otherwise missing
ModTileMissingRequestTimeout 30
Upon completion, start the Apache service
sudo service apache2 start
3.5 Front-end renderd
Next, we try to run renderd in the foreground to check if the configuration is successful.
sudo service postgresql start  # First run the postgresql service
sudo su devsum  # Need to switch users
renderd -f -c /usr/local/etc/renderd.conf  # Open Rendering
At this point, open the browser and access 127.0.0.1/hot/0/0.png (if deployed on the server, enter the server IP). The following image should be displayed:

At this point, the configuration is basically complete.
Ctrl+C terminates rendering.
3.6 Configuration of background renderd
nano /home/devsum/src/mod_tile/debian/renderd.init  # Modify renderaccount to devsum (or other usernames set above)
sudo cp /home/devsum/src/mod_tile/debian/renderd.init /etc/init.d/renderd
sudo chmod u+x /etc/init.d/renderd
sudo cp /home/devsum/src/mod_tile/debian/renderd.service /lib/systemd/system/
4. Submitting Mirrors
At this point, the container has been configured. It needs to be packaged into a mirror. Before packaging, create a script to facilitate the opening of the service.
nano /home/devsum/start-service.sh
//  Enter the following:
#!/bin/bash
sudo service postgresql start
sudo service apache2 start
sudo service renderd start
Save and exit, exit docker container.
For testing purposes, samples under extra in the osm_tile directory in the container can be copied from the container to the host:
docker cp %container ID%:/home/devsum/src/mod_tile/extra/sample_leaflet.html ~/ # container ID have access to docker ps –a Command View
Submit the container as a mirror:
docker commit –a="devsum" –m="Config Done" %container ID% devsum/openstreetmap:v1
3. Using Dockerfile files to build servers
In the previous section, we completed the configuration of the mirror, which will be used in this section to build. If you skip the previous section, and you have different concerns, you can use my mirror directly.
Create a Docker file and enter the following:
1.    FROM devsum/openstreetmap:v1
2.    # If you configure the image in the previous section, you can modify the first line parameter to your image name, or you can use my image directly. When you create the container, you can download it automatically, or you can use it. docker pull devsum/openstreetmap:v1 Manual download of commands
3.    EXPOSE 80
4.    CMD sh /home/devsum/start-service.sh && tail -f /var/log/apache2/access.log
Open the terminal and switch to the directory where dockerfile is located. Use
docker build -t osm-server . # There's one last thing you should not miss.
After building the docker container, you should see the words "Successfully built".
The container runs in the background:
docker run -d -p 80:80 osm-server
Open the HTML file copied in the previous section with a browser (if you skip the previous section, click here). download You should see the result of the map display (if it is built on the server, please modify 127.0.0.1 in the html file as the server ip first):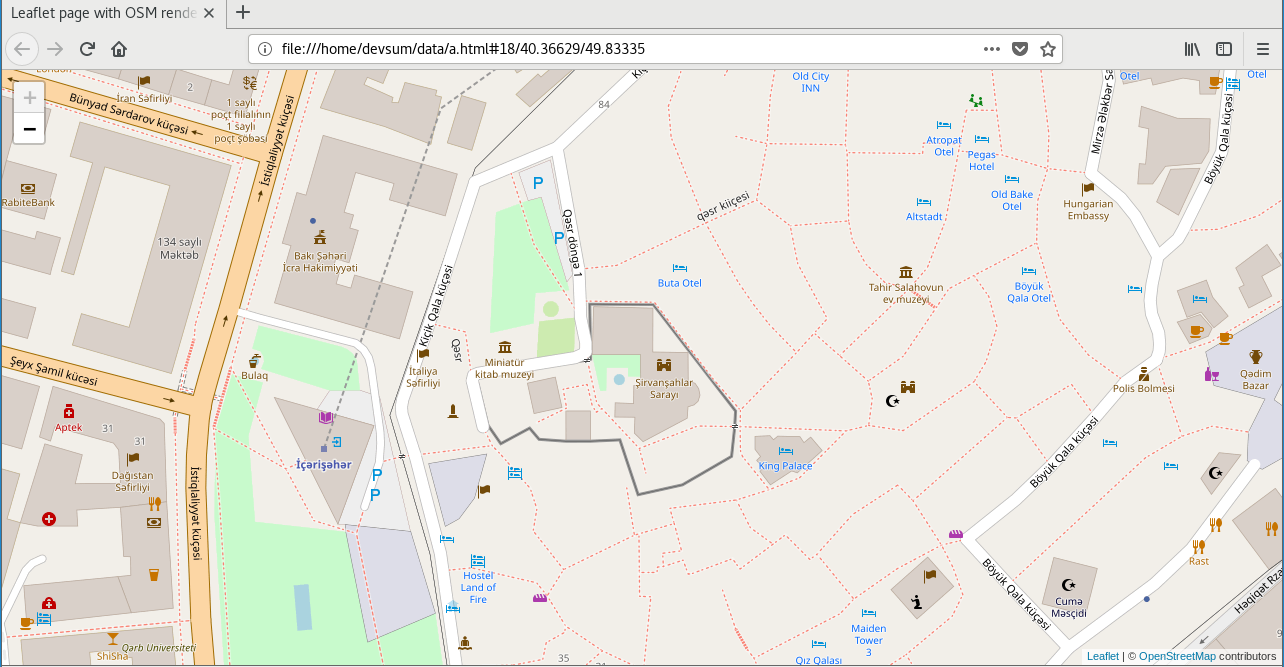
4. Use your own map data
In the above steps, the map data I used is the map data of azerbaijan (other map data can be used in the http://download.geofabrik.de/ Next, I'll show you how to use your own map data. (Or you can use your own map data directly in Part 2)
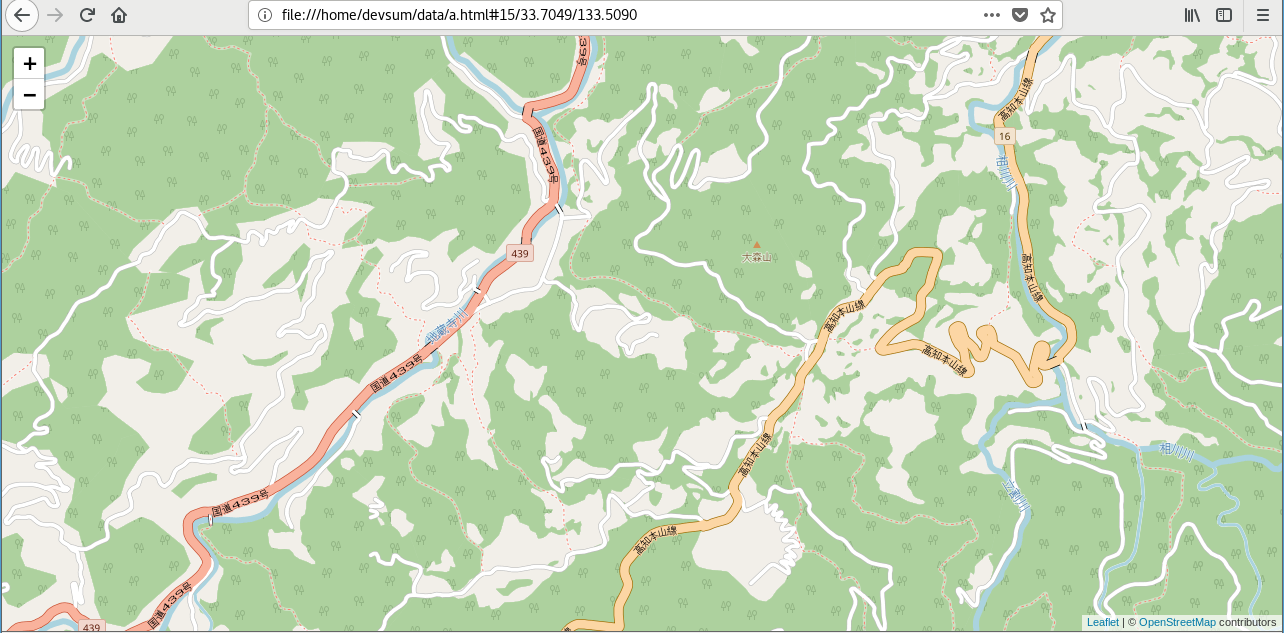
Prepare map data (which can be your own map data or downloaded other map data). In this section, I use Japan-Shikoku data as a demonstration (because it is smaller).
Create a Docker file and edit it as follows: (Line 4 changes the name of the map data file you use)
FROM devsum/openstreetmap:v1
MAINTAINER devsum

ARG mapData=shikoku-latest.osm.pbf
ADD ${mapData} /home/devsum/data
EXPOSE 80
RUN sudo service postgresql start && sudo su devsum -c "osm2pgsql -d gis --create --slim  -G --hstore --tag-transform-script /home/devsum/src/openstreetmap-carto/openstreetmap-carto.lua -C 2500 --number-processes 1 -S /home/devsum/src/openstreetmap-carto/openstreetmap-carto.style /home/devsum/data/${mapData}"
CMD sh /home/devsum/start-service.sh && tail -f /var/log/apache2/access.log Map data and Dockerfile Put it in the same directory, according to Part Three build It can run in the background.
Put map data and Dockerfile in the same directory, build and run in the background according to the third part.
The results of using Japan-Shikoku map data are as follows: