The front end is implemented by vue, the back end is implemented by spring boot, and the web server is implemented by nginx. Because your website involves databases, you also need to install database services.
1, Server
In terms of servers, Alibaba cloud's lightweight application server uses 2-core 2GB memory, system disk 60GB, and linux version is Red Hat's CentOS 7.6. It is said on the Internet that 7.6 is a classic, and CentOS 8 Version x will stop updating and maintenance at the end of the year, so version 7.6 is selected.
2, Packaging of Vue projects
Run npm run build in the folder where the vue project to be packaged is located, and the dist folder will be generated under the folder. This command will convert all the code of the vue project into css, js and html formats so that it can run on most browsers. Just put the dist folder on the http server and it will run.

3, Packaging of springboot project
-
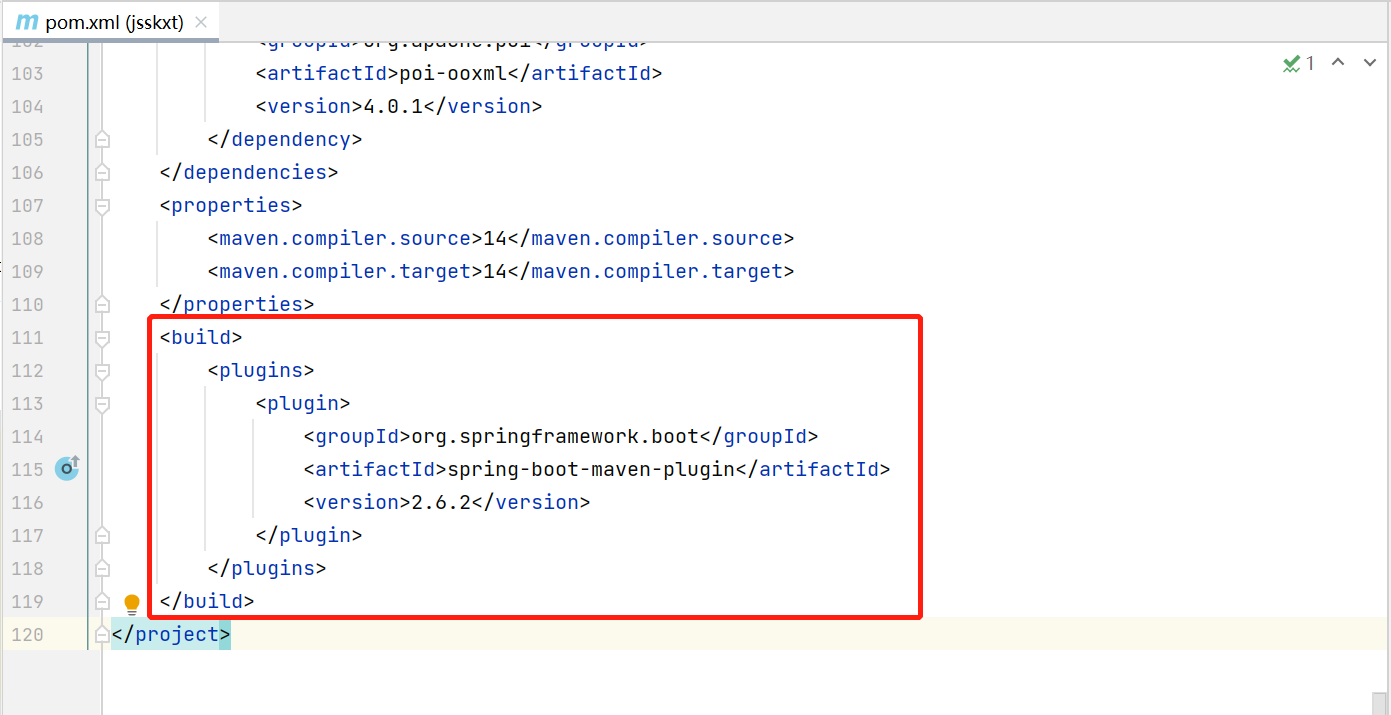
First in POM maven dependency of importing SpringBoot in XML file:
<build>
    <plugins>
        <plugin>
            <groupId>org.springframework.boot</groupId>
            <artifactId>spring-boot-maven-plugin</artifactId>
            <version>2.6.2</version>
        </plugin>
    </plugins>
</build>
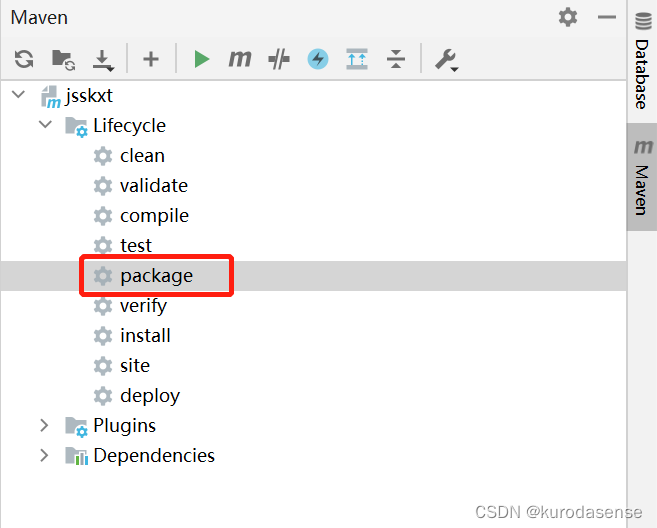
- Use the mvn package command to package the springboot project. This command will generate a jar package in the target directory of the project. If you use idea to write the springboot project, you can operate as shown in the figure:
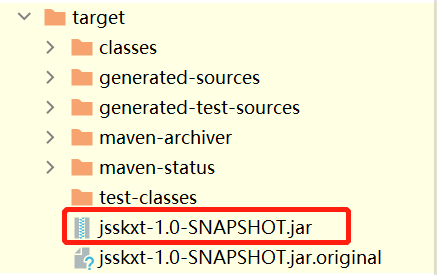
 This is`package`after target Contents in the folder, with red box jar This is the file springboot Project, because it has built-in tomcat So it only needs to be executed at the terminal`java -jar (Yours sprigboot project jar Name of the package)`It can run.
4, Deploying nginx on linux
After the vue project is built, the dist folder must be placed on a web server to run, so nginx is used as the web server here. Nginx is a high-performance web server, and it supports reverse proxy, occupies less memory, has strong concurrency, and is very lightweight. Whether it is deployed on windows or linux, it is very simple and convenient.
-
Visit nginx official website https://nginx.org/en/ , find download on the right and enter the download page

-
The download page provides three versions of nginx. Mainline version refers to the development version currently under development, Stable version refers to the latest Stable version, and Legacy versions refer to the old version of nginx. Obviously, we should choose the latest Stable version.

Because it is running on linux, choose the version of linux, that is, the version with red box.
-
After downloading, we get the tar file. You can use WinSCP to access Alibaba cloud server and put nginx in it.
-
Then we can use Xshell 5 to access alicloud server, cd to the folder where you put nginx's tar package, and run tar -xvf (your nginx's tar package name) to decompress it.
-
Then cd /usr/local/swebserver/nginx/conf to the folder where the nginx configuration file is placed, and execute VIM nginx Conf modify the configuration. In fact, if it is convenient, we can use WinSCP to carry out these operations.
-
Open nginx After the conf file, find the server block in the http block, as shown in the figure:

-
Next, modify the contents of the server (the notes with # numbers are all annotations), and modify them as follows:
server { listen 8080; # This is to set the port number of the web server server_name 8.134.217.191; # This is to set the ip address of the web server. Fill in the ip address of your server here root /dist; #charset koi8-r; #access_log logs/host.access.log main; location / { root /dist; # This is to set the location of your dist folder. Because my dist folder is placed in the root directory, it is written as / dist try_files $uri $uri/ /index.html @router; index index.html index.htm; # The above two copied @ router is to refer to the following forwarding. Because the route in vue is not an interface, but a web page Jump, it needs to be written in particular. } location @router{ rewrite ^.*$ /index.html last; # This paragraph means to rewrite all routing requests to index In HTML, route requests are sent to the route of vue for processing. } #error_page 404 /404.html; # redirect server error pages to the static page /50x.html # error_page 500 502 503 504 /50x.html; location = /50x.html { root html; } # proxy the PHP scripts to Apache listening on 127.0.0.1:80 # #location ~ \.php$ { # proxy_pass http://127.0.0.1; #} # pass the PHP scripts to FastCGI server listening on 127.0.0.1:9000 # #location ~ \.php$ { # root html; # fastcgi_pass 127.0.0.1:9000; # fastcgi_index index.php; # fastcgi_param SCRIPT_FILENAME /scripts$fastcgi_script_name; # include fastcgi_params; #} # deny access to .htaccess files, if Apache's document root # concurs with nginx's one # #location ~ /\.ht { # deny all; #} } -
Execute / usr/local/swebserver/nginx/sbin/nginx to open the nginx service.
5, Deploying mysql on linux
Before deploying and running springboot, you need to install the database service to make the springboot project run normally. Because I use mysql, I deploy the MySQL service.
-
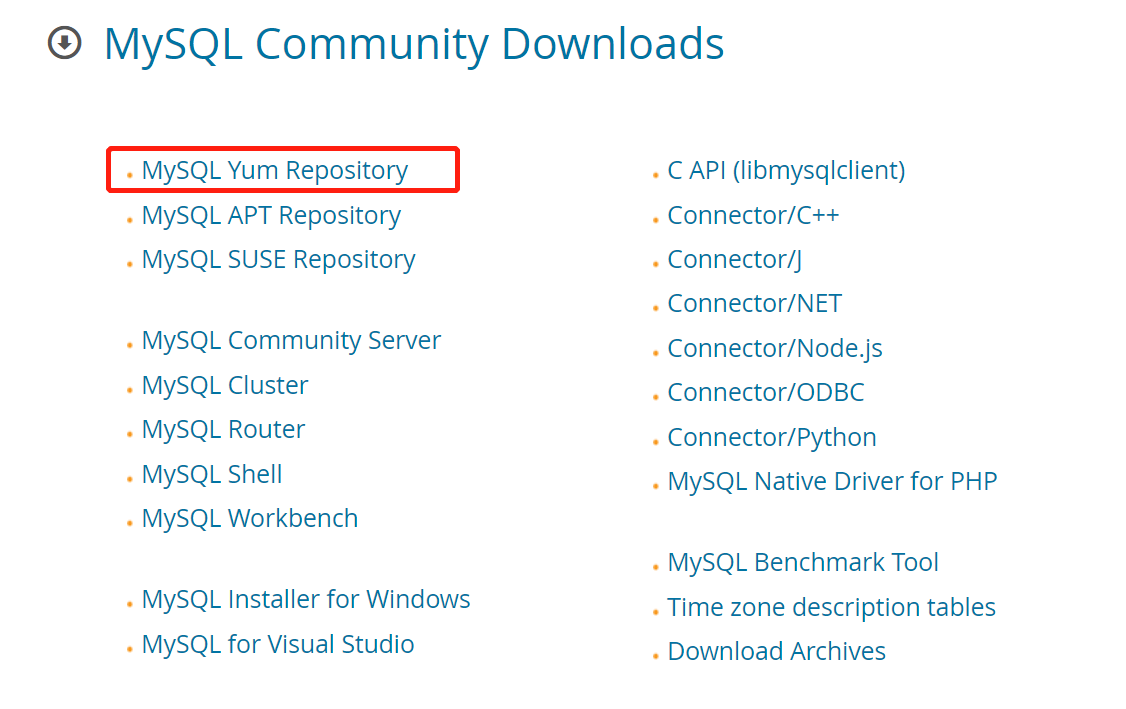
open https://dev.mysql.com/downloads/ , select MySQL Yum Repository:
-
Because our linux version is CentOS 7.6, we choose the red box version:
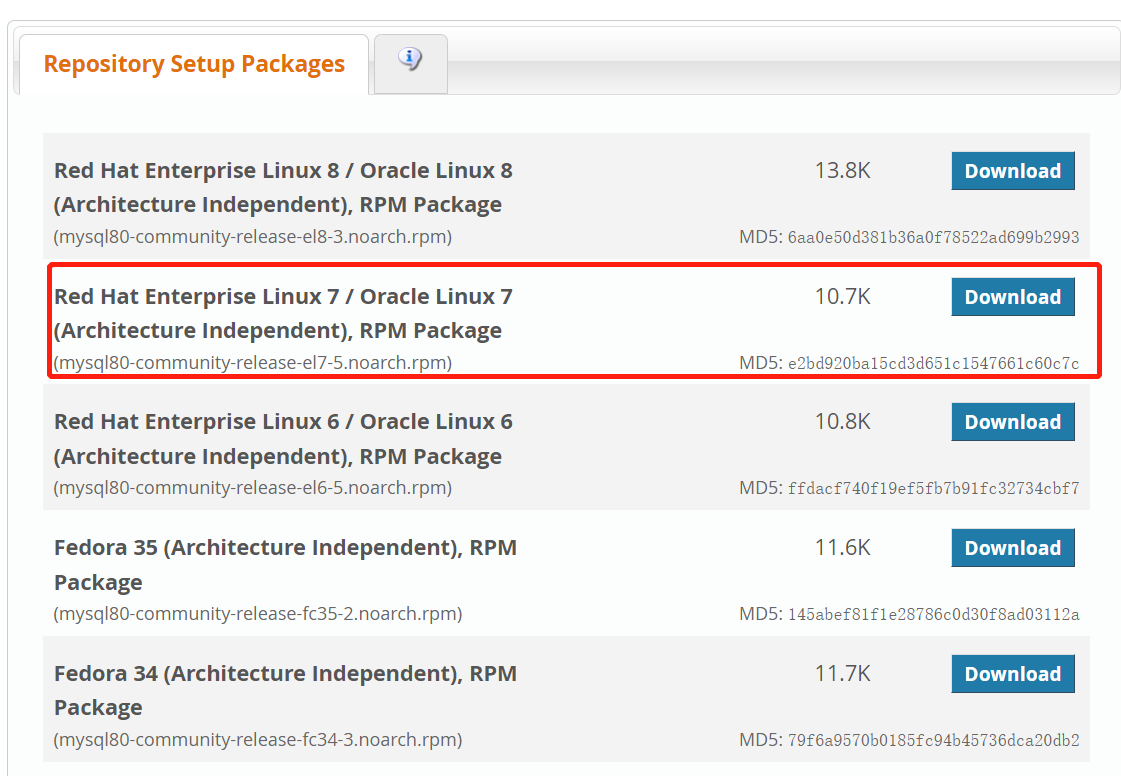
-
Click download to jump to the page. We choose No thanks, just start my download:
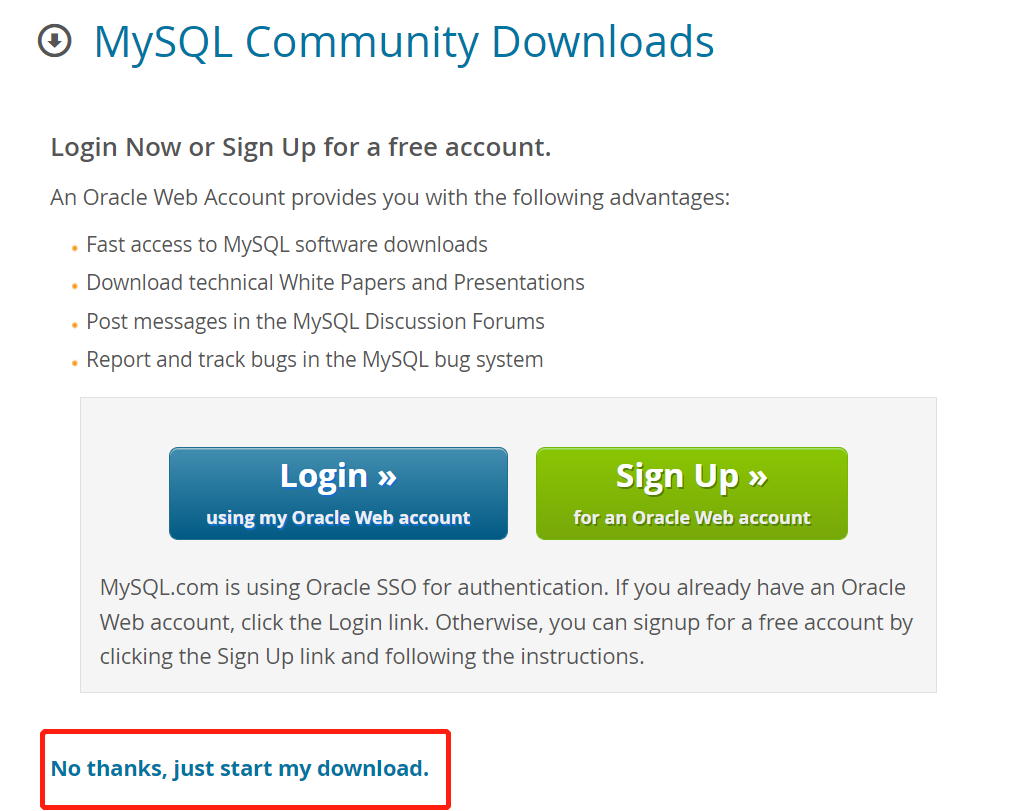
-
After downloading, use WinSCP to put the file on the server, and then execute Yum localinstall mysql80-community-release-el7-5 on XShell 5 noarch. RPM, if you need to confirm during installation, confirm all the way.
-
After installation, execute Yum install MySQL community server.
-
After installation, start the MySQL service: service mysqld start. After executing the command, you can use ps -ef | grep mysql to check whether MySQL is started successfully.
-
Modify the root password of MySQL. First execute grep 'temporary password' / var / log / mysqld Log to view the temporary password; Then copy the temporary password and log in to MySQL: MySQL - uroot - P (temporary password); Because it's mysql8 0, so execute set global validate_password.policy=0; And set global validate_password.length=1;, This purpose is to reduce the password inspection rules and facilitate password modification. Finally, execute ALTER USER 'root'@'localhost' IDENTIFIED BY 'your new password'; The password was successfully changed.
-
After changing the password, refresh the permission flush privileges. Can quit; Log out, log in with a new password, and check the new password.
6, Installing jdk on linux
-
open https://www.oracle.com/technetwork/java/javase Find Download and enter the Download page:
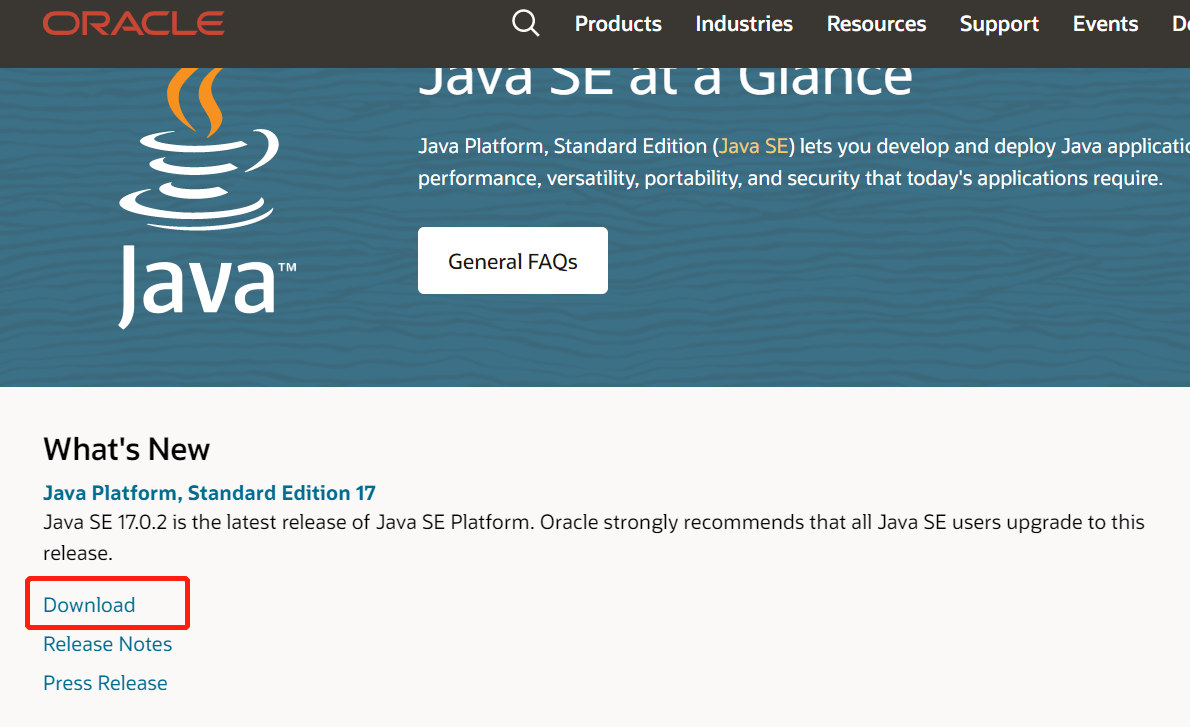
-
Because it is CentOS 7.6, choose x64 Compressed Archive version. The higher version of jdk will be compatible with the lower version, so just download the latest version recommended by the official:
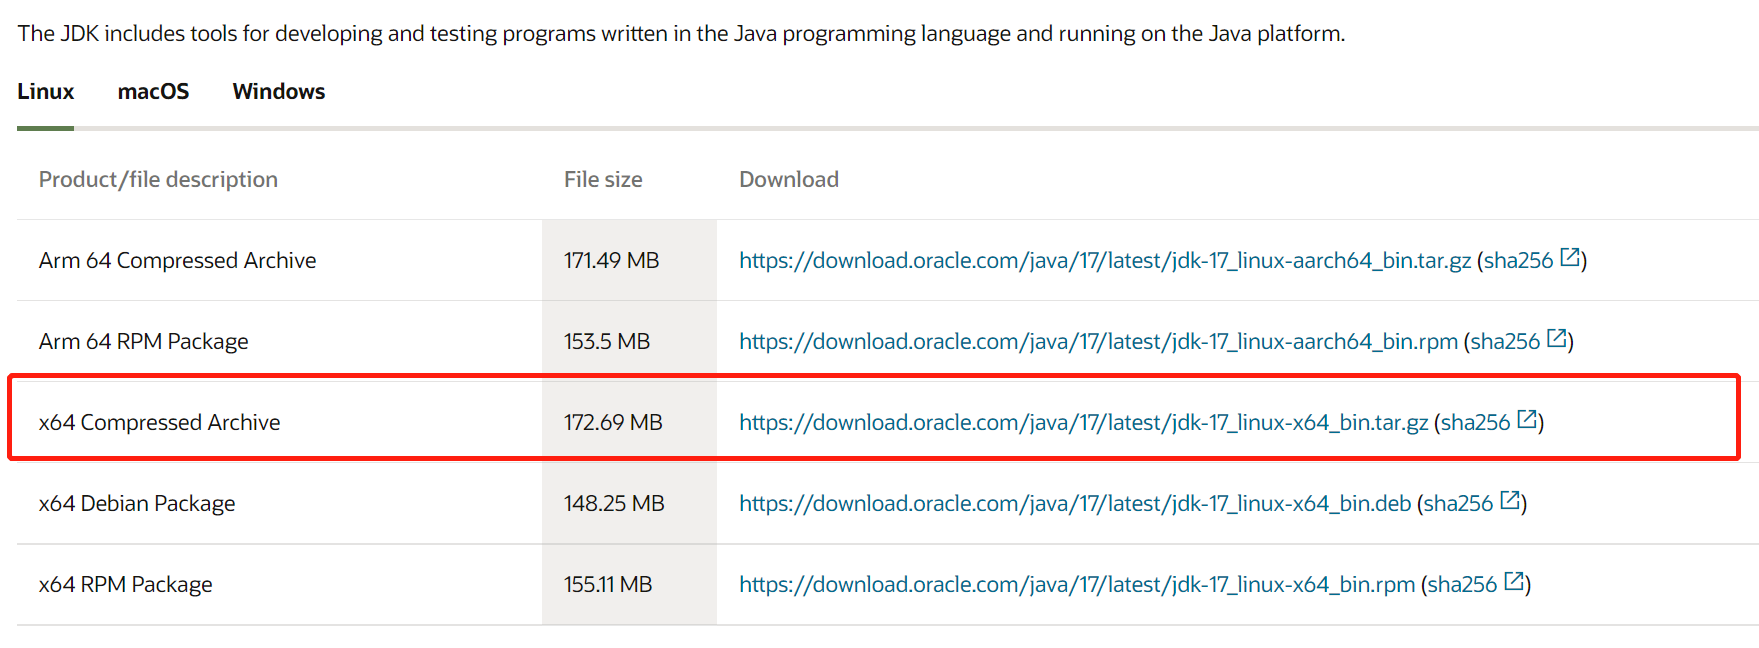
-
After downloading, use WinSCP to put it into the server, and then extract: tar zxvf (the tar package name of JDK).
-
Then configure the environment variable. Here, use vim /etc/profile to configure it. You can also use WinSCP to find / etc/profile and configure it directly later:
export JAVA_HOME=/root/jdk-17.0.2 # Set as the path of the extracted jdk folder
export PATH=$JAVA_HOME/bin:$PATH
If it is under vim, press esc, then enter: wq save to exit.
-
Then execute source /etc/profile to make the configuration file effective.
-
Finally, execute java version to check whether the version is displayed. If the version is displayed, the configuration is successful.
7, Running the springboot project on linux
Put the jar package shown in the following figure into the server, and then execute Java jar (jar package name) to run the project. If you need to run in the background, execute nohup java -jar (jar package name) & it's OK.
