Implementation of three-point menu list in the experiment of fundamentals of mobile application design
Experiment Name:
Implementation of point menu list
Tools, software and environment used:
JDK1.8,Android Studio
1, Purpose of the experiment:
Further understand the use of various Android controls, deepen the use of control properties and methods, master the use of ListView controls and dialog boxes.
2, Experiment content:
1. Implementation point menu list
1.1 layout structure


The list layout is divided into two parts. The top part displays the list content and the bottom part displays the total price of all dishes;
The menu items are shown in the figure, including
1. Picture, picture format 120 * 120;
2. Title, centered, Android: textappearance = "? Android: attr / textappearance large",
3. The content of the dish introduction is displayed in 3 lines at most, and the excess part is represented by... Android: textappearance = "? Android: attr / textappearance medium"
4. Display unit price in the font Android: textappearance = "? Android: attr / textappearance medium"
5. Buttons are displayed at the left and right ends, and numbers are displayed in the middle.
1.2 functions
1. Display the point menu in list mode;
2. Click "-" or "+" to change the purchase quantity and the total price accordingly
1.3 resources used
1. Data
<array name="item_content">
< item > "blanching" is a cooking technique of Cantonese cuisine, that is, scalding food with boiling water or soup.
Most northerners have a conceptual confusion about "blanching". They think that blanching is to boil it in white water and take it out. In fact, it is not. It is a literal misunderstanding. The real blanched shrimp still has several processes. After a friend's guidance, they can have an insight.
Blanched shrimp is actually the simplest. It doesn't need too much seasoning, complicated process, and it doesn't need to spend a lot of time. It doesn't even need to consider the temperature when eating. It doesn't need to think too much about the decoration of the plate. It can be served with an equally simple sour and salty dish.
Especially those who want shrimp and don't bother too much can choose to cook this dish, which is simple and fresh. It's also my favorite reserved recipe.
As a kiwi shrimp, its appearance in neat clothes and integrity is undoubtedly the highest reward for it. It is certainly the best ending for a gentleman to be enjoyed by human beings gracefully.
</item>
<item>
It is said that the beauty of roast duck is derived from the precious Beijing duck. It is the best meat duck in the world.
It is said that the breeding of this special pure Peking Duck began about a thousand years ago. It was due to the hunting of emperors in the Liao, Jin and Yuan Dynasties. This pure white wild duck was occasionally obtained. Later, it was raised for hunting. It has been continued. Only then can this excellent pure duck be obtained and cultivated into today's valuable meat duck. That is, a kind of white duck fattened by filling feeding method, so it is called "filling duck".
Moreover, Peking duck was introduced to Europe and the United States more than a hundred years ago and became a blockbuster after breeding. Therefore, Beijing duck, as a high-quality variety, has become a source of valuable duck species in the world for a long time.
</item>
</array>
<array name="item_title">
< item > braised shrimp < / item >
< item > Beijing roast duck < / item >
</array>
<array name="item_price">
<item>58</item>
<item>128</item>
</array>
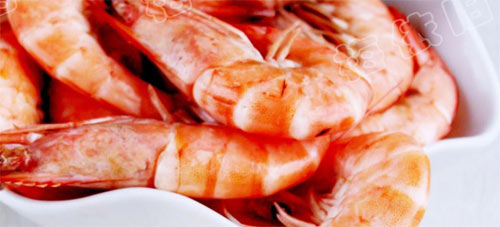
2. Pictures

3. Layout documents (implemented separately)
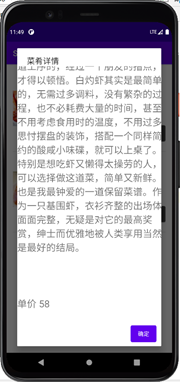
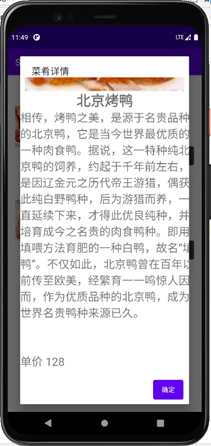
2. Click each list item to display the details of the dish in the pop-up Dialog
2.1 layout
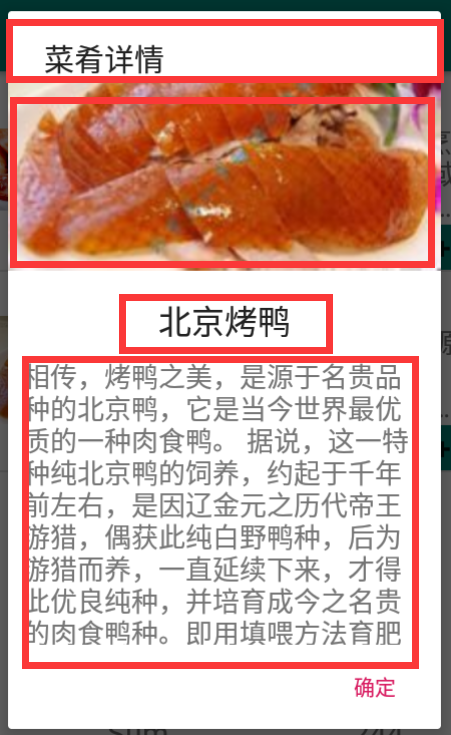
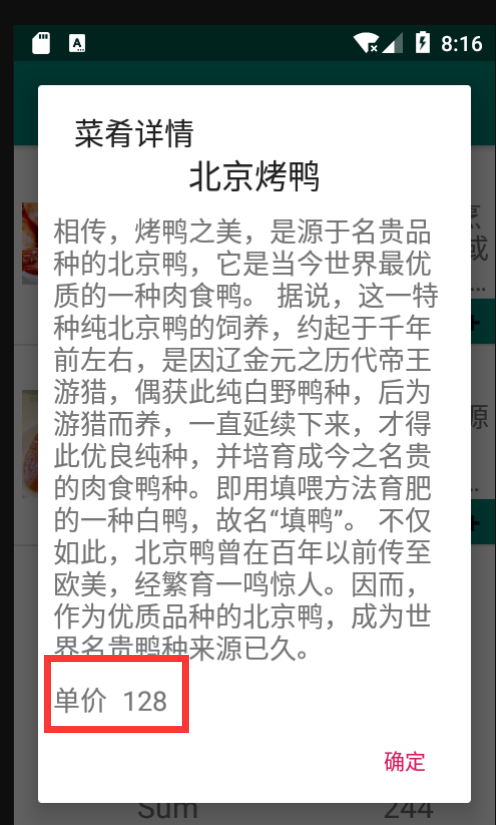
Including title, picture, dish title, details, unit price and button
2.2 functions
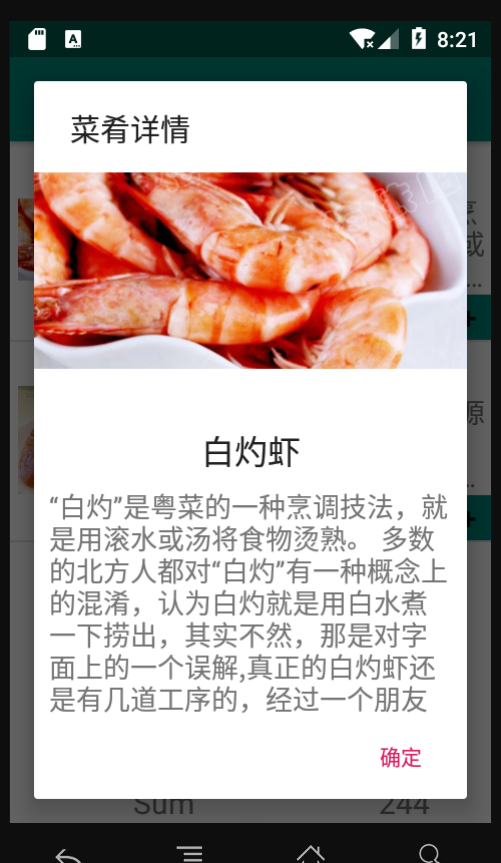
Click the list item to transfer the information of the dish (picture, dish title, details and unit price) to the pop-up dialog box in the form of constructor parameters. The pop-up dialog box realizes the display of dish details in the form of user-defined interface layout.

3, Test of experimental results
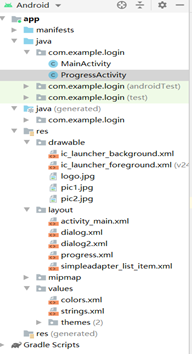
Main layout files and string XML file, mainactivity Java is the java file of the login interface, progressactivity Java is the java file of the menu interface. Dialog and dialog2 are layout files of two ordinary dialog boxes. progress is the layout file of the listview of the menu, simpleadapter_list_item is the layout file of item in listview.
Main code: (all the complete codes are in the resource download package, and there is a resource download link at the end of the article)
//ProgressActivity.java
package com.example.login;

import androidx.annotation.NonNull;
import androidx.annotation.Nullable;
import androidx.appcompat.app.AppCompatActivity;
import androidx.fragment.app.DialogFragment;
import android.content.DialogInterface;

import android.app.AlertDialog;
import android.app.Dialog;
import android.app.ListActivity;
import android.content.DialogInterface;
import android.os.Bundle;
//import android.support.v7.app.AppCompatActivity;
import android.os.Bundle;
import android.view.View;
import android.view.ViewGroup;
import android.widget.AdapterView;
import android.widget.BaseAdapter;
import android.widget.Button;
import android.widget.ImageView;
import android.widget.LinearLayout;
import android.widget.ListView;
import android.widget.SimpleAdapter;
import android.widget.TextView;
import android.widget.Toast;

import com.example.login.R;

import java.util.ArrayList;
import java.util.HashMap;
import java.util.List;

public class ProgressActivity extends AppCompatActivity {
    private ListView listView;


    private int [] ivR = {
            R.drawable.pic1,R.drawable.pic2,
    };
    private String[] titles;
    private String[] content;
    private String[] price;

    private Button less,add;
    private TextView num;
    @Override
    protected void onCreate(Bundle savedInstanceState) {
        super.onCreate(savedInstanceState);
        setContentView(R.layout.progress);
        //Reference files in string
        listView = (ListView)findViewById(R.id.listView);
        List<HashMap<String,Object>> arrayList = new ArrayList<>();


        titles =getResources().getStringArray(R.array.item_title);
        content =getResources().getStringArray(R.array.item_content);
        price =getResources().getStringArray(R.array.item_price);

        //Create a custom Adapter and inherit BaseAdapter
        MyBaseAdapter MyBase=new MyBaseAdapter();
        listView.setAdapter(MyBase);

        listView.setOnItemClickListener(new AdapterView.OnItemClickListener() {
            @Override
            public void onItemClick(AdapterView<?> adapterView, View view, int i, long l) {

                AlertDialog.Builder builder = new AlertDialog.Builder(ProgressActivity.this);
                builder.setTitle("Dish details");
                builder.setCancelable(true);            //Click the area outside the dialog box to make the dialog box disappear
                //Set front button
                builder.setPositiveButton("determine", new DialogInterface.OnClickListener() {
                    @Override
                    public void onClick(DialogInterface dialog, int which) {
                        dialog.dismiss();
                    }
                });
                //Create AlertDialog object
                AlertDialog dialog = builder.create();
                //Listening events displayed in the dialog box
                if(i==0)
                {
                    View dialogView = View.inflate(ProgressActivity.this, R.layout.dialogactivity, null);
                    dialog.setView(dialogView);
                }
                else
                {
                    View dialogView = View.inflate(ProgressActivity.this, R.layout.dialogactivity2, null);
                    dialog.setView(dialogView);
                }

                dialog.show();
            }
        });
    }
    private class MyBaseAdapter extends BaseAdapter{

        @Override
        public int getCount() {
            return 2;
        }

        @Override
        public Object getItem(int i) {
            return null;
        }

        @Override
        public long getItemId(int i) {
            return 0;
        }

        @Override
        public View getView(int i, View view, ViewGroup viewGroup) {
            View vi=View.inflate(ProgressActivity.this,R.layout.simpleadapter_list_item,null);
            ImageView imageView=(ImageView) vi.findViewById(R.id.list_item_iv);
            TextView titles_=(TextView) vi.findViewById(R.id.list_item_tv1);
            TextView content_=(TextView) vi.findViewById(R.id.list_item_tv2);
            TextView price_=(TextView) vi.findViewById(R.id.list_item_tv3);
            TextView num=(TextView)vi.findViewById(R.id.textView_num);
            TextView sum=(TextView)findViewById(R.id.textView_sumprice);


            Button less=(Button)vi.findViewById(R.id.button_less);
            Button add=(Button)vi.findViewById(R.id.button_add);

            imageView.setBackgroundResource(ivR[i]);
            titles_.setText(titles[i]);
            content_.setText(content[i]);
            price_.setText(price[i]);

            add.setOnClickListener(new View.OnClickListener() {
                @Override
                public void onClick(View view) {
                    int a=Integer.parseInt((String)num.getText());
                    String a0=Integer.toString(a+1);
                    num.setText(a0);
                    if(i==0){
                        int t=Integer.parseInt((String)sum.getText());
                        String t0=Integer.toString(t+58);
                        sum.setText(t0);
                    }
                    else{
                        int t=Integer.parseInt((String)sum.getText());
                        String t0=Integer.toString(t+128);
                        sum.setText(t0);
                    }
                }
            });
            less.setOnClickListener(new View.OnClickListener() {
                @Override
                public void onClick(View view) {
                    int a=Integer.parseInt((String)num.getText());
                    if(a==0)
                    {
                        String a0=Integer.toString(a);
                        num.setText(a0);

                    }
                    else {
                        String a0=Integer.toString(a-1);
                        num.setText(a0);
                        if(i==0){
                            int t=Integer.parseInt((String)sum.getText());
                            String t0=Integer.toString(t-58);
                            sum.setText(t0);
                        }
                        else
                        {
                            int t=Integer.parseInt((String)sum.getText());
                            String t0=Integer.toString(t-128);
                            sum.setText(t0);
                        }
                    }
                }
            });

            return vi;
        }
    }

}
Screenshot of experimental results:
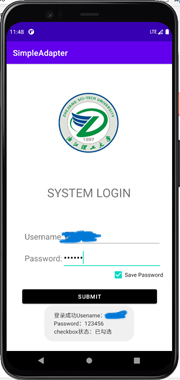
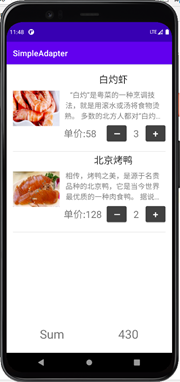

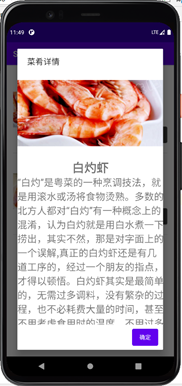

Experience:
This experiment took a long time to learn, but gained a lot. I used the common advanced controls of android, learned the use of listview and BaseAdapter, further learned the General Dialog box Dialog, and reviewed the content and knowledge of previous experiments. The learning of android development software has been further deepened and improved in the future.