Classification of design patterns
Generally speaking, design patterns are divided into three categories:
	There are five kinds of creation mode: factory method mode, abstract factory mode, singleton mode, builder mode and prototype mode.

	There are seven structural modes: adapter mode, decorator mode, agent mode, appearance mode, bridge mode, combination mode and sharing mode.

	There are eleven behavioral modes: strategy mode, template method mode, observer mode, iteration sub mode, responsibility chain mode, command mode, memo mode, state mode, visitor mode, mediator mode and interpreter mode.
A. Creation mode (5)
Factory method pattern, abstract factory pattern, singleton pattern, builder pattern, prototype pattern.
1 factory mode
1.1 simple factory mode
Definition: defines a class for creating objects, which encapsulates the behavior of instantiating objects.
Example: (let's take an example of pizza factory)
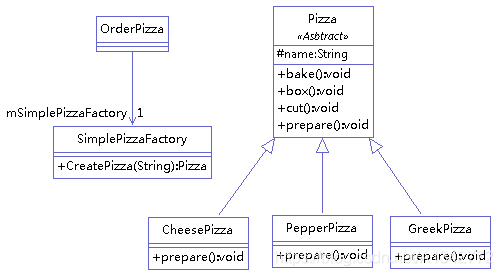
Pizza factory produces three types of pizza: chess, pepper and great. These three types of objects are instantiated through the factory class (SimplePizzaFactory). The class diagram is as follows:
Factory class code:
	public class SimplePizzaFactory {
		   public Pizza CreatePizza(String ordertype) {
				  Pizza pizza = null;
				  if (ordertype.equals("cheese")) {
						 pizza = new CheesePizza();
				  } else if (ordertype.equals("greek")) {
						 pizza = new GreekPizza();
				  } else if (ordertype.equals("pepper")) {
						 pizza = new PepperPizza();
				  }
				  return pizza;
		   }
	}
Problems and solutions of simple factory: one problem of simple factory mode is that the creation of class depends on factory class, that is, if you want to expand the program, you must modify the factory class, which violates the opening and closing principle. Therefore, from the perspective of design, how to solve some problems? We can define an abstract method for creating objects and create multiple different factory classes to implement the abstract method. In this way, once we need to add new functions, we can directly add new factory classes without modifying the previous code. This method is the factory method mode we will talk about next.
1.2 factory method mode
Definition: defines an abstract method to create an object, and the subclass determines the class to be instantiated. The factory method pattern defers instantiation of objects to subclasses.
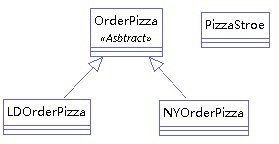
For example: (we still give the example of pizza factory, but in this example, there are two places of origin of pizza: London and New York). A new origin is added. If we use the simple factory mode, we need to modify the factory code and add a bunch of if else statements. The factory method mode overcomes the disadvantage that a simple factory needs to modify the code. It will directly create two factories, New York factory and London factory. The class diagram is as follows:
There is an abstract method in OrderPizza:
abstract Pizza createPizza();
Two factory classes inherit OrderPizza and implement abstract methods:
	public class LDOrderPizza extends OrderPizza {
		   Pizza createPizza(String ordertype) {
				  Pizza pizza = null;
				  if (ordertype.equals("cheese")) {
						 pizza = new LDCheesePizza();
				  } else if (ordertype.equals("pepper")) {
						 pizza = new LDPepperPizza();
				  }
				  return pizza;
		   }
	}
	public class NYOrderPizza extends OrderPizza {

		Pizza createPizza(String ordertype) {
			Pizza pizza = null;

			if (ordertype.equals("cheese")) {
				pizza = new NYCheesePizza();
			} else if (ordertype.equals("pepper")) {
				pizza = new NYPepperPizza();
			}
			return pizza;

		}

	}
. different instantiated objects will be obtained through different factories. The code of PizzaStroe is as follows:
	public class PizzaStroe {
		   public static void main(String[] args) {
				  OrderPizza mOrderPizza;
				  mOrderPizza = new NYOrderPizza();
		   }
	}
Solved the problem of simple factory mode: add a new pizza origin (Beijing), just add a BJOrderPizza class:
	public class BJOrderPizza extends OrderPizza {
		   Pizza createPizza(String ordertype) {
				  Pizza pizza = null;
				  if (ordertype.equals("cheese")) {
						 pizza = new LDCheesePizza();
				  } else if (ordertype.equals("pepper")) {
						 pizza = new LDPepperPizza();
				  }
				  return pizza;
		   }
	}
In fact, the advantage of this mode is that if you want to add a function now, you only need to make an implementation class, and there is no need to change the ready-made code. In this way, the expansibility is better!
Problems and solutions of factory method: the client needs to create a specific instance of the class. To put it simply, if the user wants to order pizza from the New York factory, he must go to the New York factory. If he wants to order pizza from the London factory, he must go to the London factory. When the factories in London and New York change, the users will also change, which undoubtedly increases the complexity of users' operation. In order to solve this problem, we can abstract the factory class as an interface. Users only need to find the default factory and put forward their own requirements (pass in parameters), so they can get the products they want, instead of finding different factories according to the products, which is convenient for users to operate. This is the abstract factory pattern we will talk about next.
1.3 abstract factory mode
Definition: defines an interface for creating related or dependent object families without specifying a specific class.
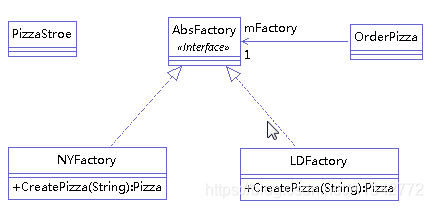
For example: (we still give the example of pizza factory. There are two pizza factories: New York factory and London factory). The class diagram is as follows:
Factory interface:
	public interface AbsFactory {
		   Pizza CreatePizza(String ordertype) ;
	}
Realization of the plant:
	public class LDFactory implements AbsFactory {
		   @Override
		   public Pizza CreatePizza(String ordertype) {
				  Pizza pizza = null;
				  if ("cheese".equals(ordertype)) {
						 pizza = new LDCheesePizza();
				  } else if ("pepper".equals(ordertype)) {
						 pizza = new LDPepperPizza();
				  }
				  return pizza;
		   }
	}
The code of PizzaStroe is as follows:
	public class PizzaStroe {
		   public static void main(String[] args) {
				  OrderPizza mOrderPizza;
				  mOrderPizza = new OrderPizza("London");
		   }
	}
It solves the problem of factory method pattern: in the abstract factory, PizzaStroe can instantiate objects only by passing in parameters.
1.4 applicable occasions of factory mode
A large number of products need to be created, and these products have a common interface.
1.5 selection of three factory modes
Simple factory: used to produce any product in the same hierarchical structure. (expansion and addition of products are not supported)
Factory method: used to produce fixed products in the same grade structure. (support the expansion and addition of products)
Abstract factory: used to produce all products of different product families. (support the expansion and addition of products; support the addition of product families)
Application of simple factory: only London factory (only this grade), and this factory produces only three types of pizza: chess, pepper and green (fixed products).
Applicable occasions of factory method: there are not only London factories, but also New York factories (still with the same hierarchical structure, but supporting product expansion). These two factories still produce only three types of pizza: cheese, pepper and green (fixed products).
Application of abstract factory: not only the New York factory is added (it is still the same hierarchical structure, but supports the expansion of products), but also a new type of pizza: chinese pizza is added to the two factories.
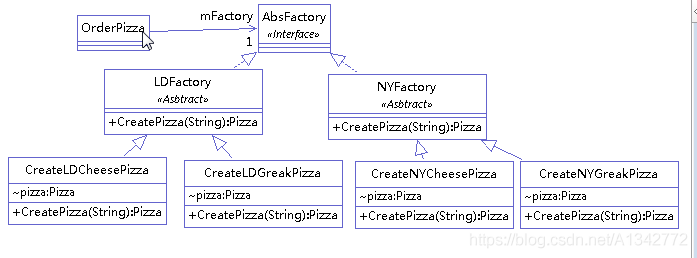
Therefore, the abstract factory is like a factory, and the factory method is like a product production line of a factory. Therefore, we can create factories with abstract factory pattern and production lines with factory method pattern. For example, we can use the abstract factory pattern to create factories in London and New York, and use the factory method to realize the production of cheese pizza and great pizza. The class diagram is as follows:
Summarize the three modes:
The simple factory pattern is to create a class of instantiated objects in which multiple objects are instantiated. The factory method pattern defines an abstract method to create an object, and the subclass determines the class to be instantiated. The advantage of this is that there are new types of objects that need to be instantiated. Just add subclasses. The abstract factory pattern defines an interface for creating an object family without specifying a specific class. The abstract factory also gives the instantiation of objects to subclasses, that is, it supports extension. At the same time, it provides the client interface to avoid the user directly operating the subclass factory.
2. Singleton mode
Definition: ensure that there is at most one instance of a class and provide a global access point
Singleton mode can be divided into two types: preload and lazy load
2.1 preloading
As the name suggests, it is preloaded. A further explanation is that the singleton object has not been used, but the singleton object has been loaded into memory.
public class PreloadSingleton {
   public static PreloadSingleton instance = new PreloadSingleton();

   //Other classes cannot instantiate objects of singleton classes
   private PreloadSingleton() {
   };

   public static PreloadSingleton getInstance() {
          return instance;
   }
}
Obviously, without using the singleton object, the object is loaded into memory, which will cause a waste of memory.
2.2 lazy loading
In order to avoid the waste of memory, we can use lazy loading, that is, we can create the singleton object when it is used.
public class Singleton {
   private static Singleton instance=null;

   private Singleton(){
   };

   public static Singleton getInstance()
   {
          if(instance==null)
          {
                 instance=new Singleton();
          }
          return instance;

   }
}
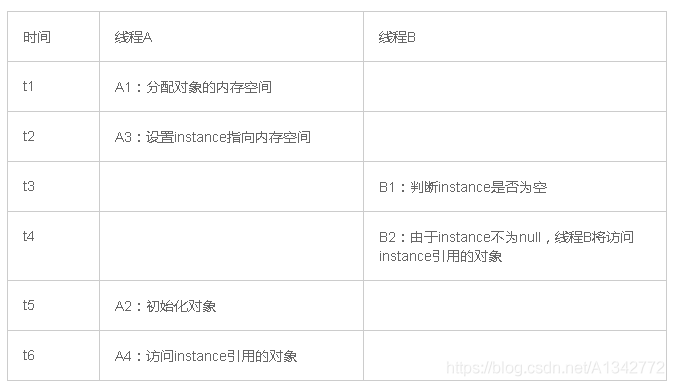
2.3 singleton mode and thread safety
(1) Preloading has only one statement return instance, which obviously ensures thread safety. However, we know that preloading can cause a waste of memory.
(2) Lazy loading does not waste memory, but it cannot ensure the safety of threads. First, if judgment and its memory execution code are non atomic. Secondly, new Singleton() cannot guarantee the order of execution.
If atomicity or sequencing is not satisfied, threads are definitely unsafe. This is basic common sense and will not be repeated. I'll mainly talk about why new Singleton() can't guarantee sequencing. We know that there are three steps to create an object:
	memory=allocate();//1: Initialize memory space

	ctorInstance(memory);//2: Initialize object

	instance=memory();//3: Set instance to point to the memory address just allocated
In order to improve the execution performance of the program, the jvm will reorder the code without dependencies. The above 2 and 3 lines of code may be reordered. We use two threads to illustrate that threads are unsafe. Both thread a and thread b create objects. Among them, the reordering of A2 and A3 will cause thread B to judge that instance is not empty at B1, and thread B will then access the object referenced by instance. At this point, thread B will access an uninitialized object (thread unsafe).
2.4 ensure thread safety of lazy loading
Our first thought is to use the synchronized keyword. Synchronized loading on getInstance() function does ensure thread safety. However, if the getInstance () method is called frequently, the thread will wake up and block whether the instance is initialized or not. In order to avoid the context switching of threads consuming a lot of time, if the object has been instantiated, we don't need to use synchronized locking to return the object directly.
	public class Singleton {
		   private static Singleton instance = null;
		   private Singleton() {
		   };
		   public static synchronized Singleton getInstance() {
				  if (instance == null) {
						 instance = new Singleton();
				  }
				  return instance;
		   }
	}
We add synchronized to the if(instance==null) judgment statement to ensure that the lock is added only when the instance is not instantiated
	public class Singleton {
		   private static Singleton instance = null;
		   private Singleton() {
		   };
		   public static synchronized Singleton getInstance() {
				  if (instance == null) {
						 synchronized (Singleton.class) {
							   if (instance == null) {
									  instance = new Singleton();
							   }
						 }
				  }
				  return instance;
		   }
	}
After the discussion in 2.3, we know that the code of a new object cannot guarantee the order. Therefore, we need to use another keyword volatile to ensure the order of the object instantiation process.
	public class Singleton {
		   private static volatile Singleton instance = null;
		   private Singleton() {
		   };
		   public static synchronized Singleton getInstance() {
				  if (instance == null) {
						 synchronized (instance) {
							   if (instance == null) {
									  instance = new Singleton();
							   }
						 }
				  }
				  return instance;
		   }
	}
At this point, we ensure the thread safety of lazy loading.
3 generator mode
Definition: encapsulates a complex object construction process and allows step-by-step construction.
Definition and explanation: we can understand the generator pattern as if we have an object to be built, which is composed of multiple components. The establishment of each Component is complex, but it is very simple to use components to build the required objects, so we can separate the steps of building complex components from using components to build objects, Using builder mode, you can build.
3.1 structure and code examples of patterns
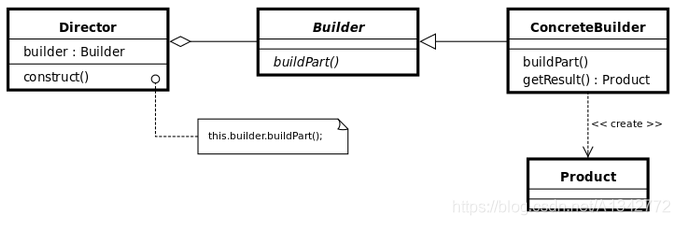
There are four roles in the generator schema structure:
(1) Product: a complex object to be constructed by a specific producer;
(2) Abstract generator: the abstract generator is an interface that defines several methods for each component that creates a Product object, and also defines the method to return the Product object (define the construction steps);
(3) Concrete Builder: the class that implements the builder interface. The concrete builder will implement the methods defined by the builder interface (produce various components);
(4) Director: a director is a class that needs to contain variables declared by the Builder interface. The commander's responsibility is to provide the user with a specific generator, that is, the commander will request the specific generator class to construct the Product object required by the user. If the requested specific generator successfully constructs the Product object, the commander can let the specific generator return the constructed Product object. (assemble the parts according to the steps and return to the Product)
For example (if we build a computer, we may need the following steps: (1) a host (2) a monitor (3) a keyboard (4) a mouse)
Although when we build a host, the actual steps of each object are different. For example, some objects build i7cpu hosts, some objects build i5cpu hosts, some objects build ordinary keyboards, and some objects build mechanical keyboards. But in any case, you always need to go through a step, that is to build a host and a keyboard. For this example, we can use the generator mode to generate a computer, which needs to be generated in multiple steps. The class diagram is as follows:

Construction steps of ComputerBuilder class definition:
public abstract class ComputerBuilder {
protected Computer computer;

public Computer getComputer() {
    return computer;
}

public void buildComputer() {
    computer = new Computer();
    System.out.println("Generated a computer!!!");
}
public abstract void buildMaster();
public abstract void buildScreen();
public abstract void buildKeyboard();
public abstract void buildMouse();
public abstract void buildAudio();
}
HPComputerBuilder defines various components:
	public class HPComputerBuilder extends ComputerBuilder {
		@Override
		public void buildMaster() {
			// TODO Auto-generated method stub
			computer.setMaster("i7,16g,512SSD,1060");
			System.out.println("(i7,16g,512SSD,1060)HP host");
		}
		@Override
		public void buildScreen() {
			// TODO Auto-generated method stub
			computer.setScreen("1080p");
			System.out.println("(1080p)HP display");
		}
		@Override
		public void buildKeyboard() {
			// TODO Auto-generated method stub
			computer.setKeyboard("cherry Green axis mechanical keyboard");
			System.out.println("(cherry Green axis mechanical keyboard)Keyboard for");
		}
		@Override
		public void buildMouse() {
			// TODO Auto-generated method stub
			computer.setMouse("MI mouse");
			System.out.println("(MI mouse)Mouse");
		}
		@Override
		public void buildAudio() {
			// TODO Auto-generated method stub
			computer.setAudio("Philips audio");
			System.out.println("(Philips audio)Sound");
		}
	}
The Director class assembles components and generates products
public class Director {
private ComputerBuilder computerBuilder;
public void setComputerBuilder(ComputerBuilder computerBuilder) {
    this.computerBuilder = computerBuilder;
}

public Computer getComputer() {
    return computerBuilder.getComputer();
}

public void constructComputer() {
    computerBuilder.buildComputer();
    computerBuilder.buildMaster();
    computerBuilder.buildScreen();
    computerBuilder.buildKeyboard();
    computerBuilder.buildMouse();
    computerBuilder.buildAudio();
}
}
3.2 advantages and disadvantages of generator mode
advantage
Decompose an object into components
Encapsulate the structure of object components
You can control the generation process of the whole object
shortcoming
For different types of objects, you need to implement different concrete constructor classes, which may greatly increase the number of classes
3.3 difference between generator mode and factory mode
When building objects with generator mode, the process of building objects usually requires multiple steps, such as the host, display screen, mouse and so on in our example. The function of generator mode is to encapsulate these complex construction processes. When building objects in factory mode, there is usually only one step. Calling a factory method can generate an object.
4 prototype mode
Definition: create a new instance by copying an existing instance without knowing the information of the corresponding class.
Simply understand that when we need to create a specified object, we happen to have such an object, but we can't use it directly. I will clone a new object like a feather to use; Basically, this is the prototype pattern. Keyword: clone.
4.1 deep and light copies
Shallow copy: after copying an object, the variables of the basic data type will be recreated, and the reference type still points to the original object.
Deep copy: after copying an object, both basic data types and reference types are recreated. In short, deep replication is a complete and complete replication, while shallow replication is not complete. Clone is obviously a deep copy, and the objects produced by clone cannot affect the prototype objects
4.2 structure and code example of prototype pattern
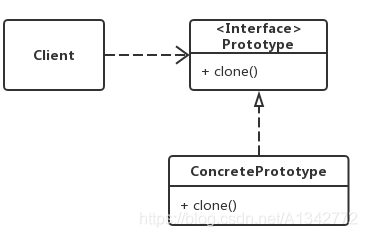
Client: user
Prototype: interface (abstract class), which declares that it has clone capability, such as clonable interface in java
ConcretePrototype: concrete prototype class
It can be seen that the design pattern is still relatively simple, focusing on the Prototype interface and the implementation class ConcretePrototype of the Prototype interface. Concrete implementation of Prototype pattern: a Prototype class only needs to implement the clonable interface and override the clone method. Here, the clone method can be changed to any name, because the clonable interface is an empty interface. You can arbitrarily define the method name of the implementation class, such as cloneA or cloneB, because the focus here is super Clone(), super Clone() calls the clone() method of Object.
	public class Prototype implements Cloneable {
		 public Object clone() throws CloneNotSupportedException {
			 Prototype proto = (Prototype) super.clone();
			 return proto;
		 }
	}
For example (the bank sends a lot of emails, and the time comparison between using clone and not using clone): we simulate that it takes a long time to create an object. Therefore, in the constructor, we let the current thread sleep for a while
	public Mail(EventTemplate et) {
				  this.tail = et.geteventContent();
				  this.subject = et.geteventSubject();
				  try {
						 Thread.sleep(1000);
				  } catch (InterruptedException e) {
						 // TODO Auto-generated catch block
						 e.printStackTrace();
				  }
		   }
Send ten emails without clone
	public static void main(String[] args) {
				  int i = 0;
				  int MAX_COUNT = 10;
				  EventTemplate et = new EventTemplate("9 Monthly credit card bill", "National Day lucky draw...");
				  long start = System.currentTimeMillis();
				  while (i < MAX_COUNT) {
						 // Here are the different parts of each email
						 Mail mail = new Mail(et);
						 mail.setContent(getRandString(5) + ",Mr. (Ms.):Your credit card bill..." + mail.getTail());
						 mail.setReceiver(getRandString(5) + "@" + getRandString(8) + ".com");
						 // Then send an email
						 sendMail(mail);
						 i++;
				  }
				  long end = System.currentTimeMillis();
				  System.out.println("Time use:" + (end - start));
		   }
Time: 10001
Using clone, send ten emails
public static void main(String[] args) {
          int i = 0;
          int MAX_COUNT = 10;
          EventTemplate et = new EventTemplate("9 Monthly credit card bill", "National Day lucky draw...");
          long start=System.currentTimeMillis();
          Mail mail = new Mail(et);
          while (i < MAX_COUNT) {
                 Mail cloneMail = mail.clone();
                 mail.setContent(getRandString(5) + ",Mr. (Ms.):Your credit card bill..."
                              + mail.getTail());
                 mail.setReceiver(getRandString(5) + "@" + getRandString(8) + ".com");
                 sendMail(cloneMail);
                 i++;
          }
          long end=System.currentTimeMillis();
          System.out.println("Time use:"+(end-start));
   }
Time: 1001
4.3 summary
The essence of prototype pattern is clone, which can solve the problem of resource consumption in building complex objects and improve the efficiency of building objects in some scenes; Another important use is protective copy, which can realize read-only restriction by returning a copy object.
B. Structure mode (7 kinds)
Adapter mode, decorator mode, agent mode, appearance mode, bridge mode, combination mode and sharing mode.
5 adapter mode
Definition: the adapter pattern converts the interface of a class into another interface representation expected by the client. The purpose is to eliminate the compatibility problems of classes caused by interface mismatch.
It is mainly divided into three categories: class adapter mode, object adapter mode and interface adapter mode.
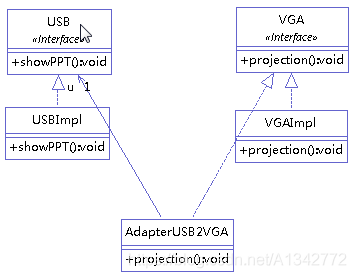
Type 5.1 adapter mode
The adaptation is realized by multiple inheritance of the target interface and the Adaptee class
For example (converting USB interface to VGA interface), the class diagram is as follows:
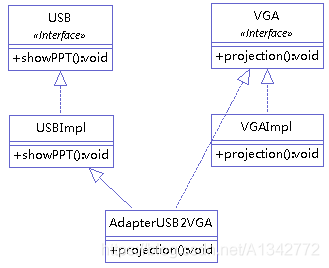
USBImpl Code:
	public class USBImpl implements USB{
		   @Override
		   public void showPPT() {
				  // TODO Auto-generated method stub
				  System.out.println("PPT Content presentation");
		   }
	}
AdatperUSB2VGA first inherits the function of USBImpl to obtain USB, and then implements VGA interface, indicating that the type of this class is VGA.
	public class AdapterUSB2VGA extends USBImpl implements VGA {
		   @Override
		   public void projection() {
				  super.showPPT();
		   }
	}
The Projector maps USB to VGA. Only the VGA interface can be connected to the Projector for projection
	public class Projector<T> {
		   public void projection(T t) {
				  if (t instanceof VGA) {
						 System.out.println("Start projection");
						 VGA v = new VGAImpl();
						 v = (VGA) t;
						 v.projection();
				  } else {
						 System.out.println("Interface mismatch, unable to project");
				  }
		   }
	}
test code
   @Test
   public void test2(){
          //Create a VGA object through the adapter, which actually uses the showPPT () method of USB
          VGA a=new AdapterUSB2VGA();
          //Projection
          Projector p1=new Projector();
          p1.projection(a);
   }
5.2 object adapter mode
Object adapter and class adapter use different methods to realize adaptation. Object adapter uses combination and class adapter uses inheritance.
For example (converting USB interface to VGA interface), the class diagram is as follows:
	public class AdapterUSB2VGA implements VGA {
		   USB u = new USBImpl();
		   @Override
		   public void projection() {
				  u.showPPT();
		   }
	}
Implement the VGA interface, indicating that the adapter class is VGA type, and the USB object is directly used in the adapter method.
5.3 interface adapter mode
When you do not need to implement all the methods provided by the interface, you can first design an abstract class to implement the interface and provide a default implementation (empty method) for each method in the interface. Then the subclass of the abstract class can selectively override some methods of the parent class to implement the requirements. It is applicable to the case that an interface does not want to use all its methods.
For example (converting USB interface to VGA interface, b() and c() in VGA will not be implemented), the class diagram is as follows:
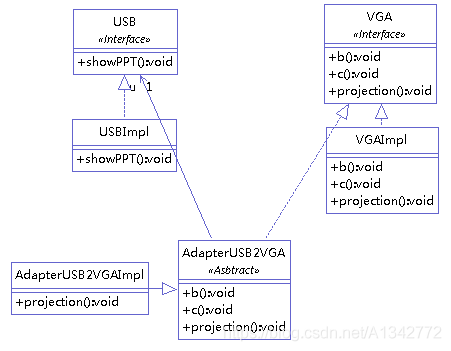
AdapterUSB2VGA abstract class
	public abstract class AdapterUSB2VGA implements VGA {
		   USB u = new USBImpl();
		   @Override
		   public void projection() {
				  u.showPPT();
		   }
		   @Override
		   public void b() {
		   };
		   @Override
		   public void c() {
		   };
	}
AdapterUSB2VGA is implemented without implementing the b() and c() methods.
	public class AdapterUSB2VGAImpl extends AdapterUSB2VGA {
		   public void projection() {
				  super.projection();
		   }
	}
5.4 summary
Summarize the application scenarios of three adapter modes:
Class adapter mode: when you want to convert a class into a class that meets another new interface, you can use the class adapter mode to create a new class, inherit the original class and implement the new interface.
Object adapter mode: when you want to transform an object into another object that satisfies another new interface, you can create a Wrapper class, holding an instance of the original class, and invoke the instance method in the Wrapper class method.
Interface adapter mode: when you don't want to implement all the methods in an interface, you can create an abstract class Wrapper to implement all the methods. When we write other classes, we can inherit the abstract class.
Naming rules:
I personally understand that the three naming methods are named according to the form src gives to the Adapter (the form in the Adapter).
Class Adapter is given by class. In the Adapter, src is inherited as a class,
The object Adapter is given by object. In the Adapter, src is held as an object.
The interface Adapter is given by the interface. In the Adapter, src is implemented as an interface.
Use selection:
According to the principle of composite reuse, combination is greater than inheritance. Therefore, the adapter pattern of the class should be used less.
6 decorator mode
Definition: dynamically attach new functions to objects. In terms of object function expansion, it is more flexible than inheritance.
6.1 decorator mode structure diagram and code example
1.Component (base class of decorated object)
Define an object interface to dynamically add responsibilities to these objects.
2.ConcreteComponent (specific decorated object)
Define an object to which you can add some responsibilities.
3.Decorator (decorator abstract class)
Maintain a reference to the Component instance and define an interface consistent with the Component interface.
4. Concrete decorator
Specific decorative objects, add specific responsibilities to the specific decorated objects held internally.
The decorated object and decorator inherit from the same superclass

For example (cafe order item: 1), coffee type: Espresso, ShortBlack, LongBlack, Decaf2), seasoning (decorator): Milk, Soy, Chocolate), the class diagram is as follows:
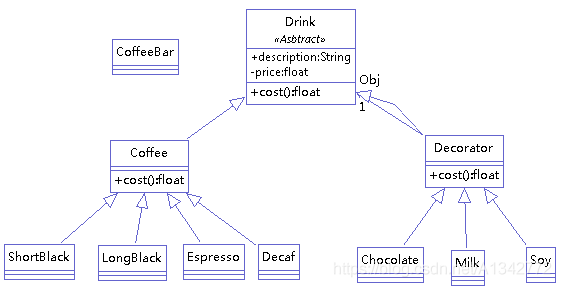
The decorated object and decorator inherit from the same superclass
	public abstract class Drink {
		   public String description="";
		   private float price=0f;;


   public void setDescription(String description)
   {
          this.description=description;
   }

   public String getDescription()
   {
          return description+"-"+this.getPrice();
   }
   public float getPrice()
   {
          return price;
   }
   public void setPrice(float price)
   {
          this.price=price;
   }
   public abstract float cost();
}
The decorated object does not need to be transformed. How to write it in the past is still how to write it now.
	public  class Coffee extends Drink {
		   @Override
		   public float cost() {
				  // TODO Auto-generated method stub
				  return super.getPrice();
		   }
	}
Implementation of coffee class
	public class Decaf extends Coffee {
		   public Decaf()
		   {
				  super.setDescription("Decaf");
				  super.setPrice(3.0f);
		   }
	}
Decorator
Decorators should not only consider themselves, but also consider the objects modified by them. It continues to add modifications to the modified objects. For example, coffee with milk and chocolate. The price after adding sugar is coffee+milk. The price of milk is coffee+milk+chocolate.
	public class Decorator extends Drink {
		   private Drink Obj;
		   public Decorator(Drink Obj) {
				  this.Obj = Obj;
		   };
		   @Override
		   public float cost() {
				  // TODO Auto-generated method stub
				  return super.getPrice() + Obj.cost();
		   }
		   @Override
		   public String getDescription() {
				  return super.description + "-" + super.getPrice() + "&&" + Obj.getDescription();
		   }
	}
Garnish (with milk). The modified object should be instantiated.
	public class Milk extends Decorator {
		   public Milk(Drink Obj) {
				  super(Obj);
				  // TODO Auto-generated constructor stub
				  super.setDescription("Milk");
				  super.setPrice(2.0f);
		   }
	}
coffee shop: initialize a modified object. The modifier instance needs to instantiate the modified object to modify the specific modified object.
	public class CoffeeBar {
		   public static void main(String[] args) {
				  Drink order;
				  order = new Decaf();
				  System.out.println("order1 price:" + order.cost());
				  System.out.println("order1 desc:" + order.getDescription());
				  System.out.println("****************");
				  order = new LongBlack();
				  order = new Milk(order);
				  order = new Chocolate(order);
				  order = new Chocolate(order);
				  System.out.println("order2 price:" + order.cost());
				  System.out.println("order2 desc:" + order.getDescription());
		   }
	}
6.2 summary
The decorator and the decorated must be of the same type, that is, they must have a common superclass. Here, application inheritance is not to copy methods, but to match types. Because the decorator and the decorated are of the same type, the decorator can replace the decorated, which makes the decorated have the unique behavior of the decorator. According to the concept of decorator model, we can realize new decorators and add new behaviors at any time. If you use inheritance, you have to modify the original program whenever you need to add a new behavior.
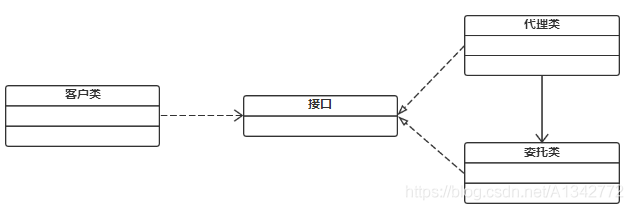
7 agent mode
Definition: proxy mode provides a proxy object for an object, and the proxy object controls the reference to the original object. Generally speaking, the agency model is a common intermediary in our life.
For example: if I want to buy a second-hand car now, although I can find the car source and do a series of vehicle ownership transfer processes such as quality inspection, it really wastes my time and energy. I just want to buy a car. Why do I have to do so many extra things? So I bought a car through an intermediary company. They came to find me a car source and help me handle the vehicle ownership transfer process. I was just responsible for selecting the car I liked and paying for it. It is shown as follows:
7.1 why use proxy mode?
Mediation isolation function: in some cases, a client class does not want or cannot directly reference a delegate object, while the proxy class object can act as an intermediary between the client class and the delegate object. Its feature is that the proxy class and the delegate class implement the same interface.
Opening and closing principle and adding functions: in addition to being the intermediary between the customer class and the delegate class, the agent class can also expand the functions of the delegate class by adding additional functions to the agent class. In this way, we only need to modify the agent class without modifying the delegate class, which is in line with the opening and closing principle of code design. The agent class is mainly responsible for preprocessing messages for the delegate class, filtering messages, forwarding messages to the delegate class, and processing the returned results afterwards. The proxy class itself does not really implement services, but calls the relevant methods of the delegate class to provide specific services. The real business function is still implemented by the delegate class, but some public services can be added before and after the execution of the business function. For example, if we want to add caching and logging functions to the project, we can use the proxy class instead of opening the encapsulated delegate class.
The agency mode is divided into three categories: 1 Static agent 2 Dynamic agent 3 Cglib agent
7.2 static agent
For example (buying a house), the class diagram is as follows:
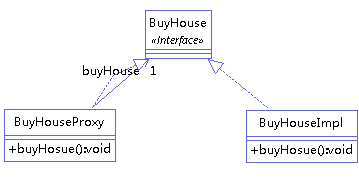
Step 1: create a service class interface
	public interface BuyHouse {
		void buyHosue();
	}
Step 2: implement the service interface
	public class BuyHouseImpl implements BuyHouse {
		   @Override
		   public void buyHosue() {
				  System.out.println("I want to buy a house");
		   }
	}
Step 3: create a proxy class
	public class BuyHouseProxy implements BuyHouse {
		   private BuyHouse buyHouse;
		   public BuyHouseProxy(final BuyHouse buyHouse) {
				  this.buyHouse = buyHouse;
		   }
		   @Override
		   public void buyHosue() {
				  System.out.println("Preparation before buying a house");
				  buyHouse.buyHosue();
				  System.out.println("Decoration after buying a house");
		   }
	}
Summary:
Advantages: it can expand the function of the target object in accordance with the opening and closing principle.
Disadvantages: to implement the same interface between the proxy object and the target object, we have to create proxy classes for each service, which is too heavy and difficult to manage. At the same time, once the interface changes, the proxy class must be modified accordingly.
7.3 dynamic agent
Dynamic agents have the following characteristics:
1. The proxy object does not need to implement the interface
2. The generation of proxy object is to dynamically build proxy object in memory by using JDK API (we need to specify the type of interface to create proxy object / target object)
Proxy classes no longer implement interfaces. However, the proxy object must have an interface.
Dynamic proxy implementation:
Java.lang.reflect.Proxy class can directly generate a proxy object
Proxy. Newproxyinstance (classloader, loader, class <? > [] interfaces, invocationhandler h) generates a proxy object
Parameter 1: classloader the classloader of the proxy object generally uses the classloader of the proxy object
Parameter 2: class <? > [] interfaces the interface to be implemented by the proxy object is generally the interface implemented by the proxy object
Parameter 3:InvocationHandler h (Interface) execution processing class
Invoke (object proxy, method, method, object [] args) method in InvocationHandler: this method will be executed when calling any method of proxy class
Parameter 3.1: proxy object (use with caution)
Parameter 3.2: currently executed method
Parameter 3.3: the parameter passed by the running time of the currently executed method
Step 1: write a dynamic processor
	public class DynamicProxyHandler implements InvocationHandler {
		   private Object object;
		   public DynamicProxyHandler(final Object object) {
				  this.object = object;
		   }
		   @Override
		   public Object invoke(Object proxy, Method method, Object[] args) throws Throwable {
				  System.out.println("Preparation before buying a house");
				  Object result = method.invoke(object, args);
				  System.out.println("Decoration after buying a house");
				  return result;
		   }
	}
Step 2: write a test class
	public class DynamicProxyTest {
		public static void main(String[] args) {
			BuyHouse buyHouse = new BuyHouseImpl();
			BuyHouse proxyBuyHouse = (BuyHouse) Proxy.newProxyInstance(BuyHouse.class.getClassLoader(), new
					Class[]{BuyHouse.class}, new DynamicProxyHandler(buyHouse));
			proxyBuyHouse.buyHosue();
		}
	}
Summary of dynamic agent: although compared with static agent, dynamic agent greatly reduces our development tasks, reduces the dependence on business interface and reduces the degree of coupling. However, there is still a little regret, that is, it can not get rid of the shackle of only supporting interface proxy (we want to use the interface of the object being proxied), because its design is doomed to this regret.
7.4 CGLIB agent
CGLIB principle: dynamically generate a subclass of the class to be proxied, and the subclass overrides all non final methods of the class to be proxied. In the subclass, the method interception technology is adopted to intercept the calls of all parent methods, and the crosscutting logic is weaved into it. It is faster than JDK dynamic proxy using java reflection.
CGLIB bottom layer: use bytecode processing framework ASM to convert bytecode and generate new classes. Direct use of ASM is not encouraged because it requires you to be familiar with the internal structure of JVM, including the format of class file and instruction set.
CGLIB disadvantage: for the final method, proxy cannot be performed.
Implementation steps of CGLIB:
Step 1: build interceptor
	public Object intercept(Object object, Method method, Object[] args, MethodProxy methodProxy) throws Throwable {
    System.out.println("Preparation before buying a house");
    Object result = methodProxy.invoke(object, args);
    System.out.println("Decoration after buying a house");
    return result;
}
Parameters: Object is the proxy class instance dynamically generated by CGLib, Method is the proxy Method reference called by the entity class above, Object [] is the parameter value list, and MethodProxy is the proxy reference of the generated proxy class to the Method.
Return: the value returned from the method call of the proxy instance.
Where proxy Invokesuper (obj, Arg) calls the parent method of the proxy method on the proxy class instance (that is, the corresponding method in the entity class TargetObject)
Step 2: generate dynamic proxy class
	public class CglibProxy implements MethodInterceptor {
		private Object target;
		public Object getInstance(final Object target) {
			this.target = target;
			Enhancer enhancer = new Enhancer();
			enhancer.setSuperclass(this.target.getClass());
			enhancer.setCallback(this);
			return enhancer.create();
		}
		public Object intercept(Object object, Method method, Object[] args, MethodProxy methodProxy) throws Throwable {
			System.out.println("Preparation before buying a house");
			Object result = methodProxy.invoke(object, args);
			System.out.println("Decoration after buying a house");
			return result;
		}
	}
Here, Enhancer class is a bytecode Enhancer in CGLib. It can easily extend the class you want to deal with. You will often see it in the future.
First, set the proxy class TargetObject as the parent class, then set the interceptor TargetInterceptor, and finally execute enhancer Create() dynamically generates a proxy class and forcibly transforms it from Object to the parent type TargetObject.
Step 3: Test
	public class CglibProxyTest {
		public static void main(String[] args){
			BuyHouse buyHouse = new BuyHouseImpl();
			CglibProxy cglibProxy = new CglibProxy();
			BuyHouseImpl buyHouseCglibProxy = (BuyHouseImpl) cglibProxy.getInstance(buyHouse);
			buyHouseCglibProxy.buyHosue();
		}
	}
CGLIB proxy summary: the dynamic proxy object created by CGLIB has higher performance than that created by JDK, but CGLIB takes much more time to create proxy object than JDK. Therefore, for singleton objects, because there is no need to create objects frequently, CGLIB is appropriate. On the contrary, JDK is more appropriate. At the same time, because CGLIB adopts the method of dynamically creating subclasses, the method modified by final cannot be represented.
8 appearance mode
Definition: it hides the complexity of the system and provides an interface for the client to access the system.
8.1 pattern structure and code examples
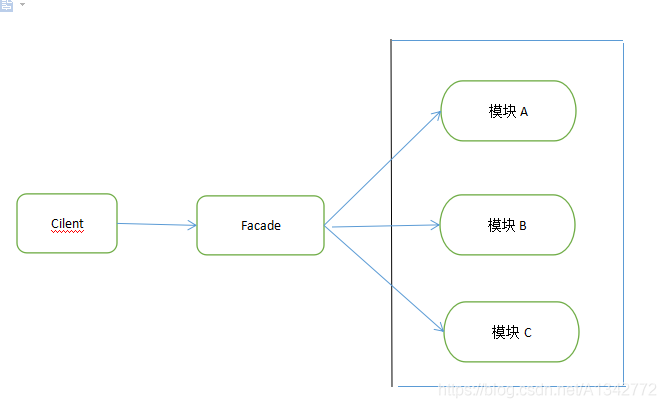
In short, this mode encapsulates some complex processes into an interface for external users to use more simply. In this mode, three roles are designed.
1). Facade role: the core of appearance mode. It is called by the customer role, and it is familiar with the functions of the subsystem. According to the needs of the customer's role, several combinations of functions are reserved internally. (the customer calls and calls the subsystem function at the same time)
2). Subsystem role: it realizes the functions of the subsystem. It is unknown to the customer role and Facade. It can interact with each other within the system, or it can be called by the interface for the outside world. (realize specific functions)
3). Customer role: complete the function to be realized by calling Facede (calling facade role).
For example (each Computer has CPU, Memory and Disk. When the Computer is turned on and off, the corresponding components will also be turned on and off). The class diagram is as follows:
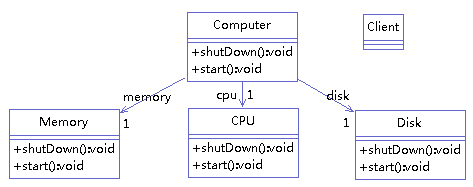
The first is the subsystem class:
public class CPU {
public void start() {
	System.out.println("cpu is start...");
}

public void shutDown() {
	System.out.println("CPU is shutDown...");
}
}

public class Disk {
	public void start() {
		System.out.println("Disk is start...");
	}

public void shutDown() {
	System.out.println("Disk is shutDown...");
}
}

public class Memory {
	public void start() {
		System.out.println("Memory is start...");
	}

public void shutDown() {
	System.out.println("Memory is shutDown...");
}
}
Then there is the Facade
public class Computer {

private CPU cpu;
private Memory memory;
private Disk disk;

public Computer() {
	cpu = new CPU();
	memory = new Memory();
	disk = new Disk();
}

public void start() {
	System.out.println("Computer start begin");
	cpu.start();
	disk.start();
	memory.start();
	System.out.println("Computer start end");
}

public void shutDown() {
	System.out.println("Computer shutDown begin");
	cpu.shutDown();
	disk.shutDown();
	memory.shutDown();
	System.out.println("Computer shutDown end...");
}
}
Finally, the customer role
public class Client {
public static void main(String[] args) {
	Computer computer = new Computer();
	computer.start();
	System.out.println("=================");
	computer.shutDown();
}
}
8.2 advantages
- loose coupling
Make the client and subsystem decoupled, and make the module functions inside the subsystem easier to expand and maintain;
- easy to use
The client does not need to know the internal implementation of the subsystem or the internal composition of the subsystem at all. It only needs to interact with the Facade class.
- better division of access levels
Some methods are used outside the system, while others are used interactively within the system. The subsystem concentrates the functions exposed to the outside into the facade, so that the use of the client can be realized, and the internal details of the subsystem are well hidden.
9 Bridge Mode
Definition: separate the abstract part from its implementation part so that they can change independently.
9.1 cases
See the class diagram of mobile phone and mobile phone software in the figure below
Adding a new mobile phone software requires adding corresponding mobile phone software classes under all mobile phone brands. When there are many types of mobile phone software, the number of classes will expand sharply and it is difficult to maintain
What is the relationship between mobile phone and software in mobile phone?
In essence, the software in the mobile phone is not a kind of mobile phone. The mobile phone software running in the mobile phone is a relationship between inclusion and inclusion, rather than a relationship between parent and child or general and special. It is against the general law to realize the design of mobile phone software class by inheriting the mobile phone class.
If the Oppo mobile phone realizes the wifi function, the Oppo application mall that inherits it will also inherit the wifi function, and any change in the Oppo mobile phone class will affect its subclasses
Another solution
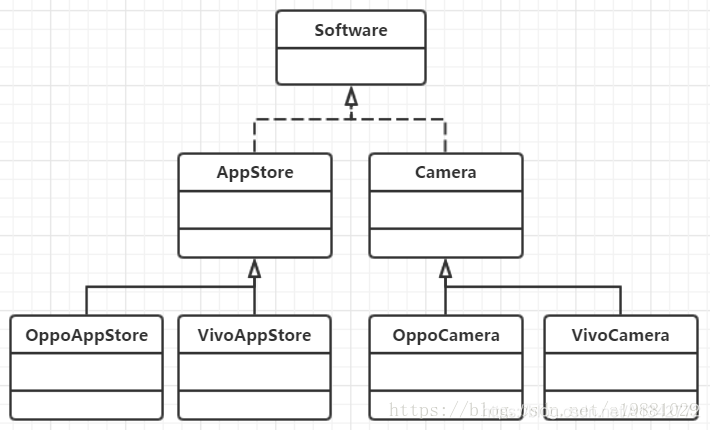
From the class diagram, it looks more like the class diagram of mobile phone software, which involves the functions related to the mobile phone itself, such as wifi function. In which class do you implement it? It is obviously inappropriate to implement it in OppoAppStore
There are two elements that cause the change of the whole structure, one is the mobile phone brand and the other is the mobile phone software, so we extract these two points and encapsulate them respectively
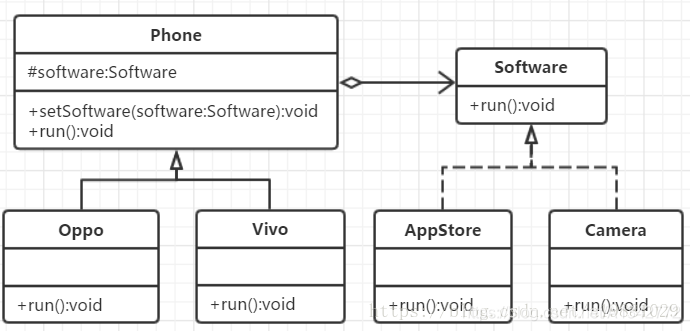
9.2 bridge mode structure and code examples
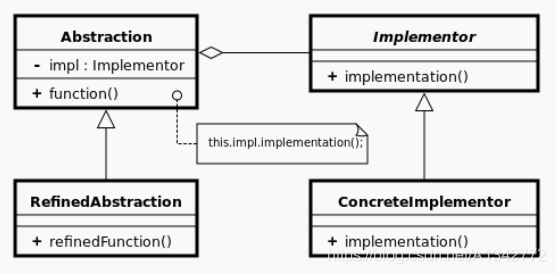
Class diagram:
realization:
public interface Software {
	public void run();

}
public class AppStore implements Software {

@Override
public void run() {
    System.out.println("run app store");
}
}
public class Camera implements Software {
@Override
public void run() {
    System.out.println("run camera");
}
}
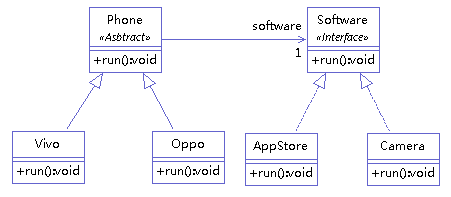
Abstract:
public abstract class Phone {

protected Software software;

public void setSoftware(Software software) {
	this.software = software;
}

public abstract void run();

}
public class Oppo extends Phone {

@Override
public void run() {
    software.run();
}
}
public class Vivo extends Phone {

@Override
public void run() {
    software.run();
}
}
Compared with the original design, the abstract part (mobile phone) is separated from its implementation part (mobile phone software class), and the implementation part is abstracted into separate classes, so that they can change independently. The whole class diagram looks like a bridge, so it is called bridging mode
Inheritance is a strong coupling relationship. The implementation of a subclass has a very close dependency on its parent class. Any change in the parent class will lead to changes in the subclass. Therefore, inheritance or strong coupling seriously affects the flexibility of the class and ultimately limits its reusability
From the design of bridge mode, we can see that aggregation is a weaker association than inheritance. Mobile phone and software classes can change independently and will not affect each other
9.3 applicable scenarios
The bridging mode is generally applicable to the following scenarios.
When a class has two independently changing dimensions and both dimensions need to be extended.
When a system does not want to use inheritance or the number of system classes increases sharply due to multi-level inheritance.
When a system needs to add more flexibility between the abstract and concrete roles of components.
9.4 advantages and disadvantages
advantage:
(1) In many cases, the bridge mode can replace the multi-layer inheritance scheme. The multi-layer inheritance scheme violates the "single responsibility principle", has poor reusability, and has a large number of classes. The bridge mode is a better solution than the multi-layer inheritance scheme, which greatly reduces the number of subclasses.
(2) The bridging mode improves the scalability of the system. Expanding one of the two change dimensions without modifying the original system conforms to the "opening and closing principle".
Disadvantages:
The use of bridging mode will increase the difficulty of system understanding and design. Because the correlation is based on the abstract layer, developers are required to design and program for the abstract layer from the beginning.
10 combination mode
Definition: sometimes called part whole mode, it is a mode of combining objects into a tree hierarchy, which is used to represent the "part whole" relationship and enable users to have consistent access to single objects and combined objects.
Intent: combine objects into a tree structure to represent a "part whole" hierarchy. The combination mode enables users to use single objects and combined objects consistently.
Main solution: in our tree structure problem, it blurs the concepts of simple elements and complex elements. The client program can deal with complex elements as simple elements, so as to decouple the internal structure of the client program and complex elements.
When to use: 1. You want to represent the part of the object - the overall hierarchy (tree structure). 2. You want users to ignore the difference between composite objects and individual objects, and users will use all objects in the composite structure uniformly.
How to solve: the branch and leaf realize a unified interface, and the interface is combined inside the branch.
Key code: the interface is combined inside the tree branch, and contains the internal attribute List with Component inside.
The main advantages of the combination mode are:
The combination mode enables the client code to deal with a single object and a combined object consistently, without caring whether it is a single object or a combined object, which simplifies the client code;
It is easier to add new objects into the assembly, and the client will not change the source code because of the addition of new objects, meeting the "opening and closing principle";
Its main disadvantages are:
The design is complex, and the client needs to spend more time to clarify the hierarchical relationship between classes;
It is not easy to limit the components in the container;
It is not easy to use the method of inheritance to add new functions of components;
10.1 pattern structure and code examples

Abstract Component role: its main role is to declare public interfaces for leaf components and branch components and implement their default behavior. In the transparent composition mode, the abstract Component also declares the interface to access and manage subclasses; In the safe combination mode, the interface for accessing and managing subclasses is not declared, and the management work is completed by the branch Component.
Leaf role: it is a leaf node object in the composition. It has no child nodes and is used to implement the public interface declared in the abstract component role.
Composite role: it is a branch node object in the composition, which has child nodes. It implements the interface declared in the abstract component role. Its main function is to store and manage sub components, usually including Add(), Remove(), GetChild(), etc
For example (visit a tree), the class diagram is as follows:
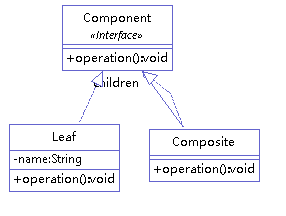
1 component
public interface Component {
	public void add(Component c);
	public void remove(Component c);
	public Component getChild(int i);
	public void operation();

}
2 leaves
public class Leaf implements Component{
private String name;
public Leaf(String name) {
	this.name = name;
}
@Override
public void add(Component c) {}
@Override
public void remove(Component c) {}
@Override
public Component getChild(int i) {
	// TODO Auto-generated method stub
	return null;
}
@Override
public void operation() {
	// TODO Auto-generated method stub
	 System.out.println("leaf"+name+": Be visited!");
}
}
3 branches
public class Composite implements Component {

private ArrayList<Component> children = new ArrayList<Component>();

public void add(Component c) {
	children.add(c);
}

public void remove(Component c) {
	children.remove(c);
}

public Component getChild(int i) {
	return children.get(i);
}

public void operation() {
	for (Object obj : children) {
		((Component) obj).operation();
	}
}
}
11 yuan sharing mode
Definition: efficiently support a large number of fine-grained objects through sharing.
Main solution: when there are a large number of objects, it may cause memory overflow. We abstract the common parts. If there are the same business requests, we can directly return the existing objects in memory to avoid re creation.
When to use: 1. There are a large number of objects in the system. 2. These objects consume a lot of memory. 3. Most of the states of these objects can be externalized. 4. These objects can be divided into many groups according to the intrinsic state. When the intrinsic objects are removed from the objects, each group of objects can be replaced by an object. 5. The system does not depend on the identity of these objects, which are indistinguishable.
How to solve it: use the unique identification code to judge. If there is in memory, return the object identified by the unique identification code.
Key code: use HashMap to store these objects.
Application examples: 1. String in JAVA, if any, will be returned. If not, a string will be created and saved in the string cache pool.
Advantages: greatly reduce the creation of objects, reduce the memory of the system and improve the efficiency.
Disadvantages: it increases the complexity of the system and needs to separate the external state from the internal state. Moreover, the external state has inherent nature and should not change with the change of the internal state, otherwise it will cause the confusion of the system.
In short, we extract the external state (which cannot be shared) and internal state (which can be shared) of an object. Then, whether to create an internal state object is determined according to the external state. Internal state objects are saved through hash table. When the external state is the same, internal state objects will not be created repeatedly, so as to reduce the number of objects to be created.
11.1 structure diagram and code example of sharing meta mode
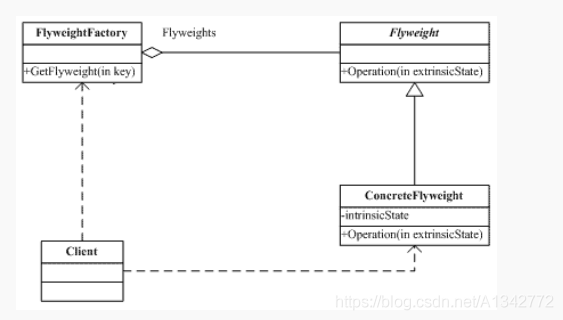
1. Flyweight: it is generally an interface or abstract class, which defines the public methods of the meta class. These methods can share the data of internal state, or call these methods to modify the external state.
2. Concreteflyweight (concrete shared meta class): the concrete shared meta class implements the method of abstract shared meta class and opens up memory space for shared meta objects to save the internal data of shared meta objects. At the same time, only one shared meta object can be created by combining with singleton mode.
3. Flyweightfactory class: the factory class creates and manages the factory class. The factory class is programmed for the factory class and manages the object by providing a pool. Generally, the shared element pool is designed as key value pairs or other storage structures. When the client requests a meta object, if there is a corresponding meta object in the meta pool, the corresponding object will be returned directly. Otherwise, the factory class creates the corresponding meta object and saves it to the meta pool.
For example, if there is a String in JAVA, it will be returned. If there is no String, it will create a String and save it in the String cache pool. The class diagram is as follows:
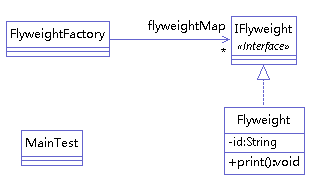
(1) Create meta object interface
public interface IFlyweight {
	void print();
}
(2) Create a concrete meta object
public class Flyweight implements IFlyweight {
	private String id;
	public Flyweight(String id){
		this.id = id;
	}
	@Override
	public void print() {
		System.out.println("Flyweight.id = " + getId() + " ...");
	}
	public String getId() {
		return id;
	}
}
(3) When creating a factory, we should pay special attention here. In order to avoid repeated creation of meta objects, we use the key value in HashMap to ensure its uniqueness.
public class FlyweightFactory {
	private Map<String, IFlyweight> flyweightMap = new HashMap();
	public IFlyweight getFlyweight(String str){
		IFlyweight flyweight = flyweightMap.get(str);
		if(flyweight == null){
			flyweight = new Flyweight(str);
			flyweightMap.put(str, flyweight);
		}
		return  flyweight;
	}
	public int getFlyweightMapSize(){
		return flyweightMap.size();
	}
}
(4) In the test, we create three strings, but only two meta objects will be generated
public class MainTest {
	public static void main(String[] args) {
		FlyweightFactory flyweightFactory = new FlyweightFactory();
		IFlyweight flyweight1 = flyweightFactory.getFlyweight("A");
		IFlyweight flyweight2 = flyweightFactory.getFlyweight("B");
		IFlyweight flyweight3 = flyweightFactory.getFlyweight("A");
		flyweight1.print();
		flyweight2.print();
		flyweight3.print();
		System.out.println(flyweightFactory.getFlyweightMapSize());
	}

}
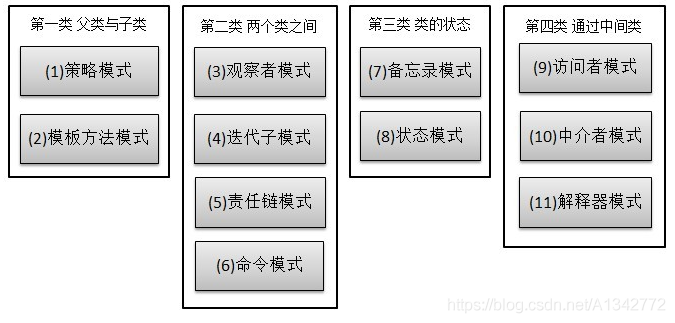
C. Relationship mode (11 kinds)
Let's start with a diagram to see the relationship between these 11 modes:
Class 1: implemented through the relationship between parent and child classes.
Class II: between two classes.
The third category: the status of the class.
Category 4: through intermediate classes
12 strategy mode
Definition: the policy pattern defines a series of algorithms and encapsulates each algorithm so that they can replace each other, and the change of the algorithm will not affect the customers using the algorithm.
Intention: define a series of algorithms, encapsulate them one by one, and make them interchangeable.
Main solution: when there are many similar algorithms, use if Else brings complexity and difficult to maintain.
When to use: a system has many classes, and what distinguishes them is their direct behavior.
How to solve it: encapsulate these algorithms into classes one by one and replace them arbitrarily.
Key code: implement the same interface.
Advantages: 1. The algorithm can be switched freely. 2. 2. Avoid using multiple conditional judgments. 3. Good scalability.
Disadvantages: 1. The number of policy classes will increase. 2. All policy classes need to be exposed.
12.1 policy pattern structure and sample code
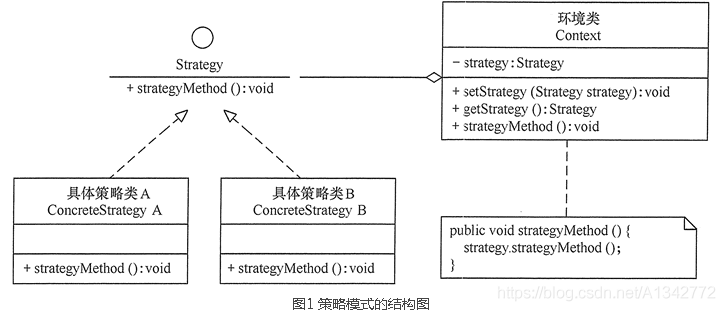
Abstract policy role: This is an abstract role, which is usually implemented using interfaces or abstract classes. In contrast, it is our Comparator interface.
Specific strategy roles: packaging specific algorithms and behaviors. In contrast, it is a group of implementation classes that implement the Comparator interface.
Environment role: an abstract role reference will be held internally and called by the client.
An example is as follows (to realize an addition and subtraction function), and the class diagram is as follows:
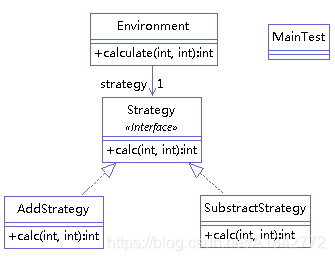
1. Define abstract policy roles
public interface Strategy {

public int calc(int num1,int num2);
}
2. Define specific policy roles
public class AddStrategy implements Strategy {

@Override
public int calc(int num1, int num2) {
	// TODO Auto-generated method stub
	return num1 + num2;
}

}
public class SubstractStrategy implements Strategy {

@Override
public int calc(int num1, int num2) {
	// TODO Auto-generated method stub
	return num1 - num2;
}

}
3. Environmental role
public class Environment {
	private Strategy strategy;

public Environment(Strategy strategy) {
	this.strategy = strategy;
}

	public int calculate(int a, int b) {
		return strategy.calc(a, b);
	}

}
4. Testing
public class MainTest {
	public static void main(String[] args) {

	Environment environment=new Environment(new AddStrategy());
	int result=environment.calculate(20, 5);
	System.out.println(result);

	Environment environment1=new Environment(new SubstractStrategy());
	int result1=environment1.calculate(20, 5);
	System.out.println(result1);
}

}
13 template mode
Definition: define the skeleton of an algorithm in operation, and delay some steps to subclasses. The template method enables subclasses to redefine some specific steps of the algorithm without changing the structure of the algorithm.
The popular understanding is that there are several fixed steps to complete a thing, but the implementation details of each step are different according to different objects; You can define a general method to complete the event in the parent class, and call the implementation method of each step according to the steps required to complete the event. The specific implementation of each step is completed by subclasses.
13.1 pattern structure and code examples
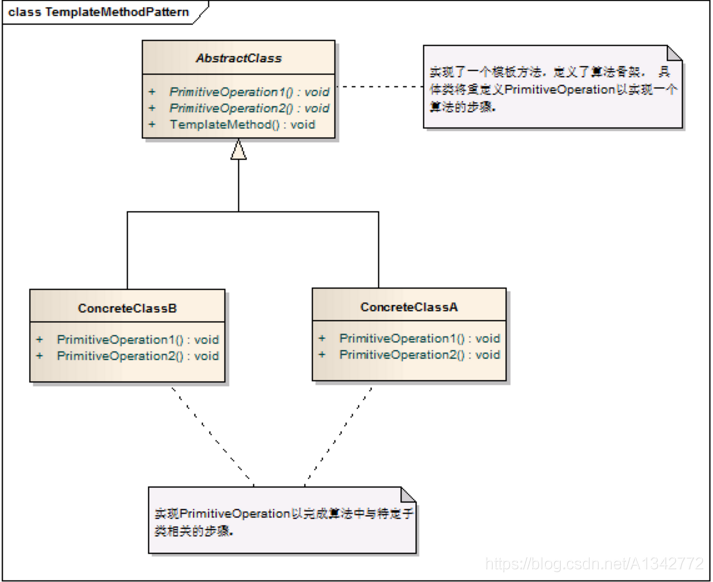
Abstract class: it implements the template method and defines the skeleton of the algorithm.
Concrete class: implement the abstract methods in the abstract class, that is, the specific implementation details of different objects.
For example, our cooking can be divided into three steps: (1) preparation of materials; (2) specific cooking; (3) serving dishes to guests. These three parts are the skeleton of the algorithm; However, the ingredients needed to make different dishes, the method of making them, and how to dress up for the guests are all different. This is the different implementation details.). The class diagram is as follows:
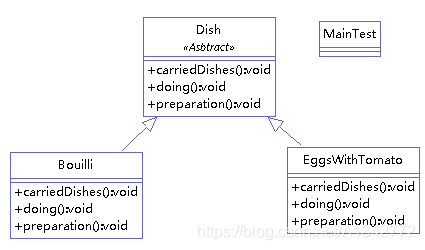
a. First, write an abstract cooking parent class:
public abstract class Dish {
	/**
	 * Specific whole process
	 */
	protected void dodish(){
		this.preparation();
		this.doing();
		this.carriedDishes();
	}
	/**
	 * Material preparation
	 */
	public abstract void preparation();
	/**
	 * cook a dish
	 */
	public abstract void doing();
	/**
	 * Serve
	 */
	public abstract void carriedDishes ();
}
b. Come down and make two EggsWithTomato and Bouilli to realize the abstract method in the parent class
public class EggsWithTomato extends Dish {

@Override
public void preparation() {
	System.out.println("Wash and cut tomatoes and beat eggs.");
}

@Override
public void doing() {
	System.out.println("Pour the eggs into the pot, then add the tomatoes and fry them together.");
}

@Override
public void carriedDishes() {
	System.out.println("Put the fried xihongsi eggs into a plate and serve them to the guests.");
}

}
public class Bouilli extends Dish{

@Override
public void preparation() {
    System.out.println("Cut pork and potatoes.");
}

@Override
public void doing() {
    System.out.println("Pour the cut pork into the pot and fry for a while, then pour in potatoes and stew.");
}

@Override
public void carriedDishes() {
    System.out.println("Put the cooked braised meat into a bowl and serve it to the guests.");
}
}
c. In the test class, let's Cook:
public class MainTest {
	public static void main(String[] args) {
		Dish eggsWithTomato = new EggsWithTomato();
		eggsWithTomato.dodish();

	System.out.println("-----------------------------");

	Dish bouilli = new Bouilli();
	bouilli.dodish();
}
}
13.2 advantages and disadvantages of formwork mode
advantage:
(1) the detailed implementation steps are defined in the subclass, and the subclass definition detailed processing algorithm will not change the overall structure of the algorithm.
(2) the basic technology of code reuse is particularly important in database design.
(3) there is a reverse control structure, which calls the operation of its subclass through a parent class, and expands the parent class through the subclass to add new behavior, which conforms to the "opening and closing principle".
Disadvantages:
Each different implementation needs to define a subclass, which will increase the number of classes and make the system larger.
14 observer mode
Definition: defines a one to many dependency between objects. When the state of an object changes, all objects that depend on it are notified and automatically updated.
It mainly solves the problem of notifying other objects of an object's state change. In addition, it should consider ease of use and low coupling to ensure a high degree of cooperation.
When to use: when the state of an object (target object) changes, all dependent objects (observer object) will be notified and broadcast.
How to solve it: using object-oriented technology can weaken this dependency.
Key code: there is an ArrayList in the abstract class to store the observers.
Advantages: 1. The observer and the observed are abstractly coupled. 2. Establish a trigger mechanism.
Disadvantages: 1. If an observed object has many direct and indirect observers, it will take a lot of time to notify all observers. 2. 2. If there is a circular dependency between the observer and the observation target, the observation target will trigger a circular call between them, which may lead to system crash. 3. The observer model has no corresponding mechanism to let the observer know how the observed target object has changed, but only know that the observed target has changed.
14.1 pattern structure diagram and code example
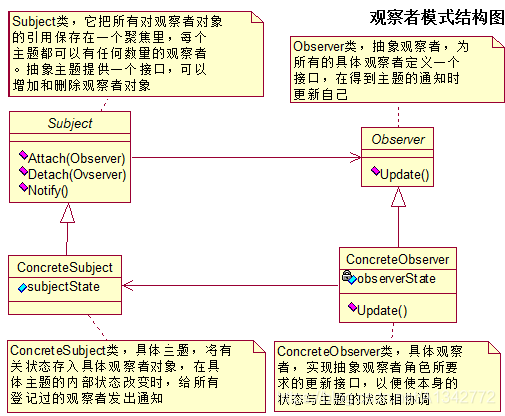
Abstract observer role: that is, an abstract topic, which saves all references to observer objects in a collection. Each topic can have any number of observers. Abstract topics provide an interface to add and remove observer roles. It is generally implemented with an abstract class and interface.
Abstract observer role: define an interface for all concrete observers and update themselves when notified by the topic.
Specific observer role: that is, a specific topic. When the internal state of the collective topic changes, all registered observers will send a notice.
Concrete observer role: implement the update interface required by the abstract observer role, while coordinating its own state with the drawing state.
For example, there is a WeChat public service, which does not release messages at any time. It can receive the push message when it concerns the official account, and no push message can be found when the official account is cancelled. The class diagram is as follows:
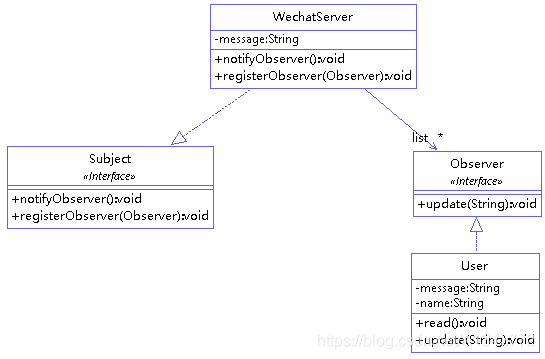
1. Define an abstract observer interface
public interface Subject {

  public void registerObserver(Observer o);
  public void removeObserver(Observer o);
  public void notifyObserver();
}
2. Define an abstract observer interface
public interface Observer {

public void update(String message);
}
3. Define the observed, implement the observeable interface, and specifically implement the three methods of the observeable interface. At the same time, there is a List set to save the registered observers. When the observer needs to be notified, traverse the set.
public class WechatServer implements Subject {

private List<Observer> list;
private String message;

public WechatServer() {
	list = new ArrayList<Observer>();
}

@Override
public void registerObserver(Observer o) {
	// TODO Auto-generated method stub
	list.add(o);
}

@Override
public void removeObserver(Observer o) {
	// TODO Auto-generated method stub
	if (!list.isEmpty()) {
		list.remove(o);
	}
}

@Override
public void notifyObserver() {
	// TODO Auto-generated method stub
	for (Observer o : list) {
		o.update(message);
	}
}

public void setInfomation(String s) {
	this.message = s;
	System.out.println("Wechat service update message: " + s);
	// Message update, notify all observers
	notifyObserver();
}

}
4. Define the specific observers. The specific observer of WeChat official account is User
public class User implements Observer {

private String name;
private String message;

public User(String name) {
	this.name = name;
}

@Override
public void update(String message) {
	this.message = message;
	read();
}

public void read() {
	System.out.println(name + " Received push message: " + message);
}

}
5. Write a test class
public class MainTest {

 public static void main(String[] args) {

        WechatServer server = new WechatServer();

        Observer userZhang = new User("ZhangSan");
        Observer userLi = new User("LiSi");
        Observer userWang = new User("WangWu");

        server.registerObserver(userZhang);
        server.registerObserver(userLi);
        server.registerObserver(userWang);
        server.setInfomation("PHP It is the best language in the world!");

        System.out.println("----------------------------------------------");
        server.removeObserver(userZhang);
        server.setInfomation("JAVA It is the best language in the world!");

    }

}
15 iterator mode
Definition: provides a method to access the elements of an aggregate object in sequence without exposing the internal representation of the object.
In short, different types of objects may need different traversal methods. We assign an iterator to each type of object, and finally combine multiple iterators into one.
Main solution: traverse the entire integration object in different ways.
When to use: traverse an aggregate object.
How to solve it: leave the responsibility of swimming between elements to the iterator, not the aggregate object.
Key code: define interface: hasNext, next.
Application example: iterator in JAVA.
Advantages: 1. It supports traversing an aggregate object in different ways. 2. Iterators simplify aggregate classes. 3. There can be multiple traversals on the same aggregate. 4. In iterator mode, it is convenient to add new aggregate classes and iterator classes without modifying the original code.
Disadvantages: because the iterator mode separates the responsibilities of storing data and traversing data, adding new aggregate classes requires adding new iterator classes correspondingly, and the number of classes increases in pairs, which increases the complexity of the system to a certain extent.
15.1 pattern structure and code examples
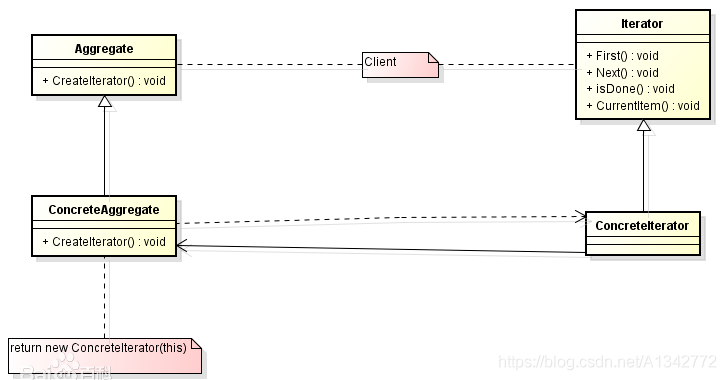
(1) Iterator role: defines the method required to traverse the element. Generally speaking, there are three methods: get the method next() of the next element, judge whether the traversal is over, hasNext(), move out the method remove() of the current object,
(2) Concrete Iterator: implement the methods defined in the iterator interface to complete the iteration of the set.
(3) Container role (Aggregate): it is generally an interface that provides an iterator() method, such as the Collection interface, List interface, Set interface, etc. in java
(4) Concrete aggregate: it is the concrete implementation class of the abstract container. For example, the ordered List of the List interface implements ArrayList, the linked List of the List interface implements LinkList, and the Hash List of the Set interface implements HashSet.
For example (coffee shop and Chinese restaurant are merged. The menus of the two restaurants are saved in array and ArrayList. The traversal methods are different. Only one way is needed to aggregate access using iterator)
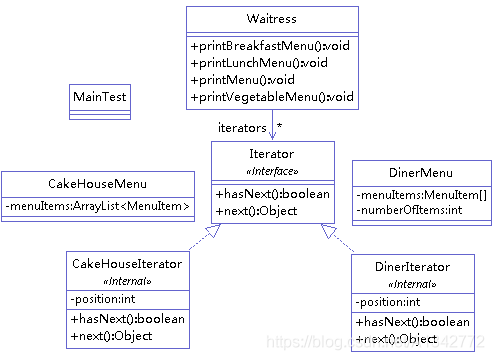
1 iterator interface
public interface Iterator {

public boolean hasNext();
public Object next();

}
2 coffee shop menu and coffee shop menu traverser
public class CakeHouseMenu {
	private ArrayList<MenuItem> menuItems;


	public CakeHouseMenu() {
		menuItems = new ArrayList<MenuItem>();

		addItem("KFC Cake Breakfast","boiled eggs&toast&cabbage",true,3.99f);
		addItem("MDL Cake Breakfast","fried eggs&toast",false,3.59f);
		addItem("Stawberry Cake","fresh stawberry",true,3.29f);
		addItem("Regular Cake Breakfast","toast&sausage",true,2.59f);
	}

	private void addItem(String name, String description, boolean vegetable,
			float price) {
		MenuItem menuItem = new MenuItem(name, description, vegetable, price);
		menuItems.add(menuItem);
	}


	public Iterator getIterator()
	{
		return new CakeHouseIterator() ;
	}

	class CakeHouseIterator implements  Iterator
	 {
		private int position=0;
		public CakeHouseIterator()
		{
			  position=0;
		}

			@Override
			public boolean hasNext() {
			// TODO Auto-generated method stub
			if(position<menuItems.size())
			{
				return true;
			}

			return false;
		}

		@Override
		public Object next() {
			// TODO Auto-generated method stub
			MenuItem menuItem =menuItems.get(position);
			position++;
			return menuItem;
		}};
	//Other function codes

}
3 Chinese restaurant menu and Chinese restaurant menu traverser
public class DinerMenu {
	private final static int Max_Items = 5;
	private int numberOfItems = 0;
	private MenuItem[] menuItems;

public DinerMenu() {
	menuItems = new MenuItem[Max_Items];
	addItem("vegetable Blt", "bacon&lettuce&tomato&cabbage", true, 3.58f);
	addItem("Blt", "bacon&lettuce&tomato", false, 3.00f);
	addItem("bean soup", "bean&potato salad", true, 3.28f);
	addItem("hotdog", "onions&cheese&bread", false, 3.05f);

}

private void addItem(String name, String description, boolean vegetable,
		float price) {
	MenuItem menuItem = new MenuItem(name, description, vegetable, price);
	if (numberOfItems >= Max_Items) {
		System.err.println("sorry,menu is full!can not add another item");
	} else {
		menuItems[numberOfItems] = menuItem;
		numberOfItems++;
	}

}

public Iterator getIterator() {
	return new DinerIterator();
}

class DinerIterator implements Iterator {
	private int position;

	public DinerIterator() {
		position = 0;
	}

	@Override
	public boolean hasNext() {
		// TODO Auto-generated method stub
		if (position < numberOfItems) {
			return true;
		}

		return false;
	}

	@Override
	public Object next() {
		// TODO Auto-generated method stub
		MenuItem menuItem = menuItems[position];
		position++;
		return menuItem;
	}
};
}
4 waitress
public class Waitress {
	private ArrayList<Iterator> iterators = new ArrayList<Iterator>();

	public Waitress() {

	}

	public void addIterator(Iterator iterator) {
		iterators.add(iterator);

	}

	public void printMenu() {
		Iterator iterator;
		MenuItem menuItem;
		for (int i = 0, len = iterators.size(); i < len; i++) {
			iterator = iterators.get(i);

			while (iterator.hasNext()) {
				menuItem = (MenuItem) iterator.next();
				System.out
						.println(menuItem.getName() + "***" + menuItem.getPrice() + "***" + menuItem.getDescription());

			}

		}

	}

	public void printBreakfastMenu() {

	}

	public void printLunchMenu() {

	}

	public void printVegetableMenu() {

	}
}
16. Responsibility chain model
Definition: if multiple objects have the opportunity to process the request, the responsibility chain can decouple the sender and receiver of the request. The request passes along the responsibility chain until an object processes it.
Main solution: the handler in the responsibility chain is responsible for processing the request. The customer only needs to send the request to the responsibility chain without paying attention to the processing details of the request and the transmission of the request. Therefore, the responsibility chain decouples the sender of the request from the handler of the request.
When to use: filter many channels when processing messages.
How to solve it: all intercepted classes implement a unified interface.
Key code: the Handler aggregates itself and determines whether it is appropriate in the HandlerRequest. If the conditions are not met, it will be passed down and set before passing to whom.
16.1 structure and code examples of patterns
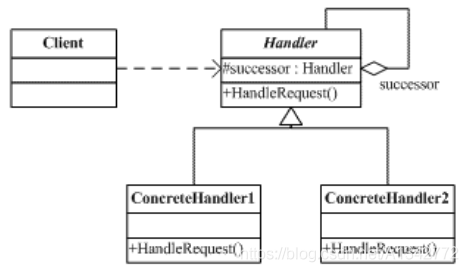
Abstract Handler role: define an interface for processing requests, including abstract processing methods and a subsequent connection.
Concrete Handler role: implement the processing method of the abstract handler to judge whether the request can be processed. If the request can be processed, process it. Otherwise, transfer the request to its successor.
Client role: create a processing chain and submit a request to the specific handler object of the chain head. It doesn't care about the processing details and the transmission process of the request.
For example (purchase request decision, different prices should be determined by different levels: team leader, minister, vice department and president). The class diagram is as follows:
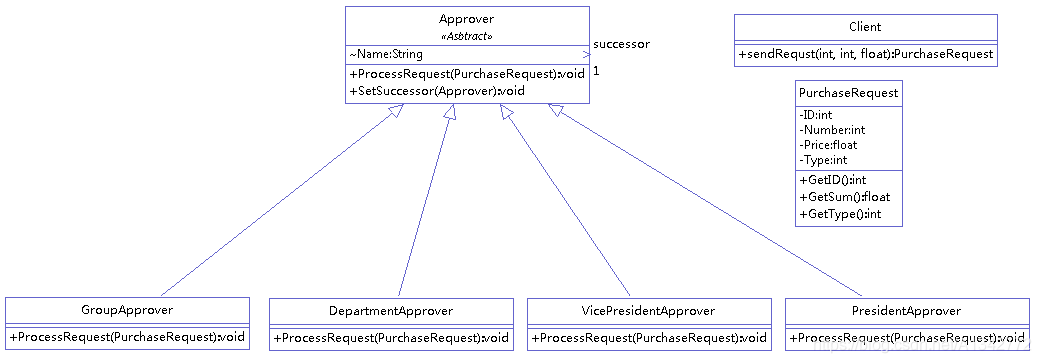
1 decision maker abstract class, which contains the function of request processing and the function of specifying the next decision maker
public abstract class Approver {
	 Approver successor;
	 String Name;
	public Approver(String Name)
	{
		this.Name=Name;
	}
	public abstract void ProcessRequest( PurchaseRequest request);
	public void SetSuccessor(Approver successor) {
		// TODO Auto-generated method stub
		this.successor=successor;
	}
}
2 client and request
public class PurchaseRequest {
	private int Type = 0;
	private int Number = 0;
	private float Price = 0;
	private int ID = 0;

public PurchaseRequest(int Type, int Number, float Price) {
	this.Type = Type;
	this.Number = Number;
	this.Price = Price;
}

public int GetType() {
	return Type;
}

public float GetSum() {
	return Number * Price;
}

public int GetID() {
	return (int) (Math.random() * 1000);
}
}
public class Client {

public Client() {

}

public PurchaseRequest sendRequst(int Type, int Number, float Price) {
	return new PurchaseRequest(Type, Number, Price);
}

}
3. Team leader and Minister... Inherit decision maker abstract class
public class GroupApprover extends Approver {

public GroupApprover(String Name) {
	super(Name + " GroupLeader");
	// TODO Auto-generated constructor stub

}

@Override
public void ProcessRequest(PurchaseRequest request) {
	// TODO Auto-generated method stub

	if (request.GetSum() < 5000) {
		System.out.println("**This request " + request.GetID() + " will be handled by " + this.Name + " **");
	} else {
		successor.ProcessRequest(request);
	}
}

}
public class DepartmentApprover extends Approver {

public DepartmentApprover(String Name) {
	super(Name + " DepartmentLeader");

}

@Override
public void ProcessRequest(PurchaseRequest request) {
	// TODO Auto-generated method stub

	if ((5000 <= request.GetSum()) && (request.GetSum() < 10000)) {
		System.out.println("**This request " + request.GetID()
				+ " will be handled by " + this.Name + " **");
	} else {
		successor.ProcessRequest(request);
	}

}

}
4 test
public class MainTest {

public static void main(String[] args) {

	Client mClient = new Client();
	Approver GroupLeader = new GroupApprover("Tom");
	Approver DepartmentLeader = new DepartmentApprover("Jerry");
	Approver VicePresident = new VicePresidentApprover("Kate");
	Approver President = new PresidentApprover("Bush");

	GroupLeader.SetSuccessor(VicePresident);
	DepartmentLeader.SetSuccessor(President);
	VicePresident.SetSuccessor(DepartmentLeader);
	President.SetSuccessor(GroupLeader);

	GroupLeader.ProcessRequest(mClient.sendRequst(1, 10000, 40));

}

}
17 command mode
Definition: encapsulate a request into an object, separating the responsibility of sending the request from the responsibility of executing the request. In this way, the two communicate through the command object, which is convenient to store, transfer, call, add and manage the command object.
Intent: encapsulate a request into an object so that you can parameterize the customer with different requests.
Main solution: in software system, the relationship between behavior requester and behavior implementer is usually a tight coupling relationship, but in some cases, such as when it is necessary to record, undo or redo behavior, transaction and other processing, this kind of tight coupling design that cannot resist change is not suitable.
When to use: in some situations, such as "record, undo / redo, transaction" of behavior, this tight coupling that cannot resist change is inappropriate. In this case, how to decouple the "behavior requester" from the "behavior implementer"? Abstracting a set of behaviors as objects can realize the loose coupling between them.
How to solve it: call the receiver to execute the command through the caller. The order is: caller → receiver → command.
17.1 pattern structure and code examples
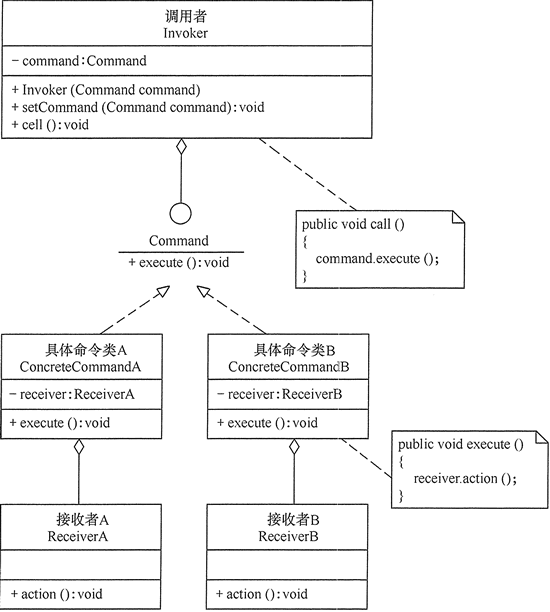
Abstract Command class (Command) role: it declares the interface for executing commands and has the abstract method execute() for executing commands.
Concrete command role: it is the concrete implementation class of the abstract command class. It has the receiver object and completes the operation to be executed by calling the receiver's function.
Implementer / Receiver role: performs operations related to command functions and is the real implementer of specific command object business.
Caller / requester role: it is the sender of the request. It usually has many command objects and executes relevant requests by accessing the command object. It does not directly access the receiver.
Code examples (light on and light off), class diagram is as follows:
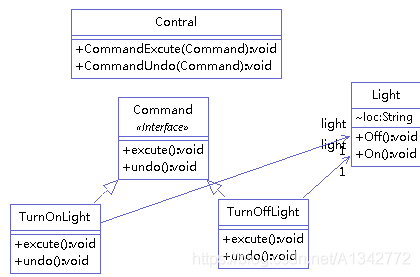
1 command abstract class
public interface Command {

public void excute();
public void undo();

}
2 specific command object
public class TurnOffLight implements Command {

private Light light;

public TurnOffLight(Light light) {
	this.light = light;
}

@Override
public void excute() {
	// TODO Auto-generated method stub
	light.Off();
}

@Override
public void undo() {
	// TODO Auto-generated method stub
	light.On();
}
}
3 implementer
public class Light {

String loc = "";

public Light(String loc) {
	this.loc = loc;
}

public void On() {

	System.out.println(loc + " On");
}

public void Off() {

	System.out.println(loc + " Off");
}

}
4 requester
public class Contral{

public void CommandExcute(Command command) {
	// TODO Auto-generated method stub
	command.excute();
}

public void CommandUndo(Command command) {
	// TODO Auto-generated method stub
	command.undo();
}

}
18 status mode
Definition: in state mode, we create objects representing various states and a context object whose behavior changes with the change of state object.
Simply understand that a context object with a state will change its behavior in different states.
Intent: allows an object to change its behavior when its internal state changes, and the object looks as if it has modified its class.
The main solution: the behavior of an object depends on its state (attribute), and its related behavior can be changed according to its state change.
When to use: the code contains a large number of conditional statements related to the object state.
How to solve it: Abstract various specific state classes.
Key code: there is usually only one method in the interface of command mode. There are one or more methods in the interface of state mode. Moreover, the method of the implementation class of the state mode generally returns the value or changes the value of the instance variable. In other words, the state pattern is generally related to the state of the object. The methods of implementing classes have different functions, covering the methods in the interface. Like command mode, state mode can also be used to eliminate if Else and other conditional selection statements.
Advantages: 1. It encapsulates the conversion rules. 2. Enumerate possible states. Before enumerating States, you need to determine the state type. 3. Put all the behaviors related to a certain state into one class, and you can easily add new states. You can change the behavior of the object by changing the state of the object. 4. Allow state transition logic to be integrated with state objects instead of a huge conditional statement block. 5. Multiple environment objects can share a state object, thus reducing the number of objects in the system.
Disadvantages: 1. The use of state mode will inevitably increase the number of system classes and objects. 2. 2. The structure and implementation of state mode are complex. Improper use will lead to confusion of program structure and code. 3. The state mode does not support the "opening and closing principle" very well. For the state mode that can switch states, adding a new state class requires modifying the source code responsible for state transition, otherwise it cannot switch to the new state, and modifying the behavior of a state class also requires modifying the source code of the corresponding class.
18.1 pattern structure and code examples
State abstract state role
Interface or abstract class, which is responsible for defining the object state and encapsulating the environment role to realize state switching.
ConcreteState concrete state role
The specific state mainly has two responsibilities: one is to deal with things in this state, and the other is how to transition from this state to other states.
Context environment role
Define the interface required by the client and be responsible for the switching of specific states.
For example (the person moves from place A to place B and from place B to place A). The class diagram is as follows:
1 state interface
public interface State {
	public void stop();
	public void move();

}
2 status instance
public class PlaceA implements State {

private Player context;

public PlaceA(Player context) {
	this.context = context;
}

@Override
public void move() {
	System.out.println("In place A,Start to B move");
	System.out.println("--------");
	context.setDirection("AB");
	context.setState(context.onMove);

}

@Override
public void stop() {
	// TODO Auto-generated method stub
	System.out.println("At the right place A,Don't stop moving");
	System.out.println("--------");
}

}
3. Context (player) object with state
public class Player {

State placeA;
State placeB;
State onMove;
private State state;
private String direction;

public Player() {
	direction = "AB";
	placeA = new PlaceA(this);
	placeB = new PlaceB(this);
	onMove = new OnMove(this);
	this.state = placeA;
}

public void move() {
	System.out.println("instructions:Start moving");
	state.move();
}

public void stop() {
	System.out.println("instructions:Stop moving");
	state.stop();
}

public State getState() {
	return state;
}

public void setState(State state) {
	this.state = state;
}

public void setDirection(String direction) {
	this.direction = direction;
}

public String getDirection() {
	return direction;
}

}
19 memo mode
Definition: capture the internal state of an object without destroying the encapsulation, and save the state outside the object, so that the object can be restored to the original saved state when necessary in the future. This mode is also called snapshot mode.
Memo mode is an object behavior mode. Its main advantages are as follows.
Provides a mechanism to restore state. When users need it, they can easily restore the data to a historical state.
The encapsulation of internal state is realized. Except for the initiator who created it, no other object can access this status information.
Simplified the human. The initiator does not need to manage and save each backup of its internal status. All status information is saved in the memo and managed by the manager, which is in line with the principle of single responsibility.
Its main disadvantage is: high resource consumption. If the internal state information to be saved is too much or too frequent, it will occupy a large amount of memory resources.
19.1 pattern structure diagram and code example
Originator role: record the internal status information at the current time, provide the function of creating memos and recovering memo data, and realize other business functions. It can access all the information in memos.
Memo role: responsible for storing the internal status of the initiator and providing these internal status to the initiator when necessary.
Caretaker role: manages memos and provides the function of saving and obtaining memos, but it cannot access and modify the contents of memos.
For example (the initiator stores and obtains information through memos), the class diagram is as follows:
1 memorandum interface
public interface MementoIF {

}
2 memorandum
public class Memento implements MementoIF{

private String state;

public Memento(String state) {
	this.state = state;
}

public String getState(){
	return state;
	}


}
3 initiator
public class Originator {

private String state;

public String getState() {
	return state;
}

public void setState(String state) {
	this.state = state;
}

public Memento saveToMemento() {
	return new Memento(state);
}

public String getStateFromMemento(MementoIF memento) {
	return ((Memento) memento).getState();
}

}
4 managers
public class CareTaker {

private List<MementoIF> mementoList = new ArrayList<MementoIF>();

public void add(MementoIF memento) {
	mementoList.add(memento);
	}

public MementoIF get(int index) {
	return mementoList.get(index);
}

}
20 visitor mode
Definition: separate the operations that act on each element in a data structure and package them into independent classes, so that they can add new operations that act on these elements without changing the data structure, and provide a variety of access methods for each element in the data structure. It separates the operation of data from the data structure.
Visitor pattern is an object behavior pattern. Its main advantages are as follows.
Good scalability. It can add new functions to the elements in the object structure without modifying the elements in the object structure.
Good reusability. Visitors can define the general functions of the whole object structure, so as to improve the reuse degree of the system.
Good flexibility. Visitor mode decouples the data structure from the operations acting on the structure, so that the operation set can evolve relatively freely without affecting the data structure of the system.
Comply with the principle of single responsibility. Visitor mode encapsulates the relevant behaviors to form a visitor, so that the function of each visitor is relatively single.
The main disadvantages of the Visitor pattern are as follows.
Adding new element classes is difficult. In the visitor mode, every time a new element class is added, the corresponding specific operation must be added to each specific visitor class, which violates the "opening and closing principle".
Destroy the package. In the visitor pattern, specific elements publish details to visitors, which destroys the encapsulation of objects.
It violates the principle of inversion of dependence. The visitor pattern relies on concrete classes rather than abstract classes.
20.1 pattern structure and code examples
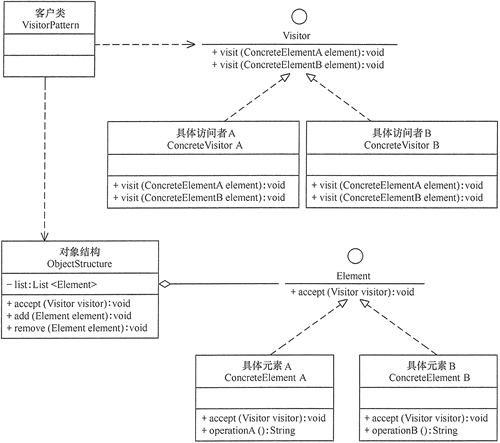
The visitor pattern contains the following main roles.
Abstract Visitor role: define an interface to access specific elements. Each specific element class corresponds to an access operation visit(). The parameter type in the operation identifies the specific element to be accessed.
Concrete visitor role: implement each access operation declared in the abstract visitor role and determine what visitors should do when accessing an element.
Abstract Element role: declare an interface containing the accept operation accept(), and the accepted visitor object is used as the parameter of the accept() method.
Concrete element role: implement the accept() operation provided by the abstract element role, and its method body is usually visitor Visit (this). In addition, the specific elements may also contain relevant operations of their own business logic.
Object Structure role: it is a container containing element roles. It provides methods for visitor objects to traverse all elements in the container. It is usually implemented by aggregate classes such as List, Set and Map.
1 Abstract visitor
public interface Visitor {

	abstract public void Visit(Element element);
}
2 specific visitors
public class CompensationVisitor implements Visitor {

@Override
public void Visit(Element element) {
	// TODO Auto-generated method stub
	Employee employee = ((Employee) element);

	System.out.println(
			employee.getName() + "'s Compensation is " + (employee.getDegree() * employee.getVacationDays() * 10));
}

}
3 abstract elements
public interface Element {
	abstract public void Accept(Visitor visitor);

}
4 specific elements
public class CompensationVisitor implements Visitor {

@Override
public void Visit(Element element) {
	// TODO Auto-generated method stub
	Employee employee = ((Employee) element);

	System.out.println(
			employee.getName() + "'s Compensation is " + (employee.getDegree() * employee.getVacationDays() * 10));
}

}
5 object structure
public class ObjectStructure {
	private HashMap<String, Employee> employees;

public ObjectStructure() {
	employees = new HashMap();
}

public void Attach(Employee employee) {
	employees.put(employee.getName(), employee);
}

public void Detach(Employee employee) {
	employees.remove(employee);
}

public Employee getEmployee(String name) {
	return employees.get(name);
}

public void Accept(Visitor visitor) {
	for (Employee e : employees.values()) {
		e.Accept(visitor);
	}
}

}
21 intermediary model
Definition: define a mediation object to encapsulate the interaction between a series of objects, so that the coupling between the original objects is loose, and the interaction between them can be changed independently. Intermediary model is also called mediation model, which is a typical application of Dimitri's law.
Intermediary model is an object behavior model, and its main advantages are as follows.
It reduces the coupling between objects and makes objects easy to be reused independently.
The one-to-many association between objects is transformed into one-to-one association, which improves the flexibility of the system and makes the system easy to maintain and expand.
Its main disadvantage is that when there are too many colleagues, the intermediary's responsibility will be great, and it will become complex and huge, so that the system is difficult to maintain.
21.1 pattern structure and code examples

Abstract Mediator role: it is the interface of the Mediator and provides abstract methods for registering and forwarding colleague object information.
Concrete mediator role: implement the mediator interface, define a List to manage colleague objects and coordinate the interaction between various colleague roles. Therefore, it depends on colleague roles.
Abstract Colleague role: define the interface of Colleague class, save the mediator object, provide the abstract method of Colleague object interaction, and realize the public functions of all interacting Colleague classes.
Concrete Colleague role: it is the implementer of abstract colleague class. When it needs to interact with other colleague objects, the mediator object is responsible for the subsequent interaction.
For example (through an intermediary seller), the class diagram is as follows:
1 Abstract intermediary
public interface Mediator {

void register(Colleague colleague); // Customer registration

void relay(String from, String to,String ad); // forward
}
2 specific intermediaries
public class ConcreteMediator implements Mediator {

private List<Colleague> colleagues = new ArrayList<Colleague>();

@Override
public void register(Colleague colleague) {
	// TODO Auto-generated method stub
	if (!colleagues.contains(colleague)) {
		colleagues.add(colleague);
		colleague.setMedium(this);
	}
}

@Override
public void relay(String from, String to, String ad) {
	// TODO Auto-generated method stub
	for (Colleague cl : colleagues) {

		String name = cl.getName();
		if (name.equals(to)) {
			cl.receive(from, ad);
		}

	}

}

}
3 Abstract colleague class
public abstract class Colleague {

protected Mediator mediator;
protected String name;

public Colleague(String name) {
	this.name = name;
}

public void setMedium(Mediator mediator) {

	this.mediator = mediator;

}

public String getName() {
	return name;
}

public abstract void Send(String to, String ad);

public abstract void receive(String from, String ad);

}
4. Specific colleagues
public class Buyer extends Colleague {

public Buyer(String name) {

	super(name);

}

@Override
public void Send(String to, String ad) {
	// TODO Auto-generated method stub
	mediator.relay(name, to, ad);
}

@Override
public void receive(String from, String ad) {
	// TODO Auto-generated method stub
	System.out.println(name + "Received from" + from + "News of:" + ad);
}
}