Detailed explanation of k8s service
Kubernetes Service defines such an abstraction: a logical set of pods, a policy that can access them - commonly known as microservices. This group of pods can be accessed by the Service, usually through the selector.
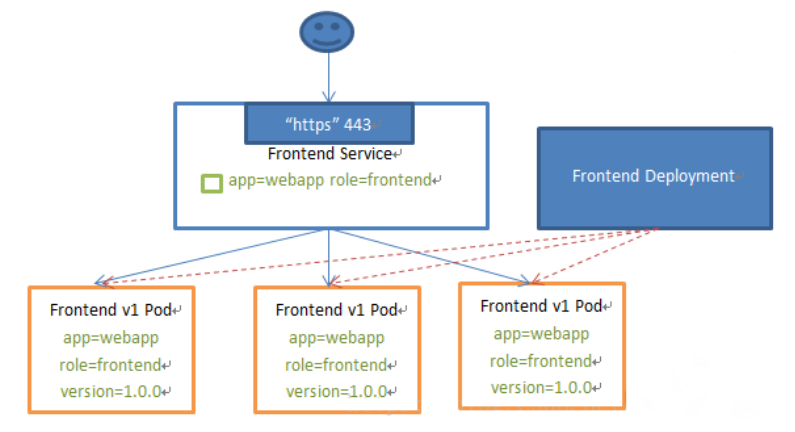
For example, consider an image processing backend that runs three copies. These copies are interchangeable -- the front end doesn't care which back-end copy they call. However, the Pod that makes up this group of back-end programs may actually change. The front-end client should not and does not need to know, and does not need to track the status of this group of back-end programs. The abstraction of Service definition can decouple this association.
Service can provide load balancing, but there are the following restrictions on its use:
- It can only provide 4-tier load balancing capabilities, but not 7-tier functions. Sometimes we may need more matching rules to forward requests, which is not supported by layer 4 load balancing
As shown in the example of web access service:
VIP and Service agents
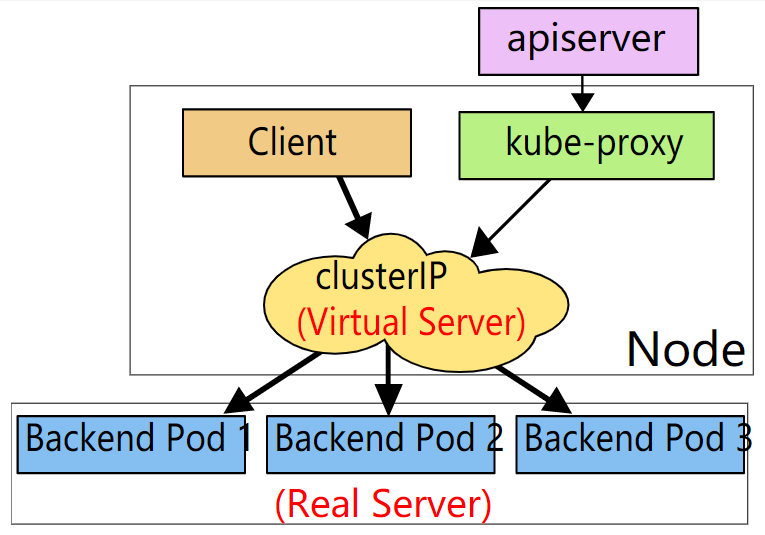
In the Kubernetes cluster, each Node runs a Kube proxy process. Kube proxy implements a form of VIP (virtual IP) for the Service instead of the form of ExternalName.
From kubernetes v1 Starting from 0, the userspace proxy mode can be used. Kubernetes v1.1 added iptables proxy mode in kubernetes v1 2. The iptables mode of Kube proxy becomes the default setting. Kubernetes v1.8 added ipvs proxy mode.
Why not use DNS polling?
The reasons are as follows:
- DNS implementation has a long history. It does not comply with the record TTL and caches the results after the name is found.
- Some applications perform DNS lookups only once and cache results indefinitely.
- Even if the application and database are properly re resolved, low or zero TTL value on DNS records may bring high load to DNS, making management difficult.
In short, it is inappropriate because there is a cache.
iptables proxy mode
In this mode, Kube proxy monitors the addition and removal of Service objects and Endpoints objects by the Kubernetes control node. For each Service, it will configure iptables rules to capture the requests that arrive at the clusterIP and port of the Service, and then redirect the requests to one of the set of backend of the Service. For each endpoint object, it will also configure iptables rules, which will select a backend combination.
The default policy is that Kube proxy randomly selects a backend in iptables mode.
Handling traffic using iptables has lower system overhead because traffic is handled by Linux netfilter without switching between user space and kernel space. This method may also be more reliable.
If Kube proxy runs in iptables mode and the first Pod selected does not respond, the connection fails. This is different from the userspace mode: in this case, Kube proxy will detect that the connection to the first Pod has failed and will automatically retry with other backend pods.
We can use the Pod readiness probe to verify whether the backend Pod can work normally, so that Kube proxy in iptables mode can only see the backend that is tested normally. This means that you can avoid sending traffic through Kube proxy to pods that are known to have failed.

IPVS proxy mode
In IPVS mode, Kube proxy monitors Kubernetes services and endpoints, calls netlink interface to create IPVS rules accordingly, and periodically synchronizes IPVS rules with Kubernetes services and endpoints. This control cycle ensures that the IPVS state matches the desired state. When accessing a service, IPVS directs traffic to one of the back-end pods.
IPVS proxy mode is based on netfilter hook function similar to iptables mode, but uses hash table as the basic data structure and works in kernel space. This means that compared with Kube proxy in iptables mode, Kube proxy in IPVS mode has shorter redirection communication delay and better performance when synchronizing proxy rules. Compared with other proxy modes, IPVS mode also supports higher network traffic throughput.
IPVS provides more options to balance the traffic of back-end pods. These are:
- rr: round-robin
- lc: least connection (smallest number of open connections)
- dh: destination hashing
- sh: source hashing
- sed: shortest expected delay
- nq: never queue
Note: to run Kube proxy in IPVS mode, you must make IPVS Linux available on the node before starting Kube proxy. When Kube proxy starts in IPVS proxy mode, it verifies that IPVS kernel modules are available. If the IPVS kernel module is not detected, Kube proxy will return to running in iptables proxy mode.
Service type
The Kubernetes Service has the following 4 types:
- ClusterIP: the default type. A virtual IP that can only be accessed inside the Cluster is automatically assigned
- NodePort: expose services through the IP and static port (NodePort) on each Node. Based on ClusterIP, NodePort services will be routed to ClusterIP services. By requesting < nodeip >: < NodePort >, NodePort services inside a cluster can be accessed from outside the cluster.
- LoadBalancer: using the load balancer of the cloud provider, you can expose services to the outside. External load balancers can route to NodePort services and ClusterIP services.
- externalName: by returning CNAME and its value, you can map the service to the contents of the externalName field (for example, foo.bar.example.com). No type of proxy was created.
It should be noted that the Service can map a receiving port to any targetPort. By default, targetPort will be set to the same value as the port field.
Service domain name format: $(service name)$ (namespace). svc. cluster.local, where cluster Local is the domain name of the specified cluster
Resource list for Deoployment
[root@master mainfest]# vim deploy.yaml
apiVersion: apps/v1
kind: Deployment
metadata:
  name: deploy
  labels:
    app: nginx
spec:
  replicas: 3
  selector:
    matchLabels:
      app: nginx
  template:
    metadata:
      labels:
        app: nginx
    spec:
      containers:
      - name: nginx
        image: nginx:latest
        ports:
        - containerPort: 80

[root@master mainfest]# kubectl apply -f deploy.yaml
deployment.apps/deploy created
[root@master mainfest]# kubectl get pod -o wide
NAME                     READY   STATUS    RESTARTS   AGE   IP            NODE    NOMINATED NODE   READINESS GATES
deploy-585449566-kdwq5   1/1     Running   0          55s   10.244.1.58   node1   <none>           <none>
deploy-585449566-p5fdj   1/1     Running   0          55s   10.244.1.57   node1   <none>           <none>
deploy-585449566-wcj5r   1/1     Running   0          55s   10.244.1.56   node1   <none>           <none>
curl access
[root@master mainfest]# curl 10.244.1.58
<!DOCTYPE html>
<html>
<head>
<title>Welcome to nginx!</title>
<style>
[root@master mainfest]# curl 10.244.1.57
<!DOCTYPE html>
<html>
<head>
<title>Welcome to nginx!</title>
<style>
[root@master mainfest]# curl 10.244.1.56
<!DOCTYPE html>
<html>
<head>
<title>Welcome to nginx!</title>
<style>
ClusterIP type example
Create a service of cluster IP type
[root@master mainfest]# vim svc-clusterip.yaml
apiVersion: v1
kind: Service
metadata:
  name: svc-clusterip
spec:
  type: ClusterIP		//It can be left blank. The default value is ClusterIP
  selector:
    app: nginx
  ports:
  - name: nginx
    port: 80
    targetPort: 80

[root@master mainfest]# kubectl apply -f svc-clusterip.yaml
service/svc-clusterip created
[root@master mainfest]# kubectl get svc
NAME            TYPE        CLUSTER-IP       EXTERNAL-IP   PORT(S)   AGE
kubernetes      ClusterIP   10.96.0.1        <none>        443/TCP   6d23h
svc-clusterip   ClusterIP   10.105.207.162   <none>        80/TCP    2m39s
curl access
[root@master mainfest]# curl 10.105.207.162
<!DOCTYPE html>
<html>
<head>
<title>Welcome to nginx!</title>
<style>
NodePort type example
If the type field is set to NodePort, the Kubernetes control layer will allocate ports within the range specified by the -- service node port range flag (default: 30000-32767).
[root@master mainfest]# vim svc-nodeport.yaml
apiVersion: v1
kind: Service
metadata:
  name: svc-nodeport
spec:
  type: NodePort
  selector:
    app: nginx
  ports:
  - name: nginx1
    port: 80			//Service the port on which the service is provided
    targetPort: 80		//The port on which the request is forwarded to the backend pod
    nodePort: 30001		//Optional field. By default, for convenience, k8s control level will randomly assign a port number from a certain range (default: 30000-32767)

[root@master mainfest]# kubectl apply -f svc-nodeport.yaml
service/svc-nodeport created
[root@master mainfest]# kubectl get svc
svc-nodeport    NodePort    10.105.10.125    <none>        80:30001/TCP   7s
[root@master mainfest]# curl 10.105.10.125
<!DOCTYPE html>
<html>
<head>
<title>Welcome to nginx!</title>
<style>
[root@master mainfest]# curl 192.168.100.110:30001 		// Access 30001 port of this machine
<!DOCTYPE html>
<html>
<head>
<title>Welcome to nginx!</title>
<style>
LoadBalancer type example
When using a Service from a cloud provider that supports an external load balancer, set the value of type to "LoadBalancer" to provide a load balancer for the Service. The load balancer is created asynchronously. The information about the provided load balancer will be through the Service status The LoadBalancer field is published.
apiVersion: v1
kind: Service
metadata:
  name: my-service
spec:
  selector:
    app: MyApp
  ports:
    - protocol: TCP
      port: 80
      targetPort: 9376
  clusterIP: 10.0.171.239
  type: LoadBalancer
status:
  loadBalancer:
    ingress:
      - ip: 192.0.2.127
Traffic from the external load balancer will be redirected directly to the back-end Pod, but how they actually work depends on the cloud provider.
Some cloud providers allow loadBalancerIP to be set. In these cases, the load balancer will be created based on the loadBalancerIP set by the user. If the loadBalancerIP field is not set, a temporary IP is assigned to the load balancer. If loadBalancerIP is set, but the cloud provider does not support this feature, the set loadBalancerIP value will be ignored.